While there is a substantial increment in the mobile apps market share, web apps are still prevalent with a significant user base. Enterprises are focusing on the quality at speed when it comes to web apps, before deployment. This is where testing has an important role to play. UI testing is still mostly a manual process unlike some functional testing which can be automated. But it is sensible to automate testing which will save time and effort. When it comes to automation, Selenium testing is the first thing that comes to mind as it is the most popular test automation tool in the world. So let’s learn more about selenium testing.
What is Selenium Testing
Selenium testing tool is open-source and it enables users to drive interactions with the page and test the app across various platforms. It allows users to control a browser from their preferred language like Java, JavaScript, C#, PHP, Python, etc. Selenium has many tools and APIs for automating user interactions on HTML JavaScript apps on browsers like IE, Chrome, Firefox, Safari, Opera, etc.

Selenium Framework is a code structure that helps to simplify and reuse the code. Without frameworks, we will place the code as well as data in the same place which is neither re-usable nor readable. Selenium automation frameworks are beneficial for higher portability, increased code re-usage, higher code readability, reduced script maintenance cost, etc.
What is Selenium Web Driver
Selenium WebDriver accepts commands via the client API and sends them to browsers. Selenium WebDriver is a browser-specific driver which helps in accessing and launching the different browsers like Chrome, Firefox, IE, etc. The WebDriver provides an interface to create and run automation scripts and every browser has different drivers to run the tests. The different drivers are IE Driver, Firefox Driver, Safari Driver, Chrome Driver, etc.
Selenium WebDriver was introduced to negate limitations of Selenium RC, which offers enhanced support for web pages where the elements on a page change without reloading. Many browsers support selenium WebDriver and it uses each browser’s native support for automation testing. The features are supported and direct calls are made depending on the browser that is being used.
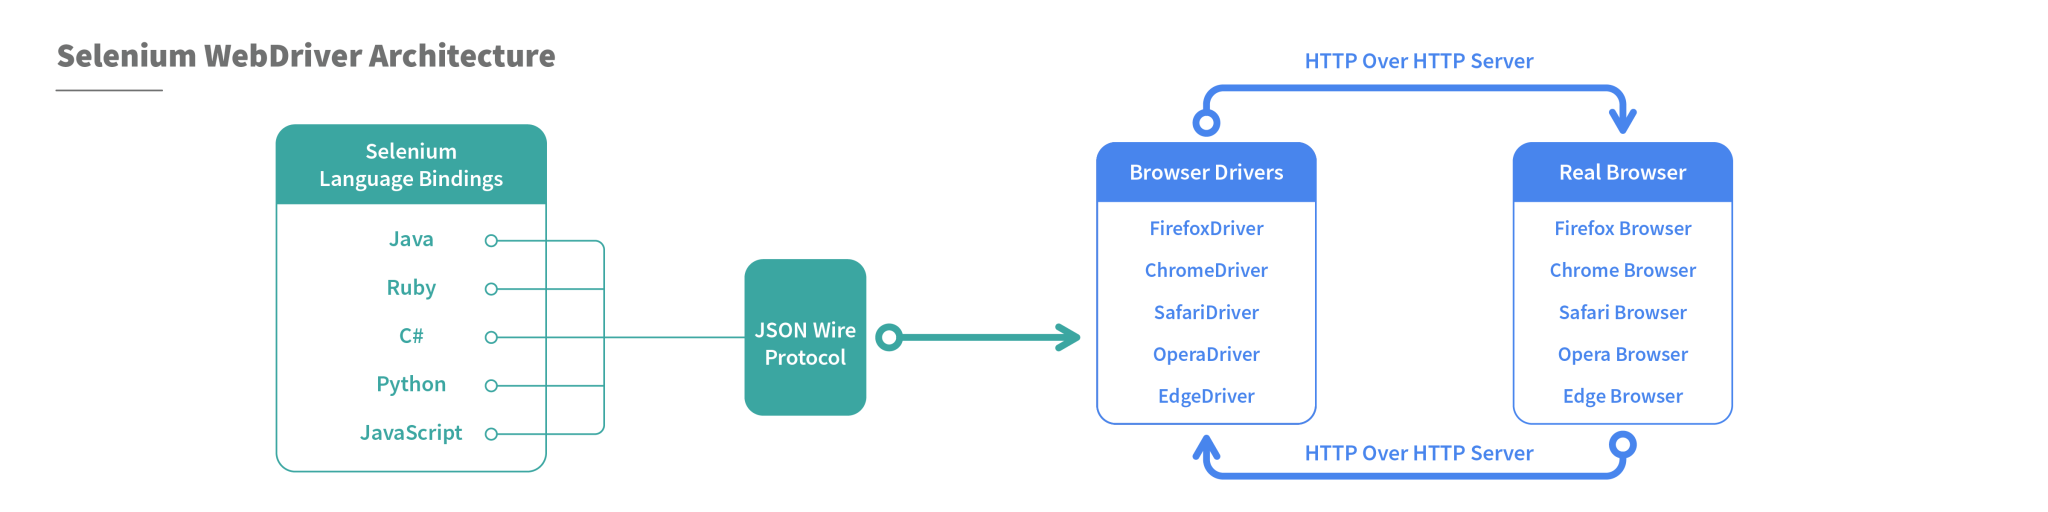
WebDriver Project depends on the programming language as well as the development environment. Selenium supports multiple languages and projects can be set up using many programming languages. Selenium provides JavaScript bindings on npm. Java projects can be setup using Maven and it will also download Java bindings and dependencies to create the project.
Run pip install selenium from the command line to add selenium in a python environment. C# bindings are there as part of a set of signed dlls and dependency dlls. You can get PHP bindings through third parties, including Chibimagic and Facebook. To add Selenium to your Ruby environment, run gem install selenium web driver from the command line.
Once you set up the environment, the selenium webdriver operates like a normal library. The selenium webdriver can self sustain as there is no need to run any installers or process before using it.
Selenium Grid
Selenium grid is a part of the Selenium Suite that allows the running of multiple test cases across different browsers, operating systems, and machines in parallel. This is called parallel testing.
In simpler words, it runs a test in parallel on multiple machines.
The test cases are triggered by a local machine. When the test cases are triggered they are automatically executed by a remote machine. So one local machine controls the triggering of test cases on multiple remote machines. For this, you need to configure a remote server so that the test cases are executed there.
Hence the architecture of the selenium grid consists of “Hub” and “Server”
Hub in Selenium Grid
Hub in selenium grid is the local machine that controls the triggering of the test cases which are executed in the multiple devices connected in parallel to it. So, the hub accepts the access request from the Webdriver client, routing the JSON test commands to the remote drives.
In short, the hub is the central machine where you will load your test and run it, but the browser will be automated in the node.
Node in Selenium Grid
A node in the selenium grid is a machine in which the browser is automated and the test cases are executed
which are triggered by the Hub. A node consists of the browser, native OS and remote web driver, in fact, all the nodes connected in parallel consists of this configuration.
How does the selenium grid work?
The selenium grid works like a regular web driver except for its two components, the Hub and Nodes (consists of remote Java Servlet which execute the test on a remote device) where the test cases are executed automatically through a remote web driver.
In your test script, you define ‘desired capabilities’ (device, platform, browser, etc.) of the node where the test will execute. The Hub receives this script, runs through the registered nodes to find one that matches the desired capabilities, and assigns the test to it for execution.
So, setting up Grid is not that difficult but scaling, configuring and maintaining its integrity may take lots of effort and resources.
Hence, Selenium Grid is mostly used for Load testing, to calculate and optimize the maximum capacity of an application to sustain the peak user load. We can use it to determine whether the current infrastructure is sufficient to run the application. To measure the number of concurrent users that an application can support and the scalability to allow more number of users to access it.
How does Selenium Boost Agile
Agile is a simple, not much organized but a continuous model that has a modular structure that promises the quality of the product.
The Agile workflow is as follows:
Once the Stakeholders agree on the simplest working design, it gets divided into smaller modules.
The module is then divided into the team of designers, software developers, and the Quality Assurance team.
The team works in a sprint to make their particular module and take a time frame called “iteration”, a window of one to four weeks to complete it. (Scrum meeting are usually carried out to gather and track work updates).
After each iteration, finished modules are put together. Multiple tests are run and the functional product is demonstrated to the stakeholder.
On receiving the product, it is evaluated by the stakeholders, add customer feedback and adapt as required, (they might ask the engineering team to add features in the product whenever required).
Where does the Selenium automation come in:
After every iteration, the finished product goes through a number of testing like System and Integration testing. After receiving the functional product the stakeholders carry out the unit and user acceptance test.
If there is any change or any feature is added then gain a series of functional test including regression testing is executed
In this way, Selenium testing is very suitable and boost Agile Methodology.
What types of testing can be automated by Selenium:
1.Compatibility Testing
Compatibility Testing is done by the QA team to assure that the web app meets the desired requirements on the browser-OS combination. Testing on various devices of different screen sizes is required to measure the responsiveness of the app. We need to test if the app is able to function properly in different types of browsers, also, for instance, to check whether the video adds are executed properly and runs on every browser and screen size. Here selenium automation will reduce the time and effort to execute the test cases.
2. Performance Testing
After the finished or functional product is handed over to the stakeholders they may run a series of performance testing to measure various parameters like loading speed, the navigation speed in case of web apps, responsiveness and stability of the product. In this case, an open-source tool like selenium which is easy to install and execute can be used to get accurate and efficient results.
3. Integration Testing
Integration testing is usually done while integrating all the modules coded separately also functions properly when assembled together. It is usually done when a new feature is added to the system. This requires a suite of lengthy test cases that requires automation to fetch efficient results. Selenium testing can make the process very easy.
4. Regression testing
A series of test cases are required to check if the new build feature is working in accordance with the existing feature. Also, you need to check if there is any adverse effect on the app due to the newly added feature. This is called regression testing. For example, if you want to add a call to action button in your blog page, you need to make sure that the button is working fine and also there is no change in the content of the blog page. Again selenium testing can help you to reduce the effort of using lengthy and test cases while giving accurate results.
Writing a Script for Selenium Automation
Let’s see how to launch a browser from the script. Make sure you have downloaded the selenium jar files and the third-party drivers. To launch a browser, the first thing you need to do is to create an object for web driver. Then use a get method to launch a new browser session and direct it to the URL specified in the parameters.
Now you need the system pointing to the location of the downloaded exe file of your browser. You can do that by using System.setProperty. Then provide the browser driver in the key and the path to the location of the browser exe file in the value. Here System is a build-in class and setProperty is a method to access the browser driver.
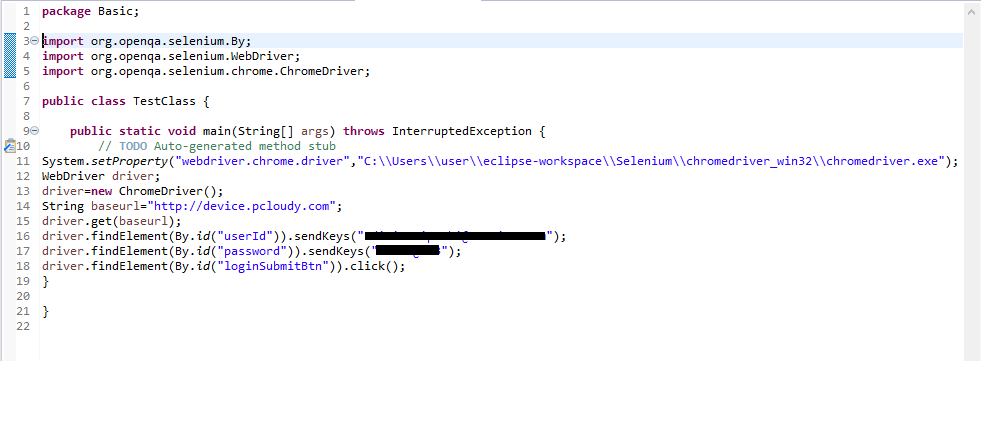
Once the path is set, you need to create an object for the WebDriver class. Hover the mouse on the highlighted value and then import it from the list as we have already added the jar files in the project.
There are two more methods, driver.close() which can be used to close the active browser window and driver.quit() is used to close the browser as well as all the associated windows.
To get the ID of any element in a web page like a button, image, logo, textbox etc., Just right-click and select inspect. You will get the source code from where you can copy the ID to be used in the script. You can also use any other element locator for the script.
Now mention the driver instance and select the findElement method from the WebDriver class. Then select the ID locator and mentions the value which we copied from the source code. Use sendKeys to pass some value to a particular web element.
How to use Selenium IDE for Test Automation
Running test cases in Selenium IDE is easy. It is a Firefox plug-in which helps in recording the test and convert into code. There are multiple options for running a test case including a “Run” button to run the displayed test case.
The “Run All” button is used to run the test cases in the test suite that are currently loaded. The “Pause” button allows pausing and restarting of a running test case. There is a “Speed” button to maintain the speed of the test case runs. With the “Record” button you can record the actions taken in the web browser.
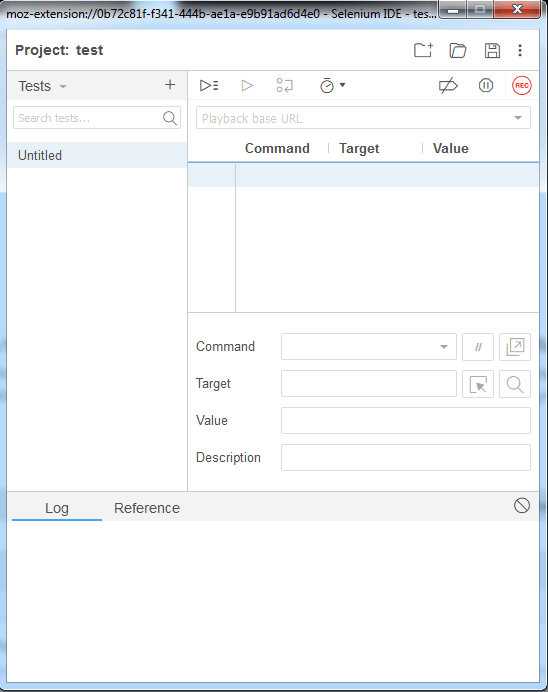
You can also use a base URL in selenium IDE to run test cases in multiple domains by mentioning a relative URL as the argument to open the test case.
The table displays the command and their parameters in a readable format. Whereas the command target and value fields display the currently selected command along with its parameters. The log will show you any kind of error messages and information messages and in the reference, you will find the documentation of the selenium command currently used.
You can use a simple HTML file and define your list of tests to define a test suite. Each row in the file should define the path to the tests you want to add in the suite. You’ll find many ways to put these tools to use to improve the development and testing processes.
To Sum Up
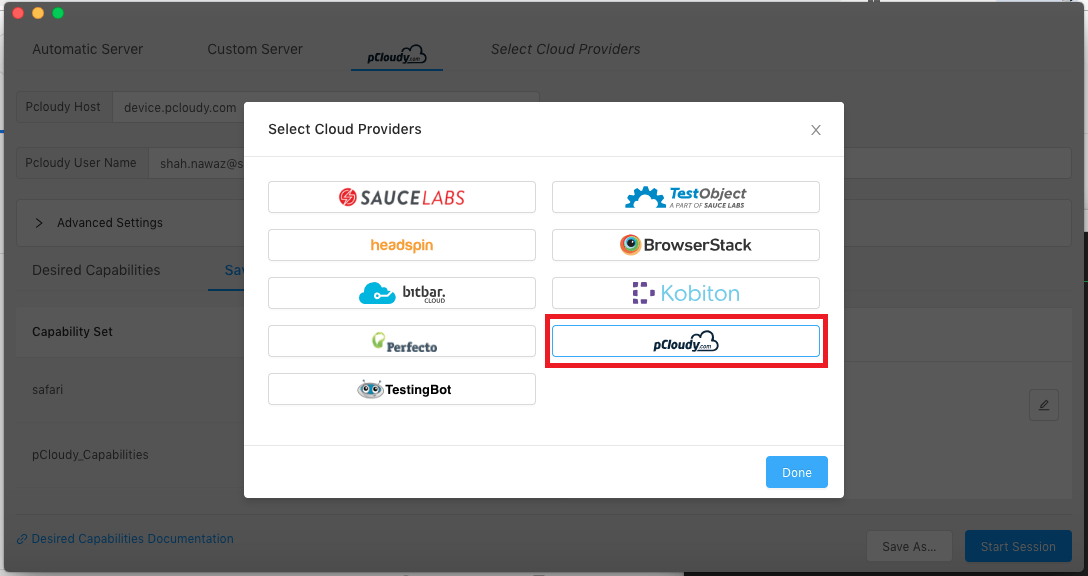
Enterprises are always looking to optimize the testing process and automation is one way to do it. Although it is important to use an effective tool for automation and Selenium automation testing is the best choice as it is open source and easy to use. Apart from Selenium testing, you can also opt for advanced tools like pCloudy, which has better features to make automation testing smooth as butter.
Want to test your Mobile App?
Join pCloudy Platform!
Related Articles:
Selenium for Mobile App Testing
17 Best Tips To Write Effective Test Cases
5 Ways AI is Changing Test Automation
8 Common Appium Mobile Test Automation Mistakes and How to Avoid Them
Cross Platform Mobile Test Automation Using Appium