By concentrating our efforts upon a few major goals, our efficiency soars, our projects are completed, we are going somewhere. This quote by Michael Korda signifies the importance of organizing our efforts to gain better efficiency at work. In mobile app testing, efficiency can be achieved by using a multifunctional tool like Jira and pCloudy. pCloudy is integrated with the Jira bug tracking tool to make it easier for testers to log bugs in Jira from pCloudy. Let’s get an overview of Jira and how it can be used for multiple purposes.
An Overview of Jira Bug Tracking
Jira is an open-source tool used for project management, bug tracking, and issue tracking. Jira has many features and functions that make issue handling easy. Customizable reporting allows you to monitor the progress of your issues with detailed graphs and charts. Jira has four major functionalities, project, issue, component, and workflow.
A Jira project is a collection of issues and it is identified by a name and a key. The project key is added to each issue associated with the project. Workflow helps in mapping your business process. So now let’s understand how to use the Jira bug tracking tool and its components.
Jira Workflow
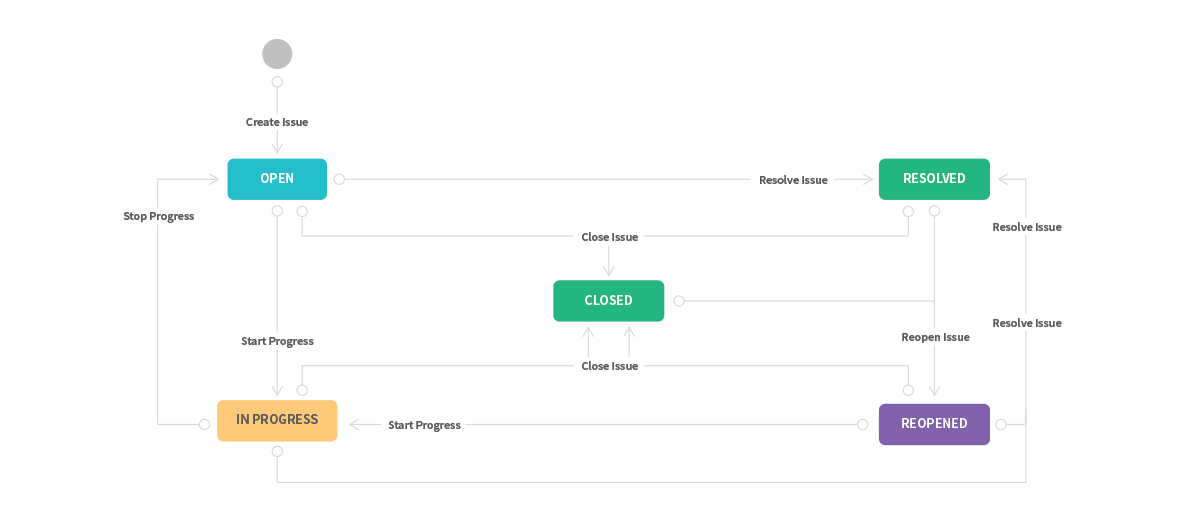
Jira has a function called workflow which is used to make a blueprint of the procedure in any organization. The workflow can be customized to suit the project, issue or any subtask. The Jira defect workflow comprises of colored blocks that represent the status of the task and lines that represent transitions.
Users can build their own workflows from scratch or download the prebuilt workflows and then customize them. Approval requests can be set for users to make changes in the tasks and task status can be set to change with transitions automatically.
Status shows the position of an issue within a workflow and transitions are the bridges between the status to represent how an issue moves from one status to another. Resolution tells why an issue changed from open to close and condition control who can perform the transition. The assignee commands the responsible member for any particular issue. Validator ensures that the transition can happen given the status of the issue and Jira can recognize some properties on transitions.
Creating an Issue in Jira
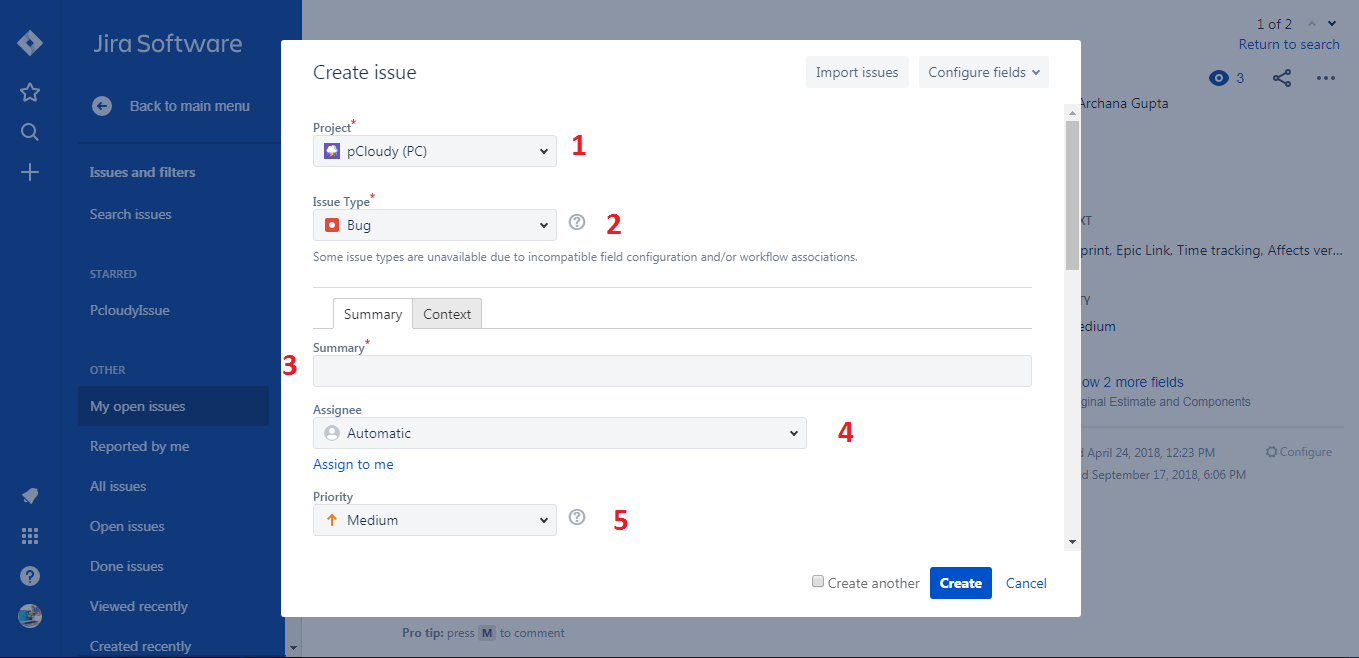
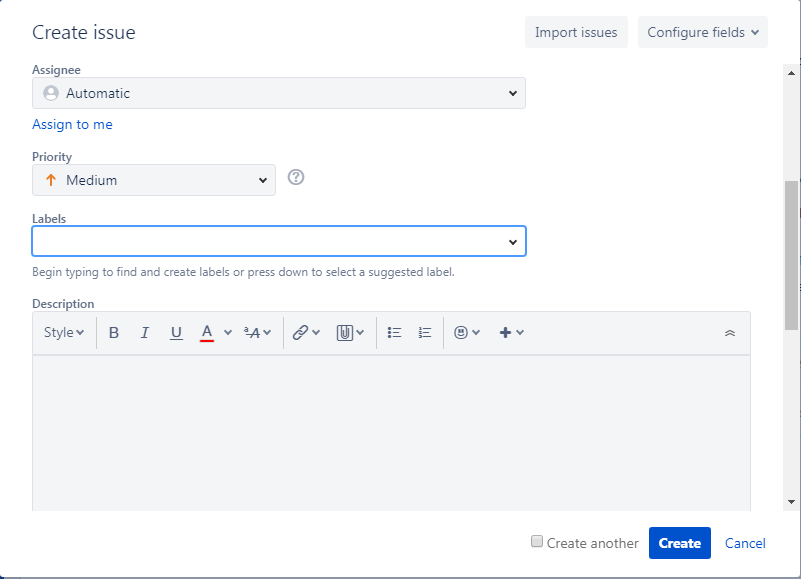
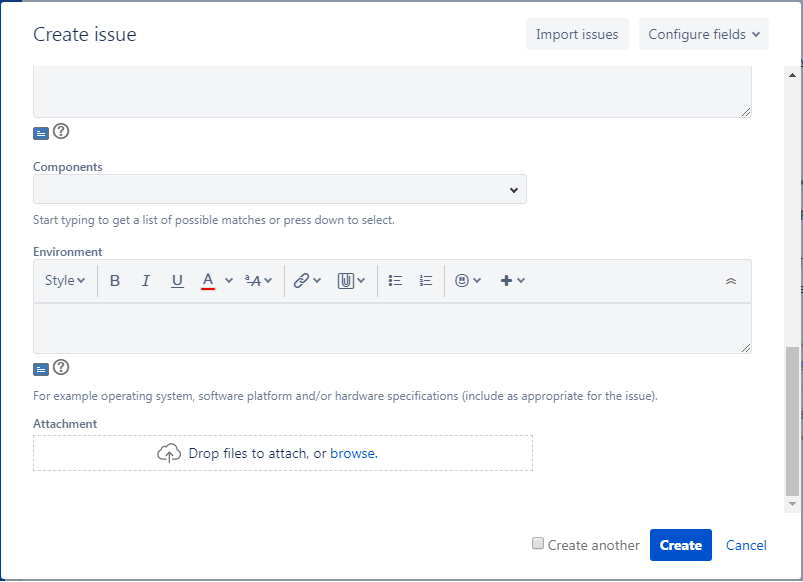
An issue is the building block of the project and components are subsections of a project used to group issues in smaller parts in a project. To create an issue you need to click on the plus sign located on the left side of the screen. A new window will pop up where you need to fill in the details about the issue that you are creating.
The first step would be to choose the project that the issue is associated with. Just below that is the issue type where you need to select if it is a task, an epic or a story.
Then add a summary about the issue and assign the issue to your team members. Next, you need to choose the priority and add a label to the issue. Once that is done, You can now add a detailed description of the issue to make sure that you and your team members are on the same page.
Below the description, you will find Components dropdown and the Environment where you need to fill in the details appropriate for the issue like Hardware specifications, OS, software platform, etc.
You can also attach files related to that particular issue by clicking on the attachment section and then click on Create to create the issue.
Jira Reports
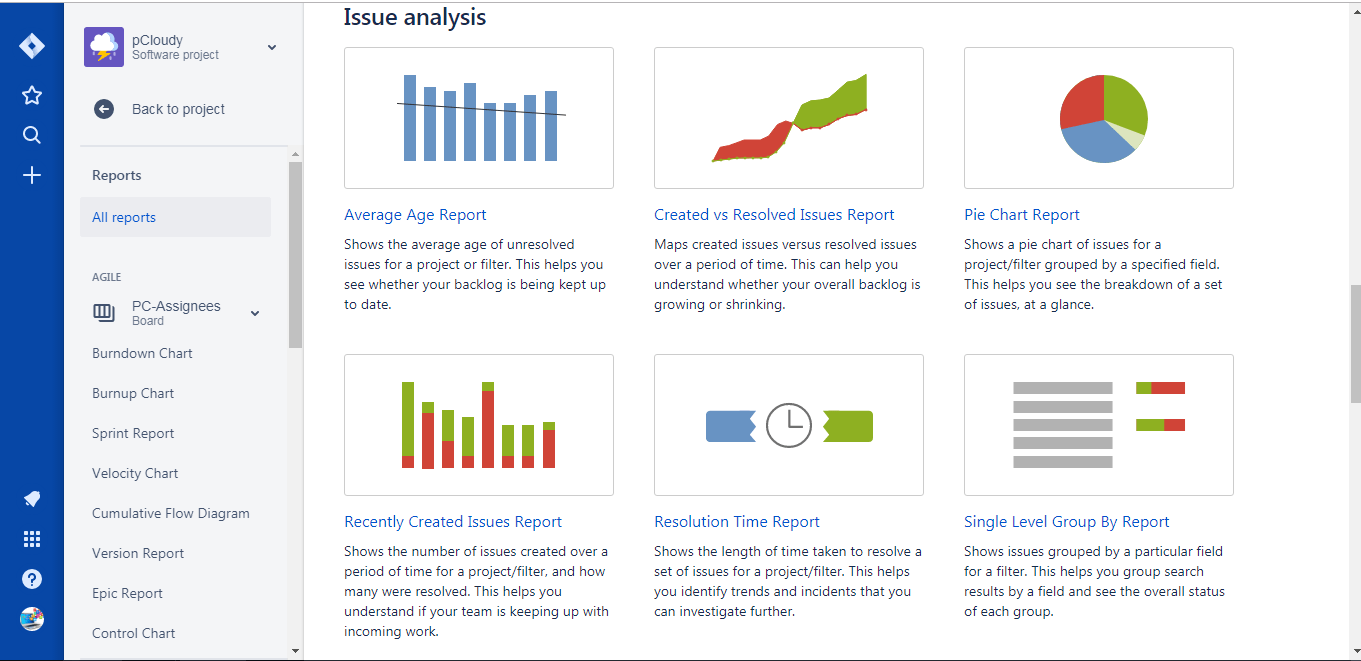
Jira generates various types of reports on the basis of workflows, issues, task status, and other data fed in by the team. You can track the total work remaining in the burndown chart and manage the progress accordingly. A burnup chart will help in tracking the total scope independently from the total work done. In the sprint report, you get an idea about the tasks that are completed and pushed backed to the backlog in each sprint. Apart from this, there is a cumulative flow diagram, velocity chart, version report, etc.
Users will also get an issue analysis report for a better understanding of the resolved and unresolved issues.
pCloudy integrated with Jira Bug Tracking
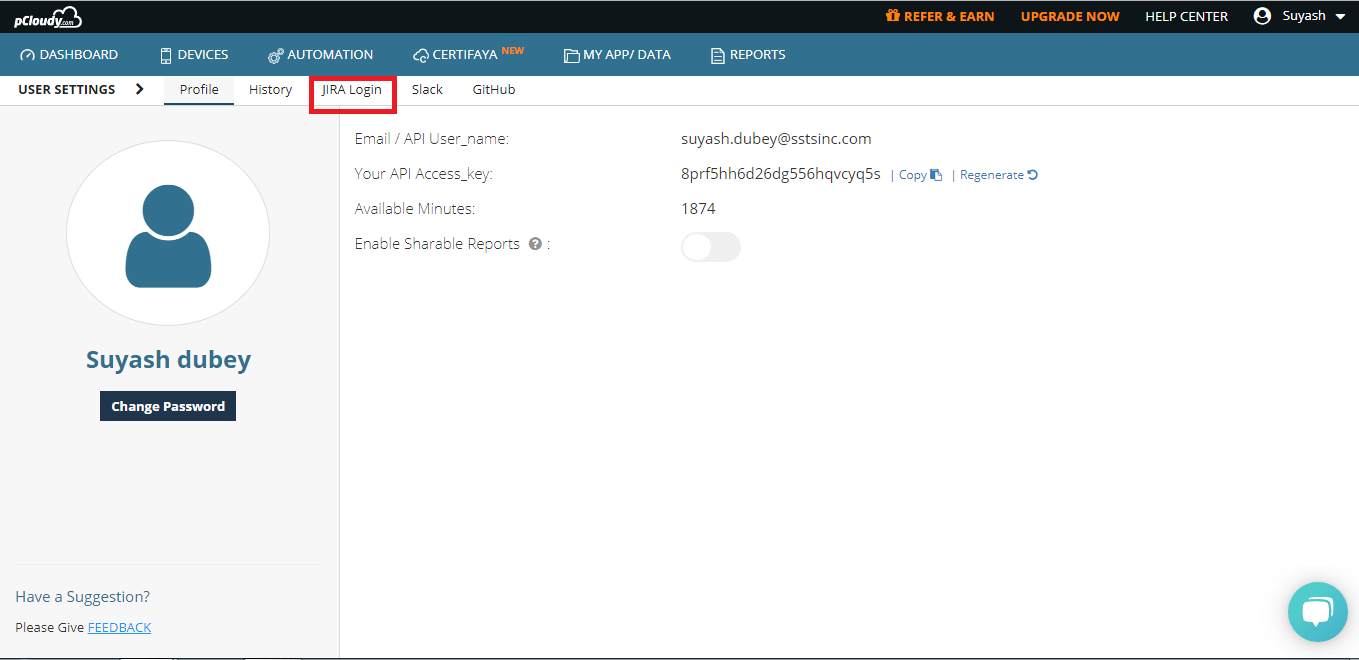
pCloudy has the option to log bugs, save screenshots and videos of the test actions. But if you want to use the Jira bug tracking system to log bugs then you can to that though pCloudy as well. Just click on the profile ID and the top right corner of the pCloudy screen and select the user setting from the dropdown list.
In the user setting page click on the JIRA Logs tab. Enter the URL, Email, API Token and login to log bugs in Jira.
This way you can maintain a separate bug log to share with the team apart from the one in pCloudy. pCloudy also generates reports like Jira and those reports can be shared across your team.
Jira supports both Kanban and Scrum agile methodologies. As a matter of fact, scrum is much more popular these days as it gives the project team to plan their work in detail prior to starting the project. When the scrum board is created, a list of items is added and then sprints and versions are created to move the issues from backlogs to sprints. With Kanban, users can start without having a detailed plan and in these issues can be created but that cannot be moved to sprints as we do in the scrum.
Conclusion
There are many uses of Jira in mobile app testing. It’s not just about handling issues or creating workflows, Jira project management is helping the world’s most known brands in the world. If you understand the Jira bug life cycle and follow the Jira bug tracking best practices, it becomes much easier to scale up your testing efforts. Jira bug tracking, when combined with pCloudy, can save your time and resources.
Test automation is gradually taking over manual testing as it saves time and improves the quality of testing. Especially in the case of regression testing, automation can improve efficiency by manifold. It is a waste of time and resources to do repetitive testing manually. Also, there is a scope for an error as repetitive testing can be exhausting but the chances of errors occurring in automation are slim. But what is automation testing? In simple terms, automation testing is replacing the manual human activity with a system that performs test cases by repeating predefined actions. To get the most out of automation it is necessary to select the right automation testing tool.
Types of Automation Testing Tools
Record & Replay: Tools in this category provide a recording option for the automated script. Every interaction on the screen like tapping, scrolling or typing will be recorded and converted into automation steps. The recorded scripts can be replayed to perform the actions and to verify the AUT.
Coordinate based recognition: Tools in this category interact with the application under test with the help of x/y coordinates, to automate and verify the application.
Native object recognition: Tools that use the native object recognition detect the UI or control elements on their given element tree. This tree is built by XPATH, XML or CSS to identify the elements, verify and automate the script.
Text recognition: Text recognition: Text recognition or (OCR) Optical Character Recognition tools identify elements based on their text. These tools use visible texts to drive automation and to verify the app.
Image recognition: These tools take screenshots of the UI elements in the product to add them to the automation scripts. The AUT will be automated with the help of these screenshots.
A lot of test automation tools support more than one recognition approach which can be useful to get more robust automation scripts. Now let us look at the factors to consider while selecting the automation testing tools.
Platform Support
Are you looking for automation testing tools for web apps or mobile apps? If mobile app then is it hybrid, native or PWA? The scripting language is also an important factor in many cases as mobile automation testing tools do not support all the languages. So if you developed your app using JavaScript then it’s not recommended to use UFT for test automation. In that case, go for a tool like Selenium that is flexible with the scripting language.
There are a lot of test automation tools that support freeware frameworks like Selenium and Appium. Framework integration helps in reducing the effort put into the testing and increasing the collaboration between the teams. Tool integration forms an ecosystem of a collaborative effort that helps in object identification, bug logging, test case management, report sharing, and shared repository.
Ease of Adoption
Ease of adoption can be measured on the basis of the skills required to use the tool and the learning curve. If there are resources available easily on the internet to learn the functioning of the tool then it is a plus point. Also, the support should be good and it’s an advantage if there is an active community that will give a rough idea about the complexities of the tool. We have observed that the installation process is also lengthy for some tools and frameworks. But overall the team should be able to use the tool easily with the skill set or the experience they have.
Ease of Scripting
Most of the automation testing tools provide flexible scripting options. It allows testing teams to write test scripts in their preferred languages. A good test automation tool helps in getting better reusability of test components and provides flexibility in scripts that can be reused across projects. Scripting time with object identification, speed of script execution, support for CI/CD tools like Jenkins, usually these attributes are considered before selecting the tool.
Integrations
If the testing team is using a test case or a bug management tool then the team would prefer an automation tool that can be easily integrated into those tools. It helps in managing the app development lifecycle properly.
The keyword-driven or data-driven automation framework should be easily integrated into any data source. It is convenient if the tool provides connectivity with different data sources easily.
Test Analytics
Analytical reports form the backbone of test automation as it provides insights into the success of the process. Automation tools must provide customizable dashboards to view different types of reports shared across various teams.
Real-time reports traceability and sharing ensure feature validation and efficient test coverage. Quality metrics such as injection rate, defect density, and test execution status allow you to maintain quality at every stage of continuous testing. It’s convenient to analyze results to identify bugs, patterns, and do a root cause analysis with a good automation tool.
License Type and Cost
It’s better to go for open-source tools but not every open-source automation tool has all the attributes that you might be looking for. Even if you opt for the proprietary licensed tools, you need to figure out how much you need to spend on the maintenance.
Some companies offer live support and training for premium plans. So you might want to upgrade to avail of these services. There is also something called runtime license if you just want to execute the automation on different machines. Apart from that, there are options for a node-locked license for a single machine and a concurrent floating license to use the tool on multiple systems.
To Sum Up
If you are still confused and want to further simplify the tool selecting process, then use a tool comparison matrix. Jot down your preferred 2,3 or even 5 tools and then rate them on the basis of all the factors that we have discussed earlier in this blog. This way it will be easier to make a decision on the basis of your requirements.
As far as mobile test automation tools are concerned, device coverage holds the key. It is recommended to use a cloud-based testing platform to run your automated test on multiple devices. Automation is the soul of any CI/CD pipeline and for the successful implementation of DevOps, it is crucial to choose the right automation testing tools.
Flutter has been creating waves in the app development space since its launch. The reason is simple, it solves the problem of creating two different codebases for a single app to run on Android and iOS devices. Some experts say that Flutter which was launched by Google is to counter React Native which is used by Facebook. Nevertheless, this is a much-needed relief for enterprises as Flutter will help them save a lot of their time and resources. So let’s first understand what is Flutter.
What is Flutter
Flutter is an opensource mobile UI framework that can create Android and iOS apps from a single codebase. The Flutter framework includes the Flutter engine, Dart platform, the Foundation library, and design-specific widgets. Flutter apps are written in Dart programming language and runs on dart virtual machine.
How to Create a Flutter App
Before we start the process of app development it is important to know that there are two types of widgets, stateless and stateful. A stateless widget describes part of the UI by building a structure of other widgets that describe the UI more definitive. Stateful widgets are the widgets that can change their state multiple times and can be redrawn on to the screen any number of times while the app is in action.
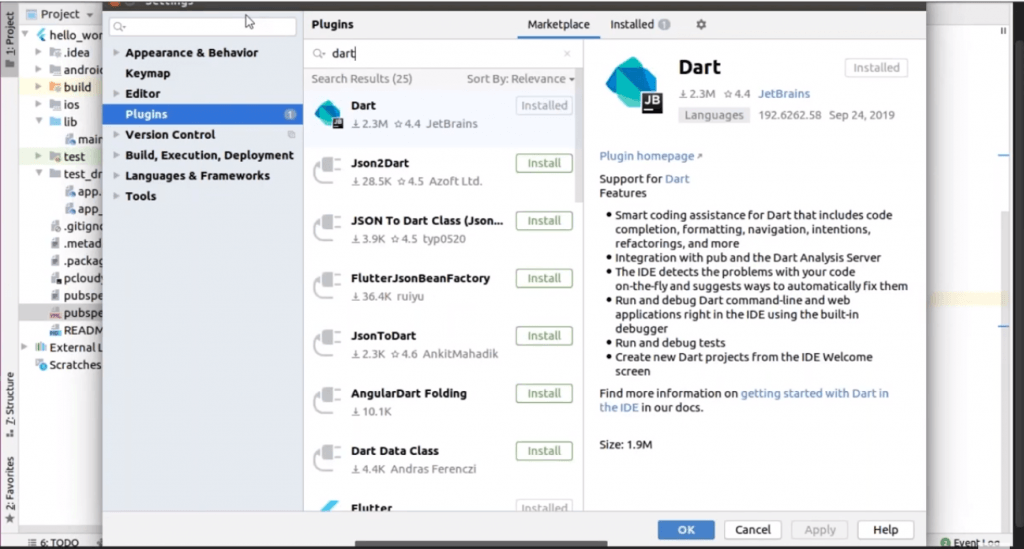
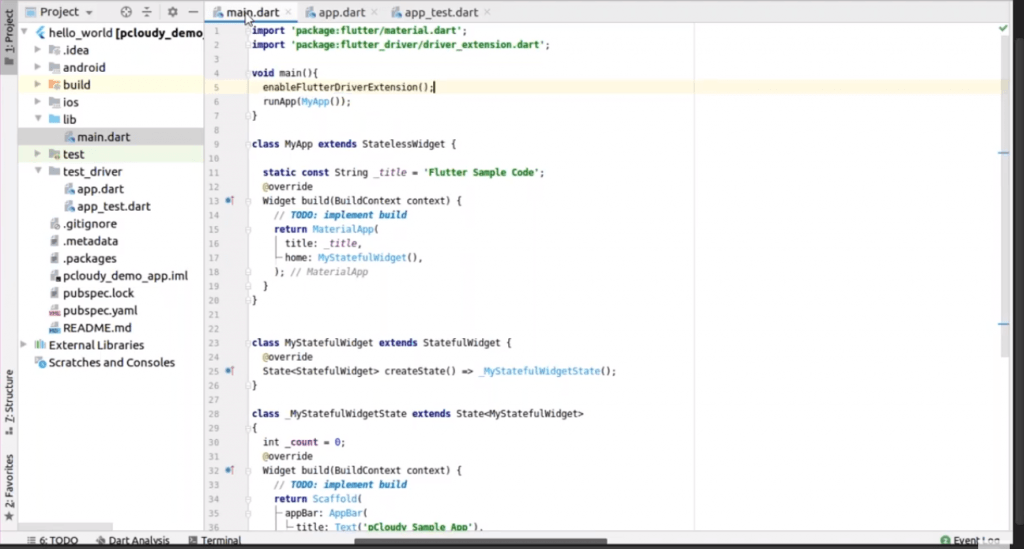
To create a Flutter app you need to install Flutter SDK and other tools required to support the framework. We will create the app in Intelli J IDE and for that, you need to install two plugins. The first one is Dart and the second plugin is Flutter. You can install the plugins by clicking on File in the menu bar of the IDE and then click on Settings.
Then you need to create a new project and you will get a basic code layout to start with your app development. In the first line, we have the main method where we will enable the flutter driver extension and there is a run app method with MyApp class instance, to run the app.
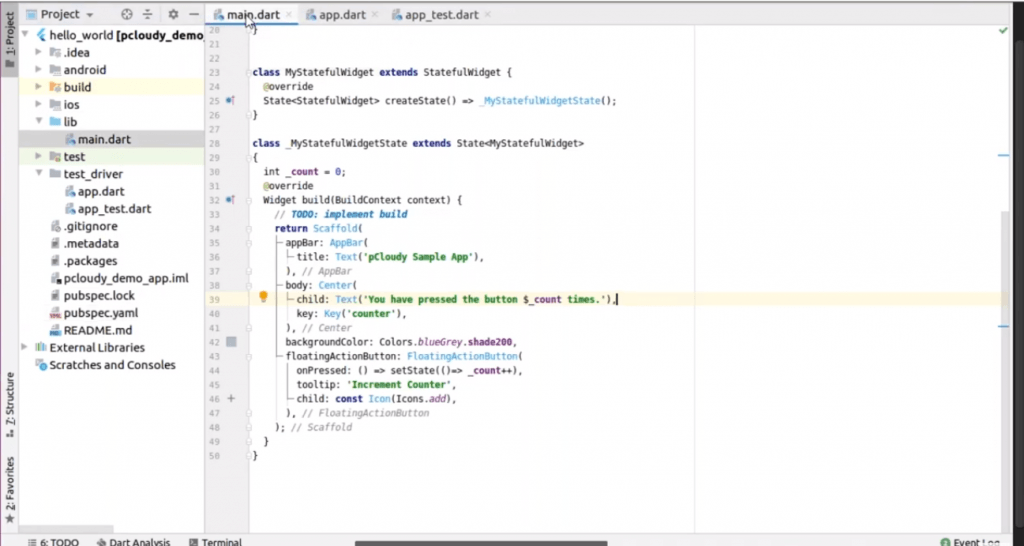
In this sample code, we have used the title as the stateless widget and we have set the title as the key and for the home screen, we are using one more instance which is MyStatefulWidget(). So in this class, we have a small piece of code, where we have set values for elements like appBar, background color, and in the body, we have placed a floating action button for a counter.
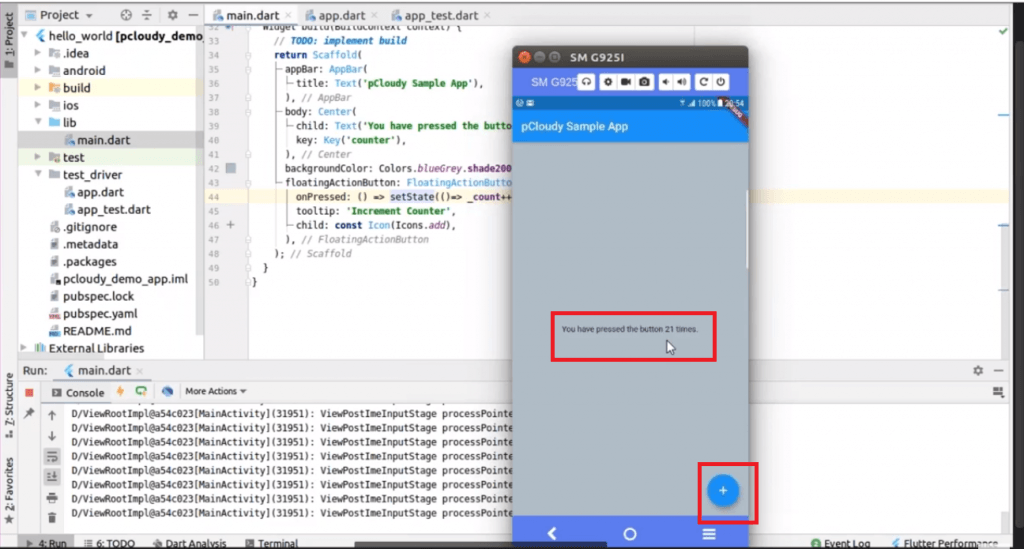
After adding the code you can run the program and you will be able to see the changed state of the counter with every click on the action button.
Appium Flutter Driver
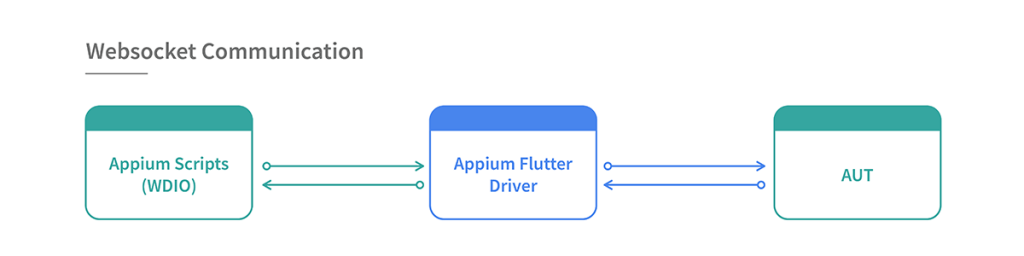
Appium Flutter driver is a test automation tool for flutter apps on multiple platforms. It is a part of the Appium mobile test automation tool. But how does the Appium Flutter driver work? It uses webSocket communication to carry WDIO script to instantiate the flutter driver and the request will be sent to the particular application. Then the AUT will send the response to the script through the Appium Flutter driver. Appium Flutter driver
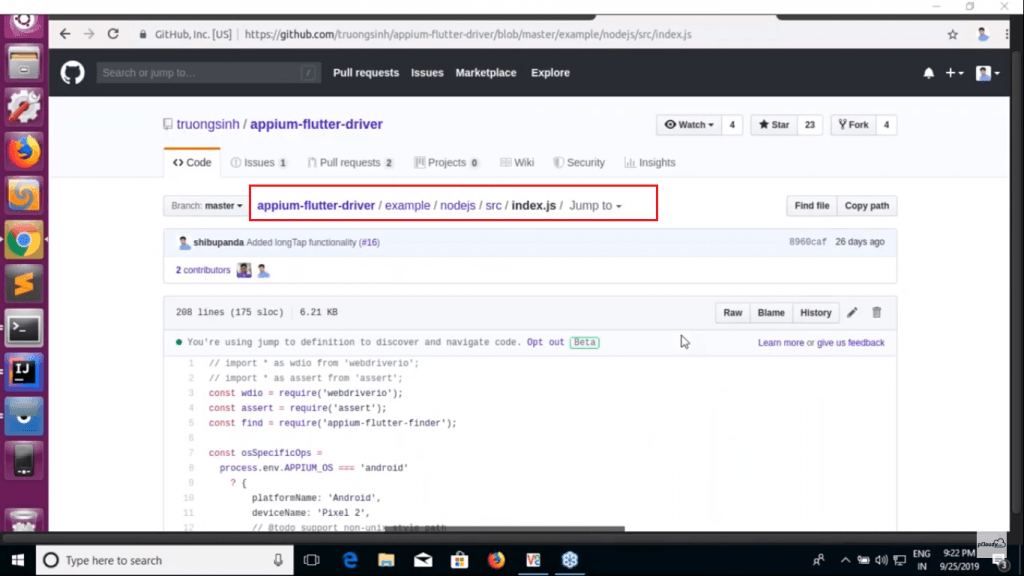
You can also build Appium in your machine through the source code. Once you have cloned the source code, run npm install then npm run built and type a command node to start the Appium server. You can download the package from GitHub. The package contains Appium Flutter Driver and Appium Flutter Finder. You can clone the sample project to get the WDIO code.
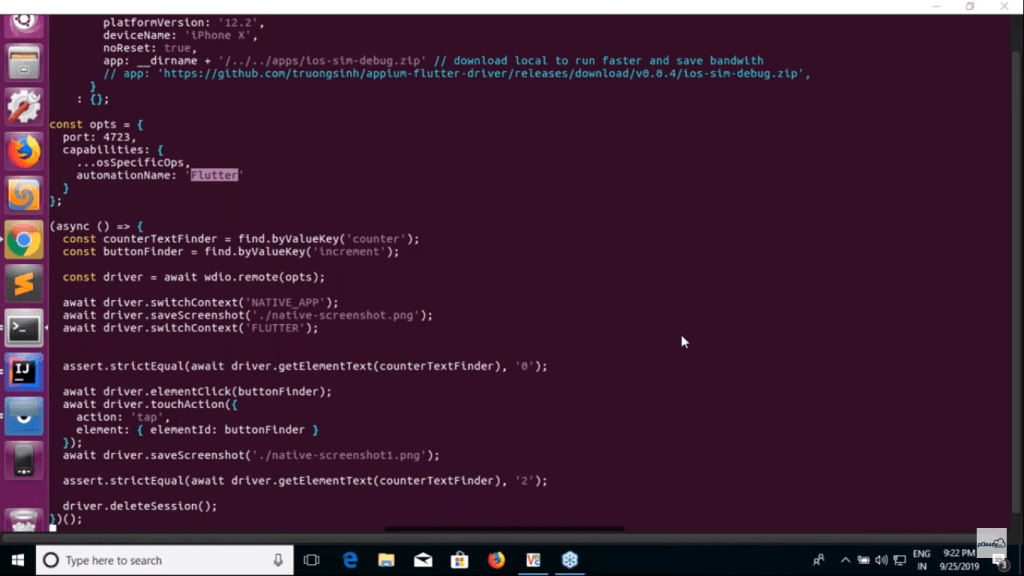
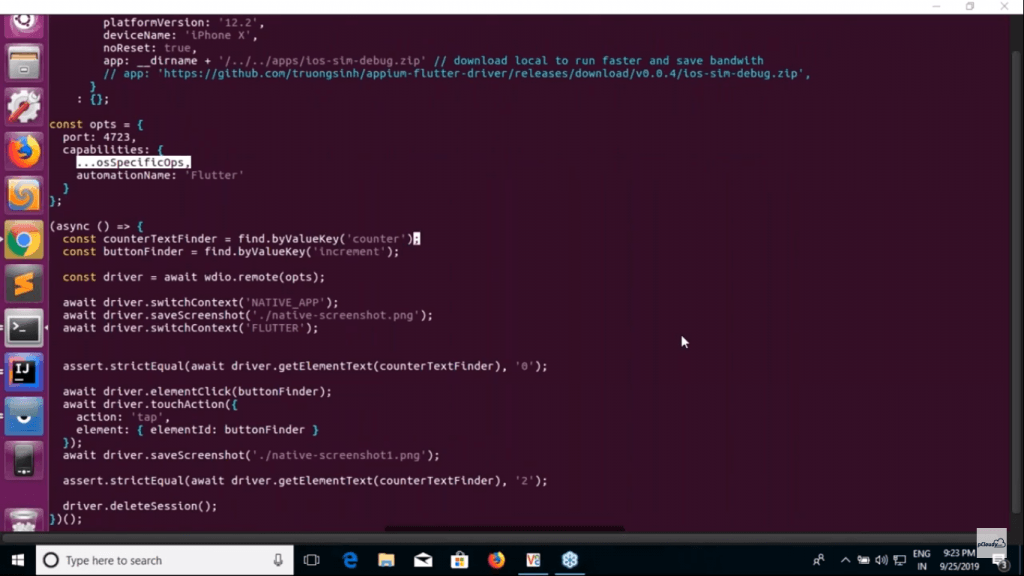
In the terminal, you can see that to automate flutter application we have used Flutter as an automation name for both Android and iOS apps. You can see that port is 4723 and in the capabilities, we have mentioned osSpecificOps, automation name: ‘Flutter’. We have mentioned the app path at the top with the device name and platform name and we created an object.
Appium==OS environment is ‘android’ which will pick all the information and specify in the capabilities and it will pass a post request to the server.
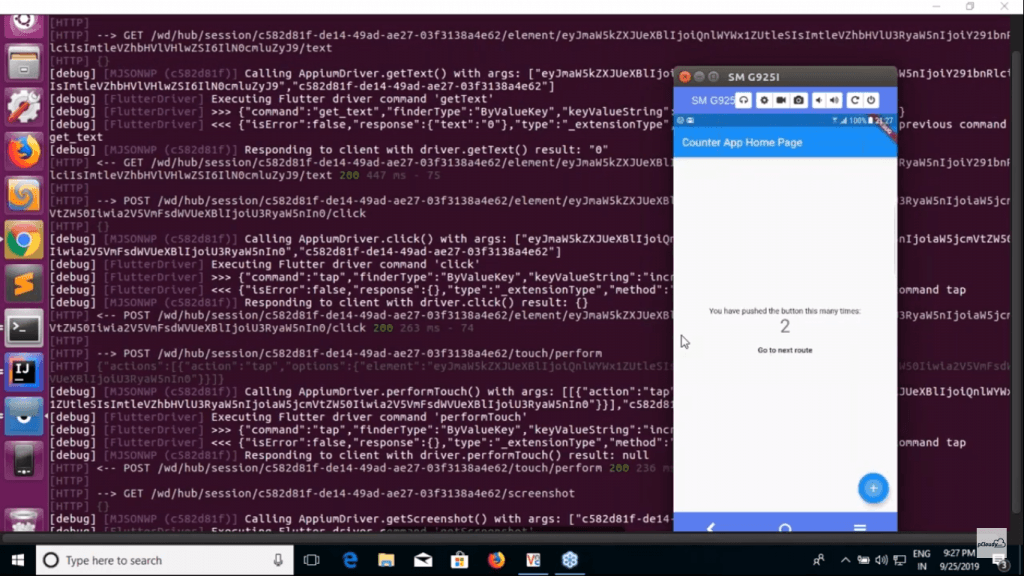
Now here we are trying to find the element using CounterTestFinder and a ButtonFinder to click on the button. In the next line, we have created a driver using a remote method.
Then we have switched the Native App context to Flutter. You can switch this if you are using the Flutter app. Once the app is launched, we are validating that the counter text finder has value as zero by calling Flutter APIs internally. So here we are using two actions, one is clicking and the other is touch.
The button is to be clicked two times and thus we have used strictEqual function. In the last line of code, we are deleting the session.
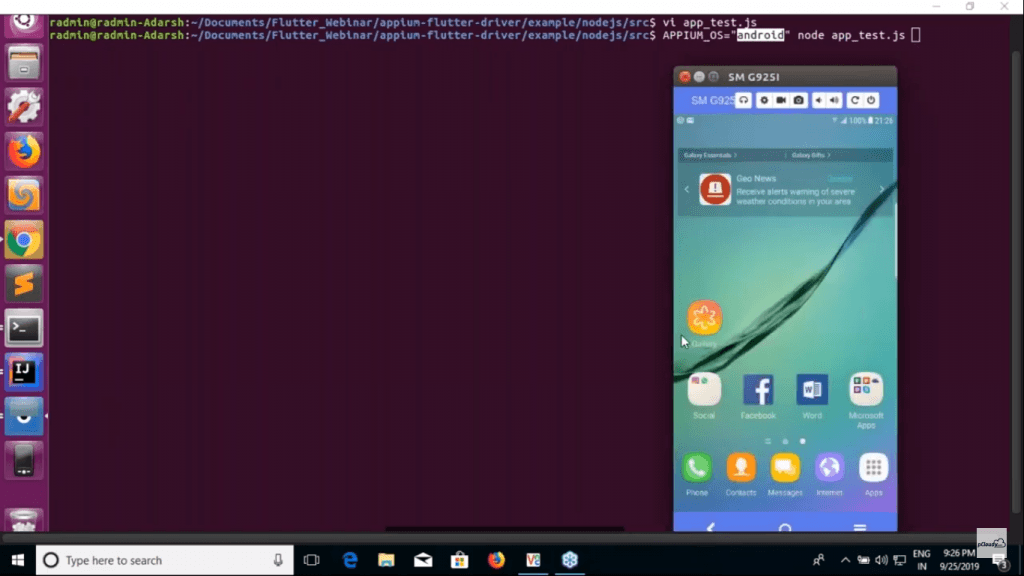
Now to run the test we need to pass the environment variable to connect the device.
Then we will check if our Appium server is running.
Then once you run the code you will be able to see the actions performed on the device and the counter will change to two.
This is how you can automate your Android and iOS app testing using Appium Flutter driver. Although there are many benefits of using Flutter, there are some limitations as well. The first thing is that you need to learn Dart language to develop and automate the Flutter app.
Suppose you need to run automated tests on multiple devices, then you will have to fire multiple commands in the terminal. Appium flutter driver depends on Flutter Driver APIs and as it’s still not matured enough, some actions cannot be performed.
Espresso is a testing framework for Android which automatically synchronizes your test actions with the UI of your app. It also lets the test wait until all the background activities have finished.
The pCloudy utility uploads your Application APK, test APK and other APK files to pCloudy. It will then acquire a device to run your test on, execute those tests and report back the status and test report.
In pCloudy you don’t have to set up the environment. Just follow these simple steps.
After the test cases are run you can see the detailed reports. Once automation ends, the device under test will be released automatically so that you or other users can use it later.
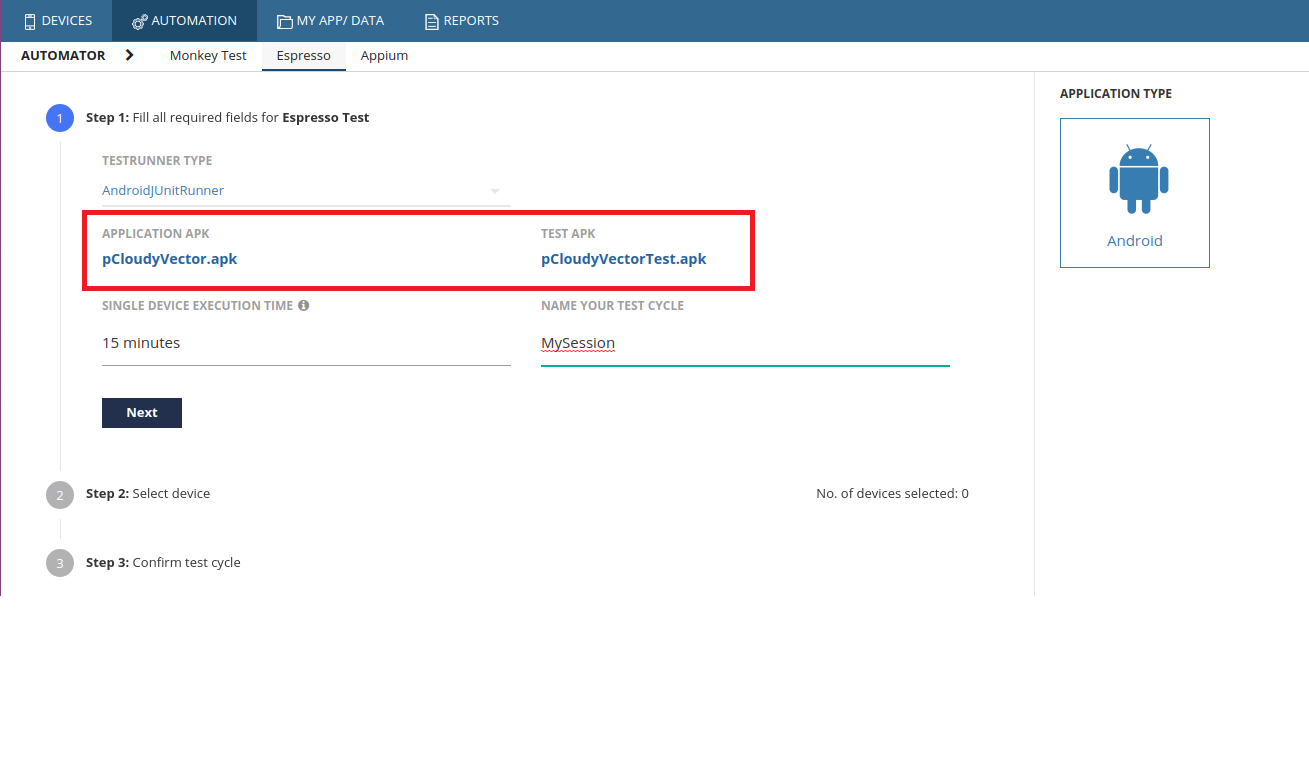
There are two ways you can execute espresso test cases. Here are the steps for both
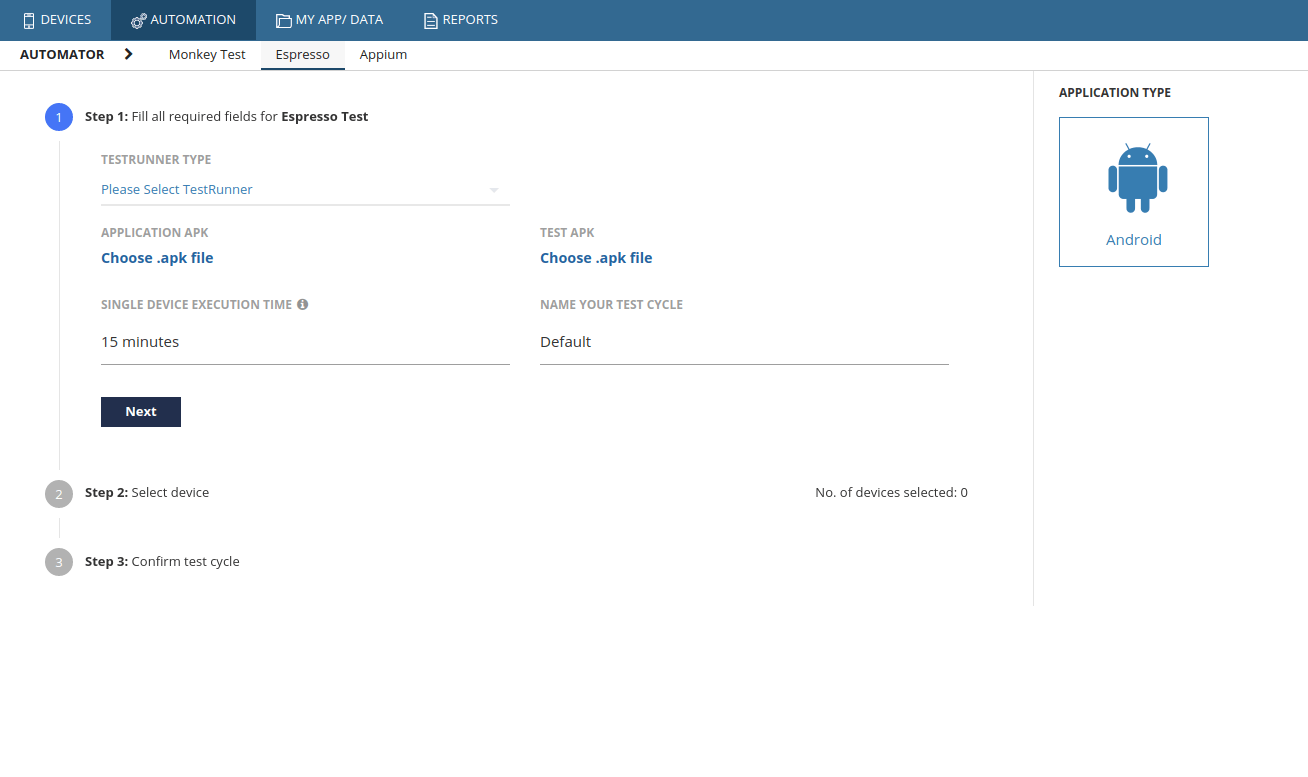
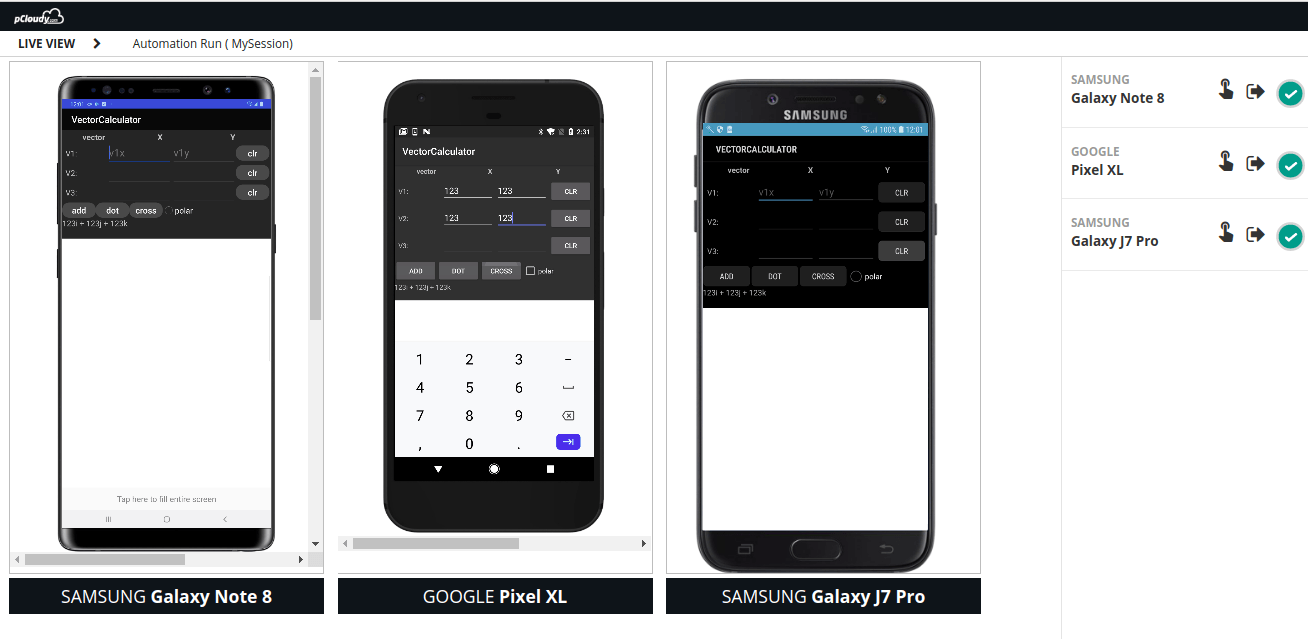
1. pCloudy UI Dashboard a. In pCloudy UI there is a section called Automation where you will find multiple automation frameworks integrated to the platform. b.Select the Espresso automation and to fill in the required details.
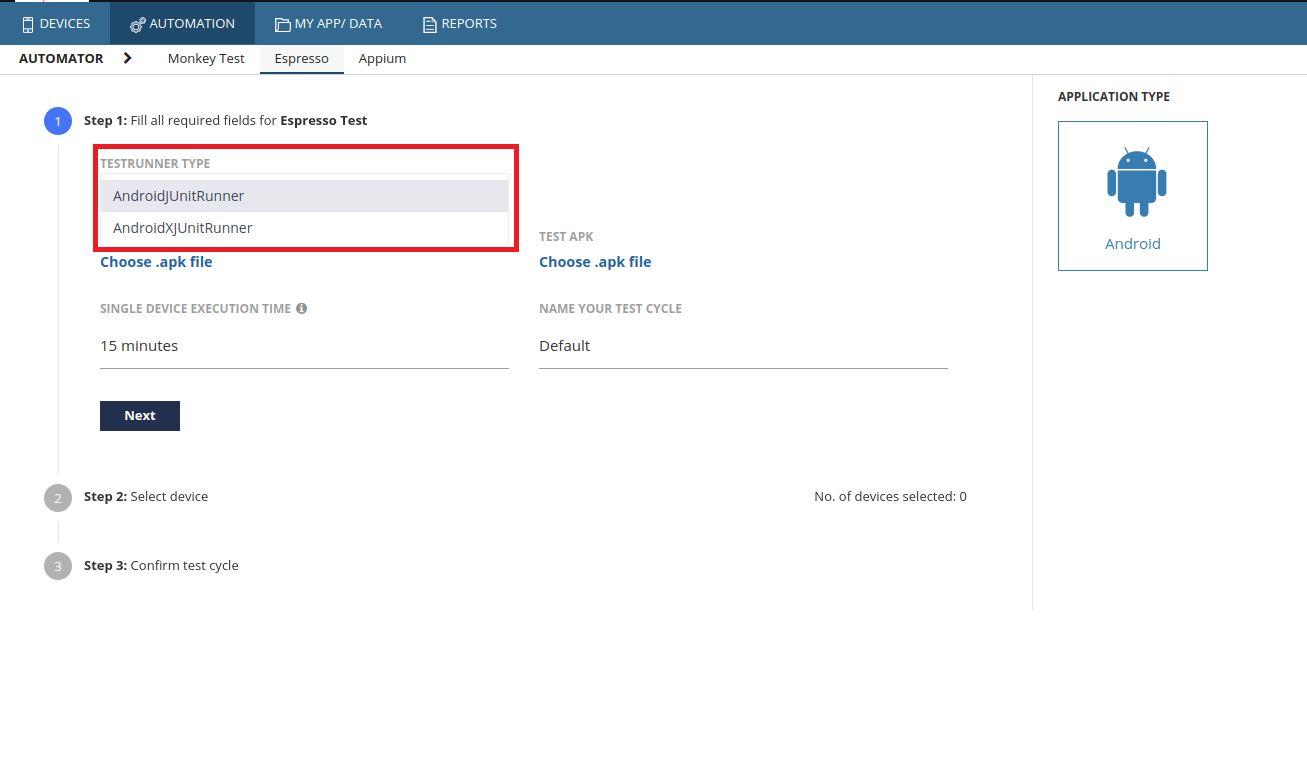
c. pCloudy Support two TestRunners.
i. AndroidJUnitRunner (android.support.test.runner.AndroidJUnitRunner)
ii. AndroidXJUnitRunner (androidx.test.runner.AndroidJUnitRunner)
d. Select your Application and Test Application.
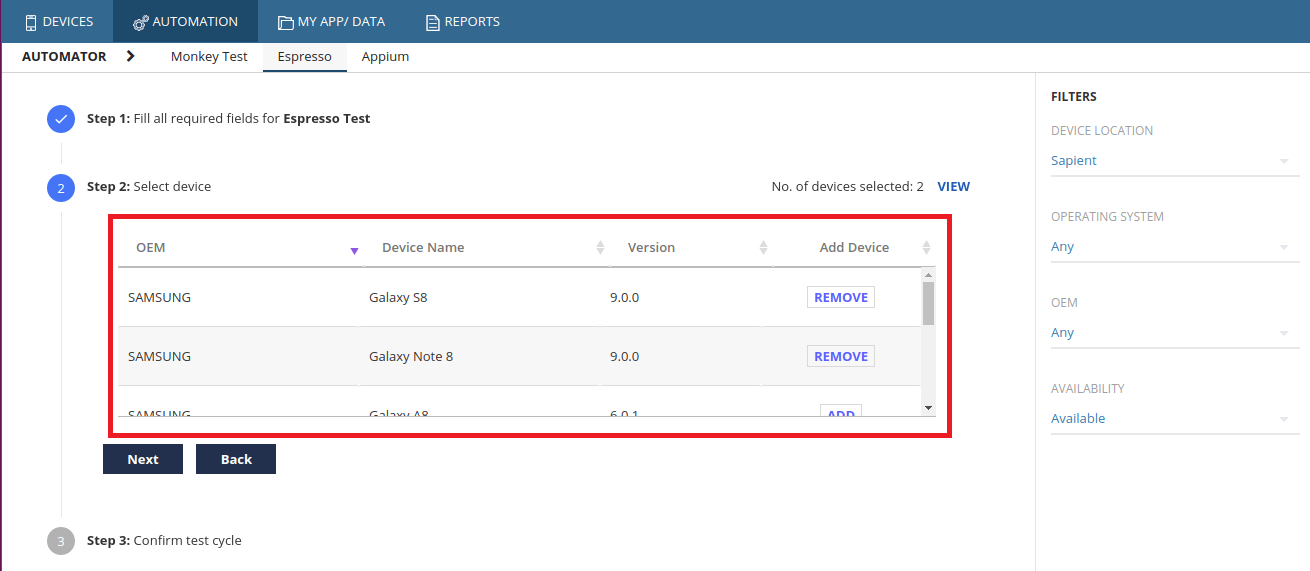
e. Select the required devices.
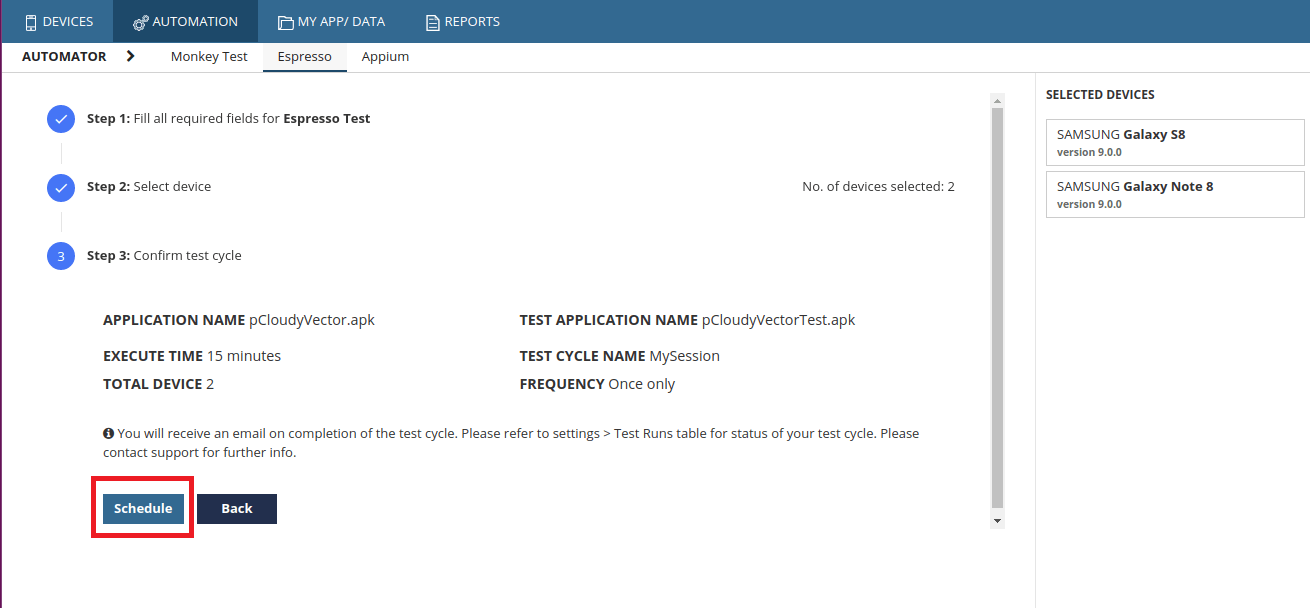
f. Click on Next button and Schedule the automation by clicking on the Schedule button.
g. You will get a dialog box. Click on Ok.
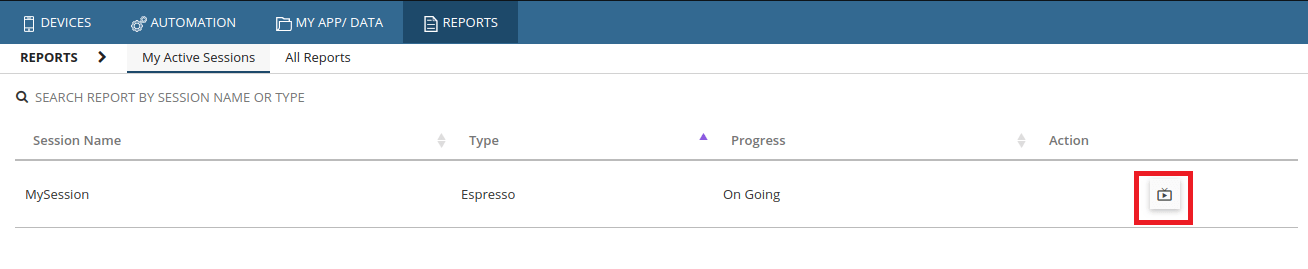
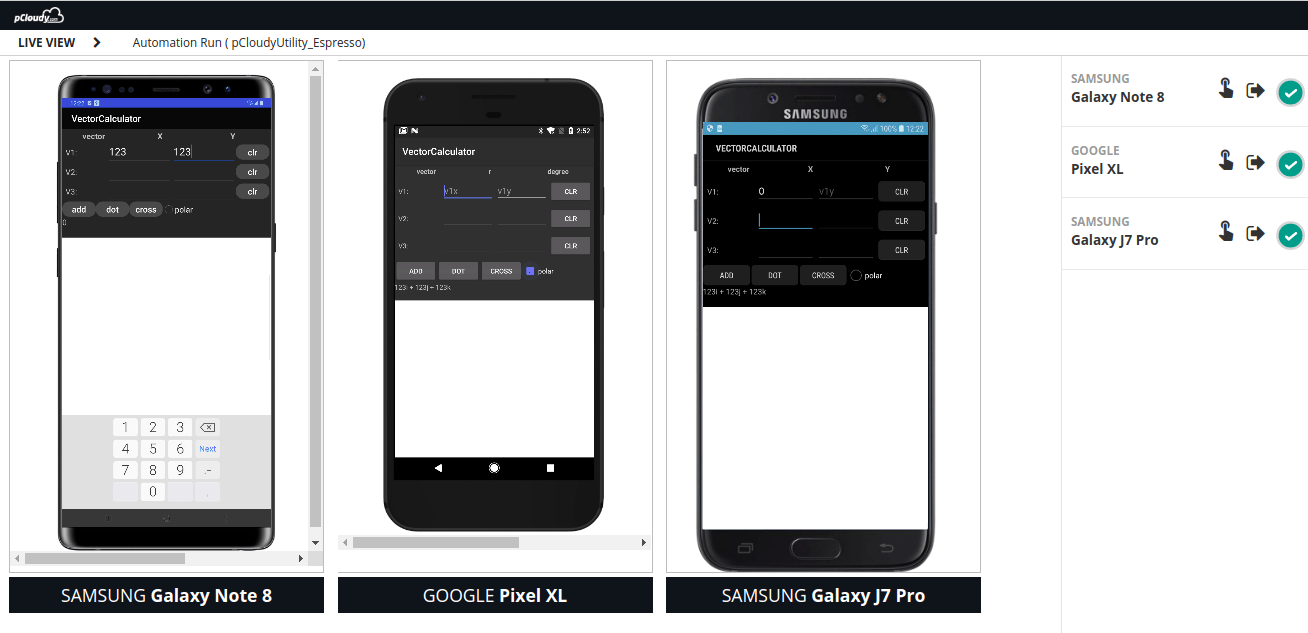
h. You will get the active session details on the Dashboard and you will also be able to see the Live view.
i. Liveview will help you to see the live execution on your test cases. Click on the Liveview icon
2.pCloudy Utility
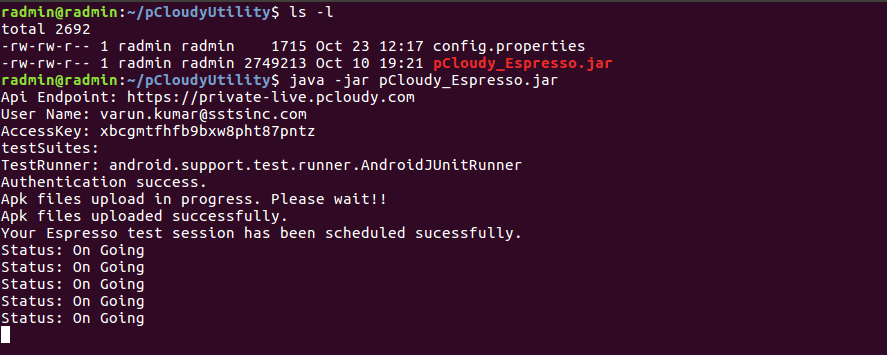
a. Download the espresso starter pack from here and Unzip it b. You will find two files,
i. pCloudy_Espresso.jar
ii.Config.properties c. Place the config.properties file and pCloudy_Espresso.js file into the same directory. d. Update the config.properties file as guided in the comments in the file. e. In your workspace, run the command by typing the java -jar pCloudy_Espresso.jar
f. This will upload the required files which you have mentioned inside the config.properties files.
g. You will get the status of the Automation in pCloudy Dashboard ActiveSession.
h. Even on the pCloudy dashboard, you can use the Liveview by which you can see the running test cases.
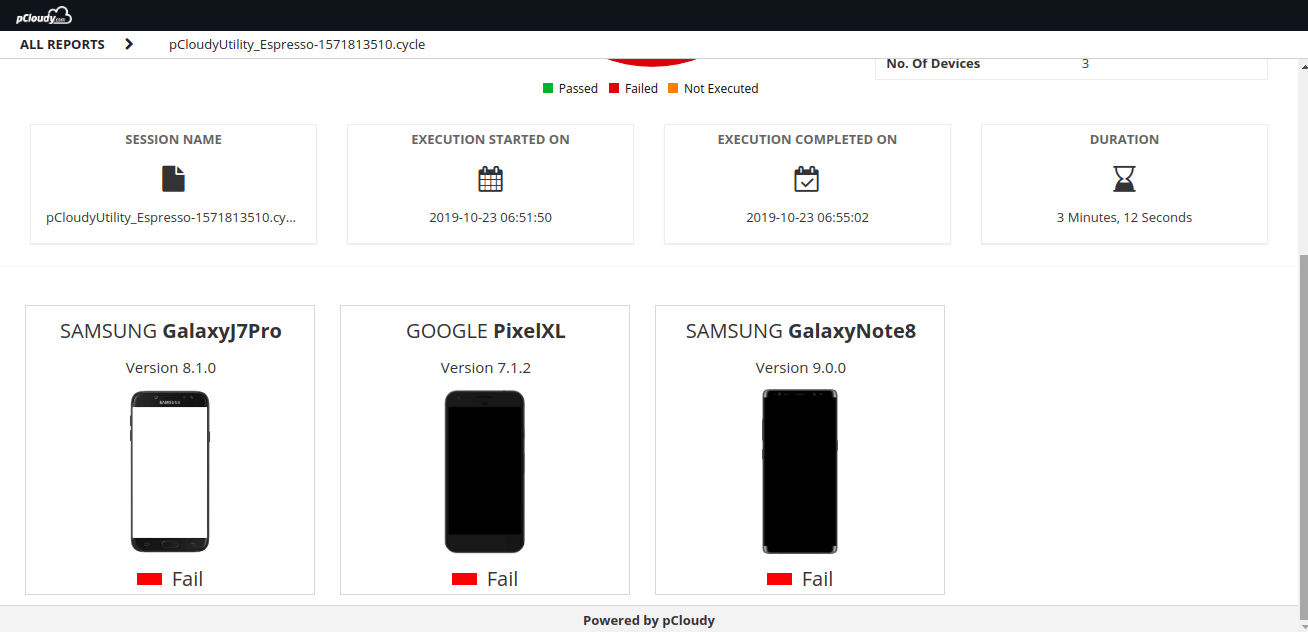
i. Once the test execution is over, You will get a URL of the test execution report on the terminal.
j. You can open the report from the dashboard Report section also. In the report, all the test details will be there as shown in the screenshots below.
k. You will also get individual device reports. Inside the test case level details, you will find performance details, test case logs, device logs, and video files.
Studies have indicated that after installing a new app, only a quarter of the users return to the app on the second day. The retention rate is eminently low and the majority of the users uninstall the app after the first use. You might have guessed the reason for this. If you think the reason is scanty testing then you are correct. A lot of times testers show little interest when testing is repetitive. Although regression testing is crucial to the success of the project, it is often overlooked to some extent. So let’s understand the concept of regression testing.
What is Regression Testing
In simple terms, regression testing can be defined as retesting a computer program after some changes are made to it to ensure that the changes do not adversely affect the existing code. Regression testing increases the chance of detecting bugs caused by changes to the application. It can help catch defects early and thus reduce the cost to resolve them.
Regression testing ensures the proper functioning of the software so that the best version of the product is released to the market. Although, creating and maintaining a near-infinite set of regression tests is not feasible at all. This is why enterprises are focusing on automating most of the regression tests to save time and effort.
Types of Regression Testing
There are different types of regression testing for different phases of testing. Let’s understand the types of regression testing.
Unit Testing: It is done when coding changes are made for a single unit and a tester re-runs all previously-passed unit tests. Often automated unit tests are built into the code to make unit testing efficient.
Progressive Testing: This type of testing works effectively when there are changes done in the software/application specifications as well as new test cases are designed.
Selective Testing: In this to cut down the retesting cost and effort, testers use a subset of the current test cases. A test unit must be rerun when there are changes in the program entities it covers.
Retest-All Testing: In this, we reuse all test cases even where the changes have not been made. It shouldn’t be done where there is a small change in the application as it is very time-consuming.
Complete Testing: Complete testing is effective when multiple changes have been done in the existing code. It is done to identify unexpected bugs and the final system can be made available to the user once complete testing is done.
How to Derive a Regression Testing Plan
Whenever there is a change in the app or a new version is released the developer carries out these tests as a part of the regression testing process.
First, the developer executes unit-level regression tests to validate the code that they have modified along with any new test that is created to cover any new functionality. Then the changed code is merged and integrated to create a new build of AUT. After that smoke tests are performed to assure that the build that we have created in the previous step is good before any additional testing is performed.
These tests can be executed automatically by continuous integration services such as Jenkins. Once we get the assurance that the build is perfect then we do the sanity testing to confirm that the functionality works as expected and known defects are resolved before conducting integration testing.
Integration testing is performed to verify that the units of the apps interact with each other and with backend services such as databases. The next step is to schedule regression tests depending on the size and the scope of the code either a partial or a full regression test may take place.
Defects are reported back to the development team and many require additional runs of regression testing to confirm the resolution. So based on the test reports you can analyze and figure out what test cases can be added for the next checking process as well and you create your report on that.
Regression Testing Challenges
Automation is always a smart move but there will be some challenges that would need your attention. Let’s have a look at the challenges that you might face in automation testing.
Cost is High
In terms of business expenses, the company will have to invest a lot of time and money in repetitive testing. Also, there’s no specific return on investment that is attached to regression testing. It is a complicated process and to explain the importance of regression testing in terms of business benefits to the management is really difficult. But this has to be done to draw the budget for the testing even though it is expensive from a management point of view.
Unstructured Information
If new testers are recruited during the ongoing software testing project, either to speed up the process or to release some of the tasks. The existing testers in the organization might not have time to give complete details about the functionalities and features of the app, existing bugs, delivery time, etc. The new testers might have to initiate testing with inadequate data about the ongoing testing project. Challenges like these need an appropriate test strategy for efficient collaboration.
Time Restrictions
The focus of enterprises is on developing quality apps and delivering them faster. This is why regression testing is always time-bound. Testers always get a deadline to complete the process of regression testing. To keep pace with time, The testers might have to take chances to give more importance to the critical regression tests and skip a few tests. It is a serious challenge as it is critical to decide which tests can be skipped.
Maintenance and Optimization
A major challenge is to maintain and optimize the existing regression test suites. The existing regression test suites might need modification like adding, removing or editing the existing test cases, whenever there are new changes. All this need to be done before the deadline fixed for the regression testing. Therefore, optimization and maintenance is another challenge that needs attention.
Best Practices to Perform Regression Testing
Now that we are aware of the challenges in regression testing. Let’s have a look at the key changes we can do to enhance it.
Focus on the Frequently Used Paths
Frequently used paths also make the most frequent use cases for your app. They must include the most popular features and the basic functionality of your app. You should be aware of the core group of users and their usual interaction with the app features. The regression test cases must ensure that this core functionality is working as expected.
Update the Regression Pack Regularly
A regression pack is a collection of test cases that are performed when a new app version is released or if there are any new updates. The tests in a regression pack are created keeping in mind the app’s older version requirement specifications. Ad-hoc tests should be included in the regression pack to keep it up to date. You wouldn’t want to waste your time on tests to validate an old feature that is not included in the latest version of the app.
Create an Entry/Exit Criteria
The entry/exit criteria that we usually follow in the software development lifecycle can be implemented in regression testing as well.
As entry criteria, a fixed set of conditions need to be met like reviewing bugs and performing regression testing to fix those bugs. Exit criteria can be applied with a fixed set of conditions like making sure that all the tests are executed and no bugs remain unfixed.
Automate Regression Tests
Automating regression tests makes the process much more efficient and saves time and effort. Repetitive testing can make testers lethargic and testers might lose motivation. It also affects the quality of their work as the testing is repetitive. Automated regression testing will free up resources to work on the more complicated tests. When we use automation, the test cases along with the software can also be reused which increases the return on investment.
In a Nutshell
Change is hardest at the beginning, messiest in the middle and best at the end. This quote by Robin Sharma suits the importance of regression testing in delivering a smooth functioning app. As mentioned earlier in this blog, different types of regression testing can be performed at all stages of the testing life cycle. And there are ways to overcome the challenges in regression testing too.
One option is to use a cloud-based app testing platform which will enhance the effectiveness of regression testing by many folds. There will be hundreds of devices to perform testing in parallel and features which complement regression testing automation.
While there is a substantial increment in the mobile apps market share, web apps are still prevalent with a significant user base. Enterprises are focusing on the quality at speed when it comes to web apps, before deployment. This is where testing has an important role to play. UI testing is still mostly a manual process unlike some functional testing which can be automated. But it is sensible to automate testing which will save time and effort. When it comes to automation, Selenium testing is the first thing that comes to mind as it is the most popular test automation tool in the world. So let’s learn more about selenium testing.
What is Selenium Testing
Selenium testing tool is open-source and it enables users to drive interactions with the page and test the app across various platforms. It allows users to control a browser from their preferred language like Java, JavaScript, C#, PHP, Python, etc. Selenium has many tools and APIs for automating user interactions on HTML JavaScript apps on browsers like IE, Chrome, Firefox, Safari, Opera, etc.
Selenium Framework is a code structure that helps to simplify and reuse the code. Without frameworks, we will place the code as well as data in the same place which is neither re-usable nor readable. Selenium automation frameworks are beneficial for higher portability, increased code re-usage, higher code readability, reduced script maintenance cost, etc.
What is Selenium Web Driver
Selenium WebDriver accepts commands via the client API and sends them to browsers. Selenium WebDriver is a browser-specific driver which helps in accessing and launching the different browsers like Chrome, Firefox, IE, etc. The WebDriver provides an interface to create and run automation scripts and every browser has different drivers to run the tests. The different drivers are IE Driver, Firefox Driver, Safari Driver, Chrome Driver, etc.
Selenium WebDriver was introduced to negate limitations of Selenium RC, which offers enhanced support for web pages where the elements on a page change without reloading. Many browsers support selenium WebDriver and it uses each browser’s native support for automation testing. The features are supported and direct calls are made depending on the browser that is being used.
WebDriver Project depends on the programming language as well as the development environment. Selenium supports multiple languages and projects can be set up using many programming languages. Selenium provides JavaScript bindings on npm. Java projects can be setup using Maven and it will also download Java bindings and dependencies to create the project.
Run pip install selenium from the command line to add selenium in a python environment. C# bindings are there as part of a set of signed dlls and dependency dlls. You can get PHP bindings through third parties, including Chibimagic and Facebook. To add Selenium to your Ruby environment, run gem install selenium web driver from the command line.
Once you set up the environment, the selenium webdriver operates like a normal library. The selenium webdriver can self sustain as there is no need to run any installers or process before using it.
Selenium Grid
Selenium grid is a part of the Selenium Suite that allows the running of multiple test cases across different browsers, operating systems, and machines in parallel. This is called parallel testing.
In simpler words, it runs a test in parallel on multiple machines.
The test cases are triggered by a local machine. When the test cases are triggered they are automatically executed by a remote machine. So one local machine controls the triggering of test cases on multiple remote machines. For this, you need to configure a remote server so that the test cases are executed there.
Hence the architecture of the selenium grid consists of “Hub” and “Server”
Hub in Selenium Grid
Hub in selenium grid is the local machine that controls the triggering of the test cases which are executed in the multiple devices connected in parallel to it. So, the hub accepts the access request from the Webdriver client, routing the JSON test commands to the remote drives.
In short, the hub is the central machine where you will load your test and run it, but the browser will be automated in the node.
Node in Selenium Grid
A node in the selenium grid is a machine in which the browser is automated and the test cases are executed
which are triggered by the Hub. A node consists of the browser, native OS and remote web driver, in fact, all the nodes connected in parallel consists of this configuration.
How does the selenium grid work?
The selenium grid works like a regular web driver except for its two components, the Hub and Nodes (consists of remote Java Servlet which execute the test on a remote device) where the test cases are executed automatically through a remote web driver.
In your test script, you define ‘desired capabilities’ (device, platform, browser, etc.) of the node where the test will execute. The Hub receives this script, runs through the registered nodes to find one that matches the desired capabilities, and assigns the test to it for execution.
So, setting up Grid is not that difficult but scaling, configuring and maintaining its integrity may take lots of effort and resources.
Hence, Selenium Grid is mostly used for Load testing, to calculate and optimize the maximum capacity of an application to sustain the peak user load. We can use it to determine whether the current infrastructure is sufficient to run the application. To measure the number of concurrent users that an application can support and the scalability to allow more number of users to access it.
How does Selenium Boost Agile
Agile is a simple, not much organized but a continuous model that has a modular structure that promises the quality of the product.
The Agile workflow is as follows:
Once the Stakeholders agree on the simplest working design, it gets divided into smaller modules.
The module is then divided into the team of designers, software developers, and the Quality Assurance team.
The team works in a sprint to make their particular module and take a time frame called “iteration”, a window of one to four weeks to complete it. (Scrum meeting are usually carried out to gather and track work updates).
After each iteration, finished modules are put together. Multiple tests are run and the functional product is demonstrated to the stakeholder.
On receiving the product, it is evaluated by the stakeholders, add customer feedback and adapt as required, (they might ask the engineering team to add features in the product whenever required).
Where does the Selenium automation come in:
After every iteration, the finished product goes through a number of testing like System and Integration testing. After receiving the functional product the stakeholders carry out the unit and user acceptance test.
If there is any change or any feature is added then gain a series of functional test including regression testing is executed
In this way, Selenium testing is very suitable and boost Agile Methodology.
What types of testing can be automated by Selenium:
1.Compatibility Testing
Compatibility Testing is done by the QA team to assure that the web app meets the desired requirements on the browser-OS combination. Testing on various devices of different screen sizes is required to measure the responsiveness of the app. We need to test if the app is able to function properly in different types of browsers, also, for instance, to check whether the video adds are executed properly and runs on every browser and screen size. Here selenium automation will reduce the time and effort to execute the test cases.
2. Performance Testing
After the finished or functional product is handed over to the stakeholders they may run a series of performance testing to measure various parameters like loading speed, the navigation speed in case of web apps, responsiveness and stability of the product. In this case, an open-source tool like selenium which is easy to install and execute can be used to get accurate and efficient results.
3. Integration Testing
Integration testing is usually done while integrating all the modules coded separately also functions properly when assembled together. It is usually done when a new feature is added to the system. This requires a suite of lengthy test cases that requires automation to fetch efficient results. Selenium testing can make the process very easy.
4. Regression testing
A series of test cases are required to check if the new build feature is working in accordance with the existing feature. Also, you need to check if there is any adverse effect on the app due to the newly added feature. This is called regression testing. For example, if you want to add a call to action button in your blog page, you need to make sure that the button is working fine and also there is no change in the content of the blog page. Again selenium testing can help you to reduce the effort of using lengthy and test cases while giving accurate results.
Writing a Script for Selenium Automation
Let’s see how to launch a browser from the script. Make sure you have downloaded the selenium jar files and the third-party drivers. To launch a browser, the first thing you need to do is to create an object for web driver. Then use a get method to launch a new browser session and direct it to the URL specified in the parameters.
Now you need the system pointing to the location of the downloaded exe file of your browser. You can do that by using System.setProperty. Then provide the browser driver in the key and the path to the location of the browser exe file in the value. Here System is a build-in class and setProperty is a method to access the browser driver.
Once the path is set, you need to create an object for the WebDriver class. Hover the mouse on the highlighted value and then import it from the list as we have already added the jar files in the project.
There are two more methods, driver.close() which can be used to close the active browser window and driver.quit() is used to close the browser as well as all the associated windows.
To get the ID of any element in a web page like a button, image, logo, textbox etc., Just right-click and select inspect. You will get the source code from where you can copy the ID to be used in the script. You can also use any other element locator for the script.
Now mention the driver instance and select the findElement method from the WebDriver class. Then select the ID locator and mentions the value which we copied from the source code. Use sendKeys to pass some value to a particular web element.
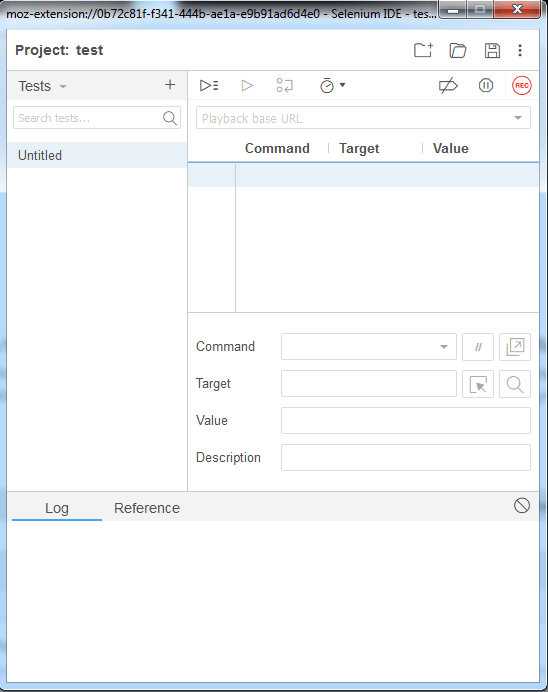
How to use Selenium IDE for Test Automation
Running test cases in Selenium IDE is easy. It is a Firefox plug-in which helps in recording the test and convert into code. There are multiple options for running a test case including a “Run” button to run the displayed test case.
The “Run All” button is used to run the test cases in the test suite that are currently loaded. The “Pause” button allows pausing and restarting of a running test case. There is a “Speed” button to maintain the speed of the test case runs. With the “Record” button you can record the actions taken in the web browser.
You can also use a base URL in selenium IDE to run test cases in multiple domains by mentioning a relative URL as the argument to open the test case.
The table displays the command and their parameters in a readable format. Whereas the command target and value fields display the currently selected command along with its parameters. The log will show you any kind of error messages and information messages and in the reference, you will find the documentation of the selenium command currently used.
You can use a simple HTML file and define your list of tests to define a test suite. Each row in the file should define the path to the tests you want to add in the suite. You’ll find many ways to put these tools to use to improve the development and testing processes.
To Sum Up
Enterprises are always looking to optimize the testing process and automation is one way to do it. Although it is important to use an effective tool for automation and Selenium automation testing is the best choice as it is open source and easy to use. Apart from Selenium testing, you can also opt for advanced tools like pCloudy, which has better features to make automation testing smooth as butter.
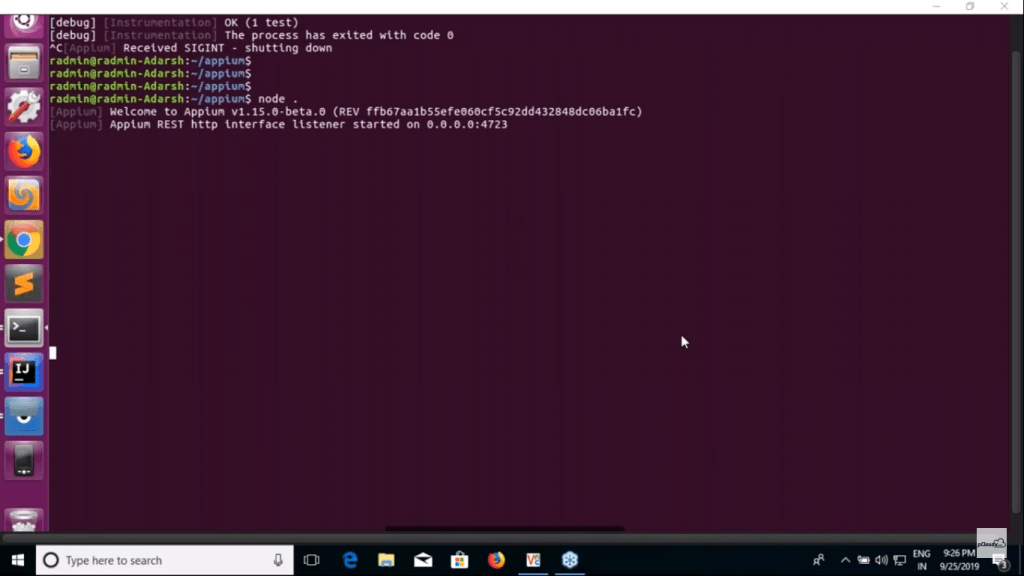
In the previous blog in this series, we learned how to write the first Appium script for Android devices. Now in this blog, we will understand how to start the Appium server.
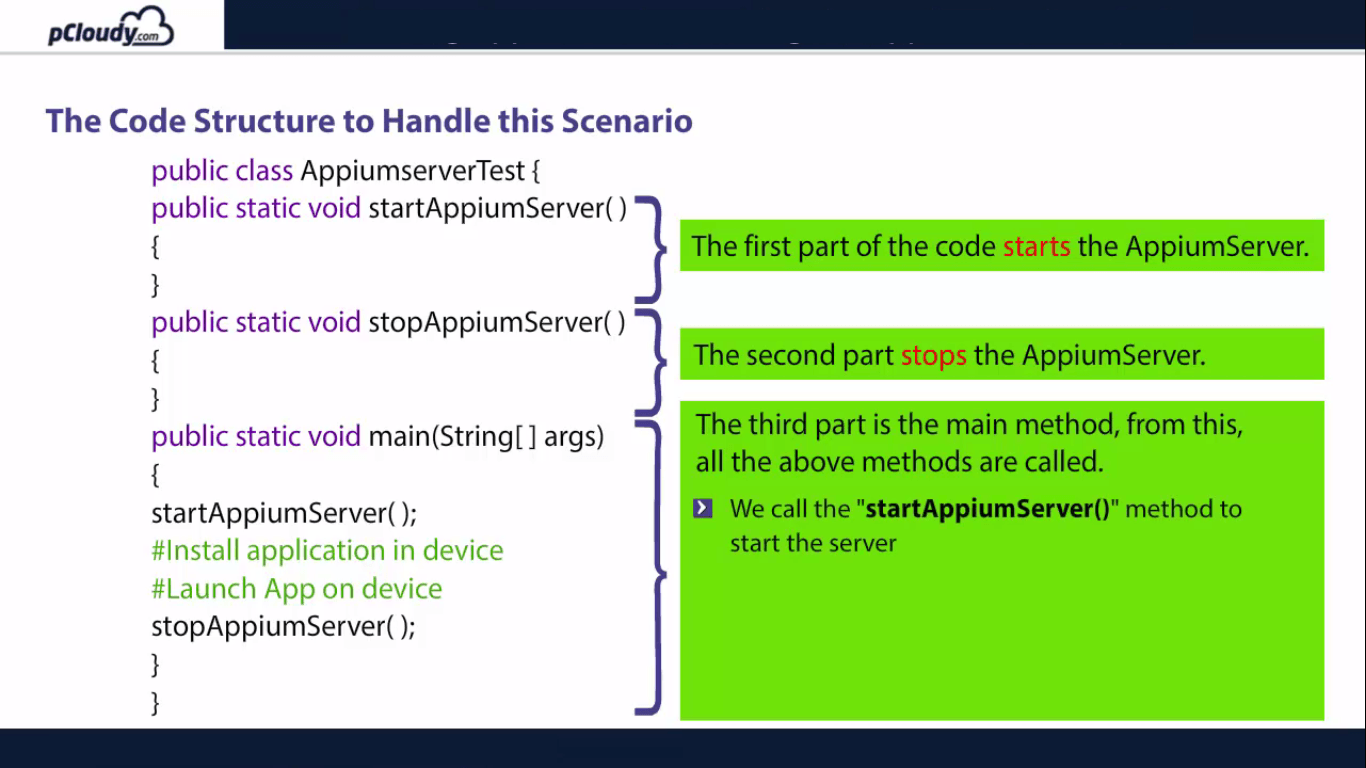
The code structure is segregated into three parts, the first part of the code starts the Appium server, the second part stops the Appium server.
The third part is the main method which is necessary to execute the class and from this main method, all the above method are called.
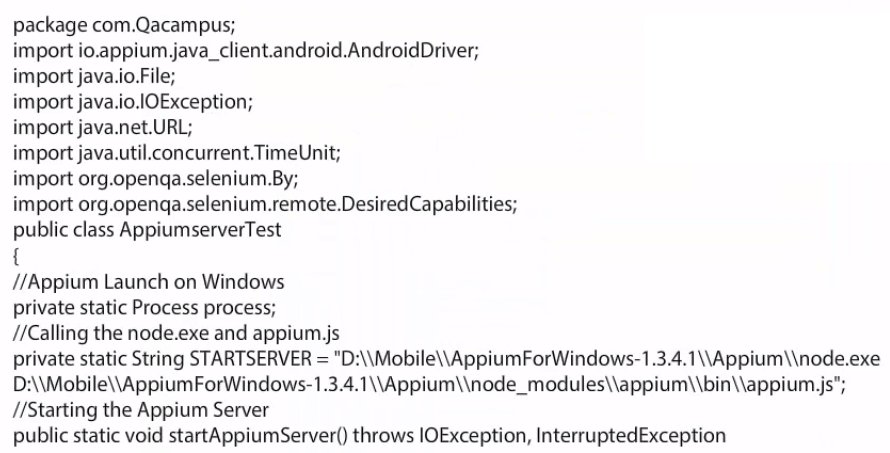
Starting Appium from code requires a path of two files which are kept inside the Appium folder.
node.exe
js
Starting Appium Server
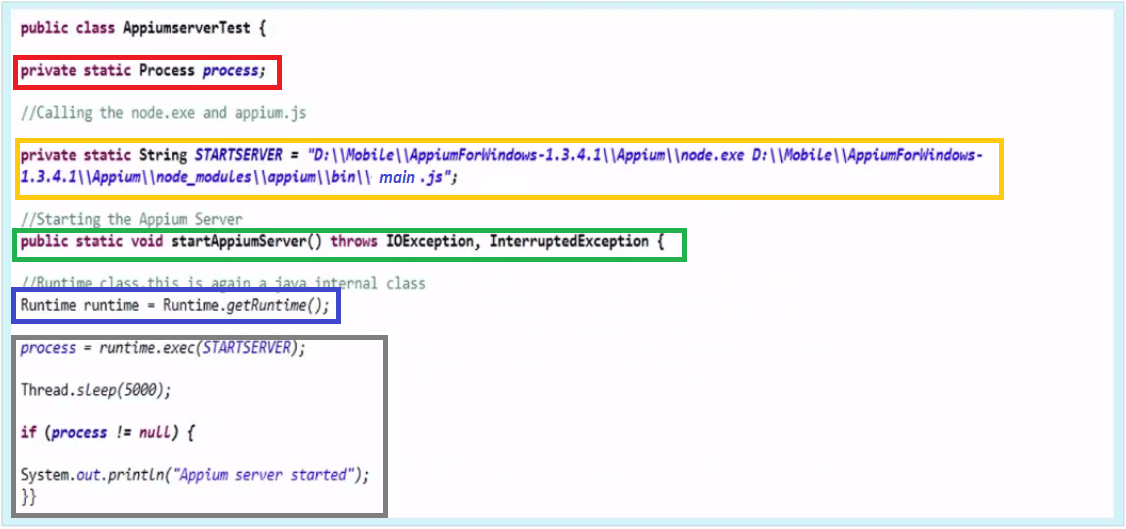
In the code highlighted in red, we have called process class which is a Java class and declared it static.
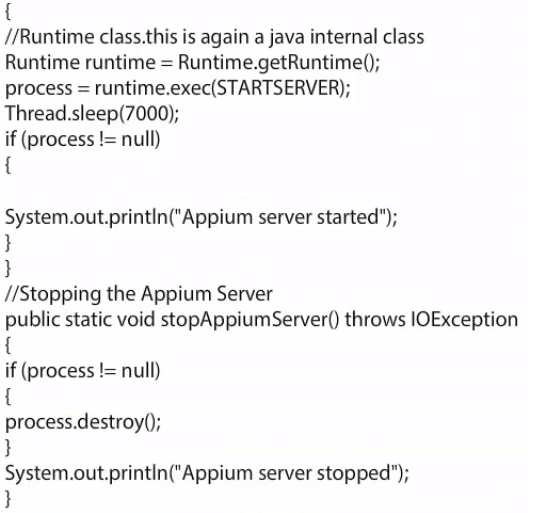
We then created a start server variable and pass the path to node.exe and main.js, highlighted in yellow. In the code highlighted in green, we added both paths into the same variable with spaces and created a method called startAppiumServer() which takes care of the Appium server startup process. Next step is to create an object of Runtime class which is again a java class and call the method getRuntime(), highlighted in blue. We will pass the variable “STARTSERVER” into runtime.exec() method. It will start the Appium Server.
Once the process is started, we have to store the current state of the process into this variable. We will give a sleep time of 5 seconds as it takes time to start the process. what we are trying to validate here is, if the process is not null; it means that the process is started as highlighted in the gray box.
Stop Appium Server
Here we need to create another method named stopAppiumServer(). We again verify the state of the process and if it is not null, call a method of process class destroy().
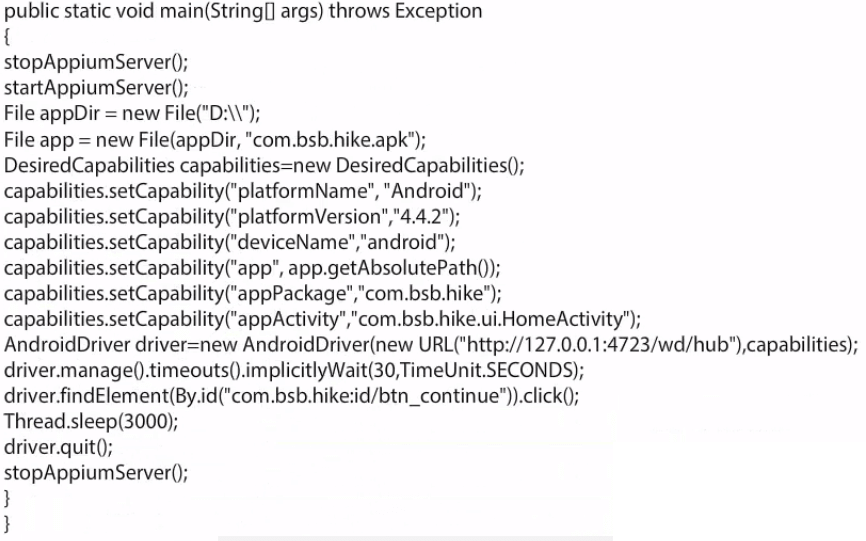
So now we know how to start and stop the Appium server from code. Let’s try to install and launch an app on a mobile device. Let’s see how we can install a .apk file on an Android device and launch it automatically without providing the path in Appium Server.
Installing and launching the application
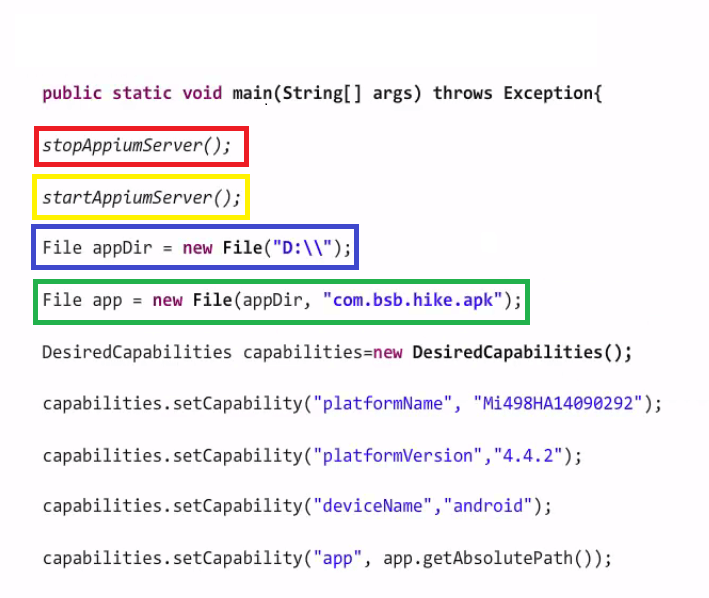
To begin with, we call the stopAppiumServer() method to verify if any instance of Appium Server is already running and if so, then it closes that instance, as highlighted in red. The method highlighted in yellow starts the Appium Server.
Then store the apk path file into a variable of File class, which is a Java class as highlighted in blue. Create another variable of File class app. It takes two parameters:
The absolute path of the apk file.
Name of the apk file.
Now the absolute path is stored into appDir variable and the name of apk file in the second part as highlighted in the green box. The rest of the things are the same as discussed in the earlier sessions.
The complete code is shown here.
Now that you have learned how to launch app from code, let’s move on to the next blog where we will learn how to set up Appium on a Mac machine.
In the last blog in this series, we learned how to set up Appium for test automation on a Windows machine. Now we will handle the application by writing the Java code. We will require the following software:
This process consists of five steps as depicted in the picture below.
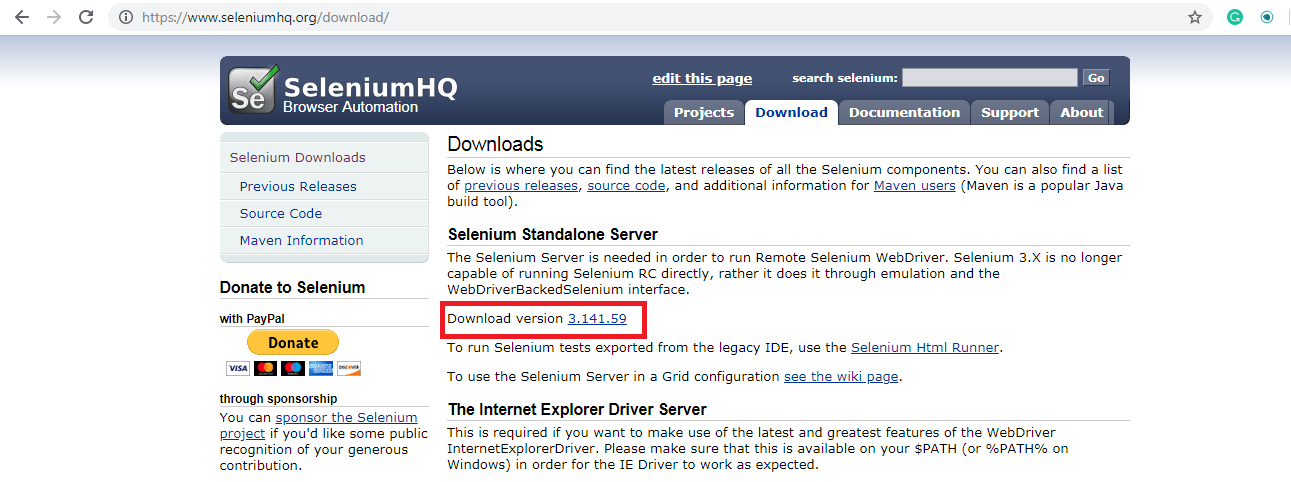
First, we need to collect the Selenium Standalone JAR and Appium Java Client Libraries. To download the Selenium standalone JAR file, go to seleniumhq.org/download then click on the Download version.
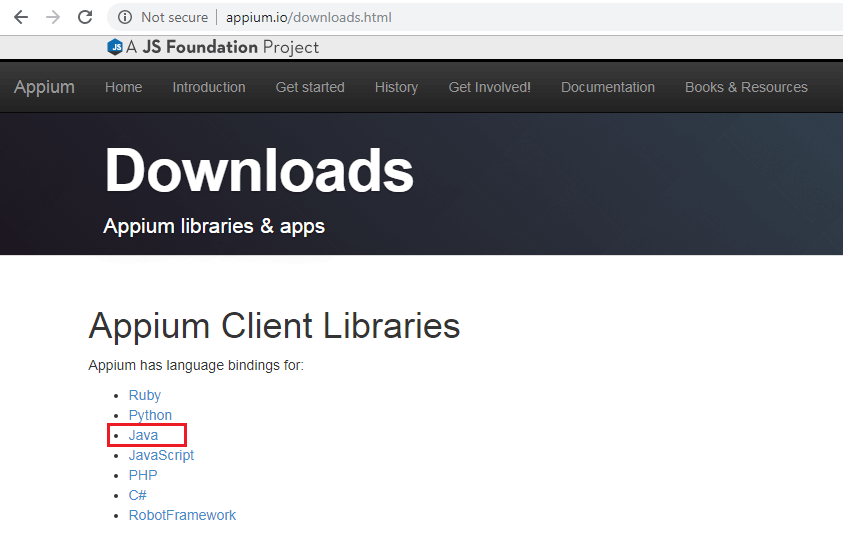
For Appium Java client you need to go to appium.io/downloads and download the libraries for the selected language.
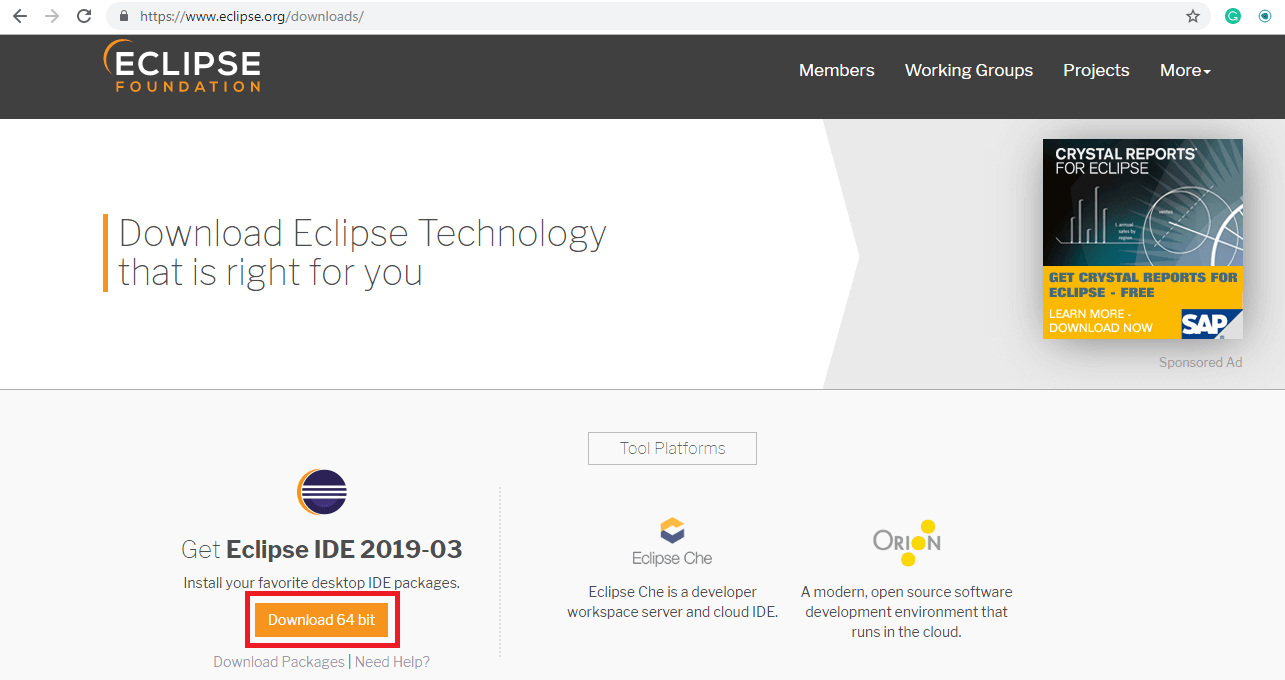
Now to create a java project download Eclipse from eclipse.org/downloads. Launch Eclipse and select the workspace location.
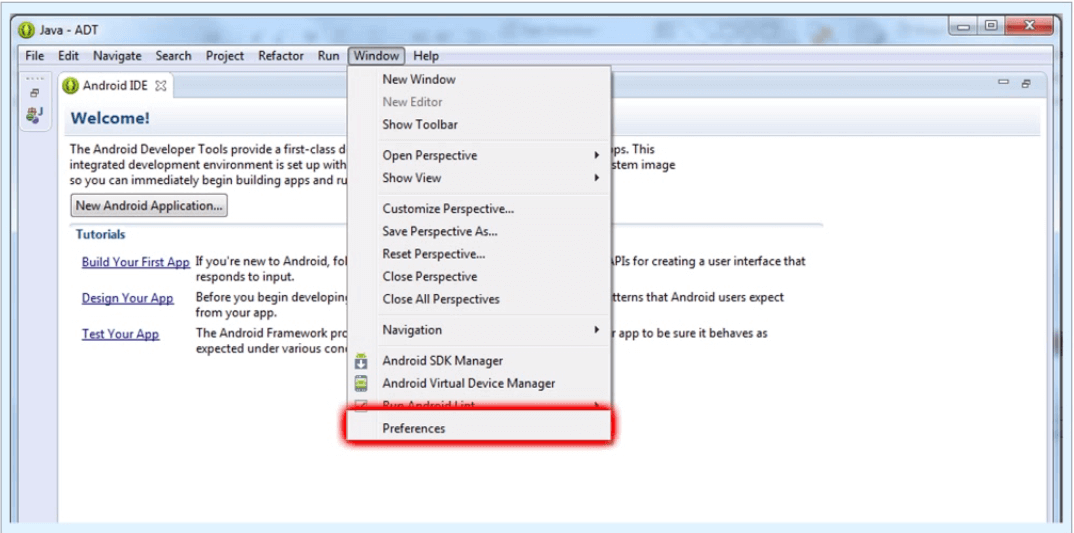
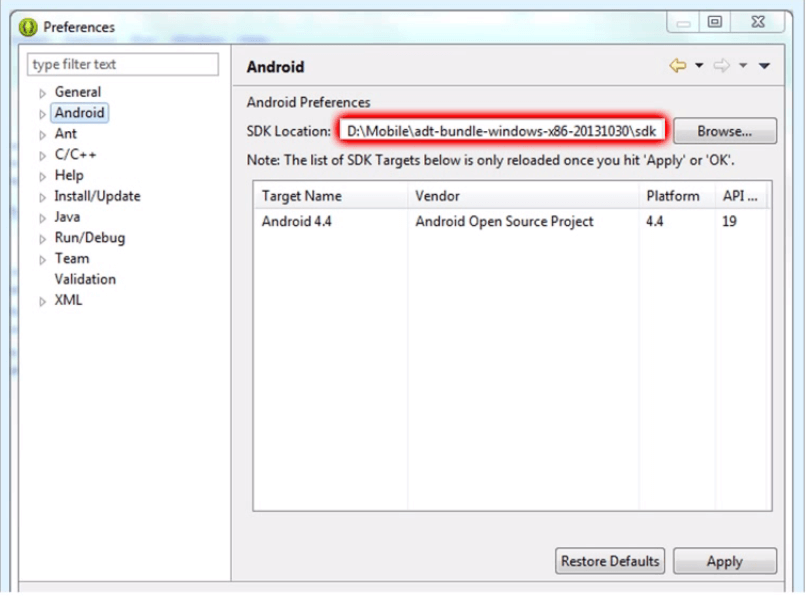
To set the Android SDK path into Eclipse, click on the Windows tab in the menu bar and select Preferences in the drop-down list.
Then select the Android option and browse your Android SDK location and click on Apply.
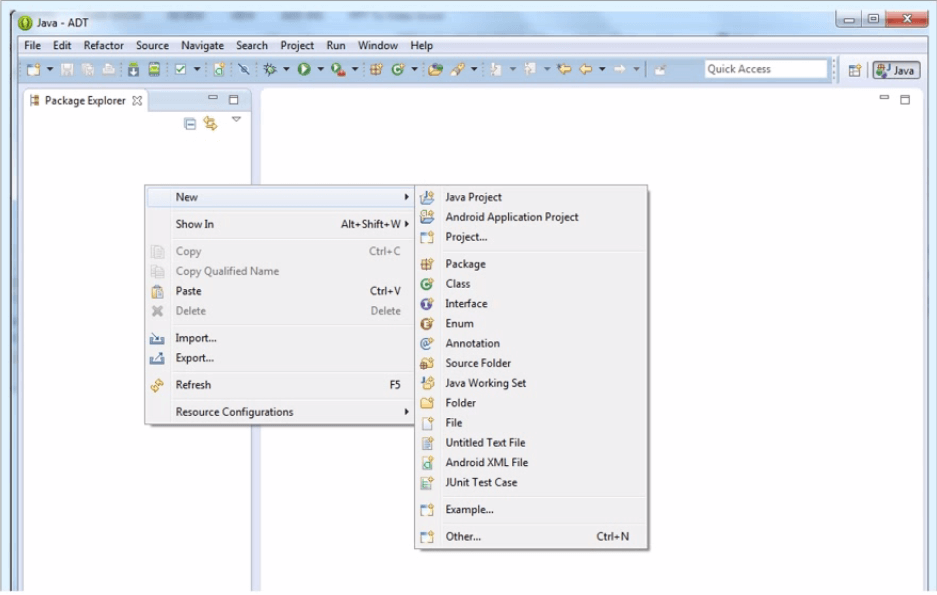
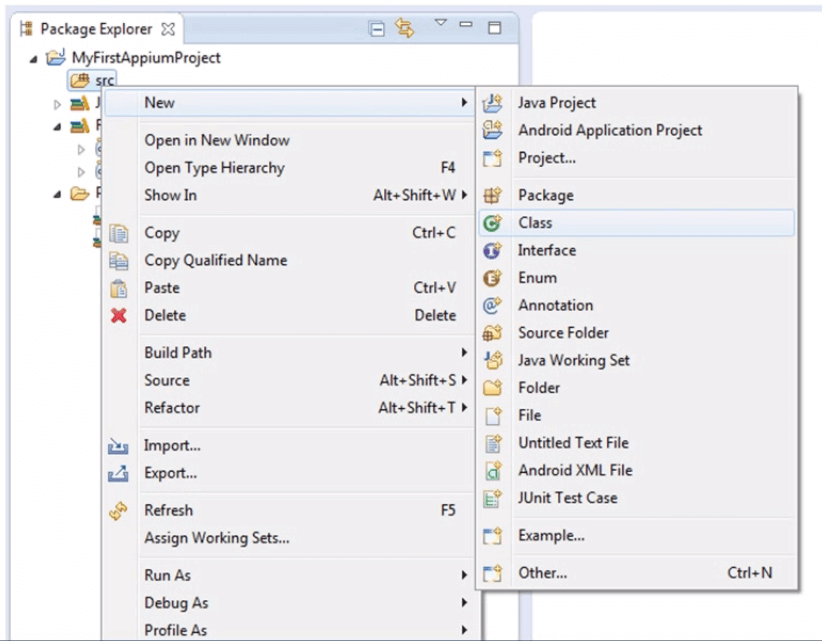
Launch Eclipse and right-click on Package Explorer. Then select a new Java Project.
Enter a project name and click finish.
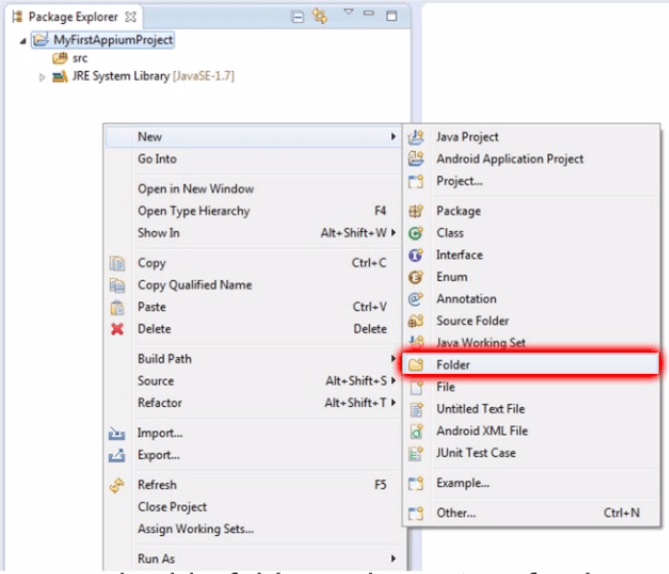
Once the project is created, add a folder to the project, for the project dependency files [Selenium Standalone] and [Appium Client Library] which you have downloaded.
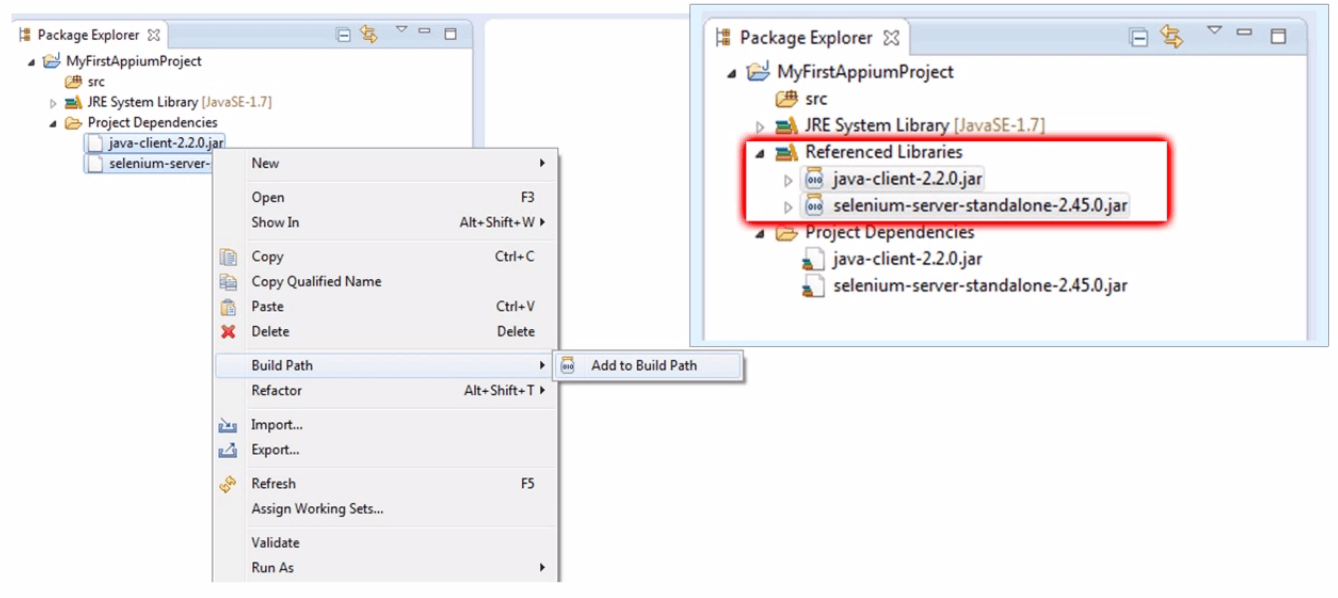
Copy the downloaded file into the newly created project dependencies folder. Select both files and right-click. Then select the add to Build path option and then Add to Build Path. Thus both classes have been added to your project reference libraries.
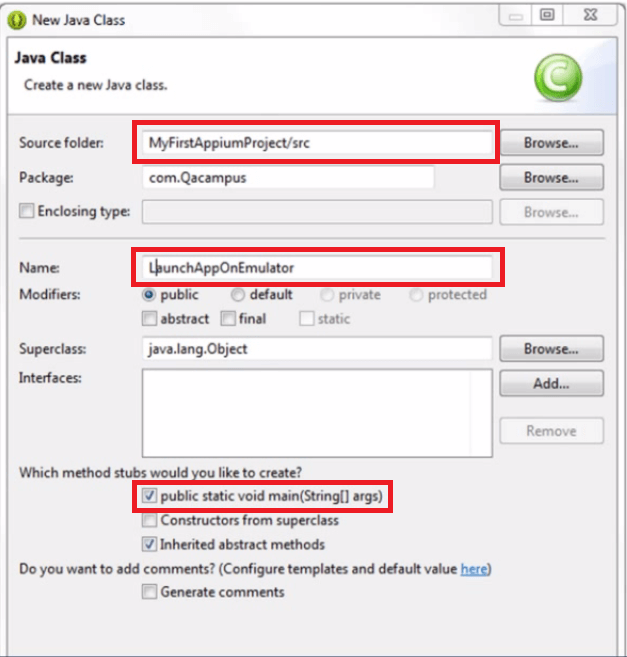
Create a class and import the required packages. Now right click on the src folder, hover the mouse over the new option and select the Class option.
Provide a package name, the name of class then select the main method checkbox.
A .java file within the package is created in Package Explorer panel. An auto-generated the main method is generated on the right panel.
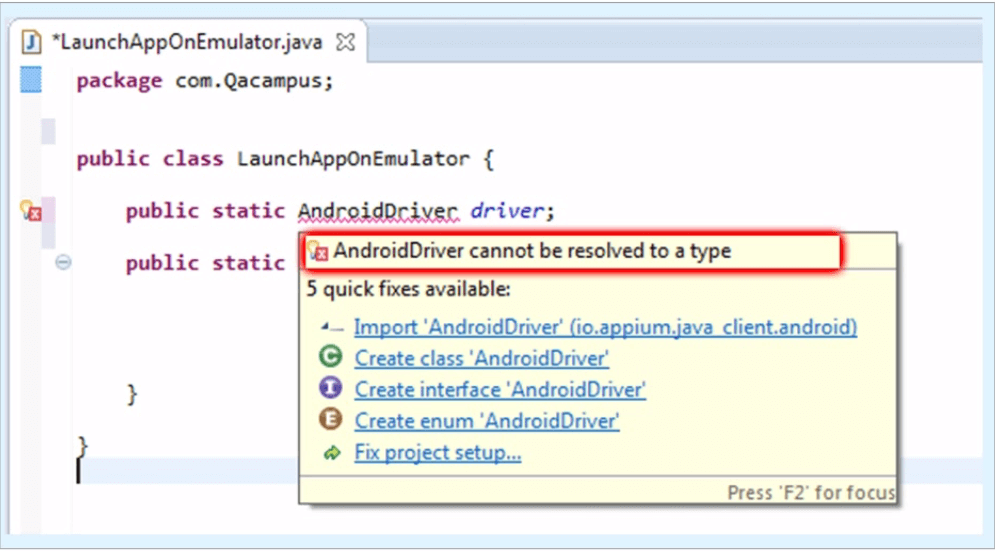
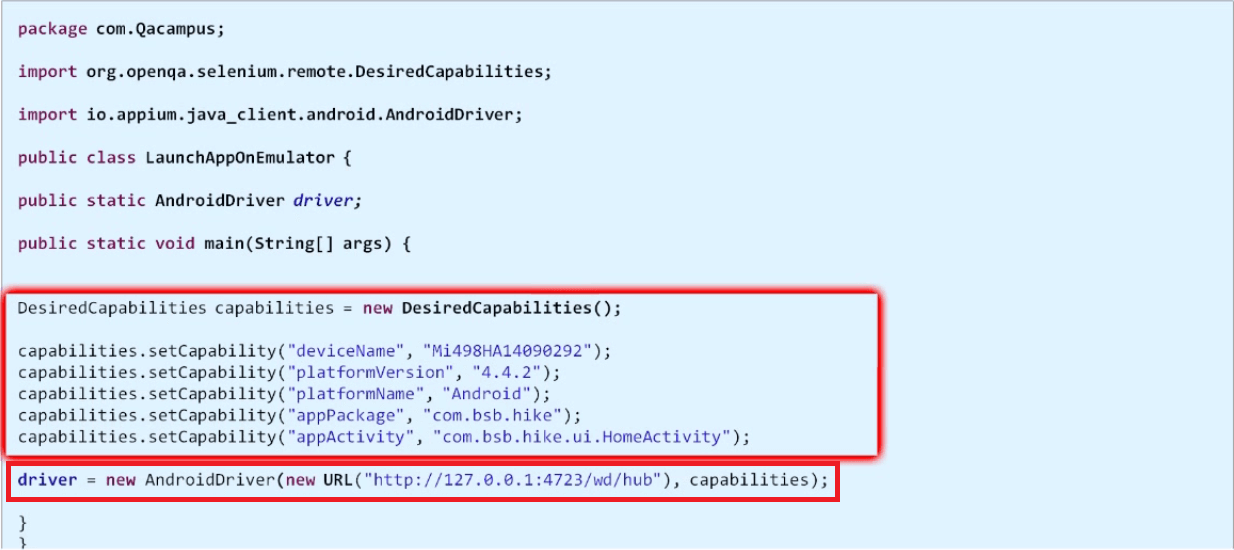
You need to define a public class variable of AndroidDriver as your first line of code. You will now see an error for an android driver. Now hover your mouse over the error, you will get a list of quick fixes. Select Import ‘AndroidDriver’. Once you select the import package option, the android driver package will be imported and the error will be removed.
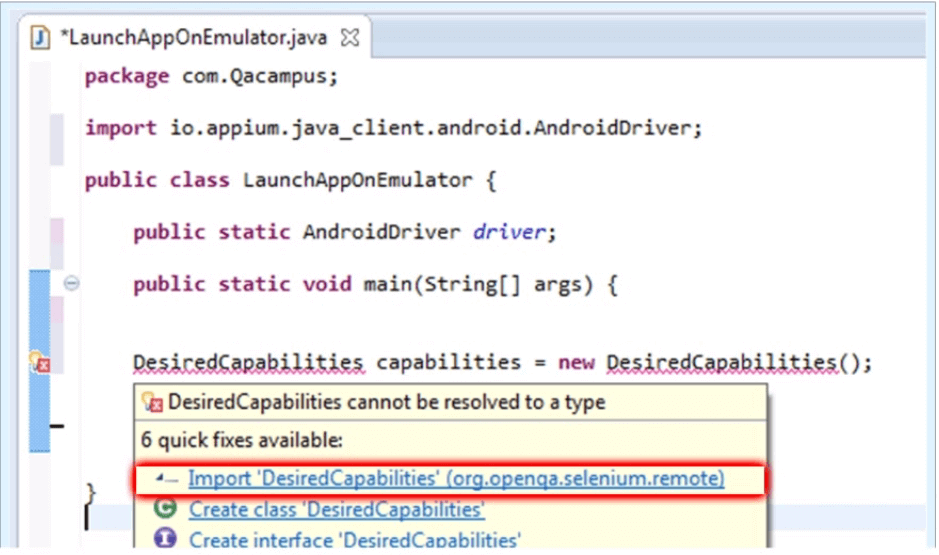
Create an object of DesiredCapabilities. Again you will get an error for DesiredCapabilities. Hover the mouse over DesiredCapabilities and then select Import ‘DesiredCapabilities’ from the quick fix list.
Once you select the import package option, the DesiredCapabilities package will be imported and the error will be removed.
Now set the DesiredCapabilities and also provide the package of an application and the name of application launcher activity.
Now you need to instantiate the Android driver.
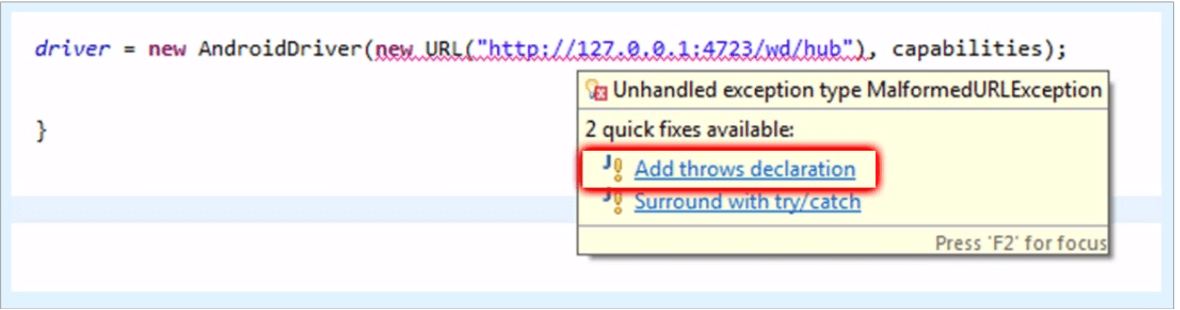
To do this we need to have two parameters, the first is the Appium server address with the port number which it is running and the Capabilities.
Hover mouse on URL and import URL from Java.net. You will get an error for complete new URL section, hover mouse on the error and select Add throws declaration. By doing so exception has been added into your main method.
Now start the Appium server and connect a device to the system. Now return to Eclipse and execute the code. This will launch the app in the device.
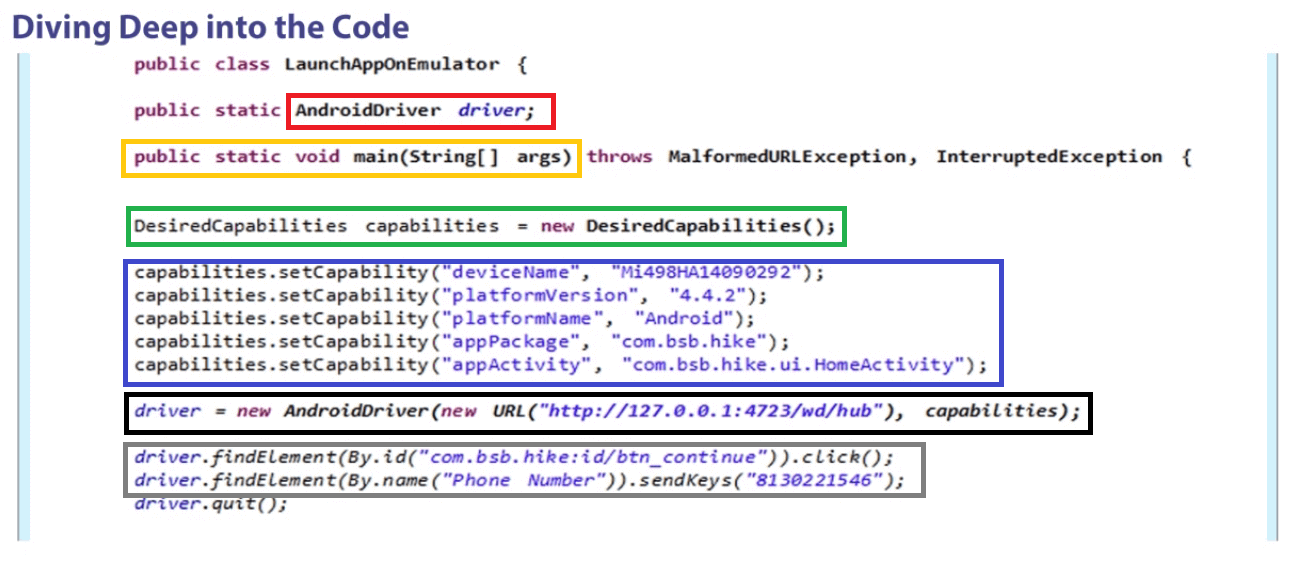
In the code, we have declared the class as public so that we can access it anywhere inside out test.
The java main method is highlighted in yellow. We created an object of desired capabilities class which you can see in the green box. In method setCapability, there are two parameters. First is the capability name and second is the capability value as highlighted in blue. Then we created an object of AndroidDriver class highlighted in the black box. The code highlighted in gray is the findElement(By) method which can locate an element on the screen.
Now that you have learned how to write a mobile test automation script using Appium test automation framework, we can move on to the next blog where we will learn how to start the Appium server and launch the app from code.
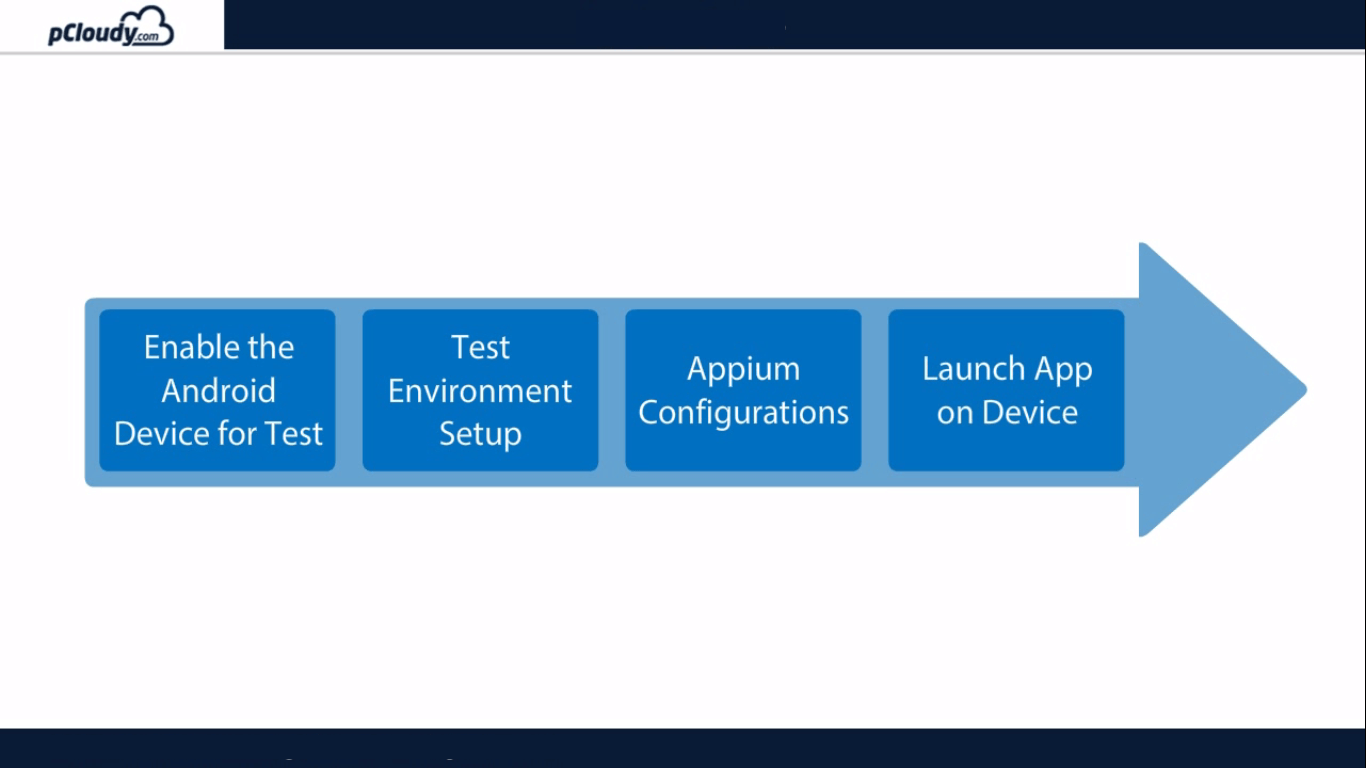
In the previous blog, we informed about the basics of Appium and its architecture. Now let’s understand how to setup Appium. There are four steps required to setup Appium, they are enabling the Android device for test, test environment setup, Appium Configurations, Launch the app on the device.
Pre-requisites for Appium Mobile Testing
1. An Android device with OS 4.2+
2. AUT(Application Under Test) file (.apk)
3. Phone USB Drivers
4. Java (JDK)
5. Android Studio (SDK)
6. Eclipse
7. Selenium Standalone JAR
8. Appium Java Client
9. Appium for Windows
10. .NET Framework 4.5
Every Android smartphone contains a secret set of Android developer options which are used by app developers who need additional functions to test their apps they are making for Android devices. It allows you to enable debugging over USB, capture bug reports on your Android device and show CPU usage on the screen to measure the impact of your software.
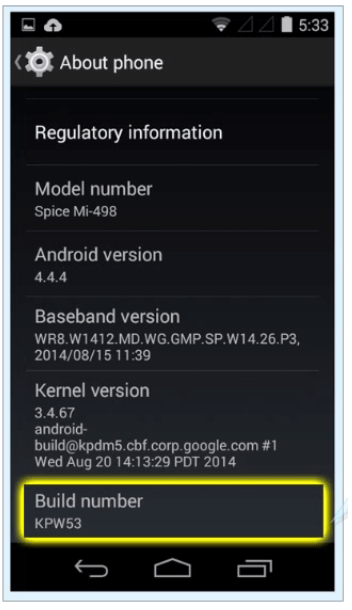
To enable developer option in the phones to go to the settings, click on the about phone options and click on the build number 7 times to enable the developer options.
Doing so will display a toast message for enabling the developer option. the current message appears if the developer message is already enabled on the phone.
Phone Drivers
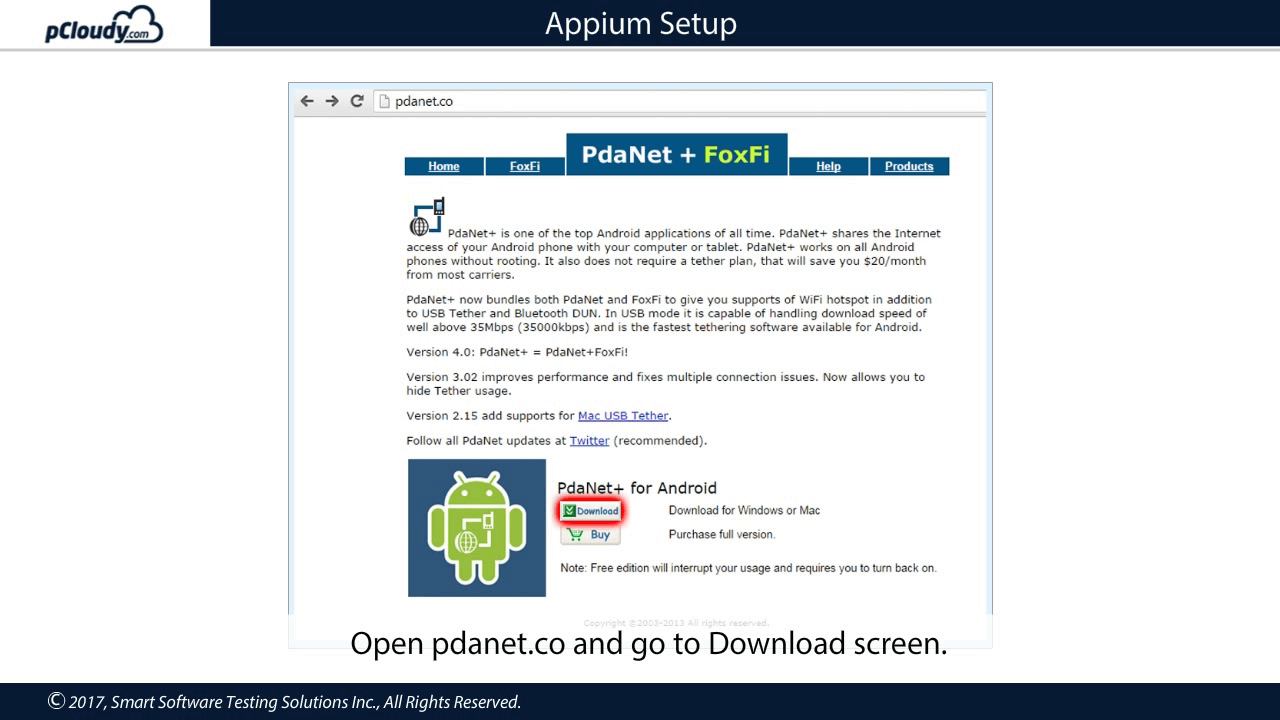
The phone can communicate with the PC only if there are proper drivers installed for the USB cable. Each phone manufacturers provides its own drivers for the phone. PDA net is a driver which works with all the Android devices. It makes sure that your phone is detected in DDMS.
Open pdanet.co and go to download screen and download the latest version to install it on your PC.
Let’s verify if the phone is prepared.
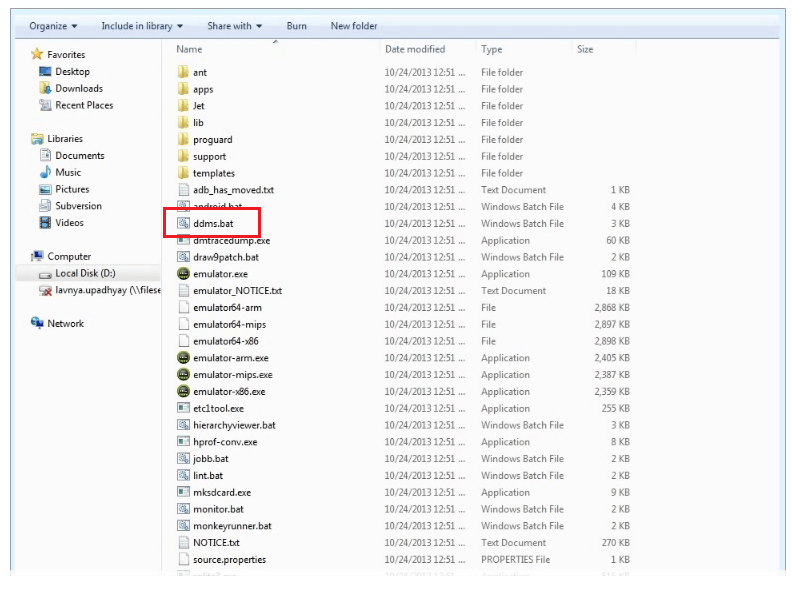
The ddms.bat file is present in the Android SDK tools folder.
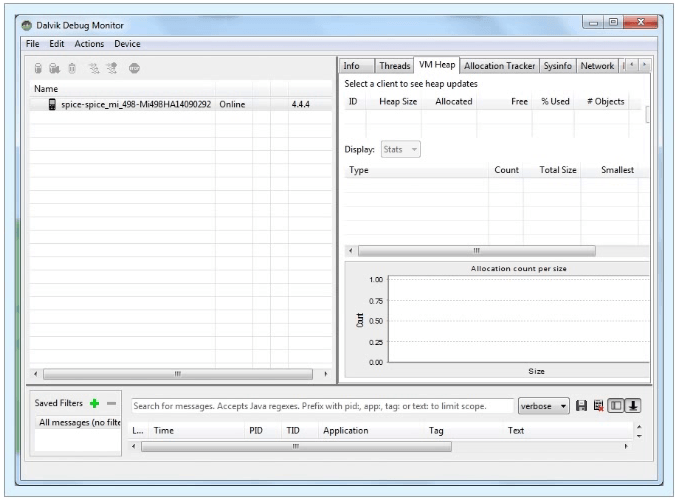
Double click on the file and you will see the Dalvic Debug Monitor window.
If your DDMS option is enabled i.e. if you have installed the PDA net software and connected the device to the machine, that device should be detected in this monitor. Now let’s move on to the second step.
Test Environment Setup
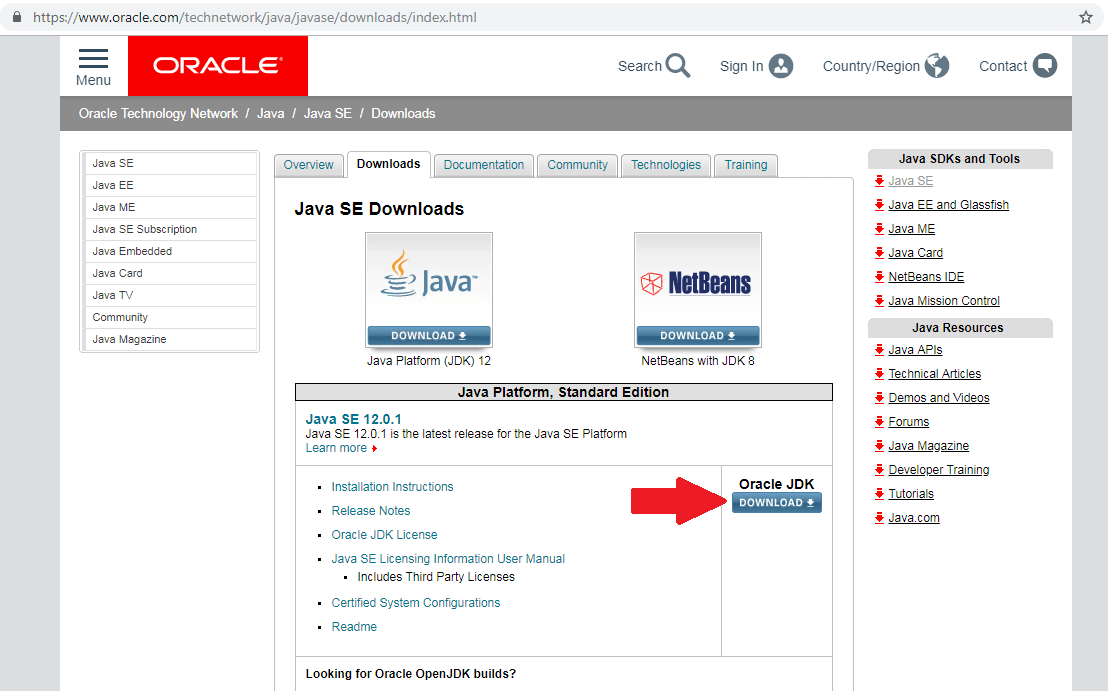
First, you need to download JDK from the Oracle website.
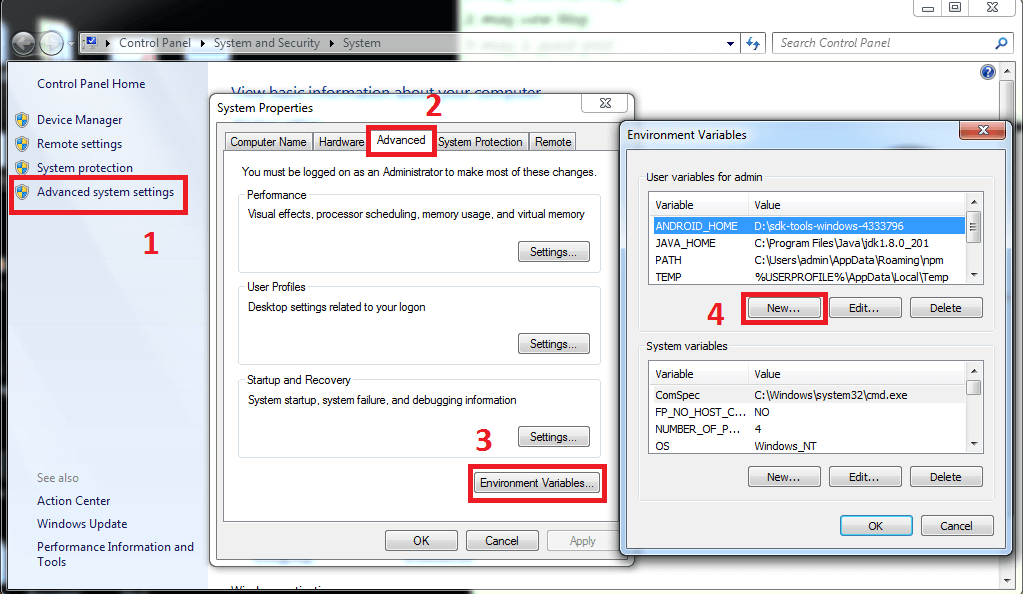
Once downloaded, install it to your machine. Now you need to set the Java installation path in your Environment variable. Right-click on Computer option in the Start menu and select the Properties option. Select Advanced system settings and then select the Environment variables option in the Advanced tab.
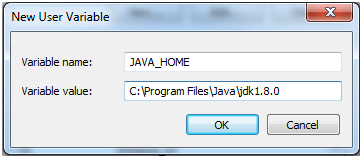
Then select the new option and enter the new variable name as JAVA_HOME.
Set the path of JDK to variable value and then click OK.
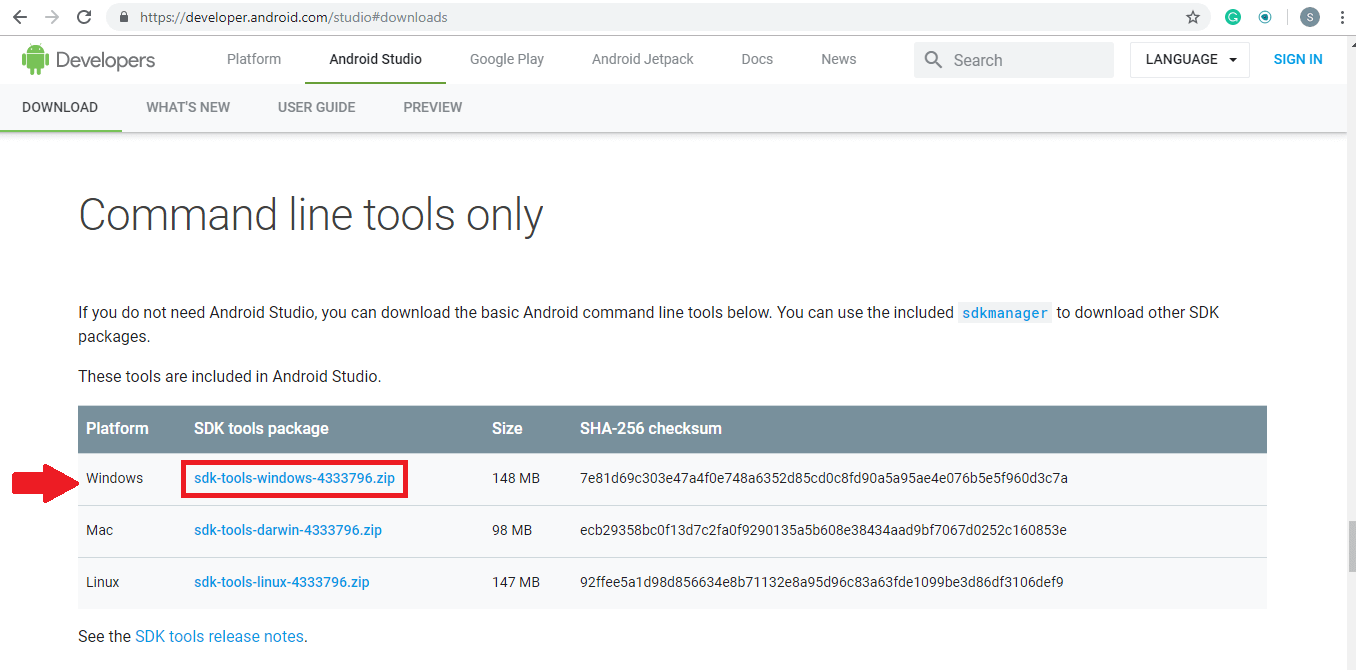
To get an Android emulator you need to go to www.developer.android.com\studio#downloads and Scroll down to Command-line tools only section to download the zip file of SDK tools package for Windows.
Don’t download the EXE file. Once the SDK file is downloaded, copy it to the C drive, make a new folder and extract the zip file in the new folder.
Now you need to search for SDK manager in the bins folder and open SDK manager. Once the SDK manager window is open, go to tools and then get into the bin folder and in the address bar type cmd and hit enter. Now in the command prompt type SDK manager “platform-tools” “platforms; Android-28 and then hit enter. So now you will be able to see Platform tools and Platform folders in now folder you created for the extracted files.
Click on platform tools and copy the address bar text and then again go to an environment variable. Then go to the path, a new window will pop up, make a new path and enter the copied text there and then click on OK.
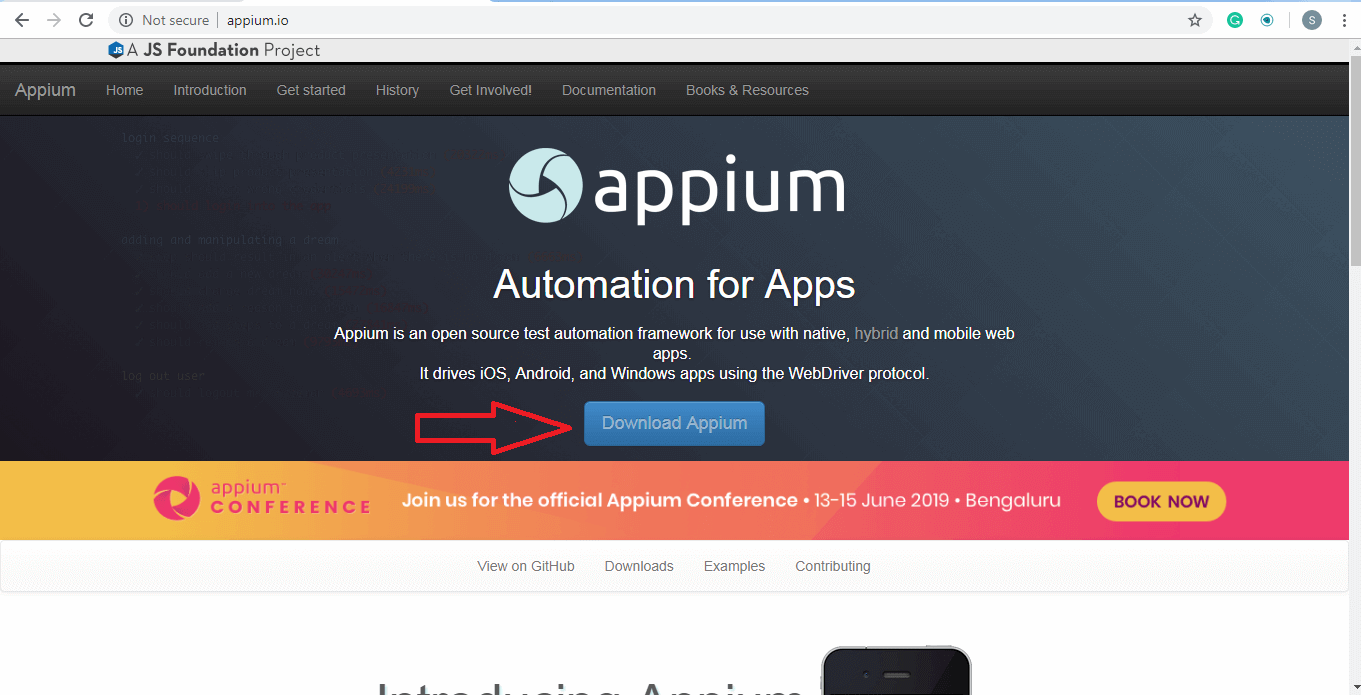
To download Appium go to www.appium.io and click on the Download button.
Under the latest version, click on the Appium-windows-1.12.1.exe file. Once the file is downloaded, open the appium.exe file. Click on the Start Server v1.12.1 button.
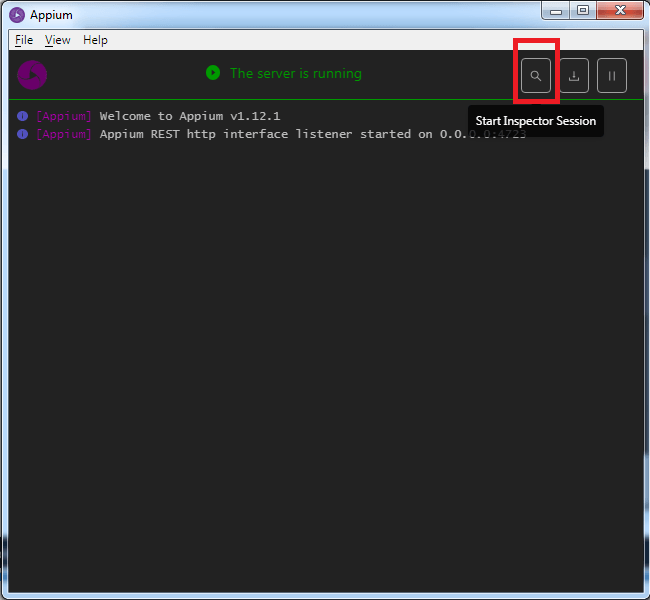
Then in the server window click on the Start inspection session icon at the top right corner.
Now you can get started with Appium automation testing. Do read our next blog to get more information about Appium mobile automation and how to inspect elements using Appium Desktop.
Appium is an open source mobile app UI testing framework. You can test all types of mobile apps and perform automation test on physical devices as well as on emulators and simulators. Appium mobile testing does not have a dependency on mobile device OS and it supports cross-platform app testing as a single API works for both Android and iOS. Appium supports many popular languages like C, PHP, Python, C#, Java, Ruby, JavaScript, etc.
What is Appium Mobile Testing?
When Appium is installed then a server is set up on your machine that exposes the REST API. It receives a command request from the client and executes that command on Android or iOS mobile devices. Then it responds back with an HTTP response. It uses mobile test automation frameworks like Apple instruments or UIAutomator2 to drive the UI of apps.
Approaches to Test Automation
There is two approaches for mobile test automation, Image-based and Object-based approach. Let’s understand both in detail.
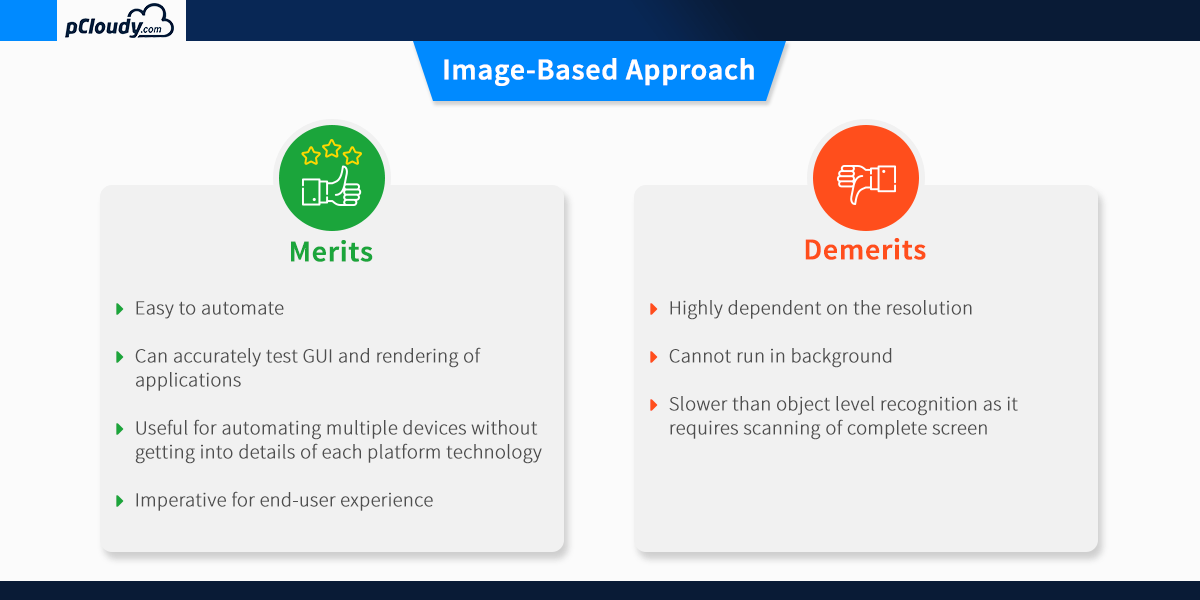
Image-Based Approach for Test Automation
This technique of object identification is based on the image processing attributes of the objects in the Application Under Test (AUT). Example: Automate user options like “click, type, drag-drop, mouse actions, etc.”
Visual verification of the expected output
• Not dependent on the platform underneath
• Can be used to automate emulators as well as a real device.
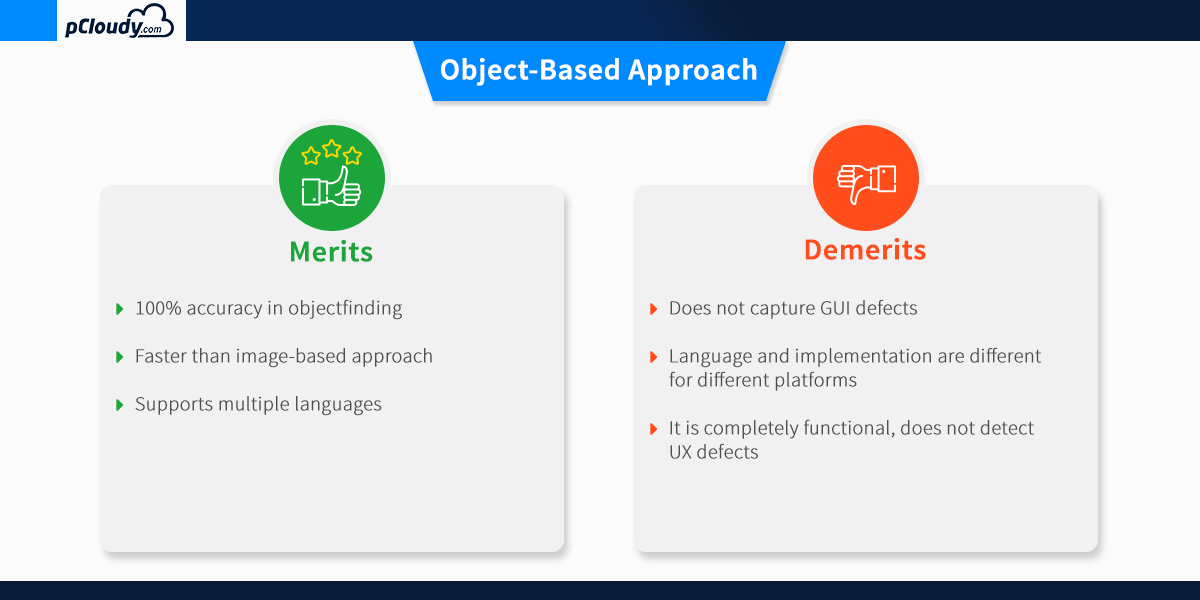
The object-based approach of test automation
This technique of test automation is based on recognizing the nativity of the objects in AUT. This nativity reorganization process for each individual object in the application is carried out using different attributes that are assigned to the object.
It is used to extract the application object identifier with its properties from the actual native operating system source code, just like the developer used. This is an accurate and fast method to recognize the buttons, lists and other objects used by the application.
One drawback of the object-based approach is that the recognition of the individual attributes of the object involved restricts these techniques ability to function in test scenarios that require third-party application access. This reduces the automation coverage of utilizing this technique.
Which approach should we choose?
As we have seen, both approaches have their pros and cons. To get better results, you can merge both approaches and think about devising a hybrid test automation solution.
The combination of OCR (image based) and native (object-based) approach allows users to build a single script that will be portable across different devices. It will make your automation robust and efficient and allows the users to confidently detect the relevant native and GUI defect within the mobile application.
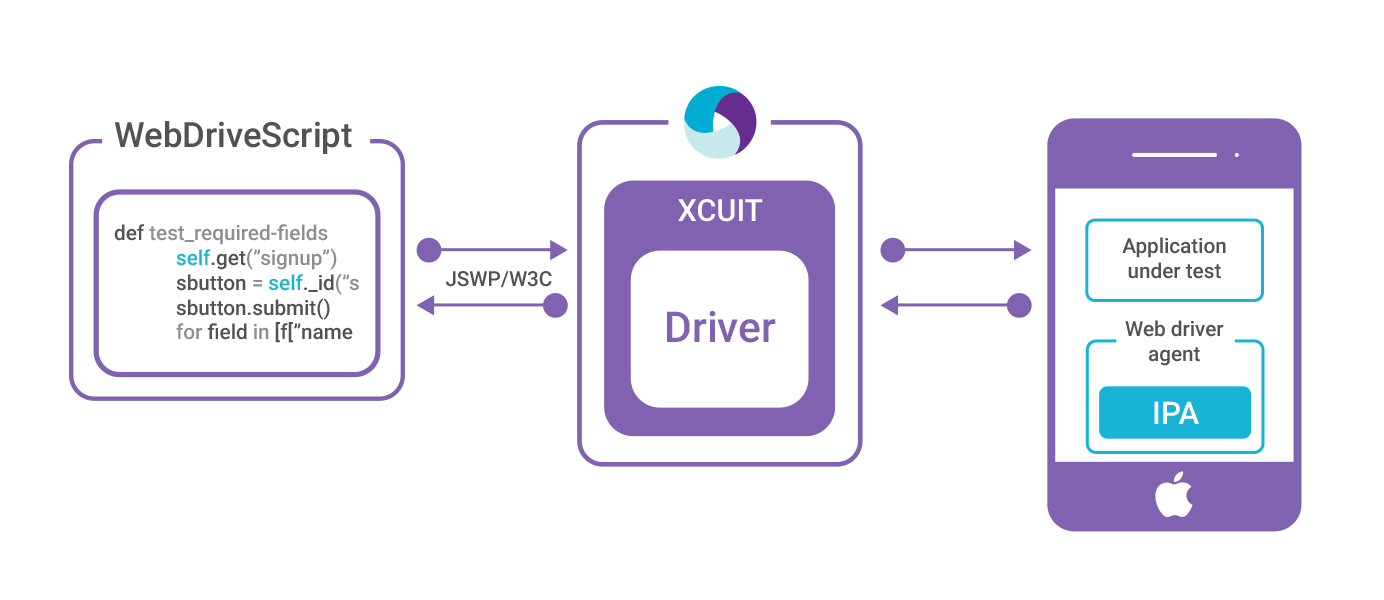
Appium Overview and Architecture
Appium is an HTTP server that manages WebDriver sessions. On iOS devices, Appium proxies command to a UI automation script running on Mac Instruments environment. Apple provides an application called instruments which are used to do a lot of activities like profiling, controlling and building iOS apps. It also provides an automation component where you can write some commands in JavaScript which uses UIAutomation APIs which interact with the app user interface. Appium mobile automation uses these same libraries to automate iOS apps.
The Webdriver Script sends a command in the form of HTTP (JSWP) to the Appium Server. Then the Appium Server will then decide as per the request which driver should be initiated. So, in this case, the Appium Server will initiate the XCUITest driver and it will pass the request to the WebdriverAgent which is an IPA (WebdriverAgent.xcproj) developed by Facebook. WebdriverAgent is responsible to send the command to the Application Under Test (AUT) to carry out the actions in the app. Then the response will be sent to the Webdriver Script through the Appium server.
Only iOS 9.3 and above version are supported by the XCUITest Driver. You can find all the capabilities for XCUITest Driver in the link mentioned below.
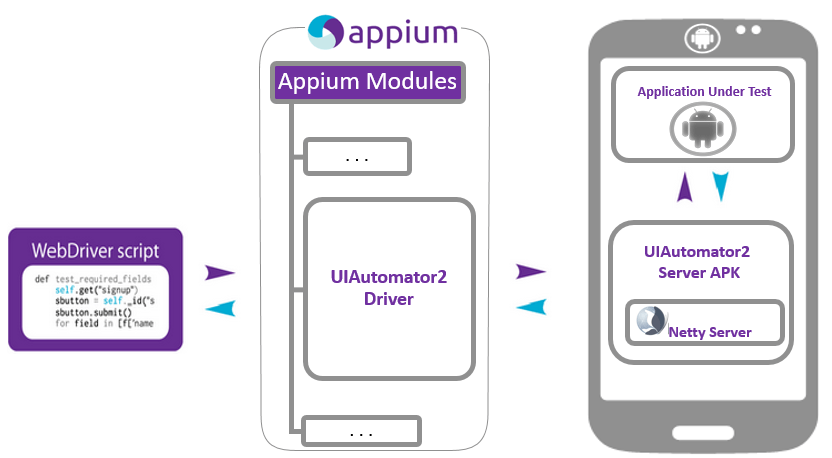
The situation is very similar in the case of Android where Appium proxies command to a UIAutomator2 test case running on the device. UIAutomator2 is Android’s UI automation framework which supports running JUnit test cases directly into the device into the command line. It uses Java as the programing language but Appium will make it run from any of the web drivers supported languages.
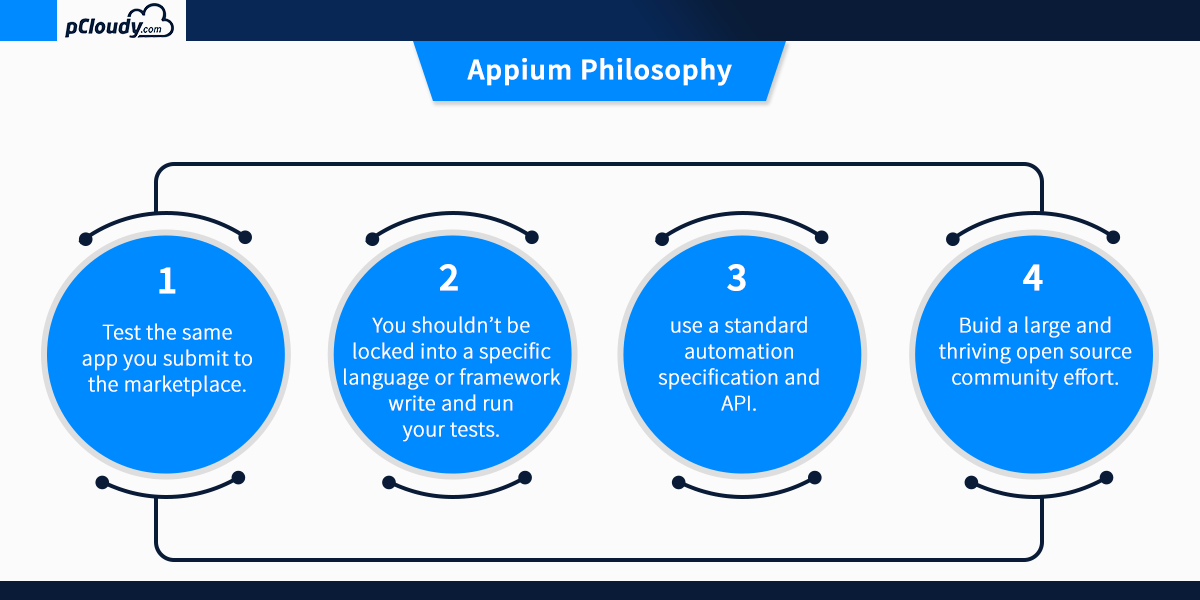
To answer the question “what is Appium automation?”, let’s have a look at the Appium philosophy.
Appium mobile testing is required for proper execution of continuous integration as it speeds up the overall testing process. Appium mobile testing helps to run the repetitive test which would take more time to perform manually. This is why appium mobile testing is the preferred choice for the developers when it comes to test automation.
In the next blog, we will learn more about Appium mobile testing and how to install/configure the Appium setup on a windows machine.