PCloudy is happy to announce several exciting features as part of it’s latest release.
ADB Bridge (for In-premise cloud): Connect and take full control of any Android device using Android Debug Bridge. It provides access to a versatile command line tool that lets you communicate with a remotely connected device over the cloud.
ADB Commands (Available as part of Enterprise package): You can run ADB commands from your computer to the remotely connected device on a Private Cloud Lab.
Network Simulation (for In-premise cloud): Control the network connected to the device on which you will test your application. Set Network Profiles, modify existing profiles and apply it to the network connected to the device.
Battery Consumption Reports (For Android devices above 5.0): The platform now displays real time battery consumption data of device and App under testing. You can view a graphical representation of battery consumed by your apps with the total battery used by the device.
Monkey Tool (UI/Application Exerciser Monkey): Perform Stress and crash test on your application by simply selecting a device and running monkey tool on your application. The tool sends out a stream of pseudo-random user events such as clicks, touches, or gestures, as well as a number of system-level events, which acts as a stress test on the application software you are testing.
New implementation of iOS Instruments: Several improvements for running Appium and Calabash scripts on iOS devices
Volume Up & Down buttons for Android: Separate keys to control Volume of the devices. This is just the beginning, there’s something bigger coming.
Wifi control button for Android: Separate keys to Switch-on/Switch off wifi settings on Android devices
Support for IOS 10 beta : Get your App ready for Testing for upcoming IOS 10 release. You can test on iPhone and iPad with IOS 10 Beta version.
Several Bug fixes
We would be happy to send you more information. Please contact us on info@pcloudy.com
(Femont, CA) – Smart Software Testing Solutions (SSTS Inc.) is proud to announce that pCloudy, a cloud-based mobile and IoT application testing platform, will be sponsoring CloudBee’s upcoming Jenkins World 2016 Conference at the Santa Clara Convention Center in Santa Clara, California, on September 13-15, 2016.
The key features and capabilities using pCloudy has quickly developed the reputation as the leading mobile and IoT application testing platform. pCloudy provides application developers robust solutions including three testing options: public, hosted, and on-premise. All three solutions allow users to perform functional and performance based testing on real Google Android and Apple iOS mobile devices. With full debugging features, analytical and performance tools, and recording session videos among other critical features, pCloudy continues to push the boundaries of mobility testing.
“pCloudy continues to innovate and push the envelope in the world of mobile testing. This sponsorship allows us to reach some of the world’s leading Jenkins focused application developers and testers to introduce the Jenkins integration within pCloudy. The opportunity to discuss pCloudy with everyone in attendance will be a great opportunity for us.” a spokesman said.
Jenkins World 2016 Conference is the flagship event for Jenkins users and professionals hosted by CloudBees. As one of the longest-running events, it brings together some of the industry’s leading thought leaders, practitioners, and solution providers. This year’s event is headlined by Kohsuke Kawaguchi of the Jenkins Project, Sacha Labourey, CEO of CloudBees, and author Gary Gruver. In addition to the headlining presenters, attendees and solution providers come from all wings of the industry.
pCloudy will be available for scheduled meetings and walk-ins within the exhibition hall. Please feel free to stop by booth K19 to learn more.
To learn more about pCloudy please reach out directly to schedule a meeting or to learn more information:
About pCloudy:
pCloudy is the simplest online device cloud, that provides customers with the necessary tools for convenient, effective, and immediate testing for their mobile strategy. It enables continuous development and testing on real mobile devices. Our unique debugging feature for app developers pinpoints potential errors that will significantly reduce costs and time. With pCloudy testing, the reduction in release time allows developers to focus on improved features instead of corrections.
About Jenkins World 2016:
Jenkins World will bring together the largest gathering of Jenkins users in the world, including Jenkins experts, continuous delivery thought leaders and companies offering complementary technologies for Jenkins. Jenkins World will provide opportunities for attendees to learn, explore and network face-to-face, as well as to help shape the future of Jenkins.
About CloudBees:
CloudBees, the Jenkins Enterprise company, is the continuous delivery (CD) leader. CloudBees provides solutions that enable IT organizations to respond rapidly to the software delivery needs of the business. Our offerings are powered by Jenkins CI, the world’s most popular open source continuous integration (CI) server. The CloudBees Continuous Delivery Platform provides a wide range of CD solutions for use on-premise and in the cloud that meet the unique security, scalability and manageability needs of enterprises. Our solutions support many of the world’s largest and most business-critical deployments.
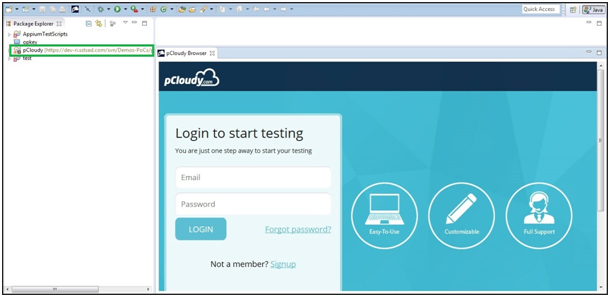
pCloudy has released a plugin for Android Studio which provides you access to the platform for performing manual and automation testing of mobile apps from within Android Studio IDE.
For Manual Testing
Now you can build and upload your Android Apps to pCloudy devices directly from your Android Studio project workspace.
If you are using Appium as automation tool and have created your Automation scripts as a project in Android Studio, you can run the scripts directly on pCloudy devices.
Prerequisites
1. An account in pCloudy with enough credits.
2. An API Access key for authentication with pCloudy.com
3. Chrome Browser on local machine
4. Android Studio IDE
5. Android Studio pCloudy plugin
Preparation
Reference the JAR files to Eclipse
Make a note the API Username and API Access Key
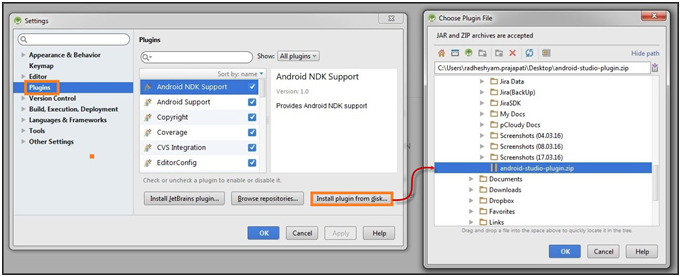
How to Install the Plugin
1. Download the Android Studio plugin for pCloudy
2. Open your Android Studio > go to Setting icon of Android Studio > Select Plugins > All available plugins are shown which can be filtered with the help of Show feature as per requirement.
3. Click on Install plugin from disk > Browse and select location of your downloaded Android Studio plugin of pCloudy
4. Click on OK
5. Now, you can see that pCloudy plugin has been successfully integrated to Android Studio.
Select pcloudy plugin and click on OK to proceed. Here, we are going to install pCloudy plugin for Android Studio from local disk. Click on Install plugin from disk
pCloudy plugin for Android Studio has been integrated successfully.
pcloudy-plugin-over-android-studio
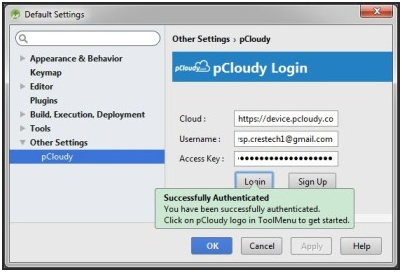
Click on pCloudy plugin icon shown on Android Studio. pCloudy Login page opens. Enter your Username and Access Key and click on Login. Your login credentials are verified. Click on OK to proceed.
Note: This is one-time task. Credentials will be valid until you logout.
Now, you are ready to use the Android Studio Plugin for pCloudy.
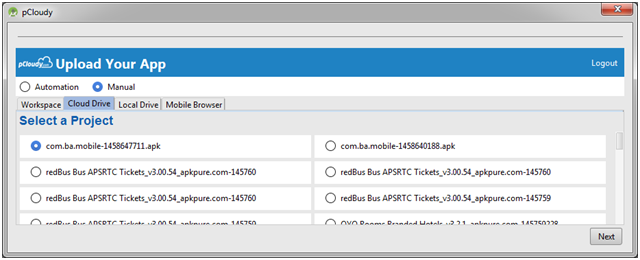
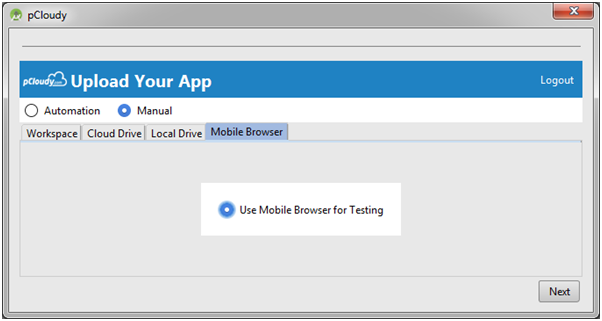
Manual Functional Testing of App
After successful login, upload your app screen appears. Workspace page helps you to select application path of your local machine.
Cloud Drive page lets you to select app from the list and click on Next to proceed.
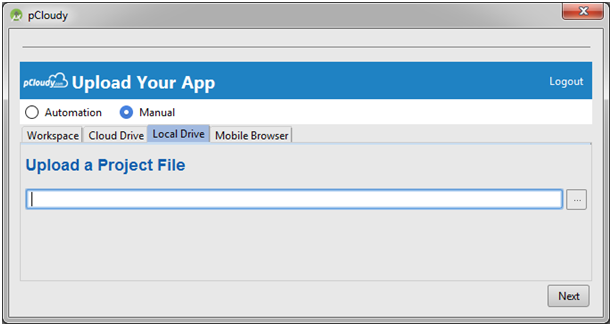
Local Drive lets you to upload your app from your local machine to perform testing.
Mobile Browser enables you to use mobile browser for testing.
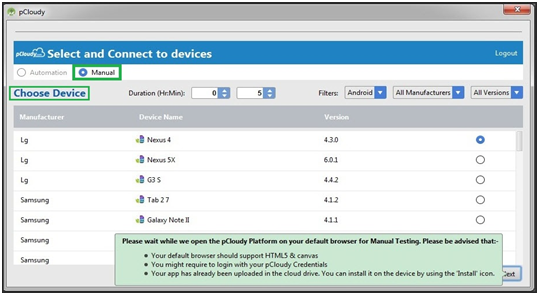
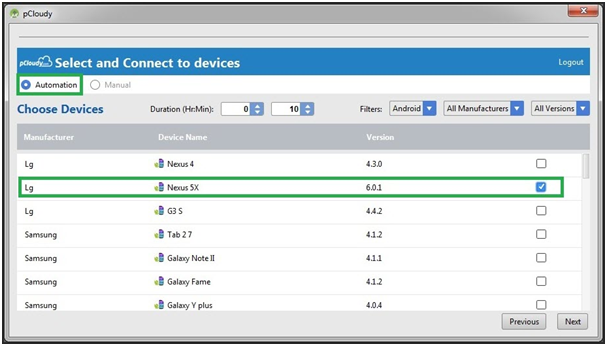
After selecting app, the next step is choosing a device. Select and Connect to devices page provides you list of devices which can be filtered by using filter parameters (Android/iOS, Manufacturer, and OS version). Select duration of your testing. The device will get booked for selected time duration.
When you click on Next, you get a message “Please wait while we open the pCloudy Platform on your default browser for Manual Testing. Please advised that…”
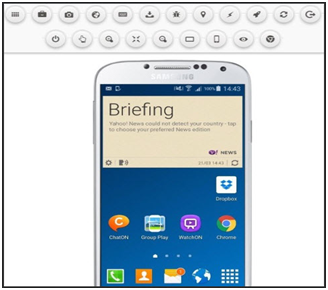
Just after few seconds, you will be redirected to the connected device page over pCloudy to perform manual functional testing of your app on selected device.
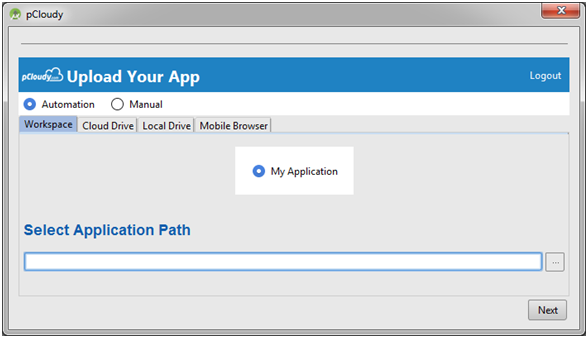
Similarly, the first step towards performing automation testing is selecting an app from workspace/cloud drive/local drive or use mobile browser.
Select your desired device; select duration of automation testing. You can filter devices displaying devices by using filter options (Android/iOS, Manufacturer, and OS version). Click onNext to proceed.
Note: Here, you can select multiple devices as well.
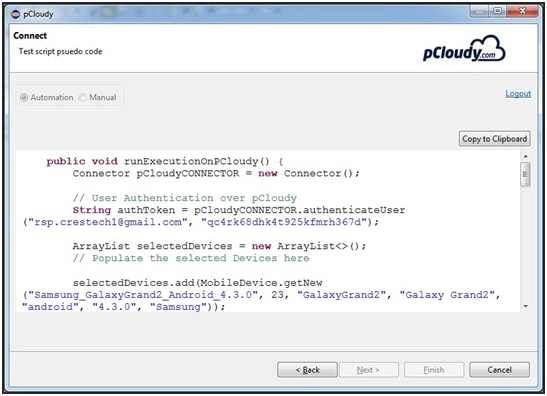
Finally, you get corresponding pseudo code for performing Automation testing of app. You can copy this pseudo code to clipboard and use it within your Automation script…
You will need the pCloudy java connector jar file for the above code to work. The pCloudy-java-conector.jar contains the API wrappers, classes & methods to use the pCloudy RestfulAPIs (without knowing how to call rest webservices from java). The gson.jar is a well known, opensource google library. You should add the pCloudy-java-connector.jar in its build path as a reference within your java project containing appium scripts.
pCloudy provides a plugin for Eclipse IDE. Using the plugin you can perform both manual and automation testing of mobile apps. The plugin provides a user interface to connect to the pCloudy platform. You can upload apps, book devices and perform your testing right from your IDE.
For Manual Testing
Upload your app to the cloud drive, select the device, and perform the manual testing of your app right from Eclipse.
For Automation Testing
This plugin helps you get a pseudo code for your Test Scripts to run on multiple pCloudy Real Devices in Parallel. Just install the plugin, login to pCloudy.com, upload your app, select devices and get the pseudo code.
Prerequisites
You have an account over pCloudy with enough credits.
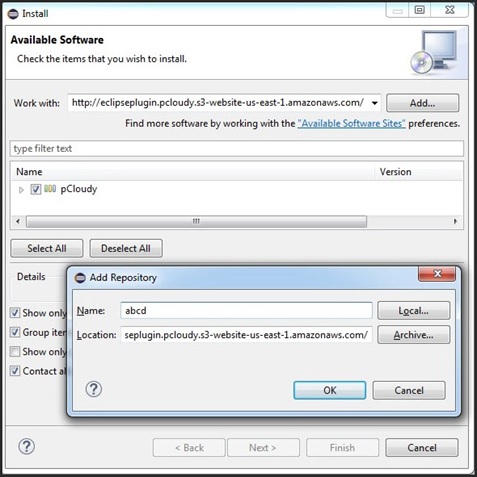
Click on Add, a new pop up window of Add Repository will open
Enter Name and Location, click on OK
Check pCloudy checkbox and then click on Next
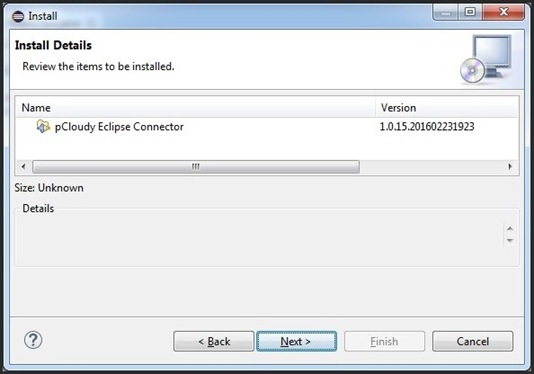
Now, you need to install pCloudy Eclipse Connector. Click on Next to begin pCloudy Eclipse Connector installation.
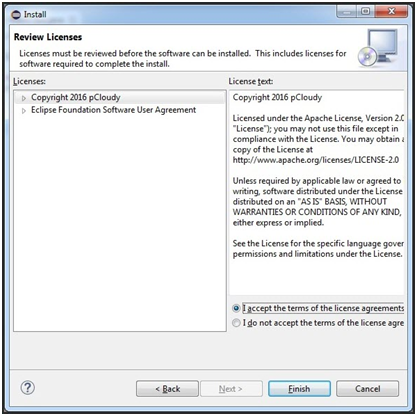
Further, check I accept the terms of the license agreements checkbox and click on Finish.
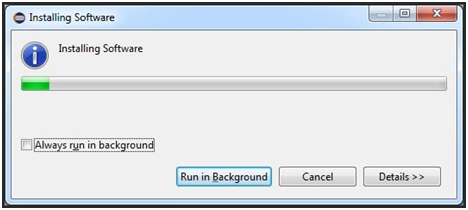
Installation of pCloudy Eclipse Connector begins.
On completion of pCloudy Eclipse Connector installation successfully, an alert message appears. Click on OK to proceed pCloudy plugin.
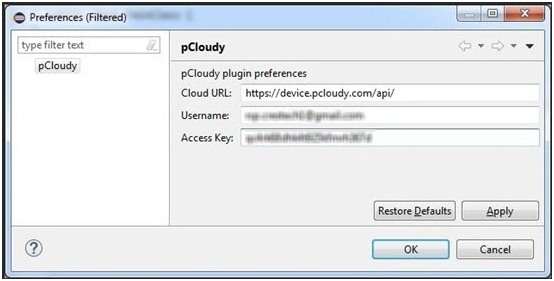
Now, enter Cloud URL of pCloudy along with registered Username and Access Key over pCloudy to login successfully. Click on Apply and then OK.
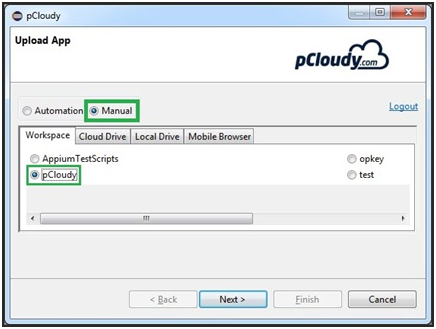
Now, you are able to perform Automation/Manual testing of apps based on Appium TestScripts/pCloudy/OpKey or Test as per your requirement.
Automation Testing of App
To perform automation testing of your app, here’s a checklist you need to prepare for Automation
Here, we are discussing about Test Automation of apps by over pCloudy.
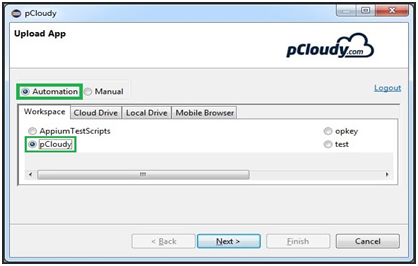
Select Automation & pCloudy and then upload your app to be tested.
Click on Next to proceed.
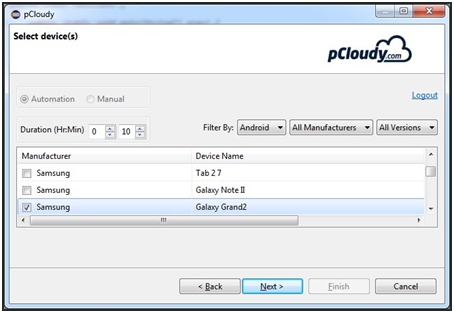
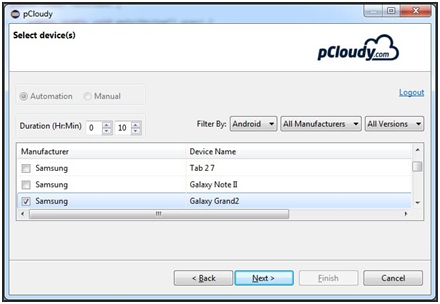
Select duration and filter list of devices by using given filter parameters (Android/iOS, Manufacturer, and Version). Select desired device (Ex. Samsung) and click on Next.
Finally, you get pseudo code for performing Test Automation. You can copy it to clipboard or copy it manually by selecting entire pseudo code.
You will need the pCloudy java connector jar file for the above code to work. The pCloudy-java-conector.jar contains the API wrappers, classes & methods to use the pCloudy RestfulAPIs(without knowing how to call rest webservices from java). The gson.jar is a well known, opensource google library. You should add the pCloudy-java-connector.jar in its build path as a reference within your java project containing appium scripts. See this link to learn how to add reference in eclipse.
You can download pCloudy-java-connector.jar & gson.jar(a dependancy of the pCloudy-java-connector.jar)
Manual Testing of App
If you want to perform Manual Testing of apps over pCloudy through Eclipse then select Manual way and pCloudy and upload app to be tested. Click on Next to proceed.
Select duration and filter list of devices by using given filter parameters (Android/iOS, Manufacturer, and Version). Select desired device (Ex. Samsung) and click on Next.
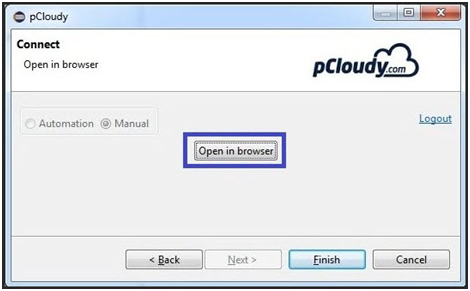
Now, you are recommended to open pCloudy in browser. Click on Open in browser and then on Finish.
When you click on Finish, pCloudy login page opens in eclipse. Now, you can login and perform manual testing on selected device as well
The upcoming iOS 10 has sparked great interest among app developers owing to it’s rich, better-than-ever features. The beta version of iOS 10 SDK includes new APIs and services that will power a whole new generation of apps. You can now extend your app capabilities to Phone Messages, Siri, VoIP, Maps, Apple Pay and much more to provide enhanced functionalities and enjoyable experience to your users.
Here are a few great features you can add to your apps:
Notifications
With iOS 10 you can create rich, interactive, and powerful notification experiences for your apps. The users can not just view photos, and listen to audio, but they’ll also be able to watch videos from inside a notification, view live information such as map updates in real time. As demonstrated at the Worldwide Developers Conference, you can even use 3D Touch to open a notification and respond to it directly from the lock screen.
Siri
You can create apps with extensions that work with Siri. Users will be able to access content and services using just their voice. The extensions developed using the new SiriKit will support new services such as booking a ride, managing workouts and sending or receiving payments, along with existing features like audio or video calling, messaging, and searching photos.
Maps: Apps that offer ride booking, restaurant reservations, and other location-related services are accessible from within Maps, allowing users to book, track, and pay. The Maps even suggest relevant apps for services in a user’s current location.
VoIP
The CallKit framework lets VoIP apps integrate with the iPhone UI. The framework lets users view and answer incoming VoIP calls on the lock screen and manage contacts from VoIP calls. CallKit also introduces app extensions that enable call blocking and caller identification. You can create an app extension that can associate a phone number with a name or tell the system when a number should be blocked.
Apple Pay Enhancements
In iOS 10, users can make easy and secure payments using Apple Pay from websites and through interaction with Siri and Maps. For developers, iOS 10 introduces new APIs you can use in code that runs on both iOS and watchOS, the ability to support dynamic payment networks, and a new sandbox testing environment. The new APIs will help you incorporate Apple Pay directly into your website. When you support Apple Pay in your website, users browsing with Safari in iOS or OS X can make payments using their cards in Apple Pay on their iPhone or Apple Watch. iOS 10 also introduces a new testing environment that lets you provision test cards directly on the device. The test environment returns encrypted test payment data.
Speech Recognition
iOS 10 introduces a new API that supports continuous speech recognition. The Speech Recognition API allows you to build apps that recognise speech and transcribe it into text. Using the APIs in the Speech framework (Speech.framework), you can perform speech transcription of both real-time and recorded audio.
These are the key developer-related features introduced in iOS 10. There are some more like interesting ones like Interactive Messages App, App Search Enhancements, Widget Enhancements, found in What’s new in iOS 10.
Need devices with the new iOS 10 beta to test new features in your app?
Try pCloudy’s Mobile App Testing Cloud. We provide real mobile devices with all versions of Android and iOS for app testing.
If you are someone using a smartphone to get through most of your day, then I’m sure would you’ve experienced it – You are in an elevator using your smartphone trying to find a restaurant for dinner but the app you are using unexpectedly crashes, or you are in a crowded subway using your smartphone to upload a video to some social media portal but the app you are using takes too long to respond, or you are just waiting for a friend in the basement of a parking lot and in the meanwhile you decide to shop for some new shoes but the e-commerce app you are using does not respond the way it should. Isn’t it frustrating when the apps you are using does not work when you require it the most? In these situations, the first thing you do is simply uninstall it, or in the worst case write a bad review.
Strangely, though most of the apps are functional and performance tested, they are still found to be defective by the users. It could be possible that not all scenarios are covered during testing. So, where is the gap? Deeper investigations have revealed that mobile apps behave differently in different network environments. In the above scenarios particularly, it seems like there is more evidence indicating that these issues are caused due to irregular mobile networks in locations such as the Elevator, or the crowded Subway, or the basement of a parking lot.
The network has a huge impact on the behaviour of your apps. Most of the apps that we use today are functioning by constantly communicating and fetching information from some servers or users that are miles away. The communication that happens is on wireless networks that are unfortunately not always reliable or consistent. Though most MNOs have established wider and better networks, it is practically difficult to achieve absolute seamless connectivity with excellent signal stability using existing wireless technologies. This is because, inherently, wireless networks have several inconsistencies like the lack of bandwidth in some places, the drop in packets caused by handovers and routing while moving, and more interference from other networks. Additionally, the networks through which data is transferred wirelessly also vary based on the technology used like GPRS, UMTS, HSDPA, LTE etc.
Why should apps be tested in different network environments?
The unpredictability of wireless networks has a huge impact on the functionality, performance and user-experience of an app. This is why we often see certain functional defects, performance defects, and sometimes crashes only when the app is running on a certain network or in some specific locations. Besides, mobile apps are expected to function on everything from an excellent Wifi connection, to a snail-paced 2.5G connection. Hence mobile apps have to undergo a wide range of tests on different networks with a variety of conditions before they are released to the users.
Are you testing your apps on different network conditions?
Traditionally, mobile apps are tested using the best networks in perfect conditions. But in real environments when the apps are being used anything can go wrong – the network bandwidth might not be enough, the latency might be high, data losses might occur, or there might be interference from other networks. App development companies have now realised the impact a network can have on their apps and are slowly filling up the gaps in mobile app testing. They are now focused on ensuring the app’s functional stability and relentless performance despite network inconsistencies. But testing mobile apps on different varieties of networks with a range of uncommon conditions is overwhelming and challenging. Moreover, these apps have to be tested on numerous mobile devices. It’s a tedious but crucial task. Additionally, tools that support such testing are scarce.
How can you test your apps in different network environments?
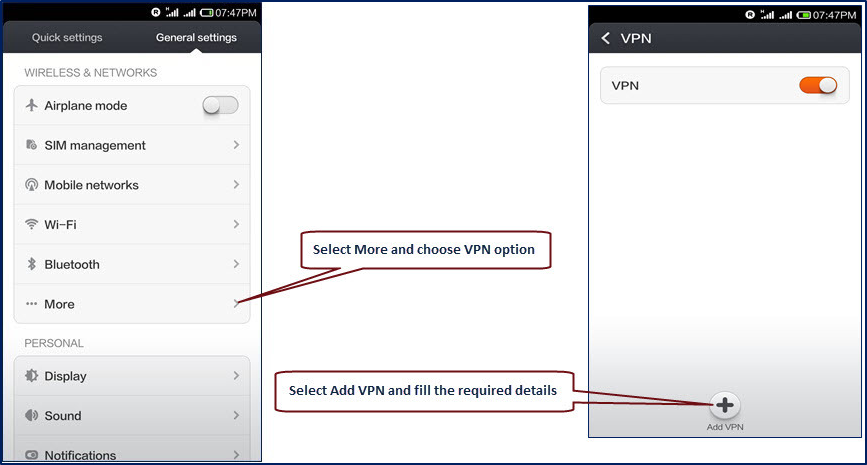
Testing Mobile Apps using live networks – Live networks can be used for testing mobile apps. The apps can be installed on real devices and can be tested on various networks like GPRS, UMTS, LTE, CDMA, etc. But the procedure of using real networks for app testing is slow, cumbersome, and mostly provides inaccurate results. Testers need to travel to different locations or wait for the network conditions to occur for conducting the tests. Furthermore, when the developers try to reproduce the bugs in order to fix it, the exact network conditions are hard to be replicated; eventually, most of the bugs will be closed as “Cannot Reproduce” while the bug still remains.
Simulated networks – Network related tests for mobile apps need not be such a hassle if the testers are given full control of the network being used. Using a simulated lab network, testers can easily test their mobile apps by simply selecting and applying the type of network profile to be used. They can also create and customize different network profiles by simply changing parameters like Uplink Bandwidth, Downlink Bandwidth, Latency, Loss Percentage, Packets Corruption, etc. This setup helps testers to replicate a myriad of network conditions for testing mobile apps.
On a larger view, when a mobile device cloud like pCloudy is being used you can test your mobile apps on varieties of networks, on hundreds of real mobile devices in parallel, through manual tests or automation runs. It is one platform that takes care of your entire app testing needs by helping app developers to easily test and experience the app functionality and performance on different networks and different mobile devices.
Fast Feedback — Every time someone pushes new code into the source repository, it is crucial to ensure that the integrity of the software is maintained. The plug-in enables you to receive immediate feedback and to help you understand which changes when introduced, made either the compile/build cycle or the tests to fail, and how to revert it.
Streamlines and saves time – Spend less time on build integration and more time on app development. Much of the work of frequent integrations is handled by automated build and testing systems, meaning developer time isn’t wasted on large-scale error-ridden integrations. On the other hand, when app developers need to test their apps on a number of mobile devices, a cloud platform like pCloudy helps you to easily select, manage, or schedule real devices for app testing. It drastically reduces the amount of time spent on device management activities like maintenance of the devices and controlling the version of OS on the devices; and not just that, it also provides an access to a host of iOS and Android devices to install and test your app on.
Continuously and consistently improve app quality – Using Jenkins allows you to receive immediate feedback from automated testing whenever a new code is pushed. Further, by automating the testing on a range of real devices helps you to improve the quality of the app. With this integration of Jenkins and pCloudy, any bugs can be instantly detected and resolved, keeping the app software in a state where it can be safely released at any time.
Speedy Development — Automated build integration and automated tests running on Real devices can be triggered anytime, this enables decreased wait time and results in faster development and deployment. Additionally, integration costs are reduced as serious integration issues are less likely.
Using continuous integration tools like Jenkins with a mobile device cloud platform like pCloudy is a powerful combination that definitely unlocks faster, better and economical means of testing and releasing quality apps.
Installing the Plugin:
An Overview:
pCloudy has released a plugin for Jenkins which provides you access to the platform for performing automation testing of mobile apps from within Jenkins on real devices.
TestFlight is an online service used to distribute and test beta iOS applications. Developers can use Test Flight to evade the Apple’s bitter binding procedure for testing new versions of their apps. It provides over-the-air installation, testing, tracking and managing of Beta apps. In simple words, TestFlight acts as a link between the developer, the tester, and the Apple Developer Center.
How is it useful?
Distribution of the app over-the- air to Testers
Tracking and managing testing using TestFlight’s dashboard
Receiving feedback from testers to improve the app
To obtain reports about the device models, OS version used while testing the App
Automatically records any crashes the testers encounter and sends it to the Developer
This tutorial will walk you through integrating TestFlight into your own apps.
What do you need to start?
You have to have your certificates, app ID, and provisioning profiles in place before distributing your apps using Test Flight. Here’s the list of items you need:
A Developer ID to login to your developer account.
A Certificate for Distribution to export builds and distribute apps
An App ID
A Device UDID
Ad Hoc Provisioning Profile to distribute your app on testers devices
Sign your app with a valid ad hoc provisioning profile
These items will help you obtain an .ipa file that can be distributed for testing in iOS devices with UDIDs mentioned in the provisioning profile of the app.
Uploading your app for Beta Testing
Open up your project in Xcode, make sure you have a correct Bundle Identifier and that you’ve chosen the correct Distribution Certificate:
Choose Product\Archive from the top toolbar:
Once Xcode finishes archiving your project, click the shiny blue Submit to App Store… button:
Choose your development team
Hit Submit
Wait for your build to upload. Once done you will receive a “Submission Successful message”
Now, run your Espresso Scripts on hundreds of Mobile devices and build quality apps faster than ever.
Several Mobile Automation Frameworks like Robotium, Calabash, Appium, KIF & uiautomator have been developed in recent years. Among a few popular ones, Espresso is one of them.
You probably know, Espresso is a testing framework for Android apps. It is predominantly used by developers and testers for testing user interactions (UI) to ensure that users do not encounter crashes or unexpected results while using an app.
There are several benefits of using Espresso, the primary ones are:
It automatically synchronises test actions with the UI of the app being tested. Meaning? To improve the reliability of tests, it detects when the main thread is idle and runs the test commands at the appropriate time.
This capability also relieves you from having to add any timing workarounds, such as a sleep period in your test code.
Espresso has an API that is small, easy to learn and built on top of the Android instrumentation framework.
It also supports testing activities outside the app like camera, browser and dialer etc which Appium does not support.
However, when you have limited time and money it is a challenge to take full advantage of your Espresso scripts in improving the quality of your apps. Luckily, there are ways to overcome this.
Conventionally, you would spend a huge amount of money to purchase several Android devices, and spend endless hours running your scripts independently on each device. Today, thankfully you don’t have to do this anymore, there is good news. With the help of a cloud-based testing platform like pCloudy.com, you can run your scripts on hundreds on real mobile devices in parallel.
Yes, using pCloudy.com you can test your apps on any device of your choice and pay a just minimum price for the time you’ve used the device. You can not only save money, but you can also save your time by running your test scripts on multiple devices in parallel and get a detailed execution report.
Here’s how you can use Espresso on pCloudy devices: