Mobile Test Automation Using Appium

 
With growing demand in the market, enterprise mobility has undergone a paradigm shift. Speed, quality and user-friendliness are the need of the hour for modern enterprises. Mobile apps have become a major source of revenue boosters for enterprises today.

It is a well-known fact today that the numbers of platforms and device types are more varied now than ever before. Customers continue to demand the latest devices, features and functionality, as well as increased mobility and accessibility. With the proliferation of mobile and portable device platforms and the Internet of Things, the workload of developers, and especially testers, has greatly increased. As traditional testing practices of manual app testing prove unable to keep up with the demand, businesses of all types are experiencing significant product delivery delays and, in some cases, costly product defects. Naturally, there is a growing demand for more efficient and cost-effective testing across all platforms.

Appium: Addressing the complexities of mobile app testing

To address the demands of complex testing needs, an effective mobile app testing platform is needed which is secure, supports functional and automated testing without losing an eye on the speed and quality. So, in this era where consumers have adopted smartphones, use multi-platforms to access mobile devices, do you think your app is delivering the best experience to your users? If not, then Appium is the solution. Appium is an open source, cross-platform mobile automation tool to automate the test for native, hybrid and mobile web apps.

Appium being one of the best solutions for automation comes with support for Android and iOS real devices. In fact, it also comes with support for simulators and emulators. At its core, it an HTTP server written in node.js. It has similar working as Selenium which actually perceives HTTP requests from selenium client libraries and handles those requests in different ways depending upon the platforms.

Being the best and widely used option available today in the market, it is widely adopted by modern enterprises to create a comprehensive mobile automation framework. With a growing user base and a stronger community, it is easier to adopt and implement which is why enterprises are adopting it on a very large scale. The best thing about Appium is that it lets you write in any language supported by Selenium using WebDriver API.

While testing an Android app, Appium automates it with the help of UIAutomator library, a part of Android SDK. This actually makes the learning and implementation easier for Selenium users. Having the capabilities to test on both Android and iOS devices makes it the best cross-platform mobile app test automation tool. Automation scripts can be run on real Android and iOS devices using the WebDriver JSON Wire protocol.

Appium starts a test case on the device that spawns a server and listens for proxy commands. On iOS, Appium proxies command to a UIAutomation script running in instruments.

AppiumSource: cloud.netlifyusercontent.com

Appium: Why should you Choose?


  • Opens the door to cross-platform mobile testing which means the same test would work on multiple platforms.
  • Unlike other tools, it doesn’t require any third-party code to compile into your app to make it automation friendly.
  • Enables a variety of frameworks and programming languages by wrapping the vendor-provided frameworks in the WebDriver API that specifies a client-server protocol.
  • For a tester, the programming language and the whole experience would remain same irrespective of the automating platform as all complexities are under the hood of Appium server
  • Possible to Execute multiple tests on multiple platforms without the need to manage them.
  • Able to run test sequences with hundreds of test cases, across multiple platforms.
  • Enables the view and share of device interactions with colleagues using in real-time built-in collaborative screen casting
  • On-demand testing and leverage results directly
  • It supports automation frameworks like JUnit and TestNG


Appium has some challenges when it comes to scaling up with continuous integration. pCloudy brings to you a solution for this where you can automate your app tests with zero learning. Sign up on pCloudy and automate your tests on Appium for faster and better delivery of apps.

Selenium


All automation development and testing engineers are very well aware of ‘Selenium’ which is the de-facto testing framework for web applications. With the changing mobile landscape, Appium is the most used framework for testing mobile apps. But is it possible to use Selenium for mobile application testing? The direct answer is ‘Not really’ but there is a long and different approach to this answer.


Appium is the most popular mobile application test framework which can be used to test all native, hybrid, and mobile web apps for iOS and Android. It is also used for cross browser testing that involves testing on real devices and real browsers. The fact is that Appium has got its roots from Selenium and it uses JSONWireProtocol to interact with iOS and Android apps using Selenium’s webdriver.


Appium/Selenium Architecture

In a typical architecture, Appium is an HTTP server written in Node.js that produces and handles multiple WebDriver sessions. Appium starts tests on the device and gets commands from the main Appium server. The server is mainly the same as the Selenium server that gets HTTP requests from Selenium client libraries.


The image below is an example to show how test scripts can run on our pCloudy platform. Don’t forget to watch the video on ‘How to run Appium scripts on pCloudy‘ here.

Appium pCloudy

Now that we know a bit about Selenium and Appium testing framework, let us understand the new term in Android app testing – ‘Selendroid’ which is a framework based on Selenium for automated app testing.


In other words, Selendroid is a test automation framework which can interact with multiple devices concurrently that can be tested without any modifications. It is also known as “Selenium for Android” for testing native and hybrid mobile apps and mobile web.


Let us have a look at some of the features of Selendroid:

a) It is an Open Source and is free to use
b) It supports all Android versions
c) It supports Selenium as a scripting language
d) It supports webdriver compatible languages eg: Perl, Java, C#
e) It can work on both emulators and real devices
f) It works on all native, hybrid and web-based apps
g) It is effective while executing native and cloud-based apps as it supports Selenium grid
h) It is very easy to implement.
i) With its feature called ‘Hotplugging’, it can recognize the new devices automatically.
j) It has a built-in Inspector to simplify test case development.
k) It can support various Android API versions from Android API 10 to Android API 19.
l) It can fully support parallel testing by integrating a node into Selenium grid.


Selendroid Architecture:
Selendroid is based on the Android Instrumentation framework where tests are written using Selenium Webdriver client API, which is also called as Selenium 2 client. Hence, it can be fully integrated with existing Selenium frameworks. It is also compatible with JSON Wire Protocol.
Let us have a look at the architecture of Selendroid:

Selenium for Mobile App Testing

To conclude, Selenium has paved its path as a de-facto web test automation framework and Appium is providing high-level APIs that can be speedily adopted by Selenium developers, and it helps simplify the tests.

PCloudy 3.4

PCloudy is happy to announce several exciting features as part of it’s latest release.

  • ADB Bridge (for In-premise cloud): Connect and take full control of any Android device using Android Debug Bridge. It provides access to a versatile command line tool that lets you communicate with a remotely connected device over the cloud.
  • ADB Commands (Available as part of Enterprise package): You can run ADB commands from your computer to the remotely connected device on a Private Cloud Lab.
  • Network Simulation (for In-premise cloud): Control the network connected to the device on which you will test your application. Set Network Profiles, modify existing profiles and apply it to the network connected to the device.
  • Battery Consumption Reports (For Android devices above 5.0): The platform now displays real time battery consumption data of device and App under testing. You can view a graphical representation of battery consumed by your apps with the total battery used by the device.
  • Monkey Tool (UI/Application Exerciser Monkey): Perform Stress and crash test on your application by simply selecting a device and running monkey tool on your application. The tool sends out a stream of pseudo-random user events such as clicks, touches, or gestures, as well as a number of system-level events, which acts as a stress test on the application software you are testing.
  • New implementation of iOS Instruments: Several improvements for running Appium and Calabash scripts on iOS devices
  • Volume Up & Down buttons for Android: Separate keys to control Volume of the devices. This is just the beginning, there’s something bigger coming.
  • Wifi control button for Android: Separate keys to Switch-on/Switch off wifi settings on Android devices
  • Support for IOS 10 beta : Get your App ready for Testing for upcoming IOS 10 release. You can test on iPhone and iPad with IOS 10 Beta version.
  • Several Bug fixes

We would be happy to send you more information. Please contact us on info@pcloudy.com

pCloudy Appium integration


1. pCloudy-java-Connector for Appium


1.1 Overview

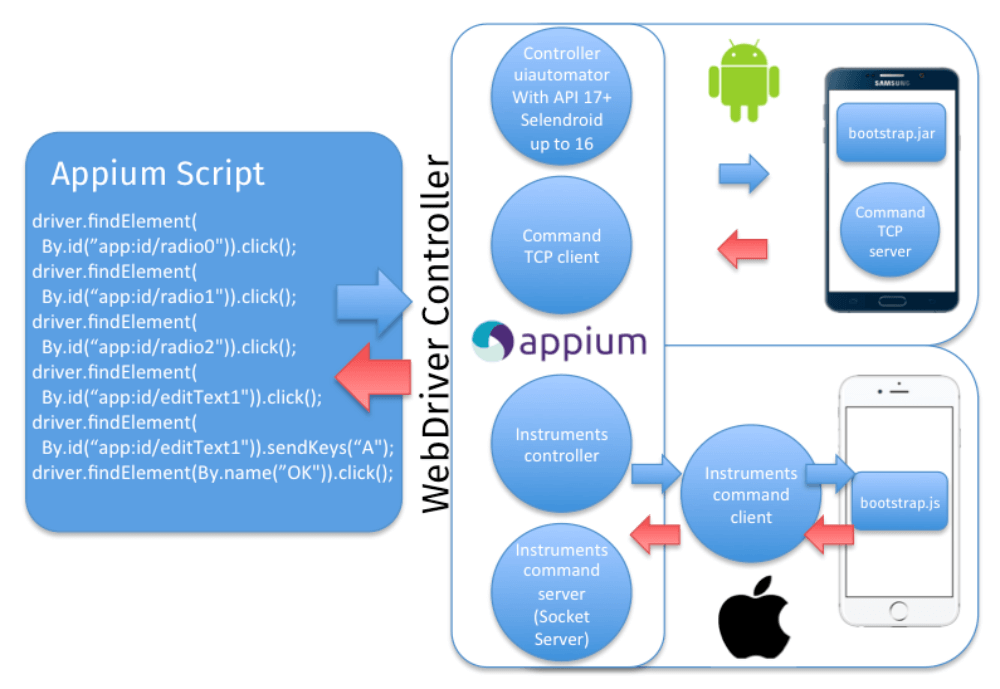
Appium is an open source test automation framework which is used with wide range of mobile apps that supports only android/ios or both. pCloudy is a popular mobile testing platform integrated with Appium script which enables you to automate test of mobile apps as well. If you have your Appium Scripts (or you plan to build them) in Java then you can use the pCloudy-java-connector.jar to integrate with the pCloudy platform. In case, you don’t have your Appium script then, you will need to use the rest web services APIs which are given in the end of this document.


1.2 Objective of this document

This user help guide has been developed for pCloudy end users. This help guide will help you to understand the APIs that pCloudy platform provides to integrate your existing Appium Scripts with pCloudy. After the integration, you will be able to execute your Appium scripts from your PC directly to the pCloudy real device cloud.


1.3 System Requirements

  • Java based Appium Script
  • Eclipse or Netbeans
  • >APK or IPA file
  • pCloudy Account
  • pCloudy-java-connector jar

NoteThe APIs are evolving and we will come back with a better set of APIs & the jar soon. You might need a little tweaking in the code.


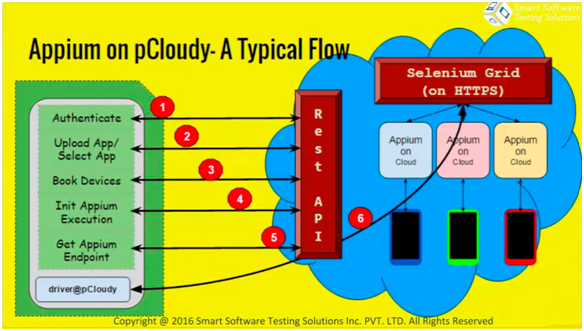
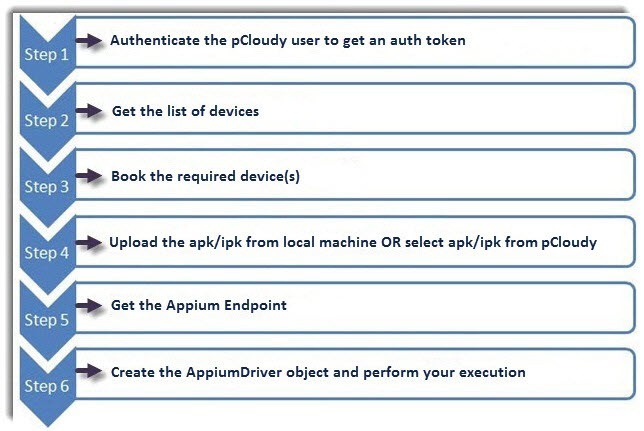
1.4 Stepwise Workflow of the APIs for getting an Appium Driver


The basic steps to get APIs for Appium Driver are given below:

appium testing


1.5 How to get my API Key for using the services

If you are a registered user then you just need to follow few simple steps to get API key for using our services.

Login to pcloudy.com –


Appium


After successful login, Instant Access page opens. Now, you finds different devices which can be filtered from the above given dropdown list of devices. From this page, you can book your device by clicking on Book your Device link. Furthermore, you can connect with any given device to perform mobile testing but you will be given 10 minutes only. While performing testing operation on selected device, you cannot perform testing on other device simultaneously.  For this, you need to release previously connected device.

When you click on settings option, support page opens by default which helps you to drop support ticket. It also includes various options like support, History, Test Runs, UDID, Profile, Credits, Unsubscribe, and API.


1.6 How to integrate my existing Appium Scripts on Java with pCloudy

You need pCloudy java connector jar file and corresponding APIs for Appium based mobile testing platform, pCloudy. You should add the pCloudy-java-connector.jar in its build path as a reference within the your java project containing appium scripts. See this link to learn how to add reference in eclipse.You can download pCloudy-java-connector.jar from this link –

http://support.pcloudy.com/solution/articles/9000062255-adding-reference-to-jars-in-eclipse

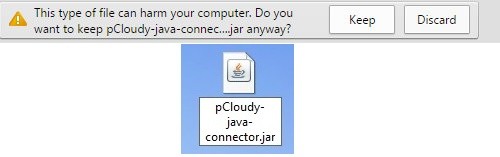
While downloading such file, you may come across message as given below which alerts you regarding safety of your computer.


pCloudy java connector jar file


Now, you can reference the JAR file in Eclipse or Android studio. Please refer the link.

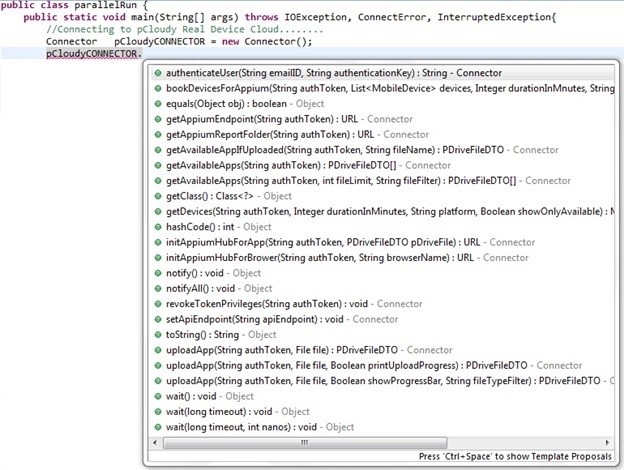
The pCloudy-java-connector.jar comprises the following methods which gives you a wrapper code over the web services. Furthermore, you will not need to call the Rest APIs if you are working on JAVA:


Appium Automation Testing


1.7 Useful Codes to get Web-Driver Object


A. Run on Android Native


public void runExecutionOnPCloudy() {
Connector pCloudyCONNECTOR = new Connector();

// User Authentication over pCloudy
String authToken = pCloudyCONNECTOR.authenticateUser(“abc@gmail.com”, “asd53sd3fa4asd5fsasda”);
ArrayList selectedDevices = new ArrayList<>();

// Populate the selected Devices here
selectedDevices.add(MobileDevice.getNew(“Gionee_Ctrl-V6L_Android_4.4.2”, 73, “Ctrl-V6L”, “Ctrl V6L”, “android”, “4.4.2”, “Gionee”));

// Book the selected devices in pCloudy

BookingDtoDevice[] bookedDevicesIDs = pCloudyCONNECTOR.bookDevicesForAppium(authToken, selectedDevices, 5, “friendlySessionName”);
System.out.println(“Devices booked successfully”);

// Upload apk in pCloudy
PDriveFileDTO pDriveFile = pCloudyCONNECTOR.uploadApp(authToken, new File(appPath));
System.out.println(“ipa file uploaded successfully”);
pCloudyCONNECTOR.initAppiumHubForApp(authToken, pDriveFile);

// Get the endpoint from pCloudy
URL endpoint = pCloudyCONNECTOR.getAppiumEndpoint(authToken);
System.out.println(“Appium Endpoint:” + endpoint);

// Create multiple driver objects in multiple threads
for (int i = 0; i < bookedDevicesIDs.length; i++) {
Thread.sleep(5000);
new Thread(getTestCaseClass(endpoint, bookedDevicesIDs[i])).start();
}
}

private Runnable getTestCaseClass(final URL endpoint, final BookingDtoDevice dto) {

// this will give a Thread Safe TestScript class.

// You may also like to have this as a named class in a separate file

return new Runnable() {
@Override

public void run() {
DesiredCapabilities capabilities = new DesiredCapabilities();
capabilities.setCapability(“newCommandTimeout”, 600);
capabilities.setCapability(“launchTimeout”, 90000);
capabilities.setCapability(“deviceName”, dto.capabilities.deviceName);
capabilities.setCapability(“browserName”, dto.capabilities.deviceName);
capabilities.setCapability(“platformName”, “Android”);
capabilities.setCapability(“appPackage”, appPackage);
capabilities.setCapability(“appActivity”, appActivity);
capabilities.setCapability(“rotatable”, true);
AppiumDriver driver = new AndroidDriver(endpoint, capabilities);

// Your Test Script Goes Here…

}
};
}


B. Run on Android Web


public void runExecutionOnPCloudy() {
Connector pCloudyCONNECTOR = new Connector();

// User Authentication over pCloudy

String authToken = pCloudyCONNECTOR.authenticateUser(“uttam.kumar@sstsinc.com”, “sadf54sad65fds6sdsdsw”);
ArrayList selectedDevices = new ArrayList<>();

// Populate the selected Devices here
selectedDevices.add(MobileDevice.getNew(“Gionee_Ctrl-V6L_Android_4.4.2”, 73, “Ctrl-V6L”, “Ctrl V6L”, “android”, “4.4.2”, “Gionee”));

// Book the selected devices in pCloudy

BookingDtoDevice[] bookedDevicesIDs = pCloudyCONNECTOR.bookDevicesForAppium(authToken, selectedDevices, 5, “friendlySessionName”);
System.out.println(“Devices booked successfully”);
pCloudyCONNECTOR.initAppiumHubForBrower(authToken, “Chrome”);

// Get the endpoint from pCloudy
URL endpoint = pCloudyCONNECTOR.getAppiumEndpoint(authToken);
System.out.println(“Appium Endpoint:” + endpoint);

// Create multiple driver objects in multiple threads
for (int i = 0; i < bookedDevicesIDs.length; i++) {
Thread.sleep(5000);
new Thread(getTestCaseClass(endpoint, bookedDevicesIDs[i])).start();
}
}

private Runnable getTestCaseClass(final URL endpoint, final BookingDtoDevice dto) {

// this will give a Thread Safe TestScript class.

// You may also like to have this as a named class in a separate file
return new Runnable() {
@Override

public void run() {
DesiredCapabilities capabilities = new DesiredCapabilities();
capabilities.setBrowserName(“chrome”);
capabilities.setCapability(“newCommandTimeout”, 600);
capabilities.setCapability(“deviceName”, dto.capabilities.deviceName);
capabilities.setCapability(“platformName”, dto.capabilities.platformName);
AppiumDriver driver = new AndroidDriver(endpoint, capabilities);
// Your Test Script Goes Here…
}
};
}


C. Run on IOS

public void runExecutionOnPCloudy() {
Connector pCloudyCONNECTOR = new Connector();

// User Authentication over pCloudy
String authToken = pCloudyCONNECTOR.authenticateUser(“uttam.kumar@sstsinc.com”, “sadf5sd5fds5sfd5a5fdas1”);
ArrayList selectedDevices = new ArrayList<>();

// Populate the selected Devices here
selectedDevices.add(MobileDevice.getNew(“Apple_iPad2_Ios_7.1.2”, 70, “iPad2”, “iPad 2”, “ios”, “7.1.2”, “Apple”));

// Book the selected devices in pCloudy
        BookingDtoDevice[] bookedDevicesIDs = pCloudyCONNECTOR.bookDevicesForAppium(authToken, selectedDevices, 5, “friendlySessionName”);
System.out.println(“Devices booked successfully”);

// Upload apk in pCloudy
PDriveFileDTO pDriveFile = pCloudyCONNECTOR.uploadApp(authToken, new File(appPath));
System.out.println(“ipa file uploaded successfully”);
pCloudyCONNECTOR.initAppiumHubForApp(authToken, pDriveFile);

// Get the endpoint from pCloudy

URL endpoint = pCloudyCONNECTOR.getAppiumEndpoint(authToken);
System.out.println(“Appium Endpoint:” + endpoint);

// Create multiple driver objects in multiple threads
for (int i = 0; i < bookedDevicesIDs.length; i++) {
Thread.sleep(5000);
new Thread(getTestCaseClass(endpoint, bookedDevicesIDs[i])).start();
}
}

private Runnable getTestCaseClass(final URL endpoint, final BookingDtoDevice dto) {
// this will give a Thread Safe TestScript class.
// You may also like to have this as a named class in a separate file

return new Runnable() {
@Override
public void run() {
DesiredCapabilities capabilities = new DesiredCapabilities();
capabilities.setCapability(“newCommandTimeout”, 600);
capabilities.setCapability(“launchTimeout”, 90000);
capabilities.setCapability(“deviceName”, dto.capabilities.deviceName);
capabilities.setCapability(“browserName”, dto.capabilities.deviceName);
capabilities.setCapability(“platformName”, “ios”);
capabilities.setCapability(“bundleId”, bundleId);
IOSDriver driver = new IOSDriver(endpoint, capabilities);
// Your Test Script Goes Here…
}
};
}


2. Rest APIs if needed to be used in platforms other than Java


https://s3.amazonaws.com/pcloudy-content-distribution/v2/API_USAGE_V2.pdf