
Last updated on : 21 Jan 2025
Espresso
Overview
Pcloudy Espresso integration allows you to run Android Espresso test suites on real devices hosted in the Pcloudy cloud directly from your local machine. You configure a single JSON file, run the provided JAR, and Pcloudy handles device booking, APK upload, test execution, and report generation automatically.
Key Highlights
- Parallel execution on real devices
- Live-view streaming during test run
- Detailed HTML/JSON reports on the Pcloudy portal
- Terminal output with the report URL on completion
Prerequisites
- Valid Pcloudy account
- API Key (Available under your Pcloudy profile settings)
- Espresso Starter Pack
Steps
- Download and Unzip the Espresso Starter Pack
Download the Espresso Starter Pack from the Pcloudy portal. Once downloaded, unzip the archive. You will find exactly two files inside:
| File | Purpose |
|---|---|
| Pcloudy_Espresso.jar | The executable JAR that reads your config, uploads APKs, books devices, and triggers test execution on the Pcloudy cloud Download JAR |
| config.json | The configuration file where you define your cloud credentials, device selection, APK paths, and test settings Download Config.json |
Important Keep both files in the same directory. The JAR reads config.json from the current working directory by default.
- Place Both Files in the Same Directory
Copy or move both files into a dedicated working folder on your machine. For example:
C:UsersYourNameEspressoRunner  ├── Pcloudy_Espresso.jar
  └── config.json
Tip - You do not need to place your APK files in this folder. APK paths in config.json can point anywhere on your file system using absolute paths.
- Configure the config.json File
Open config.json in any text editor and fill in the required values. The file is structured into four sections: Cloud Settings, Test Execution, Application Files, and Test Settings.
Complete config.json Reference
{
"PcloudyConfiguration": {
"cloudSettings": {
   "endpoint": "cloudURL/",
   "authentication": {
    "username": "Username",
    "apiKey": "***********"
    }
    },

  "testExecution": {
   "durationInMinutes": 10,
    "deviceFullName": [
      "SAMSUNG_S7Edge_Android_8.0.0_85b07"
     ],
   "testCycleName": "testMain_ESPRESSO_SESSION"
  },

  "applicationFiles": {
    "apkFilePath": "VectorApp_Espresso.apk",
    "testApkPath": "VectorApp_EspresoTestCases.apk",
    "orchestratorApkPath": "VectorApp_Espresso.apk",
    "serviceApkPath":"VectorApp_Espresso.apk"
   },
  "testSettings": {
    "suites":               [],
    "testRunner":
"android.support.test.runner.AndroidJUnitRunner",
     "testRunnerOptions": [
       "android.support.test.runner.AndroidJUnitRunner",
       "androidx.test.runner.AndroidJUnitRunner"
      ],
     "clearPackageData":     false,
     "appPermissionGrant":   true,
     "appUpload":            false
    }
 }
}
Section A — cloudSettings
| Config Key | Value/ Example | Description |
|---|---|---|
| endpoint | cloudURL | Your Cloud URL. Must end with a trailing slash. Example: https://device.Pcloudy.com/ |
| username | Username | Your registered Pcloudy email address |
| apiKey | ********* | Login-> Go to main menu-> quick action-> Copy access key |
Section B — testExecution
| Config Key | Value/ Example | Description |
|---|---|---|
| durationInMinutes | 10 | Maximum duration (in minutes) for which the device session will be booked. Increase for longer test suites. |
| deviceFullName | ["SAMSUNG_S7Edge_Android_8.0.0_85b07"] | Array of device identifiers. Add multiple entries for parallel execution on multiple devices. Get the exact device name from the Pcloudy Capability configurator. |
| testCycleName | testMain_ESPRESSO_SESSION | A label for this test run. Used to identify the session in the Pcloudy Reports dashboard. |
Multiple Devices To run on multiple devices simultaneously, add more entries to the deviceFullName array: "deviceFullName": ["SAMSUNG_S7Edge_Android_8.0.0_85b07", "OnePlus_9_Android_11.0_xyz"]
Section C — applicationFiles
| Config Key | Value/ Example | Description |
|---|---|---|
| apkFilePath | Absolute path to .apk | Path to the main application APK under test. Use double backslashes (\\) on Windows. |
| testApkPath | Absolute path to test .apk | Path to the Espresso test APK containing your test cases. |
| orchestratorApkPath | Absolute path to .apk | Path to the Android Test Orchestrator APK (optional but recommended for test isolation). |
| serviceApkPath | Absolute path to .apk | Path to the test services APK. Required when using Orchestrator. |
Windows Paths - On Windows, use double backslashes in JSON paths: C:\\Users\\Name\\folder\\file.apk On macOS/Linux, use forward slashes: /Users/Name/folder/file.apk
Section D — testSettings
| Config Key | Value/ Example | Description |
|---|---|---|
| suites | [] | Array of test suite names to run. Leave empty [] to run all test cases in the test APK. |
| testRunner | "android.support.test.runner.AndroidJUnitRunner" | The primary test runner class. Use AndroidJUnitRunner for standard Espresso tests. |
| testRunnerOptions | ["...JUnitRunner", "androidx...JUnitRunner"] | Array of runner options. Include both legacy (android.support) and AndroidX runners to support a wider range of test APK builds. |
| clearPackageData | false | Set to true to clear app data between test runs. Useful for stateful apps. Default: false. |
| appPermissionGrant | true | Set to true to automatically grant all runtime permissions to the app. Recommended for most test scenarios. |
| appUpload | false | Set to true to force re-upload of APK files even if they already exist in Pcloudy. Set to false to reuse previously uploaded files and save time. |
appUpload = false (Re-use uploaded APKs) If your APKs have not changed since the last run, set appUpload to false. The JAR will reuse the previously uploaded versions, making the start-up faster. Set to true whenever you have a new build.
3. Running the Test
Execute the JAR from the Command Line
Open a terminal or command prompt, navigate to the directory containing both files, and run the following command:
# Navigate to your working directory
cd C:UsersYourNameEspressoRunner
# Run the Espresso JAR
java -jar Pcloudy_Espresso.jar
The JAR will now automatically:
- Read your config.json configuration
- Authenticate with the Pcloudy cloud using your credentials
- Upload the APK files specified in applicationFiles (if appUpload is true)
- Book the specified device(s) for the configured duration
- Install the app APK and test APK on the booked device
- Execute the Espresso tests using the configured test runner
- Stream execution logs to your terminal in real-time
- Release the device and publish the test report
- Print the report URL to the terminal on completion
Expected Terminal Output
During execution you will see output similar to:
[Pcloudy] Authenticating user: anjali@example.com
[Pcloudy] Uploading APK: VectorApp_Espresso.apk ...... Done
[Pcloudy] Uploading Test APK: VectorApp_EspresoTestCases.apk ...... Done
[Pcloudy] Booking device: SAMSUNG_S7Edge_Android_8.0.0_85b07
[Pcloudy] Device booked successfully. Session ID: testMain_ESPRESSO_SESSION
[Pcloudy] Installing app on device ...... Done
[Pcloudy] Starting test execution ...
[Pcloudy] Test 1/20 - testLoginSuccess          PASSED   (1.2s)
[Pcloudy] Test 2/20 - testLoginInvalidPassword  PASSED   (0.9s)
[Pcloudy] Test 3/20 - testAddToCart             FAILED   (2.1s)
...
[Pcloudy] Execution complete. Duration: 8m 34s
[Pcloudy] Report URL: https://device.Pcloudy.com/reports/session/abc123
Copy the Report URL - Save the report URL printed at the end of the terminal output. You can open it in any browser to view the full test report without logging in to the portal (if your account has public reports enabled).
4. Viewing the Live Execution (Live-View)
While your tests are running, you can watch them execute in real-time on the actual device from the Pcloudy portal.
Access Live-View During Execution
| Step | Action | What You See |
|---|---|---|
| 1 | Log in to the Pcloudy platform in your browser | Pcloudy dashboard loads |
| 2 | Click ‘My Active Sessions’ tab in main menu | A list of your currently running test sessions appears. Your session is identified by the testCycleName value from config.json (e.g. testMain_ESPRESSO_SESSION) |
| 3 | Locate your session row and click the ‘Live-View’ icon (camera/play icon) on the right side of the row | A real-time device screen stream opens in your browser. You can see the test cases executing on the physical device - taps, swipes, assertions - all live. |
Live-View Tip - Live-View is read-only. You cannot interact with the device during automated test execution. Use it to monitor progress and catch issues early without waiting for the full report.
5. Viewing the Test Report
Once the test execution is complete, a detailed report is automatically published to the Pcloudy portal. There are two ways to access it:
5.1 Via the Terminal URL
The terminal prints a direct URL at the end of execution:
[Pcloudy] Report URL: https://device.Pcloudy.com/reports/session/abc123
Open this URL in a browser to view the report immediately. No portal login required if your account settings allow public report access.
5.2 Via the Pcloudy Portal
Access the Report from the Pcloudy Portal
| Step | Action | What You See |
|---|---|---|
| 1 | Log in to Pcloudy | Dashboard loads |
| 2 | Click ‘REPORTS’ in the top navigation | Reports section opens with tabs |
| 3 | Click ‘All Reports’ tab | A list of all past and current test sessions appears, sorted by most recent first |
| 4 | Locate the report by testCycleName or timestamp | Your session row is visible: testMain_ESPRESSO_SESSION with date, device name, status |
| 5 | Click on the report row or the report link | The full test execution report opens |
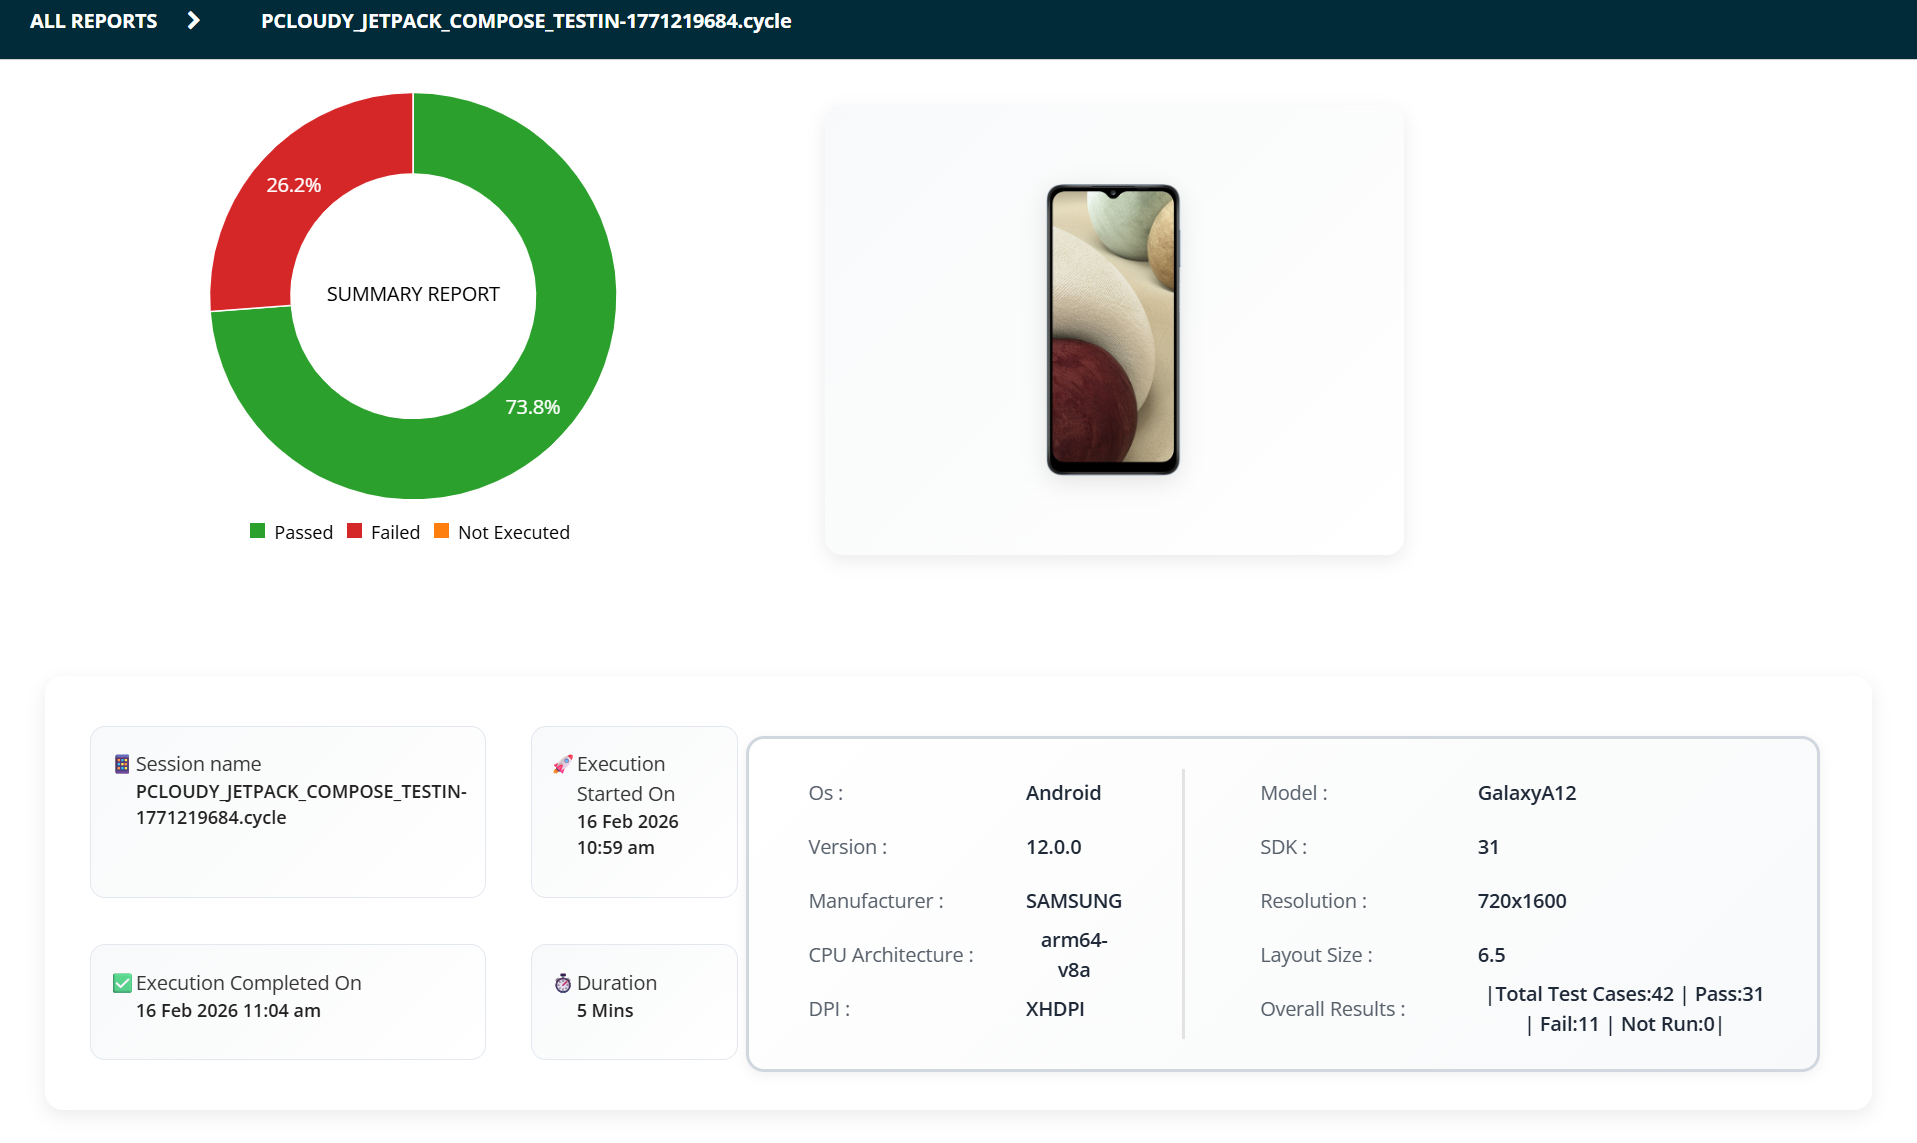
5.3 What the Report Contains
The test report on the Pcloudy portal provides the following information:
Pcloudy - Report
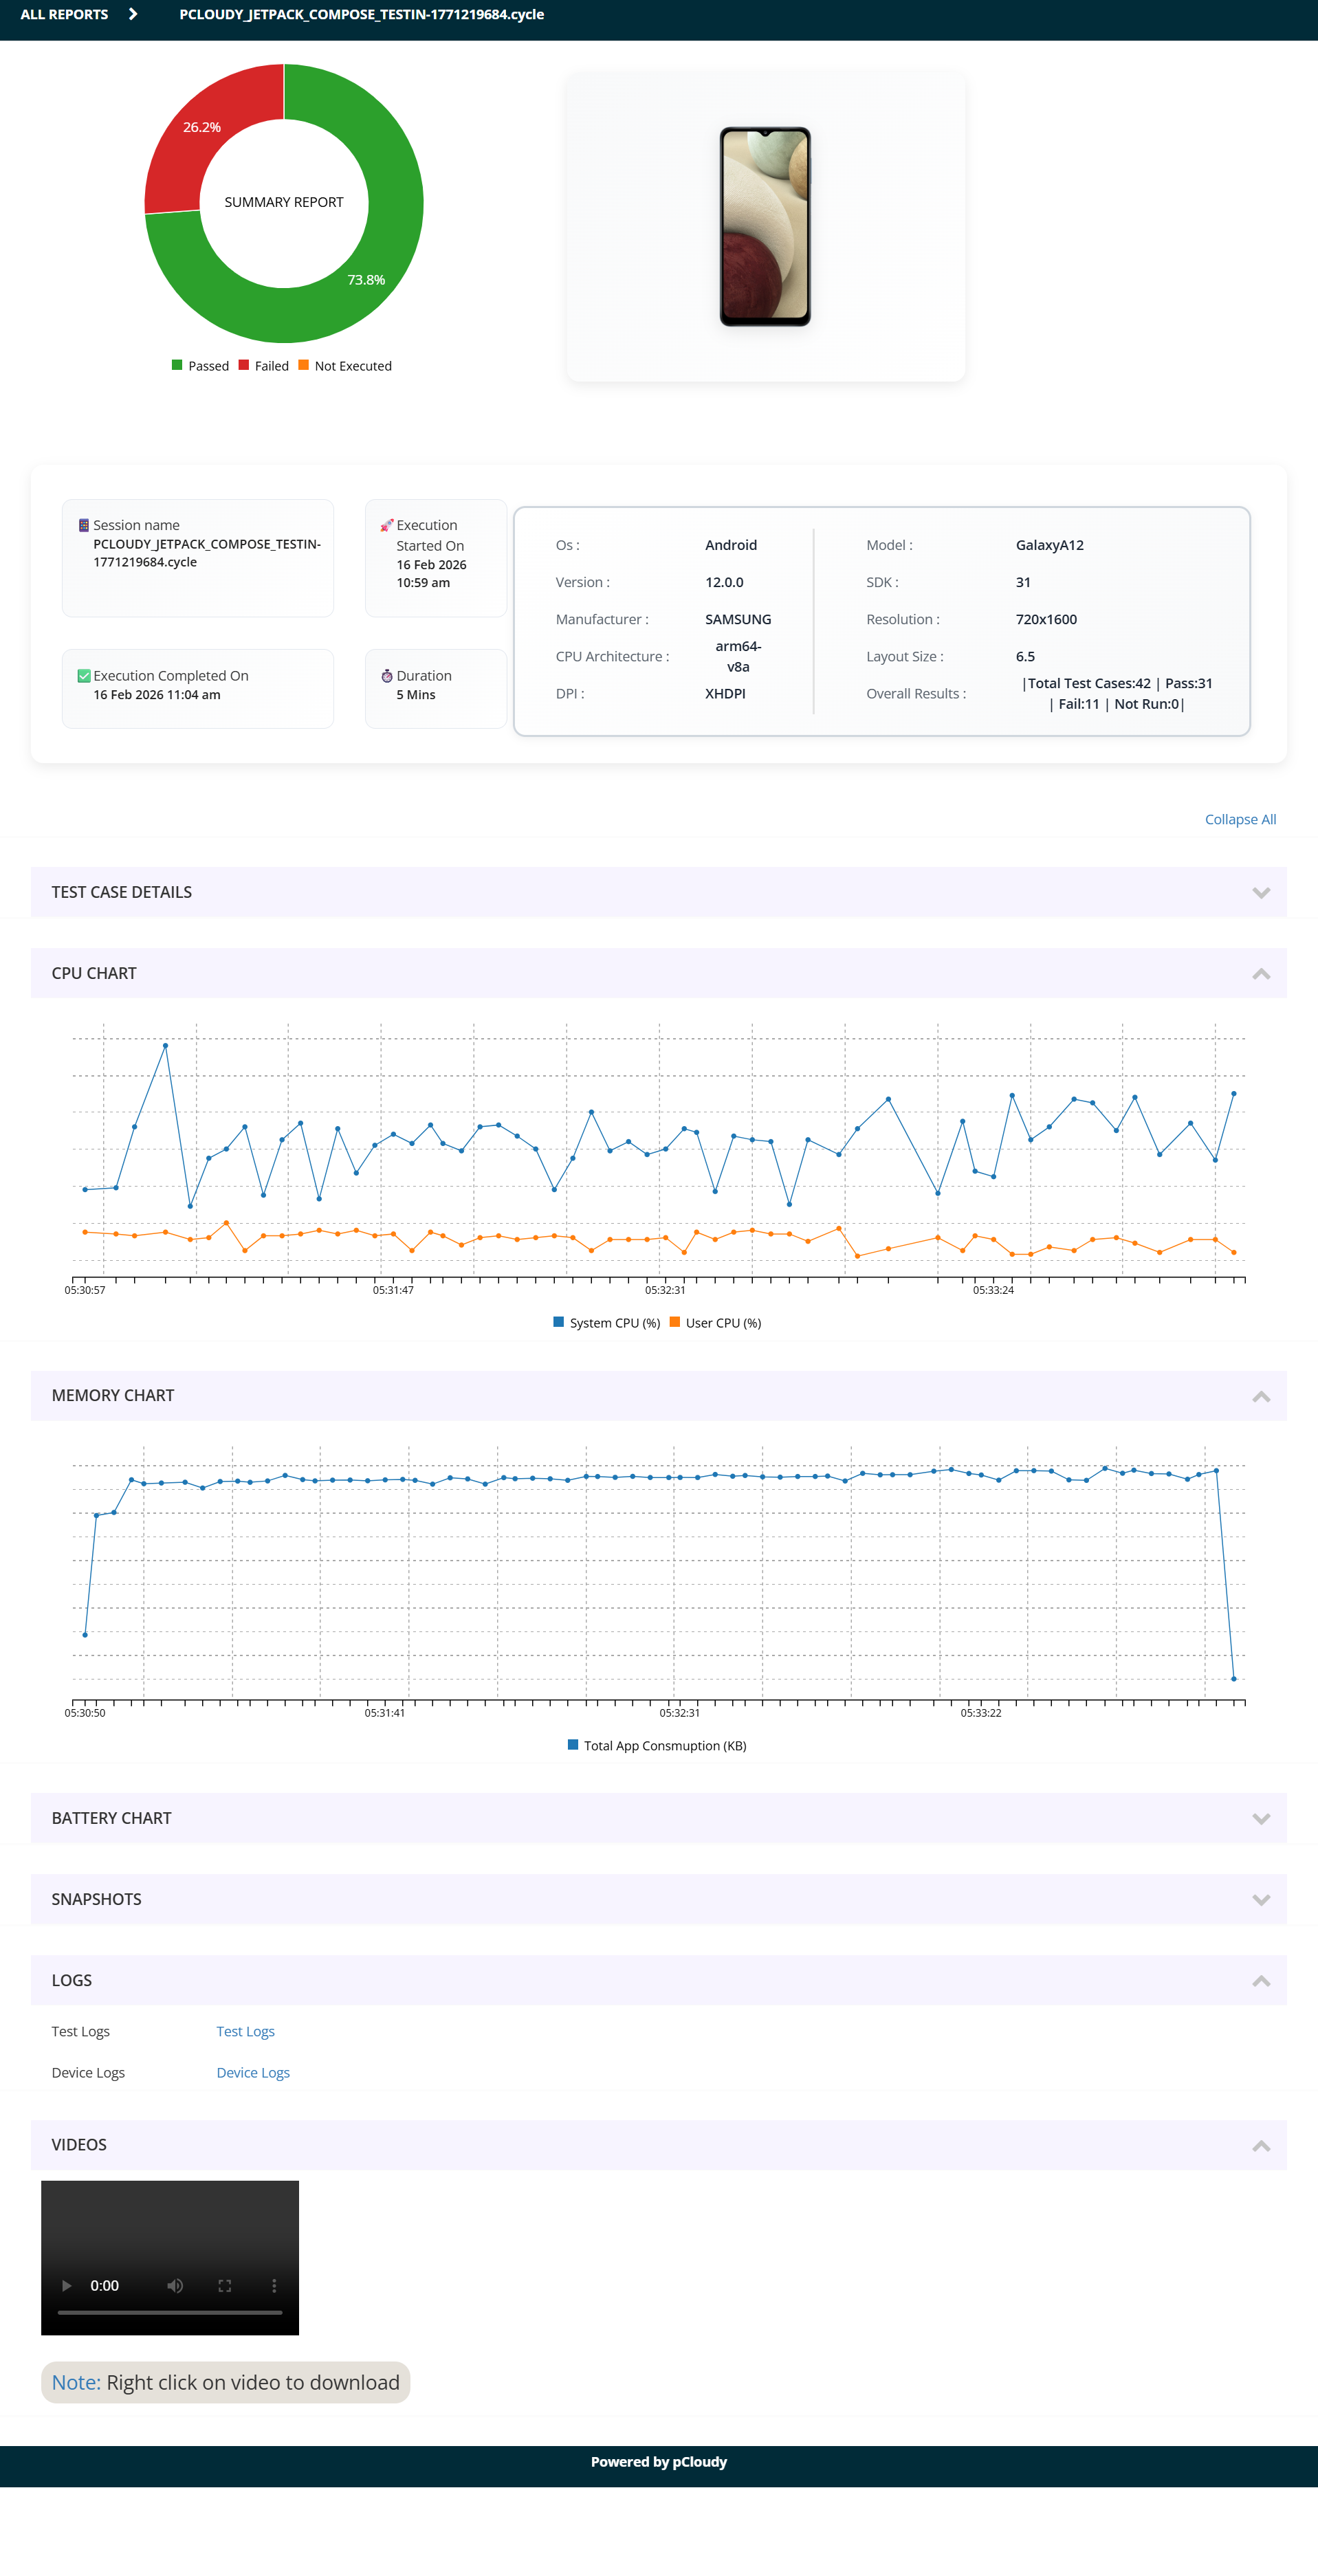
| Report Section | Details |
|---|---|
| Session Summary | Test cycle name, device used, total duration, start time, pass/fail counts, overall status |
| Test Case List | Each individual test case listed with: test name, execution status (PASSED / FAILED / SKIPPED), execution time in seconds |
| Failure Details | For failed test cases: stack trace, assertion error message, the exact line of code that failed |
| Device Logs | Full logcat logs captured during execution, filterable by tag or log level |
| Screenshots | Automatic screenshots captured at each test step (if screenshot capture is enabled in test settings) |
| Video Recording | Full screen recording of the test session playback (if recording is enabled for your Pcloudy plan) |
| Network Logs | HTTP network traffic captured during the session (if network capture is enabled) |
| Performance Metrics | CPU and memory usage graphs for the app under test during execution |
6. Failed Test Cases
Users can:
- View complete failure details
- Expand error logs
- Copy failure messages and stack traces for further analysis
- Download logs for debugging purposes
Each failed test case provides:
- Failure reason
- Stack trace
- Execution time
- Step-level breakdown (if enabled)
This allows faster root cause analysis and defect tracking.
Key Takeaways
- Test coverage execution status is clearly visible.
- Failed test cases are traceable with detailed logs.
- Performance graphs provide runtime insights.
- Execution artifacts (logs, video, screenshots) support effective debugging.
Did this page help you?