
Last updated on : 27 Apr 2026
Qverify — API Workflow Testing
Qverify is Pcloudy's API workflow testing module that lets you build, test, and validate multi-step API workflows without writing code. It is designed for QA engineers, developers, and product teams who need to test sequential API calls where each step may depend on data from previous steps.
1. What is Qverify?
Qverify is Pcloudy's API workflow testing module that lets you build, test, and validate multi-step API workflows without writing code. It is designed for QA engineers, developers, and product teams who need to test sequential API calls where each step may depend on data from previous steps.
Key Capabilities
- Build multi-step API workflows visually using the Workflow Builder
- Configure each step with HTTP method, URL, headers, body, auth, and query params
- Extract variables from responses using JSONPath and pass them between steps
- Set evaluation criteria to define pass/fail conditions per step
- Test individual steps before running the full workflow
- Run entire workflows and view detailed execution results with response times, status codes, and validation outcomes
- Create Collections to group multiple workflows and run them together as a test suite
- Get cURL commands for any step for debugging or external use
Access Points
| Module | Access Path |
|---|---|
| Projects | Left sidebar → Projects icon (grid icon) → Select project → Workflow Builder |
| Collections | Left sidebar → Collections icon (folder icon) → Create or select collection |
2. Getting Started — Create a Project
Before building workflows, you need a project to organize them.
Step 1: Navigate to Projects
Click the Projects icon (grid icon) in the left sidebar. You will see the Projects page with "Private Projects" and "Team Projects" tabs.
Step 2: Create a New Project
Click the "Create Project" icon (+) in the toolbar above "All Projects." Enter a project name (e.g., "PcloudyAPI"). A success toast will confirm: "Project created successfully."
Step 3: Create Folders
Within your project, create folders to organize workflows. Click the folder icon to add a new folder (e.g., "Android_API"). Folders help group related workflows together.
Step 4: Select Creation Type
On the right panel, you'll see "Select your project creation type" with options:
- Workflow Builder — Available now. Build API workflows step-by-step.
- API Builder — Coming Soon. Build individual API requests.
- API Importer — Coming Soon. Import from Postman, Swagger/OpenAPI, cURL, etc.
Step 5: Proceed
Select "Workflow Builder" and click "Proceed" to start building your first workflow.
3. Workflow Builder — Build Your API Test
The Workflow Builder is where you define the sequence of API calls that make up your test.
Workflow Header
| Field | Description |
|---|---|
| Workflow Name * | Required. Give your workflow a descriptive name (e.g., "Set Location", "Book Device"). This appears in the sidebar and in collections. |
| Workflow Description | Optional. Add notes about what this workflow tests. |
Adding Steps
Each step represents one API call in the workflow. Steps execute sequentially — Step 1 runs first, then Step 2, and so on.
Step 1: Click "+ Add Step"
A new step form appears with five configuration tabs: API Configuration, Variables, Retry & Conditions, Evaluation Criteria, and Test.
Step 2: Configure the Step
Fill in the API details in each tab (detailed in sections 4–8 below).
Step 3: Save & Add More
Click "Save & Next Step" to save this step and immediately start configuring the next one. Or click "Finish" if this is the last step.
Step 4: Navigation
Use "Previous Step" and "Next Step" to move between steps. The header shows your position (e.g., "Step 2 of 4").
You can add steps between existing ones using the "+ Add Step" button that appears between step cards in the visual view.
4. Step Configuration — API Configuration Tab
This is the primary tab where you define the API request details.
| Field | Description |
|---|---|
| Step Name * | Required. A descriptive name for this step (e.g., "Authentication", "Get Device List", "Book Device"). |
| API URL * | The endpoint URL. Select the HTTP method (GET, POST, PUT, DELETE, PATCH) from the dropdown, then enter the URL. Supports variables: use {{variableName}} for extracted values and {{{key}}} for globals. |
| Authorization Type * | Choose: No Auth, Basic (username + password), Bearer Token, API Key, or Custom Header. |
| Username / Password | Shown when "Basic" auth is selected. Enter credentials for Basic HTTP authentication. |
| Query Params | Key-value pairs appended to the URL as query parameters. Click "+ Add" to add rows. Click the trash icon to remove. |
| Headers | Custom HTTP headers. Add key-value pairs (e.g., Content-Type: application/json). |
| Body | Request body for POST/PUT/PATCH requests. Supports JSON, form-data, and raw text. You can use variables here: {{Token}}, {{{url}}}. |
Using Variables in URLs
Qverify supports two types of variable syntax:
{{variableName}}— For values extracted from previous steps (e.g.,{{Token}}from an authentication response){{{key}}}— For project-level global variables (e.g.,{{{url}}}for the base URL). Globals are shared across the entire workflow run.
When you type {{{ in URL or body fields, the system will auto-suggest available global variables.
5. Step Configuration — Variables Tab
The Variables tab lets you extract values from the API response of this step and make them available for use in subsequent steps.
Variable Extraction (JSONPath)
After this step executes, Qverify parses the JSON response and extracts values based on the JSONPath expressions you define.
| Field | Description |
|---|---|
| Variable Name | The name you'll use to reference this value in later steps. Use it as {{variableName}} in URLs, headers, or body. |
| JSON Path | The JSONPath expression to extract the value from the response. Example: $.id, $.data.token, $.results[0].name |
Example
If Step 1 (Authentication) returns: {"token": "abc123", "user": {"id": 42}}
- Variable Name:
Token, JSON Path:$.token→ Extracts "abc123" - Variable Name:
userId, JSON Path:$.user.id→ Extracts 42
In Step 2, use {{Token}} in the Authorization header or body to pass the token forward.
Extracted Variables Bar
Once variables are extracted, they appear in the "Extracted Variables" bar at the top of subsequent steps (e.g., "{{Token}}"). Click on any variable to insert it at the cursor position. This also copies it to your clipboard.
Add variable userId with JSONPath $.id, then use it later as {{userId}}.
6. Step Configuration — Retry & Conditions Tab
Configure retry logic and conditional execution for this step.
- Retry Count — Number of times to retry if the step fails (e.g., 0, 1, 2, 3)
- Retry Delay — Wait time between retries (in milliseconds)
- Conditions — Define conditions under which this step should run or skip (e.g., only run if a previous step's variable equals a certain value)
Retry is useful for APIs with intermittent failures or rate limiting. Set a reasonable delay (e.g., 1000–3000ms) to avoid hitting rate limits.
7. Step Configuration — Evaluation Criteria Tab
Evaluation Criteria define the pass/fail conditions for each step. This is how Qverify determines whether a step succeeded or failed.
How It Works
You define one or more criteria. Each criterion compares an actual value from the response against an expected value. If the actual result does not match the expected value, the step is marked as failed — regardless of whether the HTTP response itself was technically successful.
Common Evaluation Criteria
| Criteria Type | Example |
|---|---|
| Status Code | Expected: 200. If the API returns 500, the step fails. |
| Response Body Contains | Check if the response contains a specific string or JSON key. |
| JSON Path Value | Check if $.status equals "success" or $.data.count is greater than 0. |
| Response Time | Step fails if response time exceeds a threshold (e.g., 5000ms). |
Evaluation criteria are user-configured, not HTTP-standard. A step that returns HTTP 200 can still fail if your criteria check for a specific JSON value that isn't present.
8. Step Configuration — Test Tab
The Test tab lets you execute the current step individually before running the full workflow. This is essential for debugging.
Features
- Test Button — Runs this single step and shows the response immediately. Useful for validating your URL, auth, and body are correct before moving on.
- Get CURL — Generates the equivalent cURL command for this step. Copy it to use in terminal, Postman, or share with your team for debugging.
How to Use
- Navigate to the Test tab of any step.
- Click "Test" to execute the API call.
- View the response: status code, headers, body, and response time.
- If something is wrong, go back to API Configuration and fix it.
- Click "Get CURL" to copy the cURL equivalent for external testing.
Always test your authentication step first to verify credentials work before adding dependent steps.
9. Workflow Visual View & Execution
After saving your workflow, Qverify displays it as a visual flowchart showing all steps in sequential order.
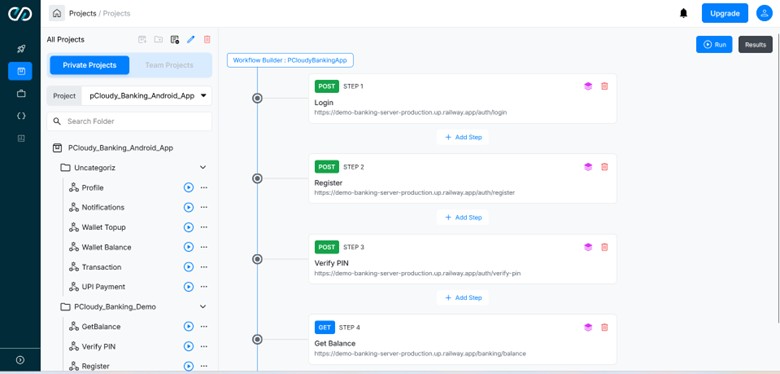
Screenshot coming soon. The image above will show the full workflow canvas with step cards, connecting lines, and the Run button.
Visual Elements
| Element | Description |
|---|---|
| Step Cards | Each step is shown as a card with: HTTP method badge (GET = blue, POST = green), step number, step name, and the API URL. |
| Connecting Line | A vertical line with circle nodes connects steps, showing execution order. |
| + Add Step | Appears between each step card. Click to insert a new step at that position. |
| Edit/Delete Icons | Each card has a layers icon (edit) and trash icon (delete) in the top-right corner. |
| Run Button | Top-right corner of the page. Click to execute the entire workflow. |
| Results Button | Top-right corner. Click to view historical results for this workflow. |
Running a Workflow
- Click the "Run" button (top-right, with play icon).
- An "Execution Summary" popup appears showing real-time progress.
- The summary displays: Status (running/completed), Progress (e.g., Step 3/4 — 75%), and a live table with each step's name and status (success/failed).
- The circle nodes on the visual flowchart change color: green = passed, red = failed.
- Once complete, click "View Report" to open the detailed results page.
10. Execution Results & Reports
The results page provides a comprehensive breakdown of workflow execution.
Summary Dashboard
- HTTP Responses: Count by status code range (2xx, 3xx, 4xx, 5xx, other)
- Response Time: Steps with duration, total time, average time, min/max
- Validation: Steps with validation rules/checks, steps marked invalid, failed checks count
Test Results Distribution
A donut chart showing Passed (green), Failed (red), and Skipped (yellow) counts.
Failed Steps
A dedicated section listing any failed steps with the failure reason (e.g., "Expected status 200, got 500").
Detailed Test Results
A table showing each step with: Step number, Step name, Status (Success/Failed), HTTP status code, response time, and the full response body. Click "Open Step Report" to drill into any individual step's complete request/response details.
11. Collections — Group & Run Multiple Workflows
Collections let you group multiple workflows together and run them as a single test suite. This is ideal for regression testing, end-to-end API validation, or running all API tests for a feature.
Accessing Collections
Click the Collections icon (folder with layers) in the left sidebar. You'll see the Collections page with "Private Collection" and "Team Collection" tabs.
Creating a Collection
- Click the "+" icon in the Collections toolbar.
- Enter a Collection Name (e.g., "Pcloudy_Banking_App", "Pcloudy API Regression") and an optional description.
- On the right panel ("Select Workflow"), choose the source: "My Projects" or "Shared Projects."
- Select a Project from the dropdown (e.g., "Pcloudy_Banking_Android_App").
- Select a Folder to browse available workflows.
- Click on individual workflows to add them to the collection. Each selected workflow appears in the "Selected Workflow" table below with Run Order, Workflow Name, Steps, Project, and a Remove button.
- Reorder workflows using the up/down arrows in the Run Order column.
- Click "Save" to create the collection.
Collection Details View
Once created, the collection shows:
- Collection Name and type (e.g., "Native APK")
- Two tabs: "Collection Details" (list of workflows) and "Run Details" (execution history)
- A table with: Workflow Name (clickable link), Project, Total Steps, and Remove action
- "Edit" button to modify the collection
- "Run Collection" button to execute all workflows sequentially
Collections can include workflows from different projects and folders. For example, a "combo" collection can mix workflows from "PcloudyAPI" and "Pcloudy_Banking_Android_App" projects.
12. Collection Results
After running a collection, the results show each workflow's outcome in sequence.
What You See
Each workflow in the collection gets its own result block showing:
- Workflow number and name (e.g., "#1 · Set Location")
- Run ID and execution order
- Overall status: Passed (green) or Failed (red)
- Failure reason if applicable (e.g., "Expected status 200, got 500")
- Step-by-step breakdown table: Step number, Name, Status, HTTP Code
- "Open Step Report" button to drill into the detailed request/response for any step
Example
A collection with 3 workflows might show:
- #1 Set Location — Passed (all 4 steps returned 200)
- #2 Push File to Device — Failed (Step 4 returned 500 instead of expected 200)
- #3 Biometric Authentication — Failed (Step 3 returned 401)
13. Key Concepts & Tips
Variable Chaining
The most powerful feature of Qverify is variable chaining — extracting a value from one step's response and using it in the next step's request. This enables realistic API workflows like:
Authenticate → Get token → Use token to list devices → Book a device → Set device location
Global Variables
Global variables (accessed with {{{key}}}) are project-level constants like base URLs, API keys, or environment identifiers. Manage them from the "Manage Globals" link in the Variables tab. Changing a global updates it across all workflows in the project.
Private vs. Team
Both Projects and Collections have Private and Team modes. Private items are visible only to you. Team items are shared with all team members. Use Team for shared regression suites and Private for personal debugging.
Sidebar Workflow List
The left sidebar shows all workflows within the selected project/folder. Each workflow has: a play button (run individually), a three-dot menu (edit, duplicate, delete), and the workflow name.
Best Practices
- Always start with an authentication step that extracts a token variable.
- Use globals for base URLs so you can switch environments easily (staging vs. production).
- Set evaluation criteria on every step — don't rely only on HTTP status codes.
- Test each step individually using the Test tab before running the full workflow.
- Name your steps descriptively (e.g., "Book Device" not "Step 3").
- Create separate collections for different test scenarios: smoke tests, regression, and full E2E.
- Use the cURL export to share failing steps with backend developers for debugging.
Did this page help you?