Avinash Tiwari is a thought leader, a recognized keynote speaker, and the co-founder of pCloudy.com. He has 15+ experience in Product development and Testing. He brings with him a passion for emerging technology and quick adoption, both of which have solidified his reputation as a leader in the mobile app testing field.
Now you can run your Espresso Scripts on hundreds of Mobile devices over pCloudy.com.
Espresso is a testing framework for Android apps. The platform allows you to write concise and reliable Android UI tests. pCloudy.com provides you the platform to run these scripts on multiple mobile devices of your choice.
Here are the steps for running your Test Scripts on multiple Android Devices:
Login over www.pcloudy.com with your registered Email ID & Password.
Choose Instrumentation Type based on your Test Scripts you’ve written. pCloudy provides support for Instrumentation Type
(InstrumentationTestRunner, AndroidJUnitRunner) for Android. For more information, see Instrumentation in the Testing Fundamentals section of the Android Developer Tools documentation.
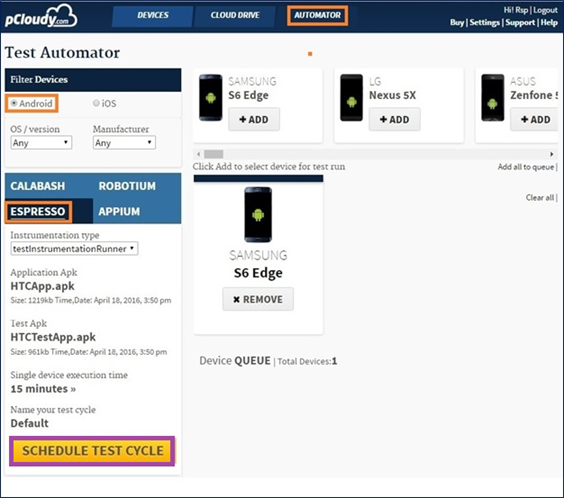
Go to the Automator Page
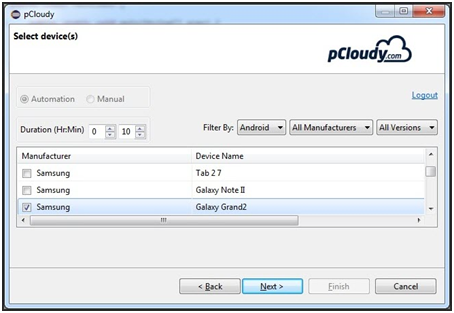
Select Android OS version & Manufacturer
Choose Espresso (to run Espresso Scripts)
Select Instrumentation Type (TestInstrumentationRunner/AndroidJUnitRunner).
Select Application .apk file (the App to be tested)
Select Test Script .apk file (the Test Script developed for testing)
Enter Single Device execution Time (Time required for the entire script to be executed on single device)
Enter Name of your Test Cycle (this name will represent your Test Cycle)
Click on Schedule Test Cycle
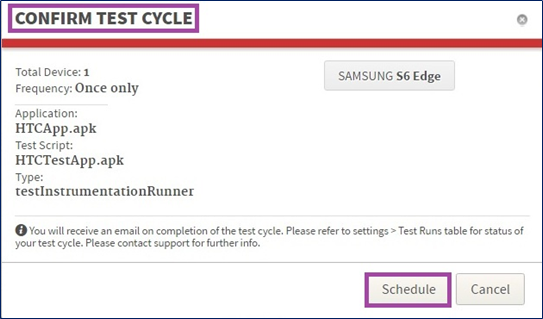
In the next step, you need to confirm schedule of test automation. Here, you can see your selected application, test script, device etc.
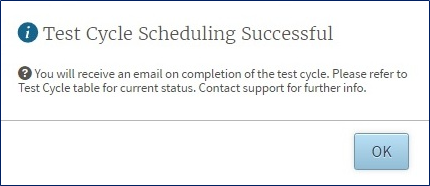
Further, you get a pop up message of test automation schedule confirmation.
Click on OK to proceed.
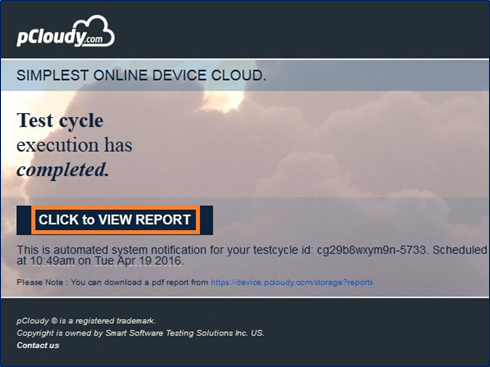
Go to your mailbox and open pCloudy Automation Alert mail.
Click on the given link “Click to view Report”.
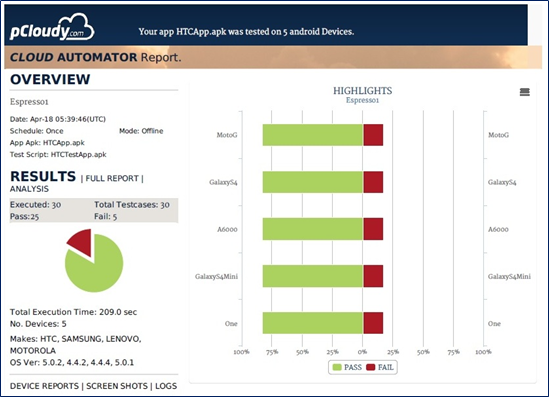
Finally, you get result of your scheduled test automation.
(Femont, CA) – Smart Software Testing Solutions (SSTS Inc.) is proud to announce that pCloudy, a cloud-based mobile and IoT application testing platform, will be sponsoring CloudBee’s upcoming Jenkins World 2016 Conference at the Santa Clara Convention Center in Santa Clara, California, on September 13-15, 2016.
The key features and capabilities using pCloudy has quickly developed the reputation as the leading mobile and IoT application testing platform. pCloudy provides application developers robust solutions including three testing options: public, hosted, and on-premise. All three solutions allow users to perform functional and performance based testing on real Google Android and Apple iOS mobile devices. With full debugging features, analytical and performance tools, and recording session videos among other critical features, pCloudy continues to push the boundaries of mobility testing.
“pCloudy continues to innovate and push the envelope in the world of mobile testing. This sponsorship allows us to reach some of the world’s leading Jenkins focused application developers and testers to introduce the Jenkins integration within pCloudy. The opportunity to discuss pCloudy with everyone in attendance will be a great opportunity for us.” a spokesman said.
Jenkins World 2016 Conference is the flagship event for Jenkins users and professionals hosted by CloudBees. As one of the longest-running events, it brings together some of the industry’s leading thought leaders, practitioners, and solution providers. This year’s event is headlined by Kohsuke Kawaguchi of the Jenkins Project, Sacha Labourey, CEO of CloudBees, and author Gary Gruver. In addition to the headlining presenters, attendees and solution providers come from all wings of the industry.
pCloudy will be available for scheduled meetings and walk-ins within the exhibition hall. Please feel free to stop by booth K19 to learn more.
To learn more about pCloudy please reach out directly to schedule a meeting or to learn more information:
About pCloudy:
pCloudy is the simplest online device cloud, that provides customers with the necessary tools for convenient, effective, and immediate testing for their mobile strategy. It enables continuous development and testing on real mobile devices. Our unique debugging feature for app developers pinpoints potential errors that will significantly reduce costs and time. With pCloudy testing, the reduction in release time allows developers to focus on improved features instead of corrections.
About Jenkins World 2016:
Jenkins World will bring together the largest gathering of Jenkins users in the world, including Jenkins experts, continuous delivery thought leaders and companies offering complementary technologies for Jenkins. Jenkins World will provide opportunities for attendees to learn, explore and network face-to-face, as well as to help shape the future of Jenkins.
About CloudBees:
CloudBees, the Jenkins Enterprise company, is the continuous delivery (CD) leader. CloudBees provides solutions that enable IT organizations to respond rapidly to the software delivery needs of the business. Our offerings are powered by Jenkins CI, the world’s most popular open source continuous integration (CI) server. The CloudBees Continuous Delivery Platform provides a wide range of CD solutions for use on-premise and in the cloud that meet the unique security, scalability and manageability needs of enterprises. Our solutions support many of the world’s largest and most business-critical deployments.
pCloudy provides a plugin for Eclipse IDE. Using the plugin you can perform both manual and automation testing of mobile apps. The plugin provides a user interface to connect to the pCloudy platform. You can upload apps, book devices and perform your testing right from your IDE.
For Manual Testing
Upload your app to the cloud drive, select the device, and perform the manual testing of your app right from Eclipse.
For Automation Testing
This plugin helps you get a pseudo code for your Test Scripts to run on multiple pCloudy Real Devices in Parallel. Just install the plugin, login to pCloudy.com, upload your app, select devices and get the pseudo code.
Prerequisites
You have an account over pCloudy with enough credits.
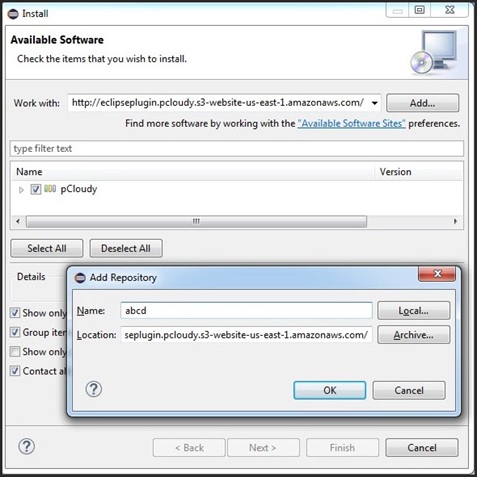
Click on Add, a new pop up window of Add Repository will open
Enter Name and Location, click on OK
Check pCloudy checkbox and then click on Next
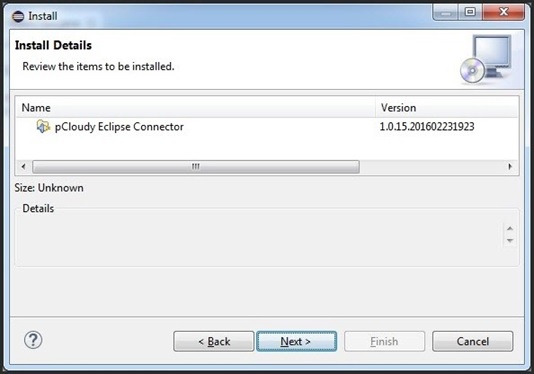
Now, you need to install pCloudy Eclipse Connector. Click on Next to begin pCloudy Eclipse Connector installation.
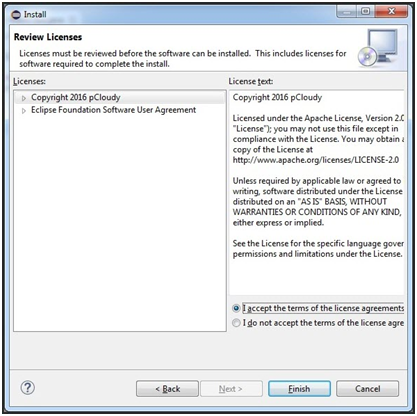
Further, check I accept the terms of the license agreements checkbox and click on Finish.
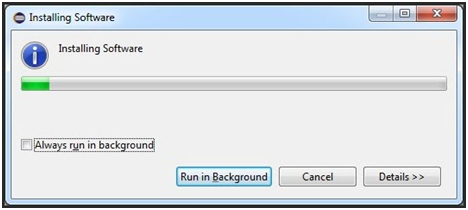
Installation of pCloudy Eclipse Connector begins.
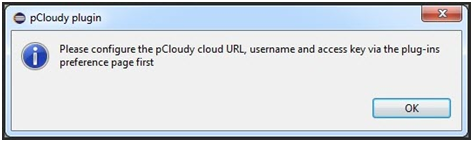
On completion of pCloudy Eclipse Connector installation successfully, an alert message appears. Click on OK to proceed pCloudy plugin.
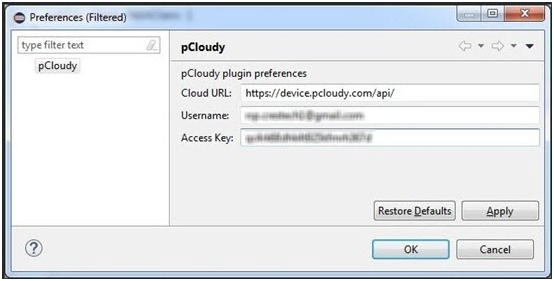
Now, enter Cloud URL of pCloudy along with registered Username and Access Key over pCloudy to login successfully. Click on Apply and then OK.
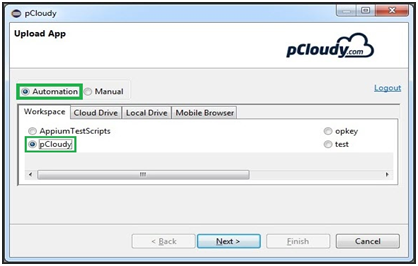
Now, you are able to perform Automation/Manual testing of apps based on Appium TestScripts/pCloudy/OpKey or Test as per your requirement.
Automation Testing of App
To perform automation testing of your app, here’s a checklist you need to prepare for Automation
Here, we are discussing about Test Automation of apps by over pCloudy.
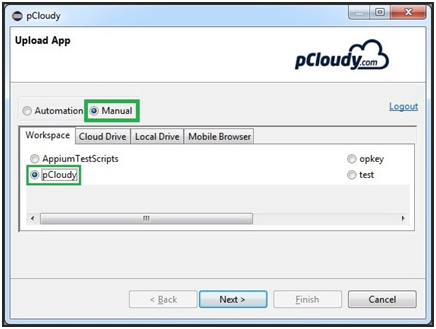
Select Automation & pCloudy and then upload your app to be tested.
Click on Next to proceed.
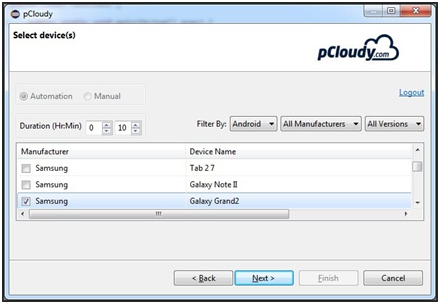
Select duration and filter list of devices by using given filter parameters (Android/iOS, Manufacturer, and Version). Select desired device (Ex. Samsung) and click on Next.
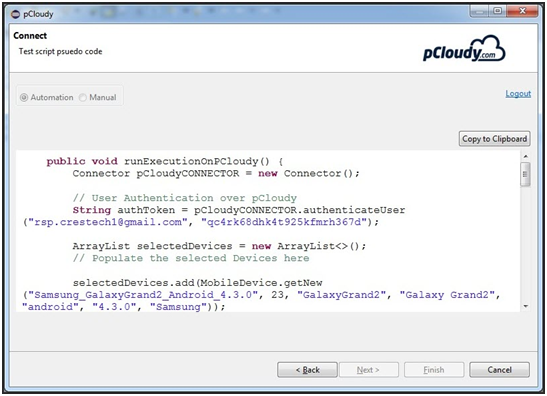
Finally, you get pseudo code for performing Test Automation. You can copy it to clipboard or copy it manually by selecting entire pseudo code.
You will need the pCloudy java connector jar file for the above code to work. The pCloudy-java-conector.jar contains the API wrappers, classes & methods to use the pCloudy RestfulAPIs(without knowing how to call rest webservices from java). The gson.jar is a well known, opensource google library. You should add the pCloudy-java-connector.jar in its build path as a reference within your java project containing appium scripts. See this link to learn how to add reference in eclipse.
You can download pCloudy-java-connector.jar & gson.jar(a dependancy of the pCloudy-java-connector.jar)
Manual Testing of App
If you want to perform Manual Testing of apps over pCloudy through Eclipse then select Manual way and pCloudy and upload app to be tested. Click on Next to proceed.
Select duration and filter list of devices by using given filter parameters (Android/iOS, Manufacturer, and Version). Select desired device (Ex. Samsung) and click on Next.
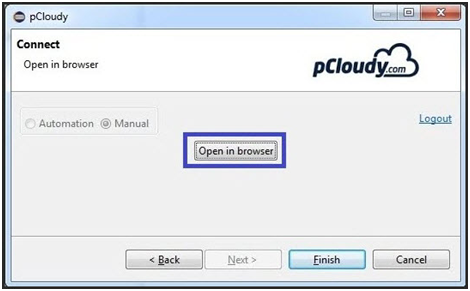
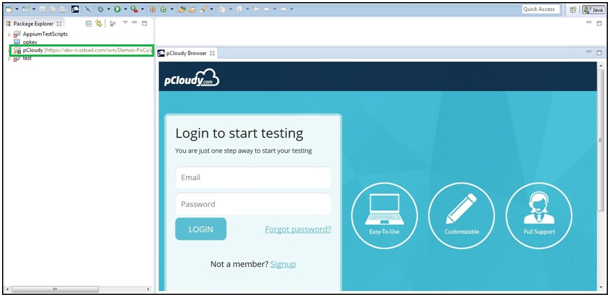
Now, you are recommended to open pCloudy in browser. Click on Open in browser and then on Finish.
When you click on Finish, pCloudy login page opens in eclipse. Now, you can login and perform manual testing on selected device as well
The upcoming iOS 10 has sparked great interest among app developers owing to it’s rich, better-than-ever features. The beta version of iOS 10 SDK includes new APIs and services that will power a whole new generation of apps. You can now extend your app capabilities to Phone Messages, Siri, VoIP, Maps, Apple Pay and much more to provide enhanced functionalities and enjoyable experience to your users.
Here are a few great features you can add to your apps:
Notifications
With iOS 10 you can create rich, interactive, and powerful notification experiences for your apps. The users can not just view photos, and listen to audio, but they’ll also be able to watch videos from inside a notification, view live information such as map updates in real time. As demonstrated at the Worldwide Developers Conference, you can even use 3D Touch to open a notification and respond to it directly from the lock screen.
Siri
You can create apps with extensions that work with Siri. Users will be able to access content and services using just their voice. The extensions developed using the new SiriKit will support new services such as booking a ride, managing workouts and sending or receiving payments, along with existing features like audio or video calling, messaging, and searching photos.
Maps: Apps that offer ride booking, restaurant reservations, and other location-related services are accessible from within Maps, allowing users to book, track, and pay. The Maps even suggest relevant apps for services in a user’s current location.
VoIP
The CallKit framework lets VoIP apps integrate with the iPhone UI. The framework lets users view and answer incoming VoIP calls on the lock screen and manage contacts from VoIP calls. CallKit also introduces app extensions that enable call blocking and caller identification. You can create an app extension that can associate a phone number with a name or tell the system when a number should be blocked.
Apple Pay Enhancements
In iOS 10, users can make easy and secure payments using Apple Pay from websites and through interaction with Siri and Maps. For developers, iOS 10 introduces new APIs you can use in code that runs on both iOS and watchOS, the ability to support dynamic payment networks, and a new sandbox testing environment. The new APIs will help you incorporate Apple Pay directly into your website. When you support Apple Pay in your website, users browsing with Safari in iOS or OS X can make payments using their cards in Apple Pay on their iPhone or Apple Watch. iOS 10 also introduces a new testing environment that lets you provision test cards directly on the device. The test environment returns encrypted test payment data.
Speech Recognition
iOS 10 introduces a new API that supports continuous speech recognition. The Speech Recognition API allows you to build apps that recognise speech and transcribe it into text. Using the APIs in the Speech framework (Speech.framework), you can perform speech transcription of both real-time and recorded audio.
These are the key developer-related features introduced in iOS 10. There are some more like interesting ones like Interactive Messages App, App Search Enhancements, Widget Enhancements, found in What’s new in iOS 10.
Need devices with the new iOS 10 beta to test new features in your app?
Try pCloudy’s Mobile App Testing Cloud. We provide real mobile devices with all versions of Android and iOS for app testing.
Testing a Mobile Web App can get knotty, especially when there are issues like obfuscated HTML/CSS/javascript code, improperly implemented HTTPS, browser inconsistencies, page load performance and so on. Moreover, few things like can be extremely agonizing while striving to support as wide a range of mobile devices as possible. So how do you overcome these issues? Using a Web Developer Tools or debugging extensions make debugging your web application easier. Here we’ll talk about the most popular one – the open source Google Chrome Developer Tools.
The Google Chrome Developer Tools is a consolidated environment built into Google Chrome Browser. It is used for web authoring, debugging, monitoring, optimizing, and understanding web applications or websites. (Sourced from Google Chrome DevTools)
Here are some of the key Chrome DevTools features
Inspect and edit the DOM and CSS of your website in real-time
Run code snippets from any page
Debug Obfuscated code
Set advanced breakpoints and debug JavaScript using graphical debugger
Troubleshoot Security issues
Analyze run-time and page performance to improve the speed of your app
Trace reflows and repaints as your app loads
The Chrome DevTools provides almost all the gears required to inspect, debug and monitor the performance of a Web App/mobile web. It also provides additional capabilities to simulate Mobile Devices to test and build mobile-first, responsive web sites. You can even debug web content on a real Android Device from a development machine. But, is it enough to test your Web App on just one or two devices?
Remote debugging using Chrome DevTools in integration with pCloudy’s Mobile Device Lab
Device fragmentation is a very real problem when testing Web apps on real devices, particularly for UI and functional tests. The number of devices with unique specifications and proprietary build variations has increased. At an advanced level, to fully test your Web App’s responsiveness and performance on real devices you will need to experiment your site on various platforms, across a number of device form factors. pCloudy’s Mobile Device Lab offers complete integration with Chrome DevTools to test your apps on real devices. This integration allows you to test Web Apps on a myriad of android devices with different sizes and configurations.
Here’s how most App developers test their Web Apps
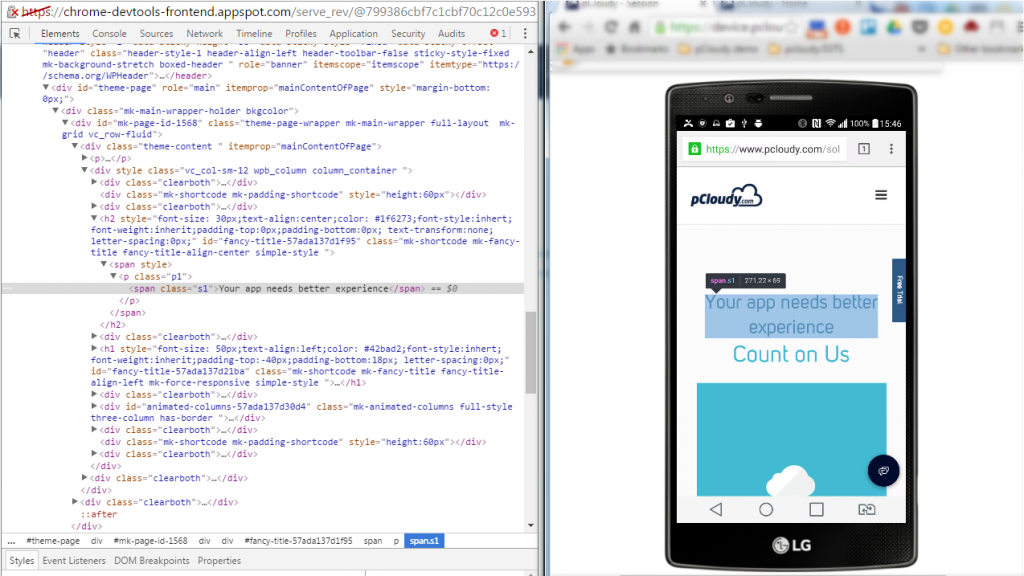
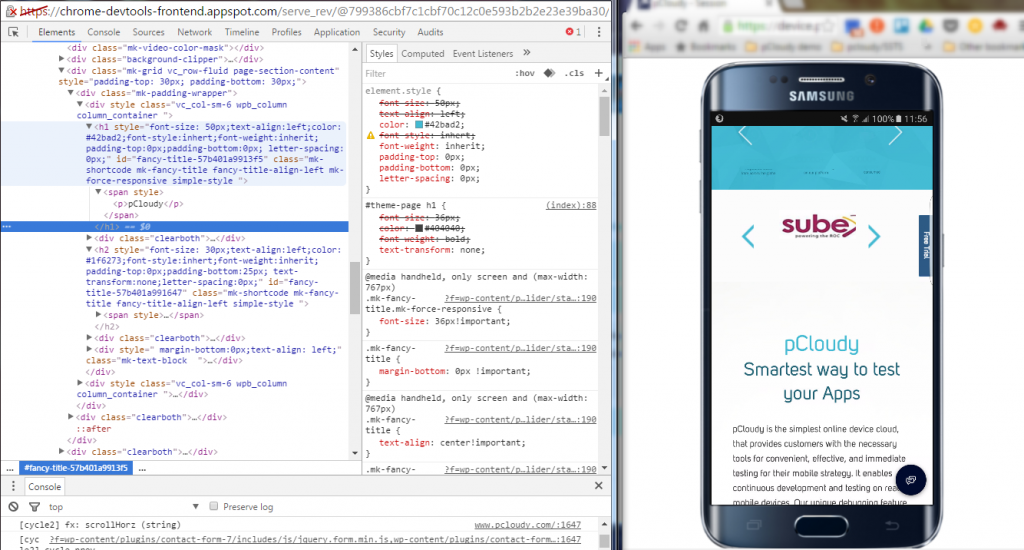
Inspect and live edit your site’s design and content
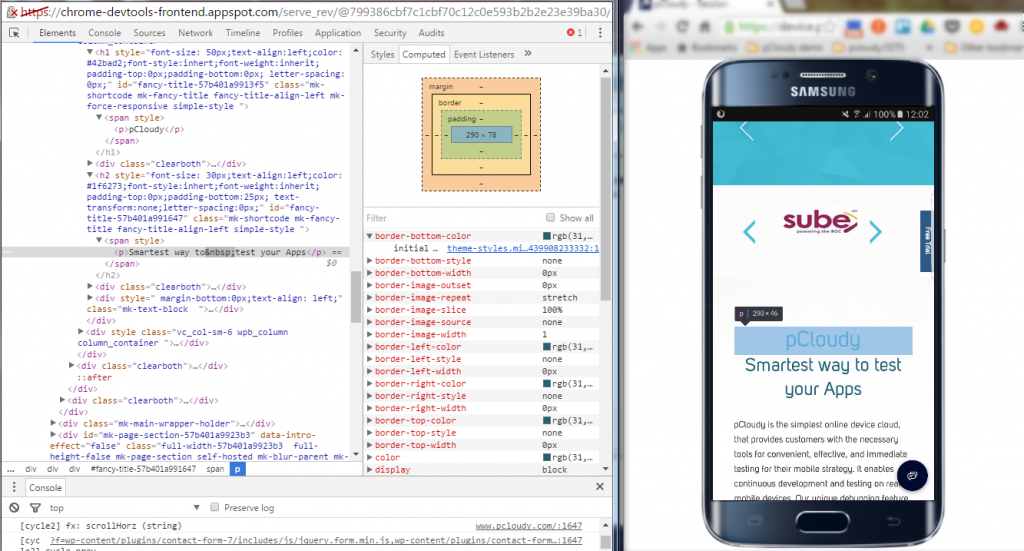
Test and edit your site in live mode by inspecting all the HTML and CSS in your page. In the Elements Panel, you can live-edit a DOM node by simply double-clicking a selected element and making changes.
You can even live-edit style property names and values in the Styles pane. Examine and edit box model parameters.
It is also possible to edit the current element’s box model parameters by making changes to top, bottom, left, right values for the current element’s padding, border, and margin properties using the Computed pane.
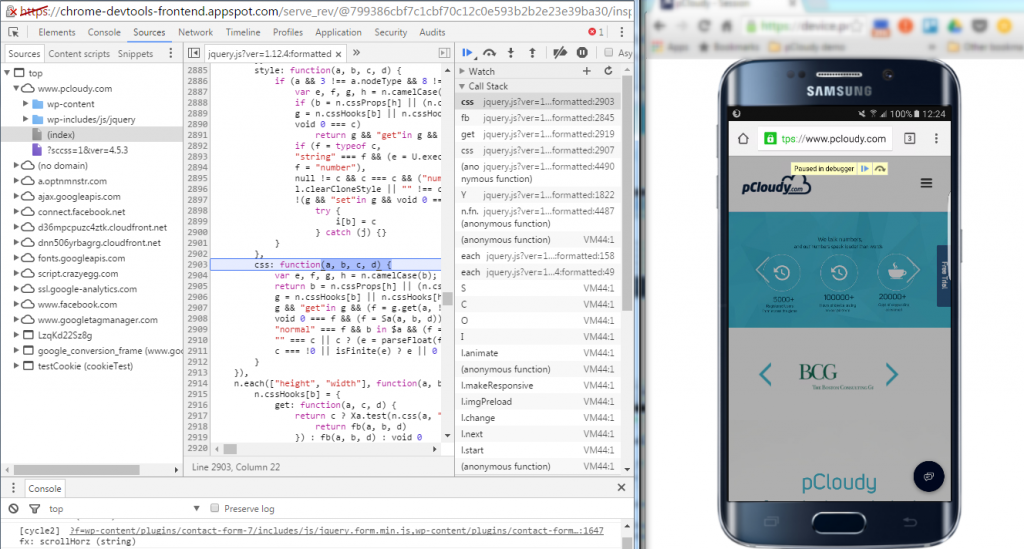
Remote Debugging on real devices to fix errors in the code
Debugging Obfuscated Code: Make your code readable and easy to debug even after you’ve combined, minified or compiled it. You can easily change the formatting of your minimized code by clicking on { }.
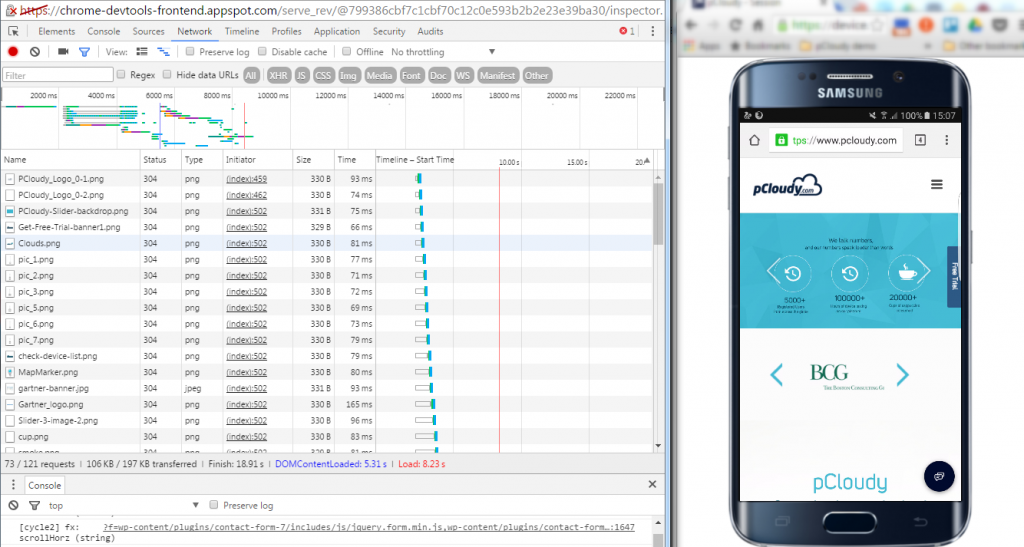
Test the and optimize the performance of the Web App
The Network Panel allows you to see how your page renders, and time taken to render from start to end. To do this click into the “Network” panel, click on the camera icon and refresh the page on the device.
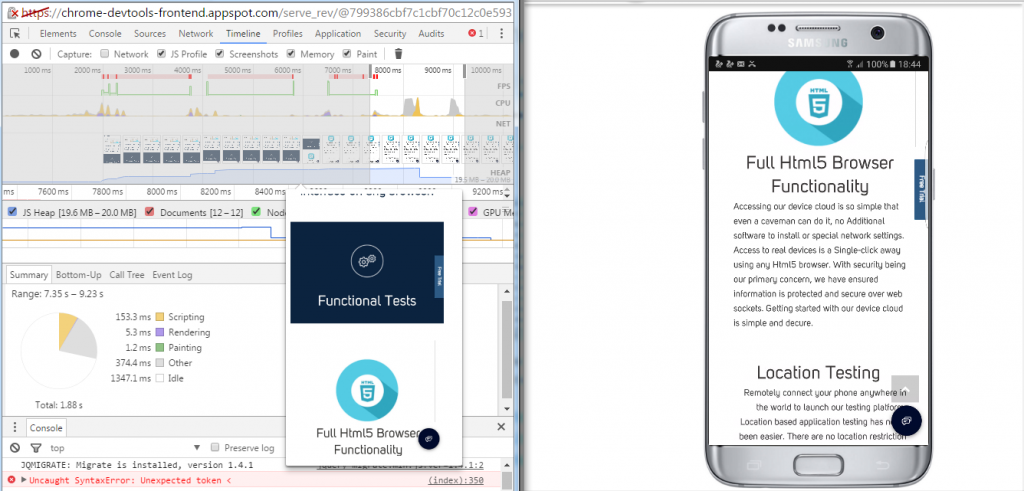
The Timeline panel helps you to record and analyze all the activities in your application as it runs. It’s the best place to start investigating perceived performance issues in your application.
To make a recording of a page load, open the Timeline panel, open the page that you want to record, and then reload the page. The Timeline panel automatically records the page reload. You can also record page interactions on the page and view the performance details through the recorded timeline.
Here are some more details you can view using the Record Timeline
Record the Timeline to analyze every event that occurred after a page load or a user interaction
View FPS, CPU, and network requests in the Overview pane
Click on an event within the Flame Chart to view details about it
Zoom in on a section of a recording to make analysis easier
Conclusion
“Using the right tools for the right job” is an old aphorism that applies to all domains including Software Development. As we’ve seen, Chrome Developer Tools has several features that helps you develop better, debug faster, and measure efficiently the performance of your website or application. The features discussed here are some of the most common ones used by developers, designers and testers to write, debug, monitor and optimize Websites and Web Apps. Using these features in integration with Mobile Device Lab like pCloudy can transmogrify the entire process of creating, testing and launching Websites and Web Apps.
Delhi, June 23, 2016 – Smart Software Testing Solutions (SSTS), a leading provider of Mobile App Test Automation Tools, today announced that it has been identified as one of the Representative Mobile App Functional Test Automation vendors in the Gartner’s Market Guide for Mobile App Test Automation Tools(1).SSTS was named in the category of commercial vendors with functional test automation and device cloud capabilities.
According to Gartner, ‘’the need for automation in mobile app testing is driven by business time-to- market demands and digitalization initiatives. These push mobile app development teams to adopt agile development approaches to deliver high-quality mobile apps faster. This rapid pace, combined with a broad and changing device ecosystem, creates a challenging environment in which to maintain a high level of quality. Without automation, it will end up crushing all but the most trivial app efforts.’’
“We believe our inclusion as a representative vendor in the Gartner Market Guide validates why the world’s best-known brands rely on SSTS, to drive their Mobile Test Automation,’’ said Avinash Tiwari, Director, Smart Software Testing Solutions, explaining the unique position of the company in the Indian market.
pCloudy is the flagship product company of SSTS (Smart Software Testing Solutions). Avinash Tiwari opines that the market in India is becoming more and more receptive of automated testing solutions and cloud based testing platforms. More and more organizations are feeling pressure to make releases more frequently. Moreover, creating right test infrastructure for mobile Apps is a key concern for organizations. pCloudy is in a unique position to serve both the challenges.
If you have a Gartner Account, you can download the report by clicking on this link.
Gartner Disclaimer
Gartner does not endorse any vendor, product or service depicted in its research publications, and does not advise technology users to select only those vendors with the highest ratings or other designation. Gartner research publications consist of the opinions of Gartner’s research organization and should not be construed as statements of fact. Gartner disclaims all warranties,expressed or implied, with respect to this research, including any warranties of merchantability or fitness for a particular purpose.
(1) Gartner, Inc. ‘’Market Guide for Mobile App Test Automation Tools’’ by MaritessSobejana, Adrian Leow, 25 April 2016
If you are someone using a smartphone to get through most of your day, then I’m sure would you’ve experienced it – You are in an elevator using your smartphone trying to find a restaurant for dinner but the app you are using unexpectedly crashes, or you are in a crowded subway using your smartphone to upload a video to some social media portal but the app you are using takes too long to respond, or you are just waiting for a friend in the basement of a parking lot and in the meanwhile you decide to shop for some new shoes but the e-commerce app you are using does not respond the way it should. Isn’t it frustrating when the apps you are using does not work when you require it the most? In these situations, the first thing you do is simply uninstall it, or in the worst case write a bad review.
Strangely, though most of the apps are functional and performance tested, they are still found to be defective by the users. It could be possible that not all scenarios are covered during testing. So, where is the gap? Deeper investigations have revealed that mobile apps behave differently in different network environments. In the above scenarios particularly, it seems like there is more evidence indicating that these issues are caused due to irregular mobile networks in locations such as the Elevator, or the crowded Subway, or the basement of a parking lot.
The network has a huge impact on the behaviour of your apps. Most of the apps that we use today are functioning by constantly communicating and fetching information from some servers or users that are miles away. The communication that happens is on wireless networks that are unfortunately not always reliable or consistent. Though most MNOs have established wider and better networks, it is practically difficult to achieve absolute seamless connectivity with excellent signal stability using existing wireless technologies. This is because, inherently, wireless networks have several inconsistencies like the lack of bandwidth in some places, the drop in packets caused by handovers and routing while moving, and more interference from other networks. Additionally, the networks through which data is transferred wirelessly also vary based on the technology used like GPRS, UMTS, HSDPA, LTE etc.
Why should apps be tested in different network environments?
The unpredictability of wireless networks has a huge impact on the functionality, performance and user-experience of an app. This is why we often see certain functional defects, performance defects, and sometimes crashes only when the app is running on a certain network or in some specific locations. Besides, mobile apps are expected to function on everything from an excellent Wifi connection, to a snail-paced 2.5G connection. Hence mobile apps have to undergo a wide range of tests on different networks with a variety of conditions before they are released to the users.
Are you testing your apps on different network conditions?
Traditionally, mobile apps are tested using the best networks in perfect conditions. But in real environments when the apps are being used anything can go wrong – the network bandwidth might not be enough, the latency might be high, data losses might occur, or there might be interference from other networks. App development companies have now realised the impact a network can have on their apps and are slowly filling up the gaps in mobile app testing. They are now focused on ensuring the app’s functional stability and relentless performance despite network inconsistencies. But testing mobile apps on different varieties of networks with a range of uncommon conditions is overwhelming and challenging. Moreover, these apps have to be tested on numerous mobile devices. It’s a tedious but crucial task. Additionally, tools that support such testing are scarce.
How can you test your apps in different network environments?
Testing Mobile Apps using live networks – Live networks can be used for testing mobile apps. The apps can be installed on real devices and can be tested on various networks like GPRS, UMTS, LTE, CDMA, etc. But the procedure of using real networks for app testing is slow, cumbersome, and mostly provides inaccurate results. Testers need to travel to different locations or wait for the network conditions to occur for conducting the tests. Furthermore, when the developers try to reproduce the bugs in order to fix it, the exact network conditions are hard to be replicated; eventually, most of the bugs will be closed as “Cannot Reproduce” while the bug still remains.
Simulated networks – Network related tests for mobile apps need not be such a hassle if the testers are given full control of the network being used. Using a simulated lab network, testers can easily test their mobile apps by simply selecting and applying the type of network profile to be used. They can also create and customize different network profiles by simply changing parameters like Uplink Bandwidth, Downlink Bandwidth, Latency, Loss Percentage, Packets Corruption, etc. This setup helps testers to replicate a myriad of network conditions for testing mobile apps.
On a larger view, when a mobile device cloud like pCloudy is being used you can test your mobile apps on varieties of networks, on hundreds of real mobile devices in parallel, through manual tests or automation runs. It is one platform that takes care of your entire app testing needs by helping app developers to easily test and experience the app functionality and performance on different networks and different mobile devices.
The cloud-based on-demand plug and play ‘app certification platform’saves cost by nearly 50%.
A mobile solution provider, based out of Noida was faced with numerous challenges, such as, lack of- adequate device coverage and devices management, test apps in continuous integration mode, efficiency of mobile app testers, device sharing between teams, access of devices to geographically distributed devices, among others.
Keeping the organisation’s large scale of business in mind, pCloudy developed the most appropriate single platform hybrid solution to address all the above pain-points. This ‘Hybrid’ Lab included the conversion of the existing physical device to an on-premise mobile lab over cloud, thus enabling teams to access the devices from anywhere, anytime enabling them to schedule and book devices easily. Teams at the mobile solutions company could now schedule automated runs in a continuous integrated mode and also during regression tests.
In addition, pCloudy provided a single interface access to its public cloud for the Client’s team. Teams could now switch between public and on-premise clouds seamlessly, depending on the specific requirement, besides being able to access various devices during their release tests, thus finding a single-click platform for all the challenges it was faced with earlier.
Thus, pCloudy, the flagship product of Smart Software Testing Solutions Inc. in addition to business growth, brought about significant benefits to the mobile solution provider, much to the latter’s delight, including,
· 30% increase in productivity of teams
· 44% reduction in Test Cycle
· 25% increase in test coverage and reduction in production benefits
Another start-up Planet Gogo, in the mobile news space, funded by HT media recently, launched their Mobile App. To ensure success of their App, they wanted to test on variety of Low and medium budget smartphones. Moreover, they wanted to reproduce issues reported by their beta users. These issues were device specific where in pCloudy provided them the appropriate one-stop solution.
How the journey began?
Pankaj Goel, a technology Consultant who formerly worked at Oracle India, HCL Technologies and Adobe Systems along with Lalit Jain, also a consultant with experience in having worked with Wipro and Adobe Systems, co-founded CresTech Software Systems in 2006. The Company grew rapidly to become a trusted name in Independent QA and Testing space. Today it has 3 delivery centers at Noida, Bangalore and California and is a trusted partner of many Fortune 500 companies helping them accomplish their software quality management goals successfully.
Around 2009-10 the founding team conceptualized a ‘Commercial of the Shelf Solution’ called OpKey with Tool Agnostic Test Automation Platform. Very soon, this became a preferred ‘tool of choice’ for many customers, across the globe, who were looking to kick-start their Automation initiatives. In 2014,the three dreamers or the ‘tech nerds’ as they proudly call themselves – Lalit Jain (The Customer’s Voice), Pankaj Goel (The Open-eyed Dreamer) along with Avinash Tiwari (The Pragmatic Dreamer) decided to start another venture, with separate investment for OpKey and closed funding recently.
This new venture, Smart Software Testing Solutions Inc., was formed with the vision to create product and platforms for testing of Apps in a connected world. In line with their vision, they acquired, pCloudy Design Labs, a Bangalore based start-up that focused on Cloud Technology for a Mobile device. Today, pCloudy has been transformed as a Mobile App Testing platform and a separate entity in itself.
pCloudy is India’s first-of-its kind, plug and play app testing platform serving e-commerce, Mobile App based businesses, Mobile App Development companies, besides large enterprises. Besides serving the Indian market, its geographical expansion plans include catering to Australia, Philippines, Singapore, Malaysia, Thailand and Indonesia.
Fast Feedback — Every time someone pushes new code into the source repository, it is crucial to ensure that the integrity of the software is maintained. The plug-in enables you to receive immediate feedback and to help you understand which changes when introduced, made either the compile/build cycle or the tests to fail, and how to revert it.
Streamlines and saves time – Spend less time on build integration and more time on app development. Much of the work of frequent integrations is handled by automated build and testing systems, meaning developer time isn’t wasted on large-scale error-ridden integrations. On the other hand, when app developers need to test their apps on a number of mobile devices, a cloud platform like pCloudy helps you to easily select, manage, or schedule real devices for app testing. It drastically reduces the amount of time spent on device management activities like maintenance of the devices and controlling the version of OS on the devices; and not just that, it also provides an access to a host of iOS and Android devices to install and test your app on.
Continuously and consistently improve app quality – Using Jenkins allows you to receive immediate feedback from automated testing whenever a new code is pushed. Further, by automating the testing on a range of real devices helps you to improve the quality of the app. With this integration of Jenkins and pCloudy, any bugs can be instantly detected and resolved, keeping the app software in a state where it can be safely released at any time.
Speedy Development — Automated build integration and automated tests running on Real devices can be triggered anytime, this enables decreased wait time and results in faster development and deployment. Additionally, integration costs are reduced as serious integration issues are less likely.
Using continuous integration tools like Jenkins with a mobile device cloud platform like pCloudy is a powerful combination that definitely unlocks faster, better and economical means of testing and releasing quality apps.
Installing the Plugin:
An Overview:
pCloudy has released a plugin for Jenkins which provides you access to the platform for performing automation testing of mobile apps from within Jenkins on real devices.