There are more than 5.5 Million apps available on Google Play and Apple App Store combined and by 2022, the number of app downloads will be around 250 Billion. The number of smartphone users in the world is more than 3 Billion and the users prefer using smartphones instead of desktop. This data shows that the mobile app market is very competitive and growing. In this age of digital transformation, the focus of enterprise mobility is to provide better user experience at great speed. The launch of 5G will further complicate the app development and testing process initially. But apart from this, there are three main challenges to overcome and pCloudy is leading the path to bring positive change. Let’s look at these challenges and their solutions.
Challenges Faced by Enterprise Mobility
There is a growing demand for quality at speed in the mobile app industry. The current market dynamics are such that it is necessary to provide the best quality product in less time to remain in the competition. When we talk about mobile app testing, quality can be maintained only when the enterprise can achieve scale. There is a myriad of devices in the market with different OS versions, browsers, Custom ROM, etc. and the app should be compatible with all the devices. How can ensure this and most importantly, how can we speed up the testing process on multiple devices? pCloudy can help you overcome this challenge with its best in the class features. Let’s have a look at them one by one.
Parallel Testing to Achieve Scalability
If we are talking about scalability then testing your app on 5,10 or even 20 devices are not enough for the enterprises to ensure a bug-free app. pCloudy enables to testers to run your test scripts concurrently on 50, 100 or maybe more devices. Enterprises have the option to perform parallel testing in our public cloud or in our plug & play on-premise infrastructure solution. With more than five thousand device browser combinations, enterprises can ensure that the application is working properly in all the devices.
Parallel testing on 50 devices
You can see in the picture above, we have set up a device infrastructure for 50 devices for demonstration. Similar device setup can be provided for our on-premise solution and public cloud users can just log into the pCloudy platform and book the devices to perform testing. These real devices can be accessed remotely on the cloud which makes it more convenient for the users as there are no location constraints.
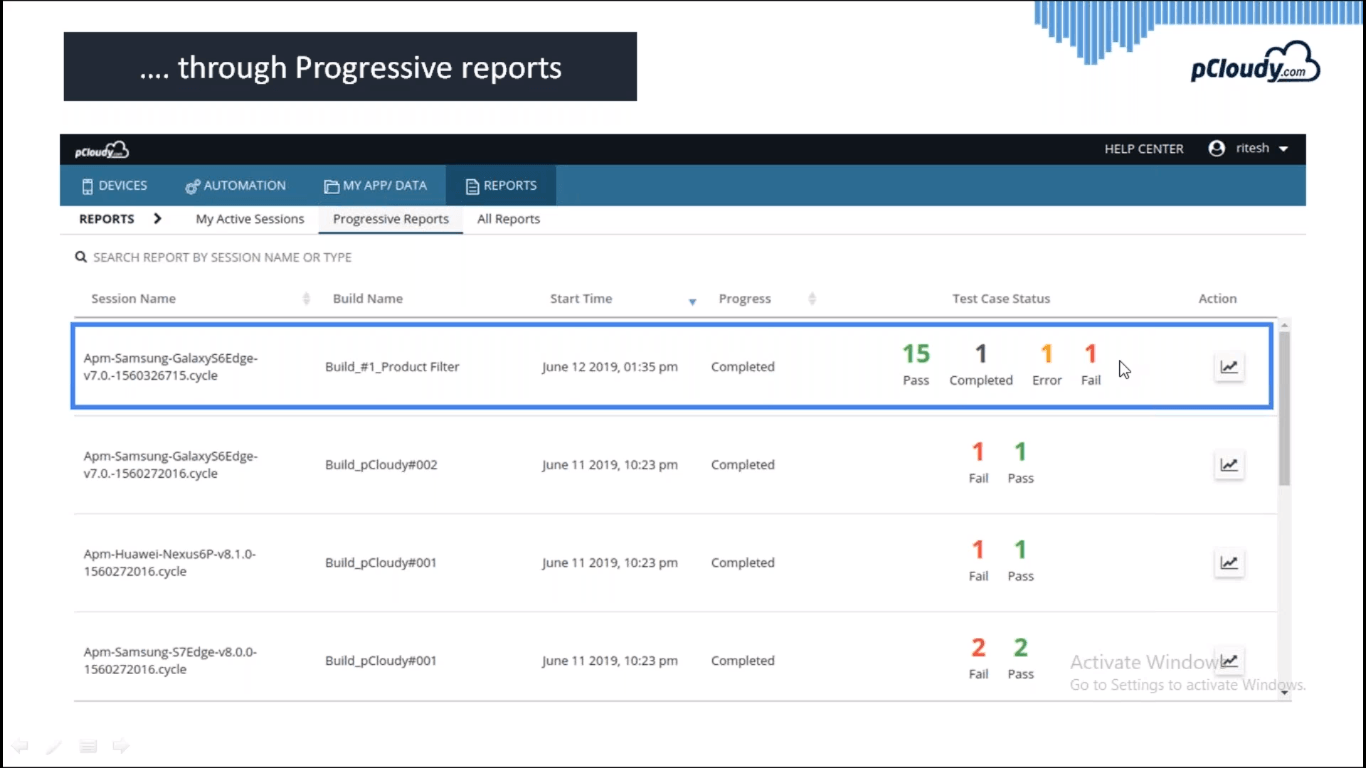
Progressive Reports to Improve Quality
It won’t be efficient to go through each and every report to analyze the data for every device. Instead of that, you get intelligent results where you can do a quick analysis of the errors and then debug quickly. In the pic below you can see the list of results for different builds with their start time, progress, status, and Action.
In the status, you will be able to see how many tests pass, fail, and errors. This way you can concentrate on the tests which failed and you will save time as you don’t have to manually go through all the cases.
You can integrate any reporting framework with your existing Appium setup. The same way you have to configure with pCloudy by adding a one-line code while creating an asset.
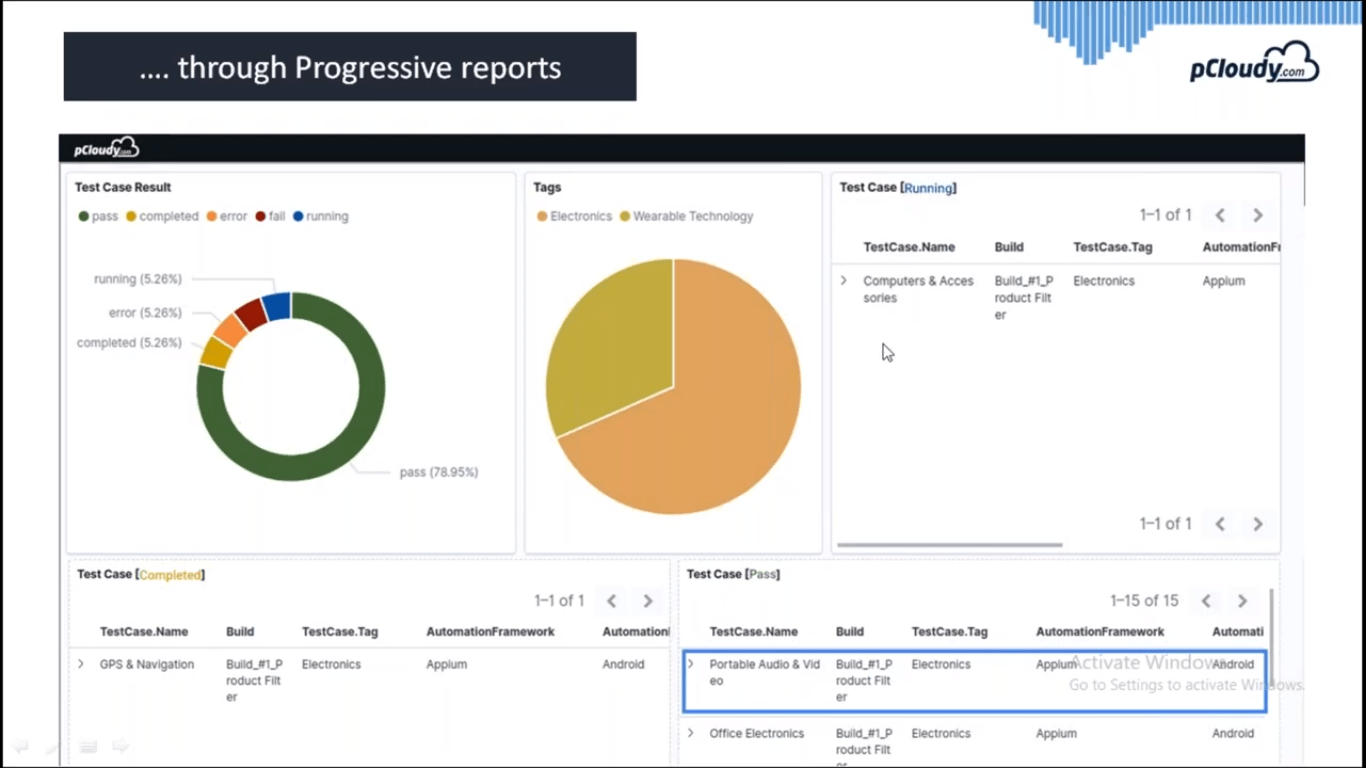
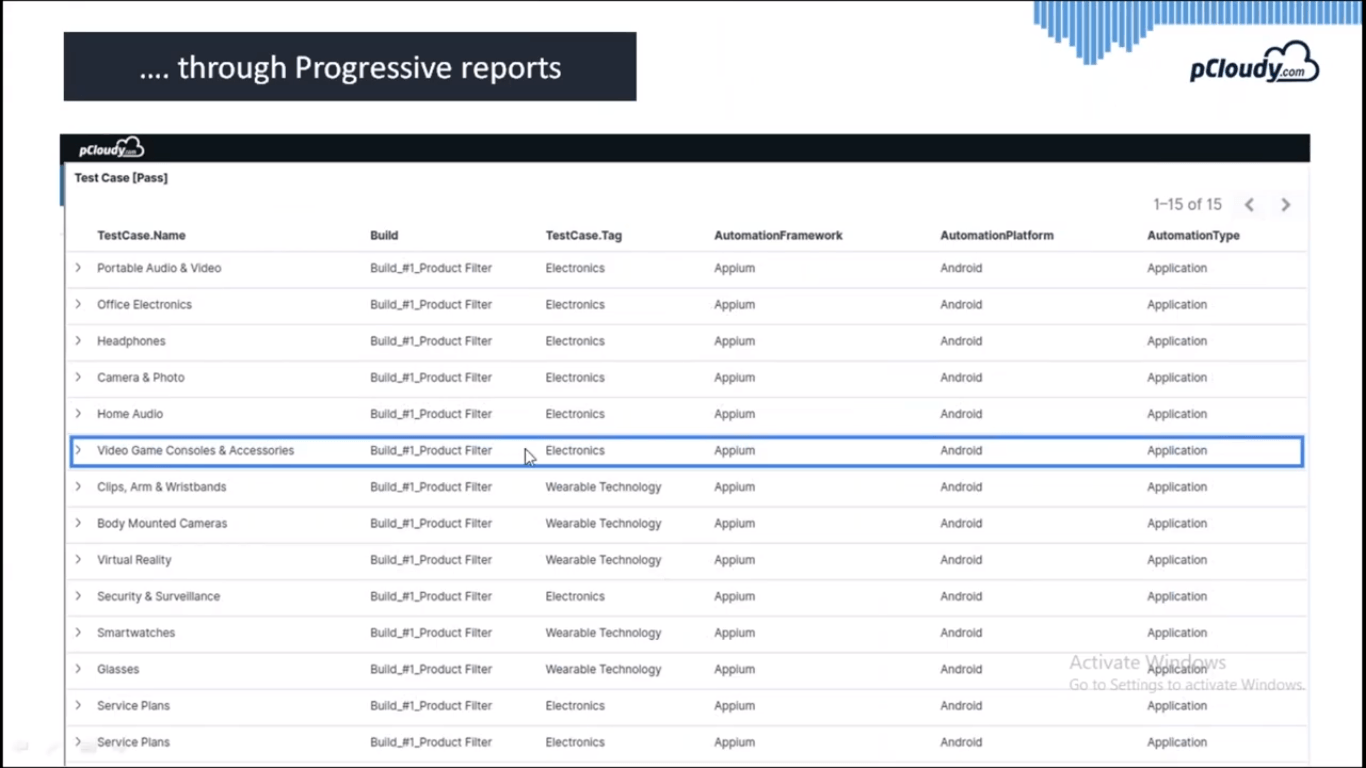
In the pic above you can see the test case result in detail. You can see the tags, test case name, build, Automation, and the live status of errors.
Once you expand the test case you can see the logs, Jason format, screenshots, video for that particular session. This information can be used to expedite the test execution.
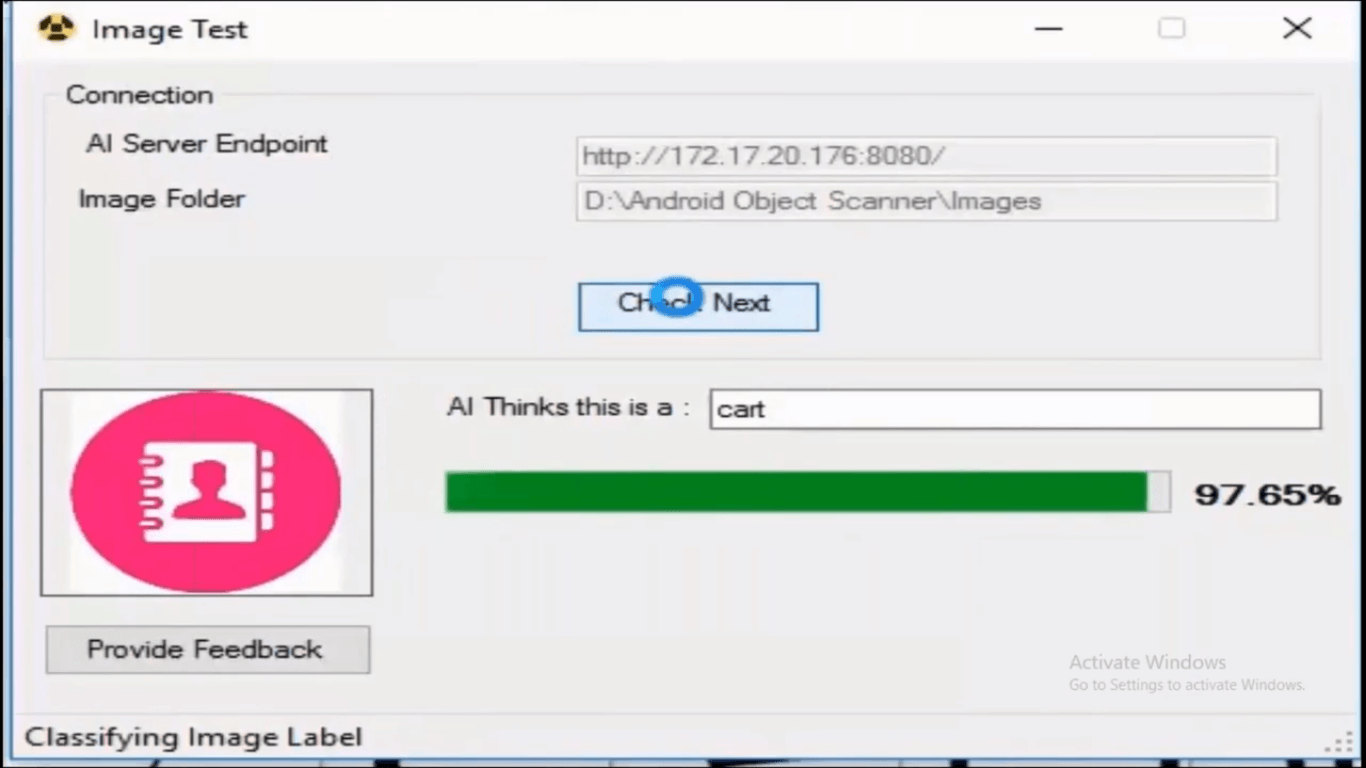
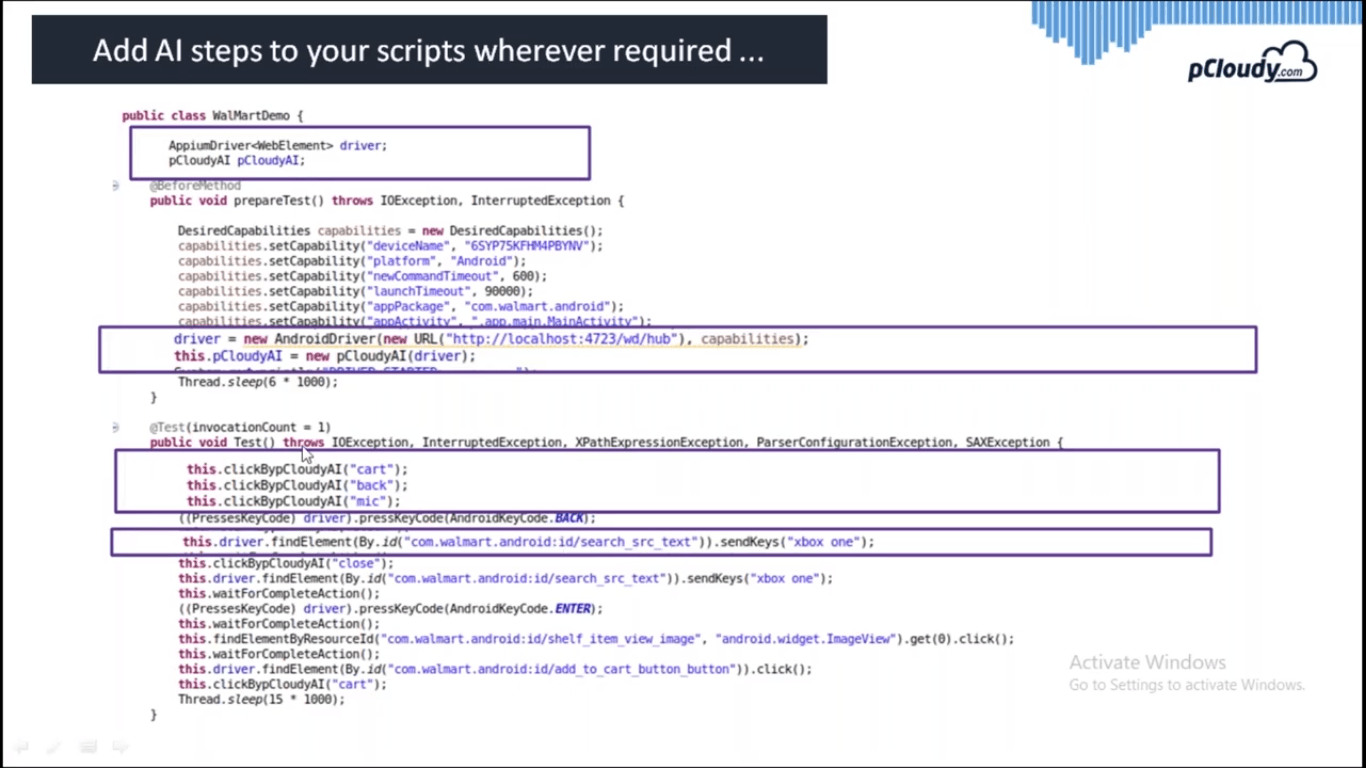
Integration with AI to Speed up Mobile App Testing
The next challenge is to speed up and simplify the test script creation process. Usually, the procedure is to connect the device to the system and use an automation framework like Appium to use object repositories. If you are using images then the XPath may change depending on the devices.
This AI based utility will help you to get the object repository for the entire page. So if there is an icon for contacts then this utility will automatically recognize the element.
In the code, you just need to declare the driver for Appium and for pCloudy as well. Then you need to initialize the drivers and start using the code generated using the AI utility. This is how the script creation is expedited using AI.
Conclusion
To sum up, pCloudy has come forward with solutions for the enterprise mobility to deliver quality at speed with scale. Whether it’s parallel testing, progressive reports or creating a script using AI-based utility, all these features fix the problems that were mentioned earlier. The proverb “change is the only constant” fits well as pCloudy comes up with updates on a regular basis to resolve the issues and make mobile app testing better.
Robot Framework is a generic keyword-driven test automation framework for acceptance level testing and acceptance test-driven development (ATDD). It has an easy-to-use tabular syntax for creating test cases and its testing capabilities can be extended by test libraries implemented either with Python or Java. Users can also create new keywords from existing ones using the same simple syntax that is used for creating test cases.
Appium Desktop is a point-and-click interface for using Appium and inspecting your app’s structure. With this new feature you will be able to run Inspector sessions on pCloudy. You just have to login in to your registered account, set up the desired capabilities for your test appropriately, and you’ll be able to drive your app remotely using Appium Desktop.
Let’s understand this in detail:
Overview
Appium Desktop is a new open source GUI application for Windows, Mac, and Linux which gives you the power of the Appium automation server in a more organized manner with a flexible UI. From an Appium Beginner’s perspective – if you want to write test scripts with Appium, you would need 2 things.
First, you would need to start the Appium Server. And second, you would also need a mechanism using which you can identify the controls (buttons, text boxes etc) in the mobile app which you want to automate.
So Appium Desktop is a combination of two essential components of Appium:
Appium Server: Server instance for enabling testing (and test automation) of apps.
Appium Inspector: For inspecting and getting all the details of UI elements of your apps.
Advantages of Appium Desktop
The Appium Desktop tool enables users to work with Appium on their desktops and use Inspector for yet better analysis of their apps.
Allows using desired capabilities and presets configuration for convenient use.
Provides the ability to switch between web-view and native app view from inspector.
Provides an action recorder and the code generator.
How to install Appium Desktop
Refer the link given below to know how and from where to install Appium Desktop.
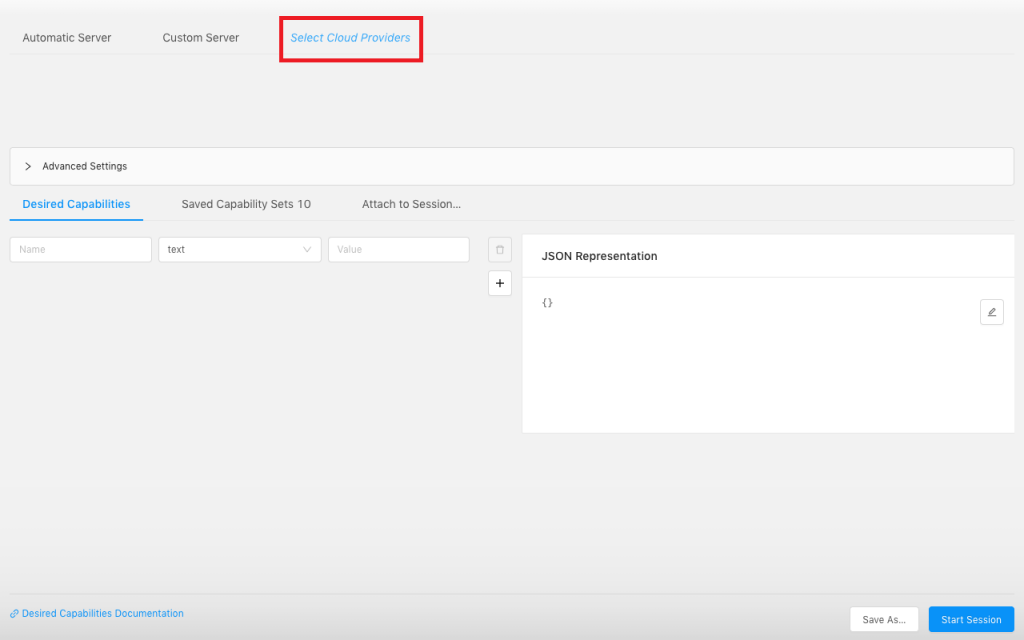
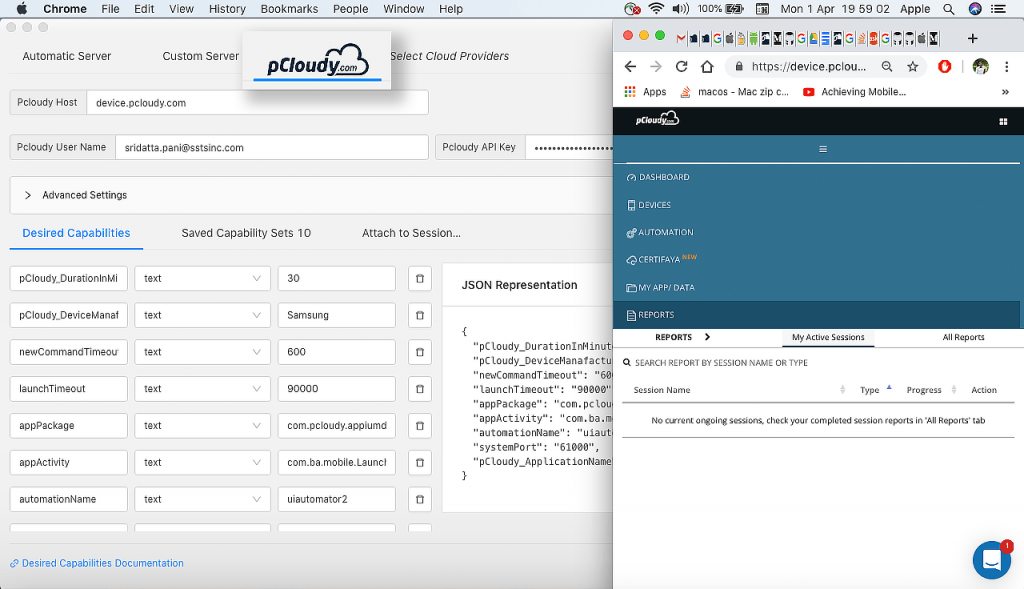
1.Open Appium Desktop in your system and click on Start Inspector Session as shown in below screenshot.
2. Click on Select Cloud Providers.
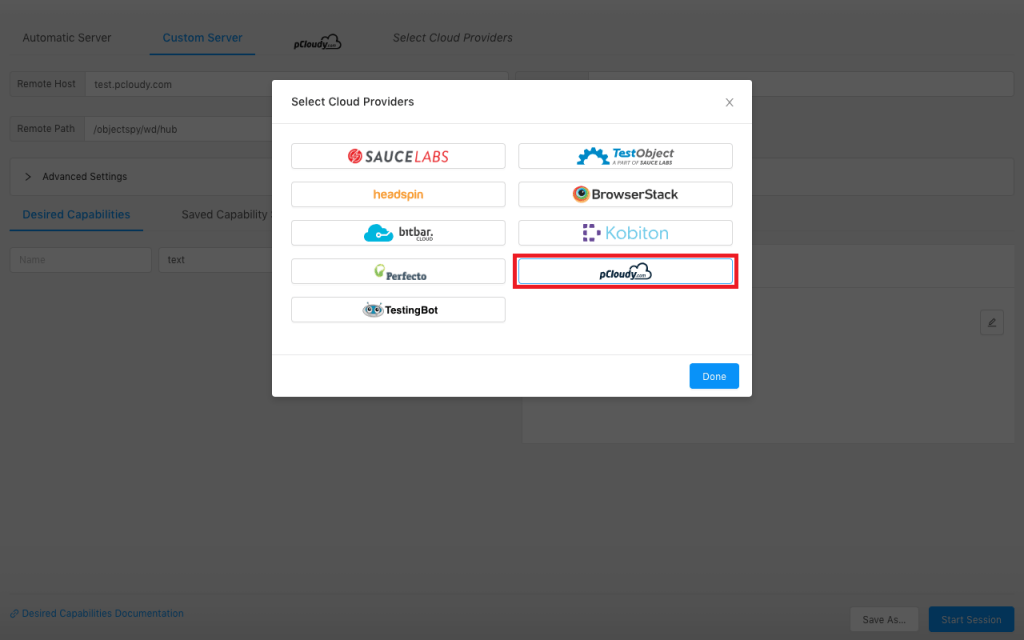
2.1 Click on the pCloudy logo and then click on done.
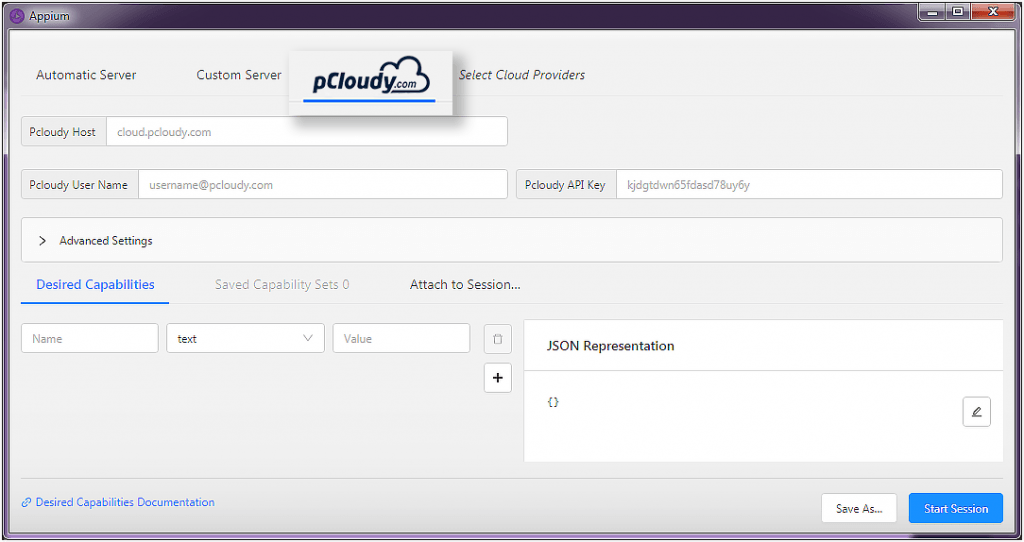
2.2 You will be directed to the desired capabilities page of pCloudy in Appium Desktop.
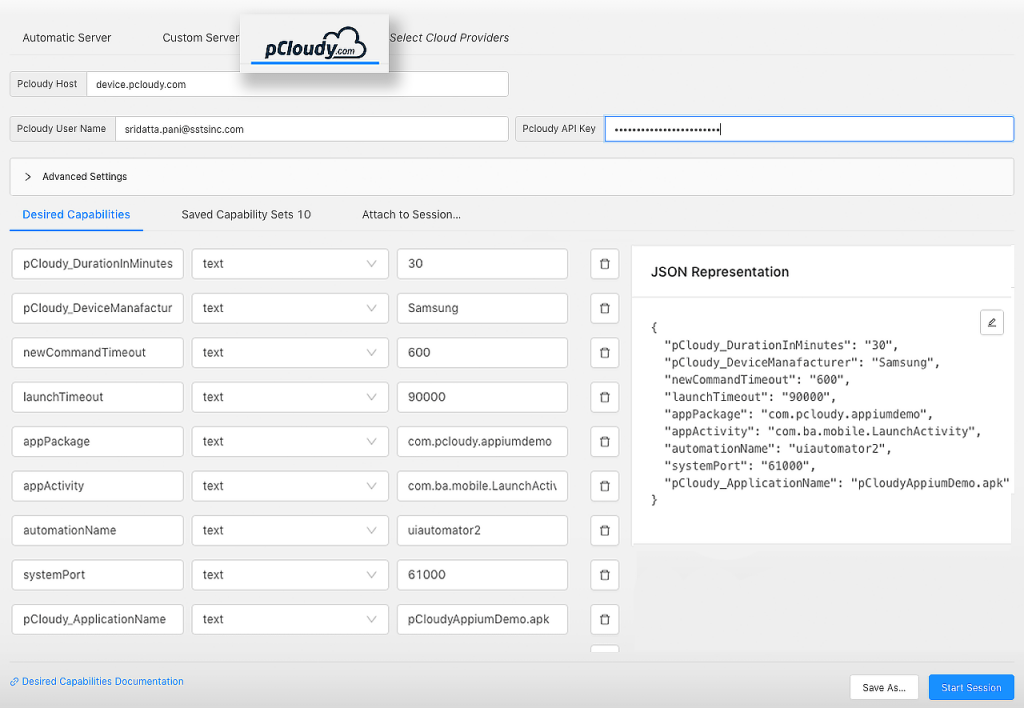
2.3 Enter the below mentioned field details
pCloudy Host
pCloudy User Name
pCloudy API Key
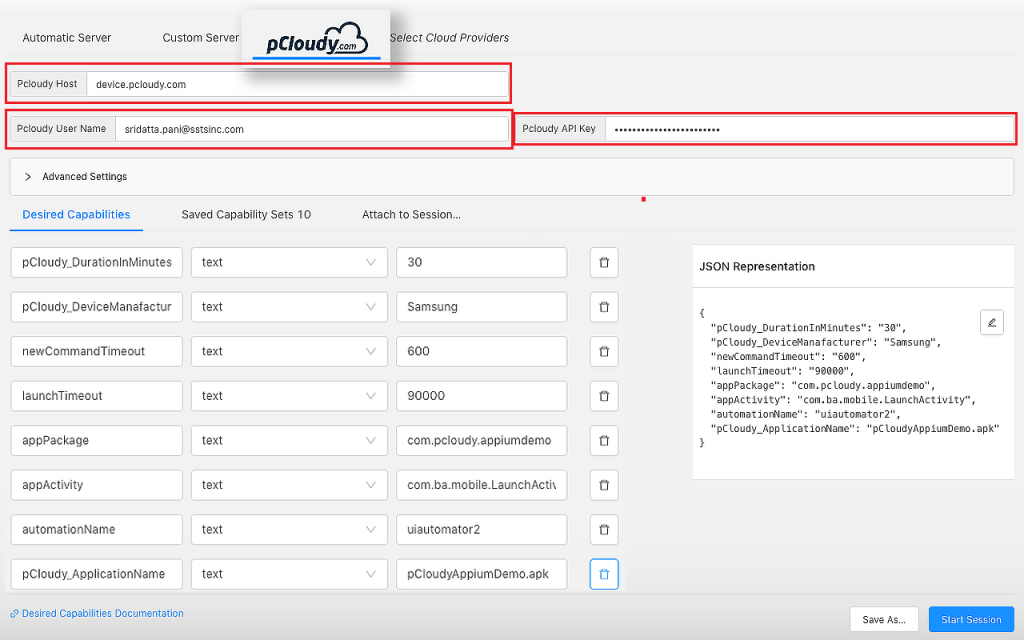
2.4 Once field details are inserted, set the Desired Capabilities.
These are used to inform Appium Server that what kind of platform and application you want to automate. Click here to know about Desired Capabilities.
Note:
By default, Booking duration is 10 minutes. If you wish to change the device duration, you have to change the number of minutes in the desired capabilities. For example, if you to keep the duration for 15 minutes, you have to set desired capabilities as ” pCloudy_DurationInMinutes”, 15 “
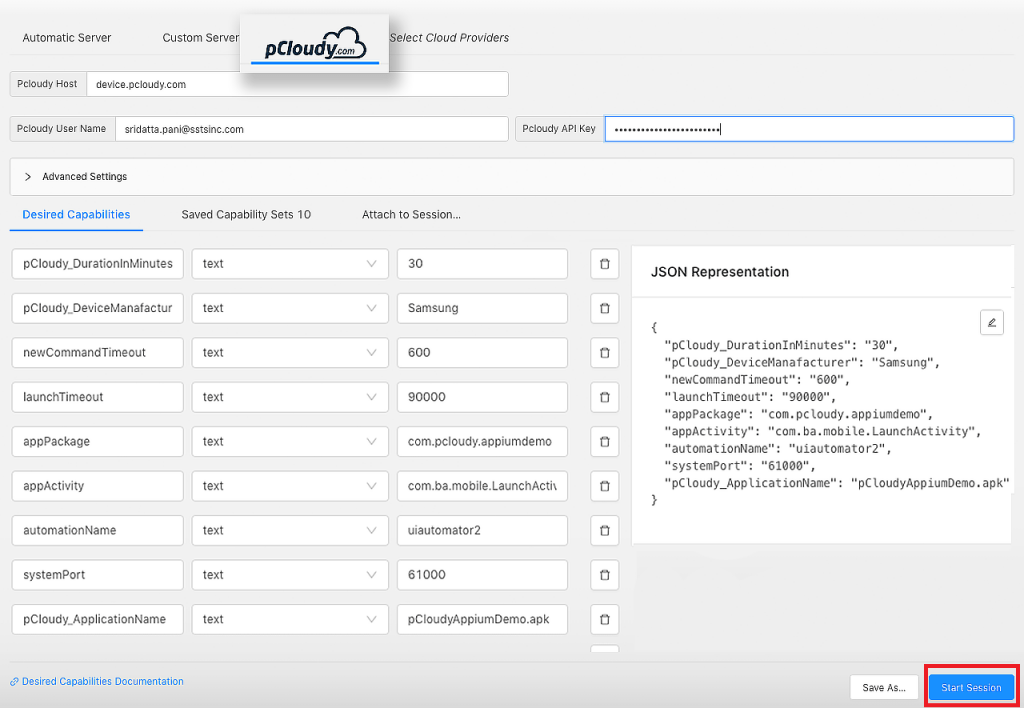
3. Click on Start Session once you have entered the field details and set the Desired Capabilities.
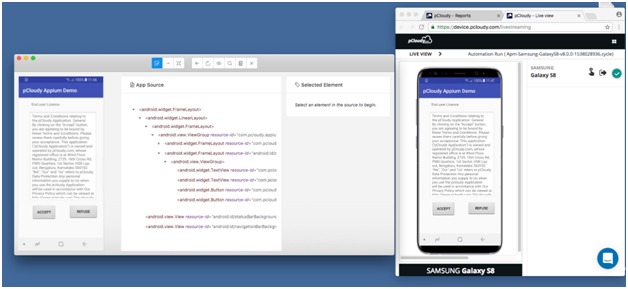
4. Once session has started, login to your registered pCloudy account .
After login go to Reports section and then go to My Active Session. Click this icon present under Action. You will be directed to LIVE VIEW page.
Note:
Device will be connected as per the set Desired Capabilities. Once your app gets launched on the device you will able to see Appium Desktop view.
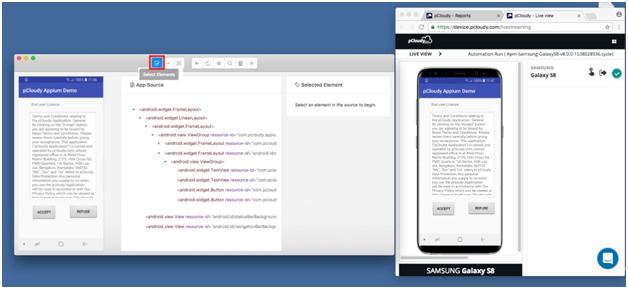
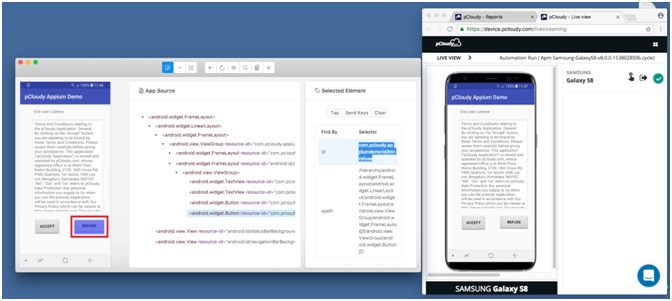
5.Click on Select Element to start inspection .
Example: In the below screenshot “Refuse” has been selected.
6.Once you select the element you will be able to see interactions .
Note:
There are three interaction given in Appium Desktop contributors. These are “Tap”, “Send keys” and “Clear” as shown in the screenshot.
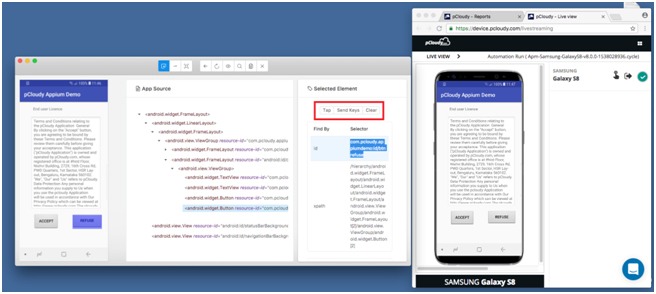
7. According to the selected interaction action will be performed on the device page.
As shown in the screenshot Tap has been selected.
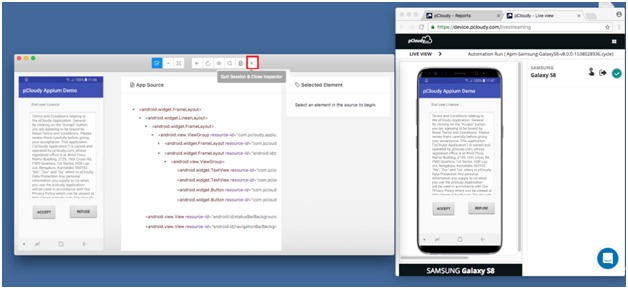
8.Click on this X icon to End the session.
Note:
As soon as you end the session device will get released from Live view.
Having Appium 1.9.0 out, we find it to be a feature release, comprising multiple updates. Some of the key features brought forward in this release update are:
a. Appium users have been facing unlocking device issues with older versions of Appium. This had been a big headache but Appium has resolved this issue with update 1.9.0. Even if the device remains locked, Appium 1.9.0 is very much capable to unlock the device and run your script smoothly.
b. If the object is not identified anywhere in the script, you will be able to locate the error in Appium logs itself.
c. Appium 1.9.0 comes with much faster execution compared to its older versions.
d. The log information is more insightful and detailed than before.
Let us have a look at Feature release updates below: (Source: https://github.com/appium/appium/releases)
General
Full W3C Specification support.
Add full beta of Espresso driver for Android automation (used by specifying automationName capability to be “Espresso”).
Fix –async-trace server argument, and rename as –long-stacktrace
Sample code has been moved into the main repository to aid in maintenance.
Fix status retrieval to speed up performance.
iOS
Add support for Xcode 10 beta 5 and iOS 12 beta 5.
Add preliminary support for MacOS Mojave beta.
Add face id biometric support.
Fix retrieval of device time, and add optional format parameter.
Do not crash if there is no idevicesyslog when ending session.
Handle frames when page changes in Safari.
Add desired capabilities:
remoteDebugProxy – port or Unix domain socket on which a proxy for the remote debugger sits.
safariGarbageCollect – turn on/off JS garbage collection in Safari.
showSafariNetworkLog – print Safari network logs in the Appium server logs.
mjpegServerPort – port to which screenshots can be streamed.
Fix handling of settings updates, so simulators are not restarted unnecessarily.
Allow pulling of folder from real devices.
Add mobile: getContexts execute function, to retrieve meta-information (title, url, etc.) about available contexts.
Fix certificate retrieval and handling.
Fix cookie handling, to allow secure cookies.
Fix Safari timeout issues.
Add support to retrieve Safari network logs, as safariNetwork log type.
Android
Update Chromedriver to v2.41.
Get Chrome version for Webviews in Android 7+, to find correct Chromedriver.
Make sure UiAutomator processes are cleaned up during test.
Fix handling of autoWebview capability.
New desired capabilities:
mjpegScreenshotUrl – url to stream screenshots to.
chromedriverUseSystemExecutable – boolean flag to use the default Chromedriver installed with Appium, avoiding any attempt to find correct Chromedriver.
disableWindowAnimation – disable window animations on device (now available on UiAutomator and UiAutomator2).
pageLoadStrategy – page load strategy for Chromedriver.
Allow test-only APKs to be installed.
Fix implicit wait handling for finding elements.
Better handle Unicode IME installation.
Relax package validation logic.
Fix error in UiAutomator searches with nested quotes.
Perform accessibility refresh when needed on UiAutomator2.
Improve logic for determining if apps need upgrade.
Fix screen recording to allow longer recordings, up to 30 minutes.
Key challenge with Appium 1.9.0
Now, we bring to you the challenge area that we have been able to identify with this release.
Even after using the capability automationName as uiautomatortool, we were unable to locate the object in >=Android v8.0 devices
If you have been able to find out any workaround for this issue mentioned above, kindly share it with us in the comments section.
At each step of our journey, we aim to make your app testing robust and simpler. That’s why your feedback and requests are so important for us. We tried to incorporate them into a release structure again that makes pCloudy work better and faster for you.
So here, we bring to you the fresh set of release updates that have been addressed and deployed in pCloudy 5.1.
Simpler Appium Integration Architecture: Here comes the bonanza for our Appium users! We have released a newer and simpler Appium integration architecture to simplify your Appium test execution on Android and iOS devices with pCloudy. The newer architecture make developers’ life simpler with lesser changes in the code. The older architecture demanded using APIs and also changes in your code that required some level of expertise. We addressed this issue and have come up with a simpler architecture where you need to mention some desired capabilities instead of calling APIs or doing changes in the code to run the Appium scripts. And wonder what! it just takes few minutes to integrate your existing Appium scripts with pcloudy. Check yourself here.
pCloudy Appium Capabilities
DesiredCapabilities capabilities = new DesiredCapabilities();
capabilities.setCapability(“pCloudy_Username”, “Enter your email Id”);
capabilities.setCapability(“pCloudy_ApiKey”, “Enter your API Key”);
driver = new AndroidDriver(new URL(“https://device.pcloudy.com/appiumcloud/wd/hub”), capabilities);
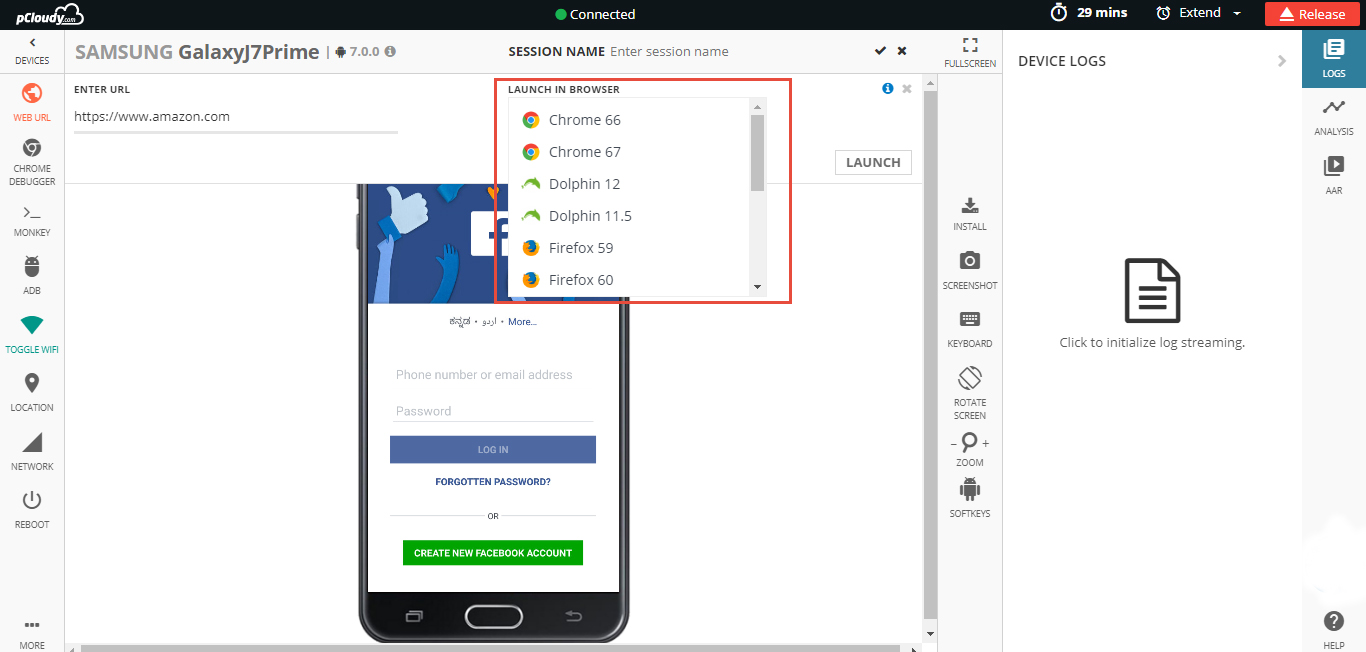
Cross-browser testing made simpler: There are many widely used web browsers, but not all browsers, and versions of those browsers, work the same. A website may not look or function identically on each one, which can lead to lost revenue for an enterprise. We addressed the issue of choosing from the fixed set of browsers previously available.
Heeding to the growing demands of our users, we have introduced the Launch and Upload browser feature for our Android users which will give him the freedom to choose the version of the browser that he wants to use. This is going to save their testing time and efforts to a great extent and also give better results for their cross browser test. To know more about it Click Here.
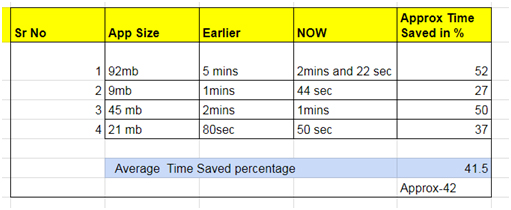
Faster Upload of Apps: We received multiple requests to speed up the process of Upload and synchronization of App/Data into the cloud. With some changes in the process, we have now succeeded to reduce the app upload and synchronization time by 42%.
As you know, during app synchronization, the platform automatically synchronizes your data with all the 4 data centers of pCloudy. Earlier, the process was done in a series where synchronization once completed in one data center will then start in the 2nd one and so on which took a few minutes to complete. We have now changed this to a parallel process, which makes your testing 2x faster.
App upload time saved in pCloudy 5.1
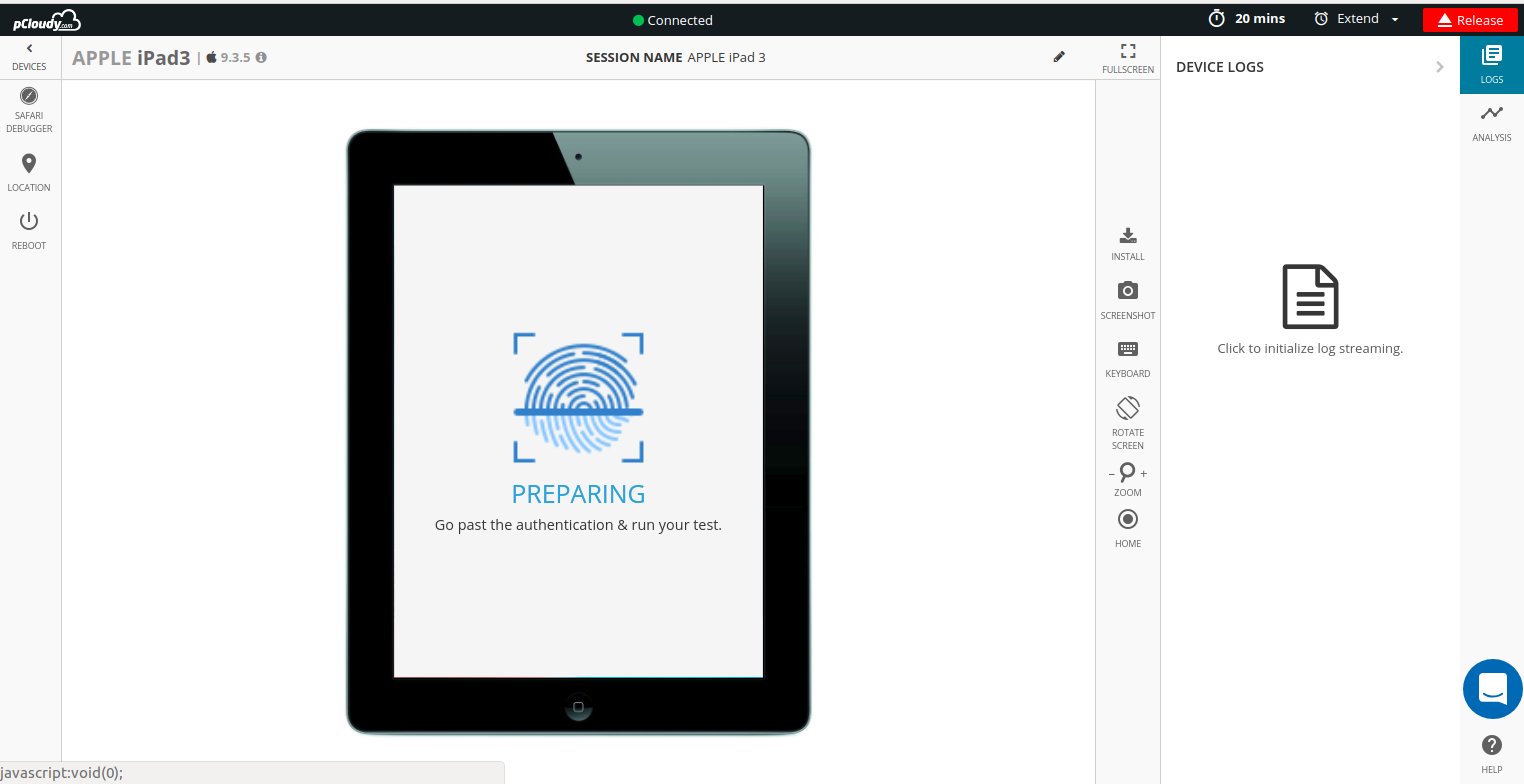
TouchID for iOS devices no more a blocker: Apple introduced the ability to perform authentication via TouchID to enable secure and effortless access to the device. But it turns out to be a hindrance for mobility teams while testing their iOS apps on devices over cloud. To ease out the process of authenticating TouchID manually every time, you can now bypass the TouchID verification in your apps using our utility. The bypass TouchID feature will be available for iOS devices version 10.0.0 or above. To know more about it Click Here.
Note: This feature will for now be available only for iOS and won’t support Face ID.
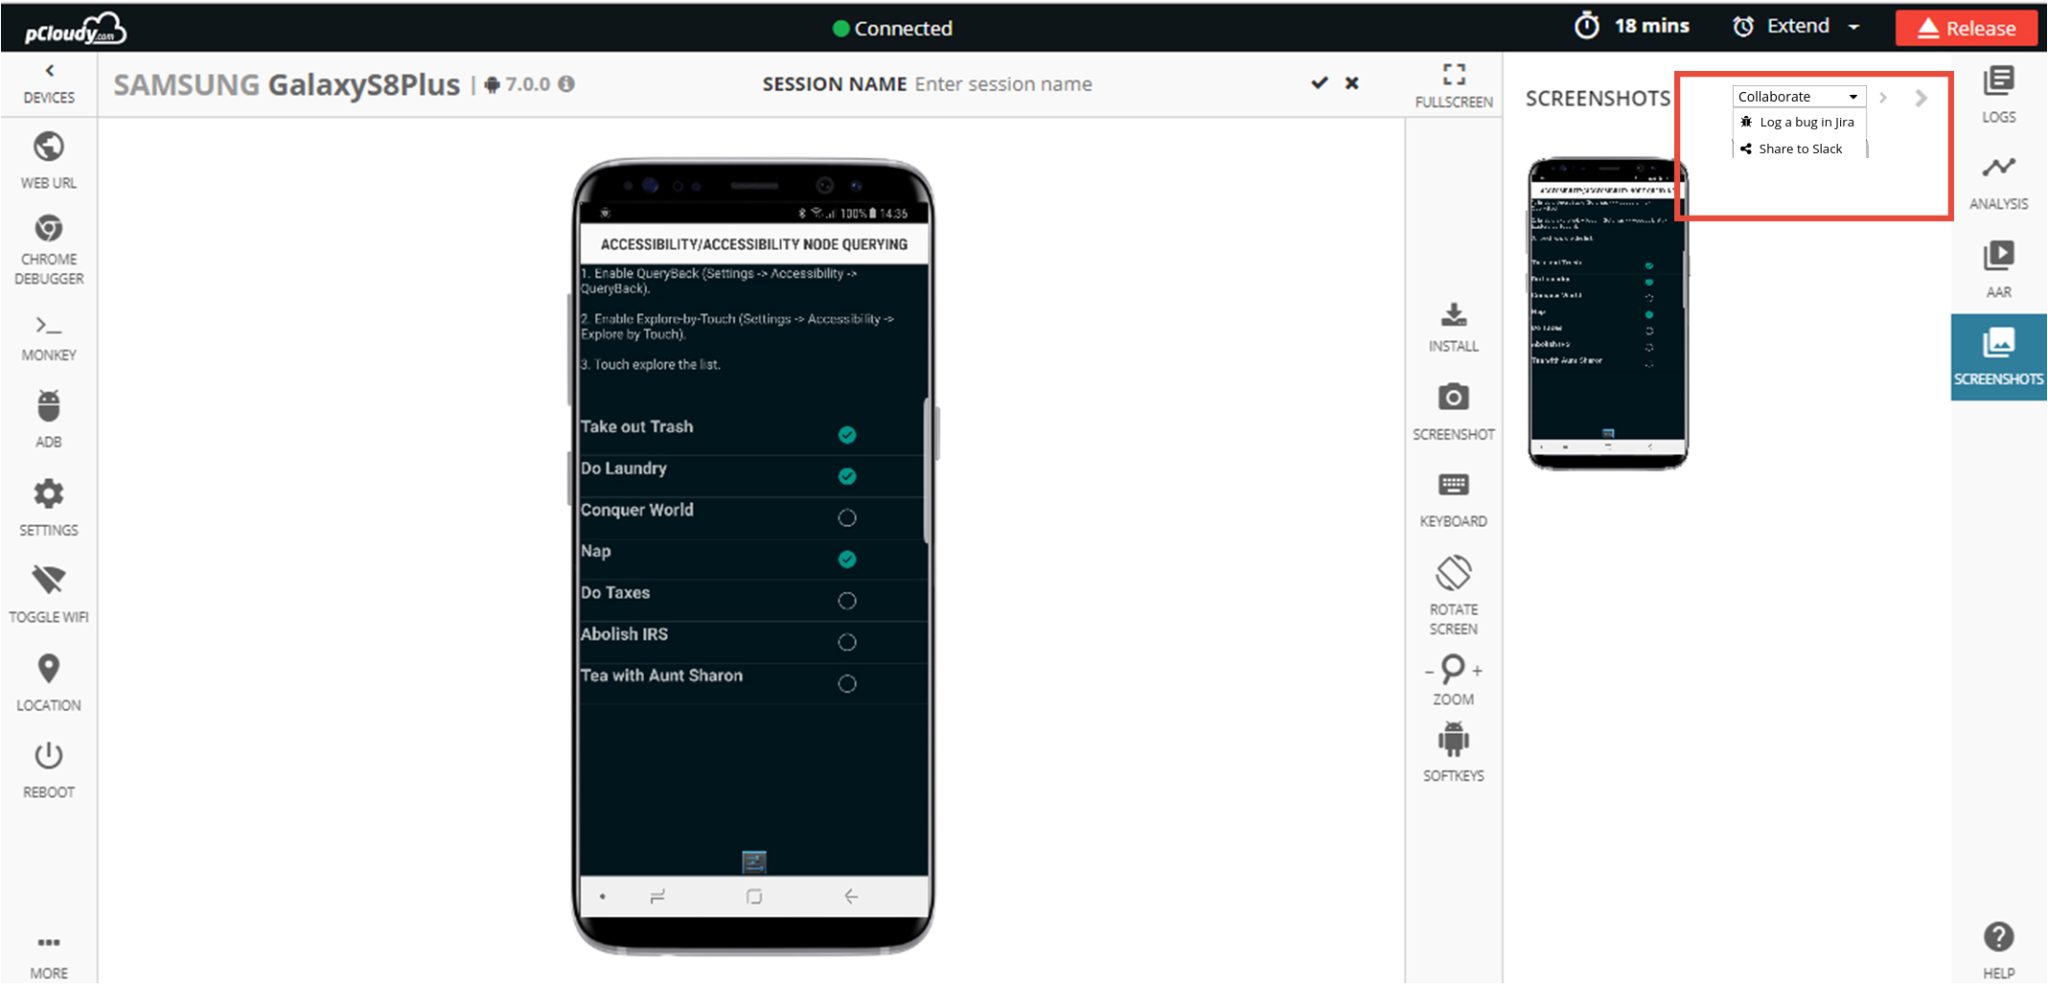
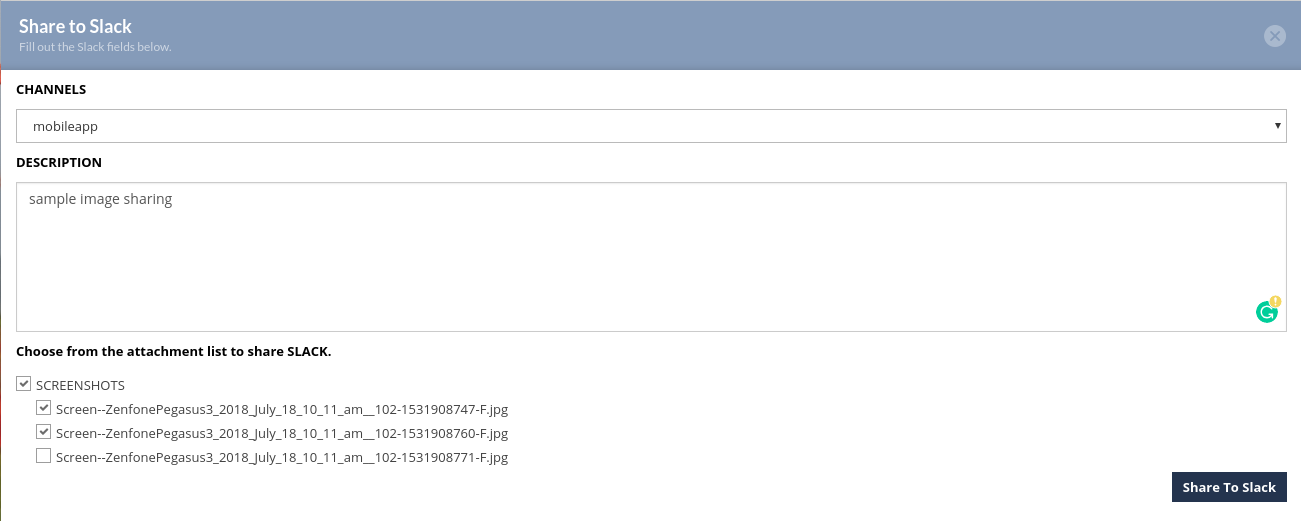
Integration with Slack: Since many of our customers are moving towards Slack, there was a huge demand to integrate Slack with pCloudy to enable their broadly distributed teams collaborate well. We noticed this change and hence we integrated Slack with pCloudy. It will now be easier for you to share bug related data and artifacts like Logs, screenshots etc through our Slack integration. To know more about it Click Here.
The much awaited bonanza for Appium users is here. We are up with a newer and simpler Appium integration architecture which can simplify your Appium test automation execution on Android and iOS devices with pCloudy. The newer architecture make developers’ life simpler with lesser changes in the code. The older architecture demanded using APIs and also changes in your code that required some level of expertise. We addressed this issue and have come up with a simpler architecture where you need to mention some desired capabilities instead of calling APIs or doing changes in the code to run the Appium scripts. And wonder what! it makes you save 50% of your app testing time.
Watch the video to know more about the new simpler and faster pCloudy Appium architecture.
Pre-requisites
Appium Script
APK or IPA file
pCloudy Account
The basic steps to replace your local Appium driver to pCloudy Appium Driver are given below:
Upload the apk/ipa from your local system to pCloudy. Check this link to know steps to upload an app for test.
Set pCloudy capabilities
pCloudy_Username: Enter the email ID with which you have registered on pCloudy. For reference, check this linkExample: capabilities.setCapability(“pCloudy_Username”, ‘{e-mail-id}’);
pCloudy_ApiKey: API key is important for user’s verification. You can generate the API key from Settings page on device.pcloudy.com. Check this link to get your API key.Example: capabilities.setCapability(“pCloudy_ApiKey”, “{api-key}”);
pCloudy_ApplicationName: Enter the application name for the apk/ipa file which you already uploaded in the MyApp/Data.Example: capabilities.setCapability(“pCloudy_ApplicationName”, “pCloudyAppiumDemo.apk”);
pCloudy_DurationInMinutes: Enter the duration in minutes for which you want to run the test.Example: capabilities.setCapability(“pCloudy_DurationInMinutes”, 5);
pCloudy_DeviceFullName: If you know the device manufacturer, device name and version then enter the full device name.Example: capabilities.setCapability(“pCloudy_DeviceFullName”, “Samsung_GalaxyTabA_Android_7.1.1”);
Note: If you don’t know the Device full name then you can enter pCloudy_DeviceManufacturer and pCloudy_DeviceVersion in the code and it will automatically run command on those devices.
With growing demand in the market, enterprise mobility has undergone a paradigm shift. Speed, quality and user-friendliness are the need of the hour for modern enterprises. Mobile apps have become a major source of revenue boosters for enterprises today.
It is a well-known fact today that the numbers of platforms and device types are more varied now than ever before. Customers continue to demand the latest devices, features and functionality, as well as increased mobility and accessibility. With the proliferation of mobile and portable device platforms and the Internet of Things, the workload of developers, and especially testers, has greatly increased. As traditional testing practices of manual app testing prove unable to keep up with the demand, businesses of all types are experiencing significant product delivery delays and, in some cases, costly product defects. Naturally, there is a growing demand for more efficient and cost-effective testing across all platforms.
Appium: Addressing the complexities of mobile app testing
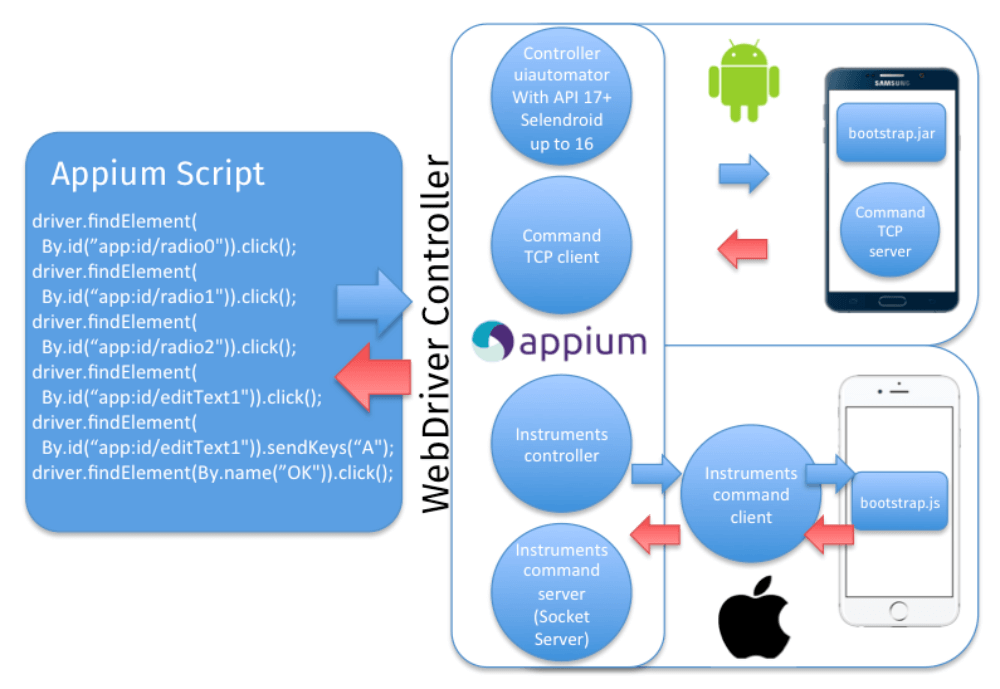
To address the demands of complex testing needs, an effective mobile app testing platform is needed which is secure, supports functional and automated testing without losing an eye on the speed and quality. So, in this era where consumers have adopted smartphones, use multi-platforms to access mobile devices, do you think your app is delivering the best experience to your users? If not, then Appium is the solution. Appium is an open source, cross-platform mobile automation tool to automate the test for native, hybrid and mobile web apps.
Appium being one of the best solutions for automation comes with support for Android and iOS real devices. In fact, it also comes with support for simulators and emulators. At its core, it an HTTP server written in node.js. It has similar working as Selenium which actually perceives HTTP requests from selenium client libraries and handles those requests in different ways depending upon the platforms.
Being the best and widely used option available today in the market, it is widely adopted by modern enterprises to create a comprehensive mobile automation framework. With a growing user base and a stronger community, it is easier to adopt and implement which is why enterprises are adopting it on a very large scale. The best thing about Appium is that it lets you write in any language supported by Selenium using WebDriver API.
While testing an Android app, Appium automates it with the help of UIAutomator library, a part of Android SDK. This actually makes the learning and implementation easier for Selenium users. Having the capabilities to test on both Android and iOS devices makes it the best cross-platform mobile app test automation tool. Automation scripts can be run on real Android and iOS devices using the WebDriver JSON Wire protocol.
Appium starts a test case on the device that spawns a server and listens for proxy commands. On iOS, Appium proxies command to a UIAutomation script running in instruments.
Source: cloud.netlifyusercontent.com
Appium: Why should you Choose?
Opens the door to cross-platform mobile testing which means the same test would work on multiple platforms.
Unlike other tools, it doesn’t require any third-party code to compile into your app to make it automation friendly.
Enables a variety of frameworks and programming languages by wrapping the vendor-provided frameworks in the WebDriver API that specifies a client-server protocol.
For a tester, the programming language and the whole experience would remain same irrespective of the automating platform as all complexities are under the hood of Appium server
Possible to Execute multiple tests on multiple platforms without the need to manage them.
Able to run test sequences with hundreds of test cases, across multiple platforms.
Enables the view and share of device interactions with colleagues using in real-time built-in collaborative screen casting
On-demand testing and leverage results directly
It supports automation frameworks like JUnit and TestNG
Appium has some challenges when it comes to scaling up with continuous integration. pCloudy brings to you a solution for this where you can automate your app tests with zero learning. Sign up on pCloudy and automate your tests on Appium for faster and better delivery of apps.
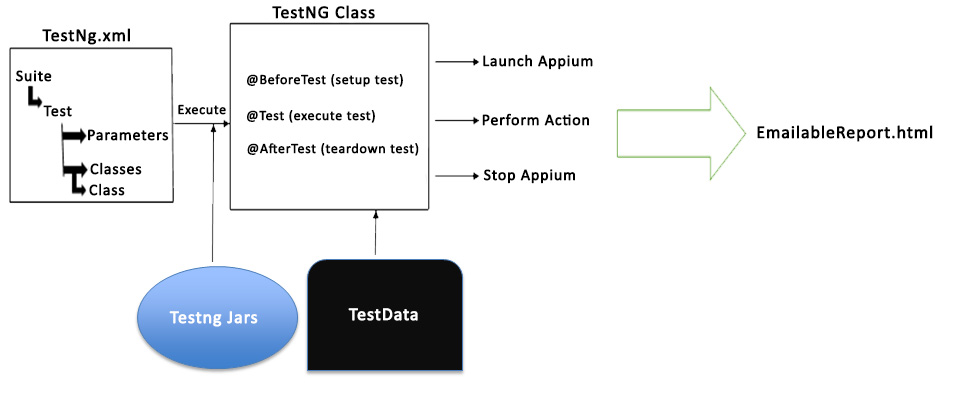
TestNG is a testing framework inspired from JUnit and NUnit but introducing new functionalities that make it more powerful and easier to use.
It is an open source automated testing framework; where NG of TestNG means Next Generation. TestNG is similar to JUnit, especially when testing integrated classes.
TestNG eliminates most of the limitations of the older framework and gives the developer the ability to write more flexible and powerful tests with help of easy annotations, grouping, sequencing & parameterizing.
Benefits of TestNG
There are number of benefits but from Selenium perspective, major advantages of TestNG are:
It gives the ability to produce HTML Reports of execution
Annotations made testers life easy
Test cases can be Grouped & Prioritized more easily
Parallel testing is possible
Generates Logs
Data Parameterization is possible
Architecture of the testNG framework
pCloudy
pCloudy platform provides single click access to real Android and IOS devices directly from your browser. Use these real Mobile Devices to click-and-perform Manual Testing and execution of Automation Testing for your App. Integrate our platform with CI for continuous Automation Testing and test your App on multiple real Mobile Devices with every change of your App.
Now it’s very much simple to integrate your existing TestNG project with pCloudy.
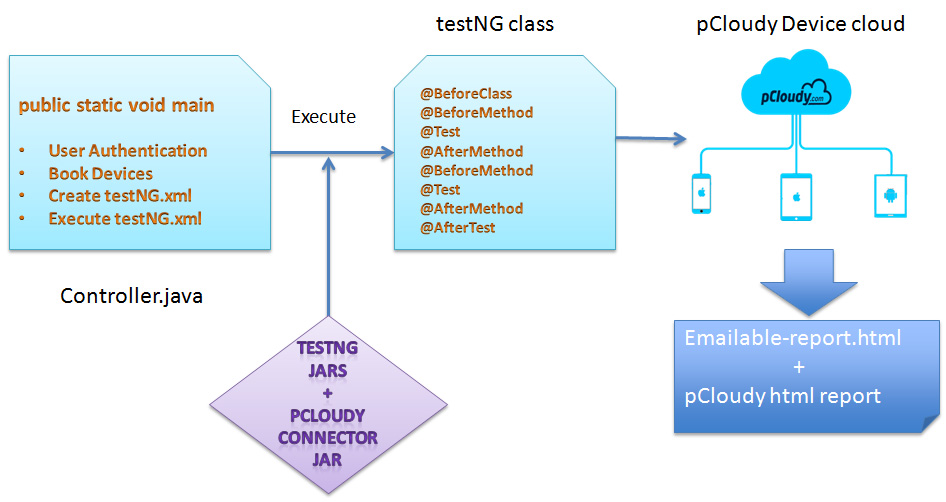
Appium is an open source test automation framework which is used with wide range of mobile apps that supports only android/ios or both. pCloudy is a popular mobile testing platform integrated with Appium script which enables you to automate test of mobile apps as well. If you have your Appium Scripts (or you plan to build them) in Java then you can use the pCloudy-java-connector.jar to integrate with the pCloudy platform. In case, you don’t have your Appium script then, you will need to use the rest web services APIs which are given in the end of this document.
1.2 Objective of this document
This user help guide has been developed for pCloudy end users. This help guide will help you to understand the APIs that pCloudy platform provides to integrate your existing Appium Scripts with pCloudy. After the integration, you will be able to execute your Appium scripts from your PC directly to the pCloudy real device cloud.
1.3 System Requirements
Java based Appium Script
Eclipse or Netbeans
>APK or IPA file
pCloudy Account
pCloudy-java-connector jar
Note : The APIs are evolving and we will come back with a better set of APIs & the jar soon. You might need a little tweaking in the code.
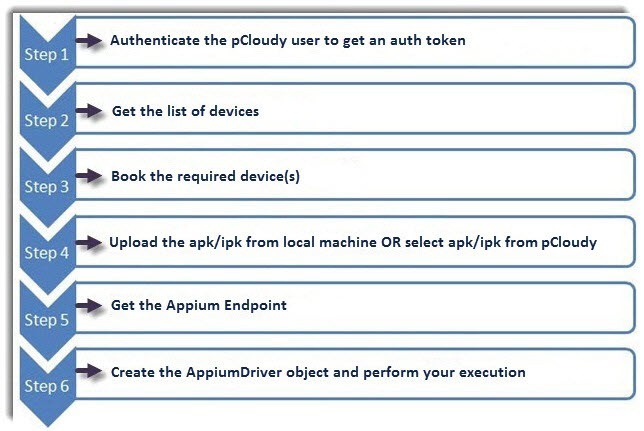
1.4 Stepwise Workflow of the APIs for getting an Appium Driver
The basic steps to get APIs for Appium Driver are given below:
1.5 How to get my API Key for using the services
If you are a registered user then you just need to follow few simple steps to get API key for using our services.
Login to pcloudy.com –
After successful login, Instant Access page opens. Now, you finds different devices which can be filtered from the above given dropdown list of devices. From this page, you can book your device by clicking on Book your Device link. Furthermore, you can connect with any given device to perform mobile testing but you will be given 10 minutes only. While performing testing operation on selected device, you cannot perform testing on other device simultaneously. For this, you need to release previously connected device.
When you click on settings option, support page opens by default which helps you to drop support ticket. It also includes various options like support, History, Test Runs, UDID, Profile, Credits, Unsubscribe, and API.
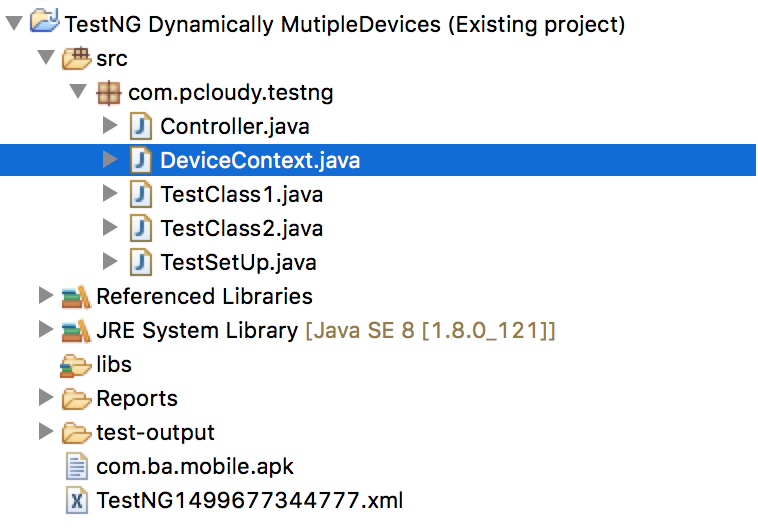
1.6 How to integrate my existing Appium Scripts on Java with pCloudy
You need pCloudy java connector jar file and corresponding APIs for Appium based mobile testing platform, pCloudy. You should add the pCloudy-java-connector.jar in its build path as a reference within the your java project containing appium scripts. See this link to learn how to add reference in eclipse.</p?
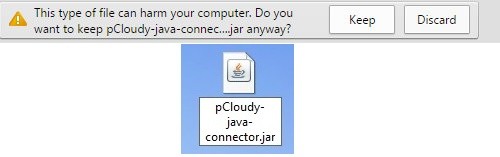
While downloading such file, you may come across message as given below which alerts you regarding safety of your computer.
Now, you can reference the JAR file in Eclipse or Android studio. Please refer the link.
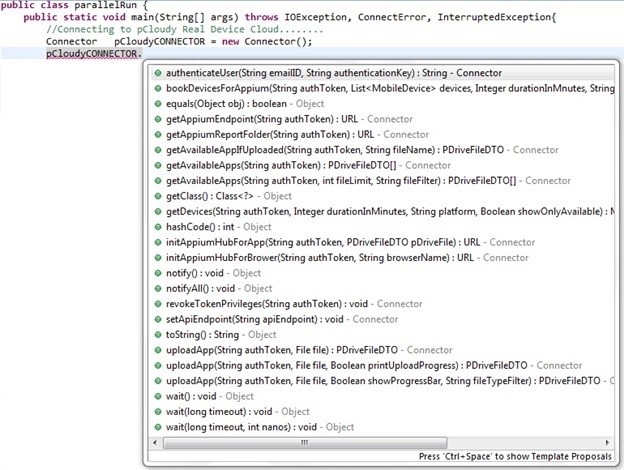
The pCloudy-java-connector.jar comprises the following methods which gives you a wrapper code over the web services. Furthermore, you will not need to call the Rest APIs if you are working on JAVA:
1.7 Useful Codes to get Web-Driver Object
A. Run on Android Native
public void runExecutionOnPCloudy() {
Connector pCloudyCONNECTOR = new Connector();
// User Authentication over pCloudy String authToken = pCloudyCONNECTOR.authenticateUser(“abc@gmail.com”, “asd53sd3fa4asd5fsasda”);
ArrayList selectedDevices = new ArrayList<>();
// Populate the selected Devices here selectedDevices.add(MobileDevice.getNew(“Gionee_Ctrl-V6L_Android_4.4.2”, 73, “Ctrl-V6L”, “Ctrl V6L”, “android”, “4.4.2”, “Gionee”));
// Upload apk in pCloudy PDriveFileDTO pDriveFile = pCloudyCONNECTOR.uploadApp(authToken, new File(appPath));
System.out.println(“ipa file uploaded successfully”);
pCloudyCONNECTOR.initAppiumHubForApp(authToken, pDriveFile);
// Get the endpoint from pCloudy URL endpoint = pCloudyCONNECTOR.getAppiumEndpoint(authToken);
System.out.println(“Appium Endpoint:” + endpoint);
// Create multiple driver objects in multiple threads for (int i = 0; i < bookedDevicesIDs.length; i++) {
Thread.sleep(5000); new Thread(getTestCaseClass(endpoint, bookedDevicesIDs[i])).start();
}
}
private Runnable getTestCaseClass(final URL endpoint, final BookingDtoDevice dto) {
// this will give a Thread Safe TestScript class.
// You may also like to have this as a named class in a separate file
// Get the endpoint from pCloudy URL endpoint = pCloudyCONNECTOR.getAppiumEndpoint(authToken);
System.out.println(“Appium Endpoint:” + endpoint);
// Create multiple driver objects in multiple threads for (int i = 0; i < bookedDevicesIDs.length; i++) {
Thread.sleep(5000); new Thread(getTestCaseClass(endpoint, bookedDevicesIDs[i])).start();
}
}
private Runnable getTestCaseClass(final URL endpoint, final BookingDtoDevice dto) {
// this will give a Thread Safe TestScript class.
// You may also like to have this as a named class in a separate file returnnew Runnable() {
@Override
public void run() {
DesiredCapabilities capabilities = new DesiredCapabilities();
capabilities.setBrowserName(“chrome”);
capabilities.setCapability(“newCommandTimeout”, 600);
capabilities.setCapability(“deviceName”, dto.capabilities.deviceName);
capabilities.setCapability(“platformName”, dto.capabilities.platformName);
AppiumDriver driver = new AndroidDriver(endpoint, capabilities); // Your Test Script Goes Here… }
};
}
C. Run on IOS
public void runExecutionOnPCloudy() {
Connector pCloudyCONNECTOR = new Connector();
// User Authentication over pCloudy String authToken = pCloudyCONNECTOR.authenticateUser(“uttam.kumar@sstsinc.com”, “sadf5sd5fds5sfd5a5fdas1”);
ArrayList selectedDevices = new ArrayList<>();
// Populate the selected Devices here
selectedDevices.add(MobileDevice.getNew(“Apple_iPad2_Ios_7.1.2”, 70, “iPad2”, “iPad 2”, “ios”, “7.1.2”, “Apple”));
// Book the selected devices in pCloudy BookingDtoDevice[] bookedDevicesIDs = pCloudyCONNECTOR.bookDevicesForAppium(authToken, selectedDevices, 5, “friendlySessionName”);
System.out.println(“Devices booked successfully”);
// Upload apk in pCloudy
PDriveFileDTO pDriveFile = pCloudyCONNECTOR.uploadApp(authToken, new File(appPath));
System.out.println(“ipa file uploaded successfully”);
pCloudyCONNECTOR.initAppiumHubForApp(authToken, pDriveFile);
// Create multiple driver objects in multiple threads for (int i = 0; i < bookedDevicesIDs.length; i++) {
Thread.sleep(5000); new Thread(getTestCaseClass(endpoint, bookedDevicesIDs[i])).start();
}
}
private Runnable getTestCaseClass(final URL endpoint, final BookingDtoDevice dto) { // this will give a Thread Safe TestScript class. // You may also like to have this as a named class in a separate file
returnnew Runnable() {
@Override public void run() {
DesiredCapabilities capabilities = new DesiredCapabilities();
capabilities.setCapability(“newCommandTimeout”, 600);
capabilities.setCapability(“launchTimeout”, 90000);
capabilities.setCapability(“deviceName”, dto.capabilities.deviceName);
capabilities.setCapability(“browserName”, dto.capabilities.deviceName);
capabilities.setCapability(“platformName”, “ios”);
capabilities.setCapability(“bundleId”, bundleId);
IOSDriver driver = new IOSDriver(endpoint, capabilities); // Your Test Script Goes Here…
}
};
}
2. Rest APIs if needed to be used in platforms other than Java


 Source: cloud.netlifyusercontent.com