pCloudy – On Boarding Document
Thank you very much for opting pCloudy.
We appreciate your business and welcome you to our long list of satisfied and much valued customers. Our success comes from the continuous faith in the excellence of our products and services, something we are committed to and would never sacrifice.
Our customer service, especially in the after sales phase, guarantees the satisfaction of our clients. In line with this strategy, we ask you to share with us your feedback at any time, be it positive or negative. There is always room for improvement, so if we can serve you better in anyway, please do inform us.
Introduction
This document is created to serve as a guide while you explore the pCloudy platform. It will help you understand how to use, to get quick help and whom to contact while starting off with pCloudy. Though this is not a complete help document, it will act as a quick reference to begin using the platform.
About pCloudy
pCloudy is a mobile application testing platform which will help you to test your apps on hundreds of real devices. You can remotely access real devices and carry out Manual and Automation Testing.
Quick Start
Registration
The platform has a secure login process to protect the apps you test. In order to use the platform you must setup your login credentials first.
Where do I do this?
Simply, enter your details at https://device.pcloudy.com/signup, after a short verification you will be ready to sign-in.
In case of any issues, drop an email to support@pcloudy.com
Sign-in
Once you’ve signed up, you can access the platform with the help of your registered Email ID and Password.
In case of any issues, drop an email to support@pcloudy.com
Note: If your workstation has touch screen feature, enable TouchScreenBrowserSettings
Where do we go from here?
Once you login, you will be exposed to an array of devices and platform features. You might get overwhelmed and lost, but don’t worry, we have you covered.
A typical pCloudy user will follow these steps for testing mobile apps using the platform.
Divided into five parts –
1. How to select right device from the platform?
2. How to manage apps on the platform?
3. How to start testing your apps on the selected devices?
4. How to run automation scripts on cloud-based devices?
5. Additional Features
1. How to select right device from the platform?
To select the right device on the cloud the platform provides various filters. These filters will help you to select devices based on the OS versions, OEMs, Screen Size, Network, or Device Location.
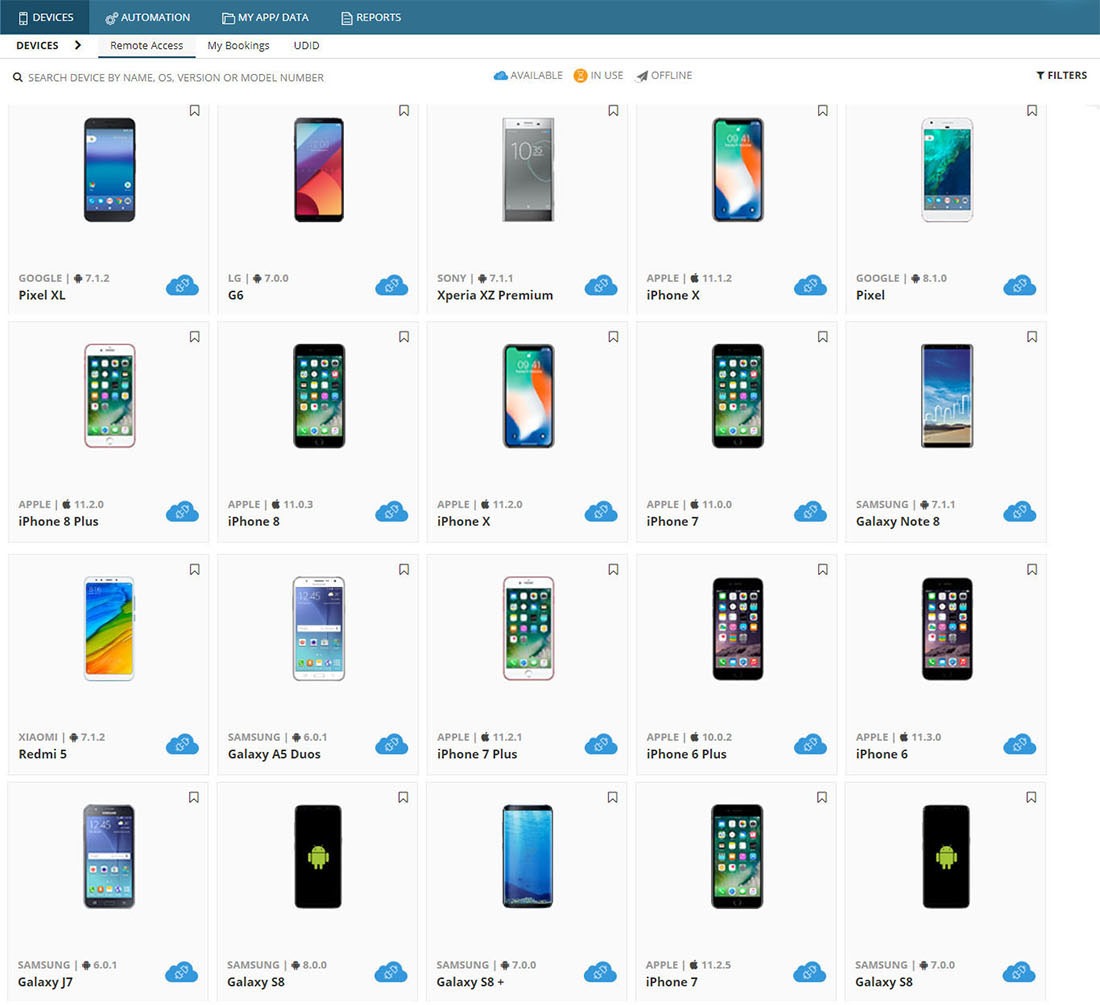
There are two modes to access the devices on the cloud –
1. Instant Access – This provides immediate access to the available devices at that moment. Just hit the ‘Connect’ button on any device displayed in the Instant Access page and you will be ready to use the device.
2. Book your Device – In some cases you might want to reserve a device for the future. You can book a device in advance to keep yourself prepared for testing. With careful planning, with the help of ‘Book your Device’ mode you can make sure the devices are available when you need them and save time.
To learn more, refer to these links:
Managing your credits
To use the devices you need to have enough credits in your account:
- To view the remaining credits in your account refer to this link
- To buy more credits, click this link
How to manage apps on the platform?
The platform provides secure limited disk space to store the apps on the platform. This space can be used to store app installation files (apk or ipa) or test data (image files, zip, etc).
Refer these links to know how to upload your app files to the platform:
Manual Testing of Mobile Apps
The dashboard provides you with quick and easy access to use the different features to test your mobile apps.
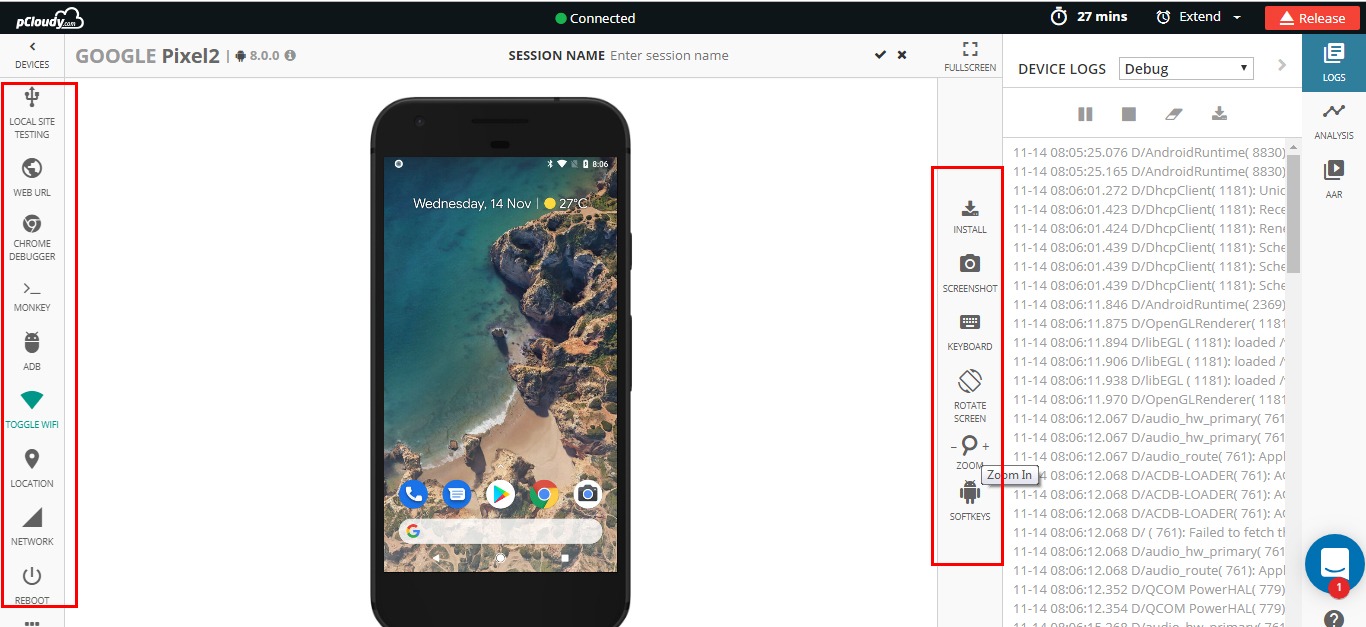
1. Device Screen: You can use the device same as how you use a device physically. You can use swipe actions, zoom-in, zoom-out and various gestures to control the device.
2. Main Panel: This panel provides options to view device info, install/uninstall apps, change device settings, tools to debug apps and run automation, and more.
3. Quick Action Bar: Frequently used controls like taking Screenshots, changing device orientation, sending text to device, and more
4. Logs and Performance: Real time device logs and app performance are displayed
Features
Here’s a list of some important features to test your apps –
1. Functional Tests
You can install/uninstall apps on the devices, you can use various gestures on cloud based devices just like how you do testing on physical device, you can mock GPS location, take screenshots, and much more. Here are some links that will help you:
- Installing an App on the Device
- Transfer Test Content to a device
- Using Zoom-in/Zoom-out Gestures on Android phone
- Taking a Screenshot
- Set Phone Location
- Send Text to Phone
- and much more
2. Performance Profiling
Performance profiling of Android Apps – You can monitor the CPU usage, memory usage, battery consumption, frame render count of the app in real-time while testing an app.
Performance on iOS Device – You can monitor the CPU usage & memory usage of the device in real-time during testing.
3. Debugging mobile apps
You can capture bug and crash information in the form of logs, screenshots, videos, and stack trace information while testing your apps on devices.
4. Test Mobile Web Apps
You can test your web apps or website on various browsers on various devices.
5. Network Virtualization Tool
The app you tested in your lab environment will not work the same way when you use it in an elevator, or in a basement, or while you are travelling on a highway. The Network Virtualization Tool will help you to emulate different network environments and test your apps.
- Network Virtualization – Testing mobile apps on different network conditions
6. Device Tunnel
You can connect and use a device with ADB just like the way you connect it physically with USB/Wireless ADB. This is used to control a device using ADB commands and debug apps.
- Device Tunnel – Connecting a device with ADB Bridge
7. Reports
The reports section will contain the complete details of all your testing sessions. It will hold the screenshots, logs, videos and the performance details of the testing.
- Device Tunnel – Connecting a device with ADB Bridge
- Device Sessions – Performance Graph
- Automation Testing Reports
8. Automation
You can run your automation scripts on multiple devices in parallel. The pCloudy platform supports several automation tools. Here are some links to help you –
Other than the reports generated from the automation tools, you can view additional testing reports stored on the platform as well – Automation Testing Reports. This will contain the videos, logs, and performance graphs of the devices on which Automation execution was run.
9. Integration with Continuous Integration tool – Jenkins
You can use CI tools like Jenkins in integration with the pCloudy platform. This integration will leverage your testing practices to a whole new level. You can deliver quality mobile apps continuously by automating the process of build integration using pCloudy plugin for Jenkins.
Team Admin
To effectively manage the devices, users, apps, or credits on the platform you can use Team Admin.
Refer to article – Team Admin
Contact
Find detailed pCloudy knowledge base articles from support@pcloudy.com
You can reach out to us – support@pcloudy.com or info@pcloudy.com
 February 07, 2025
 January 17, 2025