Category Page

[xyz-ihs snippet=”quickLinks-Appium”]
 
In our previous chapter on Android, we learned about UI Automator Viewer, Which is available on Android SDK, to get the properties of the application object. In the case of iOS, Appium itself provides an Inspector which helps users to locate those elements in the application.
 
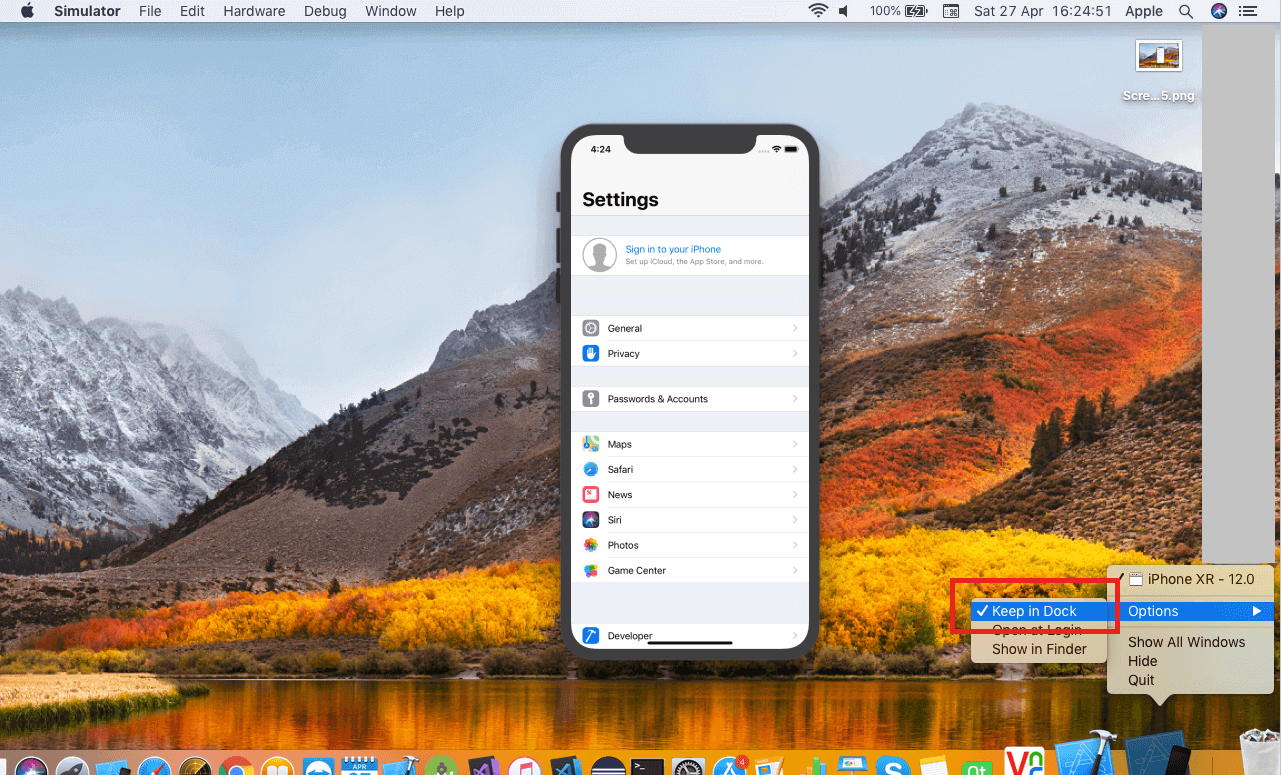
First, open the simulator by clicking on the dock option.
 
Open the simulator

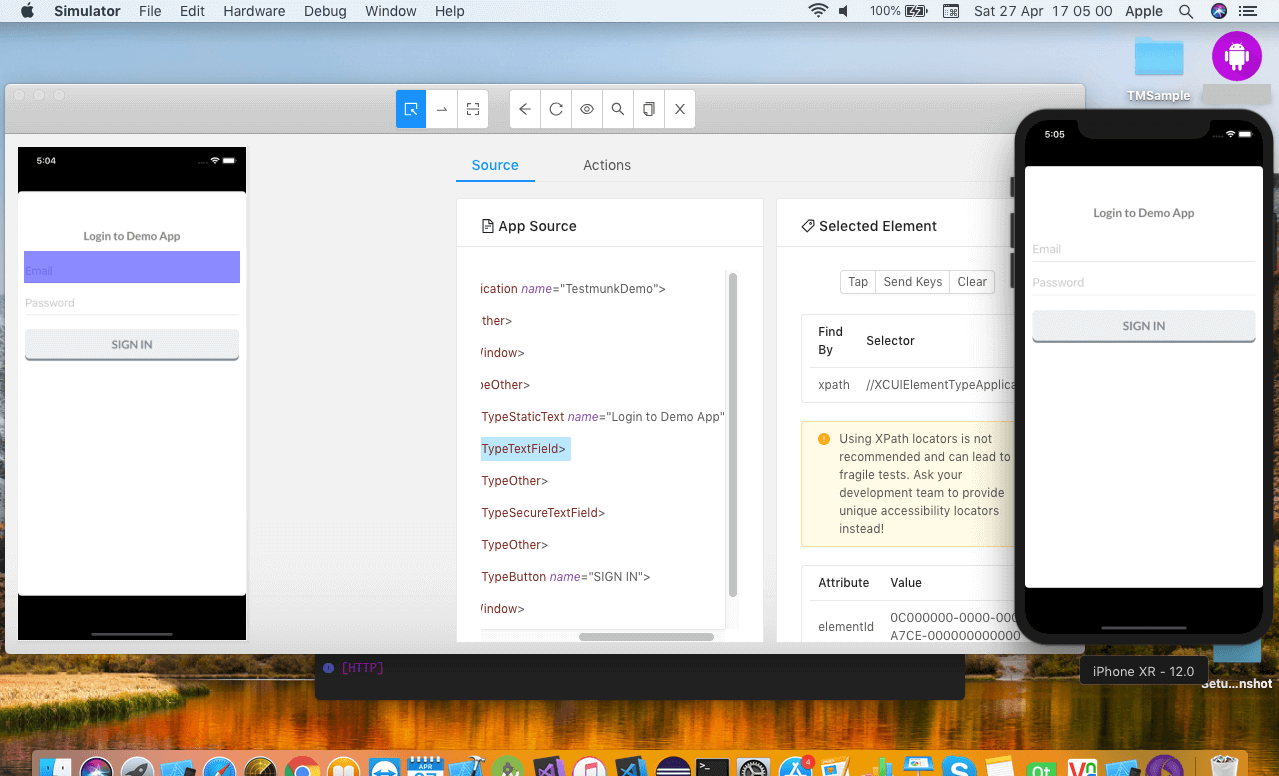
Now in the Device/Simulators window, select the simulator. Open the Appium Desktop and keep the simulator side by side.
 
Device-Simulators

Once the inspector is started, select any of the objects on the screen. It will show you the complete hierarchy and properties of that object.
 
Appium-Test-Automation

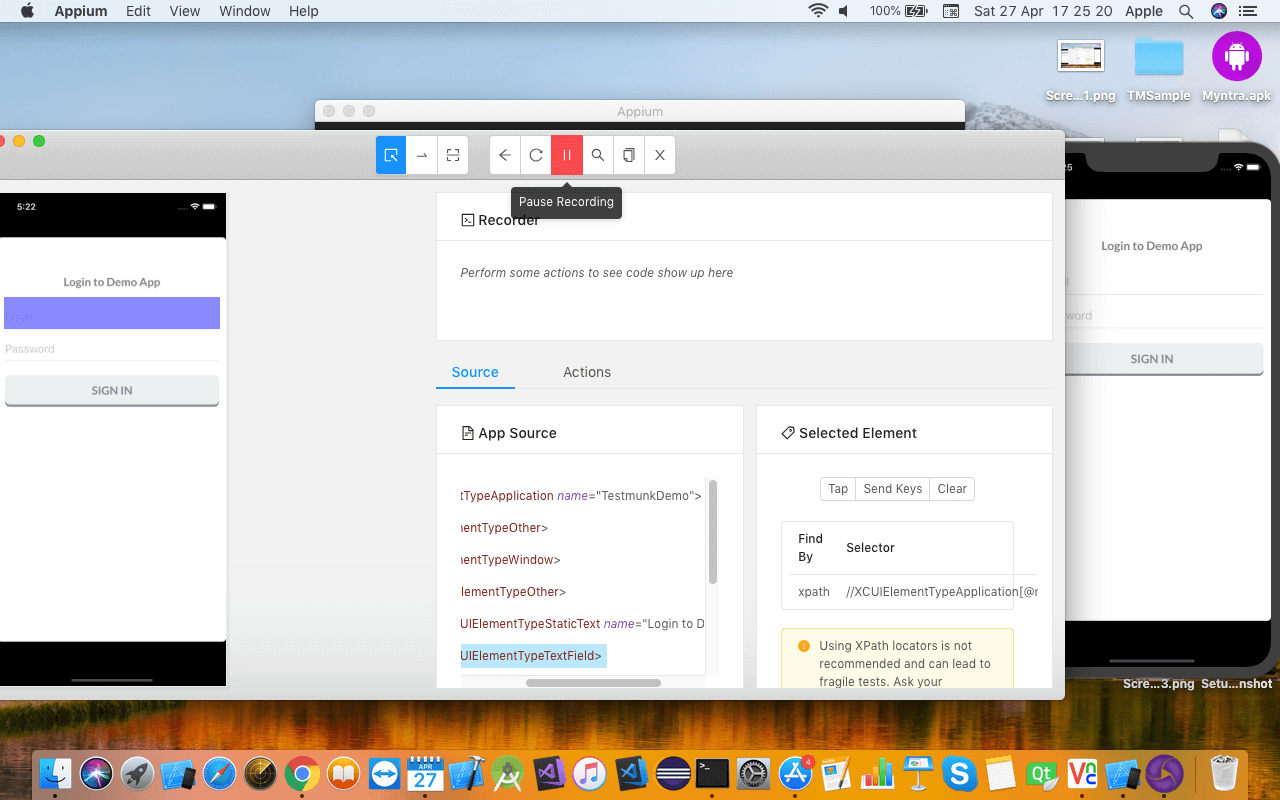
At the top of the window, you can see the Record button which is used to record all the actions taken and record the script.
 
Appium-Test-Automation

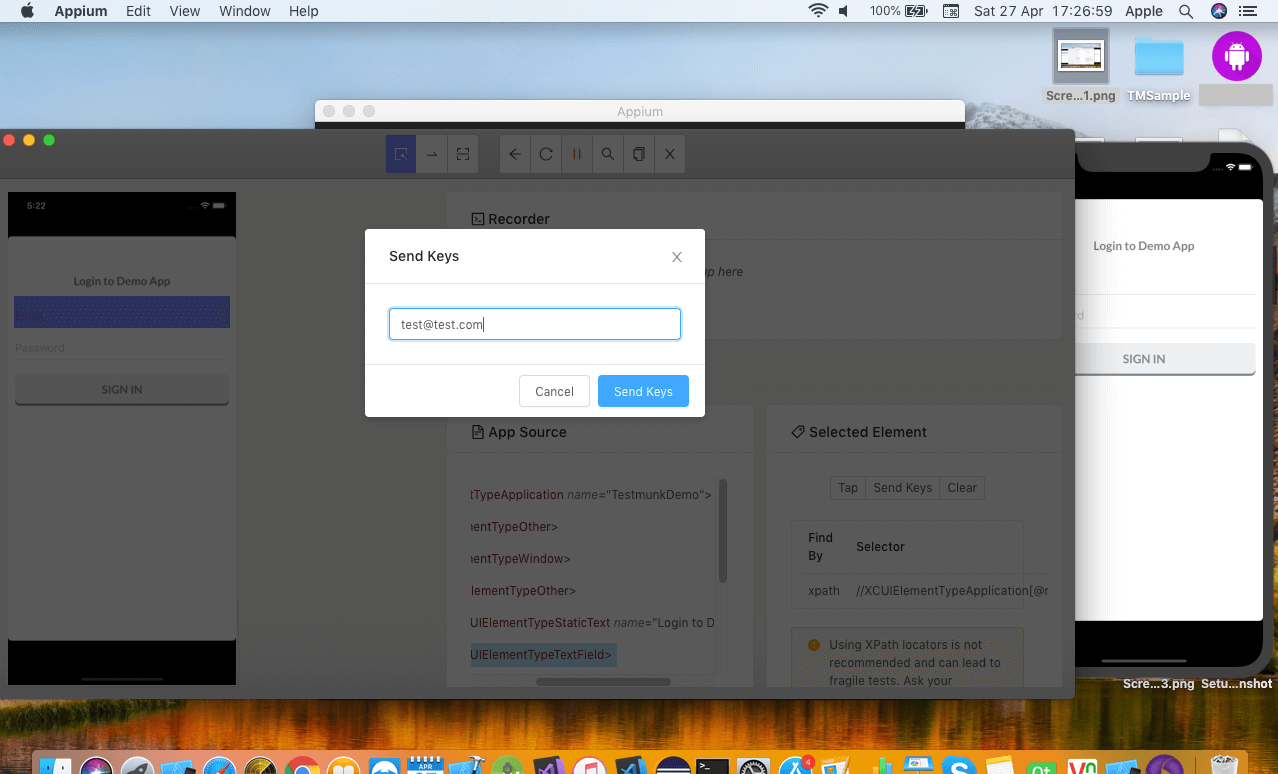
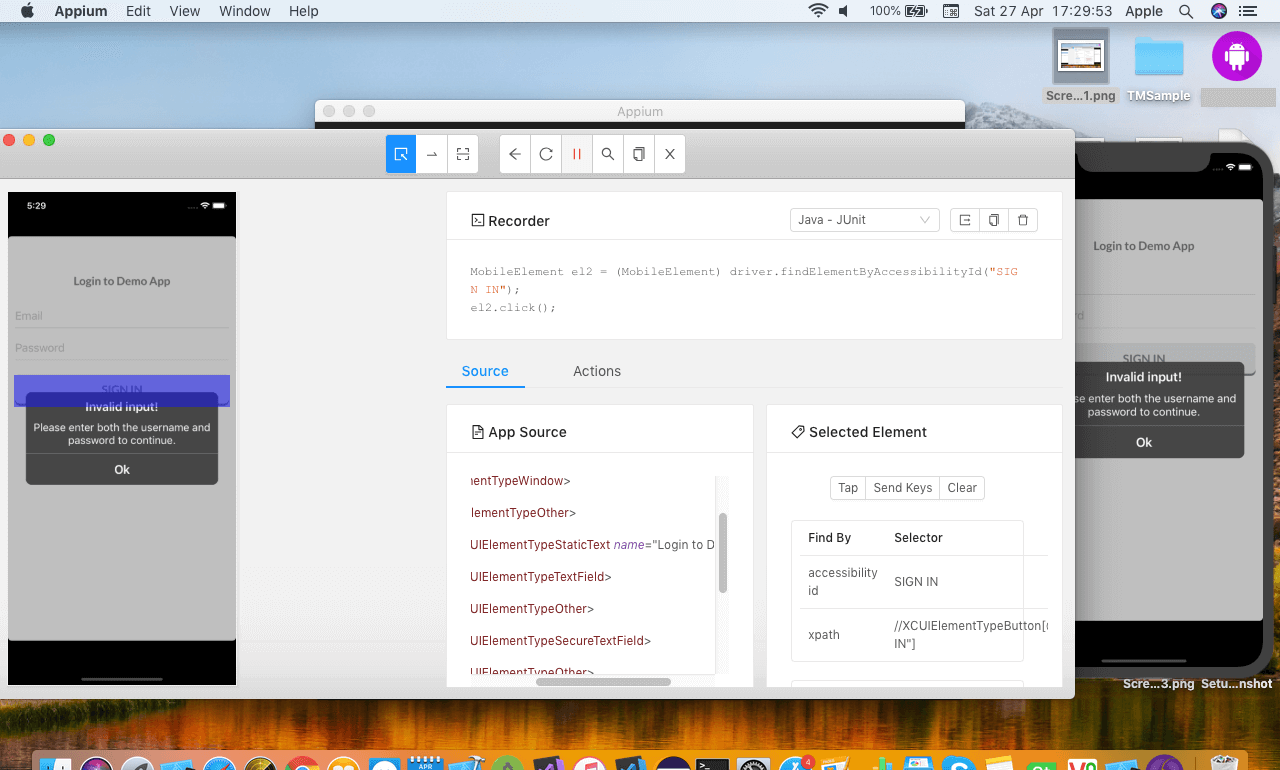
To select any object, click on the Select Element button and then you can use Tap button to click on an object, Send Keys to enter text and clear to undo the action.
 
Appium-Test-Automation5

As soon as you perform an action on an object, it is recorded in the form of a script.
 
Appium-Test-Automation
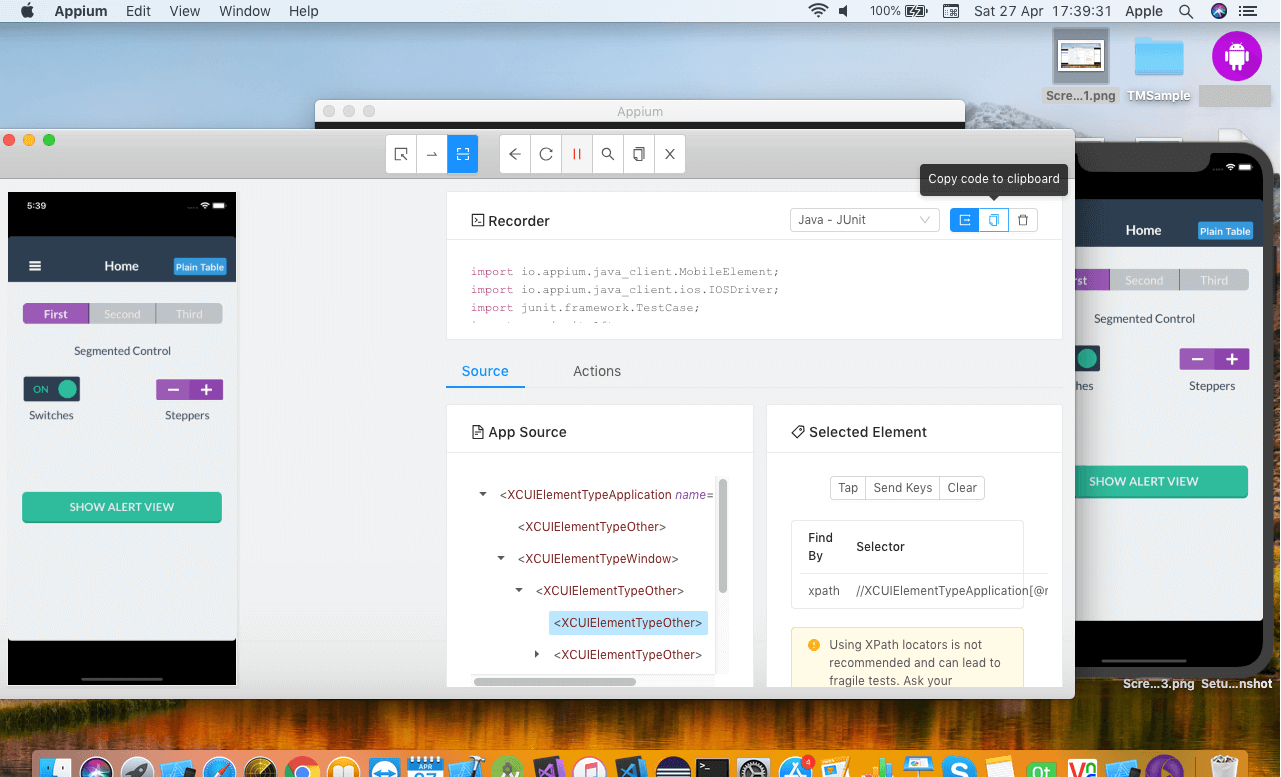
Once you are done with the recording you can copy the script and paste in eclipse editor.
 
Appium-Test-Automation
In the next blog, we will learn how to write the first appium script for iOS.
 
Related Articles:

  • Appium vs Espresso: The Most Popular Automation Testing Framework in 2019
  • How To Install Appium On A Mac Machine
  • Writing The First Appium Test Automation Script (Android)
  • Basics of Appium Mobile Testing
  • 8 Common Appium Mobile Test Automation Mistakes and How to Avoid Them
  • Suyash Dubey | Posted on | 2 min Read

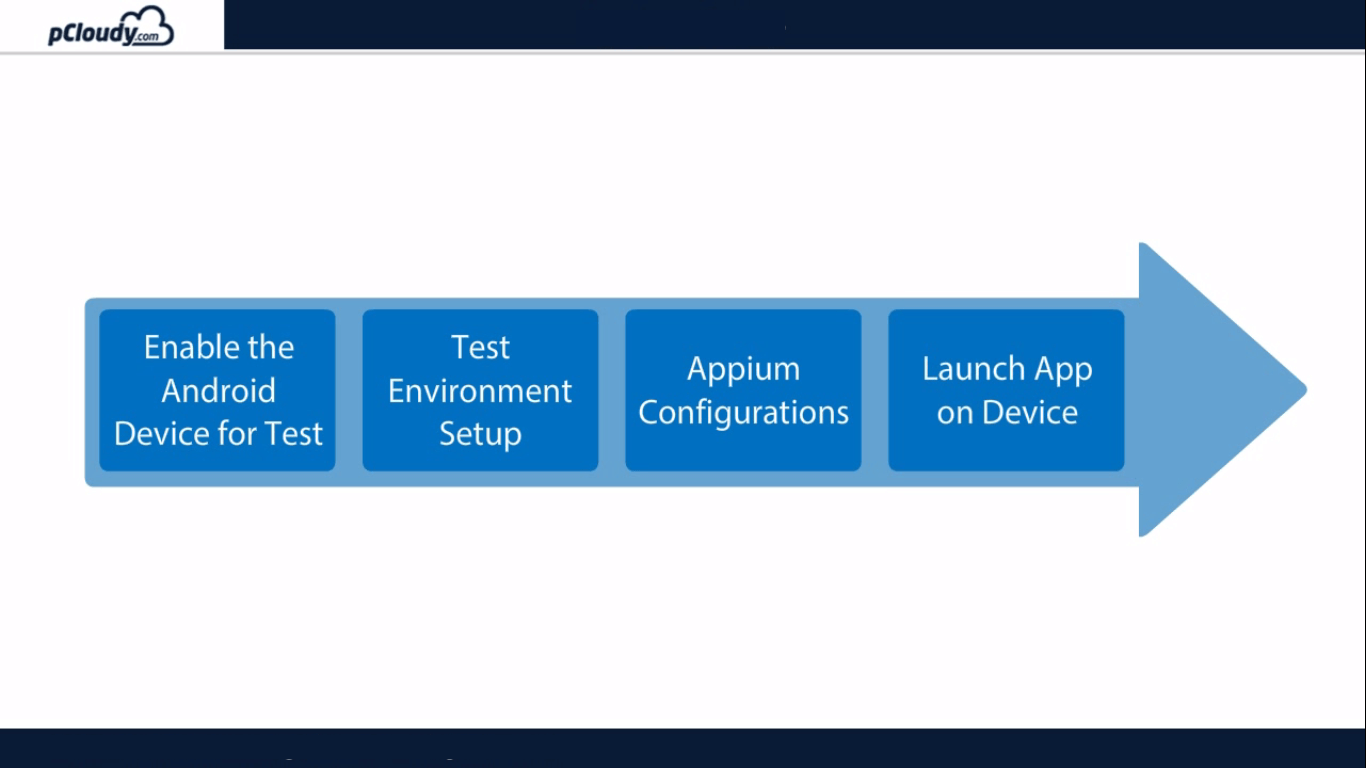
    In the previous blog, we informed about the basics of Appium and its architecture. Now let’s understand how to setup Appium. There are four steps required to setup Appium, they are enabling the Android device for test, test environment setup, Appium Configurations, Launch the app on the device.
     
    Appium Mobile Testing

    Pre-requisites for Appium Mobile Testing

     
    1. An Android device with OS 4.2+
    2. AUT(Application Under Test) file (.apk)
    3. Phone USB Drivers
    4. Java (JDK)
    5. Android Studio (SDK)
    6. Eclipse
    7. Selenium Standalone JAR
    8. Appium Java Client
    9. Appium for Windows
    10. .NET Framework 4.5
     

    Want to test your Mobile App?

    Join pCloudy Platform!

    Android Developer Options in device

     
    Every Android smartphone contains a secret set of Android developer options which are used by app developers who need additional functions to test their apps they are making for Android devices. It allows you to enable debugging over USB, capture bug reports on your Android device and show CPU usage on the screen to measure the impact of your software.
     
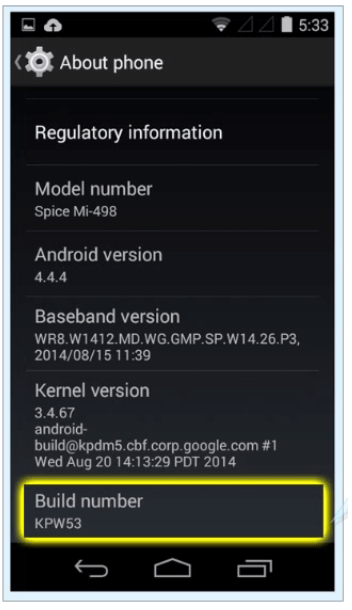
    To enable developer option in the phones to go to the settings, click on the about phone options and click on the build number 7 times to enable the developer options.
     
    About Phone

    Doing so will display a toast message for enabling the developer option. the current message appears if the developer message is already enabled on the phone.
     

    Phone Drivers

     
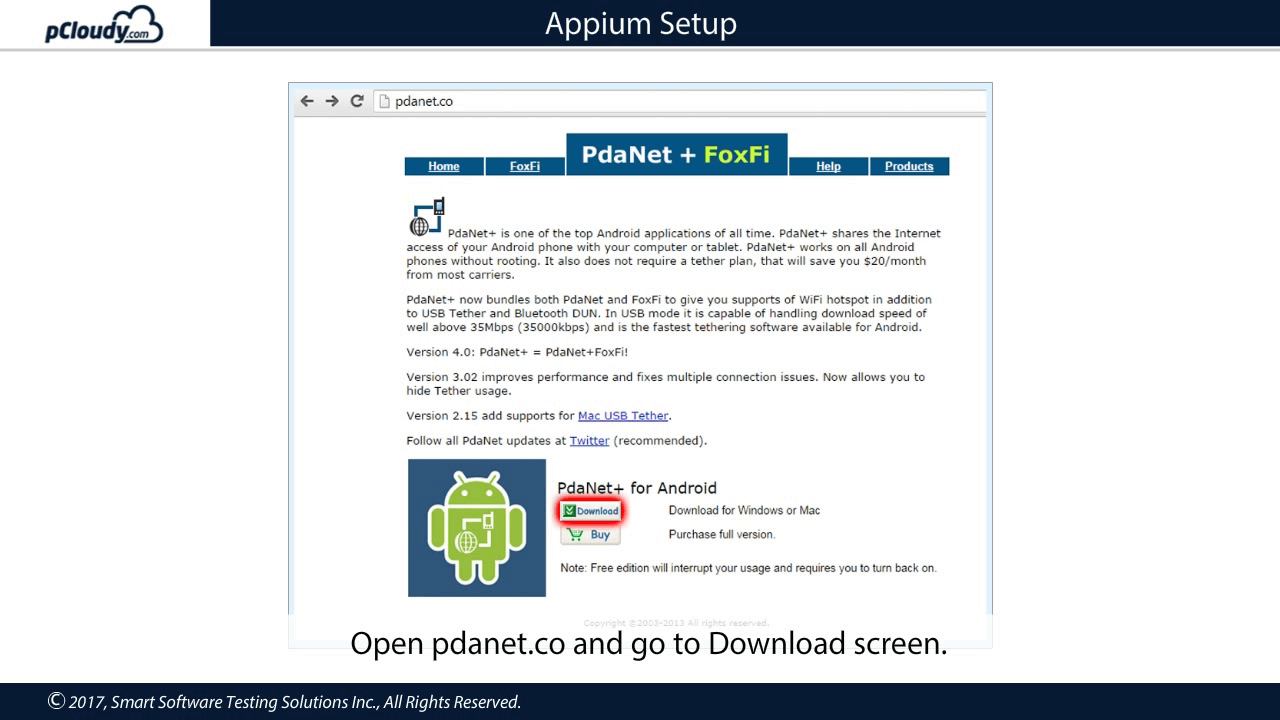
    The phone can communicate with the PC only if there are proper drivers installed for the USB cable. Each phone manufacturers provides its own drivers for the phone. PDA net is a driver which works with all the Android devices. It makes sure that your phone is detected in DDMS.
     
    Open pdanet.co and go to download screen and download the latest version to install it on your PC.
     
    Appium Setup

    Let’s verify if the phone is prepared.
     
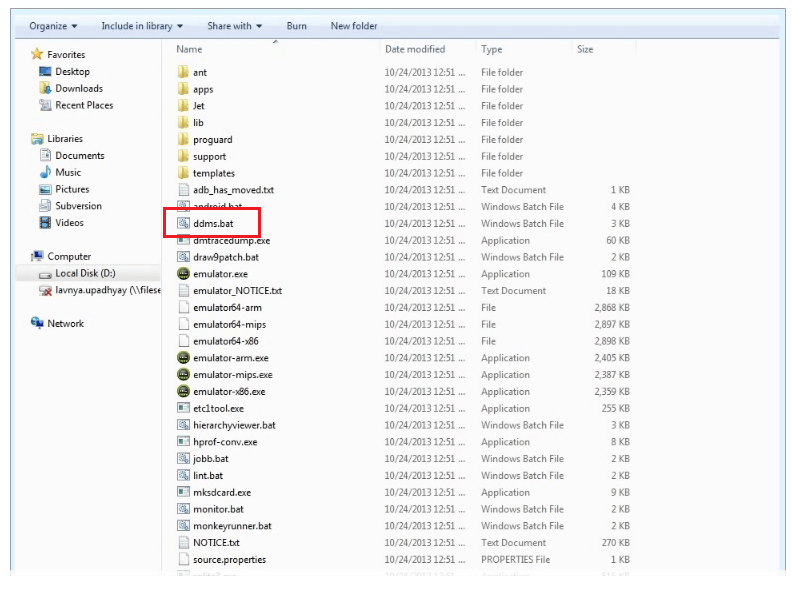
    The ddms.bat file is present in the Android SDK tools folder.
     
    Dalvic Debug Monitor

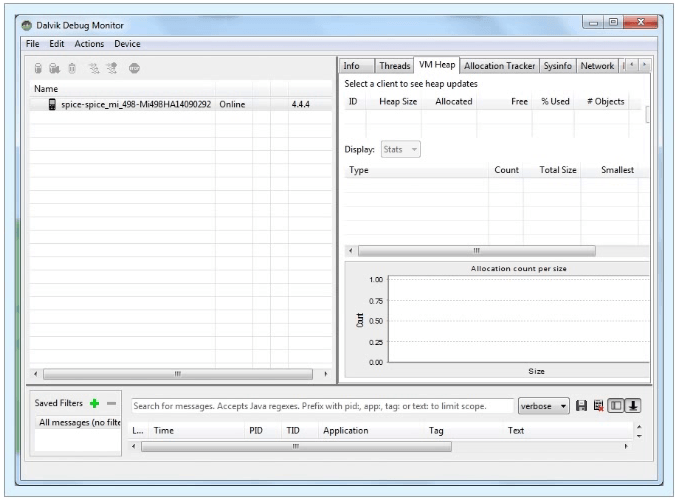
    Double click on the file and you will see the Dalvic Debug Monitor window.
     
    DDMS

    If your DDMS option is enabled i.e. if you have installed the PDA net software and connected the device to the machine, that device should be detected in this monitor. Now let’s move on to the second step.
     

    Test Environment Setup

     
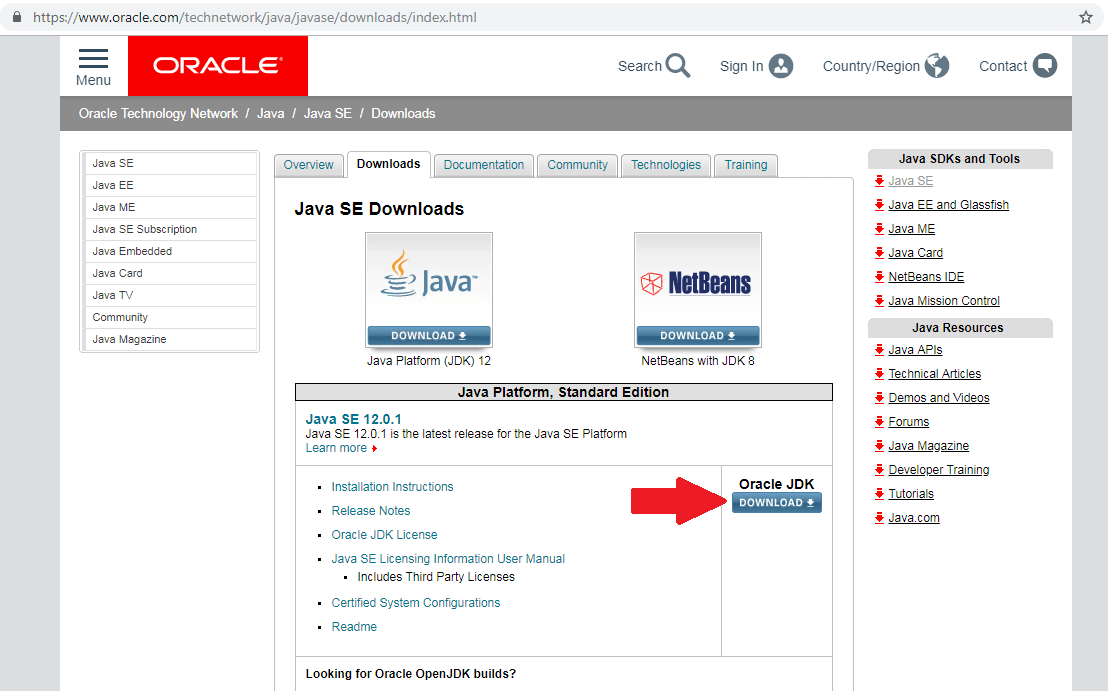
    First, you need to download JDK from the Oracle website.
    Oracle download

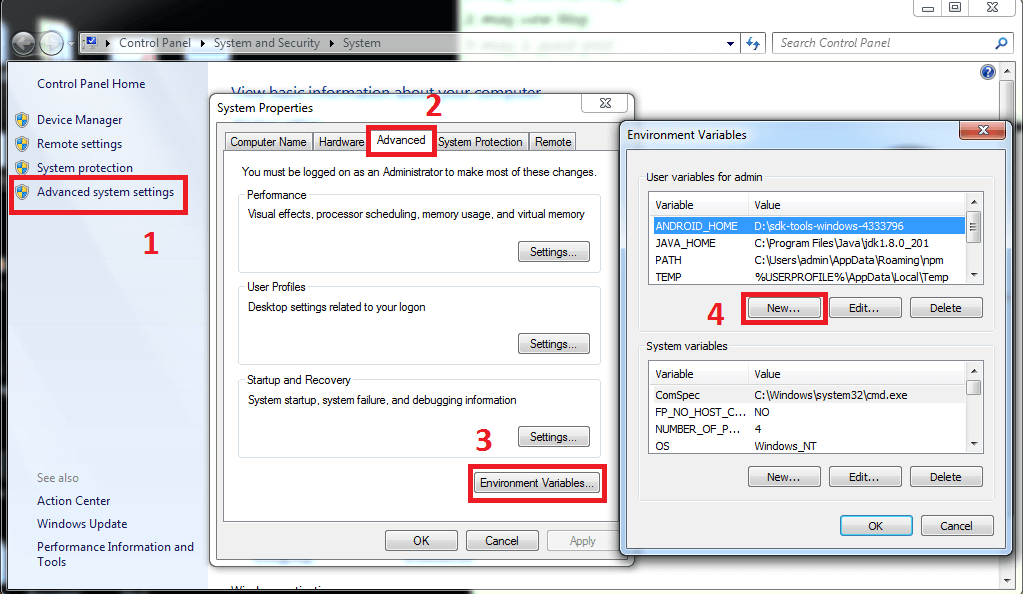
    Once downloaded, install it to your machine. Now you need to set the Java installation path in your Environment variable. Right-click on Computer option in the Start menu and select the Properties option. Select Advanced system settings and then select the Environment variables option in the Advanced tab.
     
    Advanced system setting

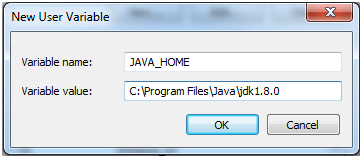
    Then select the new option and enter the new variable name as JAVA_HOME.
     
    Java Home

    Set the path of JDK to variable value and then click OK.
     
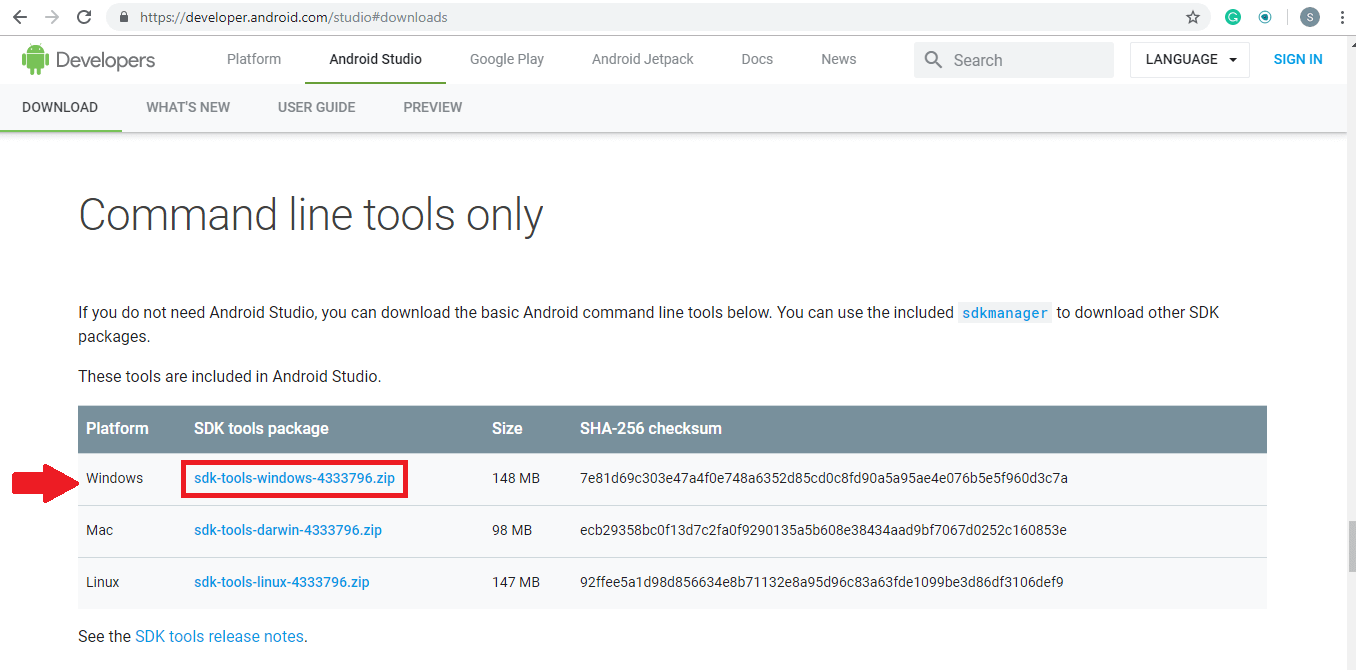
    To get an Android emulator you need to go to www.developer.android.com\studio#downloads and Scroll down to Command-line tools only section to download the zip file of SDK tools package for Windows.
     
    Command line tools only

    Don’t download the EXE file. Once the SDK file is downloaded, copy it to the C drive, make a new folder and extract the zip file in the new folder.
     
    Now you need to search for SDK manager in the bins folder and open SDK manager. Once the SDK manager window is open, go to tools and then get into the bin folder and in the address bar type cmd and hit enter. Now in the command prompt type SDK manager “platform-tools” “platforms; Android-28 and then hit enter. So now you will be able to see Platform tools and Platform folders in now folder you created for the extracted files.
    Click on platform tools and copy the address bar text and then again go to an environment variable. Then go to the path, a new window will pop up, make a new path and enter the copied text there and then click on OK.
     
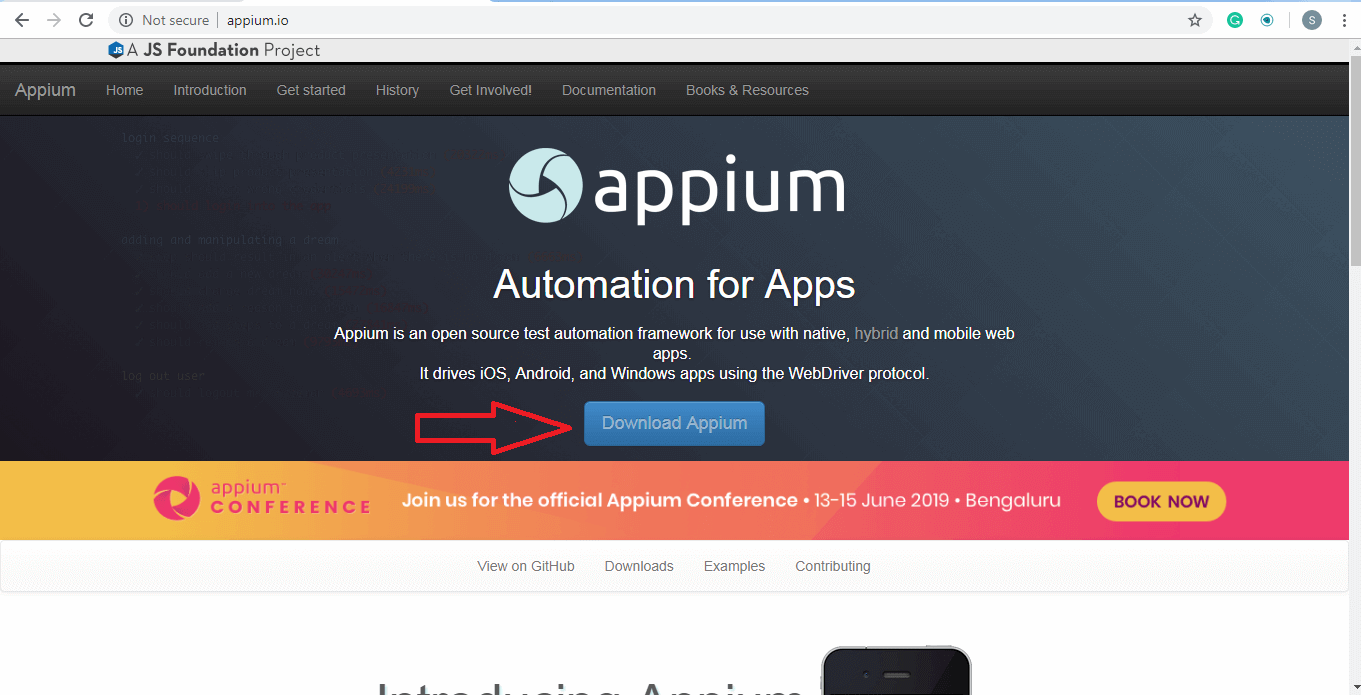
    To download Appium go to www.appium.io and click on the Download button.
     
    Download Appium
     
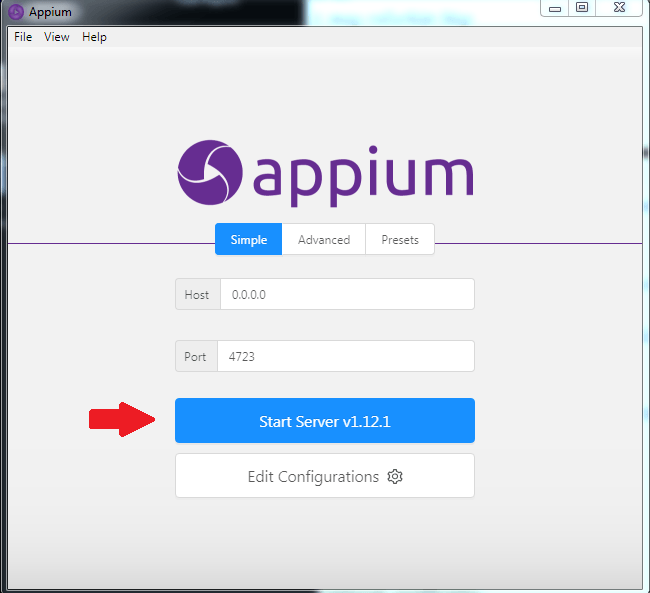
    Under the latest version, click on the Appium-windows-1.12.1.exe file. Once the file is downloaded, open the appium.exe file. Click on the Start Server v1.12.1 button.
     
    ApAppium Start Server v1.12.1

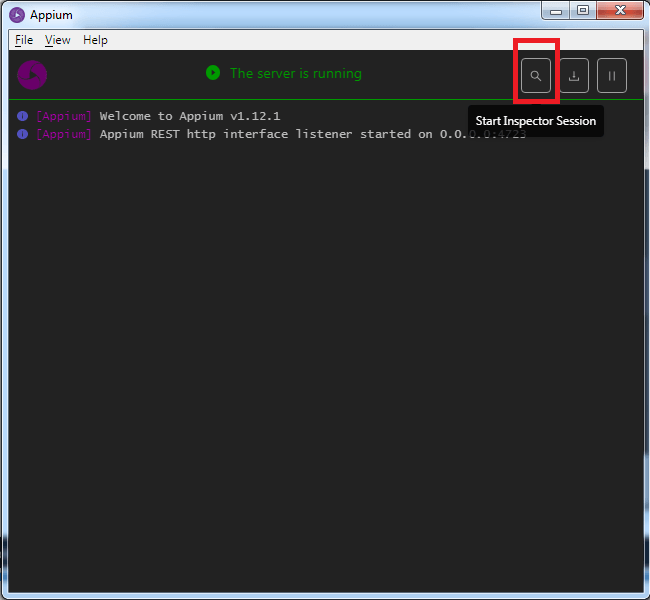
    Then in the server window click on the Start inspection session icon at the top right corner.
     
    Appium server

    Now you can get started with Appium automation testing. Do read our next blog to get more information about Appium mobile automation and how to inspect elements using Appium Desktop.

    Want to test your Mobile App?

    Join pCloudy Platform!

     
    Related Articles:

  • Writing The First Appium Test Automation Script (Android)
  • How To Install Appium On A Mac Machine
  • Basics of Appium Mobile Testing
  • Inspecting Element on pCloudy Devices Using Appium Desktop
  • Cross Platform Mobile Test Automation Using Appium
  • Mobile Test Automation Using Appium

     
    With growing demand in the market, enterprise mobility has undergone a paradigm shift. Speed, quality and user-friendliness are the need of the hour for modern enterprises. Mobile apps have become a major source of revenue boosters for enterprises today.

    It is a well-known fact today that the numbers of platforms and device types are more varied now than ever before. Customers continue to demand the latest devices, features and functionality, as well as increased mobility and accessibility. With the proliferation of mobile and portable device platforms and the Internet of Things, the workload of developers, and especially testers, has greatly increased. As traditional testing practices of manual app testing prove unable to keep up with the demand, businesses of all types are experiencing significant product delivery delays and, in some cases, costly product defects. Naturally, there is a growing demand for more efficient and cost-effective testing across all platforms.

    Appium: Addressing the complexities of mobile app testing

    To address the demands of complex testing needs, an effective mobile app testing platform is needed which is secure, supports functional and automated testing without losing an eye on the speed and quality. So, in this era where consumers have adopted smartphones, use multi-platforms to access mobile devices, do you think your app is delivering the best experience to your users? If not, then Appium is the solution. Appium is an open source, cross-platform mobile automation tool to automate the test for native, hybrid and mobile web apps.

    Appium being one of the best solutions for automation comes with support for Android and iOS real devices. In fact, it also comes with support for simulators and emulators. At its core, it an HTTP server written in node.js. It has similar working as Selenium which actually perceives HTTP requests from selenium client libraries and handles those requests in different ways depending upon the platforms.

    Being the best and widely used option available today in the market, it is widely adopted by modern enterprises to create a comprehensive mobile automation framework. With a growing user base and a stronger community, it is easier to adopt and implement which is why enterprises are adopting it on a very large scale. The best thing about Appium is that it lets you write in any language supported by Selenium using WebDriver API.

    While testing an Android app, Appium automates it with the help of UIAutomator library, a part of Android SDK. This actually makes the learning and implementation easier for Selenium users. Having the capabilities to test on both Android and iOS devices makes it the best cross-platform mobile app test automation tool. Automation scripts can be run on real Android and iOS devices using the WebDriver JSON Wire protocol.

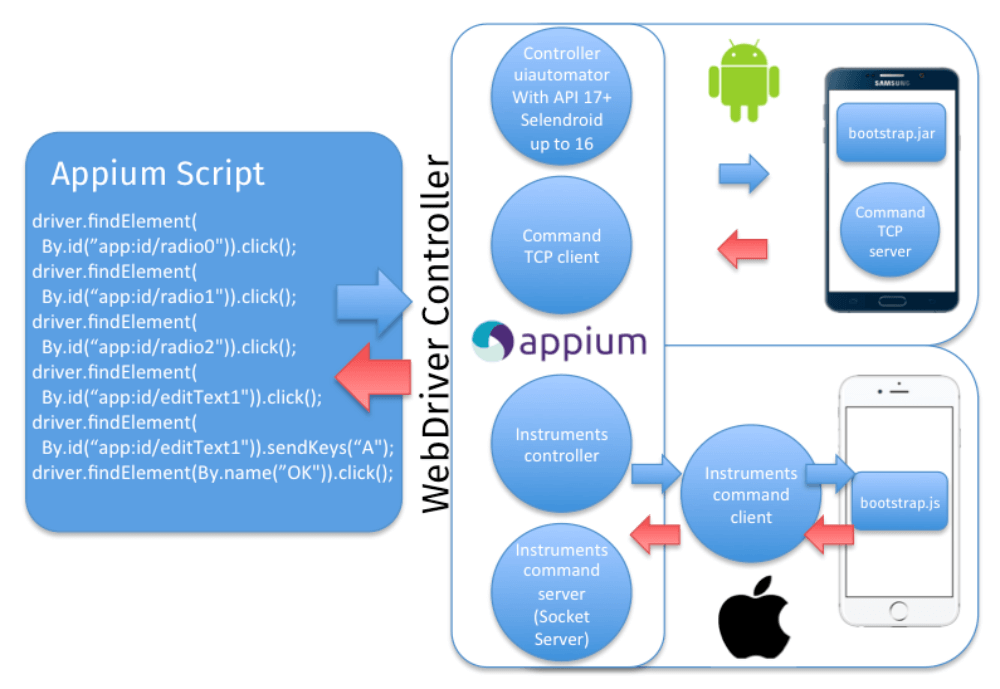
    Appium starts a test case on the device that spawns a server and listens for proxy commands. On iOS, Appium proxies command to a UIAutomation script running in instruments.

    AppiumSource: cloud.netlifyusercontent.com

    Appium: Why should you Choose?


    • Opens the door to cross-platform mobile testing which means the same test would work on multiple platforms.
    • Unlike other tools, it doesn’t require any third-party code to compile into your app to make it automation friendly.
    • Enables a variety of frameworks and programming languages by wrapping the vendor-provided frameworks in the WebDriver API that specifies a client-server protocol.
    • For a tester, the programming language and the whole experience would remain same irrespective of the automating platform as all complexities are under the hood of Appium server
    • Possible to Execute multiple tests on multiple platforms without the need to manage them.
    • Able to run test sequences with hundreds of test cases, across multiple platforms.
    • Enables the view and share of device interactions with colleagues using in real-time built-in collaborative screen casting
    • On-demand testing and leverage results directly
    • It supports automation frameworks like JUnit and TestNG


    Appium has some challenges when it comes to scaling up with continuous integration. pCloudy brings to you a solution for this where you can automate your app tests with zero learning. Sign up on pCloudy and automate your tests on Appium for faster and better delivery of apps.

    pCloudy – On Boarding Document


    Thank you very much for opting pCloudy.

    We appreciate your business and welcome you to our long list of satisfied and much valued customers. Our success comes from the continuous faith in the excellence of our products and services, something we are committed to and would never sacrifice.


    Our customer service, especially in the after sales phase, guarantees the satisfaction of our clients. In line with this strategy, we ask you to share with us your feedback at any time, be it positive or negative. There is always room for improvement, so if we can serve you better in anyway, please do inform us.


    Introduction


    This document is created to serve as a guide while you explore the pCloudy platform. It will help you understand how to use, to get quick help and whom to contact while starting off with pCloudy. Though this is not a complete help document, it will act as a quick reference to begin using the platform.


    About pCloudy


    pCloudy is a mobile application testing platform which will help you to test your apps on hundreds of real devices. You can remotely access real devices and carry out Manual and Automation Testing.


    Quick Start


    Registration


    The platform has a secure login process to protect the apps you test. In order to use the platform you must setup your login credentials first.


    Where do I do this?


    Simply, enter your details at https://device.pcloudy.com/signup, after a short verification you will be ready to sign-in.


    In case of any issues, drop an email to support@pcloudy.com


    Sign-in


    Once you’ve signed up, you can access the platform with the help of your registered Email ID and Password.


    In case of any issues, drop an email to support@pcloudy.com


    Note: If your workstation has touch screen feature, enable TouchScreenBrowserSettings


    Where do we go from here?


    Once you login, you will be exposed to an array of devices and platform features. You might get overwhelmed and lost, but don’t worry, we have you covered.


    A typical pCloudy user will follow these steps for testing mobile apps using the platform.


    Divided into five parts –


    1. How to select right device from the platform?
    2. How to manage apps on the platform?
    3. How to start testing your apps on the selected devices?
    4. How to run automation scripts on cloud-based devices?
    5. Additional Features


    1. How to select right device from the platform?


    To select the right device on the cloud the platform provides various filters. These filters will help you to select devices based on the OS versions, OEMs, Screen Size, Network, or Device Location.
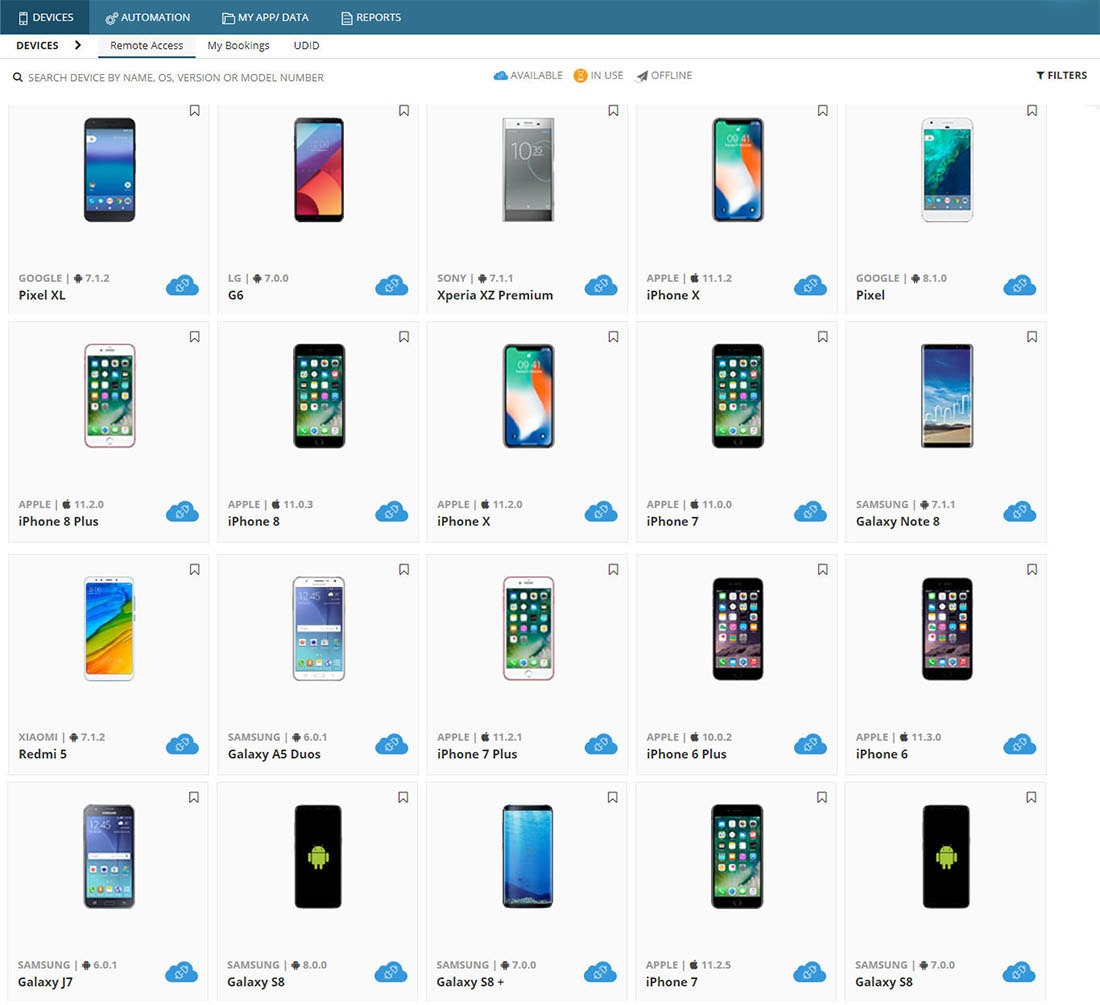
     

    Mobile Device Testing


    There are two modes to access the devices on the cloud –


    1. Instant Access – This provides immediate access to the available devices at that moment. Just hit the ‘Connect’ button on any device displayed in the Instant Access page and you will be ready to use the device.


    2. Book your Device – In some cases you might want to reserve a device for the future. You can book a device in advance to keep yourself prepared for testing. With careful planning, with the help of ‘Book your Device’ mode you can make sure the devices are available when you need them and save time.


    To learn more, refer to these links:


    Managing your credits


    To use the devices you need to have enough credits in your account:

    • To view the remaining credits in your account refer to this link
    • To buy more credits, click this link


    How to manage apps on the platform?


    The platform provides secure limited disk space to store the apps on the platform. This space can be used to store app installation files (apk or ipa) or test data (image files, zip, etc).


    Refer these links to know how to upload your app files to the platform:


    Manual Testing of Mobile Apps


    The dashboard provides you with quick and easy access to use the different features to test your mobile apps.
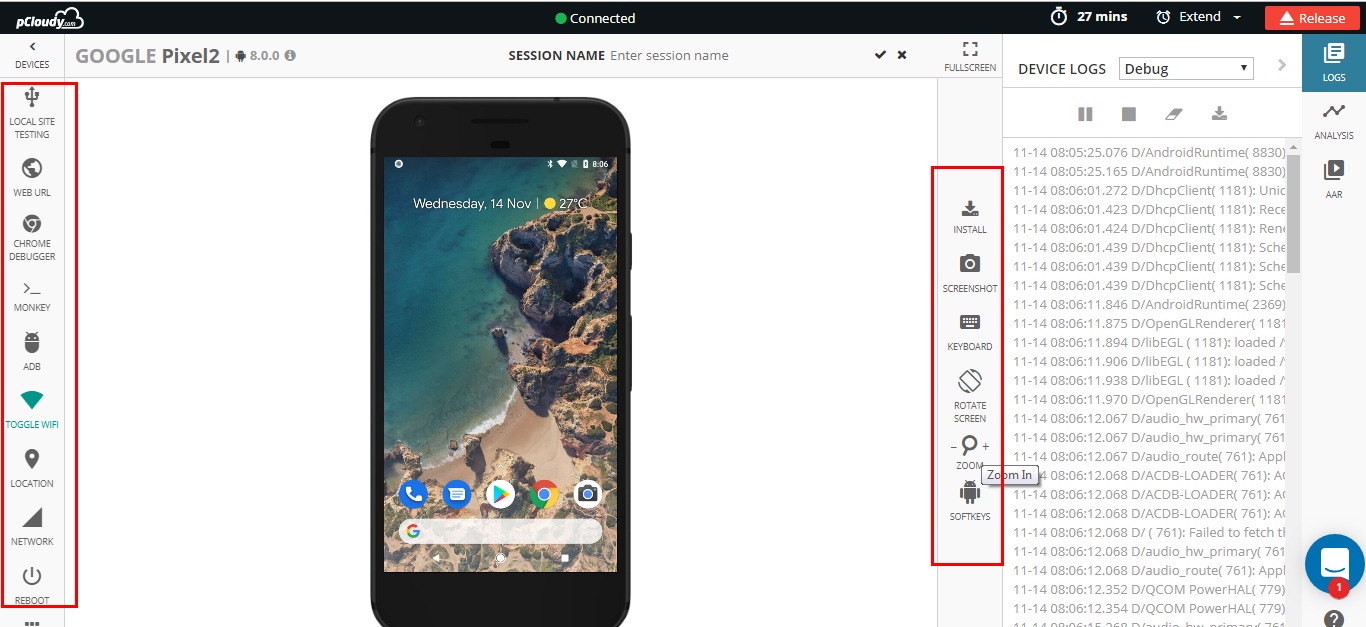
     

    Device Information


    1. Device Screen: You can use the device same as how you use a device physically. You can use swipe actions, zoom-in, zoom-out and various gestures to control the device.

    2. Main Panel: This panel provides options to view device info, install/uninstall apps, change device settings, tools to debug apps and run automation, and more.

    3. Quick Action Bar: Frequently used controls like taking Screenshots, changing device orientation, sending text to device, and more

    4. Logs and Performance: Real time device logs and app performance are displayed


    Features

    Here’s a list of some important features to test your apps –


    1. Functional Tests

    You can install/uninstall apps on the devices, you can use various gestures on cloud based devices just like how you do testing on physical device, you can mock GPS location, take screenshots, and much more. Here are some links that will help you:


    2. Performance Profiling


    Performance profiling of Android Apps – You can monitor the CPU usage, memory usage, battery consumption, frame render count of the app in real-time while testing an app.

    Performance on iOS Device – You can monitor the CPU usage & memory usage of the device in real-time during testing.


    3. Debugging mobile apps

    You can capture bug and crash information in the form of logs, screenshots, videos, and stack trace information while testing your apps on devices.


    4. Test Mobile Web Apps

    You can test your web apps or website on various browsers on various devices.


    5. Network Virtualization Tool

    The app you tested in your lab environment will not work the same way when you use it in an elevator, or in a basement, or while you are travelling on a highway. The Network Virtualization Tool will help you to emulate different network environments and test your apps.


    6. Device Tunnel

    You can connect and use a device with ADB just like the way you connect it physically with USB/Wireless ADB. This is used to control a device using ADB commands and debug apps.


    7. Reports


    The reports section will contain the complete details of all your testing sessions. It will hold the screenshots, logs, videos and the performance details of the testing.


    8. Automation


    You can run your automation scripts on multiple devices in parallel. The pCloudy platform supports several automation tools. Here are some links to help you –


    Other than the reports generated from the automation tools, you can view additional testing reports stored on the platform as well – Automation Testing Reports. This will contain the videos, logs, and performance graphs of the devices on which Automation execution was run.


    9. Integration with Continuous Integration tool – Jenkins


    You can use CI tools like Jenkins in integration with the pCloudy platform. This integration will leverage your testing practices to a whole new level. You can deliver quality mobile apps continuously by automating the process of build integration using pCloudy plugin for Jenkins.


    Team Admin


    To effectively manage the devices, users, apps, or credits on the platform you can use Team Admin.
    Refer to article – Team Admin


    Contact


    Find detailed pCloudy knowledge base articles from support@pcloudy.com
    You can reach out to us – support@pcloudy.com or info@pcloudy.com