Anshuman Chatterjee | Posted on | 2 min Read

Why Mobile App Automation Testing?

Testing of Mobile Apps in quite cumbersome because of sheer magnitude of testing required on variety of devices. Moreover, Mobile Apps require changes faster than other kind of Applications (Web or Desktop). That’s the reason, more and more organizations have started realizing the need of using automation testing over manual testing as much as possible.


Mobile App Automation Testing can be a massive undertaking, and if unaware, one can end up complicating the process by selecting a bad tool. With a major trending shift to open-source mobile test automation tools, there have been a plethora of tools available in most open-source software markets.


So how do you know which are the best software testing tool available in the market? Which tools will give you the most efficient solution to fulfill your enterprise’s need for speed and integration? Will manual testing suffice your app testing needs?


This blog post is to help you quickly choose which open-source test automation tool will be right for your automation testing


Benchmarks for selecting the right tool

You would need a set of criteria to fulfil when assessing your selection of the right open-source automation tool. Here are a crucial few questions to ask:


  • Do you have the required skilled resource for automation tasks?
  • Is there ease of script development to support agile processes and shorter iteration cycles?
  • Does the tool support cross team collaboration for seamless use by QA and Dev?
  • Can it match app platform with test development language?
  • Will it have performance capabilities gaps while testing?
  • Will it support both real devices and emulators?
  • Does the app support multiple platforms — Mobile and Web?
  • Does it have multi device execution capability
  • How easily can it integrated with external Device cloud platforms?


Best Open-Source Mobile Testing Frameworks to use:

To take the final call, testers must have a strong awareness of the tool’s strong and weak aspects, what it can do and what it cannot, and find a balance between cost and benefit.


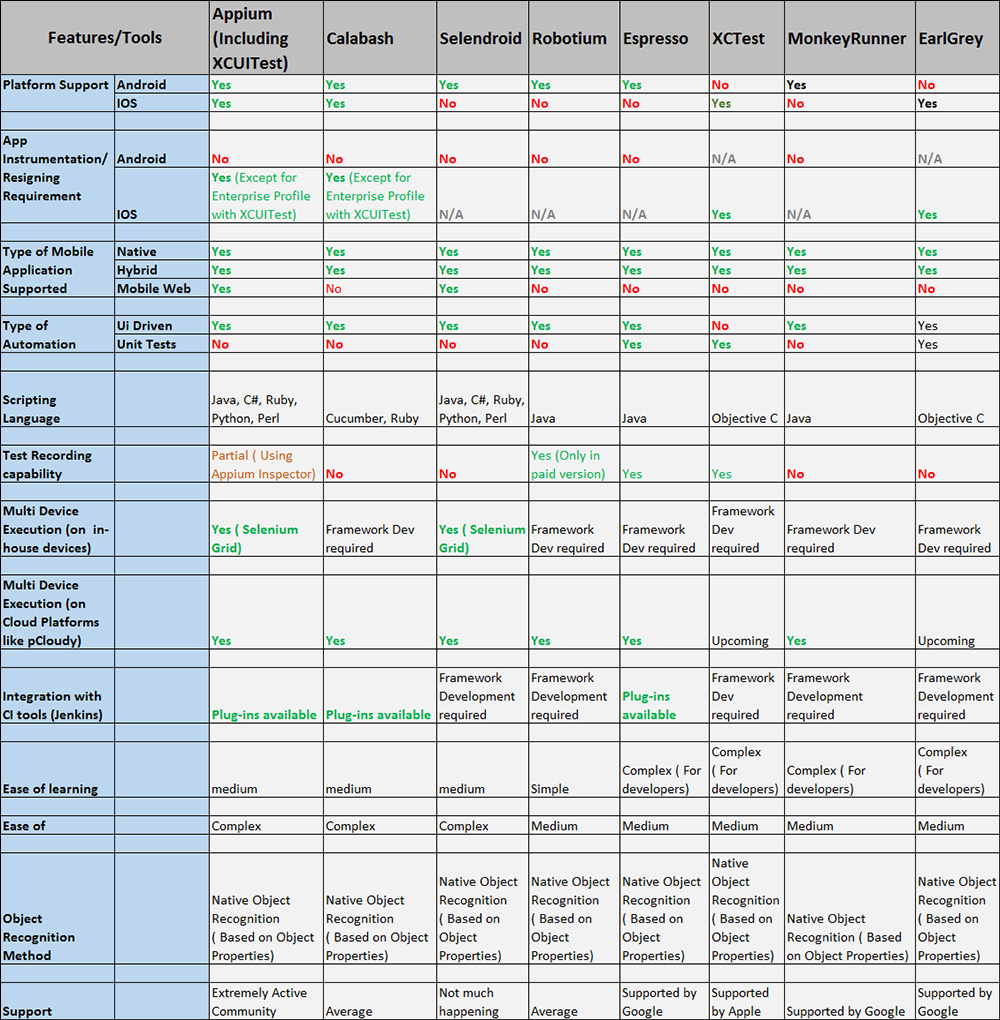
These are top highly adopted open source test automation frameworks available in the market. Each of these frameworks are backed by different communities due to their unique offerings to the target audiences and relevant platforms. The overall benefits are that they cover a wide range of devices. However, for technical clarity it’s important to know the pros and cons of the framework based on your mobile and web testing needs:


1. Appium: Widely adopted, it is the leading open-source test framework for mobile app (Android, iOS) test automation.


Pros:

  • Best suited for QA teams to test the functionality of mobile web, native and mobile hybrid apps across iOS and Android.
  • Its reports are limited from debugging and fast feedback loop.
  • Supports development tools using any WebDriver compatible language including Java, C#, Ruby etc.
  • Cross Browser Support and cross platform capabilities


Con: It is less suitable for performing and developing unit testing.


2. Calabash: It is a Behavior-driven development (BDD) test framework based on Ruby development language.


Pros:

  • Has a large community support
  • Cross platform development support (Android and iOS)
  • Provides solid reports and insights to QA and Dev teams
  • Easy path to both develop and test features in parallel
  • Simple and easy-to-read test statements

Con: It is not friendly to languages other than Ruby.

3. Espresso & XCTest UI: Both are very similar tools as they were designed for the target users. Espresso for Android and XCTest for iOS are fully maintained by Google and Apple, assuring the latest features for respective platforms.

Pros:

  • Latest feature integrations assure lead in market curve for developers and testers
  • Easy to develop techniques including test recorders
  • Support both types of unit testing and functional UI

Con: Both are app context only, which means limited ability to test for user condition scenarios

4. Selendroid: An open source automation framework which drives off the UI of android native, hybrid and mobile web application. A powerful testing tool that can be used on emulators and real devices. And because it still reuses the existing infrastructure for web, you can write tests using the Selenium 2 client APIs.


Pros:

  • Can interact with multiple Android devices and simulators simultaneously
  • Can simulate human actions like touch, swipe, drag etc. on devices
  • Supports development tools using any WebDriver compatible language including Java, C#, Ruby etc.


5. Robotium: Widely adopted open source Android test Automation framework.


Pros:

  • Easy to write powerful test scenarios
  • Full support for native and hybrid Android Apps
  • Easy to use recorder
  • Handles multiple Android routines automatically


6. EarlGrey: EarlGrey is a native iOS UI automation test framework that enables you to write clear, concise tests. It integrates with Xcode’s Test Navigator so you can run tests directly from Xcode or the command line.


Pros:

  • Works directly from XCode
  • Full support for native and hybrid Android Apps
  • Synchronization features which automatically synchronizes with the UI and network requests.


mobile app automation testing


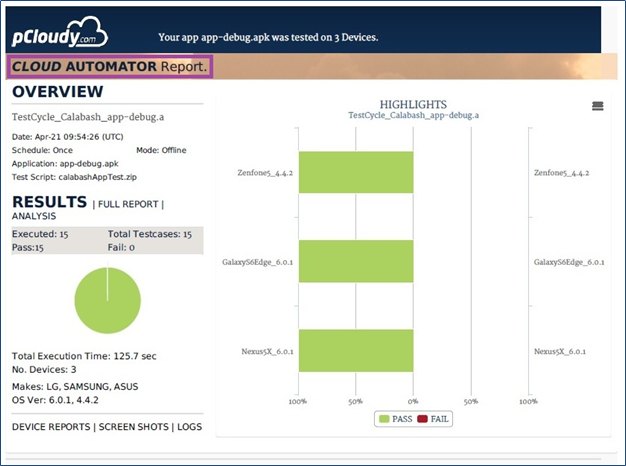
Would you like to know how to use Automation Testing on Real Devices with pCloudy? Click Here

PCloudy 3.4

PCloudy is happy to announce several exciting features as part of it’s latest release.

  • ADB Bridge (for In-premise cloud): Connect and take full control of any Android device using Android Debug Bridge. It provides access to a versatile command line tool that lets you communicate with a remotely connected device over the cloud.
  • ADB Commands (Available as part of Enterprise package): You can run ADB commands from your computer to the remotely connected device on a Private Cloud Lab.
  • Network Simulation (for In-premise cloud): Control the network connected to the device on which you will test your application. Set Network Profiles, modify existing profiles and apply it to the network connected to the device.
  • Battery Consumption Reports (For Android devices above 5.0): The platform now displays real time battery consumption data of device and App under testing. You can view a graphical representation of battery consumed by your apps with the total battery used by the device.
  • Monkey Tool (UI/Application Exerciser Monkey): Perform Stress and crash test on your application by simply selecting a device and running monkey tool on your application. The tool sends out a stream of pseudo-random user events such as clicks, touches, or gestures, as well as a number of system-level events, which acts as a stress test on the application software you are testing.
  • New implementation of iOS Instruments: Several improvements for running Appium and Calabash scripts on iOS devices
  • Volume Up & Down buttons for Android: Separate keys to control Volume of the devices. This is just the beginning, there’s something bigger coming.
  • Wifi control button for Android: Separate keys to Switch-on/Switch off wifi settings on Android devices
  • Support for IOS 10 beta : Get your App ready for Testing for upcoming IOS 10 release. You can test on iPhone and iPad with IOS 10 Beta version.
  • Several Bug fixes

We would be happy to send you more information. Please contact us on info@pcloudy.com

Calabash Automation Testing

Improve the quality of your iOS and Android apps by running your Calabash Test Scripts (Calabash Automation Testing) against real phones and tablets on pCloudy.com.

Along with Appium, Robotium and Espresso, you can use Calabash as well on pCloudy.com.

Calabash is a free open source framework for mobile automation testing. It is cross platform, supporting both iOS and Android. It consists of two libraries – calabash android and calabash iOS, which helps in writing tests in domain specific languages. Calabash consists of libraries that enable the test code to interact with apps. Each of these interactions consists of a number of end user actions like gestures, assertions or screenshots. The Tests can be written in simple, self-explanatory language that can be easily followed by even non-technical people.

Further, to increase the efficiency of testing and to improve the quality of your iOS and Android Apps and you can automate your Calabash Test Scripts against a wide range of real mobile devices on pCloudy.com.

Here’s how you can use Calabash on pCloudy devices:

Calabash Automation Execution for Mobile Apps


pCloudy provides automation execution environment to run your Calabash test script of android and iOS and hybrid applications as well.

Here are steps to run Calabash test script over android device:

  • Login over www.pcloudy.com with your registered Email ID & Password
  • Go to the Automator Page
  • Select Android or iOS OS version & Manufacturer
  • Select and add desired device
  • Choose Calabash (to run Calabash test scripts)
  • Select Application .apk/.ipa file (the App to be tested)
  • Select Test Script zip file (the Test Script developed for testing)
  • Enter Single Device execution Time (Time required for the entire script to be executed on single device)
  • Enter Name of your Test Cycle (this name will represent your Test Cycle)
  • Click on Schedule Test Cycle

Calabash

Click on Schedule to confirm schedule of test automation. Here, you can see your selected application, test script, device(s) etc.

calabash-confirm-test-cycle

You get a pop up message of test automation schedule confirmation.

Click on OK to proceed.

calabash-test-cycle-scheduling-successful

Go to your mailbox and open pCloudy Automation Alert mail.

Click on the given link “Click to view Report”.

calabash-simplest-online-device-cloud

Here, you can see result of your Calabash Automation Execution. This directory contains all important information of execution result.

calabash-cloud-automator-report

pCloudy – On Boarding Document


Thank you very much for opting pCloudy.

We appreciate your business and welcome you to our long list of satisfied and much valued customers. Our success comes from the continuous faith in the excellence of our products and services, something we are committed to and would never sacrifice.


Our customer service, especially in the after sales phase, guarantees the satisfaction of our clients. In line with this strategy, we ask you to share with us your feedback at any time, be it positive or negative. There is always room for improvement, so if we can serve you better in anyway, please do inform us.


Introduction


This document is created to serve as a guide while you explore the pCloudy platform. It will help you understand how to use, to get quick help and whom to contact while starting off with pCloudy. Though this is not a complete help document, it will act as a quick reference to begin using the platform.


About pCloudy


pCloudy is a mobile application testing platform which will help you to test your apps on hundreds of real devices. You can remotely access real devices and carry out Manual and Automation Testing.


Quick Start


Registration


The platform has a secure login process to protect the apps you test. In order to use the platform you must setup your login credentials first.


Where do I do this?


Simply, enter your details at https://device.pcloudy.com/signup, after a short verification you will be ready to sign-in.


In case of any issues, drop an email to support@pcloudy.com


Sign-in


Once you’ve signed up, you can access the platform with the help of your registered Email ID and Password.


In case of any issues, drop an email to support@pcloudy.com


Note: If your workstation has touch screen feature, enable TouchScreenBrowserSettings


Where do we go from here?


Once you login, you will be exposed to an array of devices and platform features. You might get overwhelmed and lost, but don’t worry, we have you covered.


A typical pCloudy user will follow these steps for testing mobile apps using the platform.


Divided into five parts –


1. How to select right device from the platform?
2. How to manage apps on the platform?
3. How to start testing your apps on the selected devices?
4. How to run automation scripts on cloud-based devices?
5. Additional Features


1. How to select right device from the platform?


To select the right device on the cloud the platform provides various filters. These filters will help you to select devices based on the OS versions, OEMs, Screen Size, Network, or Device Location.


Mobile Device Testing


There are two modes to access the devices on the cloud –


1. Instant Access – This provides immediate access to the available devices at that moment. Just hit the ‘Connect’ button on any device displayed in the Instant Access page and you will be ready to use the device.


2. Book your Device – In some cases you might want to reserve a device for the future. You can book a device in advance to keep yourself prepared for testing. With careful planning, with the help of ‘Book your Device’ mode you can make sure the devices are available when you need them and save time.


To learn more, refer to these links:


Managing your credits


To use the devices you need to have enough credits in your account:

  • To view the remaining credits in your account refer to this link
  • To buy more credits, click this link


How to manage apps on the platform?


The platform provides secure limited disk space to store the apps on the platform. This space can be used to store app installation files (apk or ipa) or test data (image files, zip, etc).


Refer these links to know how to upload your app files to the platform:


Manual Testing of Mobile Apps


The dashboard provides you with quick and easy access to use the different features to test your mobile apps.


Device Information


1. Device Screen: You can use the device same as how you use a device physically. You can use swipe actions, zoom-in, zoom-out and various gestures to control the device.

2. Main Panel: This panel provides options to view device info, install/uninstall apps, change device settings, tools to debug apps and run automation, and more.

3. Quick Action Bar: Frequently used controls like taking Screenshots, changing device orientation, sending text to device, and more

4. Logs and Performance: Real time device logs and app performance are displayed


Features

Here’s a list of some important features to test your apps –


1. Functional Tests

You can install/uninstall apps on the devices, you can use various gestures on cloud based devices just like how you do testing on physical device, you can mock GPS location, take screenshots, and much more. Here are some links that will help you:


2. Performance Profiling


Performance profiling of Android Apps – You can monitor the CPU usage, memory usage, battery consumption, frame render count of the app in real-time while testing an app.

Performance on iOS Device – You can monitor the CPU usage & memory usage of the device in real-time during testing.


3. Debugging mobile apps

You can capture bug and crash information in the form of logs, screenshots, videos, and stack trace information while testing your apps on devices.


4. Test Mobile Web Apps

You can test your web apps or website on various browsers on various devices.


5. Network Virtualization Tool

The app you tested in your lab environment will not work the same way when you use it in an elevator, or in a basement, or while you are travelling on a highway. The Network Virtualization Tool will help you to emulate different network environments and test your apps.


6. Device Tunnel

You can connect and use a device with ADB just like the way you connect it physically with USB/Wireless ADB. This is used to control a device using ADB commands and debug apps.


7. Reports


The reports section will contain the complete details of all your testing sessions. It will hold the screenshots, logs, videos and the performance details of the testing.


8. Automation


You can run your automation scripts on multiple devices in parallel. The pCloudy platform supports several automation tools. Here are some links to help you –


Other than the reports generated from the automation tools, you can view additional testing reports stored on the platform as well – Automation Testing Reports. This will contain the videos, logs, and performance graphs of the devices on which Automation execution was run.


9. Integration with Continuous Integration tool – Jenkins


You can use CI tools like Jenkins in integration with the pCloudy platform. This integration will leverage your testing practices to a whole new level. You can deliver quality mobile apps continuously by automating the process of build integration using pCloudy plugin for Jenkins.


Team Admin


To effectively manage the devices, users, apps, or credits on the platform you can use Team Admin.
Refer to article – Team Admin


Contact


Find detailed pCloudy knowledge base articles from support@pcloudy.com
You can reach out to us – support@pcloudy.com or info@pcloudy.com