Mobile app automation testing has become essential for ensuring the quality and performance of apps in today’s competitive market. With shorter release cycles and tighter budgets, choosing the right automation testing framework can significantly impact your app’s success. While there are many automation frameworks available, Appium and Espresso have emerged as two of the most widely used frameworks for mobile app testing.
This blog provides a detailed comparison of Appium vs Espresso, highlighting their strengths, weaknesses, and ideal use cases to help you decide which framework is right for your needs.
Appium vs Espresso
Mobile app automation testing has evolved as a crucial aspect of the mobile app development process to help deliver better quality solutions, under controlled time cycles and cost schedules. But for delivering bug-free app, choosing the best suitable automation testing framework for your app is very important. There are many automation testing frameworks available in the market with exceptional capacities. This blog is all about Appium vs Espresso and we will analyze which of these two most widely used Automation testing frameworks is preferable for your app testing.
Espresso was not preferred because of its flakiness and instability issues. But, from the time Google has brought Android Test Orchestrator, a Gradle test option, instability and unreliability of Android Espresso tests have vanished. This, in turn, is creating a serious problem for the most popular automation framework Appium.
Let’s find out in this blog if Espresso now comes with a power to kill Appium or Appium can hold its stand in this fiercely competitive market.
What is Appium?
Appium is an open-source, cross-platform mobile automation testing framework that supports the testing of native, hybrid, and web apps. It enables testing on real devices, emulators, and simulators, making it a versatile choice for mobile app testing. Appium’s architecture uses the Selenium WebDriver protocol, which allows cross-platform compatibility, enabling the same test scripts to work for both Android and iOS apps.
Advantages of Using Appium
Facilitates Test Execution Without a Server Machine Appium is built on a Node.js-based runtime, making it lightweight and capable of running on local machines without requiring a dedicated server.
No App Code Recompilation Required
Appium enables testers to run automation tests without modifying or recompiling the app code, making it highly flexible for both native and cross-platform apps.
3. Automates Various Types of Mobile Apps
Whether it’s a web, hybrid, or native app, Appium supports automation across all app types using the same framework.
4. Supports Real Devices, Emulators, and Simulators
Appium enables testers to run tests on real devices for accurate usability testing while also supporting emulators and simulators for faster test execution.
5. Record and Playback Tool for Quick Test Creation
Appium’s inspector allows testers to record app behavior and generate scripts in multiple programming languages such as Java, Python, Ruby, and C#.
6. Cross-Platform Compatibility
Appium enables you to run the same test script on both Android and iOS platforms, reducing the effort required for cross-platform app testing.
7. Supports Multiple Programming Languages
Appium integrates with WebDriver-compatible languages, including Java, JavaScript, Python, PHP, Ruby, C#, and Objective-C, allowing testers to write scripts in their preferred language.
Disadvantages of Using Appium
Limited Gesture Support
Common mobile gestures, such as double-tap, may not be natively supported in Appium’s Java-client libraries, requiring workarounds.
2. No Support for Concurrent iOS Simulator Testing
Appium does not allow running multiple test scripts on iOS simulators concurrently, which can slow down large-scale iOS testing.
3. Limited Image Recognition Capability
Appium struggles with image-based testing as it cannot recognize images automatically and requires screen coordinates for locating visual elements.
4. No Support for Older Android Versions
Appium only supports Android 4.2 and above, making it difficult to test apps targeting older Android APIs.
What is Espresso?
Espresso is Google’s UI testing framework for Android apps. It provides fast, reliable UI testing by synchronizing test actions with the app’s user interface and ensuring that the app’s activities have completed before the test starts.
With the introduction of Android Test Orchestrator, Google has addressed common issues like flaky tests and shared states, making Espresso more stable and reliable.
Advantages of Using Espresso
Integration with Gradle Espresso is fully integrated with Android Studio and Gradle, enabling developers to run tests directly from the command line or IDE with minimal setup.
Android Test Orchestrator for Reliability
The Android Test Orchestrator runs each test in its own sandboxed environment, ensuring minimal shared state and isolating crashes, leading to more reliable test results.
3. Less Flakiness
Espresso’s built-in synchronization mechanism ensures that test actions are executed only when the app’s UI is idle, reducing flakiness caused by asynchronous operations.
4. Developer-Friendly Test Automation
Since Espresso is based on Java and JUnit, Android developers can quickly adopt it without additional learning curves or external dependencies.
5. Fast Feedback Loop
Unlike Appium, Espresso runs alongside the app without requiring a server, resulting in faster test execution and immediate feedback.
6. Simple Test Suite Management
Espresso allows developers to package their tests as standalone APKs, which can be installed alongside the app and executed easily.
Disadvantages of Using Espresso
1.Requires Access to the App’s Source Code
Espresso requires access to the app’s source code, limiting its use for black-box testing or when working with third-party apps.
2. Narrow Focus (Android-Only)
Espresso is designed exclusively for Android, so separate frameworks (like XCTest) are required for iOS testing, resulting in increased effort for cross-platform apps.
3. Requires Emulator Experience
Running Espresso tests requires familiarity with launching and managing Android apps on emulators, which may add complexity for QA teams unfamiliar with Android development.
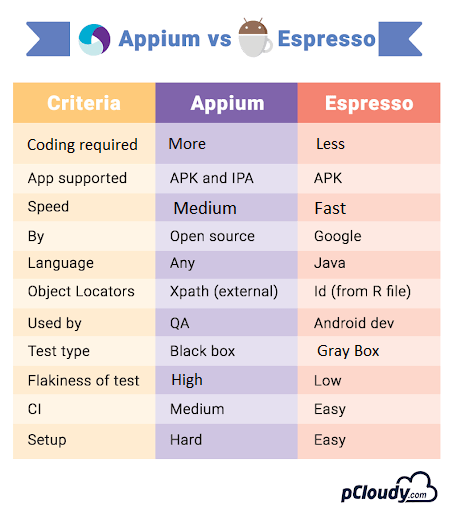
Appium vs Espresso: Key Differences
Criteria
Appium
Espresso
Platform Support
Android and iOS
Android only
Source Code Access
Not required
Required
Test Type
Black-box and white-box testing
Primarily white-box testing
Programming Language
Supports multiple languages (Java, Python, C#, etc.)
Java and Kotlin (via JUnit)
Test Execution
Requires Appium server
Runs directly in the app process
Cross-Platform
Yes
No
Test Reliability
May face flakiness due to external dependencies
High reliability with built-in synchronization
Integration
Requires WebDriver integration for advanced features
When you require black-box testing without access to the app’s source code.
When you want to use a familiar WebDriver-based framework with support for multiple languages.
When to Use Espresso
When you are building a native Android app and need fast, reliable UI testing.
When you need a developer-friendly testing framework that integrates seamlessly with Android Studio.
When you prioritize faster feedback loops for CI/CD pipelines.
Conclusion
Both Appium and Espresso offer powerful capabilities for mobile app testing, but the right choice depends on your app’s requirements. If you need a cross-platform solution that supports both Android and iOS, Appium is the better option. However, if you’re focused solely on Android and need a reliable, fast UI testing framework, Espresso is ideal.
Comprehensive Test Coverage
Test your apps on 5000+ real device and browser combinations and ensure a complete test coverage.
Get a free demo
Automation Testing Advantages: A Comprehensive Guide
Automation testing has transformed how software is developed, tested, and delivered. By leveraging tools and frameworks to execute predefined test cases, automation testing offers speed, precision, and scalability that manual testing cannot match. Below, we delve into the advantages of automation testing, highlighting how it addresses key challenges and accelerates software development lifecycles.
1. Faster Feedback Loops
Automation testing enables rapid feedback during various stages of the software development lifecycle. It enhances communication between developers, testers, product owners, and designers, ensuring issues are identified and resolved promptly.
Benefits:
Speeds up development cycles by enabling faster iterations.
Minimizes miscommunication between teams through immediate defect reporting.
Helps maintain project timelines without compromising quality.
2. Significant Time Savings
Writing test cases manually is time-consuming, particularly for repetitive tasks like regression testing. Automation testing eliminates the need for repetitive manual efforts, reducing the overall testing time.
Benefits:
Accelerates regression, smoke, and performance testing.
Shortens delivery cycles for time-sensitive projects.
Frees testers to focus on exploratory and high-priority testing.
3. Early Bug Detection
Automation testing allows bugs to be identified during the initial stages of development. This proactive approach prevents issues from escalating into larger problems.
Benefits:
Saves time and resources by reducing debugging efforts in later stages.
Improves overall code quality.
Enhances collaboration between developers and QA teams by integrating defect tracking into the CI/CD pipeline.
4. Reusability of Test Scripts
Test scripts in automation can be reused across multiple projects with minimal modifications. This reusability is particularly beneficial for applications with frequent updates or releases.
Benefits:
Reduces the effort required to adapt tests for different versions.
Ensures consistency in test execution across environments.
Saves significant time in setting up test cases for new projects.
5. Running tests anytime, anywhere:
Automated testing help test engineers to run their tests 24/7. If the test engineer has to leave early for the day, he can easily schedule the tests and leave the office. The test results will be ready by the time he logs in again next morning.
6. Distributed Test Execution
Automation testing cuts down complexities with its distributed test execution feature. It helps the testers to run a test script on more than one computer or shared network or servers simultaneously. So, only an automation testing tool is the requirement rather than multiple tools.
7. Robust and simpler reporting:
Automation testing gives us the benefit of tracking each test script. All the test scripts executed will be visible in visual logs. The reports generated can evidently show the number of test scripts already executed, scheduled, their reported bugs or issues and the ways in which they have been fixed.
8. Testing Capabilities:
Automated testing offers an unmatched and huge testing capability. The mobile app needs to be tested on multiple devices, OS versions, screen sizes etc. which can be efficiently done through automated testing and not by manual testing. In fact, it is almost impossible to get perfect results through manual testing.
9. Better Test Coverage
Test automation can easily execute thousands of different complex test cases during every test run providing coverage that is impossible with manual tests. It can only be possible through automated testing as it can run test scripts on multiple computers with varied configurations. It can look inside an application and see memory contents, data tables, file contents, and internal program states to determine if the app is functioning as expected.
10. Less Manual Effort:
Automation testing significantly reduces dependency on manual testers for repetitive and time-consuming tasks. This allows QA teams to focus on higher-value activities.
Benefits:
Minimizes human error during testing.
Optimizes resource allocation for other critical tasks.
Increases overall team productivity.
11. Improves Accuracy:
We have been saying this time and again that automation testing overcomes the shortcomings of manual testing. It has improved the accuracy to a great deal by giving error-free results unlike manual testing where testing is error-prone, delays the delivery and increases the cost. It is especially a boon in stress testing where getting error free results in manual testing is almost impossible.
12. Return on Investment:
One of the most important advantages of automation testing is the return on investment to the organization. Every enterprise analyses the return it would get out of its investment and then would go for creating a test automation framework. Automated testing offers immense returns in terms of faster testing, error-free results, less manual effort. If the enterprise has automated testing tool, then the testing would be more efficient and accurate and easy.
13. Volume:
You can run your tests on more than 500 devices in automation testing which is impossible in manual testing.
One of the most important business advantages of automation testing is the return on investment to the organization. There are many advantages of automation testing tools as they are a crucial component in the DevOps toolchain. The importance of automation testing comes into picture when you have to run the test cases with different data and conditions several times.
Conclusion
Automation testing not only saves time and improves accuracy but also adds significant value to all stakeholders involved in the app development lifecycle. Despite its many benefits, some organizations hesitate to adopt automation due to initial configuration costs. However, with Agile and DevOps methodologies becoming the industry norm, automating testing processes is no longer optional—it’s a necessity.
By investing in renowned automation testing tools and frameworks, organizations can ensure faster releases, error-free applications, and satisfied customers. Whether you’re new to automation or scaling your testing efforts, platforms like Pcloudy can help you achieve unparalleled efficiency and coverage.
Automate with Selenium
Automate your web app testing by running your selenium scripts on multiple real desktop browsers with ease.
Get a free demo
Testing framework plays a crucial role in the success of any automated testing process. Choosing the right test automation framework is important as it will maximize the test coverage and improve test efficiency which means a better return on investment.
There are some key points you need to keep in mind while choosing a suitable python testing framework. The framework should justify your testing needs and it should be easy to use. Check if the framework has integrations with other tools and frameworks that you might use. The features, support, stability, and extensibility are also important. So let’s compare the most popular python testing frameworks to make it easier for you to choose the right one.
Robot framework
It is still the most popular python testing framework that uses a keyword-driven testing approach and is used for acceptance testing. To run Robot you will have to install python 2.7.14 or any later version, python package manager, and a development framework like Pycharm. Advantages
Opensource
Platform independent
No need to learn a programming language to write Robot Framework test cases
Automatic report generation after executing each built
Supports behavior-driven, data-driven and keyword-driven approaches
Easy installation
Disadvantages
Not enough support for parallel testing
It’s difficult to create customized HTML reports
Gauge
It is an opensource tool developed by the team that made Selenium. Gauge is immensely useful while integrating continuous testing in the CI/CD pipeline. It is gaining popularity as it supports many plugins like python runner, IDE plugins, build management, java runner, etc. Advantages
Quick defect detection
Easy to write test cases
Supports multiple programming languages
Command-line support
Supports all major plugins
Cross-browser tests can be automated
Disadvantages
It is relatively new so it will evolve in the coming years
Pytest
Although Pytest is used for different types of testing, it is more preferred for functional and API testing. There are no prerequisites needed for Pytest, just knowledge of python will be enough to get started. It has a simple syntax which makes test execution easier. Advantages
Supports Fixtures and Classes that help in creating common test objects available throughout a module
It allows the use of multiple fixtures
It does not require a debugger
Xdist and other plugins support makes parallel execution easier
It supports parameterization, which is essential while executing the same test with different
configurations using a simple marker
Large community support
Disadvantages
Test written in Pytest cannot be shared with other platforms
Pyunit
It is a unit testing framework much like Junit but for python language. Also referred to as unittest, it has five core modules. The test loader class is used to load all the test cases and test suites. The test runner shows the result of the test executed using an interface. The test suite is a collection of test cases that are clubbed logically based on the functionalities. A test case contains the actual implementation of the code and the test report contains the organized data of the test results. Advantages
No need for high-level python knowledge for test execution
Extensive report generation
Pyunit comes with Python package, no need to install any additional module
Simple and flexible test case execution
Disadvantages
Requires boilerplate code
Pyunit is derived from Junit and so it still uses camelCase naming instead of snake_case naming method
It supports abstraction so the code intent sometimes becomes unclear
Behave
In Behave, test cases can be written in simple language and lets teams execute behavior-driven development (BDD) testing with ease. Behavior-driven development encourages quality analysts, developers, and business managers to work in collaboration to achieve higher efficiency. Advantages
Easy execution of all kind of test cases and easy coordination
Better clarity on the developers and testers output as the format of the spec is similar
Domain vocabulary that keeps the behavior consistent in the organization and the system behavior is expressed in a semi-formal language
Detailed reasoning and thinking promotes better product specs
Disadvantages
Only for black-box testing
To sum it up
All the above-mentioned frameworks have their specialties like Pyunit is used for unit testing and Behave is good for behavior-driven testing. Although Robot framework is the best tool for a beginner to learn the nuances of automation framework. It’s always better to jot down your requirements based on their priority and then choose the right python testing framework.
As we all know that Appium is the most preferred test automation tool for mobile applications. It is the first choice of the testers because of its flexibility i.e. it is open source, it has the best supported and highly active community of experts, Appium works across different platforms and works well with different scripting languages. Even after gaining such popularity and having a strong community base, surprisingly, the users still make mistakes while running the mobile test automation with Appium.
Here are a few common mistakes that Appium users encounter while using Appium Mobile Test Automation Tool:
1.Unrestricted X Path Usage:
Over usage of X Path could be found in case of Selenium as well but when it comes to Appium world, it has more outrageous effects because X Path is a more dynamic way to unearth the elements. But the biggest stumbling block in this scenario is its huge performance cost due to which it becomes elusive an area. This is because Google and Apple do not provide XML or XPath related queries in a way we would need them to be. All of this hospitalizes an unmanageable cost finding elements using X Path. Undoubtedly, X Path is the most trusted method but there are several other better locator methods like ‘Accessibility IDs’ that can be used in this sitch.
2. Neglected usage of Accessibility IDs:
The accessibility ID locator strategy is formulated to read a unique identifier for a UI element. For both iOS and Android, getting an element by their accessibility ID is the best method. Most importantly, it is preferable because it is quicker. It should be noted that semantically accessible IDs are different than the Web IDs. However, the two shouldn’t be combined. In many cases, the accessibility IDs are used only for the purpose of testing even though they have a larger purpose. So, in order not to spoil the accessibility of the applications just for the sake of testing, the bigger purpose of the accessibility IDs should be known. If the accessible IDs are set up on the elements to make the apps testable, the app accessibility also increases, provided that the accessibility labels are sensible to the users using them. But the foremost criteria not to make automation efforts a failure is to make the application testable in the first place.
3. Not making a testable App:
Developing an app should be a forecasted move where in the developers, even before writing the first line of code, plan to develop an app keeping the automation in mind. This they can achieve by keeping in mind the hooks and the unique IDs for the elements in order to make the app more testable. This strategic approach would be a reason for a successful mobile app test automation. Apart from this, there should also be a concentration on the different testing scenarios in order to elude the chances of overlapping before even getting into Appium coding. An open discussion forum with the development teams to discuss the plotting of right accessibility IDs, labels or Unique IDs for the application’s elements would reduce many test automation reliability concerns.
4. Disregarding Application View States:
One of the challenge faced in Mobile Test Automation is not setting up the application. Most of the developers do not set up the application in order to access specific views and user states rapidly. To quote an example given by Jonathan Lipps,one of the key contributors to the Appium project.
A shopping cart functionality of the app might have ten different tests, and ninety percent of the tests might go through the same steps of logging in and searching items to be put in the cart which is a huge waste of time.
So, your team should be able to set up an app’s state and start the test in that apposite state, straightaway. This is highlighted in Appium scenario due to the fact that the mobile simulators and emulators are slow and take longer than usual to reach to the right position on the test.
5. Query for every element visibility:
Not querying for the visibility of every element is another way to speed up the run-time of the Appium test scripts. This leads to an additional load of calls and waiting time for Appium while in the every activity of retrieving an element. The lag can be reduced by only requesting the element attributes which are important in perspective of the test code.
6. Native Testing tools – Always better?
According to some developers, usage of the native testing tools is the best way to get unfailing mobile tests. For example- Espresso in case of Android and XCUITest in case of iOS. This is not good advice as neither of Google or Apple are going to release and new automation technology. When the question is of stability, the stability of code should be chosen rather than technology and in this scenario, Appium is the best choice!
As an exception, if the development team writes the tests and it’s most comfortable in mobile SDK language, using Google and Apple providers to build development environments. Also, when the constricted test-app or test code-app code integration is needed, then Appium might not be of much help. The utmost value is that Appium provides the WebDriver layer on top of the technology, which means the code can be written in any language and acts as a stable interface to that specific automation technology. Also, being a cross-platform tool, Appium allows to saves a lot of code and architecture in case of testing both iOS and Android devices.
7. Appium is slow:
Appium might be slower in some circumstances and also there are points in Appium codes where it does not seem efficient. Appium backs upon technologies that are slower than Appium and the curators of Appium have strategically chosen to utilize slower strategies for specific instances. For eg: Appium will certainly be slower if you are relying on XPath. The efficiency of the tool depends on how it is being used. Mostly, Appium is favored because of stability than the speed.
8. Not Using Appium Documentation:
The earlier Appium docs were not very user friendly. As a result, they weren’t used as much as they needed to be but the new Appium documents have been completely redesigned and reorganized. Information about the API reference to Appium, client libraries, supported drivers and Appium commands, code examples which was not provided before is all documented in the updated version. It deserves a revisit due to its newness and can be accessed at Appium.io.
9. Not creating reusable code
Repetitive or duplicate code can cause several issues for Appium mobile testing process. When the same code is repeated in several test scripts, any updates or modifications must be copied across all instances. This increases the chance of failures and complicates the debugging procedure. It also increases the maintenance cost for the organization.
Duplicate code makes identifying the primary reason for a test failure challenging. It can be difficult to pinpoint which occurrence of the code caused a test to fail if the same code is used repeatedly throughout several test scripts. This could increase the duration required for debugging the software and expand the market time.
Therefore, it’s crucial to use appropriate coding principles to prevent these issues. This includes creating simple reusable code, utilizing libraries and frameworks, and modifying code to remove redundancies.
10. Ignoring the Test-driven Deployment
Test-driven deployment is an Appium mobile test automation approach that stresses developing automated test cases before writing application code.
It lets the developer test all the application features before being deployed. This way, they can detect and resolve any bug in the early stage. This saves not only the organization’s time but also valuable resources.
Not just this, Test-driven deployment also helps developers in developing more reliable and enduring codes. By allowing them to understand the needs and provide a solution accordingly. Which lets them create more modular, maintainable, and error-free codes.
11. Choosing the right tool for API testing
APIs may have several endpoints, each with a unique set of parameters, methods, and authentication requirements. Writing and maintaining tests that accurately reflect the behavior of the API can be challenging due to this complexity.
Another difficulty is the requirement to simulate various scenarios and inputs. Testing for different response codes, error messages, and payloads might be part of this. To ensure the API can manage a high volume of queries, developers might also need to simulate load and stress testing.
Developers use a testing framework or library like RestAssured and Postman, which provides integrated support for API testing. These tools streamline and simplify the testing process by providing pre-build methods for common API testing scenarios, these tools streamline and simplifies the testing process. Alternatively, they can mimic various scenarios and inputs using mock data or a staging environment.
Developers can test their API in a safe setting before releasing it for production. Moreover, they can evaluate the API’s capacity by simulating heavy requests using load-testing tools like JMeter or LoadRunner.
12. Need to follow a good design pattern.
In Appium mobile test automation, the Page Object Model (POM) and the Page Automation Layer Model (PALM) are popular architectural patterns. Both techniques increase automated tests’ maintainability, scalability, and reusability.
POM is a design pattern that emphasizes the creation of reusable and modular code by isolating the application’s user interface from the test automation code, making it simpler to update tests when UI changes are made. POM builds an object repository that holds all the web elements and methods.
PALM is another design pattern that builds upon the principles of POM. But unlike POM, which focuses on UI elements, PALM emphasizes creating an abstraction layer between the test automation code and the application’s business logic. This approach distinguishes the test automation code from the underlying implementation. Thus making it easier to modify the test code without affecting the business logic.
With Appium creating a buzz in enterprise mobility, mobility teams are still finding ways to successfully automate tests leveraging Appium. Appium being an open source tool is the perfect choice for automating native, mobile web and hybrid applications on their respective platforms.
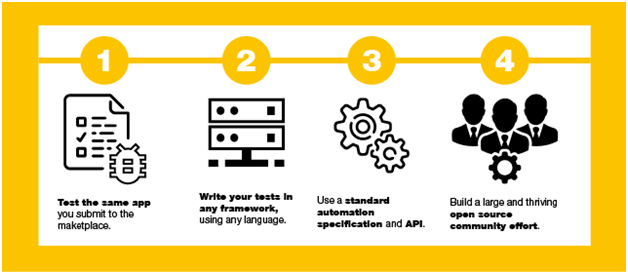
Let us now see the major factors behind Appium being the best choice for mobile automation tool:
An impressive expression by Appium.io showing why to choose Appium
1. Use of standard API: Appium is widely popular because modification of codes or a recompilation of your app is not required as it uses the standard API in all the platforms. Appium makes it effortless to create your tests against iOS and Android platforms with same API. But, separate iOS and Android scripts are still needed as the UI elements vary on both the platforms.
2. Use any WebDriver compatible language: Appium gives the freedom from getting locked into a particular language or framework to write and run the tests. Any WebDriver compatible language like Perl with Selenium WebDriver API, Java, PHP, C#, Python, Ruby, Javascript with Node.js can be used for writing the tests.
3. Testing Framework of Choice: Appium gives flexibility to mobility teams to use testing framework of their choice. Earlier, tests could only be written through Javascript using the UI Automation of library for Apple or Java based tests could only be written through UI Automator of Google. Appium completely changed this scenario.
4. Cross-platform test automation: Having the capabilities to test on both Android and iOS devices makes it the best cross-platform mobile app test automation tool. In order to interact with Android and iOS with Selenium WebDriver, Appium uses the JSON wire protocol. Appium makes use of the libraries provided by Apple with the help of an application called Instruments to automate iOS apps. In newer versions of iOS after v9.3, the Instruments api has been deprecated and now use XCUITest framework.
The method is similar in Android also where Appium proxies the automation command to the UIAutomator test case running on the device. Android has a native UI automation framework called UIAutomator which supports running JUnit test cases from the command line directly into the device.
5. Open Source: Being an open source testing framework is one of the biggest advantages of Appium as it supports Simulators, Emulators, real devices, and of course, native, hybrid and web application testing of iOS and Android. Appium having a large and thriving open community makes it easier for new automation engineers to clarify their doubts.
You can instigate test scripts created from Appium libraries locally, on a session reserved by the Cloud, for any iOS or Android device. Appium integrates with continuous integration servers to ensure better results and drives GUI-related widgets and controls, allowing the same scripts to run for different software versions of various apps. Appium can automate native, web and hybrid mobile apps, and you can test on a real device, a simulator, or an emulator. It also supports Safari on iOS and Chrome Mozilla or any built-in ‘Browser’ app on Android.
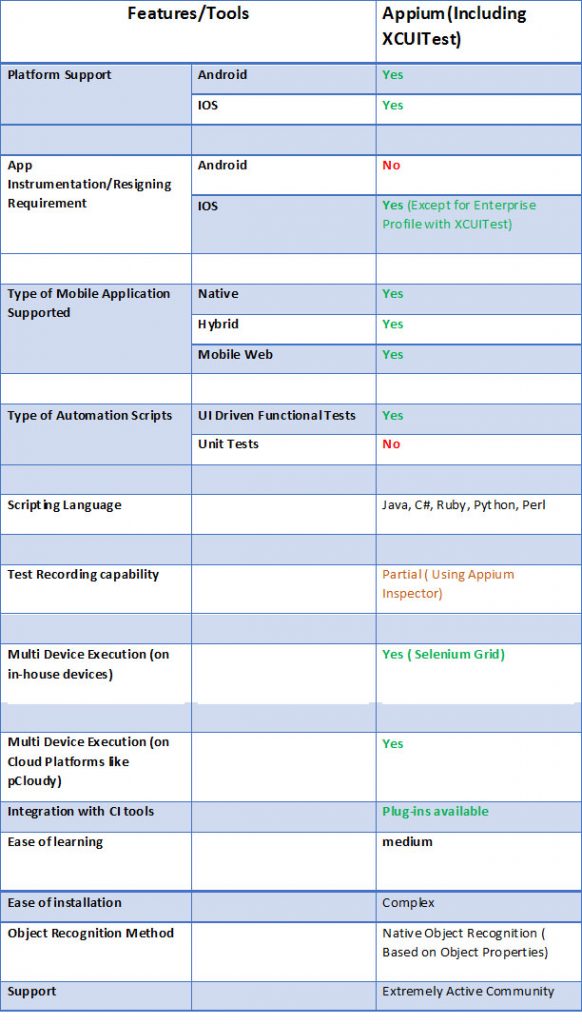
There are many automation tools for mobile application testing. Testers usually choose Appium as the best mobile testing tool. Mobile automation testing tools comparison can be done on the basis of language support and continuous integration. The most common automation testing tools used for mobile application testing are Appium, Robotium, and Calabash. If you are looking for iOS app automation testing tools then Appium and Calabash can do the job for you.
Here is tabular representation for you to understand Appium’s compatibility with different features and tools.
Teams who are getting started with Automation or are considering Appium as an option, must explore an alternative to go for a mobile device cloud with built-in Appium.
A mobile device cloud not only assists in managing and sharing devices, but also helps in streamlining automated testing and continuous delivery processes. A mobile device cloud with built-in Appium makes it easy for teams to get started with automation and scale up later. Furthermore, it will give additional cushion against any sort of roadblock that might occur while using an open-source platform for tests. Let’s have a look at some of the benefits of having a built-in Appium support on a mobile device cloud:
At pCloudy, we are dedicated towards helping enterprise mobility teams make the process of mobile development, testing and device sharing seamless and faster by integrating it with cutting edge tools like Appium. Read this blog to get a comprehensive analysis sheet to quickly choose which open-source test automation tool will be right for your automation testing.
Sign up on pCloudy and automate your tests using best open source automation tool for faster and better delivery of apps.
Flutter has been creating waves in the app development space since its launch. The reason is simple, it solves the problem of creating two different codebases for a single app to run on Android and iOS devices. Some experts say that Flutter which was launched by Google is to counter React Native which is used by Facebook. Nevertheless, this is a much-needed relief for enterprises as Flutter will help them save a lot of their time and resources. So let’s first understand what is Flutter.
What is Flutter
Flutter is an opensource mobile UI framework that can create Android and iOS apps from a single codebase. The Flutter framework includes the Flutter engine, Dart platform, the Foundation library, and design-specific widgets. Flutter apps are written in Dart programming language and runs on dart virtual machine.
How to Create a Flutter App
Before we start the process of app development it is important to know that there are two types of widgets, stateless and stateful. A stateless widget describes part of the UI by building a structure of other widgets that describe the UI more definitive. Stateful widgets are the widgets that can change their state multiple times and can be redrawn on to the screen any number of times while the app is in action.
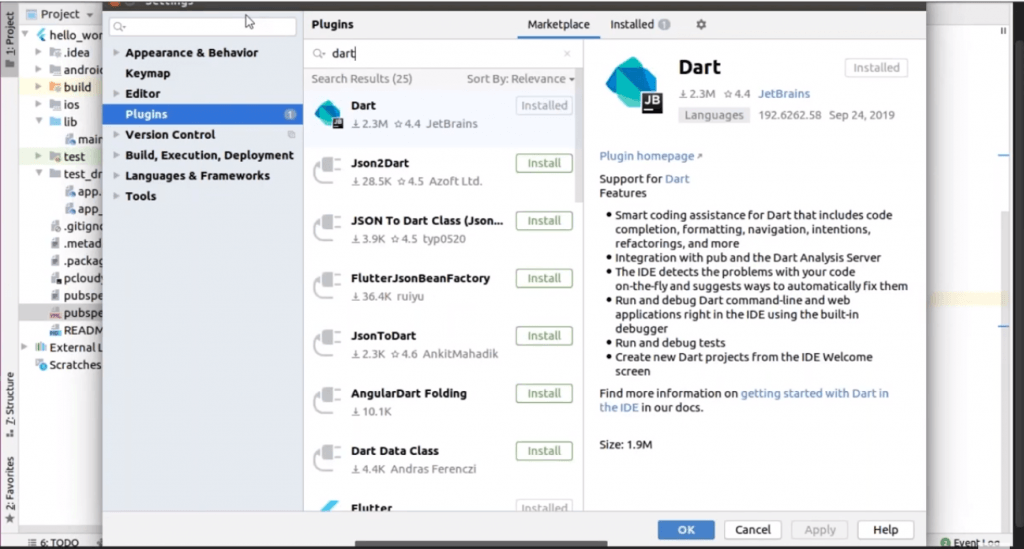
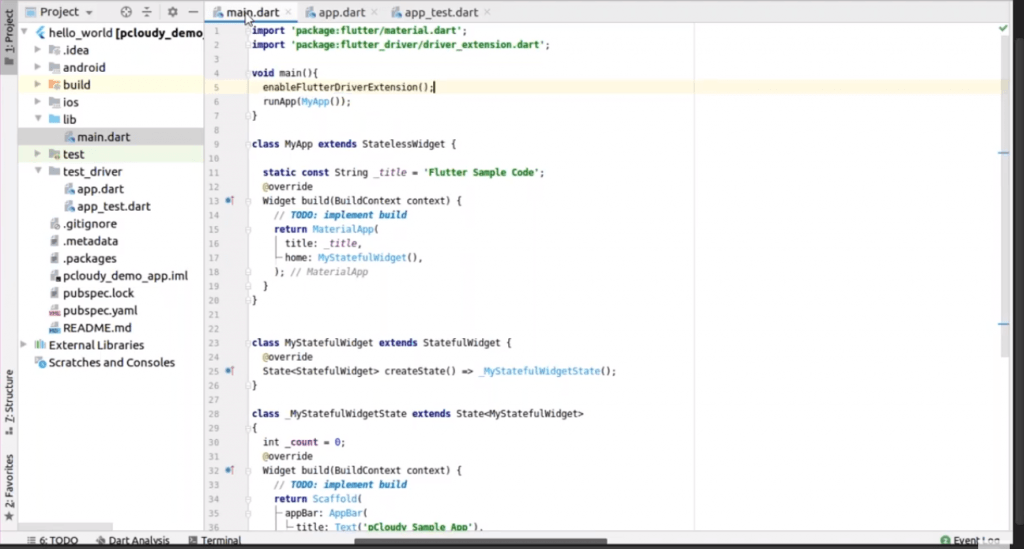
To create a Flutter app you need to install Flutter SDK and other tools required to support the framework. We will create the app in Intelli J IDE and for that, you need to install two plugins. The first one is Dart and the second plugin is Flutter. You can install the plugins by clicking on File in the menu bar of the IDE and then click on Settings.
Then you need to create a new project and you will get a basic code layout to start with your app development. In the first line, we have the main method where we will enable the flutter driver extension and there is a run app method with MyApp class instance, to run the app.
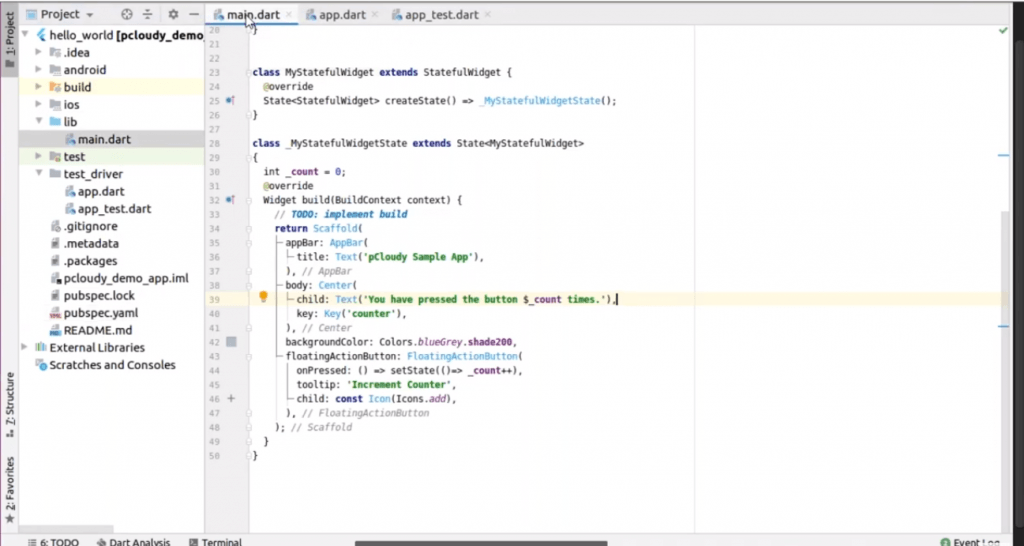
In this sample code, we have used the title as the stateless widget and we have set the title as the key and for the home screen, we are using one more instance which is MyStatefulWidget(). So in this class, we have a small piece of code, where we have set values for elements like appBar, background color, and in the body, we have placed a floating action button for a counter.
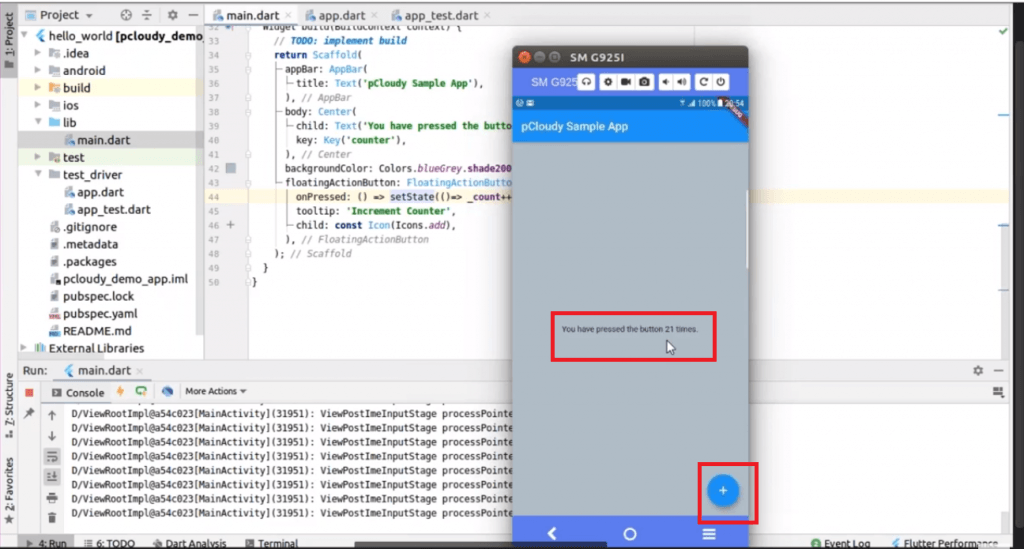
After adding the code you can run the program and you will be able to see the changed state of the counter with every click on the action button.
Appium Flutter Driver
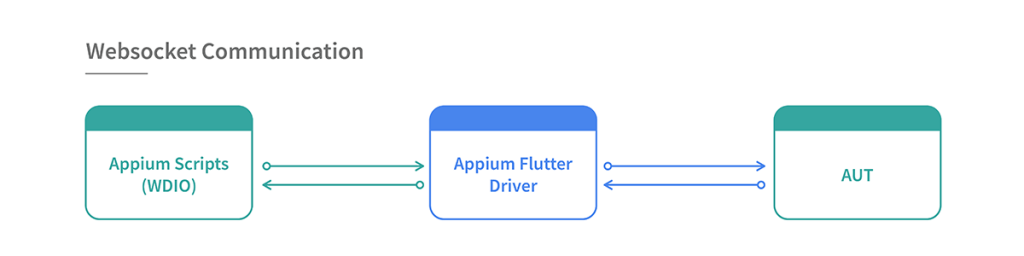
Appium Flutter driver is a test automation tool for flutter apps on multiple platforms. It is a part of the Appium mobile test automation tool. But how does the Appium Flutter driver work? It uses webSocket communication to carry WDIO script to instantiate the flutter driver and the request will be sent to the particular application. Then the AUT will send the response to the script through the Appium Flutter driver. Appium Flutter driver
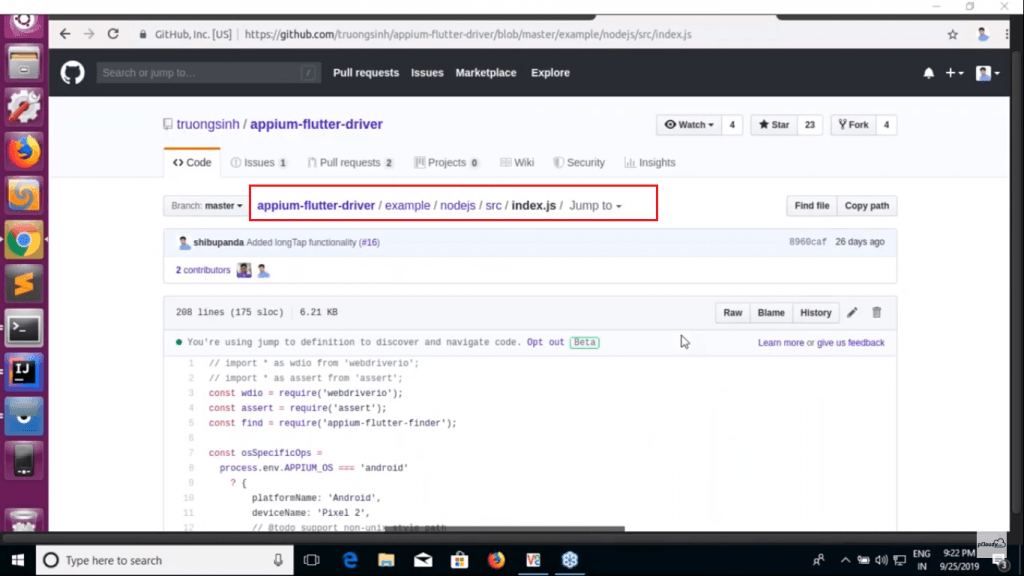
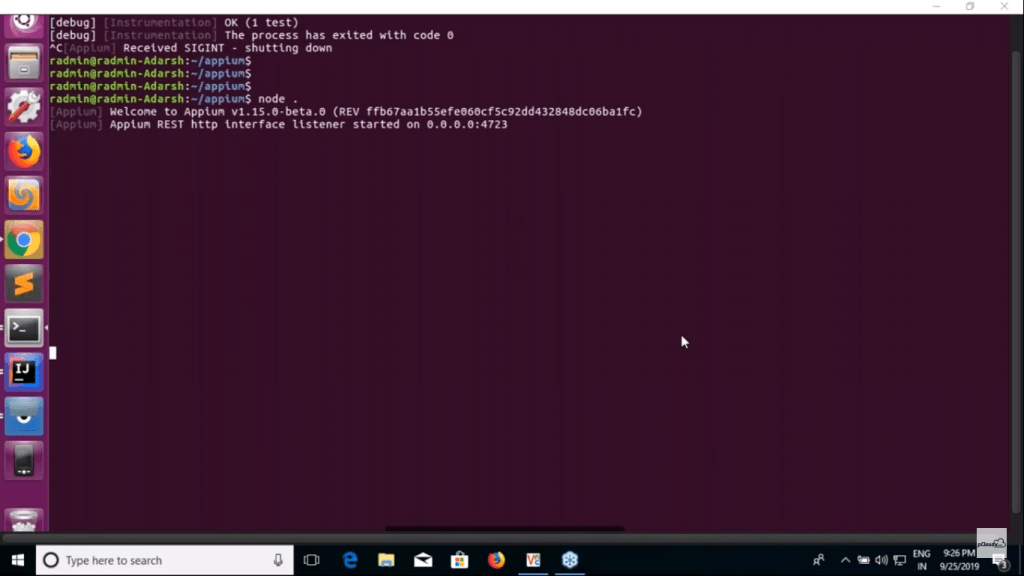
You can also build Appium in your machine through the source code. Once you have cloned the source code, run npm install then npm run built and type a command node to start the Appium server. You can download the package from GitHub. The package contains Appium Flutter Driver and Appium Flutter Finder. You can clone the sample project to get the WDIO code.
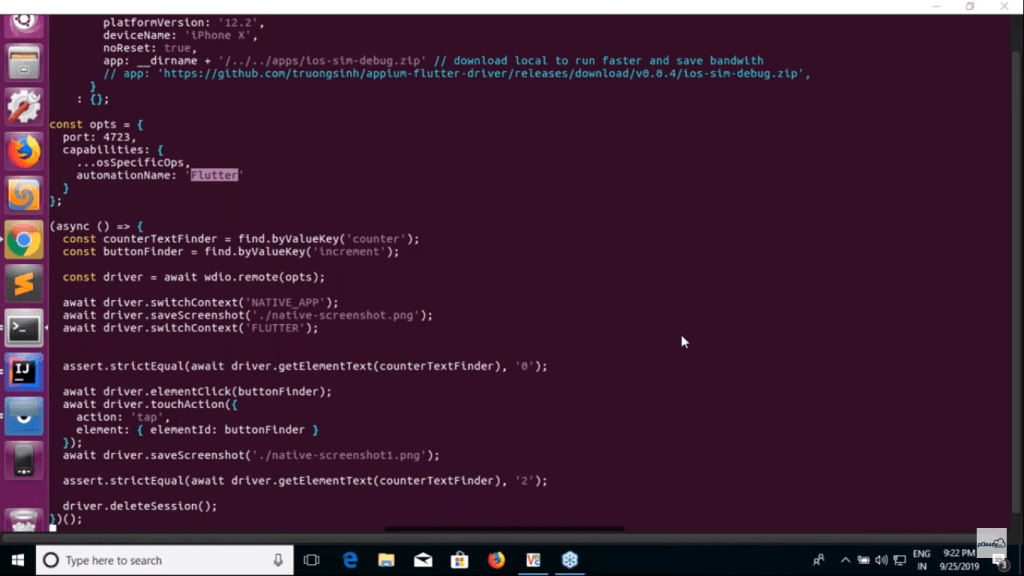
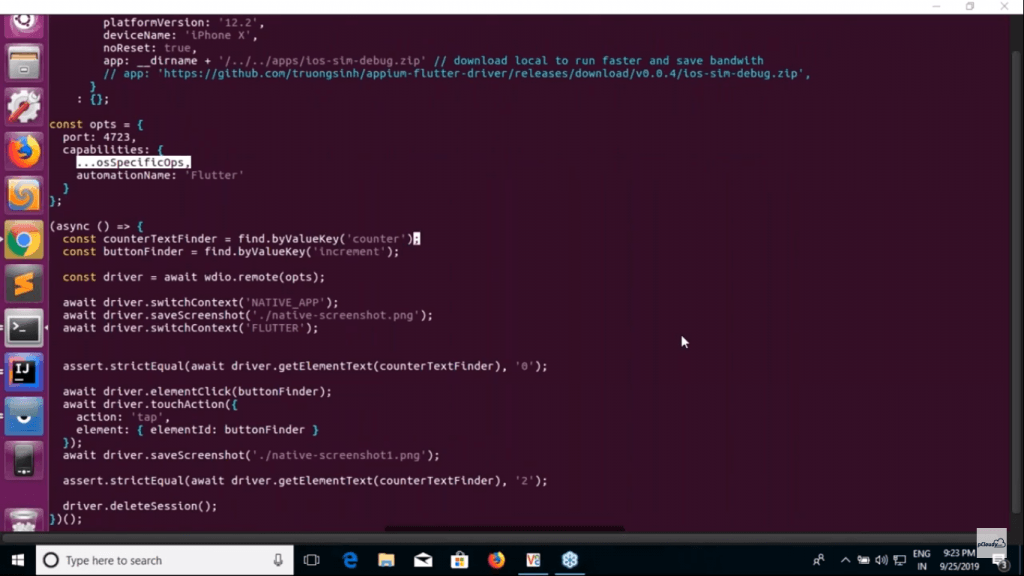
In the terminal, you can see that to automate flutter application we have used Flutter as an automation name for both Android and iOS apps. You can see that port is 4723 and in the capabilities, we have mentioned osSpecificOps, automation name: ‘Flutter’. We have mentioned the app path at the top with the device name and platform name and we created an object.
Appium==OS environment is ‘android’ which will pick all the information and specify in the capabilities and it will pass a post request to the server.
Now here we are trying to find the element using CounterTestFinder and a ButtonFinder to click on the button. In the next line, we have created a driver using a remote method.
Then we have switched the Native App context to Flutter. You can switch this if you are using the Flutter app. Once the app is launched, we are validating that the counter text finder has value as zero by calling Flutter APIs internally. So here we are using two actions, one is clicking and the other is touch.
The button is to be clicked two times and thus we have used strictEqual function. In the last line of code, we are deleting the session.
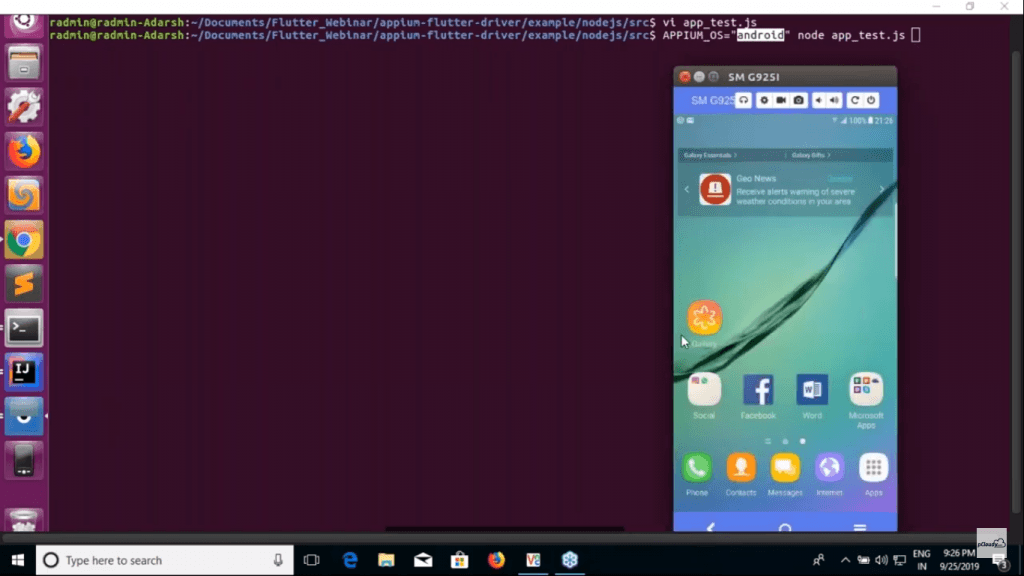
Now to run the test we need to pass the environment variable to connect the device.
Then we will check if our Appium server is running.
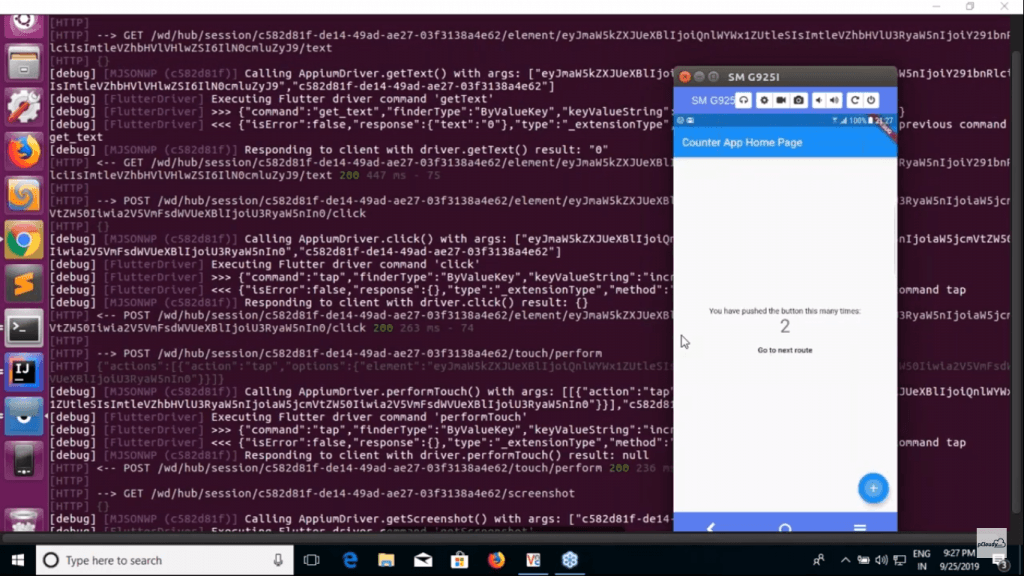
Then once you run the code you will be able to see the actions performed on the device and the counter will change to two.
This is how you can automate your Android and iOS app testing using Appium Flutter driver. Although there are many benefits of using Flutter, there are some limitations as well. The first thing is that you need to learn Dart language to develop and automate the Flutter app.
Suppose you need to run automated tests on multiple devices, then you will have to fire multiple commands in the terminal. Appium flutter driver depends on Flutter Driver APIs and as it’s still not matured enough, some actions cannot be performed.
The efficiency of the software development life cycle is what differentiates a successful app delivery to a faulty one. The industry is emphasizing on the need to increase the productivity of the development process with speedy deployment. This can be achieved with continuous integration and continuous delivery. In agile development, there is a constant need to test the code regularly with continuous integrations of the builds. Jenkins helps in optimizing the CI/CD process. So let’s start with Continuous integration and then we will move on to the role of Jenkins in achieve continuous integration.
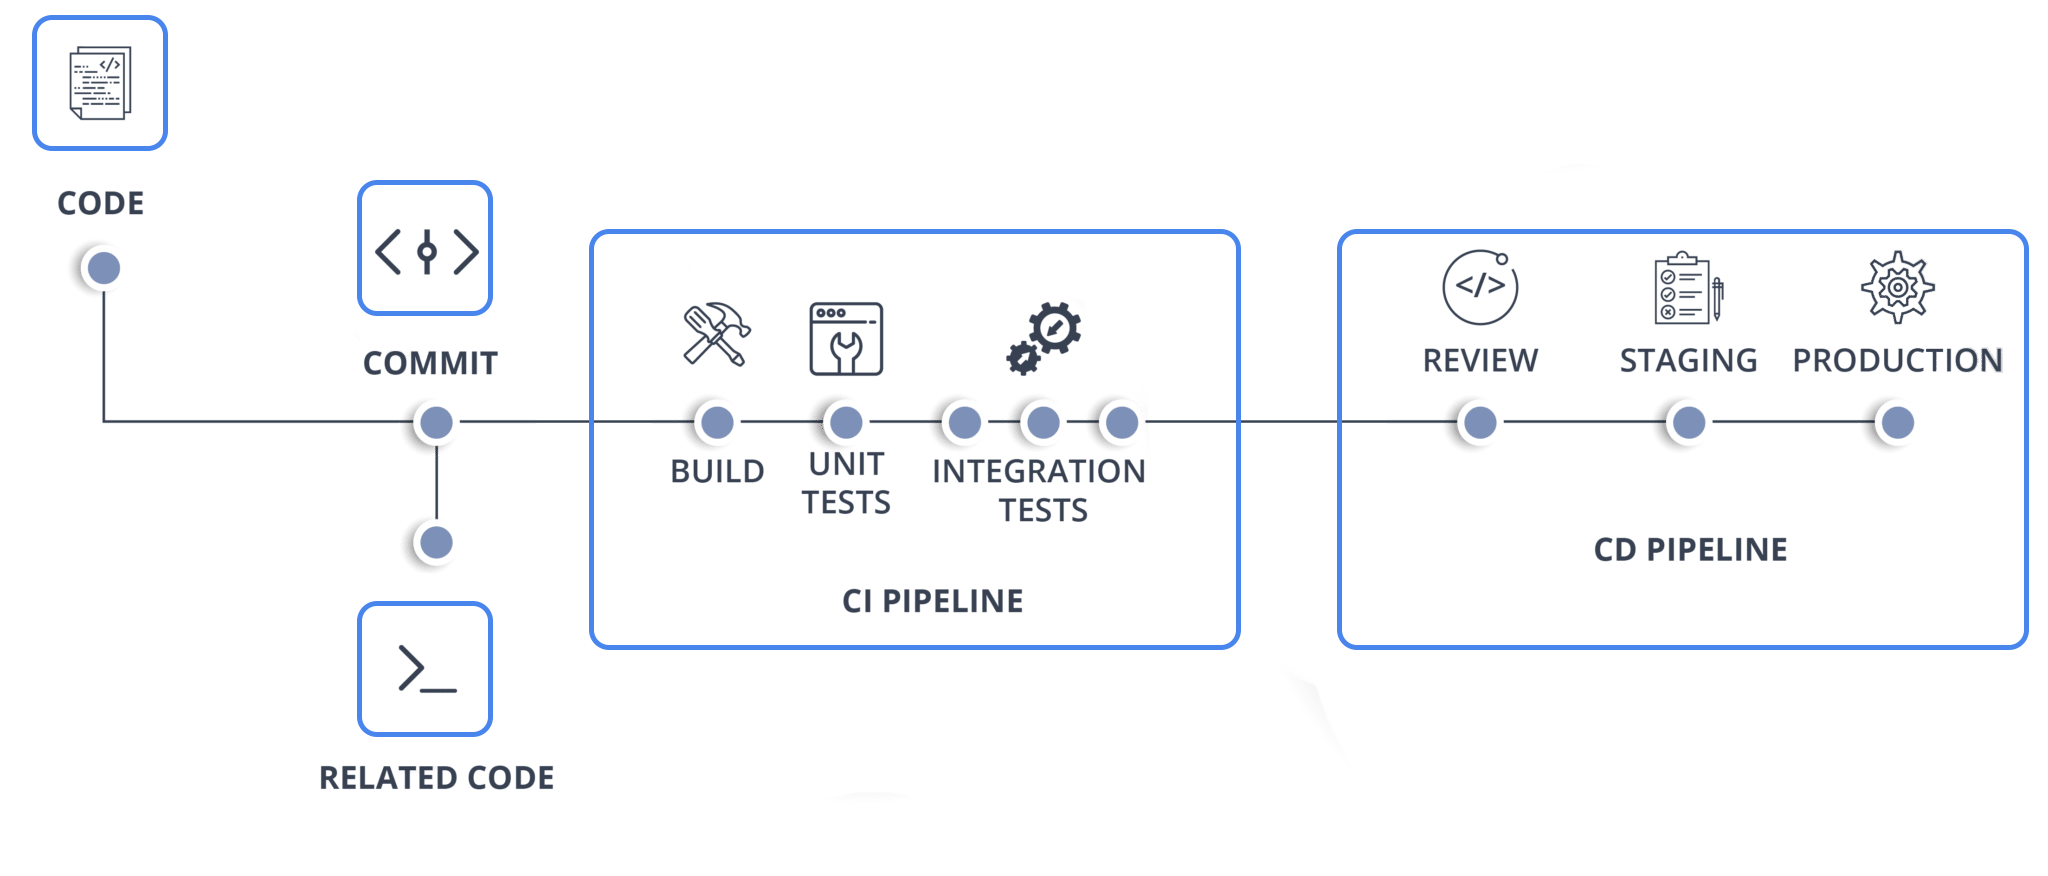
What is Continuous Integration
Continuous integration is a process in which multiple commits are made every day and each commit code is built and tested immediately. Once the test is passed the build is tested for deployment and then it is sent to production. A CI/CD pipeline consists of Continuous Integration server like Jenkins, Source Control tool, Build tool, and an automation testing framework like Selenium, Appium, etc. There are many benefits of continuous integration and according to the project requirement, the development team can choose the best continuous integration tools.
What is Jenkins
Jenkins is an open-source server-based application written in Java used to achieve continuous integration in an automated fashion. It is popular because it makes monitoring the repeated task which arises during the development phase. While working on the project, Jenkins automation will continuously test the builds and recognize the errors in the early stages of the development. Jenkins speed up the software development process by automating the build and test quickly.
Why CI needs Jenkins
When a team of developers works on a project and uses a shared repository, some might take 20 days and others might take 25 days to complete. When the developers were done with their coding, they used to commit at the same time and then the build was tested. This way a single build was done after many days. But with Jenkins, build, and testing of code can be done many times in a day. Once the testing is done then the source will be deployed into the test server. Jenkins will notify the developers if the build fails.
Since the code was built all at once, some developers would have to wait for others to complete which is not efficient. It was difficult to detect and fix bugs for multiple commits. Now with Jenkins, once the developer commits, the code is built immediately and thus it is easy to find the code that causes build failure.
Earlier the code build and test process were done manually and this was the reason for more number of errors. This is rectified by the automated build and testing in Jenkins.
One more issue was that code was deployed when all the bugs were fixed and this made the development cycle slow. Jenkins helps speed up the process as the code is deployed after every build and test.
Advantages and Disadvantages
The best thing about Jenkins is that it is open source and the community takes feedback from the users for enhancement of the project. In every three months, there is a stable release and there are more than 320 plugins are published in its plugins database. It also supports cloud-based architecture and it can be integrated with cloud-based platforms.
Some flaws include its outdated user interface and lack in the overall user experience in some ways. It runs on a server which requires more maintenance and skills to install, configure and monitor the activity. There will be some issues with the setting changes and the continuous integration will break which will need developers attention.
Use of Jenkins to Achieve CI/CD Pipeline with pCloudy
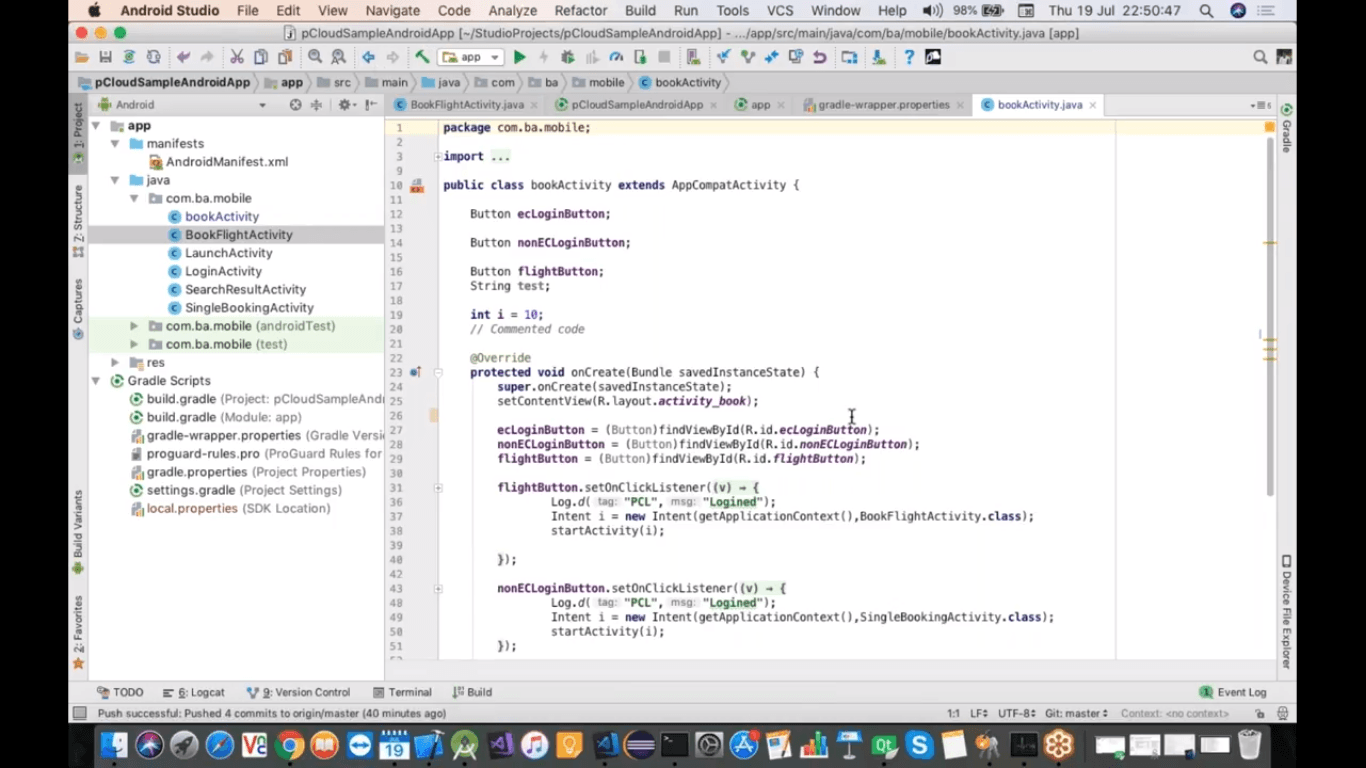
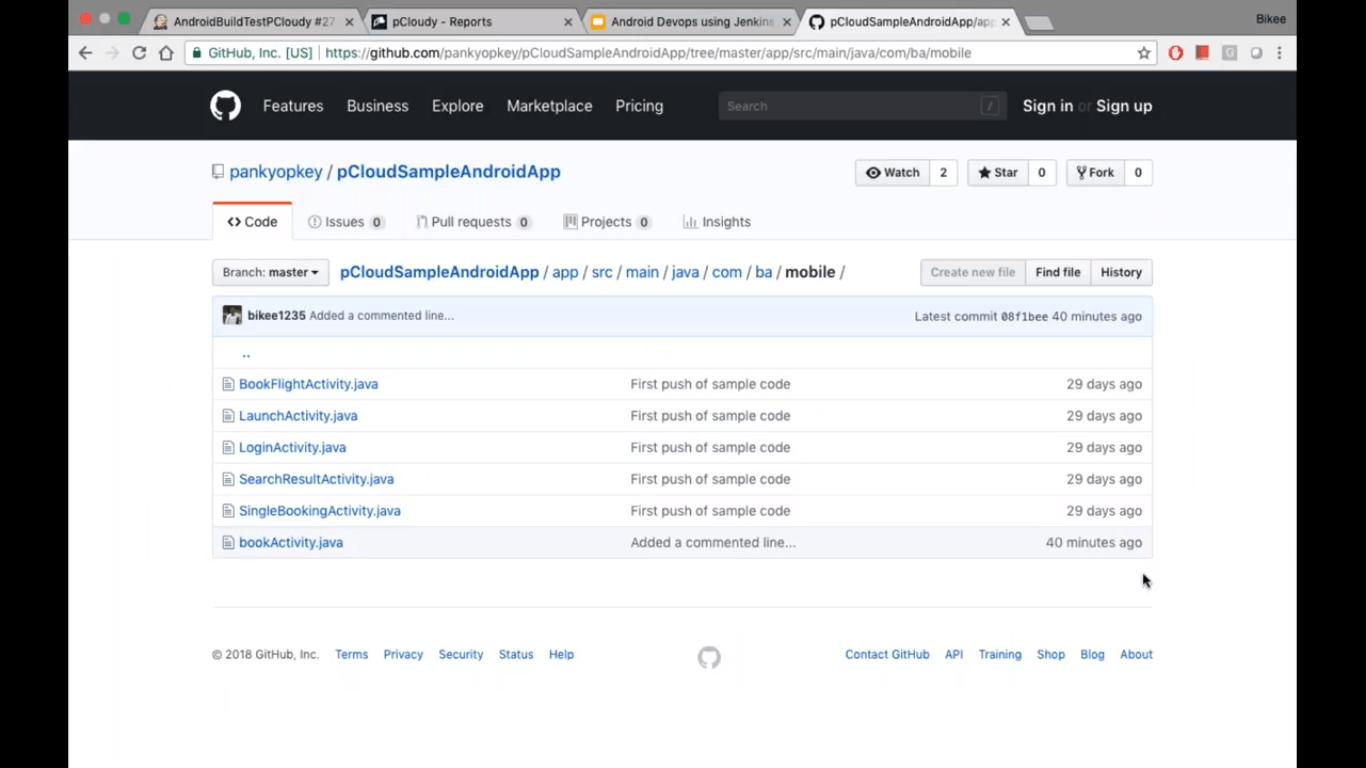
Here we can see a sample app code that will be used in this process.
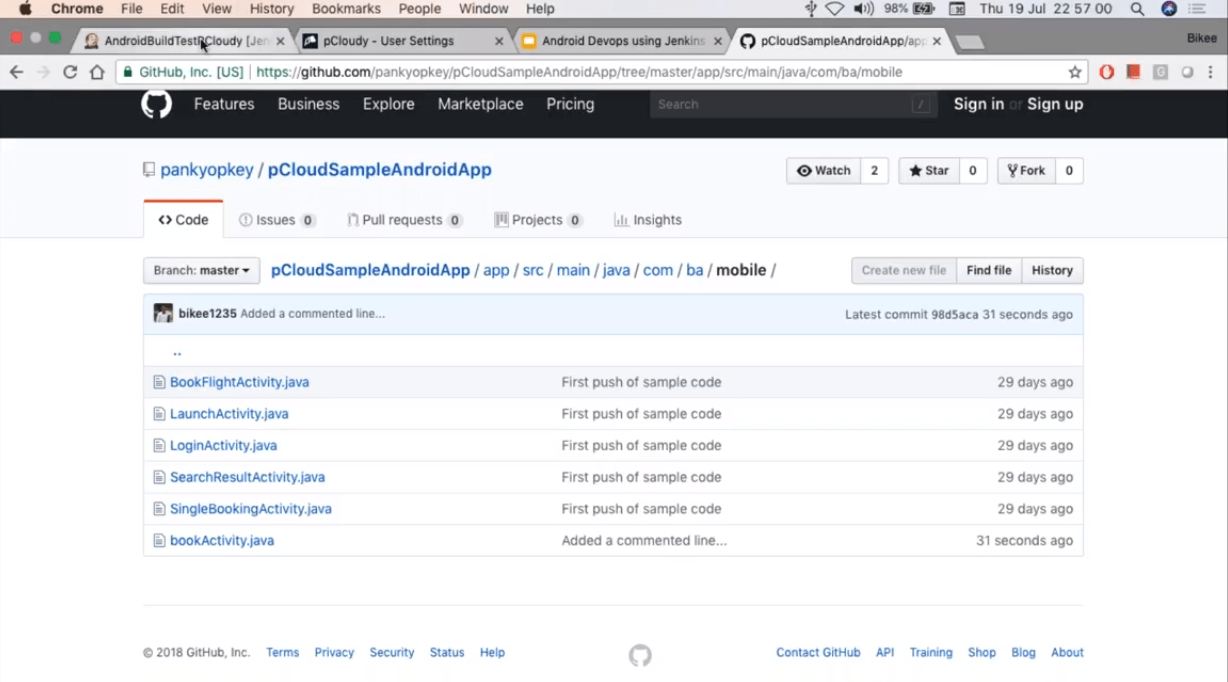
This app is also hosted on Git as shown in the figure.
Go to the configuration page in Jenkins for this project.
We have configured it to pCloudySampleAndroidApp. Jenkins will pick up this project from the location and build it. Then we need to get the Github access and branch to pick the code. The source control mechanism should be polled with a schedule.
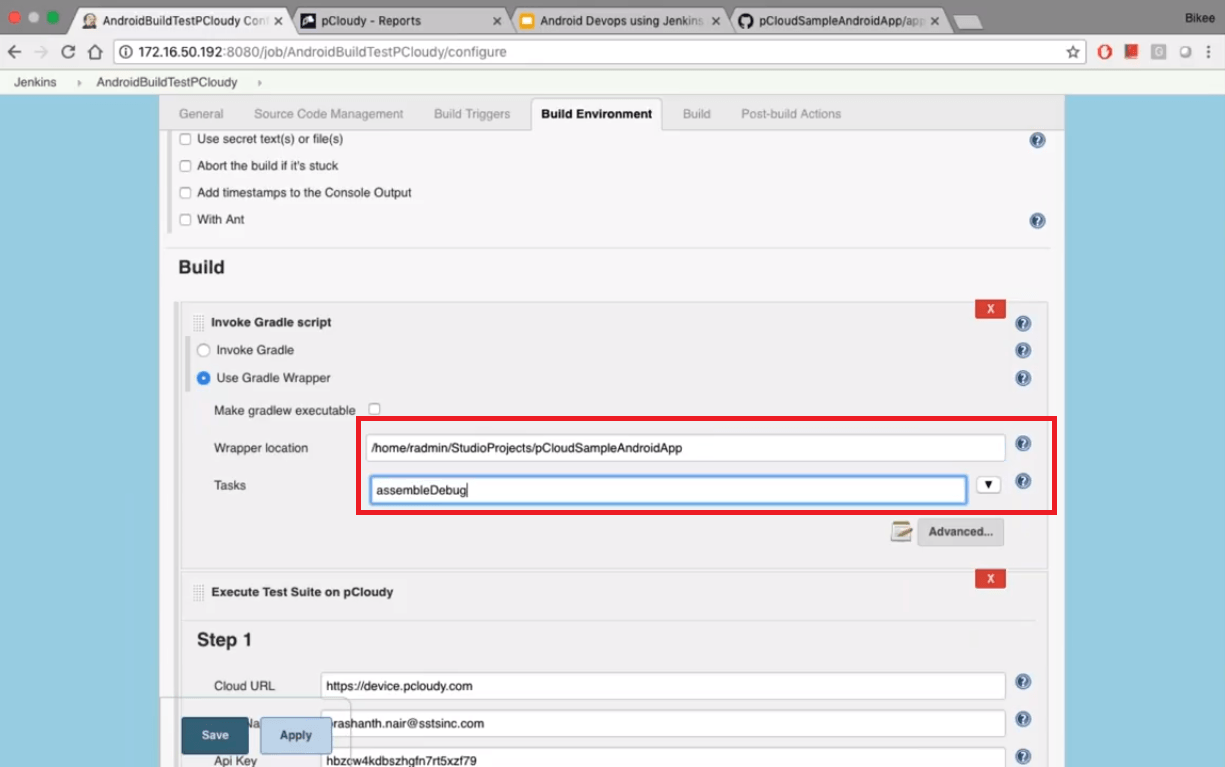
In this build, we will build the android studio project using Gradle wrapper.
Here we can see the location of the Gradle wrapper and the task that needs to be performed by Gradle.
Next step is to integrate Jenkins and the plugin can be taken from the pCloudy website.
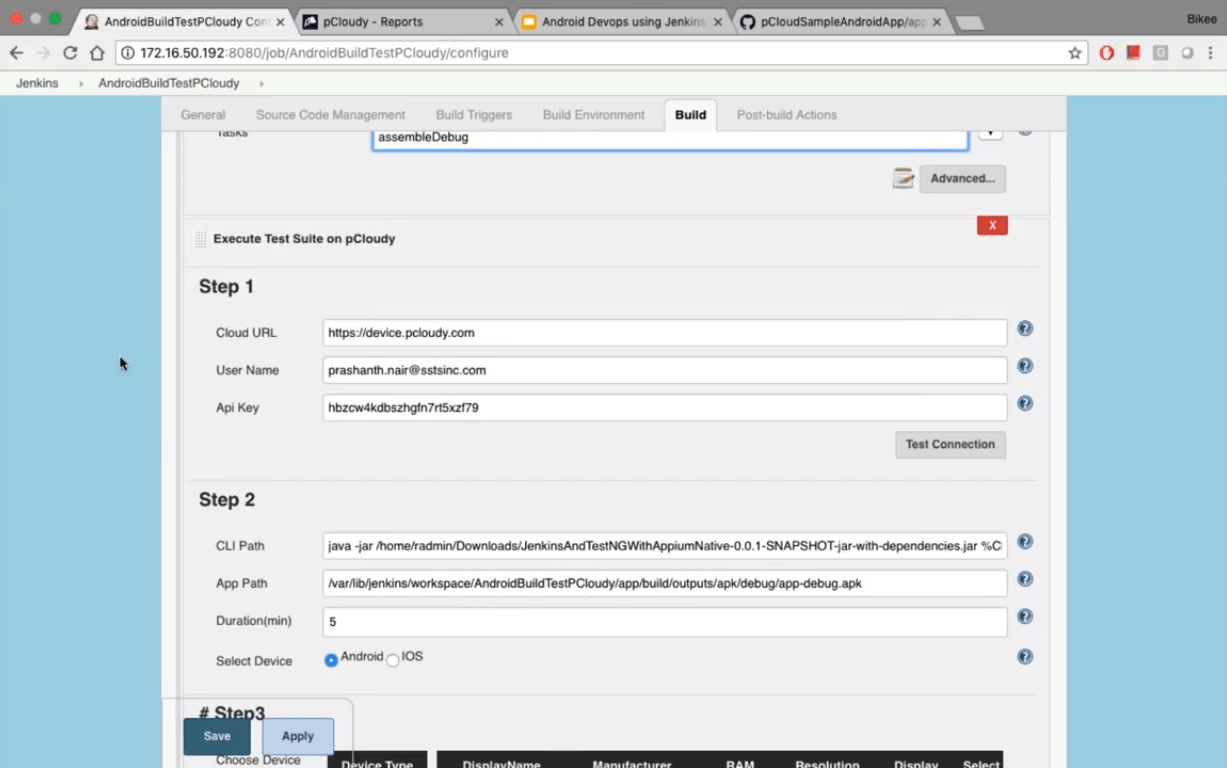
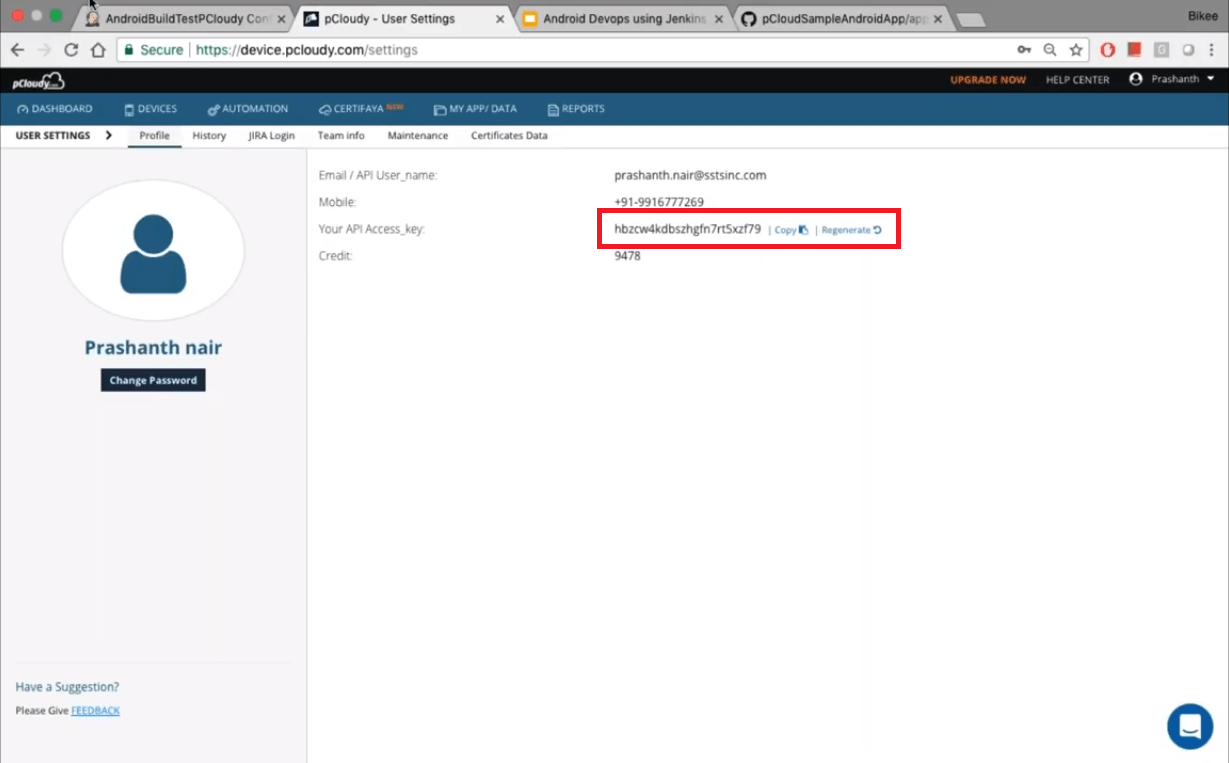
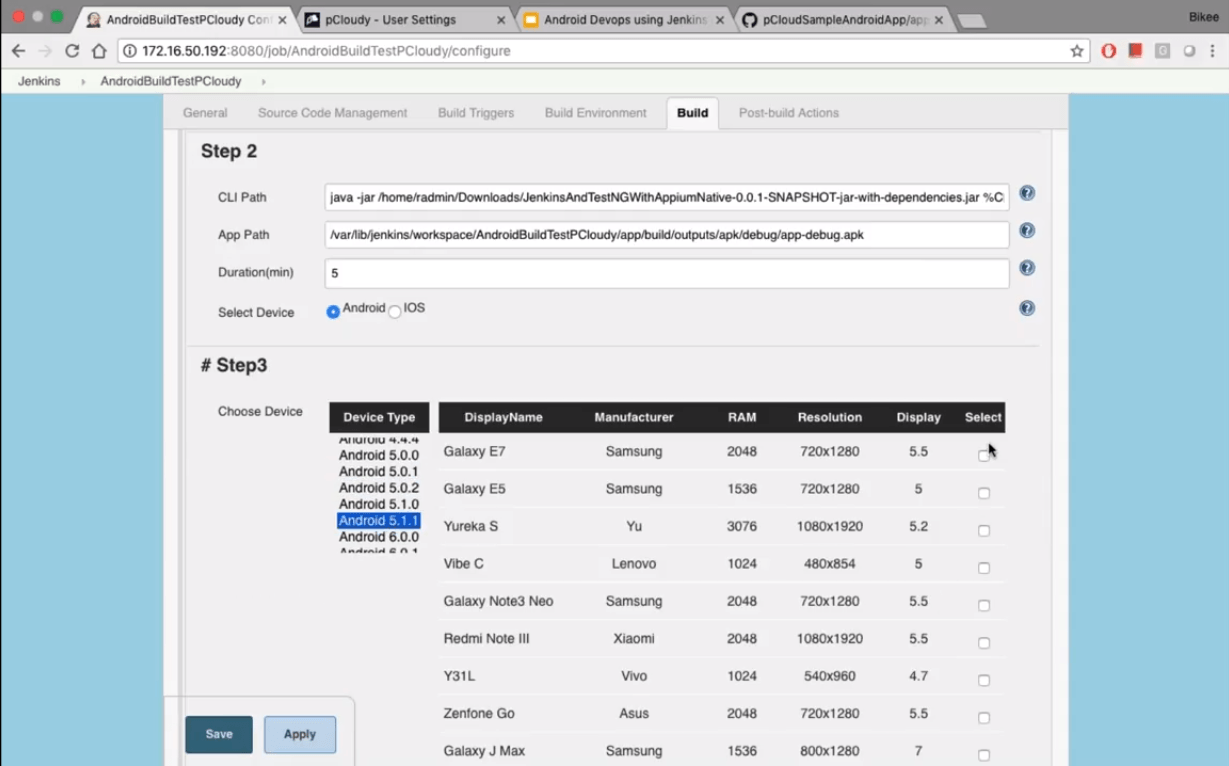
In Step 1, we have mentioned the URL of the device cloud followed by the user name and the API key. You can retrieve your API access key by going to the settings page in pcloudy.
In step 2 we need to provide the command line path where we have mentioned the Appium Jar file which has the test cases. Next, you need to give the path of the app that has been build by Jenkins and then mention the automation duration.
In step 3, we can choose the device on which we want to run the Appium. So you can select the Android version and select the preferred device with desired specifications. We selected two devices for the process.
Now we can go back to the code and check how the entire configuration comes together.
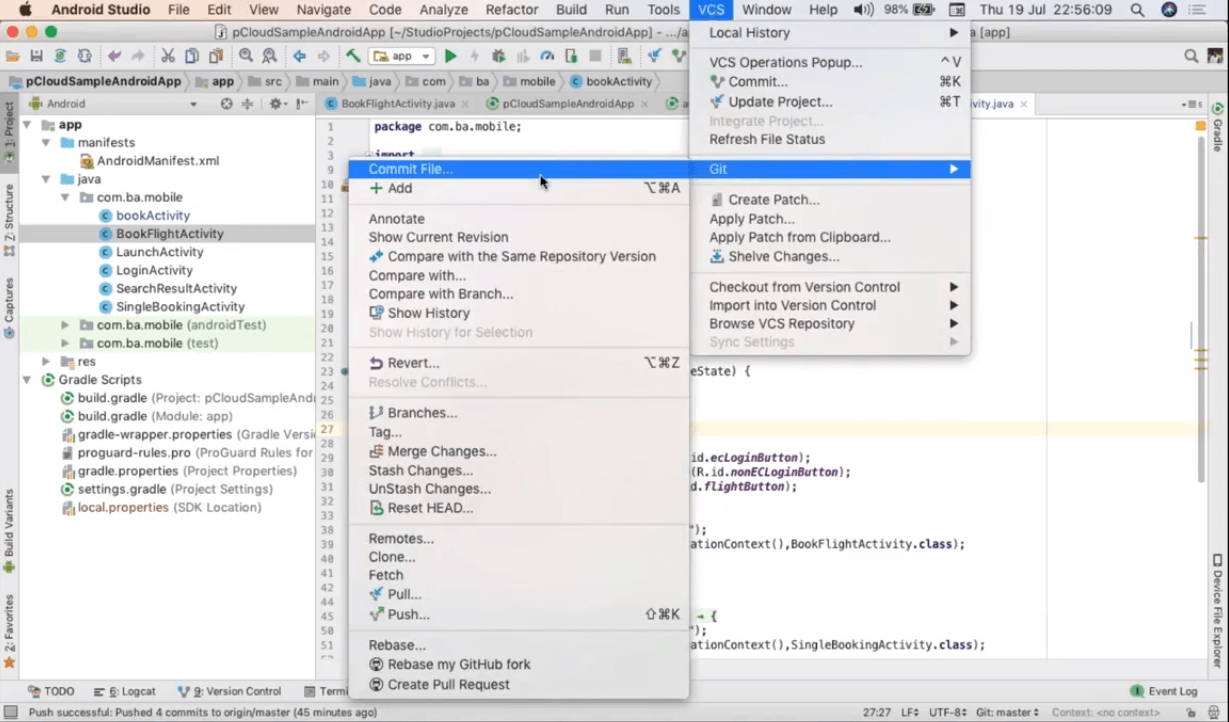
After making the changes in the code, go to the version control system and add a commit.
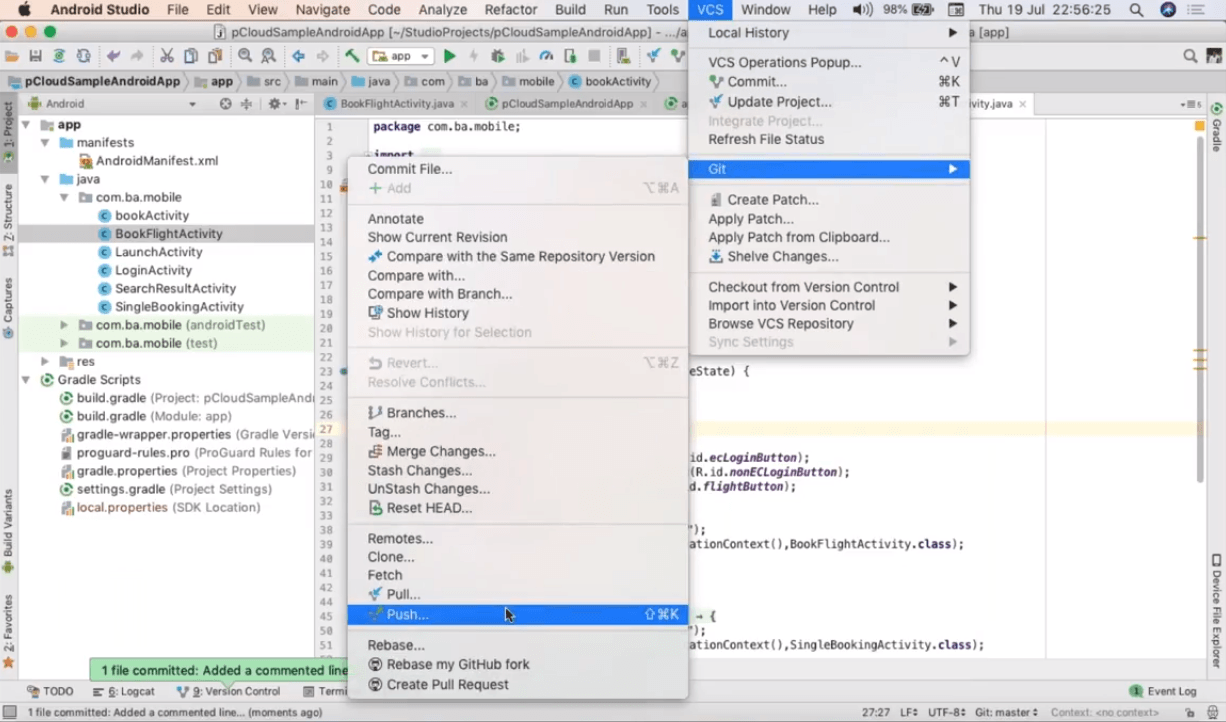
After that push the code. Once the push is successful you can check in the Git if it is showing the code change.
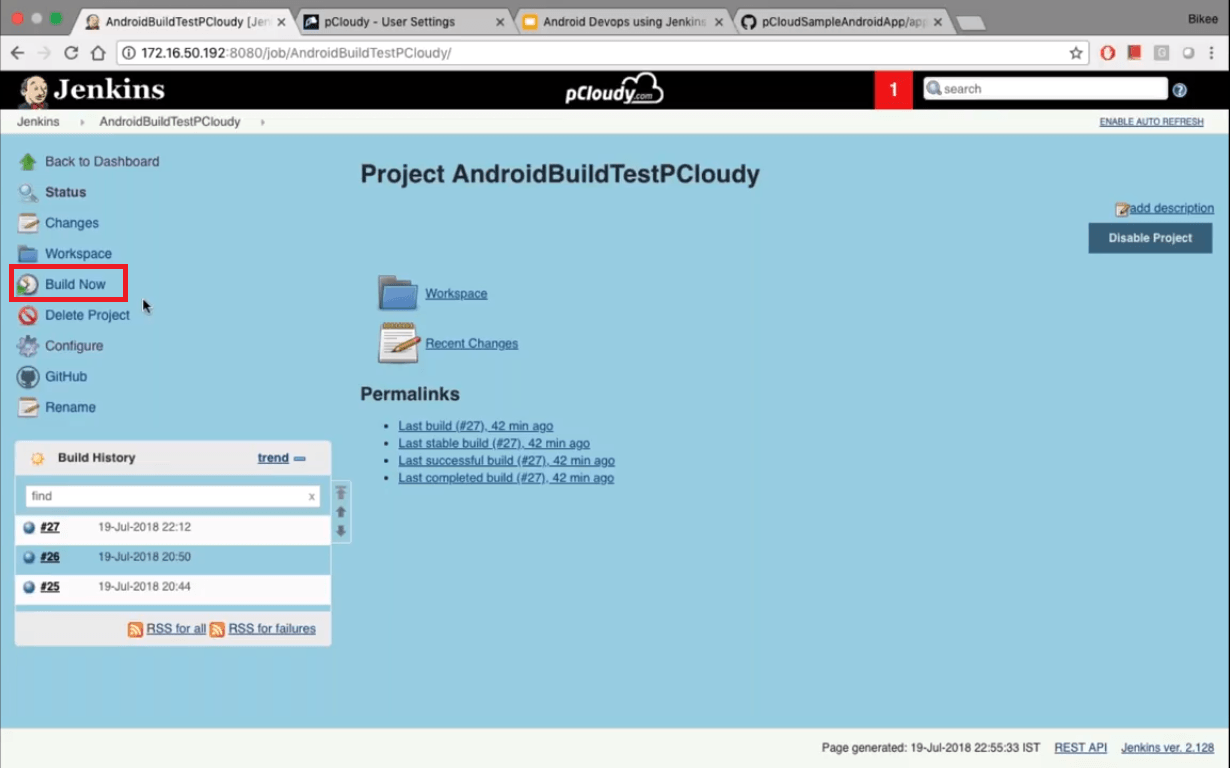
Now again go to Jenkins and click on “Build Now”.
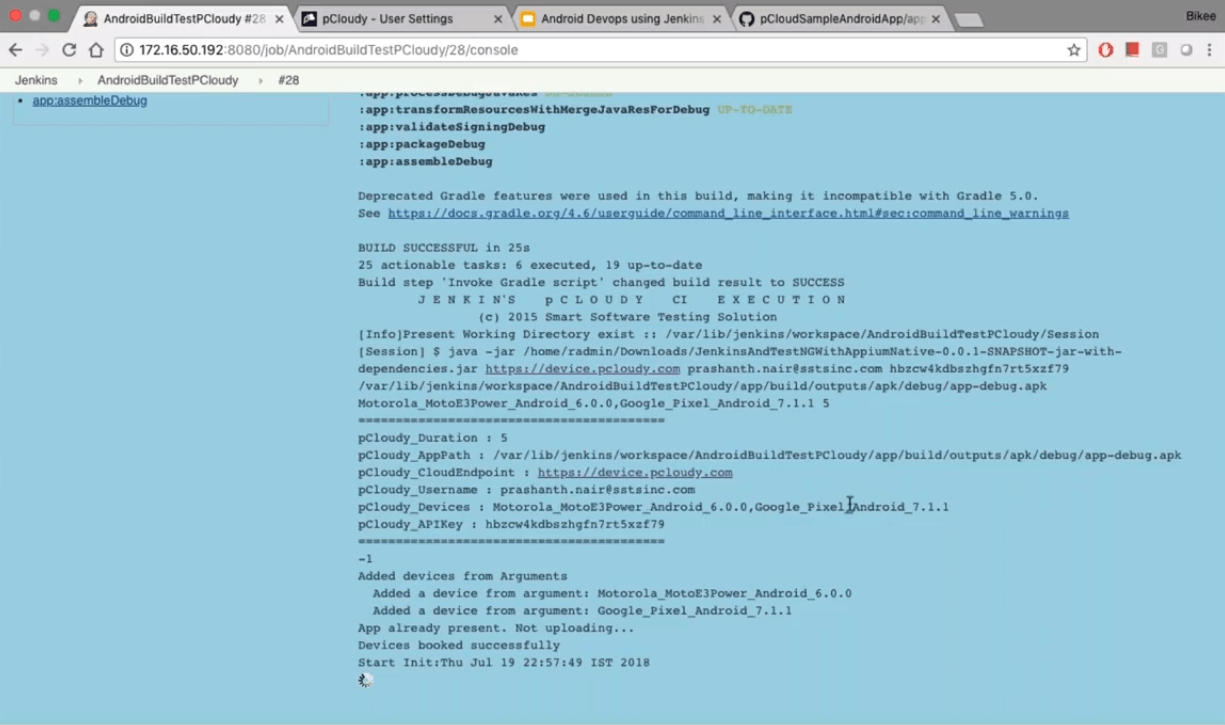
In the next screen, we can see the initiation of Gradle Daemon.
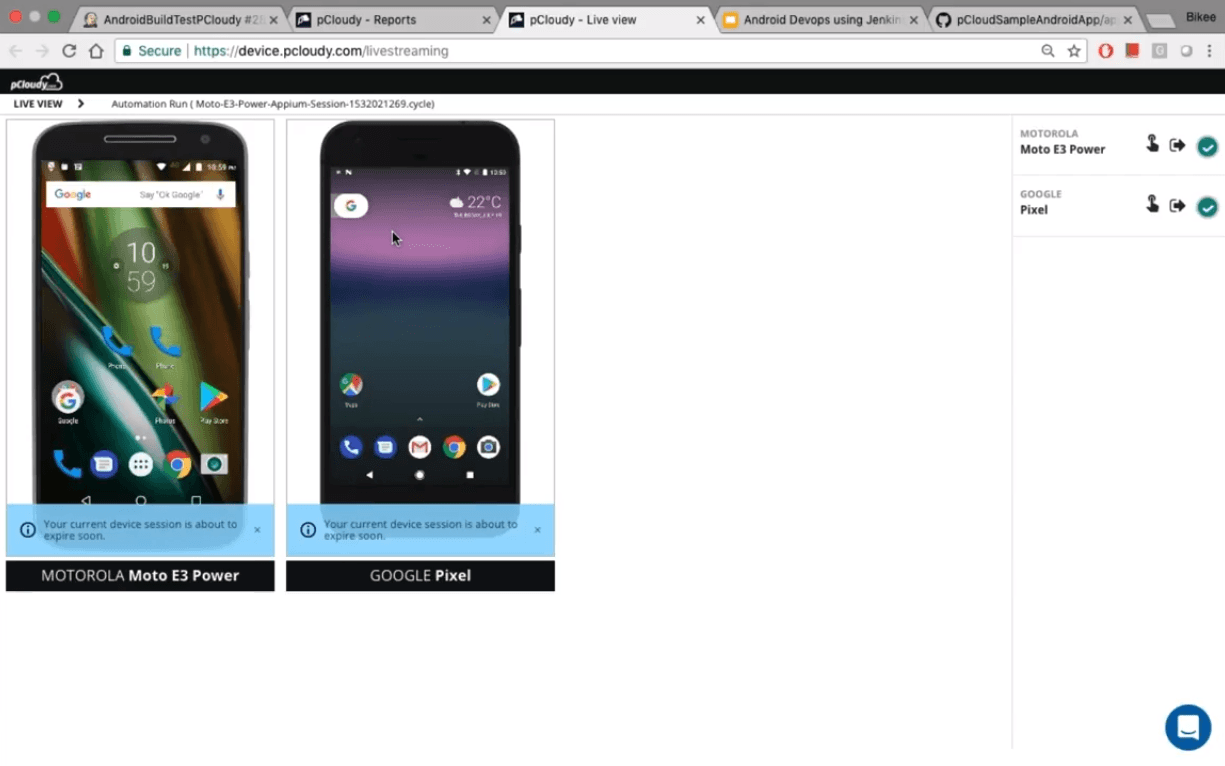
Now go to active sessions in device.pcloudy to see the live view of the activity in the devices.
So this is how you can make changes in the code and push the code into Git from where Jenkins download the code and upload the build into pCloudy. This process takes a few minutes and we were also able to see the test activity live which is an advantage of integrating the Jenkins based build system with pCloudy’s automation.
Conclusion
Jenkins is like the soul of the continuous integration process as it builds and tests the app continuously which makes it easier to integrate changes to the process. Most of the process is automated and this saves time and effort which can be used to perform other tasks related to the delivery. It has some issues like the old UI but the benefits like an active opensource community overshadow the little disadvantages. This is why Jenkins is the most popular CI server among the developers.
QA & testing become indomitable especially in the context of API testing. The development teams benefit from automated integration tests at API levels as it helps them in easy integration of apps and higher product adoption rate, ultimately helping the firm increase their profits. API layer is frequently ignored while developing and executing automated tests and mostly end to end user interface driven tests are executed to check if final application works perfectly after integration. API layer is not to be ignored and for a QA strategy to be successful, it should consider API testing as a fundamental part of the overall testing strategy.
Let us understand what API testing means:
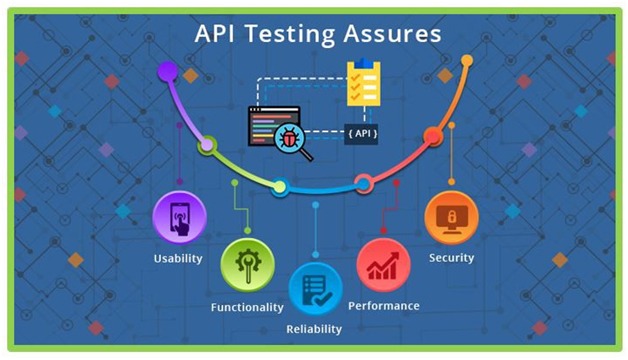
Application Programming Interfaces (APIs) are a set of programs that allow two or more software to communicate with each other and be able to exchange data smoothly. In the testing world, testing APIs is different than other types of testing. UI and functional testing is often given importance while API testing is ignored. The foremost responsibility of a tester is to ensure that API testing is performed in order to attain seamless functioning, performance, and the reliability of different data-driven applications and systems by verifying exchanges and communications between applications, systems, databases, and networks.
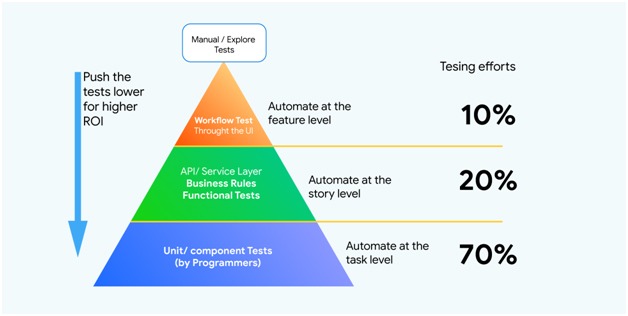
While integration testing has been a component of the test automation pyramid since its inception, it’s also been the most undermined layer in functional test automation. All tests that supercede the scope of an individual unit, and can’t be covered by unit testing are often executed through user interface-driven, end-to-end test scenarios. But while end-to-end tests can be seen as the ultimate integration test, where all components come together, having too many of them leads to test suites that take unnecessarily long to execute, and that are hard to maintain and keep stable. It’s often possible to test important parts of an application’s technical and business logic through an API. To understand the importance of API Testing more in depth, let’s understand the undermentioned benefits of Automated API testing:
Unit tests are often run on small group of components within a single application layer. Issues are often not detected in distributed apps where one application layer ends and the next one begins. In order validate if the components are communicating as desired, API level tests are designed. So, the need of a strong API testing Strategy is of dire importance at the integration level especially when it comes to integrating with external components. Managing the testing environment is a critical task to perform especially when the components are with different teams.
More Stability and Speed as compared to end-to-end tests:
It is true that end-to-end tests are vaster in scope than API testing. They cover all the layers and components of the application but API tests cope up with its loss with its stability and speed. API tests are certainly faster than the former. End-to-end tests take longer time to load browsers and screens whereas API tests are based on individual request-response interactions (for example in JSON or XML format)which makes the execution faster with shorter feedback cycles. Moreover, user interfaces tend to change frequently due to various user change requests and adherence to advanced front end frameworks API tends to be more stable in terms of Interfaces that yields fewer faults and requires less maintenance.
Introducing API Level Testing more seriously- A significant decision in Automation Testing
API level integration testing should be a mandatory aspect of any automated testing agenda. It could be an unnerving move for those with no prior expertise in this area. It is mostly the tester’s cup of tea more than the developer’s as it can go beyond the component or application. The absence of user interface can be a blocker in accessing and testing the API. But you can opt from various automated API testing tools available in the market. Tools like RestAssured, SoapUI, and Postman are preferred among the most.
Conclusion
In the era of Artificial intelligence and IoT, the need for API tests is becoming intense. Automated API Testing strategy is the most effective strategy for faster delivery and reduced human inaccuracies. With the help of the tools, more API test requirements could be covered and API testing could be made more advantageous for secured and quality deployment of mobile applications in shorter time. Why don’t you integrate your automation framework using pCloudy’s API and make your app release faster?
At each step of our journey, we aim to make your app testing robust and simpler. That’s why your feedback and requests are so important for us. We tried to incorporate them into a release structure again that makes pCloudy work better and faster for you.
So here, we bring to you the fresh set of release updates that have been addressed and deployed in pCloudy 5.1.
Simpler Appium Integration Architecture: Here comes the bonanza for our Appium users! We have released a newer and simpler Appium integration architecture to simplify your Appium test execution on Android and iOS devices with pCloudy. The newer architecture make developers’ life simpler with lesser changes in the code. The older architecture demanded using APIs and also changes in your code that required some level of expertise. We addressed this issue and have come up with a simpler architecture where you need to mention some desired capabilities instead of calling APIs or doing changes in the code to run the Appium scripts. And wonder what! it just takes few minutes to integrate your existing Appium scripts with pcloudy. Check yourself here.
pCloudy Appium Capabilities
DesiredCapabilities capabilities = new DesiredCapabilities();
capabilities.setCapability(“pCloudy_Username”, “Enter your email Id”);
capabilities.setCapability(“pCloudy_ApiKey”, “Enter your API Key”);
driver = new AndroidDriver(new URL(“https://device.pcloudy.com/appiumcloud/wd/hub”), capabilities);
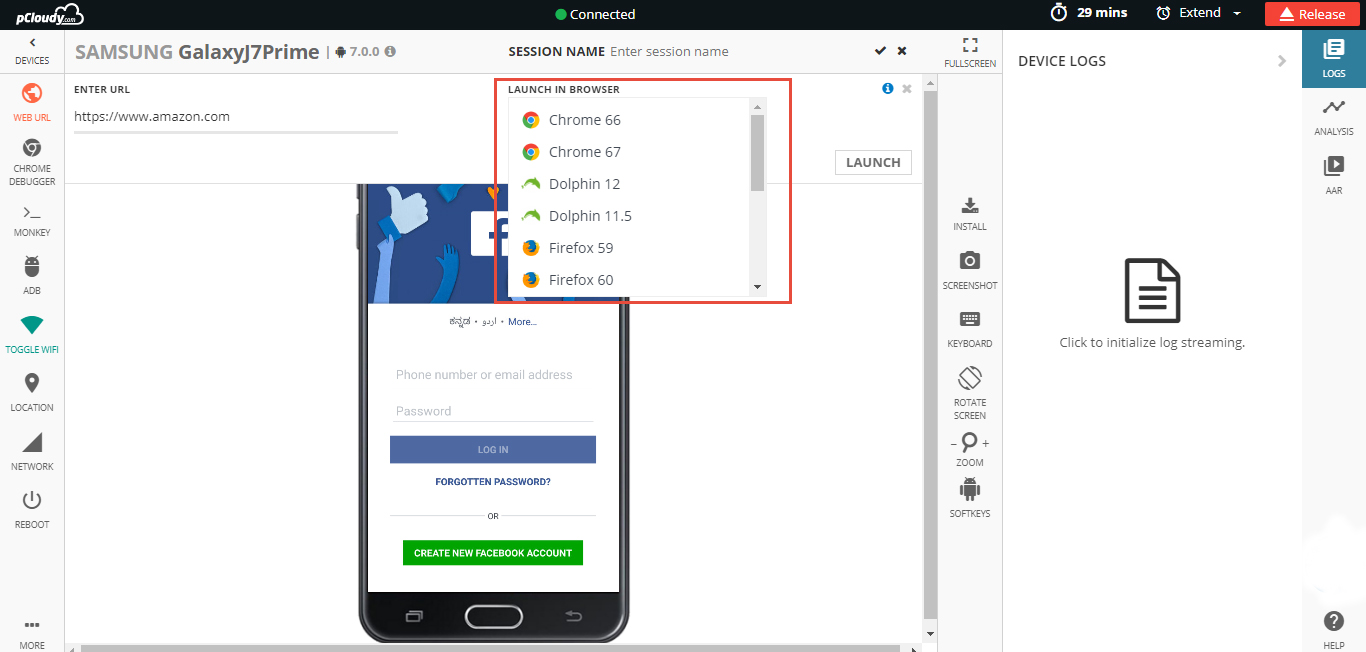
Cross-browser testing made simpler: There are many widely used web browsers, but not all browsers, and versions of those browsers, work the same. A website may not look or function identically on each one, which can lead to lost revenue for an enterprise. We addressed the issue of choosing from the fixed set of browsers previously available.
Heeding to the growing demands of our users, we have introduced the Launch and Upload browser feature for our Android users which will give him the freedom to choose the version of the browser that he wants to use. This is going to save their testing time and efforts to a great extent and also give better results for their cross browser test. To know more about it Click Here.
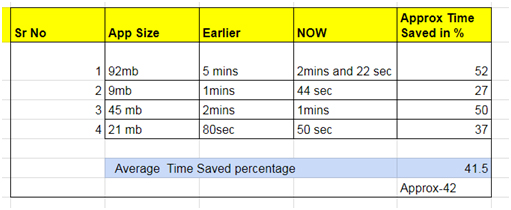
Faster Upload of Apps: We received multiple requests to speed up the process of Upload and synchronization of App/Data into the cloud. With some changes in the process, we have now succeeded to reduce the app upload and synchronization time by 42%.
As you know, during app synchronization, the platform automatically synchronizes your data with all the 4 data centers of pCloudy. Earlier, the process was done in a series where synchronization once completed in one data center will then start in the 2nd one and so on which took a few minutes to complete. We have now changed this to a parallel process, which makes your testing 2x faster.
App upload time saved in pCloudy 5.1
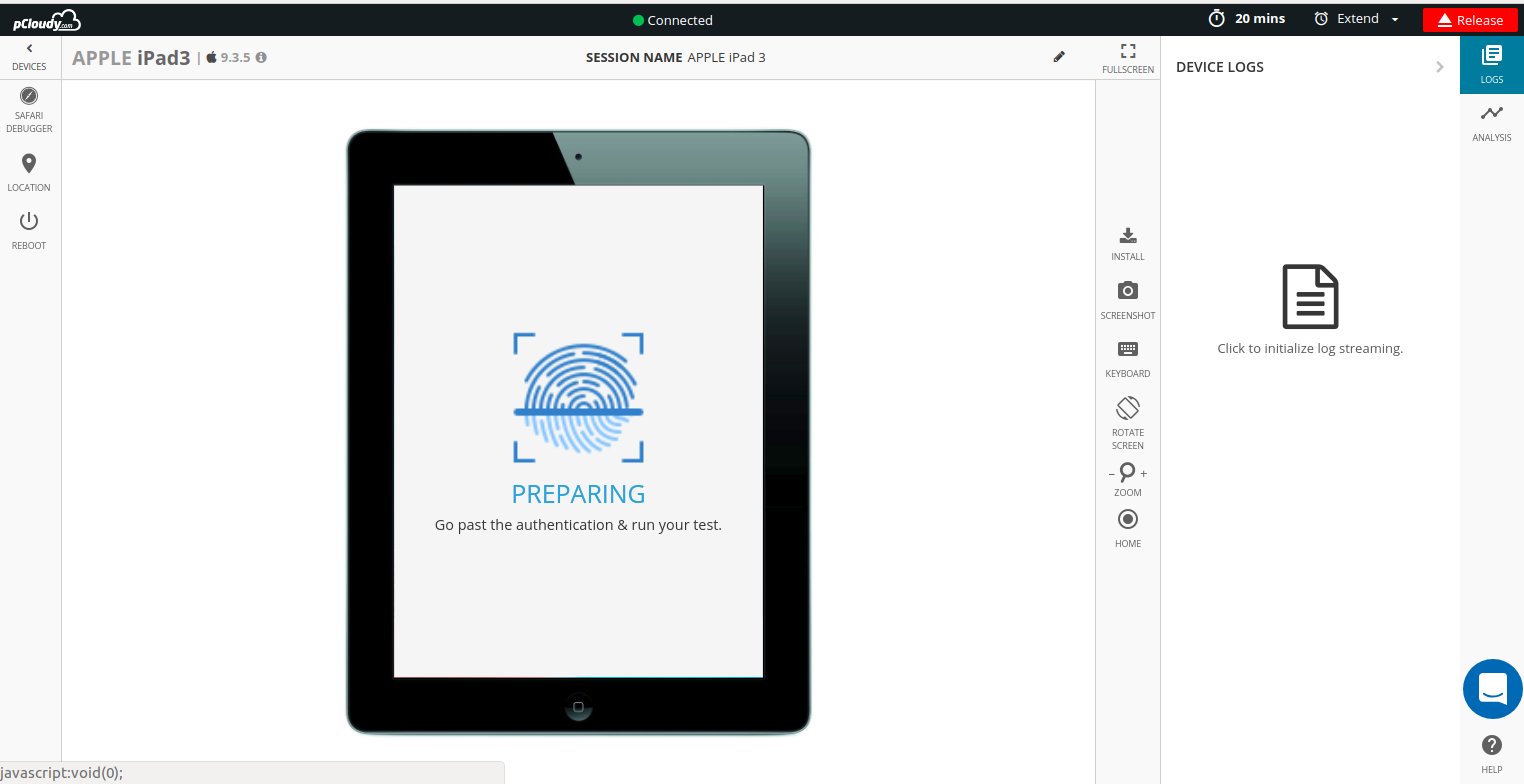
TouchID for iOS devices no more a blocker: Apple introduced the ability to perform authentication via TouchID to enable secure and effortless access to the device. But it turns out to be a hindrance for mobility teams while testing their iOS apps on devices over cloud. To ease out the process of authenticating TouchID manually every time, you can now bypass the TouchID verification in your apps using our utility. The bypass TouchID feature will be available for iOS devices version 10.0.0 or above. To know more about it Click Here.
Note: This feature will for now be available only for iOS and won’t support Face ID.
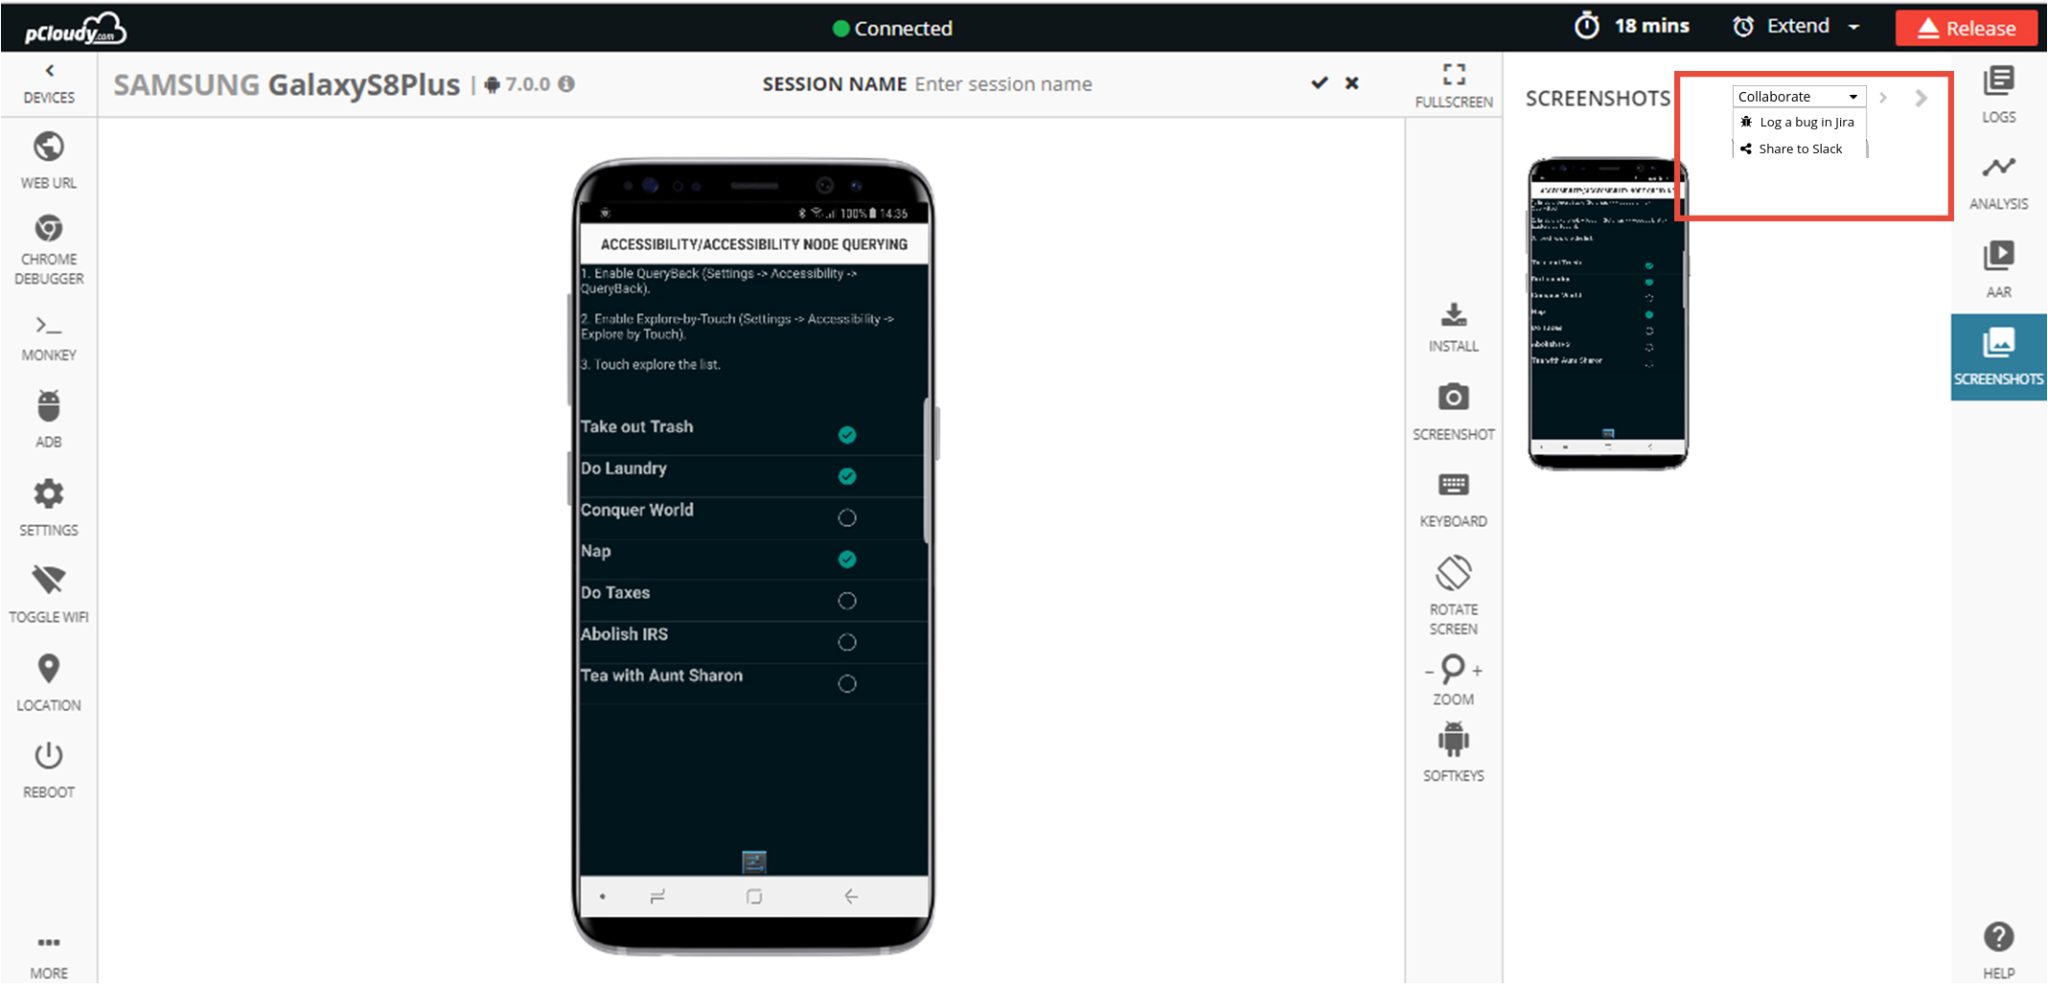
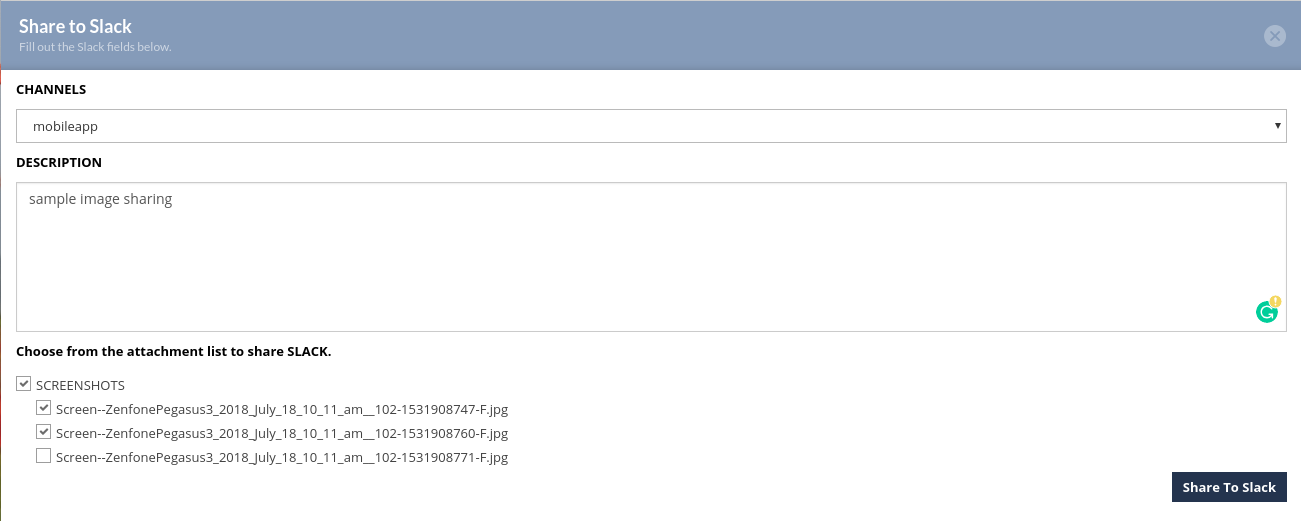
Integration with Slack: Since many of our customers are moving towards Slack, there was a huge demand to integrate Slack with pCloudy to enable their broadly distributed teams collaborate well. We noticed this change and hence we integrated Slack with pCloudy. It will now be easier for you to share bug related data and artifacts like Logs, screenshots etc through our Slack integration. To know more about it Click Here.
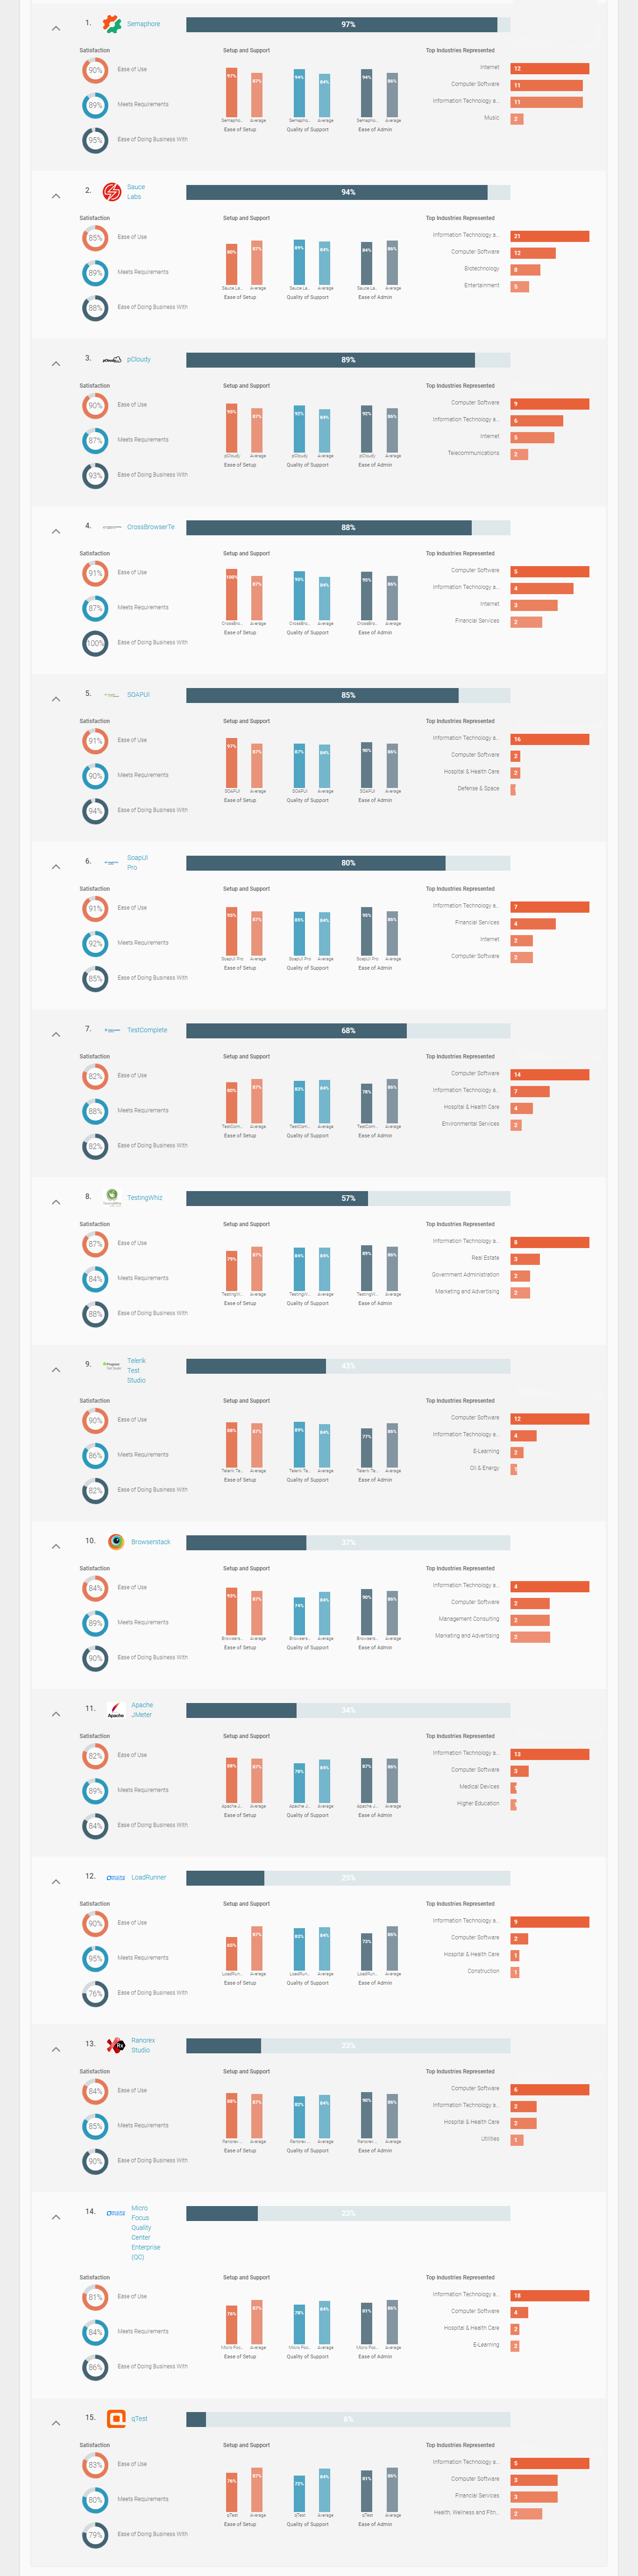
We are proud to announce that pCloudy has been ranked among the top 3 Test Automation Software products based on the user satisfaction. With this, we have got another feather added in our cap after achieving the 50k milestone. It has become possible only because of your constant trust and support that motivates us to keep growing stronger.
Check out this list of the top Test Automation Software products based on user satisfaction. As per G2Crowd, the product’s satisfaction score is calculated by a proprietary algorithm that factors in real-user satisfaction ratings from review data. Check yourself.