Application Performance Monitoring (APM) involves employing various strategies and tools to ensure the efficient operation of business applications. These apps need to meet the performance, reliability, and user experience requirements set by stakeholders, such as employees, clients, and partners.
Mobile Application Performance Monitoring is a part of the broader term Application Performance Management, which encompasses all aspects of managing an application’s performance, while APM focuses on monitoring an application’s performance. In simple terms, monitoring is an integral part of management.
What is the purpose of APM?
The main goal of Application Performance Monitoring (APM) is to maintain an application’s optimal performance and smooth operation. It enables linking application performance to business results, detecting and correcting mistakes before they impact end-users, and minimizing mean time to repair, aiding organizations in maintaining business continuity and enhancing customer satisfaction
Why is APM crucial?
Application Performance Monitoring (APM) is important because of all the advantages it offers to a business in terms of operational effectiveness, brand recognition, and long-term cost savings.
By enabling front-end monitoring, managing the user experience, back-end monitoring of the services and dependencies used by the app, and infrastructure monitoring, APM offers improved collaboration and coordination in the application delivery process. This promotes seamless and transparent application delivery and the elimination of silos.
APM safeguards the organization’s reputation and brand image by ensuring applications are reliable and accessible. Poor application performance can lead to user dissatisfaction, lower application utilization, slower adoption, and decreased revenue. APM is essential to maintaining a good reputation and ensuring application success.
App Performance while conducting Manual Tests
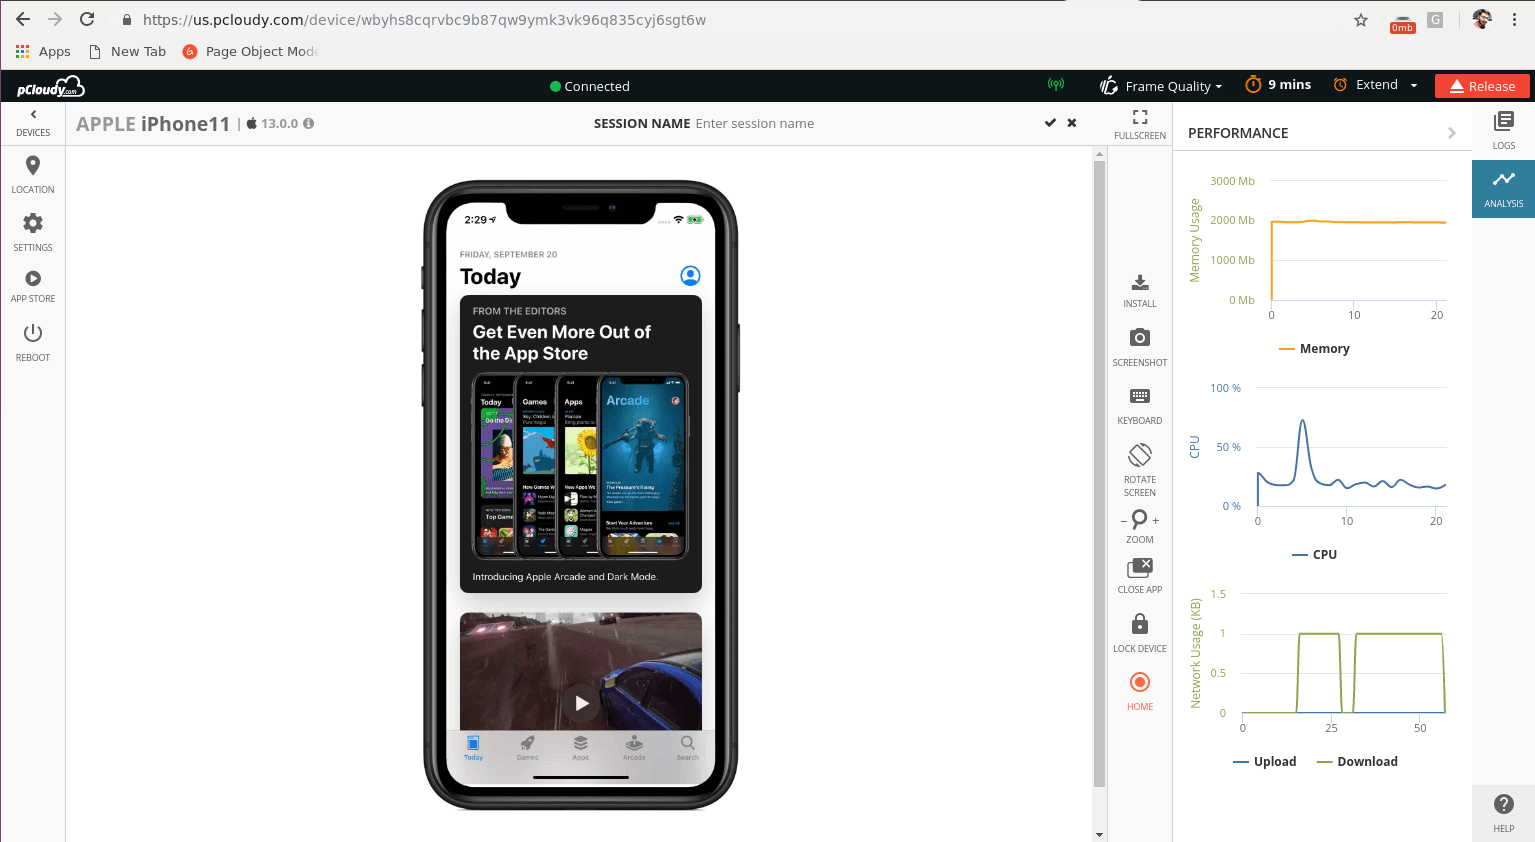
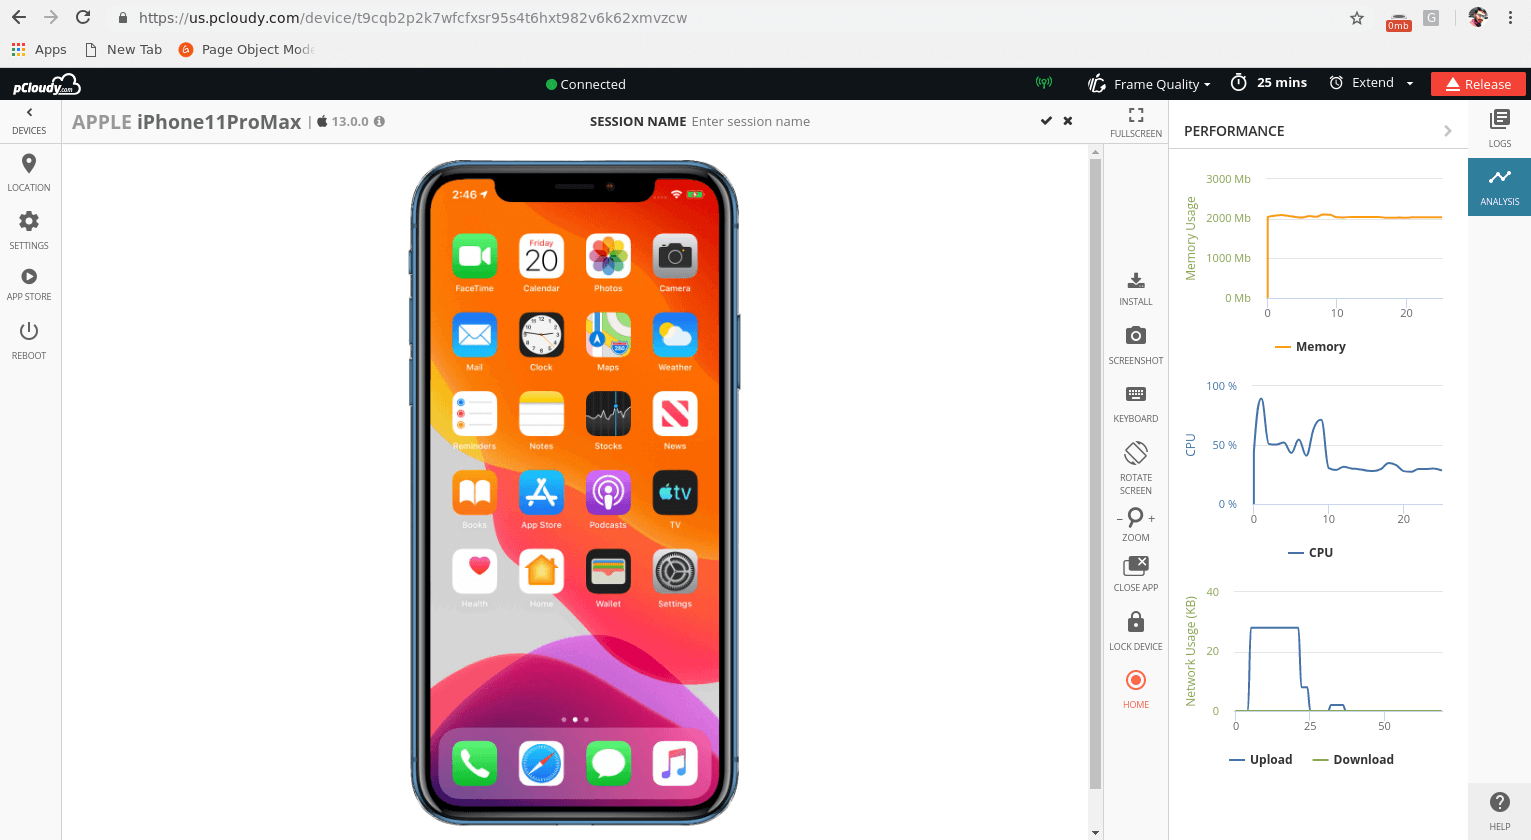
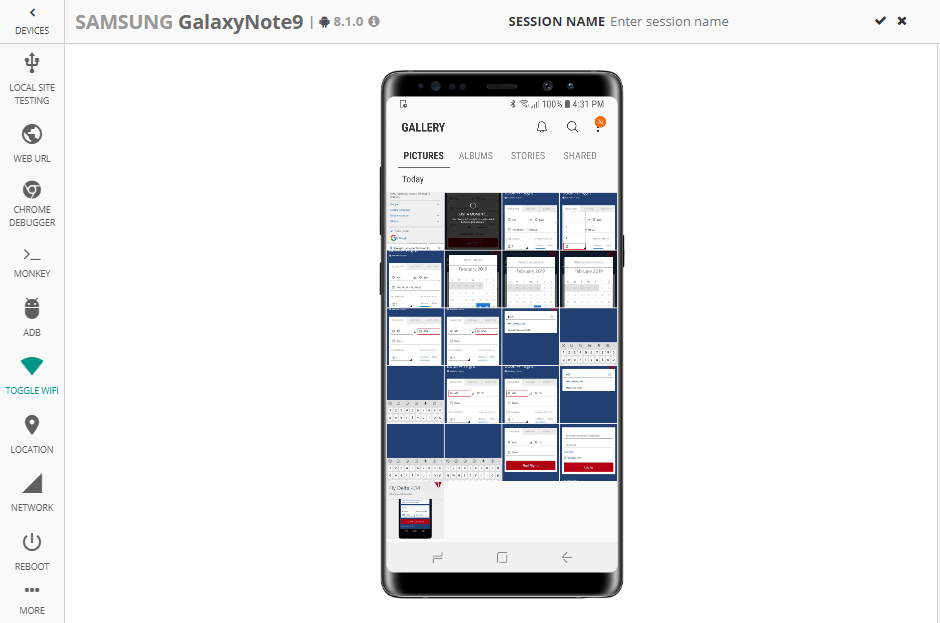
The performance of an app can be viewed real-time while conducting functional tests. You can simply select the application installed on the device from the Tools section to view a graph of Memory and CPU usage, with the packets/bytes consumed in the Data Usage.
application performance monitoring
All information captured during a app testing session is gathered by the platform and stored in a secure location to be used later. When a tester completes his testing session using a device, the performance related information can be found in the Cloud Drive.
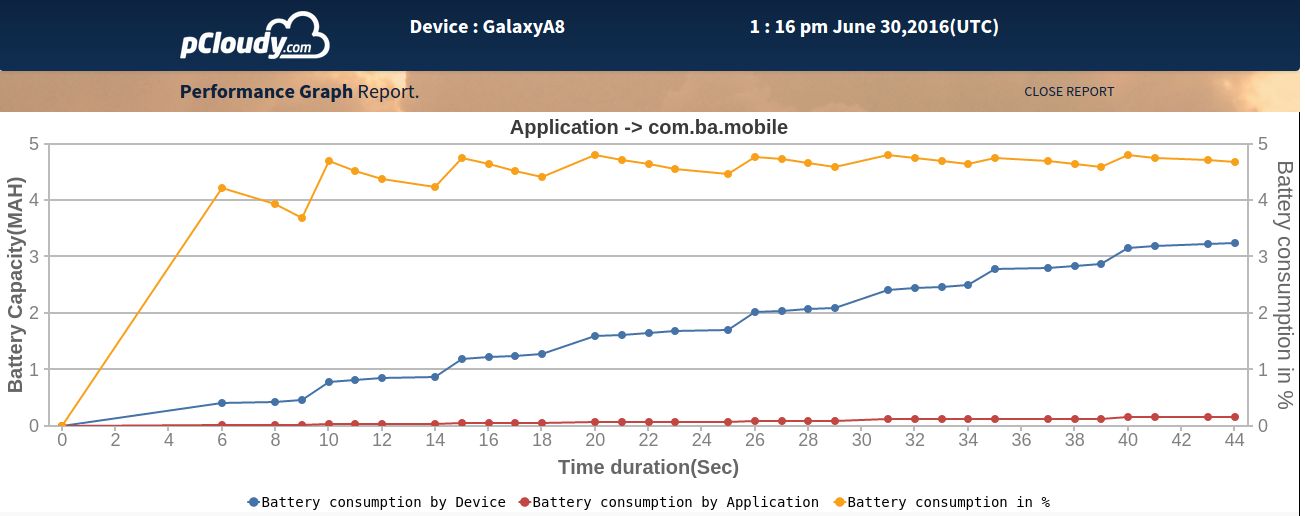
Battery Consumption
The Battery Consumption graph indicates Battery consumption by Device, Battery consumption by Application and Battery consumption in %.
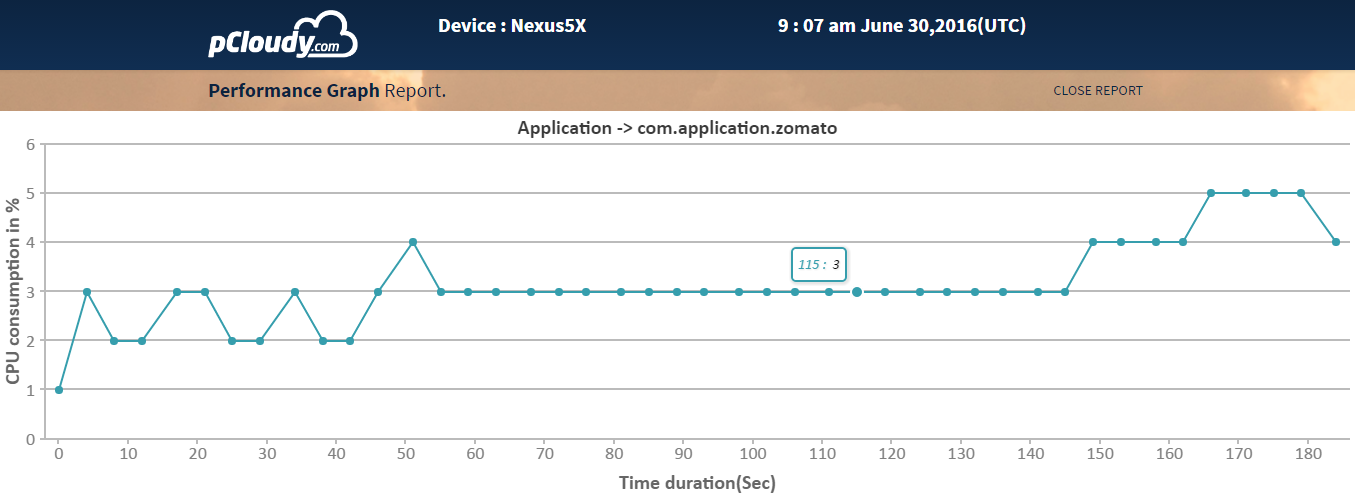
CPU Consumption
The CPU consumption of an App is plotted as CPU consumption in percentage against Time Duration in seconds.
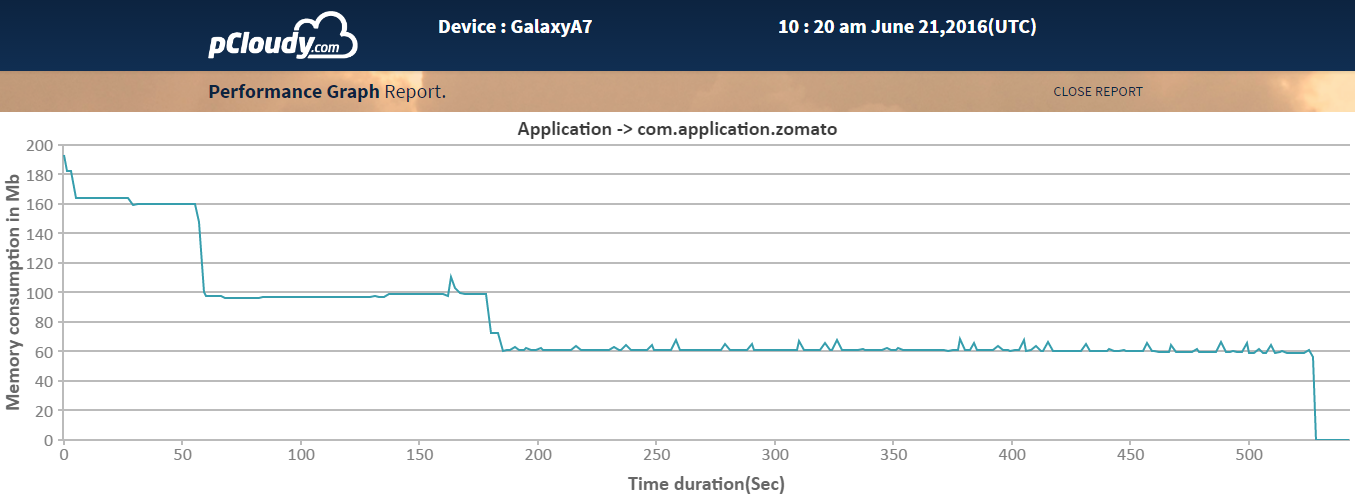
Memory Consumption
The CPU consumption of an App is plotted as Memory consumption in ‘Mb’ against Time Duration in seconds.
How pCloudy can help you?
Mobile application testing does not stop when all the functional tests pass. Testing the application performance monitoring is a critical step before releasing it.
pCloudy helps you with performance profiling of your mobile apps. You can view the CPU usage, Memory usage, Data usage and Battery consumption while performing a series of actions on the app. The Real time app performance monitoring feature helps you to keep track of the app’s performance while conducting manual tests. You can even check the performance consistency of the app by running automation test suites in parallel on multiple devices and by also simulating different network environments.
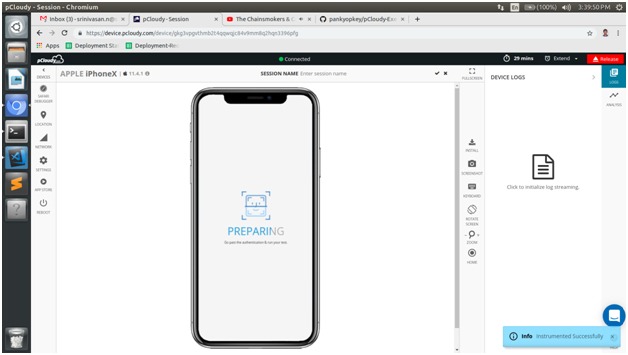
Since pCloudy is committed to provide to you with the newest the fastest, here is another one. The newly released device Apple iOS 14 Beta is now available on pCloudy for you to test your app.
Since pCloudy is committed to providing to you with the newest, the fastest, here is another one. The newly released devices iPhone 11, iPhone 11 Pro and iPhone 11 Pro Max is now available on pCloudy for you to test your app.
We are glad to announce the release of pCloudy 5.4 with exciting new features to make app testing simpler than ever. There is a possibility that you might be familiar with pCloudy, but for those who are new, pCloudy is a cloud-based mobile app testing platform. We have achieved many milestones in a short period of time because we resolve issues immediately and bring in new features on a regular basis. Case in point: This new version of pCloudy, where we have addressed the concerns of our users and added new features to optimize testing. Let’s have a look at all the features added in pCloudy 5.4.
CTRL + V
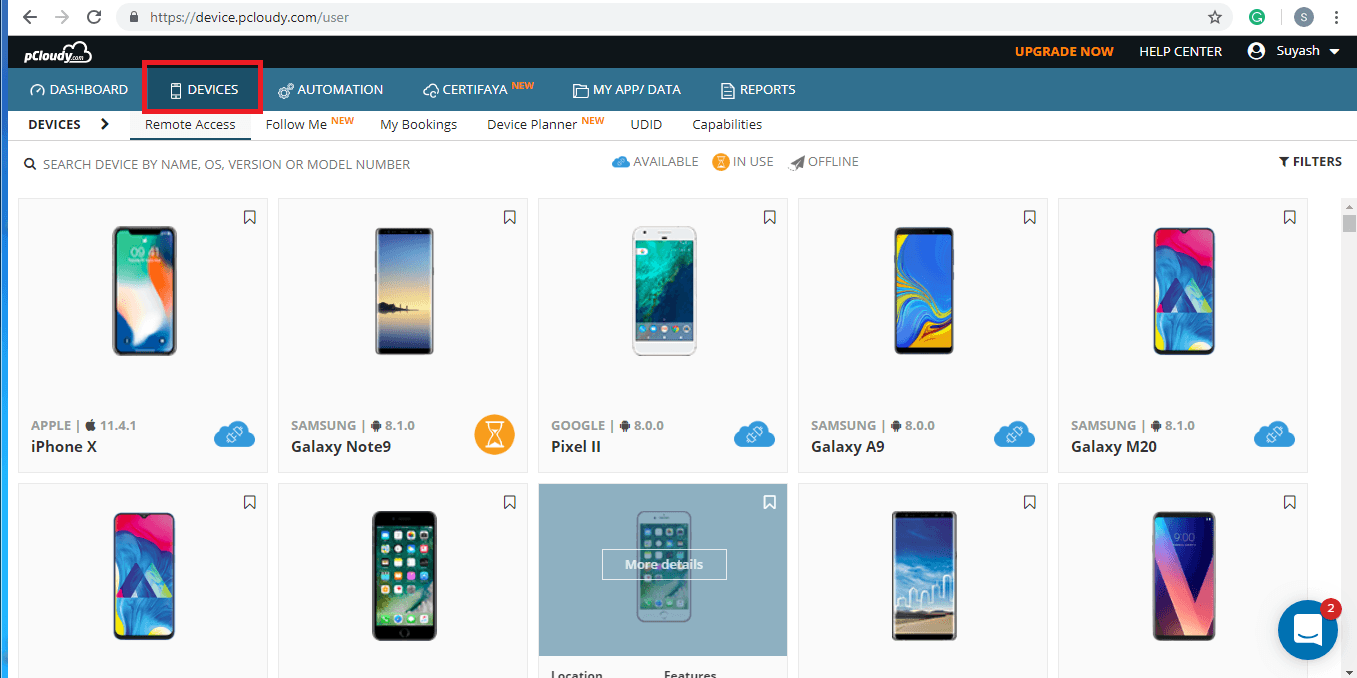
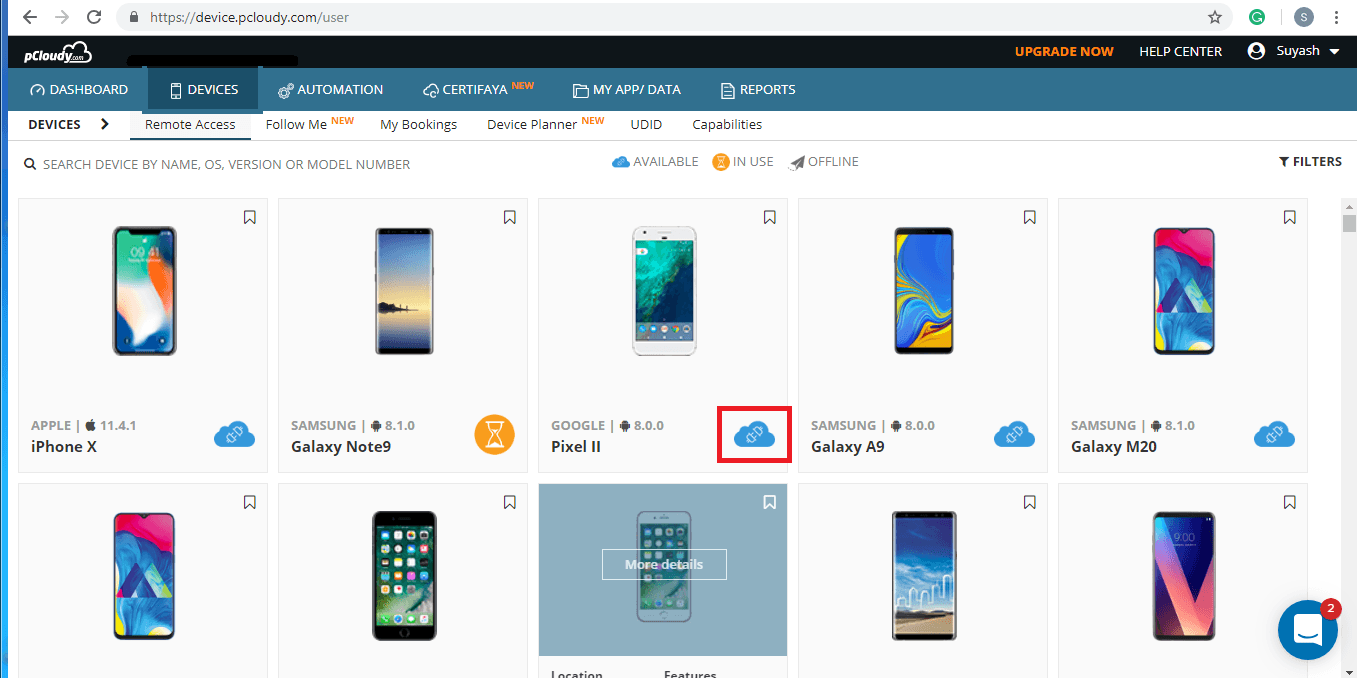
To test your app on a pCloudy device you need to login to device.pcloudy.com and then book a device by clicking on the devices tab. Just click on the available button next to the chosen device which will take you to the device interaction page. Earlier in the device window, you would have to use the virtual extended keyboard to enter text in the device. Although now you can just copy any text from your system and paste it in the device directly. So now instead of using an extended keyboard just use two buttons to enter the string in the device. This will save time and effort when working with multiple devices where you need to enter long text many times.
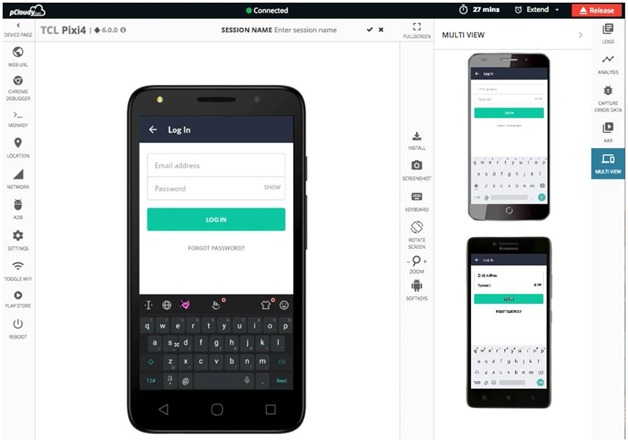
FollowMe new UI
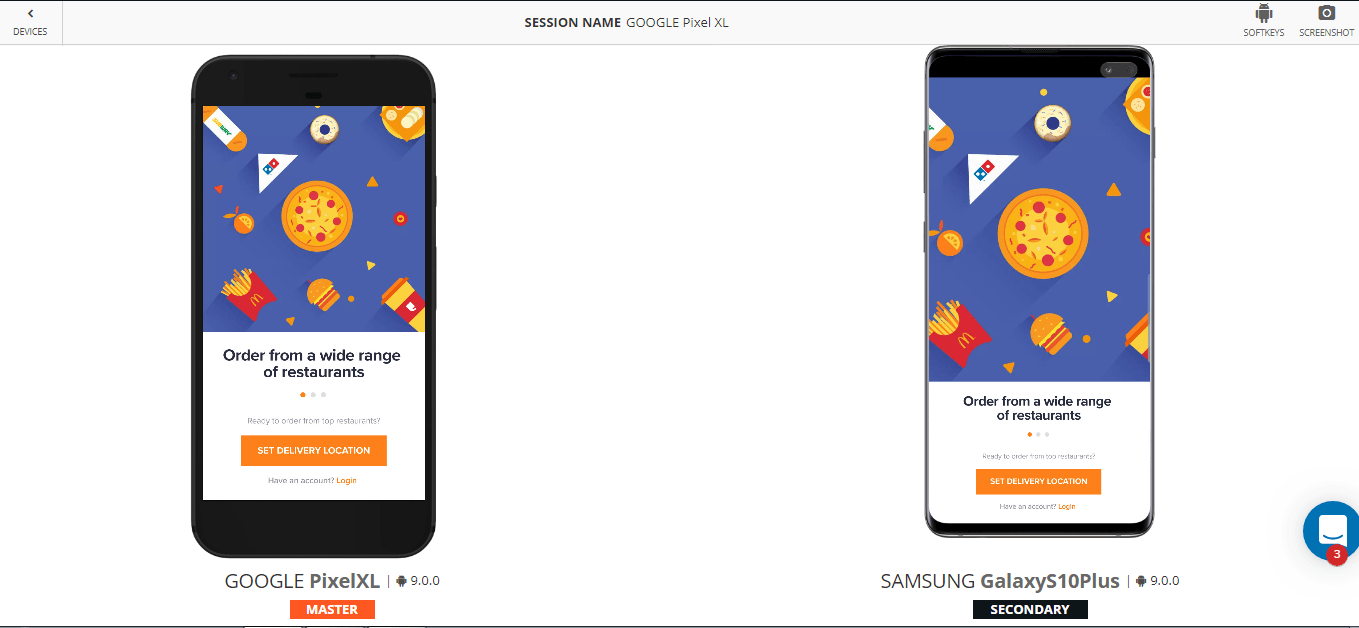
To use the FollowMe feature you will have to instrument the app you want to perform the test on. Under devices section, click on the FollowMe tab then in the next screen choose the app, select the duration and devices on which you will perform the test. In the next screen, you will see the devices which you selected and two options (Softkeys and Screenshots) at the top right corner of the window. Now when you perform any action in the master device, that action gets replicated on the secondary device too. If you enter text, tap on a button, swipe, etc. in the master device then that will happen simultaneously in the secondary device.
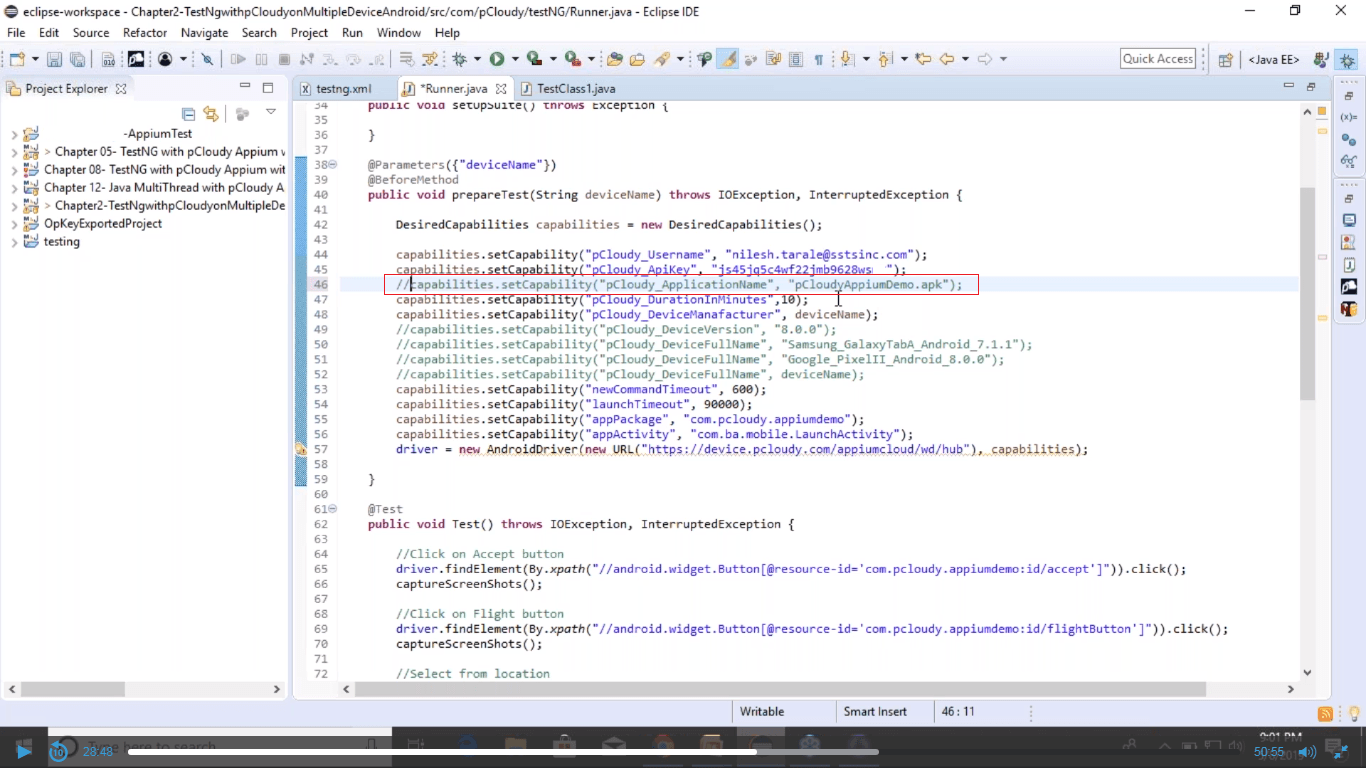
In pCloudy, you can run Appium tests on multiple devices in parallel. To perform a test using Appium, you need to feed in the capabilities. Some users want to test their apps more than once to perform different types of tests on the same app. To do that earlier the users had to install the app again and again. But now we have released an update through which you can perform different types of testing using Appium on the preinstalled apps. This will save you time and make the process easier.
So if you have already installed the app in the device and you want to perform a test on the same app then you don’t need to pass the Application Name capability.
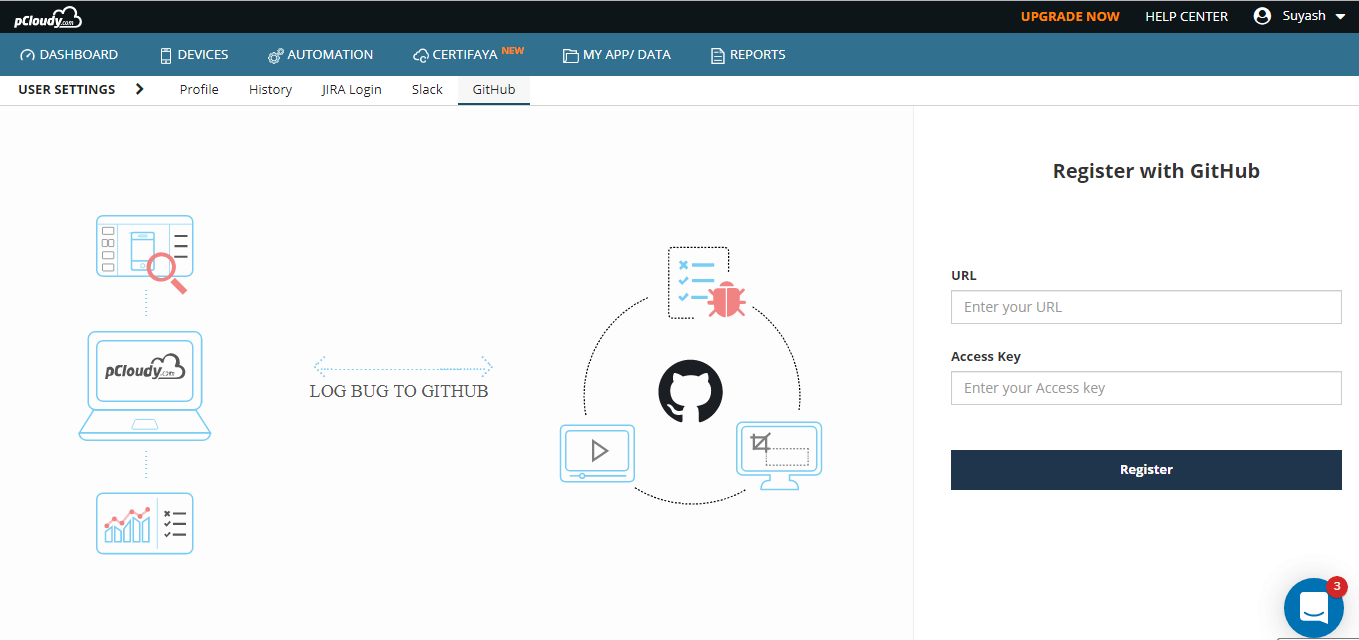
pCloudy is integrated with the most popular tools and frameworks to make testing convenient. A lot of users also requested to integrate Github repository and so we did it. Now you can directly upload your tasks and raise defects in the GitHub repository from pCloudy. Again this feature is added to make it convenient for our users to test and manage the tasks through pCloudy.
To make use of GitHub just login to device.pcloudy.com and click on the user name at the top right corner of the window. In the dropdown list click on settings and in the settings window click on GitHub tab and enter the URL and access key to register. Now in the device session screen, you can click on Collaborate and then select Log a bug in GitHub. A new window will open where you will be able to see the list of repositories, enter the issue type, enter the title, add the description and then click on the click on the Log A Bug In GitHub button. Then you can go to the GitHub to check all the issues raised whenever you want.
Summary
We are working on some more new features and very soon we will come up with the new version of pCloudy. This is a constant process and we always try to address the users issues and provide them updates on a regular basis. This is why we are achieving new heights and we will keep on working hard to provide the best service.
Mobile Responsive Test across range of Mobile Devices and platforms is extremely important for superior User Experience. However, Mobile Responsive Test and debugging can get knotty, especially when there are issues like obfuscated HTML/CSS/javascript code, improperly implemented HTTPS, browser inconsistencies, page load performance and so on. So how do you overcome these issues? Using a Web Developer Tools or debugging extensions make debugging your web application easier. Here we’ll talk about the most popular one – Google Chrome Developer Tools.
The Google Chrome Developer Tools is a consolidated environment built into Google Chrome Browser. It is used for web authoring, debugging, monitoring, optimizing, and understanding web applications or websites. (Sourced from Google Chrome DevTools)
A responsive testing simulator provides a virtual environment where you can test the functionalities just like in a real device. You can also test websites on mobile devices online and test websites on different screen sizes. It is easy to perform responsive design testing across devices on a simulator.
Inspect and edit the DOM and CSS of your website in real-time
Run code snippets from any page
Debug Obfuscated code
Set advanced breakpoints and debug JavaScript using graphical debugger
Troubleshoot Security issues
Analyze run-time and page performance to improve the speed of your app
Trace reflows and repaints as your app loads
The Chrome DevTools provides almost all the gears required to inspect, debug and monitor the performance of a Web App/mobile web. It also provides additional capabilities to simulate Mobile Devices to test and build mobile-first, responsive web sites. You can even debug web content on a real Android Device from a development machine. But, is it enough to perform Mobile responsive test on one or two devices?
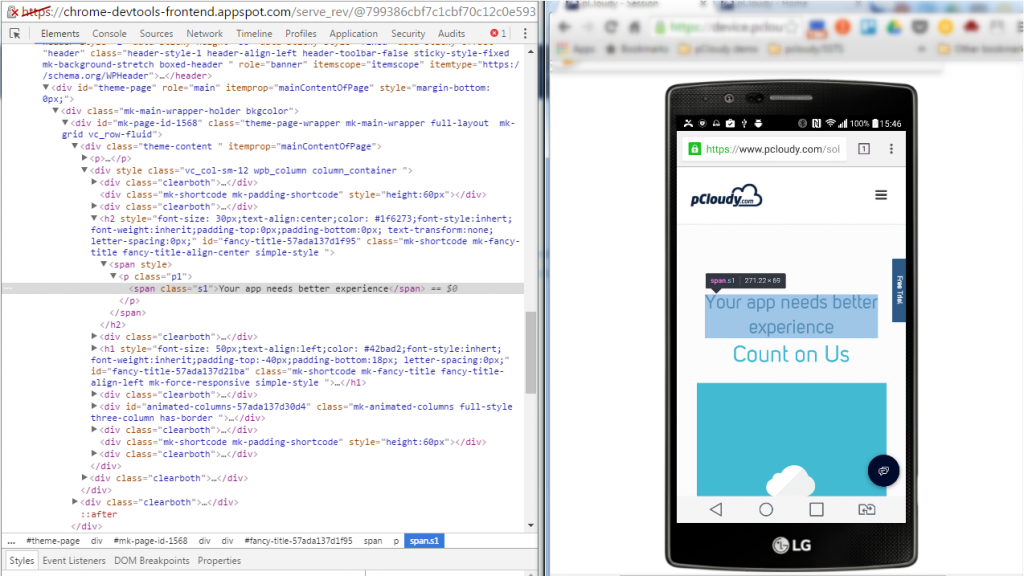
Remote debugging using Chrome DevTools in integration with pCloudy’s Mobile Device Lab
Device fragmentation is a very real problem when testing Web apps on real devices, particularly for UI and functional tests. The number of devices with unique specifications and proprietary build variations has increased. At an advanced level, to perform Mobile Responsive Testing and to check performance of the Web App on real devices, you will need to experiment your site on various platforms, across a number of device form factors. pCloudy’s Mobile Device Lab offers complete integration with Chrome DevTools to test your apps on real devices. This integration allows you to test Web Apps on a myriad of android devices with different sizes and configurations.
Here’s how most App developers test their Web Apps
Inspect and live edit your site’s design and content
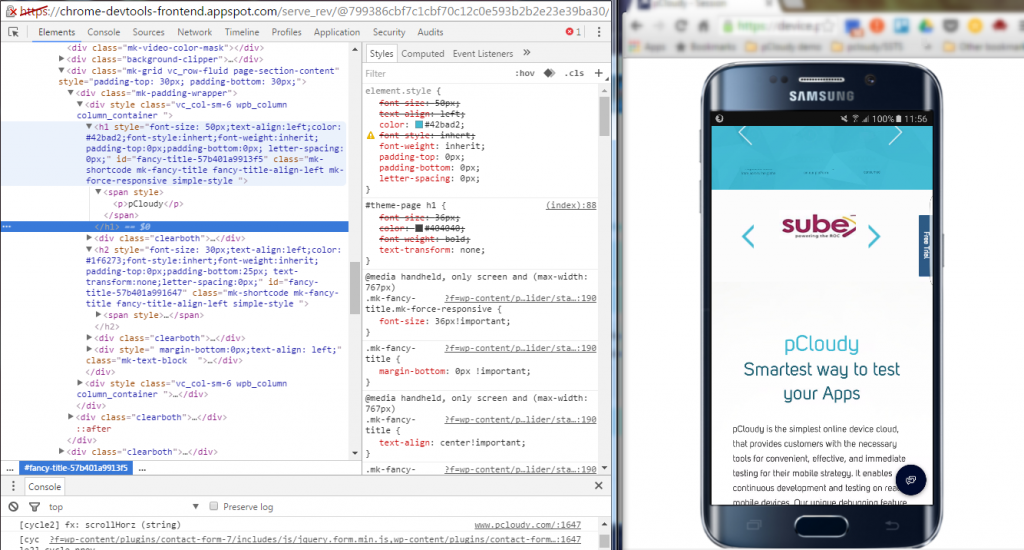
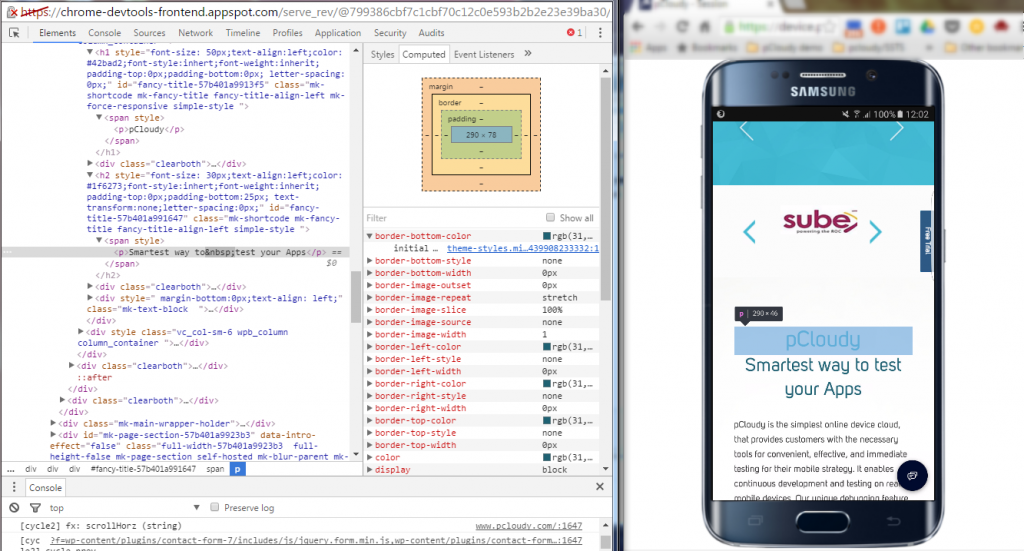
Test and edit your site in live mode by inspecting all the HTML and CSS in your page. In the Elements Panel, you can live-edit a DOM node by simply double-clicking a selected element and making changes.
You can even live-edit style property names and values in the Styles pane. Examine and edit box model parameters.
It is also possible to edit the current element’s box model parameters by making changes to top, bottom, left, right values for the current element’s padding, border, and margin properties using the Computed pane.
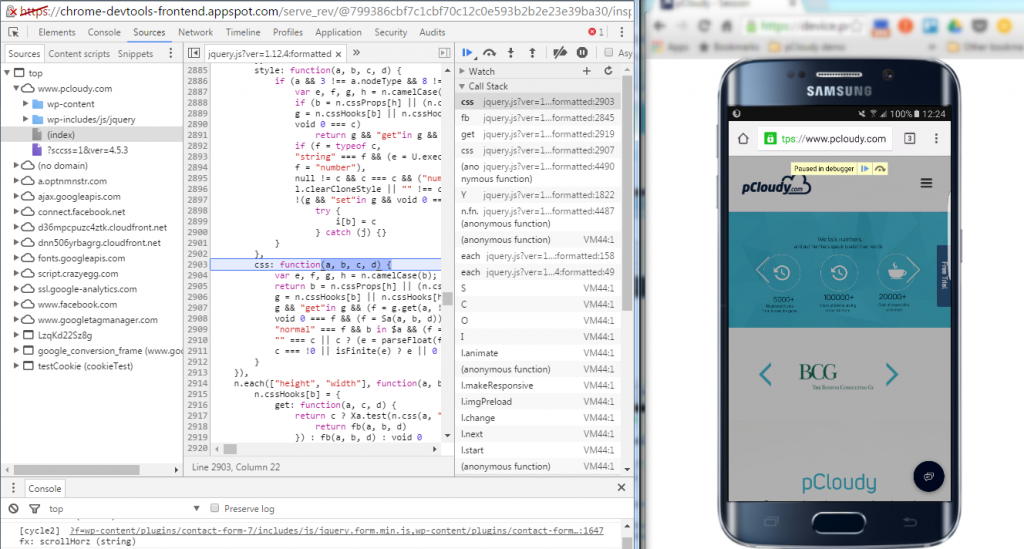
Remote Debugging on real devices to fix errors in the code
Debugging Obfuscated Code: Make your code readable and easy to debug even after you’ve combined, minified or compiled it. You can easily change the formatting of your minimized code by clicking on { }.
Test and optimize the performance of the Web App
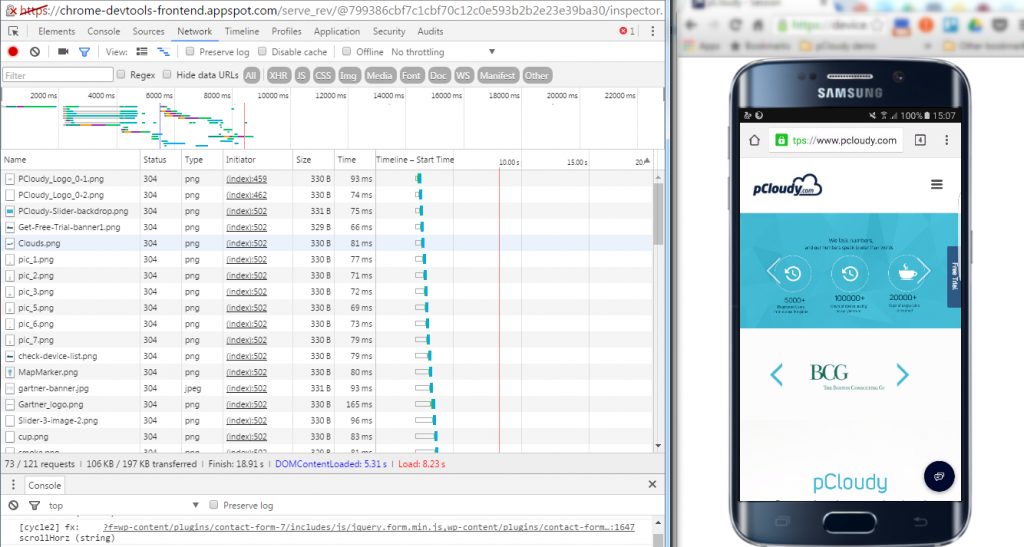
The Network Panel allows you to see how your page renders, and time taken to render from start to end. To do this click into the “Network” panel, click on the camera icon and refresh the page on the device.
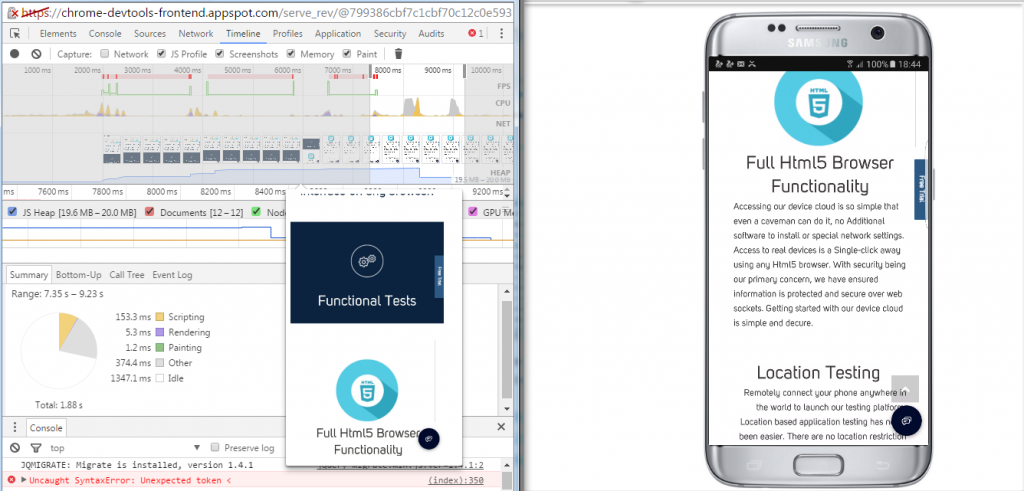
The Timeline panel helps you to record and analyze all the activities in your application as it runs. It’s the best place to start investigating perceived performance issues in your application.
To make a recording of a page load, open the Timeline panel, open the page that you want to record, and then reload the page. The Timeline panel automatically records the page reload. You can also record page interactions on the page and view the performance details through the recorded timeline.
Here are some more details you can view using the Record Timeline
Record the Timeline to analyze every event that occurred after a page load or a user interaction
View FPS, CPU, and network requests in the Overview pane
Click on an event within the Flame Chart to view details about it
Zoom in on a section of a recording to make analysis easier
There are some things to be kept in mind while performing responsive testing:
Device selection
It is better to ask your business analyst or your manager which devices we need to perform the testing. Creating a device matrix is a tedious job due to device fragmentation with frequent browser and OS updates. Even if you spend a lot of time on making a strategy for the combination of devices, that may not get approved by the product manager or scrum master.
Automation testing and Manual testing
It’s better to use both automated and manual approach to perform testing. Based on the type of testing you can share the effort like 70% automated and 30% manual. It is obvious that sometimes automated testing will miss something that a human eye can see. A tool clicking on a link or zooming in and out is different from doing it manually.
Emulators, simulators and real devices
If you wish to test your app on many verities of devices then you can also opt for emulators and simulators. It won’t be possible for you to set up a device lab as it will cost a lot. So you can use a real device that is popular in the market and emulators for the devices that are not that popular.
Prioritize
Mobile app testing including mobile responsive testing needs to be perfectly prioritized as testing is a time-consuming process. Responsive testing priority should be discussed with the BA and the product manager well in advance and take some suggestions from them. The issue is that there are a plethora of devices and while prioritizing, the most popular devices will be used first for testing.
Conclusion
“Using the right tools for the right job” is an old aphorism that applies to all domains including Software Development. As we’ve seen, Chrome DevTools has several features that help you develop better, debug faster, and measure efficiently the performance of your website or application. An ideal choice for you for Mobile Responsive Testing.
The features discussed in this blog are some of the most common ones used by developers, designers, and testers to write, debug, monitor and optimize Websites and Web Apps. Using these features in integration with Mobile Device Lab like pCloudy can transform the entire process of creating, testing and launching Websites and Web Apps.
You can fix the issues in your Android phone by connecting it with your computer and writing some easy commands. For this, you will need some command line tools which you can download from the Android developer’s site. If you are using Windows then you will need to visit the manufacturer’s page for your device and download the ADB and fastboot drivers for Windows. But first, let’s understand what are Android shell commands.
Android Shell Commands
ADB is Android Debug Bridge which is a command line utility included with Google’s Android SDK. It provides a terminal interface to control your Android device connected to a computer using a USB. ADB can be used to run shell commands, transfer files, install/uninstall apps, reboot and more. You can also backup and restore your android devices using these commands.
Want to test your Mobile App?
Join pCloudy Platform!
Signup for Free
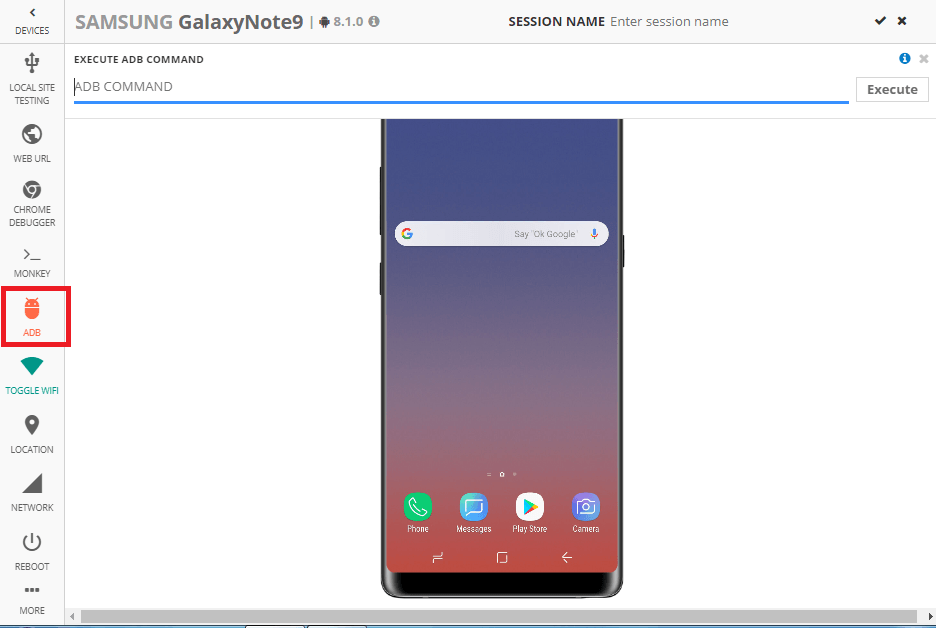
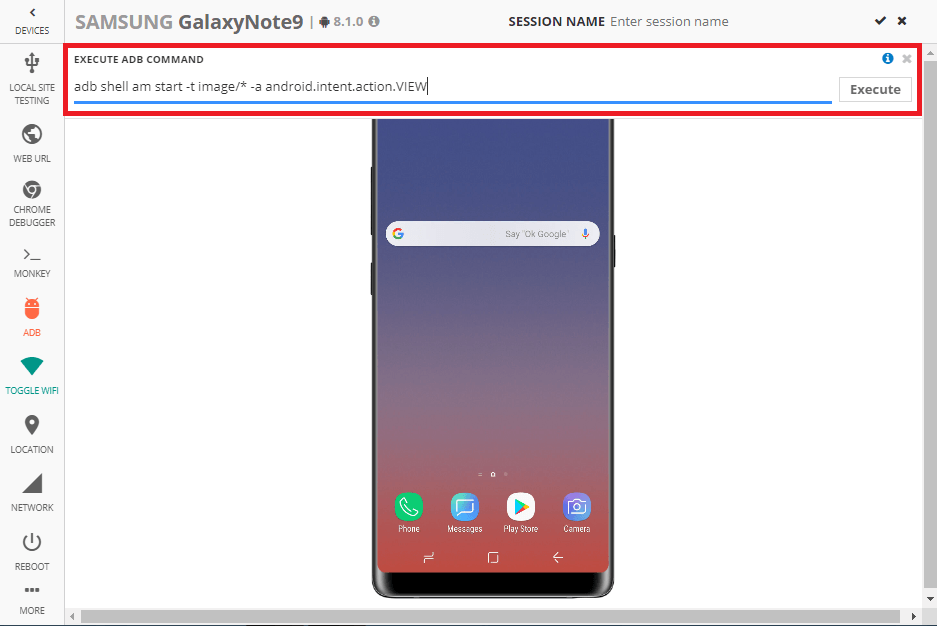
pCloudy also allows you to execute ADB Shell Commands on the connected device to perform mobile testing.
Select your desired device from the list and connect.
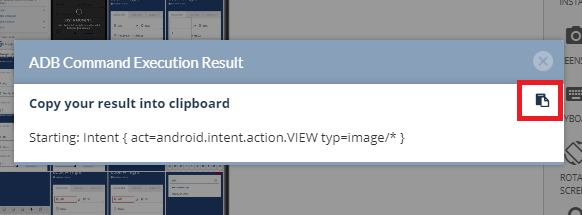
While trying to execute ADB Shell command, you just need to follow few simple steps as given below:
1. Select a device from the displayed list
2. Confirm connection of your selected device
3. The connected device is ready testing
4. Enter ADB shell command to the given text box
5. Execute given ADB shell command
6. Android ADB shell command execution result
Useful Android terminal commands:
1. ADB reboot-bootloader and reboot recovery commands:
This command will let you can reboot your device in the bootloader. If due to some malware your device is stuck or if your device is not rebooting then you can connect your device to the computer and run this command to reboot. To run the command just type adb reboot-bootloader in the command line and to boot the device in recovery just type adb reboot recovery.
2. Fastboot device command:
Fastboot is a diagnostic and engineering protocol that you can boot your Android device into. ADB does not work in the bootloader. If you have to boot into Android and the debugging tools are not active to communicate then you can use the fastboot command. Type fastboot devices in the prompt and you get the serial number.
3. Fastboot unlock command
Fastboot flashing unlock command unlocks your bootloader. This command is not supported in many phones that support fastboot but you can check if your phone supports it. Just type fastboot flashing unlock in the command prompt and hit enter.
4. ADB sideload command:
You can download the update zip file in your phone instead of waiting for the update to be pushed into the phone. To do that just download the update to your computer and connect your device to the computer. Now reboot into recovery on your phone and using the volume buttons choose to apply update from ADB. then open command line and type ADB sideload Full-Path-to-the-file.zip and hit enter.
A lot of users create android shell commands root in a device in spite of security. The adb reboot-bootloader command allows you to boot directly to your phone’s bootloader. Once you’re in the bootloader, ADB shell commands won’t work anymore. That’s where Android ADB fastboot command comes into the picture. Fastboot allows you to send commands to your phone while in the boot loader.
Single sign on is a process of authentication where user can access multiple applications and portals with one set of credentials. With SSO a user logs in with a single ID and password to gain access to a connected system. Single sign on must internally store the credentials for initial authentication and then translate them to the credential required for the different mechanisms.
SAML 2.0
SSO services uses security assertion mark-up language (SAML 2.0) which is an XML standard that facilitates the exchange of user authentication and authorization of data across secure domains. SAML simplifies the authentication and authorization process for the user, an identity provider and a service provider. When the user attempts to access an application, the service provider will send a request to identity provider for authentication.
Benefits of single sign on
SSO reduces risk for access to third party sites (user passwords not stored externally). It also alleviate password fatigue from different user name and password combinations. Reduces IT cost due to lower number of IT help desk calls about password. Reduces time spent re-entering password for the same identity.
pCloudy SSO integration architecture
Sequence of events for integration of SAML 2.0 Authentication
The user attempts to reach a web application at a service provider (SP i.e pCloudy Set Up).
The service provider generates a SAML request and redirects the user to the IdP’s SSO URL with the generated request.
The IdP authenticates the user and generates a SAML response.
The user is redirected back to the SP with the SAML response.
The SP verifies the SAML response.
The user is successfully logged-in to the SP’s web application.
Note: pCloudy has included this feature in Enterprise set up Private Cloud and On-Premise Cloud.
SAML assertion
SAML assertion is the XML document that the identity provider sends to the service provider, that contains user authorization. There are Three types of SAML assertion:
Authentication assertion – It proves identification of the user and provide the time the user logged in and what method of authentication they used.
Attribute assertion – It passes the SAML attributes to the service provider. SAML attributes are specific pieces of data that provide information about the user.
Authorization decision assertion – It says if the user is authorized to use the services or if the identity provider denied the request due to password failure or lack of rights of the service.
SSO solves the problem of managing the increasing number of users across an ecosystem of application and services. It is a step forward in the optimization of pCloudy integrated architecture.
With no access to internal or private servers, complexity in the process of VPN connections, or the problems to test a software, website or service in a production-similar environment, testing your local or a private website or url on a cloud platform has always been a challenge for testing teams.
For all the users who have been asking for a solution to test their private servers on pCloudy devices before deploying them on production, we have a good news for you.
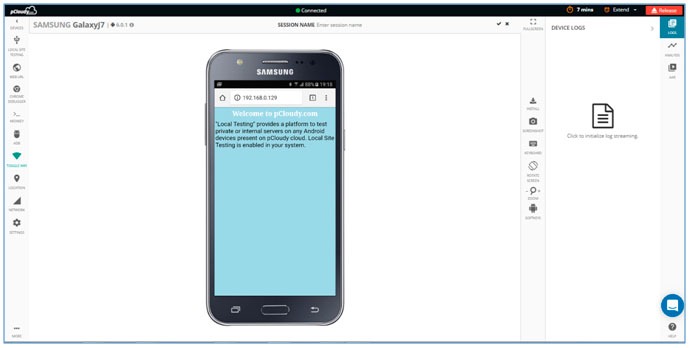
Now, you can access your site behind a firewall, on a staging server, or locally with pCloudy before it hits production.
Since private servers are internal to your network, they have no public access which makes it difficult to test on a device on cloud. Local Site emulation Testing provides a platform to test private or internal servers on any Android device present on pCloudy.
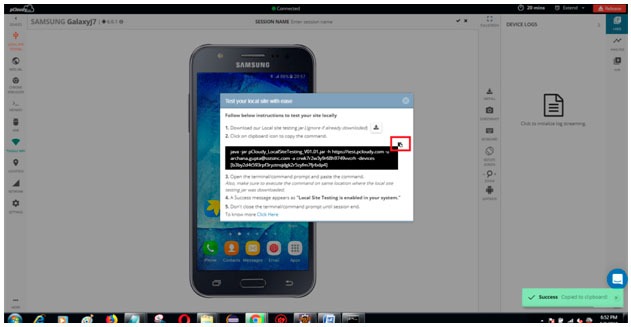
Let us see how to set up the connection for Local Site Testing:
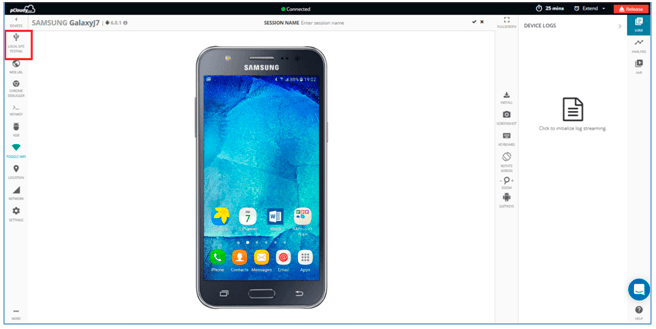
2. Select desired device from the Device page and click on “Local Site Testing” icon present at top on right hand side as shown in below screenshot.
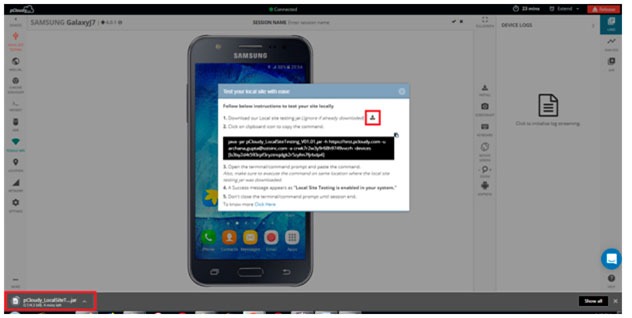
3. Download the Local Site Testing jar file as shown in snapshot below.
Note: Ignore if jar is already downloaded.
4. Copy the command by clicking on icon as shown in the snapshot.
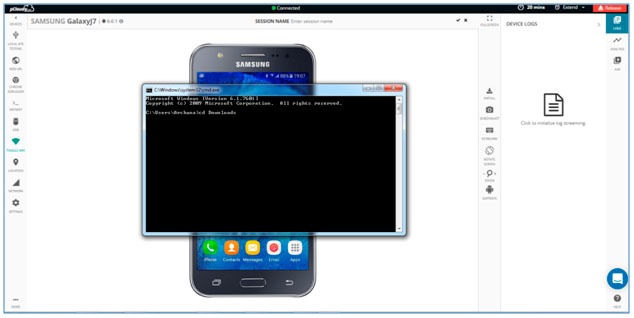
5. After the file download is complete, Open your command prompt or terminal
Let us see how to open Command Prompt in different Operating system.
You can follow any of them among three mentioned ways
For Mac-OS users:
a. Open “Launch pad”: It’s the silver icon in the Dock that looks like a rocket. Type “terminal” in search bar and hit enter.
b. Hold command button and hit space bar. Pop will appear and type terminal and hit enter.
c. Open Launch pad and click the “Other” folder: It’s a square icon containing several smaller icons. Then look for terminal.
For Windows users:
a. Open Start and type in command prompt or cmd then hit enter.
b. Click the Windows logo in the bottom-left corner of the screen, or press the ⊞ Win key. You can search for Command Prompt on all supported versions of Windows.
c. Open the Run program. Hold the Win key and press the R key to open the Run window. Then enter “cmd” or “Command prompt” and press enter.
For Ubuntu users:
a. Using Keyboard Shortcuts: Press Ctrl+Alt+T This will launch the Terminal.
b. Press Alt+F2 and type gnome-terminal. This will also launch the Terminal.
c. Press Win+T (Xubuntu only). This Xubuntu-specific shortcut will also launch Terminal.
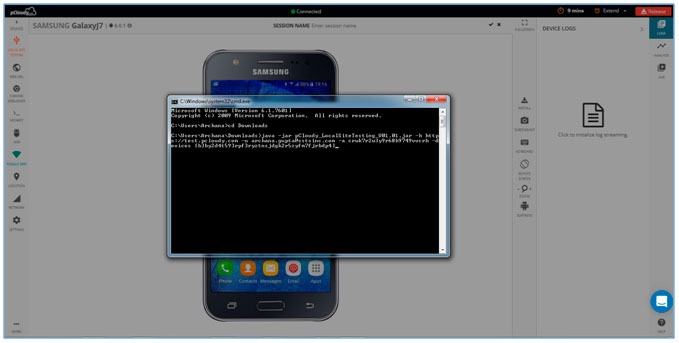
6. Execute the command on same location where the local site testing jar file was downloaded.
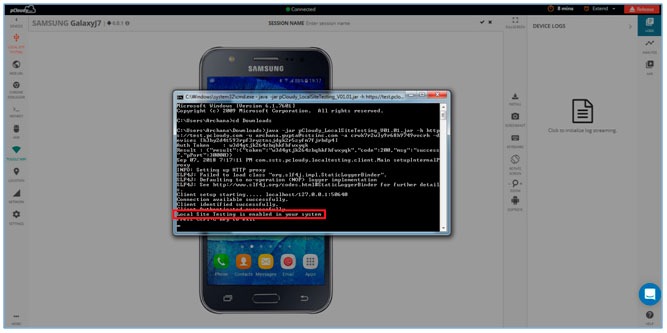
7. After the command is successfully executed you will able to see a success message appearing as “Local Site Testing is enabled in your system”. This confirms that now you are ready to test your private server on the device connected on pCloudy.
Note: Don’t close the command prompt until session ends.
8. Go to the connected device and using the browser open any private URL to test. That’s all you are all set.
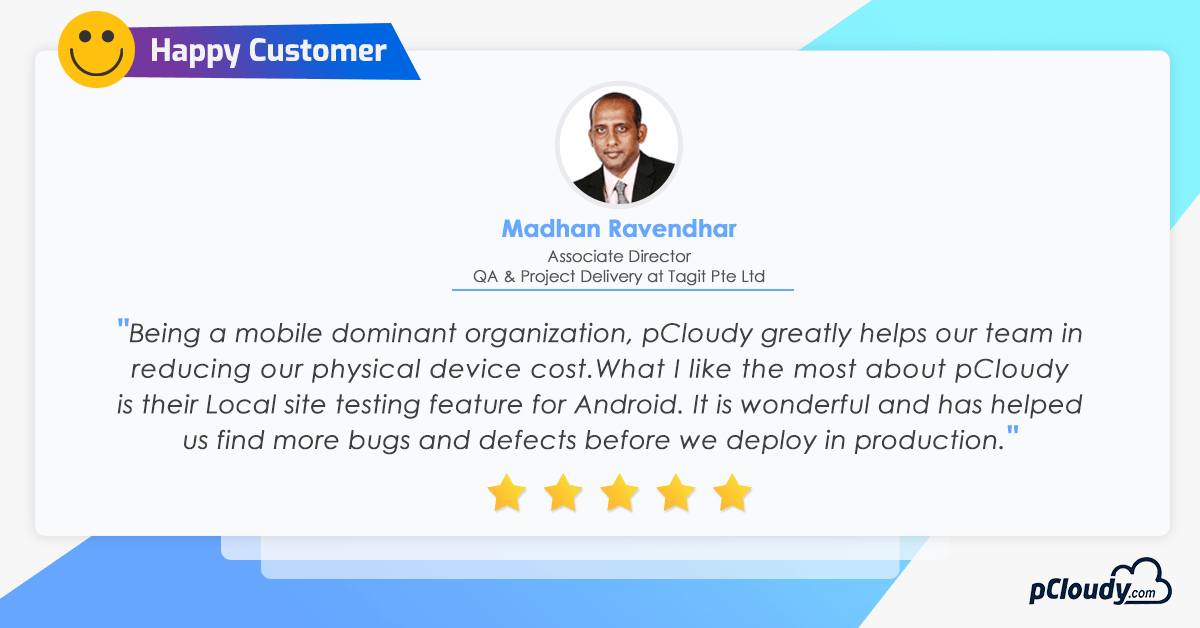
You can now find more bugs and defects on your local sites before deploying it to production with this breakthrough feature.
Here’s testimony to it by one of our customers from TagIT mobile.
Why don’t you try it yourself and let us know your feedback in comments about how this feature is useful to you!
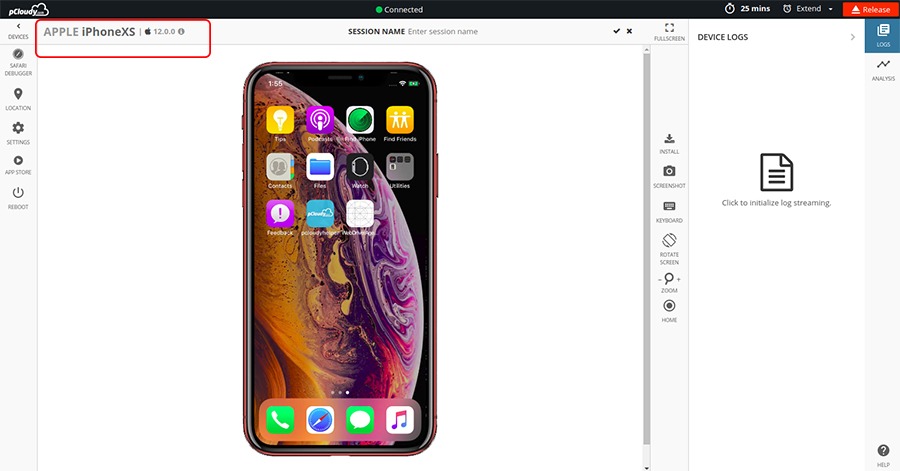
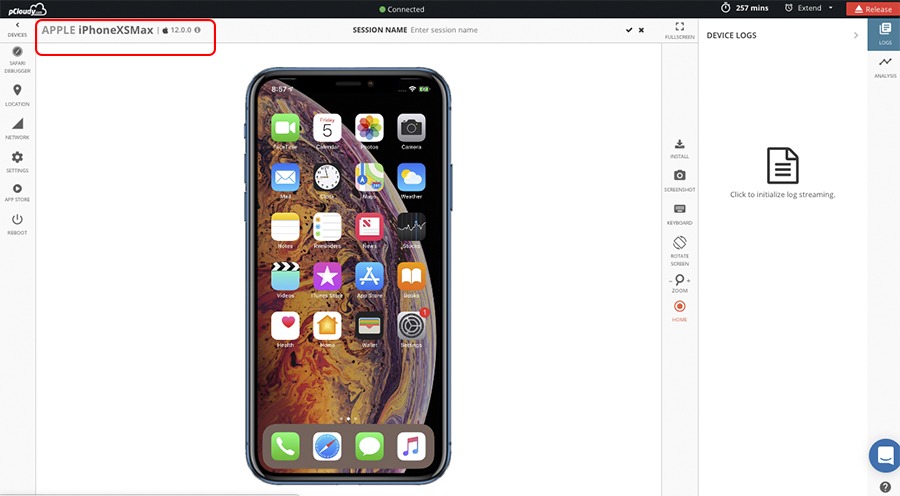
pCloudy announces the support for the brand new iPhone XS and XS Max our real device cloud. You can now test your apps on the latest iPhone devices without any wait. Committed to provide you with the latest, we provide you with fast support for latest devices and OS for mobile app test.
Apple iPhone XS
Apple iPhone XSMAX
With users becoming more conscious, it’s very important for companies to make sure that their apps run smoothly on a wide spectrum of devices including the latest released devices and OS. It becomes a mandate for enterprise mobility to test their apps on multiple real devices like the recently launched iPhone XS and XS Max to make sure that their apps don’t fail or have to face the brunt of getting bad reviews or ratings on App store. Get your app quality assured!
To know more about what these phones are offering, you can read this blog. Why don’t you test your app on pCloudy, the unified digital app testing platform, to find out the difference in app quality?
We are very excited! V.5.2 of pCloudy has been released with a number of exciting new features and product improvements. This update brings some path-breaking features, some revamped ones building on previous experiences, more mature than ever before.
Check it out yourself!
a)Test local or Staged sites with Local site emulation: It’s a path breaking feature for enterprise mobility. For all the users who have been asking for a solution to test their private servers on pCloudy devices before deploying them on production, we have a good news for you.
Now, you can access your site behind a firewall, on a staging server, or locally with pCloudy before it hits production.
Since private servers are internal to your network, they have no public access which makes it difficult to test on a device on cloud. Local Site emulation Testing provides a platform to test private or internal servers on any Android device present on pCloudy. Find the details about this feature here.
b) Test your app with Face ID feature: Apple introduced the ability to perform authentication via FaceID to enable secure and effortless access to the device. But it turns out to be a hindrance for mobility teams while testing their iOS apps on devices over cloud. To ease out the process of authenticating Face ID manually every time, you can now bypass the FaceID verification in your apps using our utility.
With this feature released, you can instrument your iOS app for both TouchID and FaceID on pCloudy. Isn’t it a bonanza for iPhone users? Click here to find out more about this feature.
c) Inspecting Element using Appium Desktop: Appium Desktop is a point-and-click interface for using Appium and inspecting your app’s structure. With this new feature you will be able to run Inspector sessions on pCloudy. You just have to login in to your registered account, set up the desired capabilities for your test appropriately, and you’ll be able to drive your app remotely using Appium Desktop. Read More
d) Releasing Follow Me Officially: ‘Follow Me’, the one-of-its-kind feature to speed up the manual app tests has been available on beta version for you to test your apps manually and report us the issues. After a rigorous quality assurance done for the features and fixing most of the issues reported, we are now releasing ‘Follow Me’ officially to manually test your apps in synchronous mode and accelerate it exponentially. Read More
Comments closed
Request a Demo
Perfect Your App's Digital Experience with Pcloudy
Your 30 minutes demo includes:
Commitment free consultation on your top testing challenges
Live demo of our functional & app performance testing
Get a practical implementation plan with clear ROI milestones
Expert guidance on using AI to transform your testing efficiency