Anshuman Chatterjee is a technical consultant at pCloudy who enjoys traveling and singing. When he is not working, you would find him reading Sidney Sheldon and Agatha Christie.
You can fix the issues in your Android phone by connecting it with your computer and writing some easy commands. For this, you will need some command line tools which you can download from the Android developer’s site. If you are using Windows then you will need to visit the manufacturer’s page for your device and download the ADB and fastboot drivers for Windows. But first, let’s understand what are Android shell commands.
Android Shell Commands
ADB is Android Debug Bridge which is a command line utility included with Google’s Android SDK. It provides a terminal interface to control your Android device connected to a computer using a USB. ADB can be used to run shell commands, transfer files, install/uninstall apps, reboot and more. You can also backup and restore your android devices using these commands.
Want to test your Mobile App?
Join pCloudy Platform!
Signup for Free
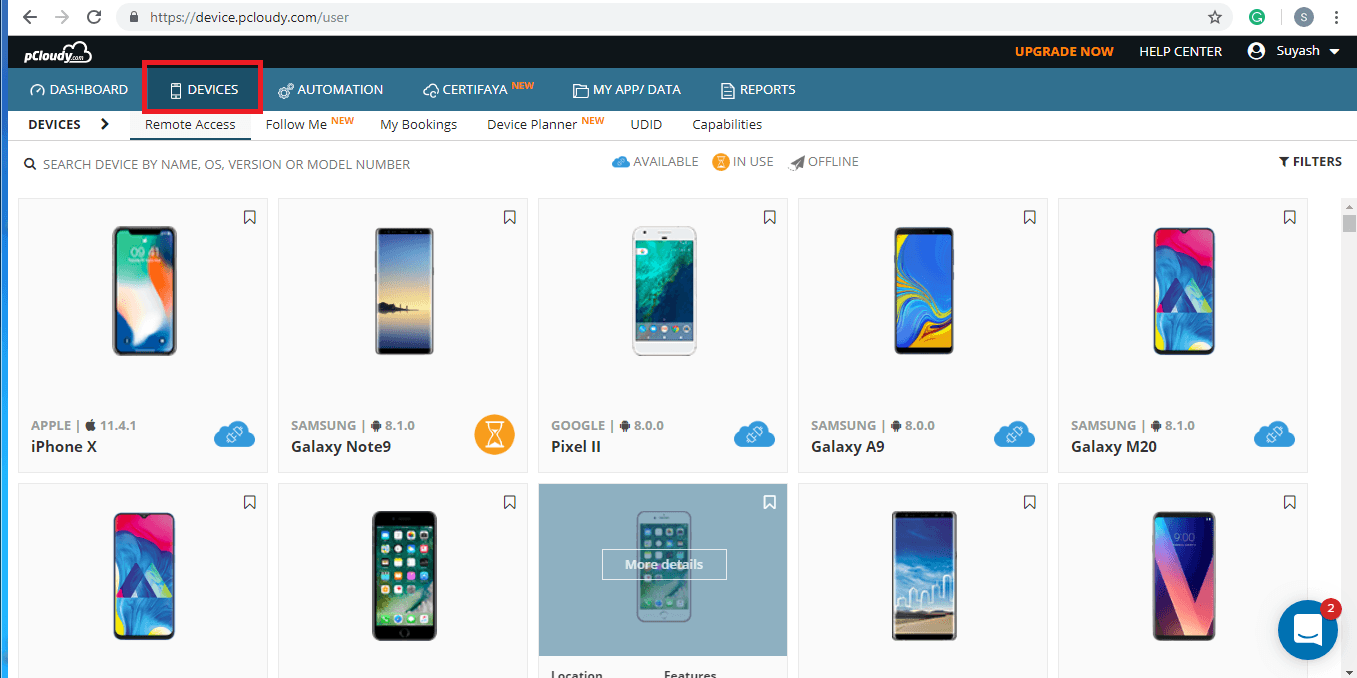
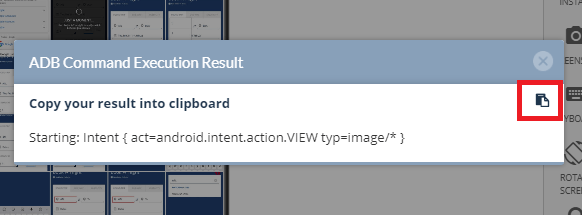
pCloudy also allows you to execute ADB Shell Commands on the connected device to perform mobile testing.
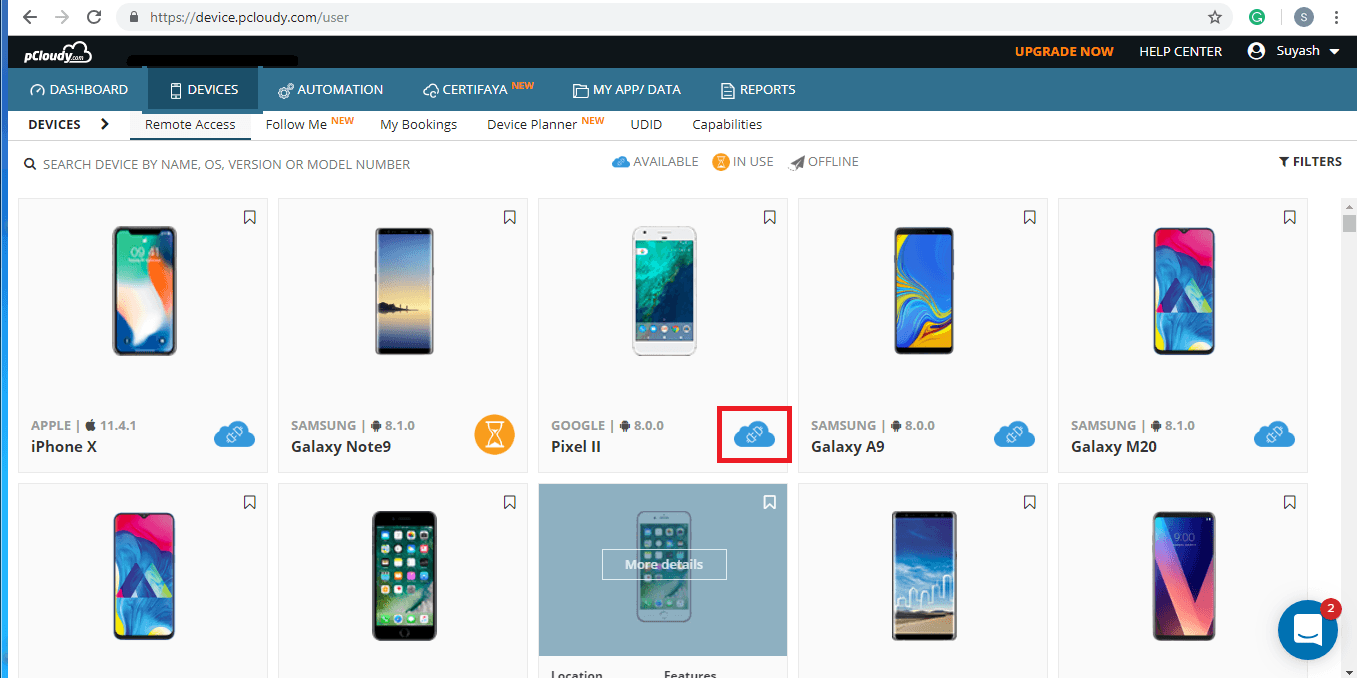
Select your desired device from the list and connect.
While trying to execute ADB Shell command, you just need to follow few simple steps as given below:
1. Select a device from the displayed list
2. Confirm connection of your selected device
3. The connected device is ready testing
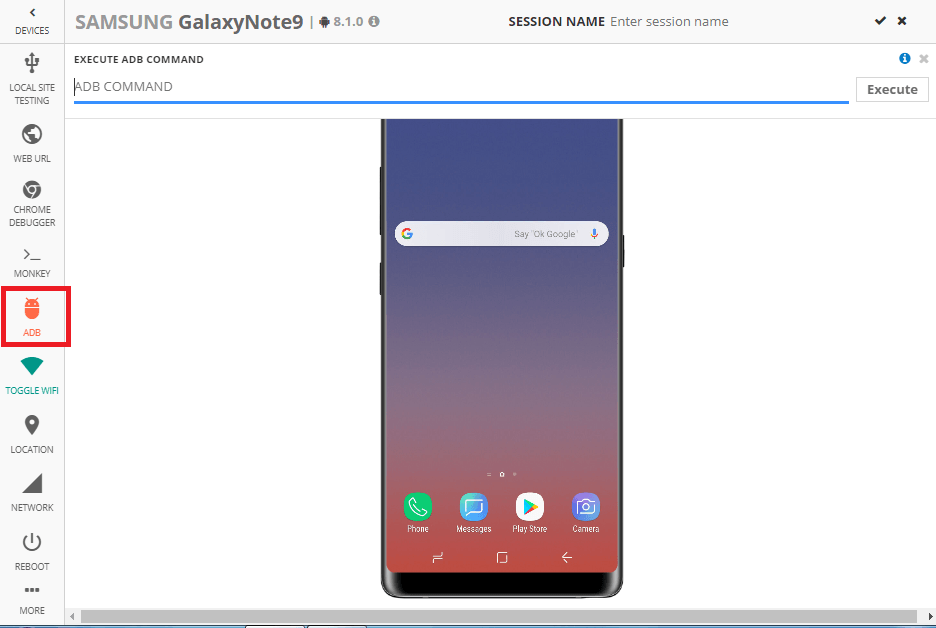
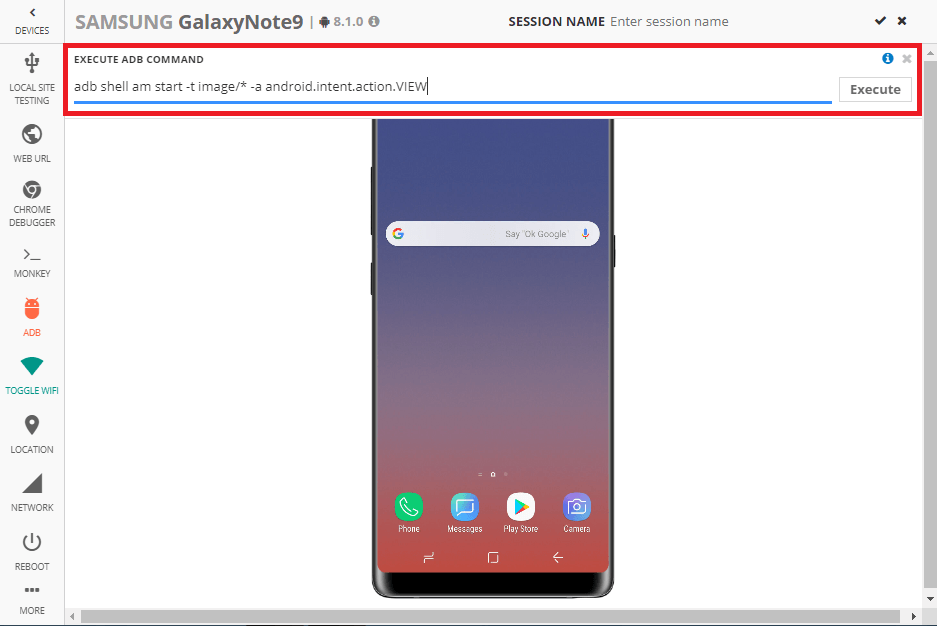
4. Enter ADB shell command to the given text box
5. Execute given ADB shell command
6. Android ADB shell command execution result
Useful Android terminal commands:
1. ADB reboot-bootloader and reboot recovery commands:
This command will let you can reboot your device in the bootloader. If due to some malware your device is stuck or if your device is not rebooting then you can connect your device to the computer and run this command to reboot. To run the command just type adb reboot-bootloader in the command line and to boot the device in recovery just type adb reboot recovery.
2. Fastboot device command:
Fastboot is a diagnostic and engineering protocol that you can boot your Android device into. ADB does not work in the bootloader. If you have to boot into Android and the debugging tools are not active to communicate then you can use the fastboot command. Type fastboot devices in the prompt and you get the serial number.
3. Fastboot unlock command
Fastboot flashing unlock command unlocks your bootloader. This command is not supported in many phones that support fastboot but you can check if your phone supports it. Just type fastboot flashing unlock in the command prompt and hit enter.
4. ADB sideload command:
You can download the update zip file in your phone instead of waiting for the update to be pushed into the phone. To do that just download the update to your computer and connect your device to the computer. Now reboot into recovery on your phone and using the volume buttons choose to apply update from ADB. then open command line and type ADB sideload Full-Path-to-the-file.zip and hit enter.
A lot of users create android shell commands root in a device in spite of security. The adb reboot-bootloader command allows you to boot directly to your phone’s bootloader. Once you’re in the bootloader, ADB shell commands won’t work anymore. That’s where Android ADB fastboot command comes into the picture. Fastboot allows you to send commands to your phone while in the boot loader.
pCloudy understands that businesses need their apps to be rolled out faster than before, without bugs, crashes, functionality issues, UI glitches, memory drainage and well, everything wrong with every app you uninstalled on your phone within minutes of using them.
We simplify testing. More importantly, this platform will equip, enable and guide you to provide single-click access solutions to the battling issues that can easily drive a developer nuts. This platform allows you to test real Android and IOS devices directly from your browser using real Mobile Devices to click-and-perform Manual and Automated Testing for maximum coverage.
Here are the most frequently used App Testing Use Cases you might be interested in.
Mobile is the key to the digital world in today’s era. The rise of Mobile Internet has ensured that we all are going to make most of our digital decisions on a Mobile device (primarily using an App). Mobile Apps are going to be everywhere.
One of the biggest challenges for App Development teams is to ensure that their Apps works on the variety of devices. They need their apps tested on multiple devices before it is released to the market, simply because of the plethora of devices available in the market.
Each mobile from each OEM (Original Equipment Manufacturer) with different specifications is a unique device where the application should be tested.
Practically it is not possible to test the application on each and every mobile device available in the market. But the app must be tested on a large set of the devices depending on the market segment of App under test.
Introduction:
pCloudy is a cloud-based remote mobile app testing platform which allows testing of Android and iOS mobile applications on remote REAL devices. It allows the user to do Manual testing and also facilitate to run test automation on multiple devices in parallel.
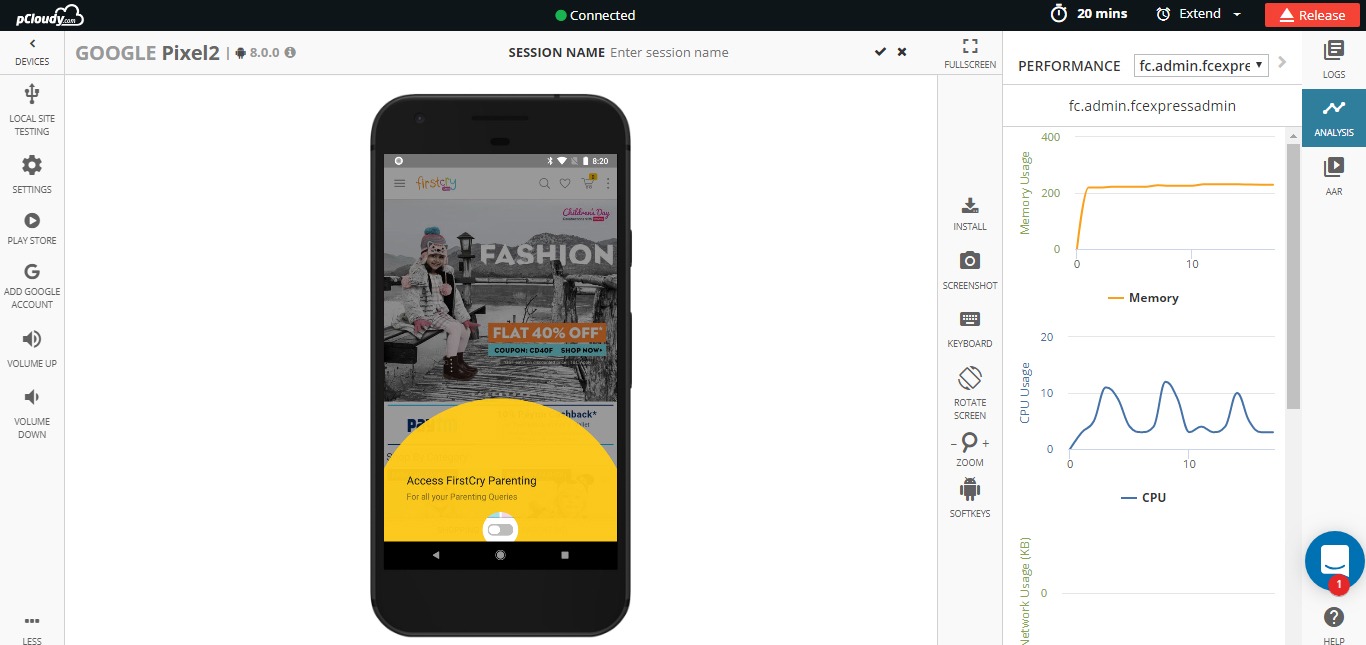
It provides a whole lot of statistics like session video, device logs, Screenshots, data usage, memory usage, CPU usage, battery consumption and frame rendering count. The devices are also equipped with Real Operator SIM’s to make MO/MT calls and can receive and send SMS.
Preparing for Manual Test
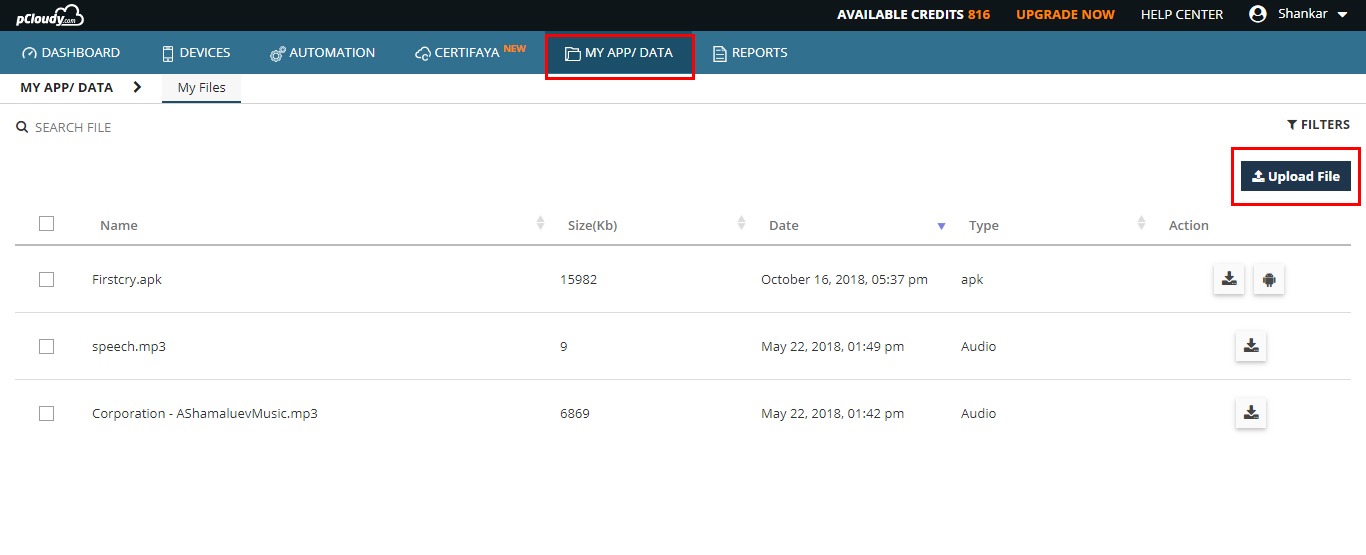
Before we start the test on pCloudy, we recommend uploading the test application, test data or even test suites to the cloud drive provided by pCloudy. This is the secured location for each user.
Click on the Upload button and select the file from your local system through file explorer. After selecting the file select upload and the file will be uploaded to your cloud drive.
You can also manage the cloud drive by download. These applications can be installed on the devices as explained below.
Performing Manual Test remotely
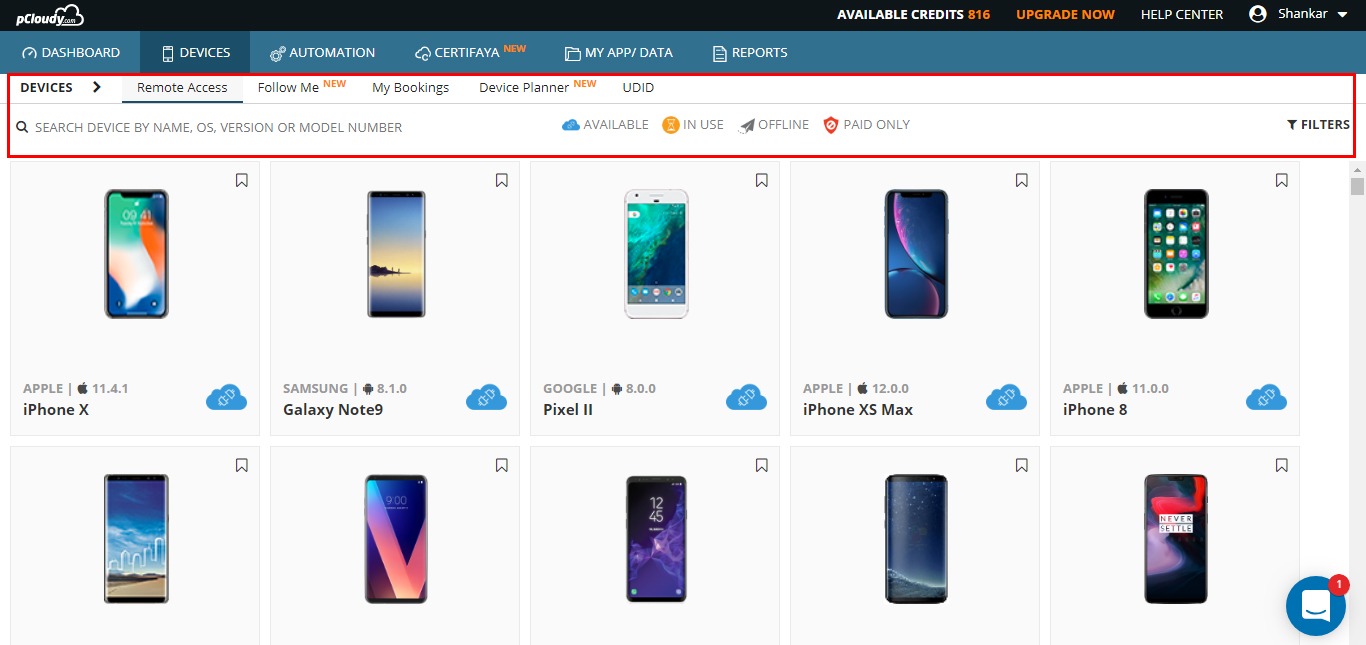
Based on test requirement, you can search for any specific device by using the filters provided at pCloudy.
(Note: Click on any image for enlarged view)
You can access any device for Instant Access. Also, you can book the device for a longer duration for your planned testing using “Book your Device” link.
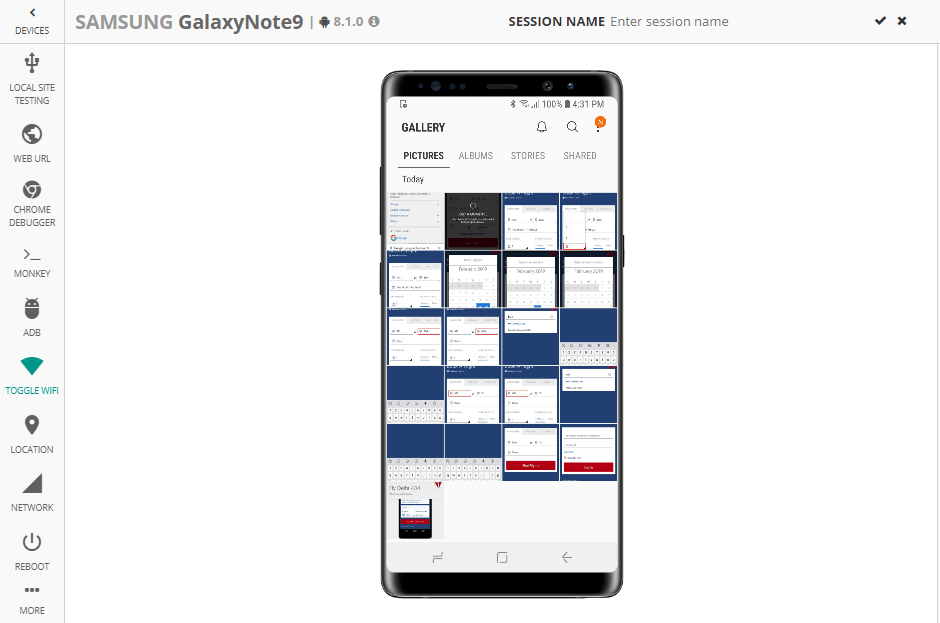
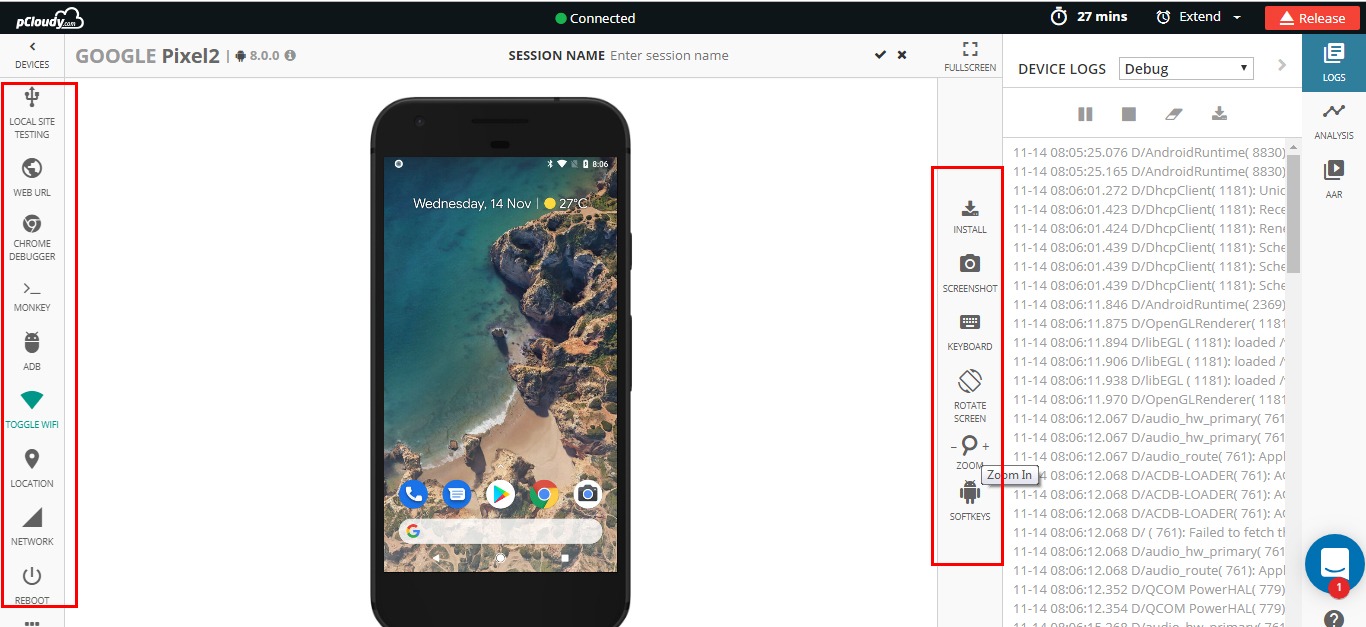
After selecting the device just click on the “Connect to a device” button to connect to the device. The below device page will be displayed with all the supported features.
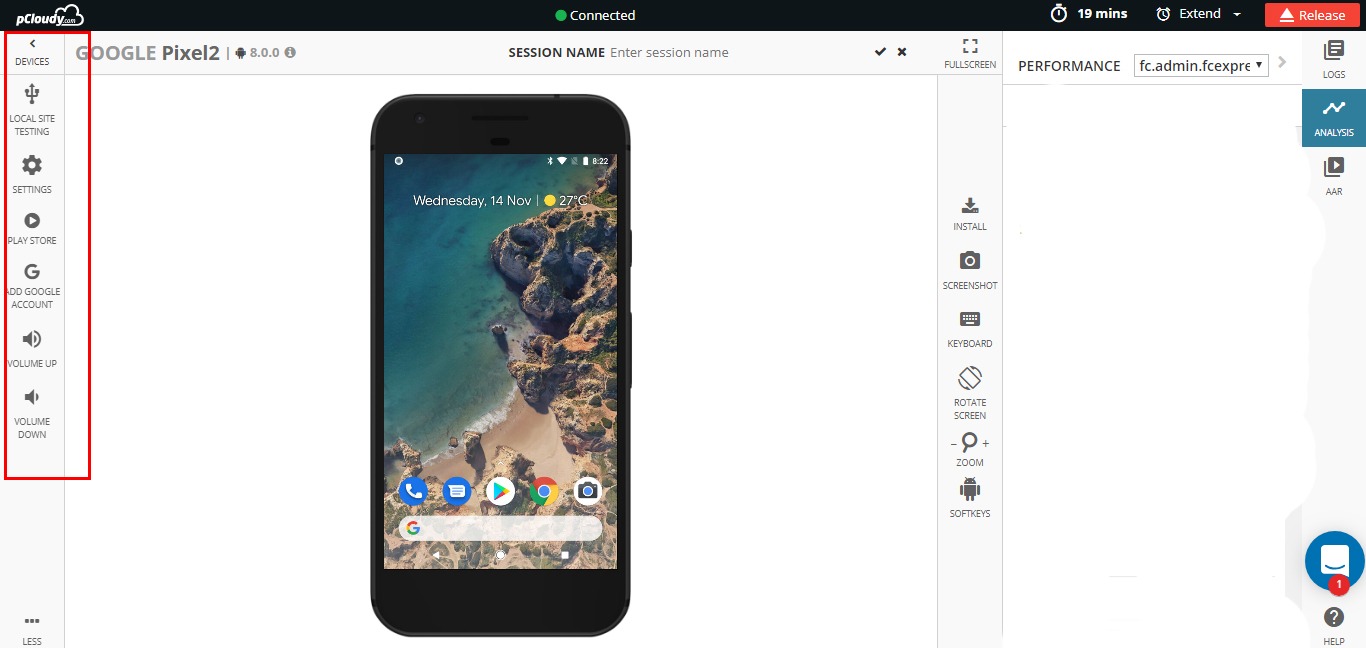
The device is displayed in the middle pane with some features on the right, left and top pane.
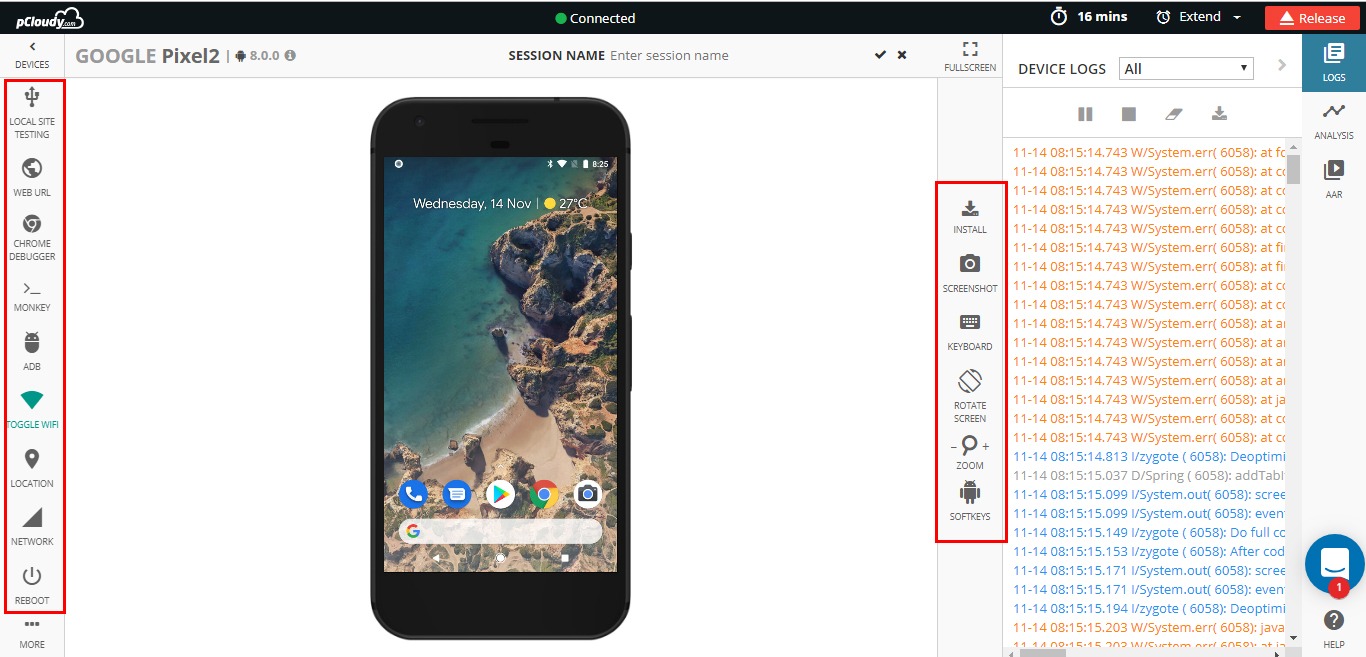
The Left pane where the device information is displayed, followed by other tabs like App/Data, Device Settings, Debug and Automation
The top pane with handy features & a timer to show the remaining time & wake up the device and release the device back to the cloud.
The right pane to view the device logs and Performance vitals for application under test.
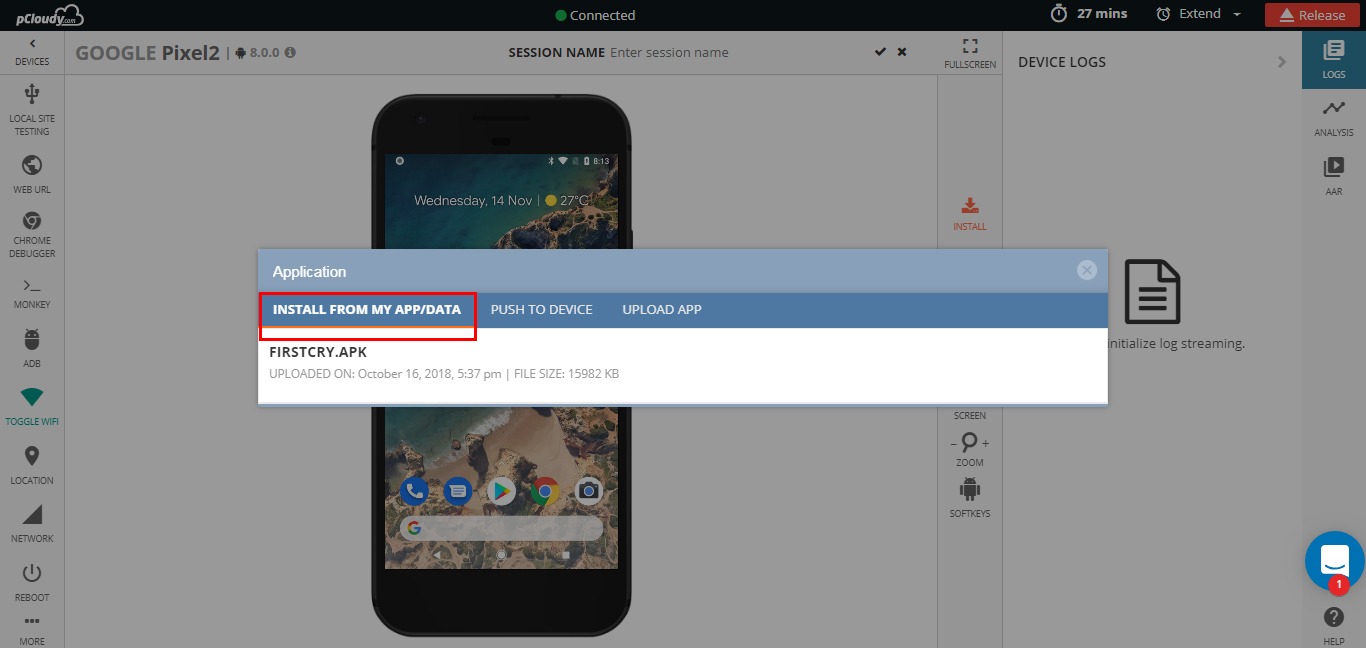
How to Install the application on the Remote Mobile device?
Install from my App data – enables user to upload app on device.
Push to Device – This feature allows you to transfer your test data to the device.
Upload App – Upload and install an app from your local system.
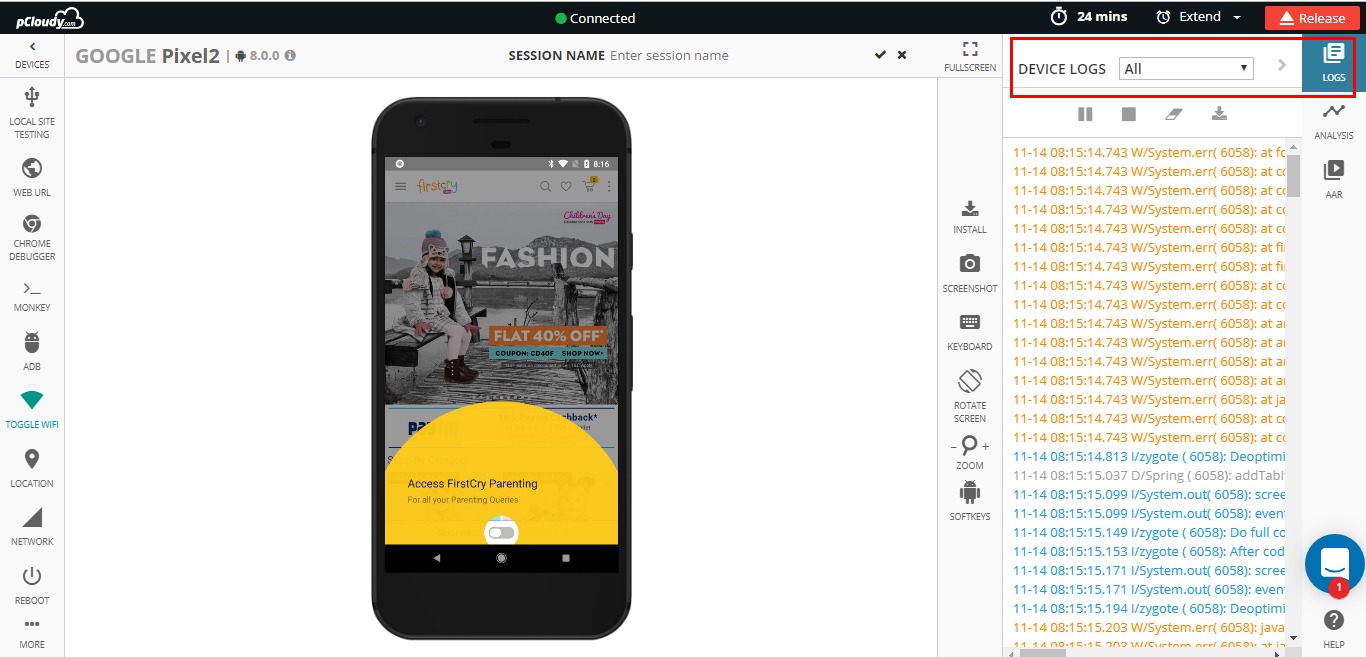
Once the application is installed you can test the application on REAL Remote Device the way you test the application with the phone in hand. You can use the mouse to give touch gestures to the device. You can click the button, drag the screen or double tap the image.
While doing functional testing on the remote device, you can also monitor the device logs next to the device. Please start the logs from the right page and start monitoring the logs next to the device.
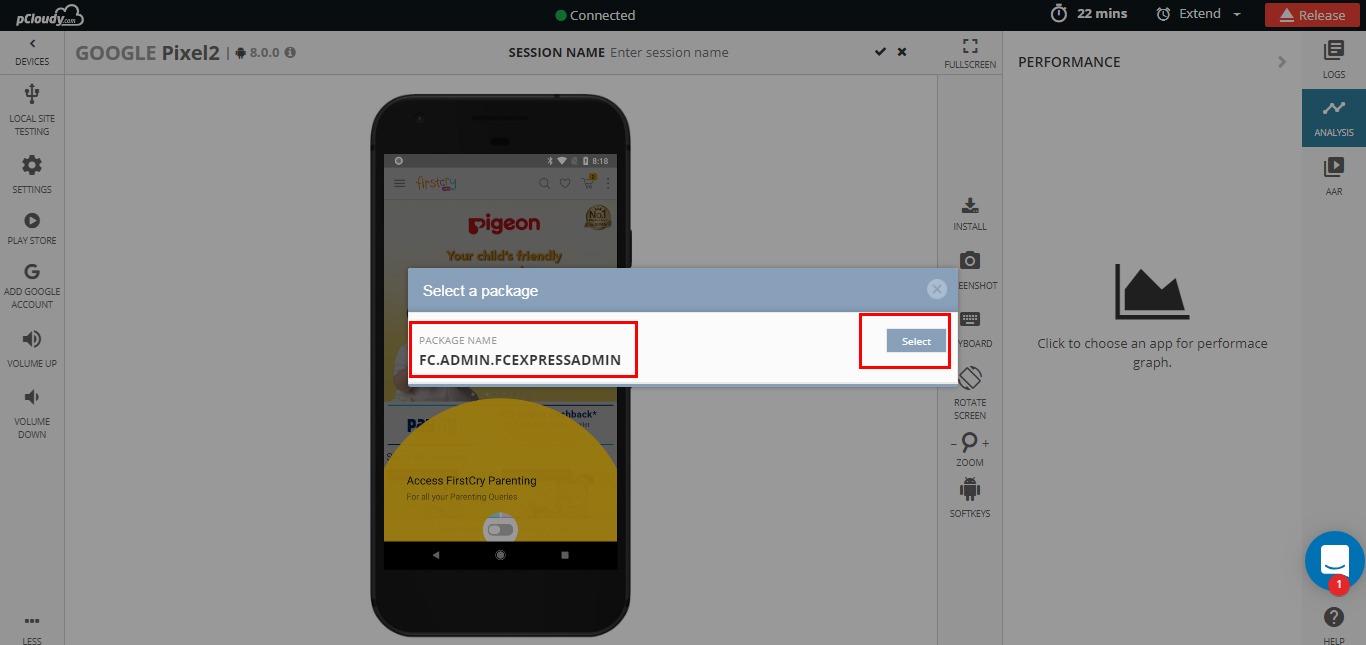
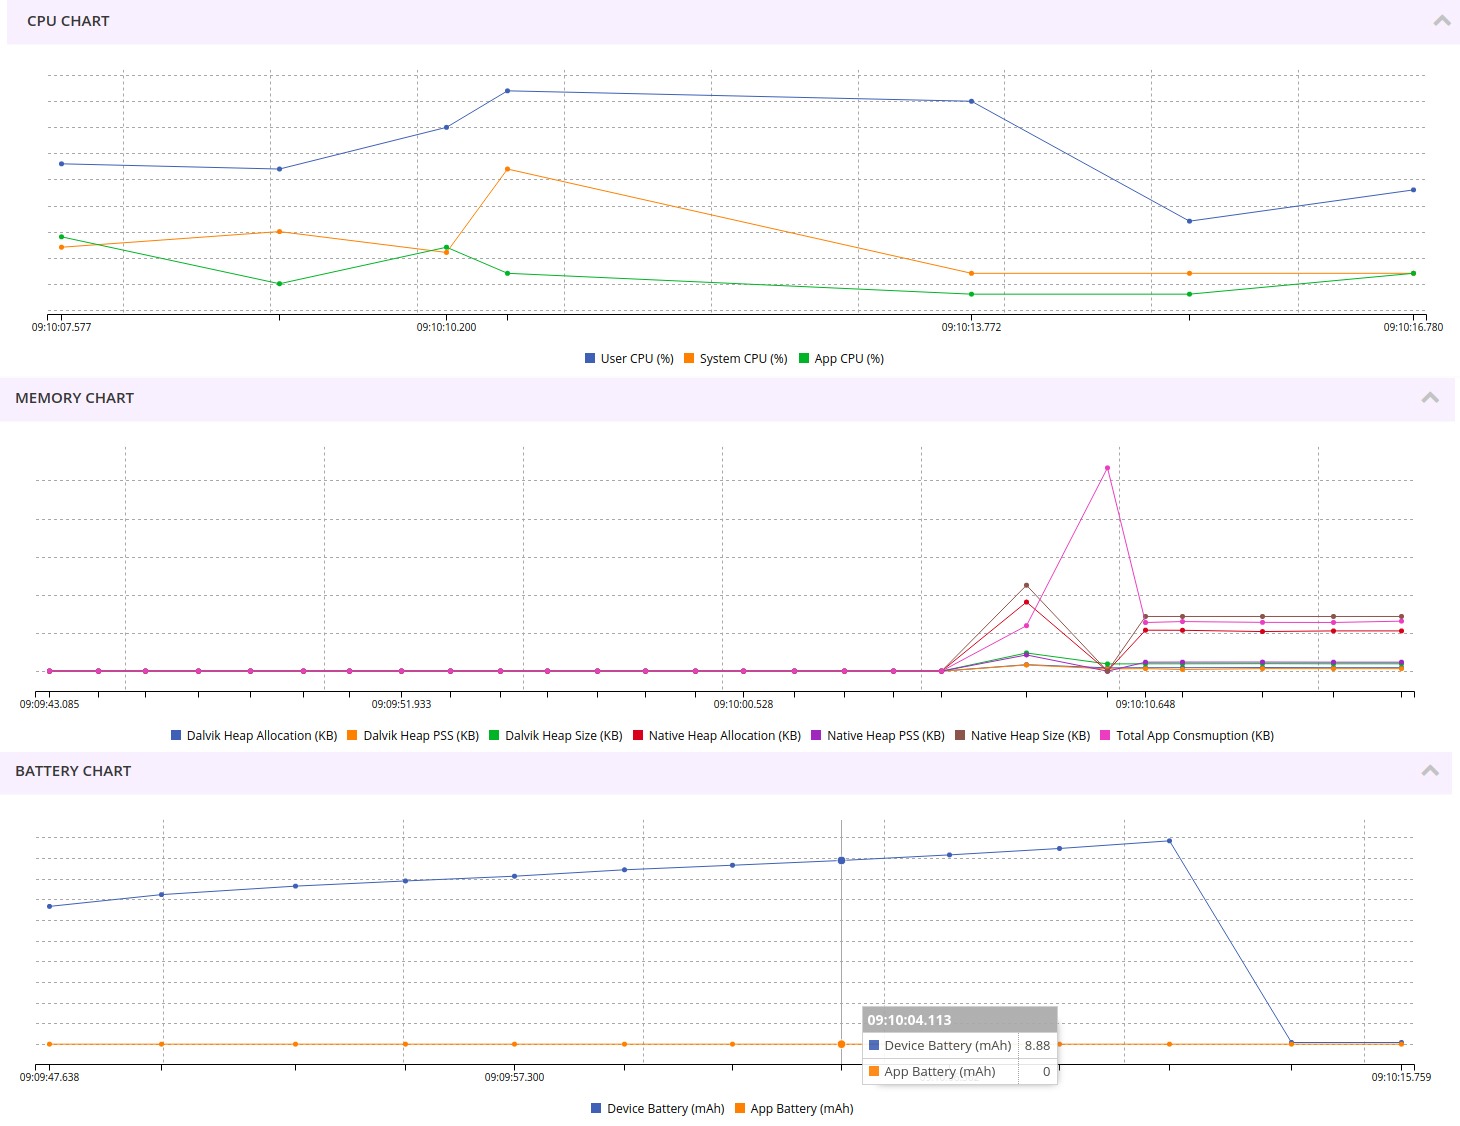
All Mobile App Testing tools at one place: One of the biggest advantages of pCloudy platform is it provides performance statistics like Memory Usage, CPU Usage, Battery usage, Data usage & frame rendering count of the application under test without any extra efforts by the test engineer.
To view this vital statistic on pCloudy platform, please select Performance tab -> Choose an APP -> Select the application under test.
Start navigating through the application to complete the function test flow.
On the right pane, you will start seeing the important vitals of the performance.
On the left pane, you can expand the device settings. All the important frequently used applications are made available to use on the device.
You can perform below actions on the remote device:
Reboot the device remotely
Toggle the Wi-Fi connection
Adjust the volume of the device
Manage the Apps
Open Developers options
Open Play store
Open Device settings
Use Set Phone Location
If your application under test is a location aware app and if it reads the geo-location from the device to provide the necessary results, “Set Phone Location” feature can be used to inject any location on the earth to the device and the device will be teleported to the selected location.
Once you select the “Set Phone Location”, the platform shows the google maps and you can select the location of your choice on this map. The same location is injected to the device.
Other key features during manual tests
You can capture high-resolution screen shots with the skin of the device
Change the orientation of the device to Landscape and portrait
Open the browser from the list of preinstalled browsers
Use the extended keyboard if you want to enter some text on the device. However, for Android ver 5.0 and above you can directly enter the text from your system keyboard.
Check the stack trace (crash logs) if the application is crashed
You can navigate the application with the buttons
Zoom in/out the device shown on the screen
Reset the zoom level to bring the device to default size
Extend the session if the device is available
Wake up the device from sleep mode or push the device to sleep mode
Release the device back to the cloud
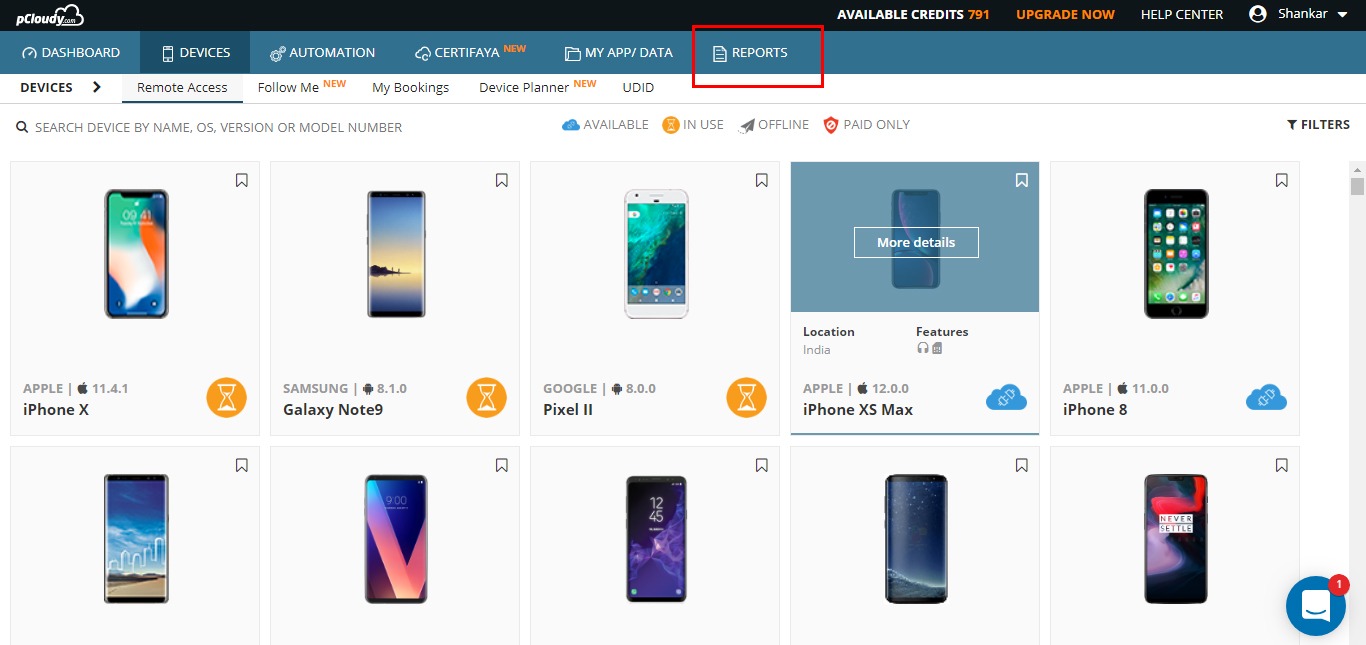
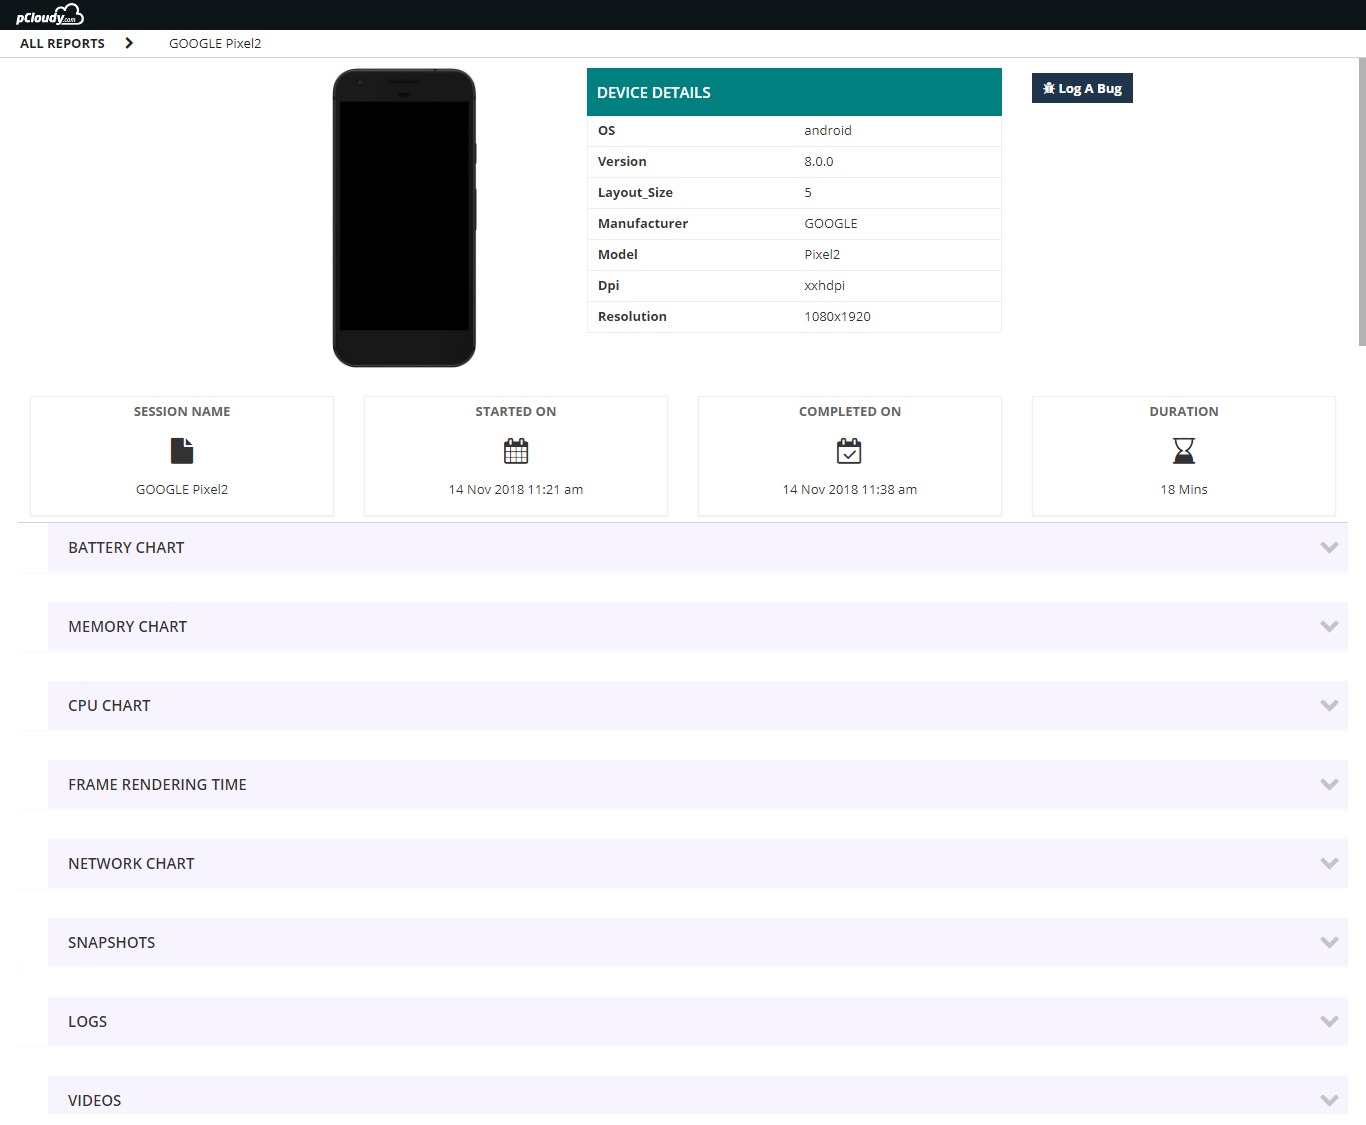
Reporting
Under reports folder, you can see the entire device session data for all the devices you used. You can find Videos & Logs (by default platform generates), screen shots and performance data if selected by the user.
Running test automation remotely
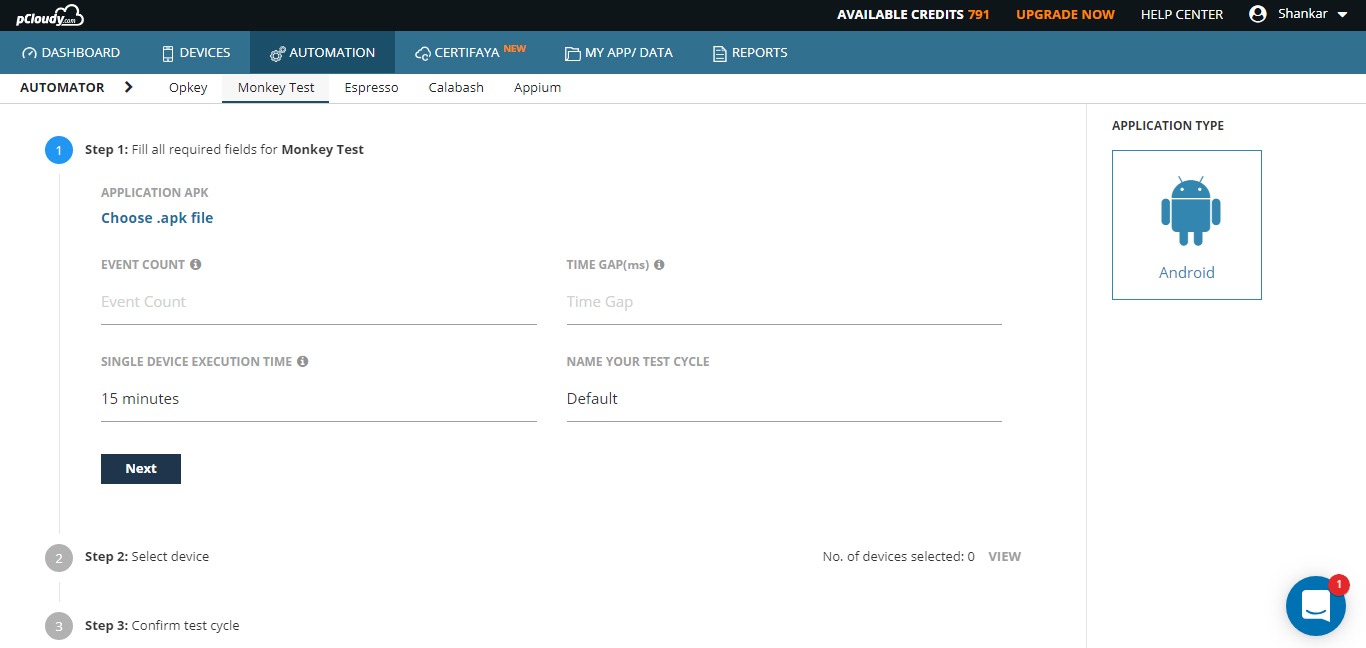
pCloudy platform supports test automation on multiple devices in parallel. Below test frameworks are supported for Android platform.
You just need to select the Test platform, Choose the application under test, Test Suite, time to run on single device and test cycle name.
The biggest advantage of this platform is it generates performance vitals for your test automation scripts without you adding any hooks in your scripts. Otherwise, you will be using multiple mobile App testing tools to achieve the same result.
Once the above data is provided, user can select the devices on which the test automation to be run. Once the devices are selected, the user can schedule the test cycle.
The platform will book the devices on your behalf and will start the test automation as soon as the devices are available. Once the execution is over, the user will be notified with an email and user can see the test reports.
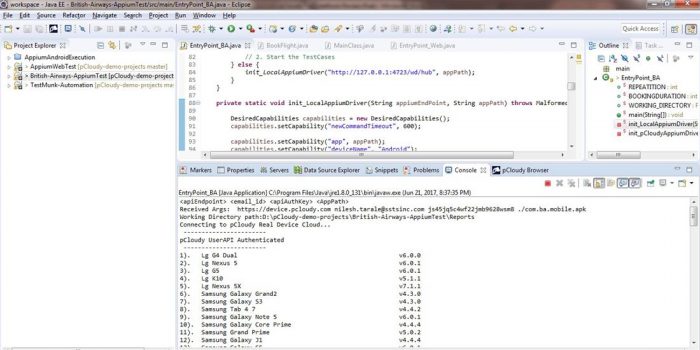
APPIUM Test Automation
You can run the Appium test automation scripts directly from Eclipse or Android Studio. The platform provides the plugin for both the IDE’s. Simply copy a small piece of code to your driver code and run the project, select the devices on which this tests to be run.
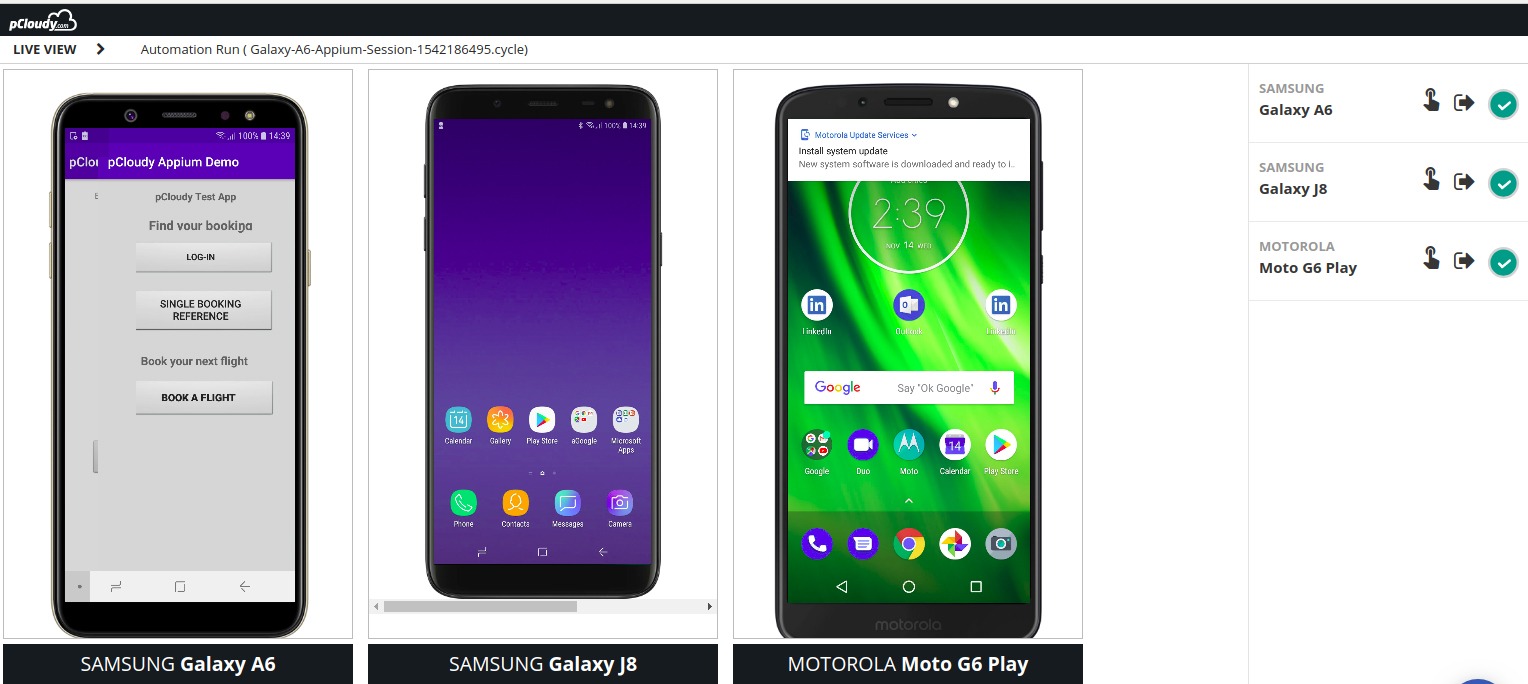
The “LIVE VIEW” feature will allow you to monitor the test automation runs through video streaming on the platform.
LIVE VIEW
Live view – To see the automation happening on devices
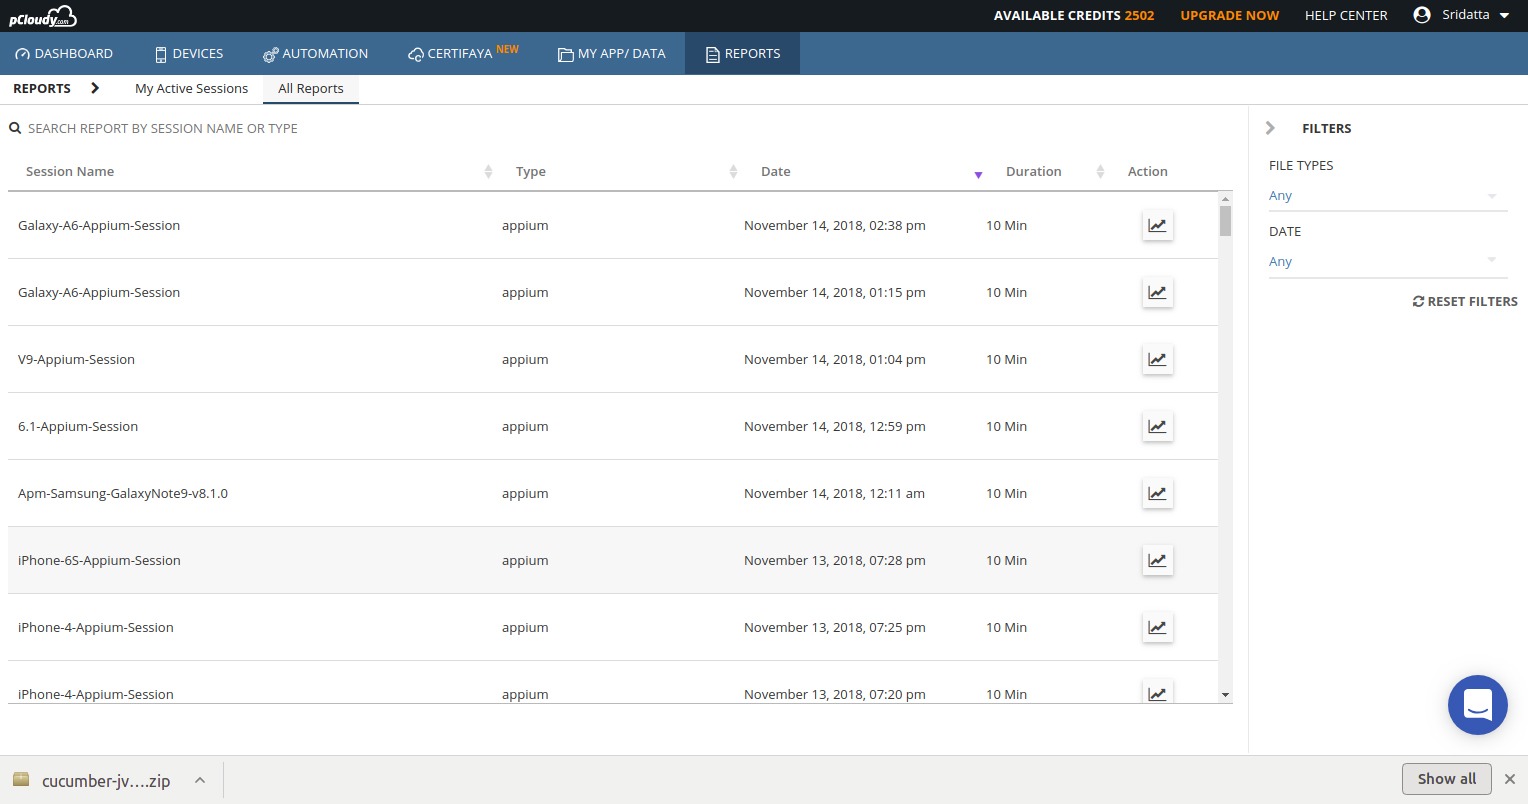
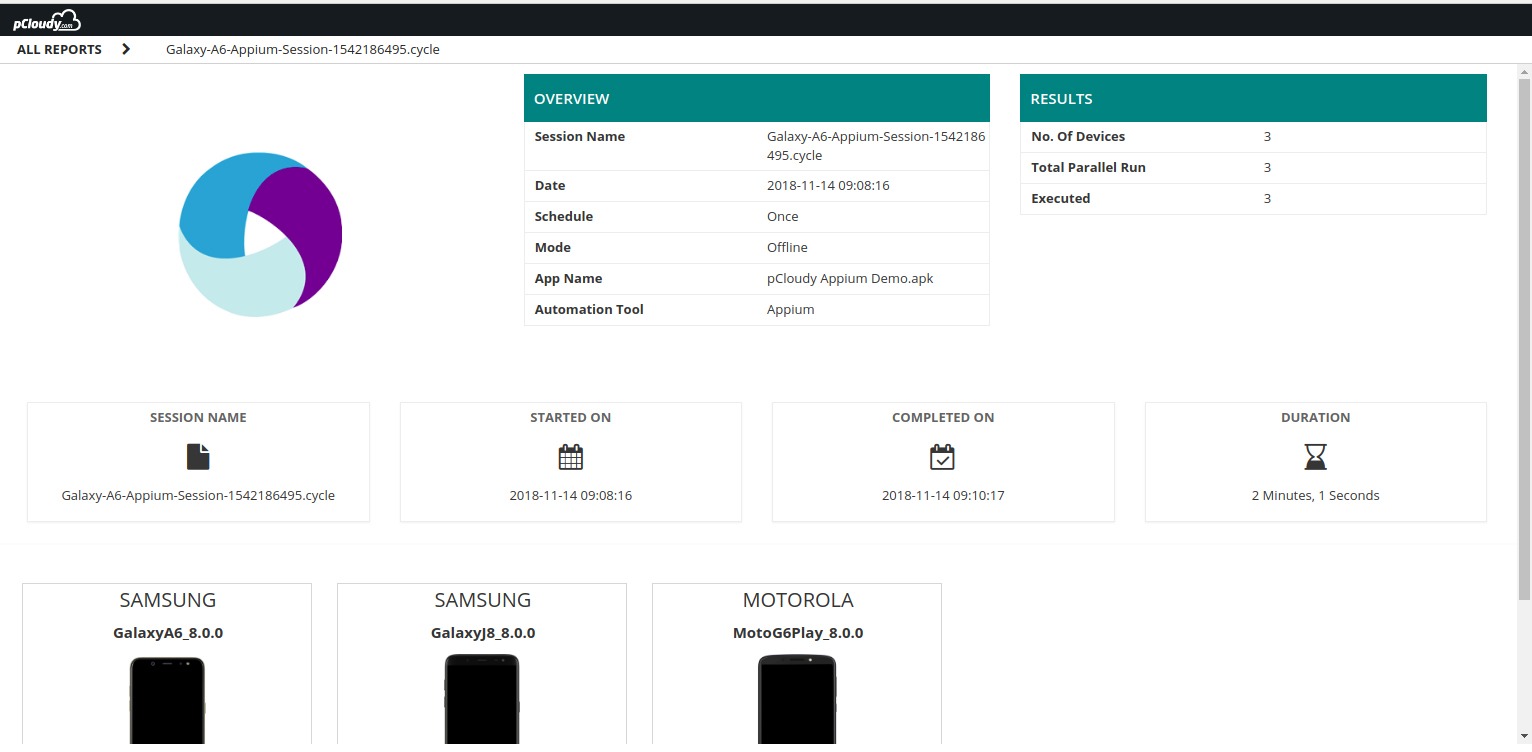
Automation Test Reports
All the test automation reports will be available under Reports folder.
The reports will open in another tab with video, logs and performance data.
To view the performance data for each device, please click on the device icon for each device.
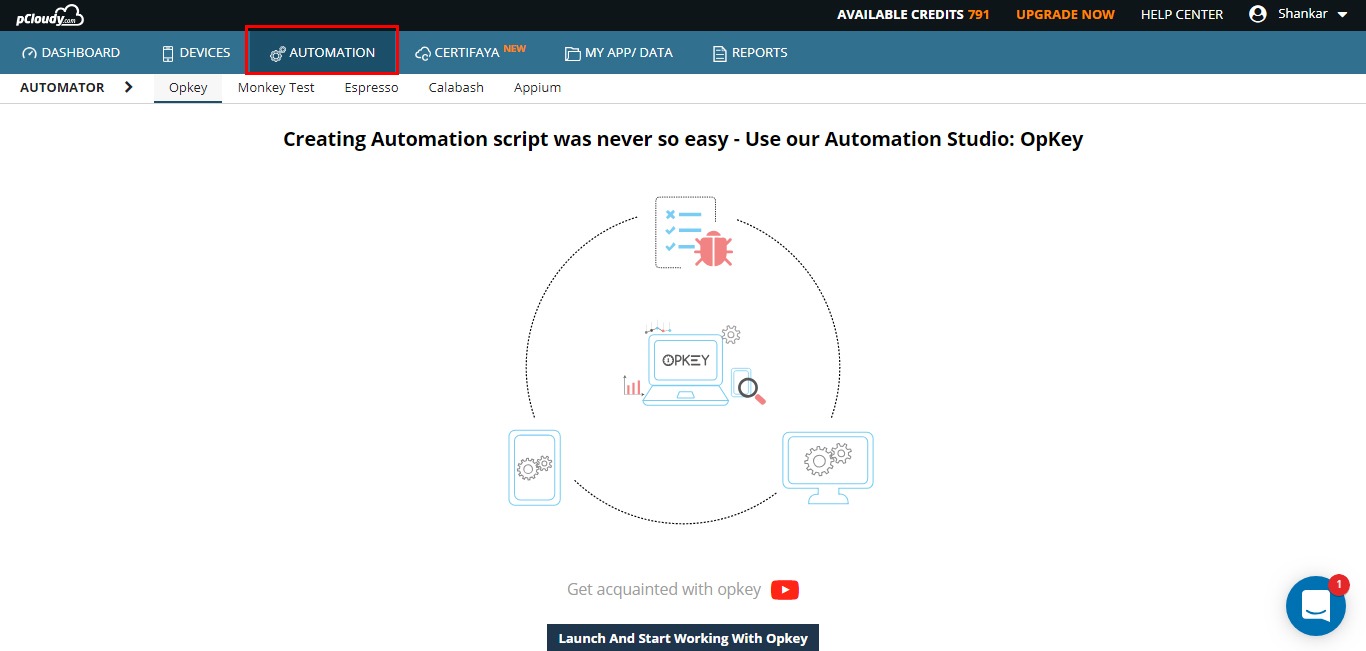
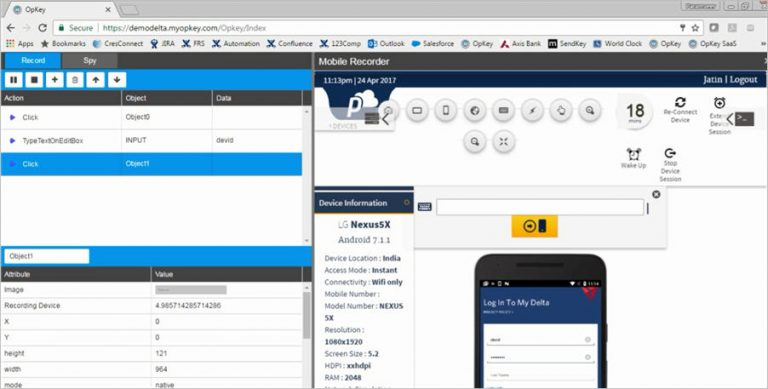
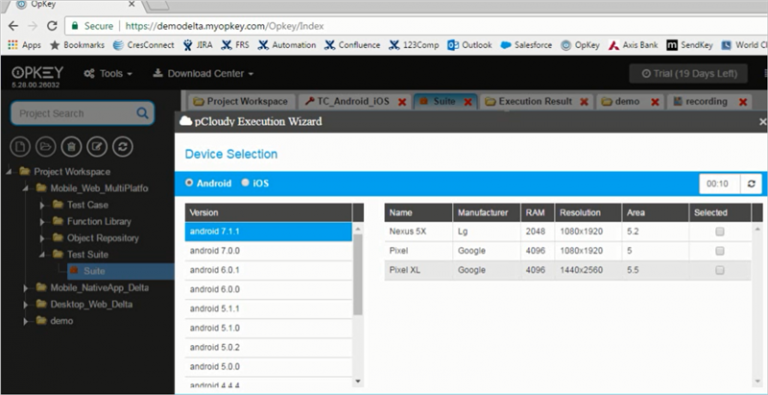
Opkey Integration
pCloudy has seamless integration with OpKey, which is a zero code multi-channel automation tool. A unique combination of Mobile App Testing Tools for manual and Automation testing.
OpKey allows single click recording and generation of automated scripts for Mobile Apps.
You can run the automated scripts on multiple devices on pCloudy directly from OpKey interface.
The quality of App is extremely important for its success in the market. Right devices and right mobile App testing tools are critical ask from every Mobile Dev and Test team. pCloudy with its comprehensive set of devices and tools could be a perfect companion to every Developer and Tester.
Mobile apps can often crash for many reasons. Nothing is as excruciating as memory leaks. It starts with your app crashing often, or becoming slow or maybe making your entire phone slow down, taking longer time to load activities. Memory leaks are notoriously hard to detect, and thus can easily surprise you. Have we ever thought why most of the users uninstall the application after some use?
Which is why it is critical for Developers to understand the memory consumption by any mobile application. How do you detect memory leaks during Mobile Application Testing? And if so, how can you prevent them from hogging mobile resource consumption?
Memory is one of the key resources of the mobile device.And memory leaks in Android is an important thing to be kept in mind. Java is a garbage collecting language, which removes the need for developers to dig deep to manage allocated memory. This reduces the chances of any segmentation fault crashing an app or any unfreed memory allocation from eating up space of the heap area, thus creating a safer code.
However, a garbage collector is never an insurance against memory leaks. There are other ways by which memory can be leaked within Java. This means that your android mobile application is still pretty prone to wasting unnecessary memory allocation and crashing with out-of-memory (OOM) errors.
Figure 1: Image Credit- Toptal
Why are Memory Leaks Bad?
Cause: Memory leaks occur when some variable of the application still has references to some objects that are unnecessary, no longer in use or used to be with the app anymore, is bloating the allocated memory heap and the Garbage Collector is not being able to release that memory.
Effect: Android devices mostly run on phones with limited memory, so as a result of too many leaks, the app runs out of available memory. This triggers more frequent Garbage Collector events which paralyze the device (Stop-the-world GC events) by almost stopping the rendering of UI and processing of events. This leads to an Out of Memory Exception and translates to the user as the app being unresponsive.
Testing for Memory Leaks
Memory Leaks are caused by the failure to not be able to de-allocate memory that is no longer in use, which is why they cannot be identified during black box testing. The best phase to find the memory leaks is when developers are developing the application, at a code level.
It’s best to check for memory leaks during unit testing. However, testers can follow these tips:
Release Unused Memory: Memory leaks can be present because of the bad design of the application and thus might consume lot of memory when the application is in use
Test on Multiple devices:The memory consumption by the application should be monitored while doing the system & functional testing. One shouldn’t rely on a single device testing as there are plethora of devices in the market.
Detecting Memory Leaks
There are quite a few techniques and tools devised by developers to pin point memory leaks. Android’s very own Android Studio has a powerful tool to monitor not only memory usage but also for network, GPU and CPU usage as well, called the Android Monitor.
Memory Monitor in this helps track memory usage, find de-allocated objects, identify memory leaks and helps get an overall sense of how your app allocates and frees memory. It’s done in three steps:
1. During and use and debugging of app, track the memory monitor. If the memory usage graph rises for your app and doesn’t fall even if put in background, it’s a memory leak.
2. Using the Allocation tracker, you can check the percentage of memory allocated to different types of variables in your app. This gives you a sense of how much memory is consumed by which object.
3. Create a Java Heap Option to create a heap dump that keeps a snapshot of the memory at any given point of time, thus providing the data consumption data.
Despite Android’s monitor to detect memory leaks, there are a few platforms from developers that help extract memory consumption data without so many steps for faster testing cycles.
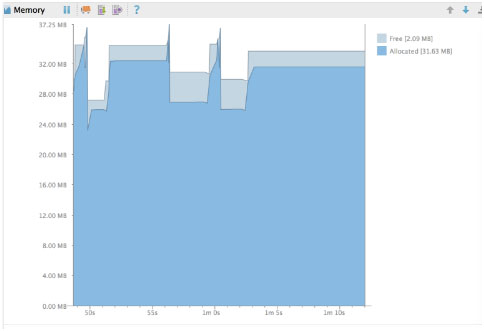
pCloudy’s very own platform for example, generates the statistics for Memory consumption while doing the normal functional Mobile Application Testing on real mobile devices.It also generates other vital data such as CPU consumption, battery consumption & data consumption for testers and developers who reiterate several test cycles across multiple physical devices.
Testing of Mobile Apps in quite cumbersome because of sheer magnitude of testing required on variety of devices. Moreover, Mobile Apps require changes faster than other kind of Applications (Web or Desktop). That’s the reason, more and more organizations have started realizing the need of using automation testing over manual testing as much as possible.
Mobile App Automation Testing can be a massive undertaking, and if unaware, one can end up complicating the process by selecting a bad tool. With a major trending shift to open-source mobile test automation tools, there have been a plethora of tools available in most open-source software markets.
So how do you know which are the best software testing tool available in the market? Which tools will give you the most efficient solution to fulfill your enterprise’s need for speed and integration? Will manual testing suffice your app testing needs?
You would need a set of criteria to fulfil when assessing your selection of the right open-source automation tool. Here are a crucial few questions to ask:
Do you have the required skilled resource for automation tasks?
Is there ease of script development to support agile processes and shorter iteration cycles?
Does the tool support cross team collaboration for seamless use by QA and Dev?
Can it match app platform with test development language?
Will it have performance capabilities gaps while testing?
Will it support both real devices and emulators?
Does the app support multiple platforms — Mobile and Web?
Does it have multi device execution capability
How easily can it integrated with external Device cloud platforms?
Best Open-Source Mobile Testing Frameworks to use:
To take the final call, testers must have a strong awareness of the tool’s strong and weak aspects, what it can do and what it cannot, and find a balance between cost and benefit.
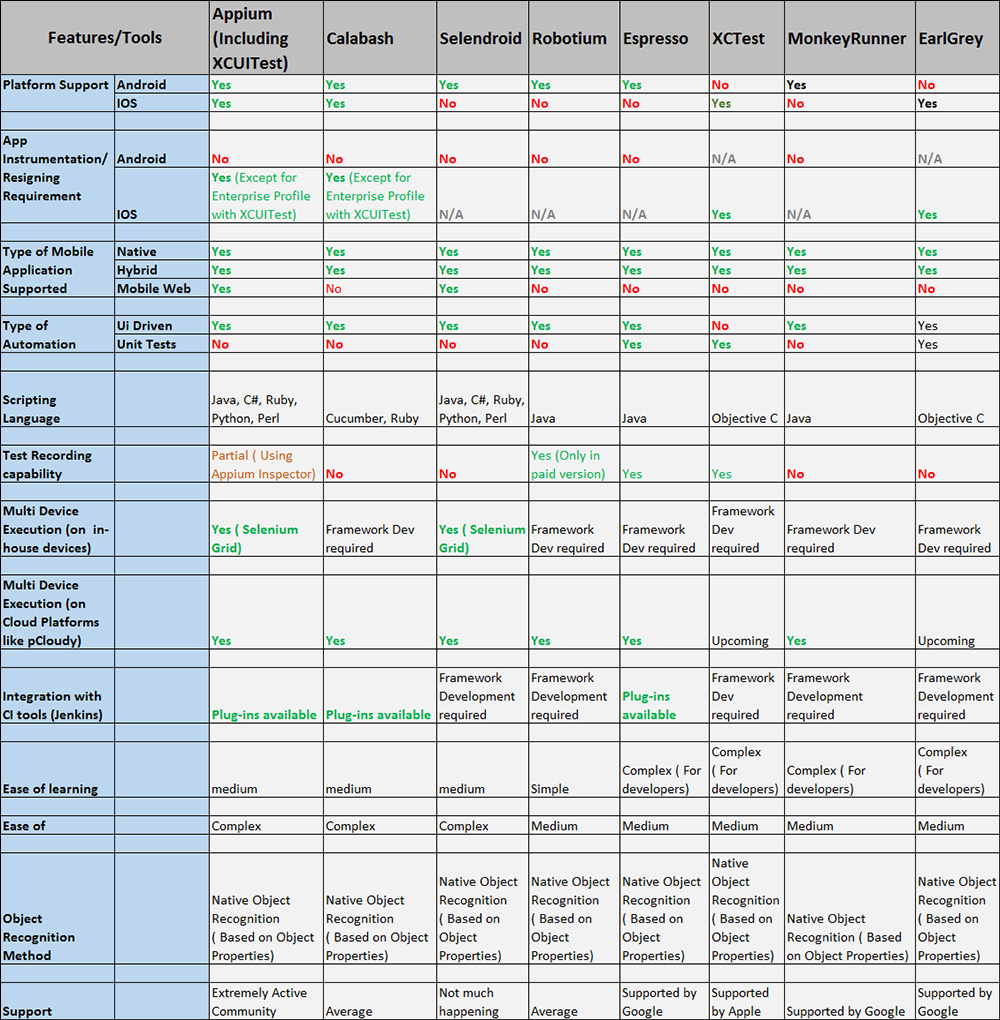
These are top highly adopted open source test automation frameworks available in the market. Each of these frameworks are backed by different communities due to their unique offerings to the target audiences and relevant platforms. The overall benefits are that they cover a wide range of devices. However, for technical clarity it’s important to know the pros and cons of the framework based on your mobile and web testing needs:
1. Appium: Widely adopted, it is the leading open-source test framework for mobile app (Android, iOS) test automation.
Pros:
Best suited for QA teams to test the functionality of mobile web, native and mobile hybrid apps across iOS and Android.
Its reports are limited from debugging and fast feedback loop.
Supports development tools using any WebDriver compatible language including Java, C#, Ruby etc.
Cross Browser Support and cross platform capabilities
Con: It is less suitable for performing and developing unit testing.
2. Calabash: It is a Behavior-driven development (BDD) test framework based on Ruby development language.
Pros:
Has a large community support
Cross platform development support (Android and iOS)
Provides solid reports and insights to QA and Dev teams
Easy path to both develop and test features in parallel
Simple and easy-to-read test statements
Con: It is not friendly to languages other than Ruby.
3. Espresso & XCTest UI: Both are very similar tools as they were designed for the target users. Espresso for Android and XCTest for iOS are fully maintained by Google and Apple, assuring the latest features for respective platforms.
Pros:
Latest feature integrations assure lead in market curve for developers and testers
Easy to develop techniques including test recorders
Support both types of unit testing and functional UI
Con: Both are app context only, which means limited ability to test for user condition scenarios
4. Selendroid: An open source automation framework which drives off the UI of android native, hybrid and mobile web application. A powerful testing tool that can be used on emulators and real devices. And because it still reuses the existing infrastructure for web, you can write tests using the Selenium 2 client APIs.
Pros:
Can interact with multiple Android devices and simulators simultaneously
Can simulate human actions like touch, swipe, drag etc. on devices
Supports development tools using any WebDriver compatible language including Java, C#, Ruby etc.
5. Robotium: Widely adopted open source Android test Automation framework.
Pros:
Easy to write powerful test scenarios
Full support for native and hybrid Android Apps
Easy to use recorder
Handles multiple Android routines automatically
6. EarlGrey: EarlGrey is a native iOS UI automation test framework that enables you to write clear, concise tests. It integrates with Xcode’s Test Navigator so you can run tests directly from Xcode or the command line.
Pros:
Works directly from XCode
Full support for native and hybrid Android Apps
Synchronization features which automatically synchronizes with the UI and network requests.