Category Page

Emulators vs Real Devices


Mobile Responsive Test across range of Mobile Devices and platforms is extremely important for superior User Experience. However, Mobile Responsive Test and debugging can get knotty, especially when there are issues like obfuscated HTML/CSS/javascript code, improperly implemented HTTPS, browser inconsistencies, page load performance and so on. So how do you overcome these issues? Using a Web Developer Tools or debugging extensions make debugging your web application easier. Here we’ll talk about the most popular one – Google Chrome Developer Tools.


The Google Chrome Developer Tools is a consolidated environment built into Google Chrome Browser. It is used for web authoring, debugging, monitoring, optimizing, and understanding web applications or websites. (Sourced from Google Chrome DevTools)


A responsive testing simulator provides a virtual environment where you can test the functionalities just like in a real device. You can also test websites on mobile devices online and test websites on different screen sizes. It is easy to perform responsive design testing across devices on a simulator.


Want to test your Mobile App?

Join pCloudy Platform!

Here are some of the key Chrome DevTools features


  • Inspect and edit the DOM and CSS of your website in real-time
  • Run code snippets from any page
  • Debug Obfuscated code
  • Set advanced breakpoints and debug JavaScript using graphical debugger
  • Troubleshoot Security issues
  • Analyze run-time and page performance to improve the speed of your app
  • Trace reflows and repaints as your app loads


The Chrome DevTools provides almost all the gears required to inspect, debug and monitor the performance of a Web App/mobile web. It also provides additional capabilities to simulate Mobile Devices to test and build mobile-first, responsive web sites. You can even debug web content on a real Android Device from a development machine. But, is it enough to perform Mobile responsive test on one or two devices?


Remote debugging using Chrome DevTools in integration with pCloudy’s Mobile Device Lab

Device fragmentation is a very real problem when testing Web apps on real devices, particularly for UI and functional tests. The number of devices with unique specifications and proprietary build variations has increased. At an advanced level, to perform Mobile Responsive Testing and to check performance of the Web App on real devices, you will need to experiment your site on various platforms, across a number of device form factors. pCloudy’s Mobile Device Lab offers complete integration with Chrome DevTools to test your apps on real devices. This integration allows you to test Web Apps on a myriad of android devices with different sizes and configurations.


Here’s how most App developers test their Web Apps


Inspect and live edit your site’s design and content


Test and edit your site in live mode by inspecting all the HTML and CSS in your page. In the Elements Panel, you can live-edit a DOM node by simply double-clicking a selected element and making changes.
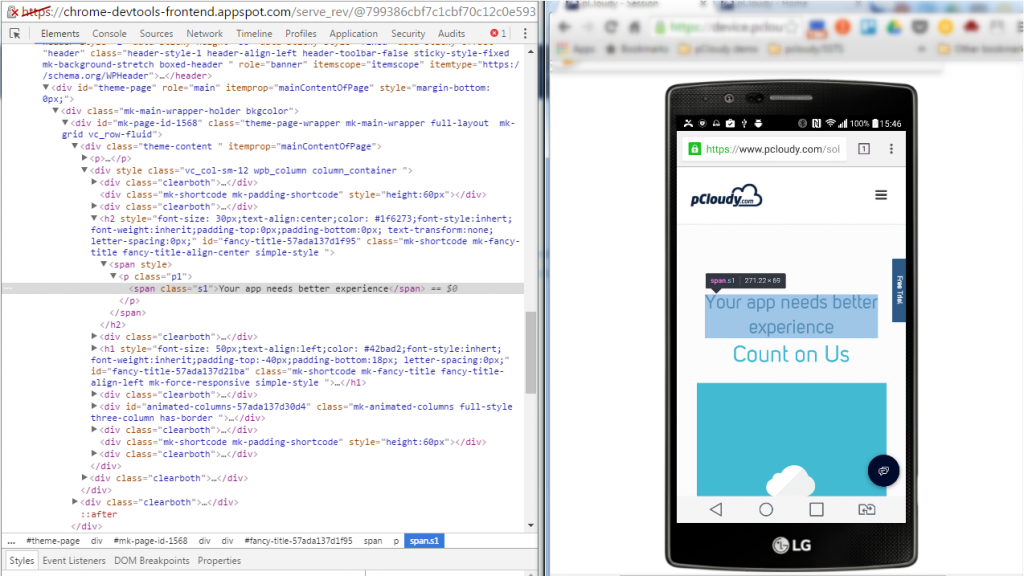
 

mobile responsive test


You can even live-edit style property names and values in the Styles pane. Examine and edit box model parameters.
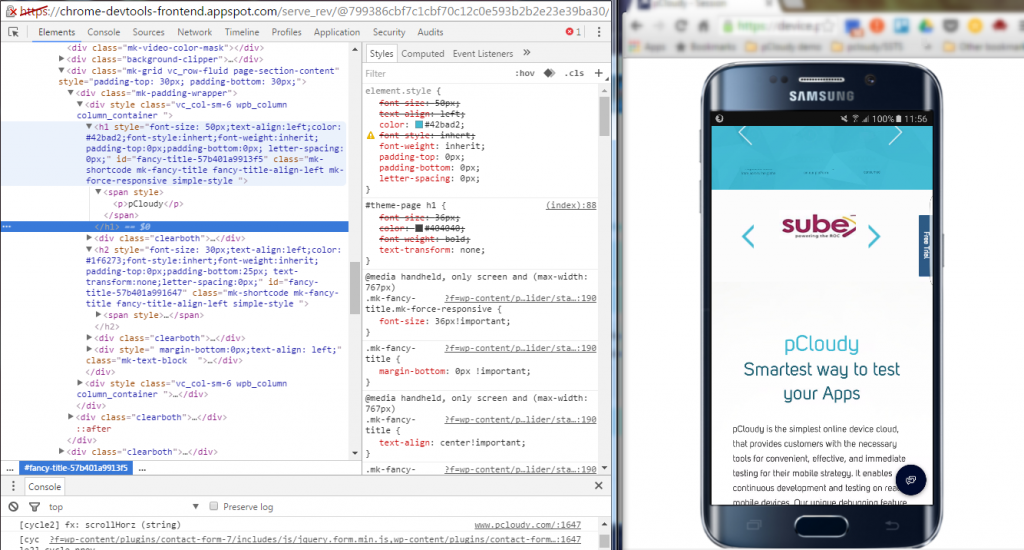
 

Live-Edit_Styles


It is also possible to edit the current element’s box model parameters by making changes to top, bottom, left, right values for the current element’s padding, border, and margin properties using the Computed pane.
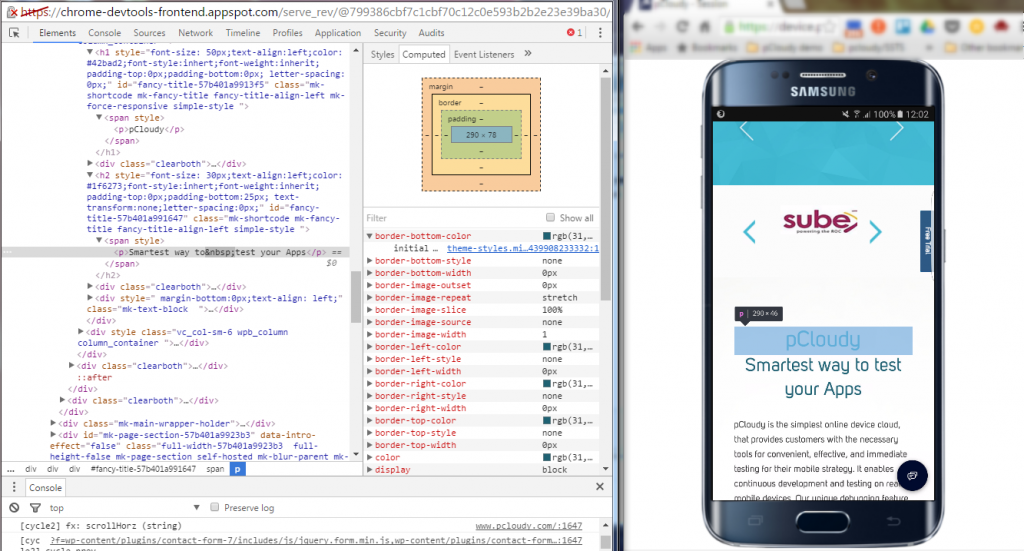
 

Box_Parameters


Remote Debugging on real devices to fix errors in the code


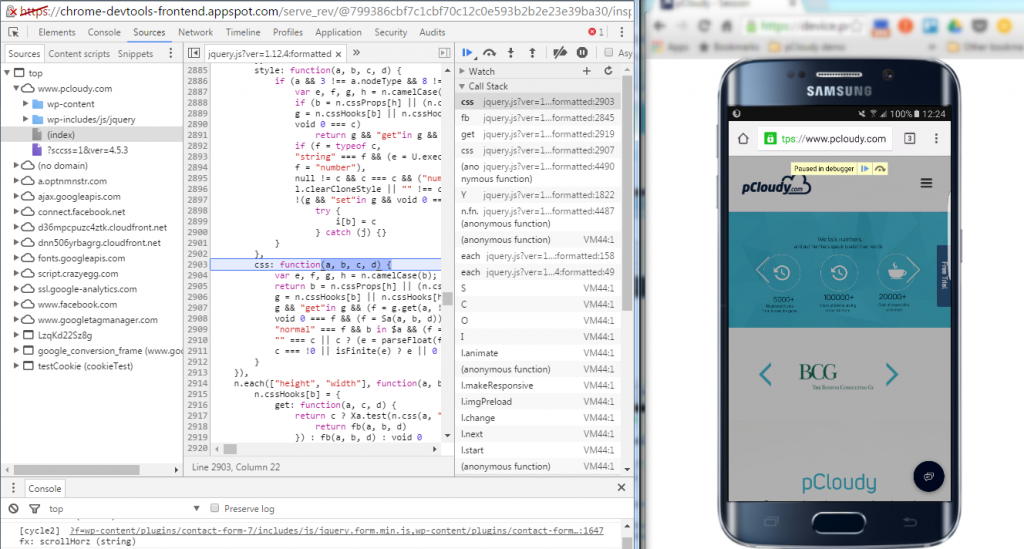
Debugging Obfuscated Code: Make your code readable and easy to debug even after you’ve combined, minified or compiled it. You can easily change the formatting of your minimized code by clicking on { }.


Debug-Obfuscated


Test and optimize the performance of the Web App


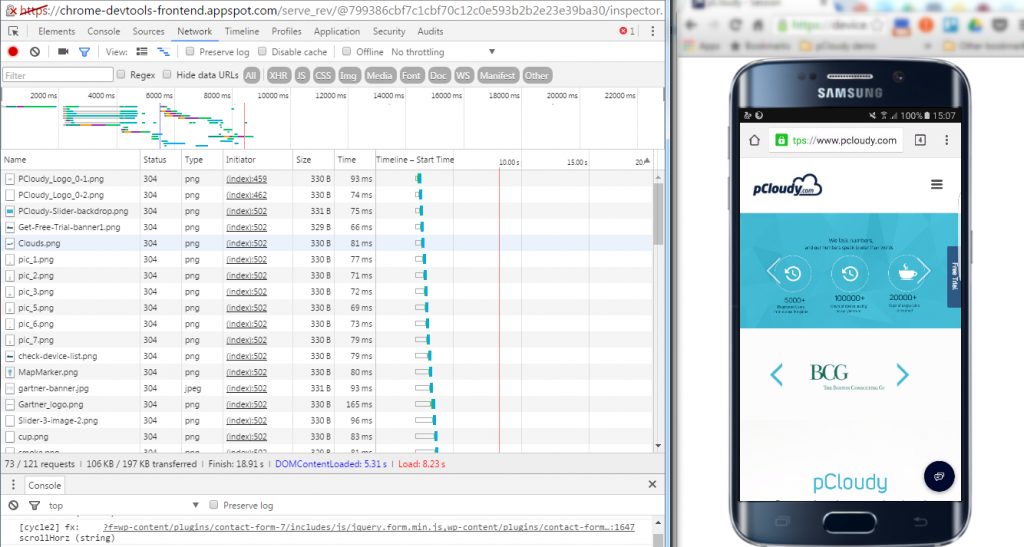
The Network Panel allows you to see how your page renders, and time taken to render from start to end. To do this click into the “Network” panel, click on the camera icon and refresh the page on the device.


Network


The Timeline panel helps you to record and analyze all the activities in your application as it runs. It’s the best place to start investigating perceived performance issues in your application.


To make a recording of a page load, open the Timeline panel, open the page that you want to record, and then reload the page. The Timeline panel automatically records the page reload. You can also record page interactions on the page and view the performance details through the recorded timeline.


Here are some more details you can view using the Record Timeline


  • Record the Timeline to analyze every event that occurred after a page load or a user interaction
  • View FPS, CPU, and network requests in the Overview pane
  • Click on an event within the Flame Chart to view details about it
  • Zoom in on a section of a recording to make analysis easier
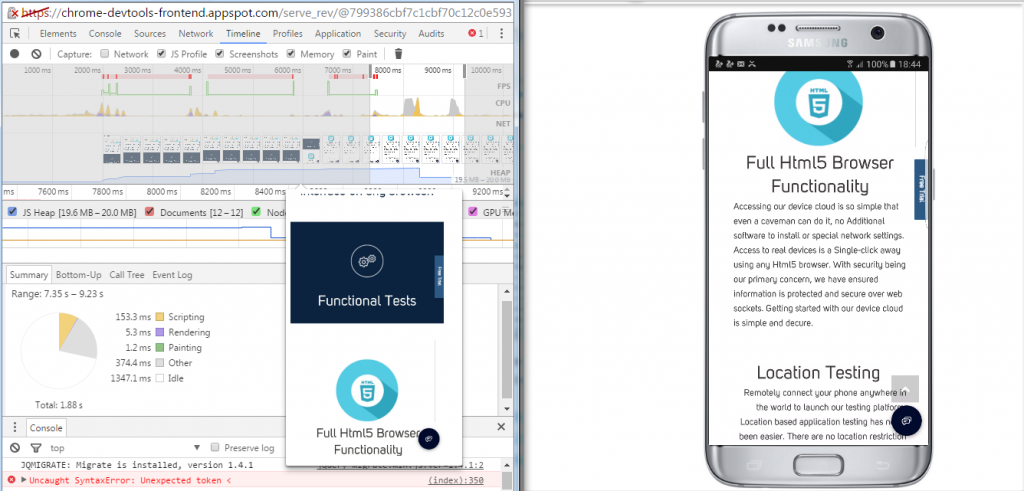
 

Timeline


There are some things to be kept in mind while performing responsive testing:
 
Device selection
It is better to ask your business analyst or your manager which devices we need to perform the testing. Creating a device matrix is a tedious job due to device fragmentation with frequent browser and OS updates. Even if you spend a lot of time on making a strategy for the combination of devices, that may not get approved by the product manager or scrum master.
 
Automation testing and Manual testing
It’s better to use both automated and manual approach to perform testing. Based on the type of testing you can share the effort like 70% automated and 30% manual. It is obvious that sometimes automated testing will miss something that a human eye can see. A tool clicking on a link or zooming in and out is different from doing it manually.
 
Emulators, simulators and real devices
If you wish to test your app on many verities of devices then you can also opt for emulators and simulators. It won’t be possible for you to set up a device lab as it will cost a lot. So you can use a real device that is popular in the market and emulators for the devices that are not that popular.
 
Prioritize
Mobile app testing including mobile responsive testing needs to be perfectly prioritized as testing is a time-consuming process. Responsive testing priority should be discussed with the BA and the product manager well in advance and take some suggestions from them. The issue is that there are a plethora of devices and while prioritizing, the most popular devices will be used first for testing.
 

Conclusion

“Using the right tools for the right job” is an old aphorism that applies to all domains including Software Development. As we’ve seen, Chrome DevTools has several features that help you develop better, debug faster, and measure efficiently the performance of your website or application. An ideal choice for you for Mobile Responsive Testing.


The features discussed in this blog are some of the most common ones used by developers, designers, and testers to write, debug, monitor and optimize Websites and Web Apps. Using these features in integration with Mobile Device Lab like pCloudy can transform the entire process of creating, testing and launching Websites and Web Apps.


Want to test your Mobile App?

Join pCloudy Platform!

For more information check out this video:

 
Related Articles:

  • Beginners Guide to Mobile Web Debugging on Real Devices Using Chrome DevTools
  • Mobile Testing Infrastructure – Emulators vs Real Devices
  • Problems With Online Android Emulators and How to Solve it?
  • Tips to Consider While Creating a World Class Mobile Testing Lab
  • Functional Testing Vs Non-Functional Testing
  • Mobile App Testing Tools to Improve App Quality


    Mobile is the key to the digital world in today’s era. The rise of Mobile Internet has ensured that we all are going to make most of our digital decisions on a Mobile device (primarily using an App). Mobile Apps are going to be everywhere.

    One of the biggest challenges for App Development teams is to ensure that their Apps works on the variety of devices. They need their apps tested on multiple devices before it is released to the market, simply because of the plethora of devices available in the market.

    Each mobile from each OEM (Original Equipment Manufacturer) with different specifications is a unique device where the application should be tested.

    Practically it is not possible to test the application on each and every mobile device available in the market. But the app must be tested on a large set of the devices depending on the market segment of App under test.


    Introduction:


    pCloudy is a cloud-based remote mobile app testing platform which allows testing of Android and iOS mobile applications on remote REAL devices. It allows the user to do Manual testing and also facilitate to run test automation on multiple devices in parallel.

    It provides a whole lot of statistics like session video, device logs, Screenshots, data usage, memory usage, CPU usage, battery consumption and frame rendering count. The devices are also equipped with Real Operator SIM’s to make MO/MT calls and can receive and send SMS.

    Preparing for Manual Test

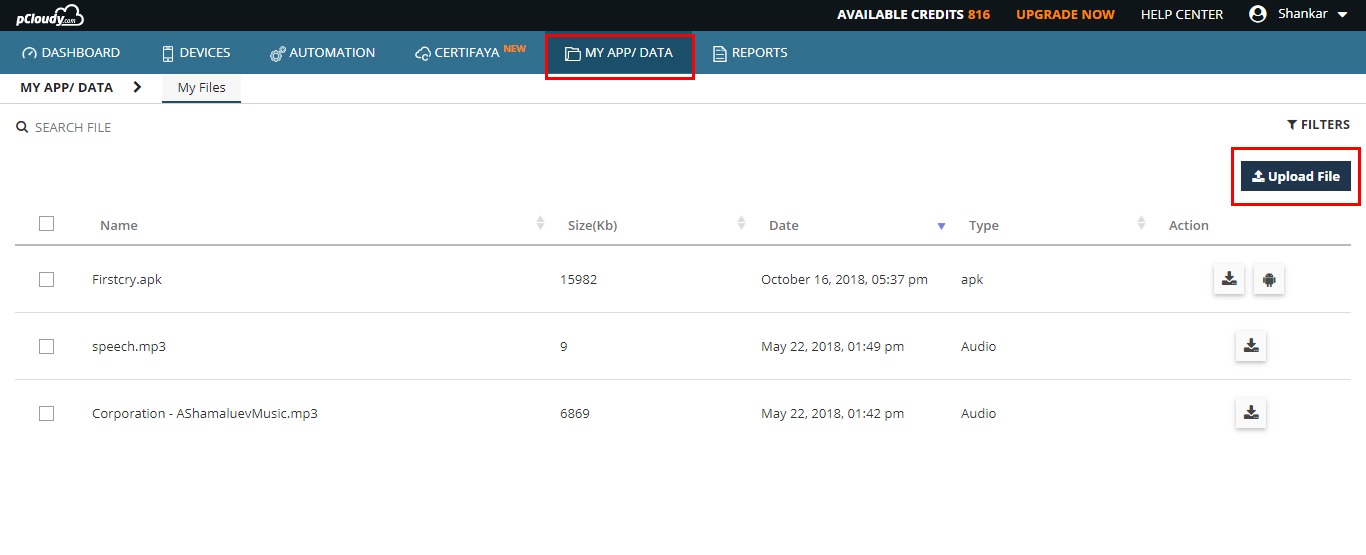
    Before we start the test on pCloudy, we recommend uploading the test application, test data or even test suites to the cloud drive provided by pCloudy. This is the secured location for each user.

    Click on the Upload button and select the file from your local system through file explorer. After selecting the file select upload and the file will be uploaded to your cloud drive.

    MyApp Data
    You can also manage the cloud drive by download. These applications can be installed on the devices as explained below.

    Performing Manual Test remotely

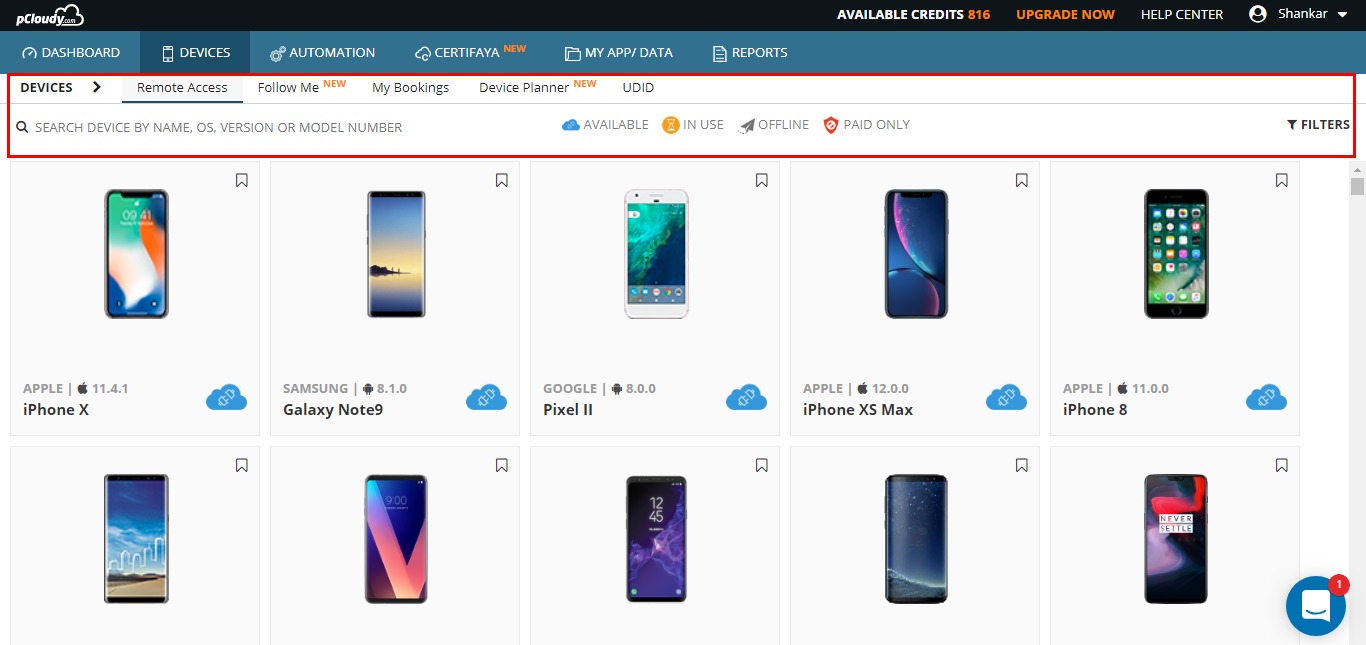
    Based on test requirement, you can search for any specific device by using the filters provided at pCloudy.

    (Note: Click on any image for enlarged view)

    Search device using filters

    You can access any device for Instant Access. Also, you can book the device for a longer duration for your planned testing using “Book your Device” link.

    After selecting the device just click on the “Connect to a device” button to connect to the device. The below device page will be displayed with all the supported features.

    Device Information

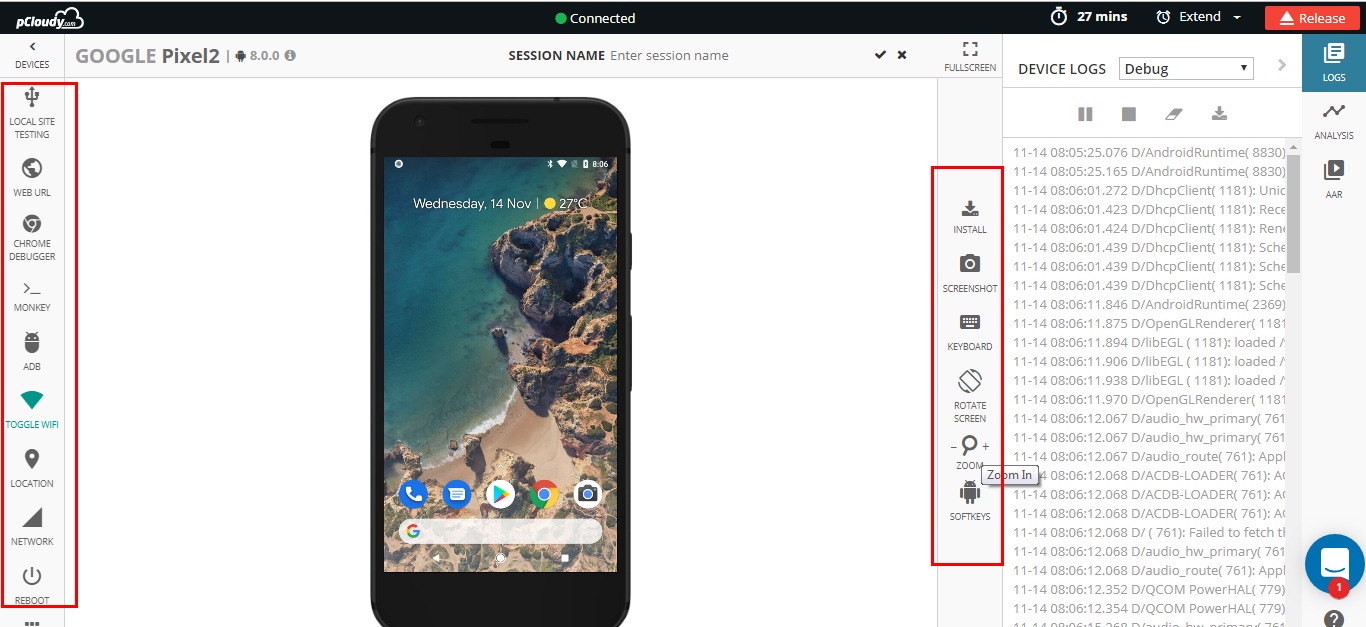
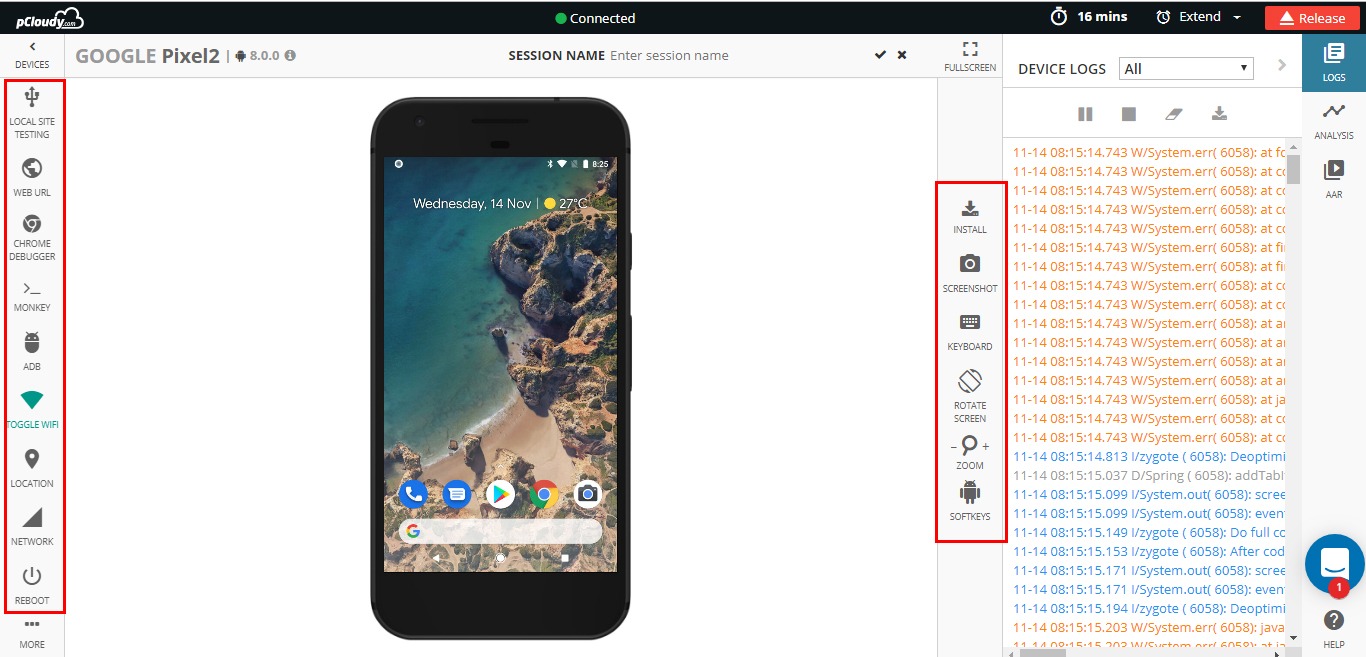
    The device is displayed in the middle pane with some features on the right, left and top pane.

    • The Left pane where the device information is displayed, followed by other tabs like App/Data, Device Settings, Debug and Automation
    • The top pane with handy features & a timer to show the remaining time & wake up the device and release the device back to the cloud.
    • The right pane to view the device logs and Performance vitals for application under test.

    How to Install the application on the Remote Mobile device?

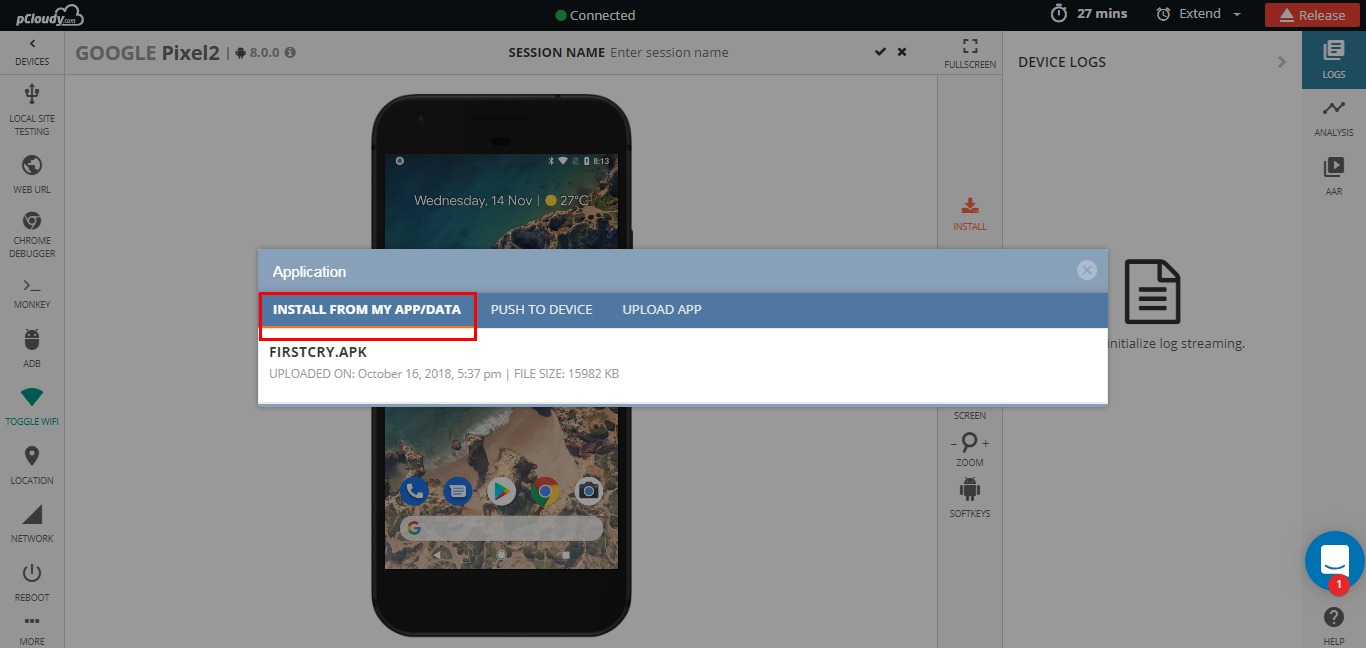
    • Install from my App data – enables user to upload app on device.
    • Push to Device – This feature allows you to transfer your test data to the device.
    • Upload App – Upload and install an app from your local system.

    Install APK on Device

    Once the application is installed you can test the application on REAL Remote Device the way you test the application with the phone in hand. You can use the mouse to give touch gestures to the device. You can click the button, drag the screen or double tap the image.

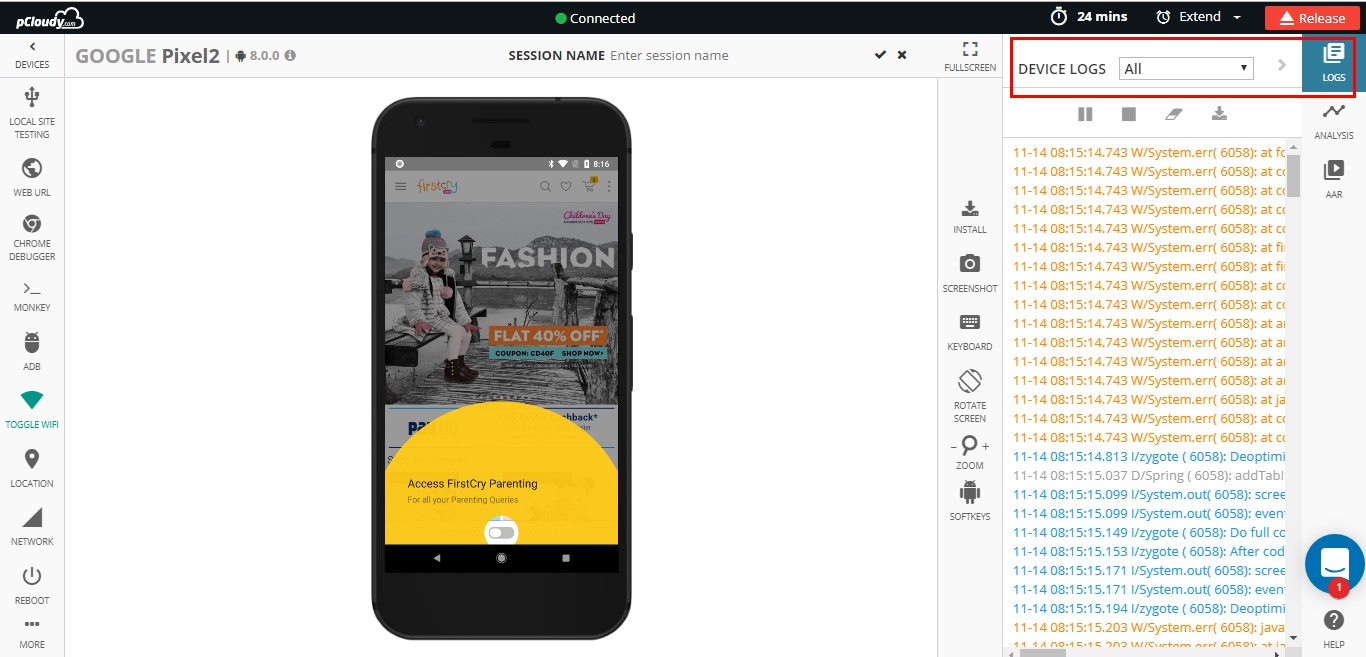
    While doing functional testing on the remote device, you can also monitor the device logs next to the device. Please start the logs from the right page and start monitoring the logs next to the device.

    Device Logs

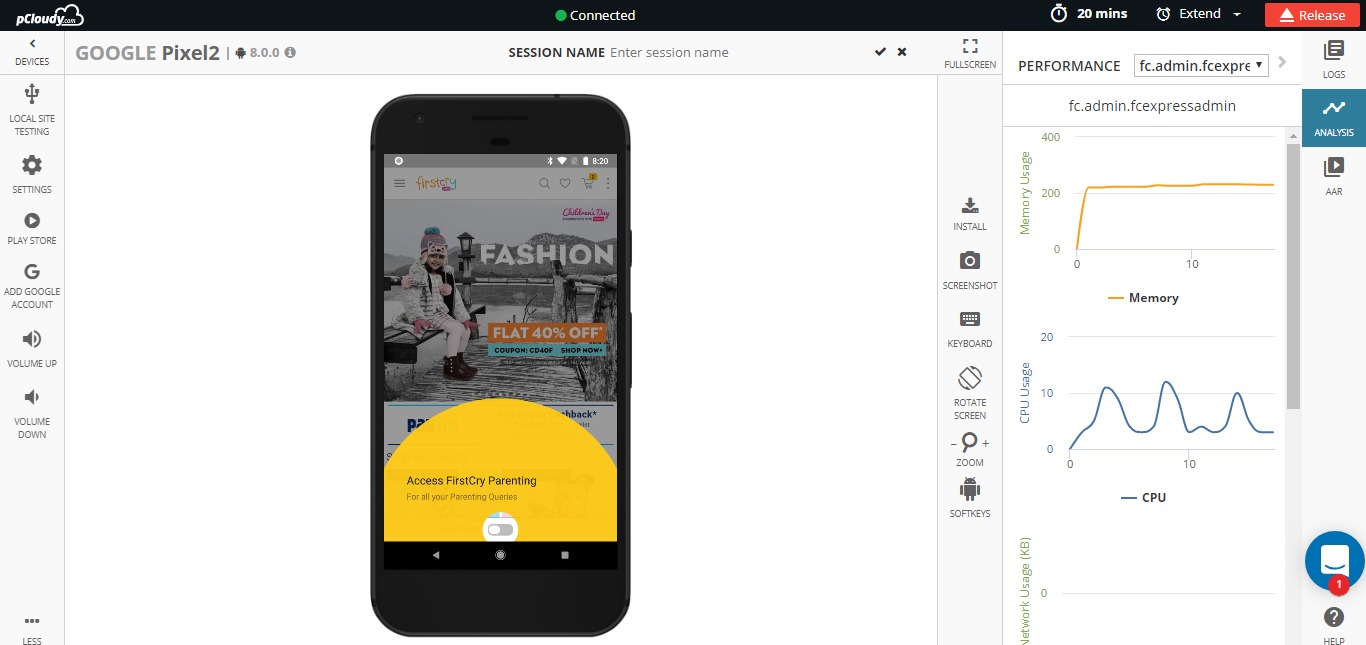
    All Mobile App Testing tools at one place: One of the biggest advantages of pCloudy platform is it provides performance statistics like Memory Usage, CPU Usage, Battery usage, Data usage & frame rendering count of the application under test without any extra efforts by the test engineer.

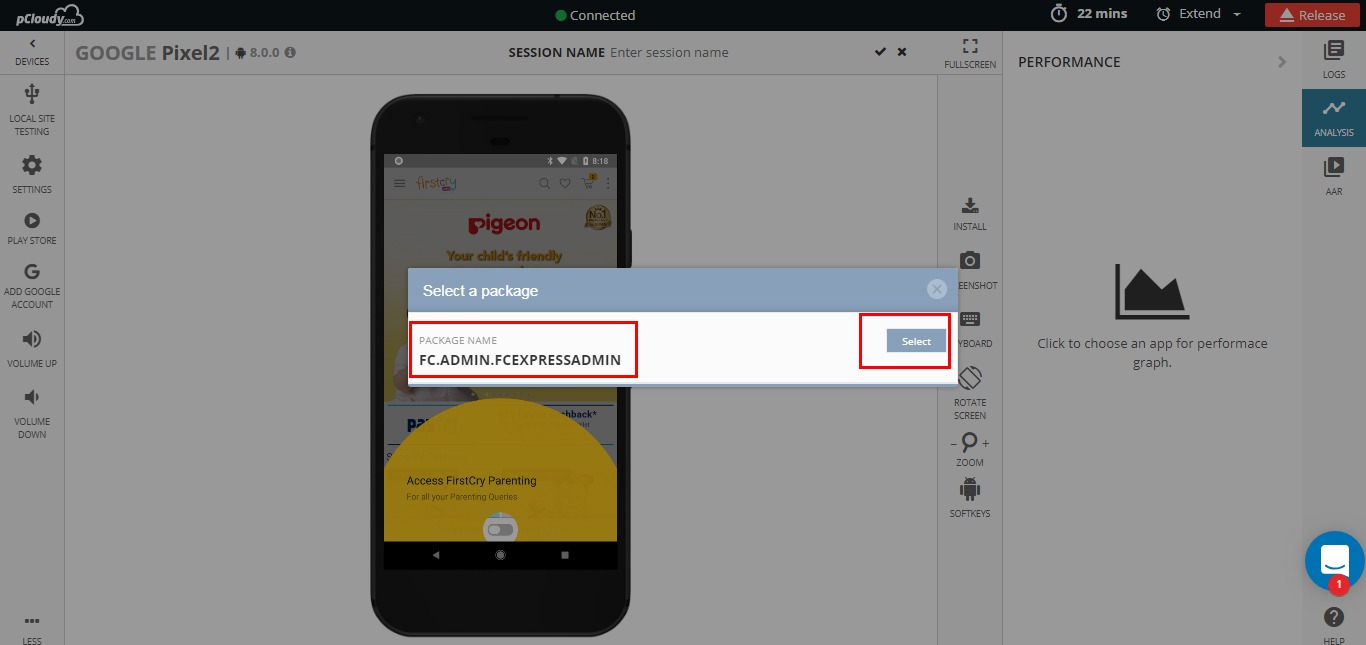
    To view this vital statistic on pCloudy platform, please select Performance tab -> Choose an APP -> Select the application under test.

    Select an app

    Start navigating through the application to complete the function test flow.

    On the right pane, you will start seeing the important vitals of the performance.

    Performance Metrics

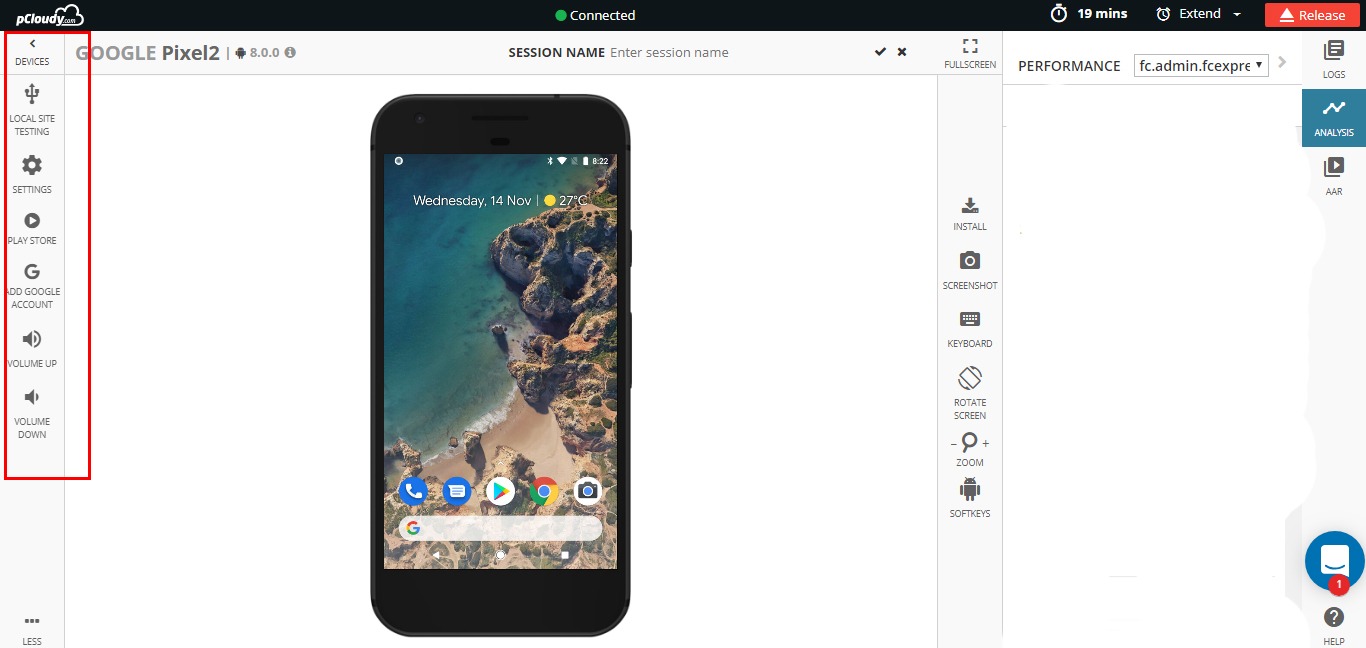
    On the left pane, you can expand the device settings. All the important frequently used applications are made available to use on the device.

    Device Settings

    You can perform below actions on the remote device:

    • Reboot the device remotely
    • Toggle the Wi-Fi connection
    • Adjust the volume of the device
    • Manage the Apps
    • Open Developers options
    • Open Play store
    • Open Device settings
    • Use Set Phone Location

    If your application under test is a location aware app and if it reads the geo-location from the device to provide the necessary results, “Set Phone Location” feature can be used to inject any location on the earth to the device and the device will be teleported to the selected location.

    Once you select the “Set Phone Location”, the platform shows the google maps and you can select the location of your choice on this map. The same location is injected to the device.

    Other key features during manual tests

    Key Features

    • You can capture high-resolution screen shots with the skin of the device
    • Change the orientation of the device to Landscape and portrait
    • Open the browser from the list of preinstalled browsers
    • Use the extended keyboard if you want to enter some text on the device. However, for Android ver 5.0 and above you can directly enter the text from your system keyboard.
    • Check the stack trace (crash logs) if the application is crashed
    • You can navigate the application with the buttons
    • Zoom in/out the device shown on the screen
    • Reset the zoom level to bring the device to default size
    • Extend the session if the device is available
    • Wake up the device from sleep mode or push the device to sleep mode
    • Release the device back to the cloud

    Reporting

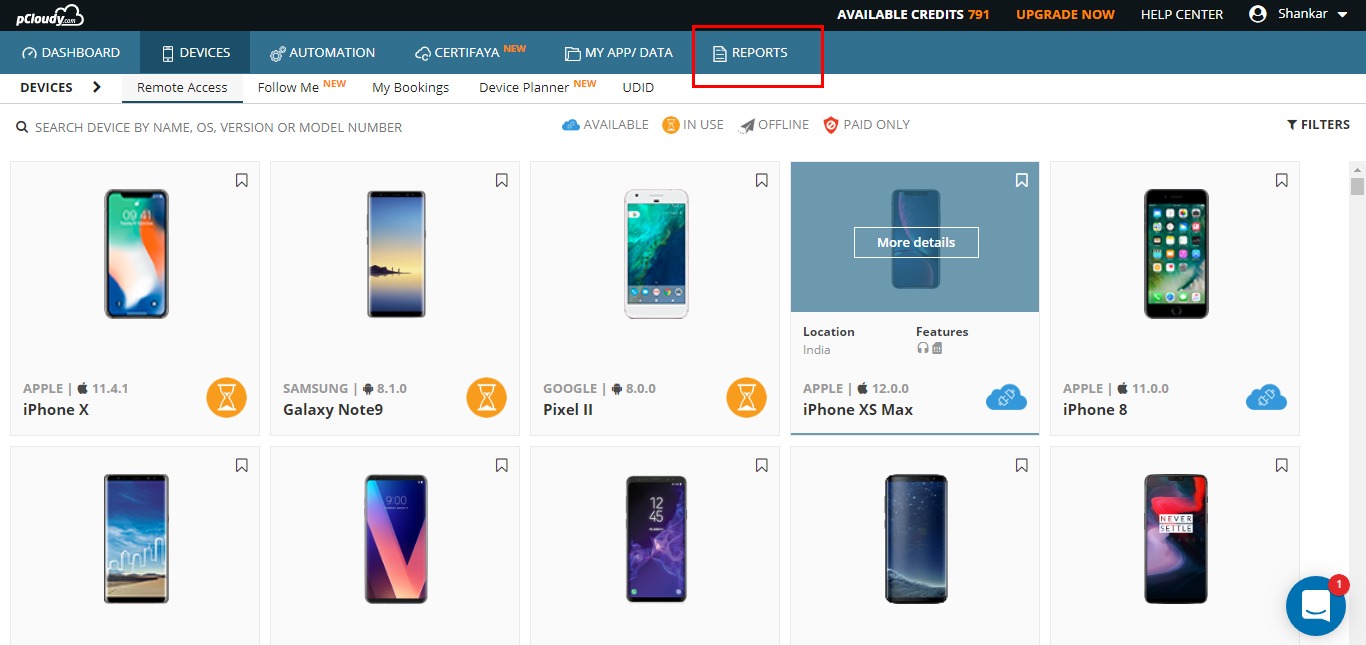
    Report

    Under reports folder, you can see the entire device session data for all the devices you used. You can find Videos & Logs (by default platform generates), screen shots and performance data if selected by the user.


    All Reports

    Running test automation remotely

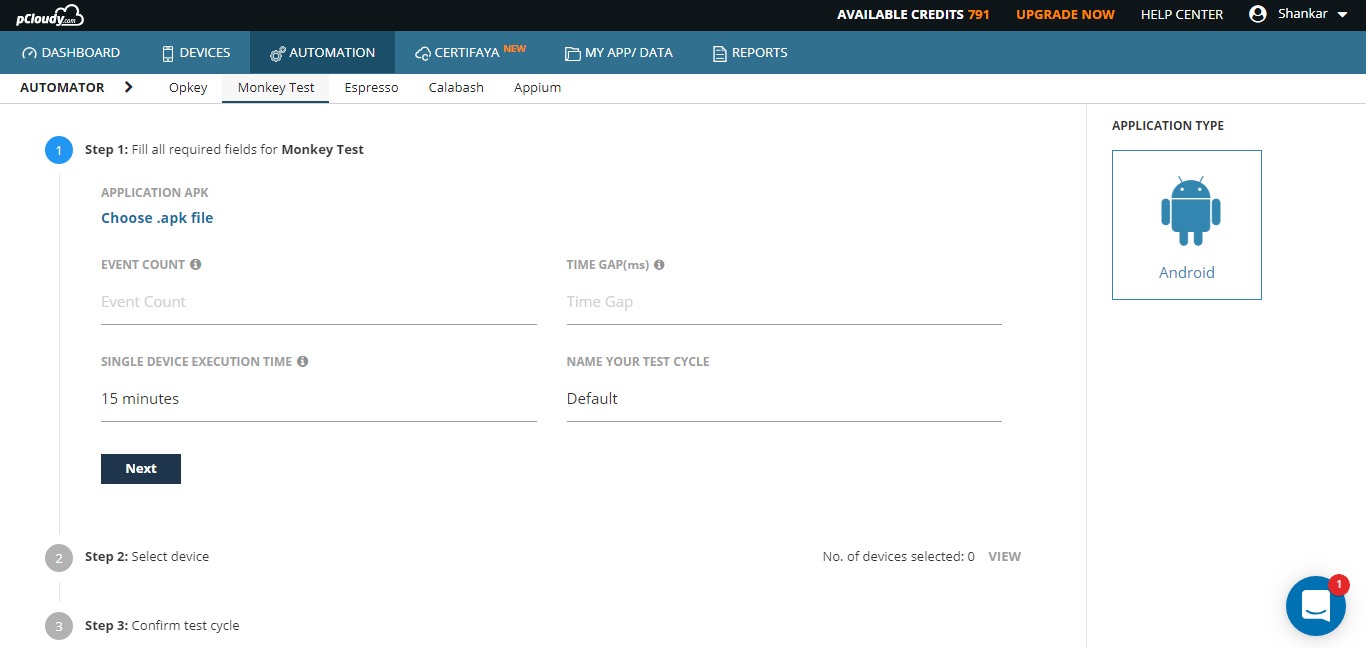
    pCloudy platform supports test automation on multiple devices in parallel. Below test frameworks are supported for Android platform.

    Automation Testing

    You just need to select the Test platform, Choose the application under test, Test Suite, time to run on single device and test cycle name.

    The biggest advantage of this platform is it generates performance vitals for your test automation scripts without you adding any hooks in your scripts. Otherwise, you will be using multiple mobile App testing tools to achieve the same result.

    Once the above data is provided, user can select the devices on which the test automation to be run. Once the devices are selected, the user can schedule the test cycle.

    Device for automation testing

    The platform will book the devices on your behalf and will start the test automation as soon as the devices are available. Once the execution is over, the user will be notified with an email and user can see the test reports.

    APPIUM Test Automation

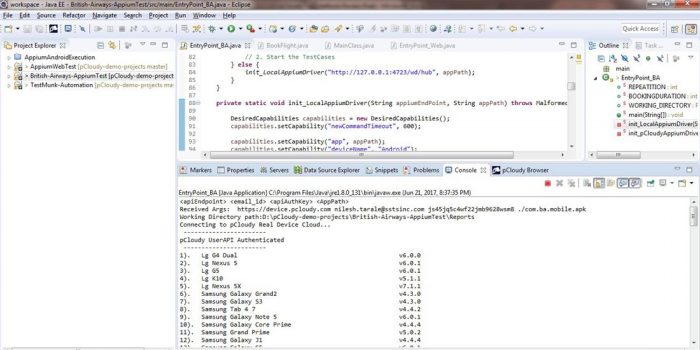
    You can run the Appium test automation scripts directly from Eclipse or Android Studio. The platform provides the plugin for both the IDE’s. Simply copy a small piece of code to your driver code and run the project, select the devices on which this tests to be run.

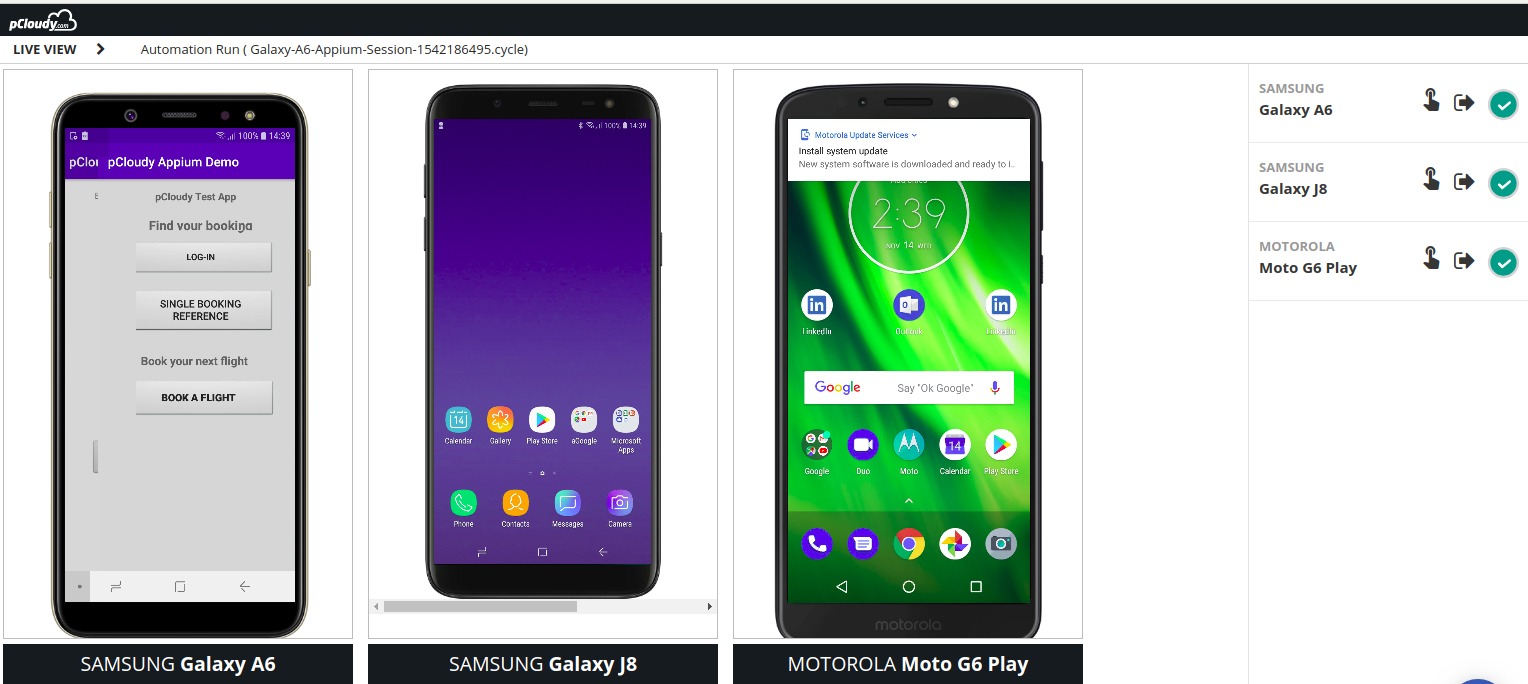
    The “LIVE VIEW” feature will allow you to monitor the test automation runs through video streaming on the platform.

    appium test automation

    LIVE VIEW

    Live view for automation
    Live view – To see the automation happening on devices

    Live View on devices

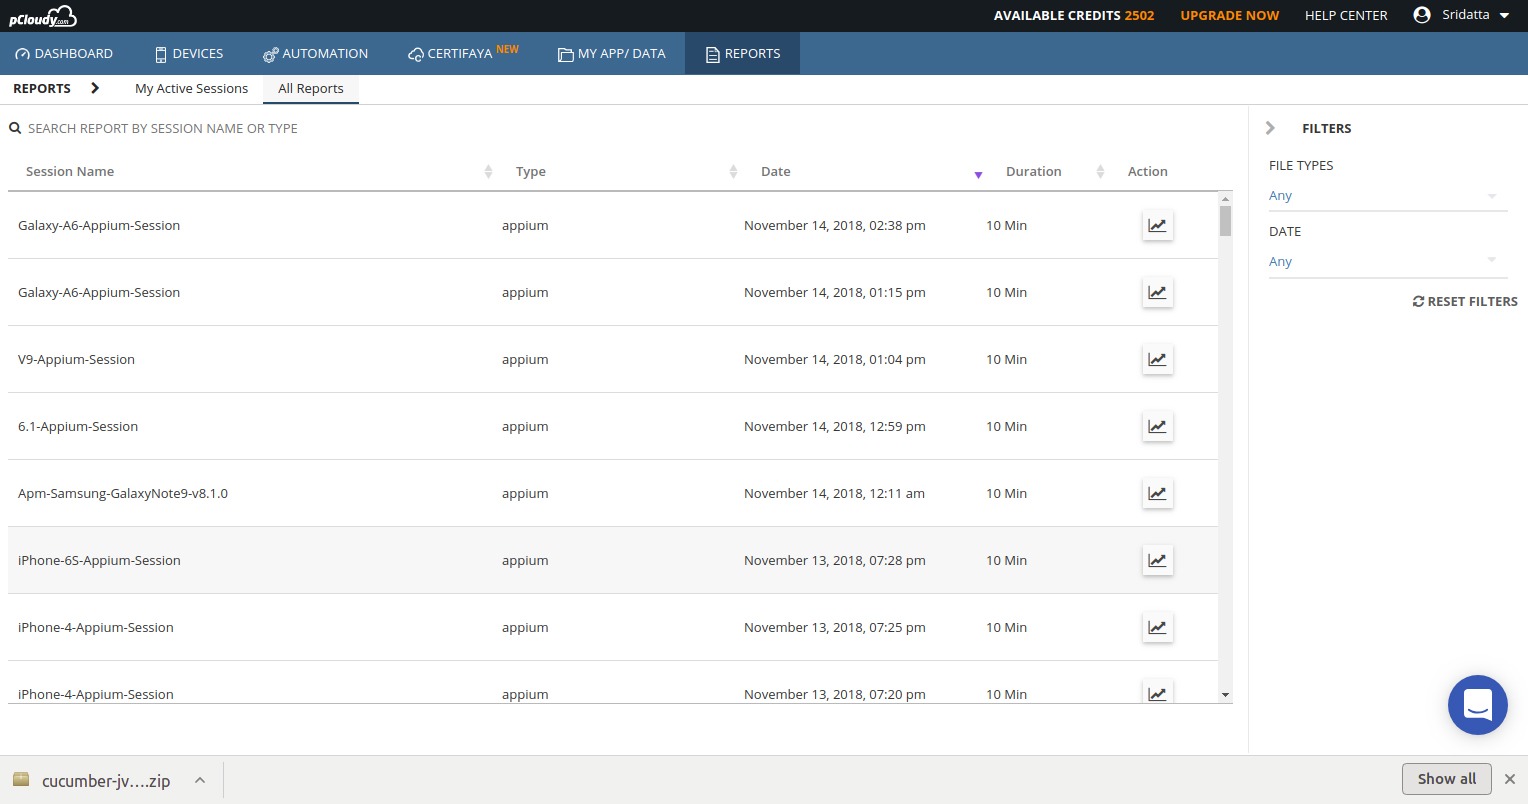
    Automation Test Reports

    All the test automation reports will be available under Reports folder.

    Automation test reports

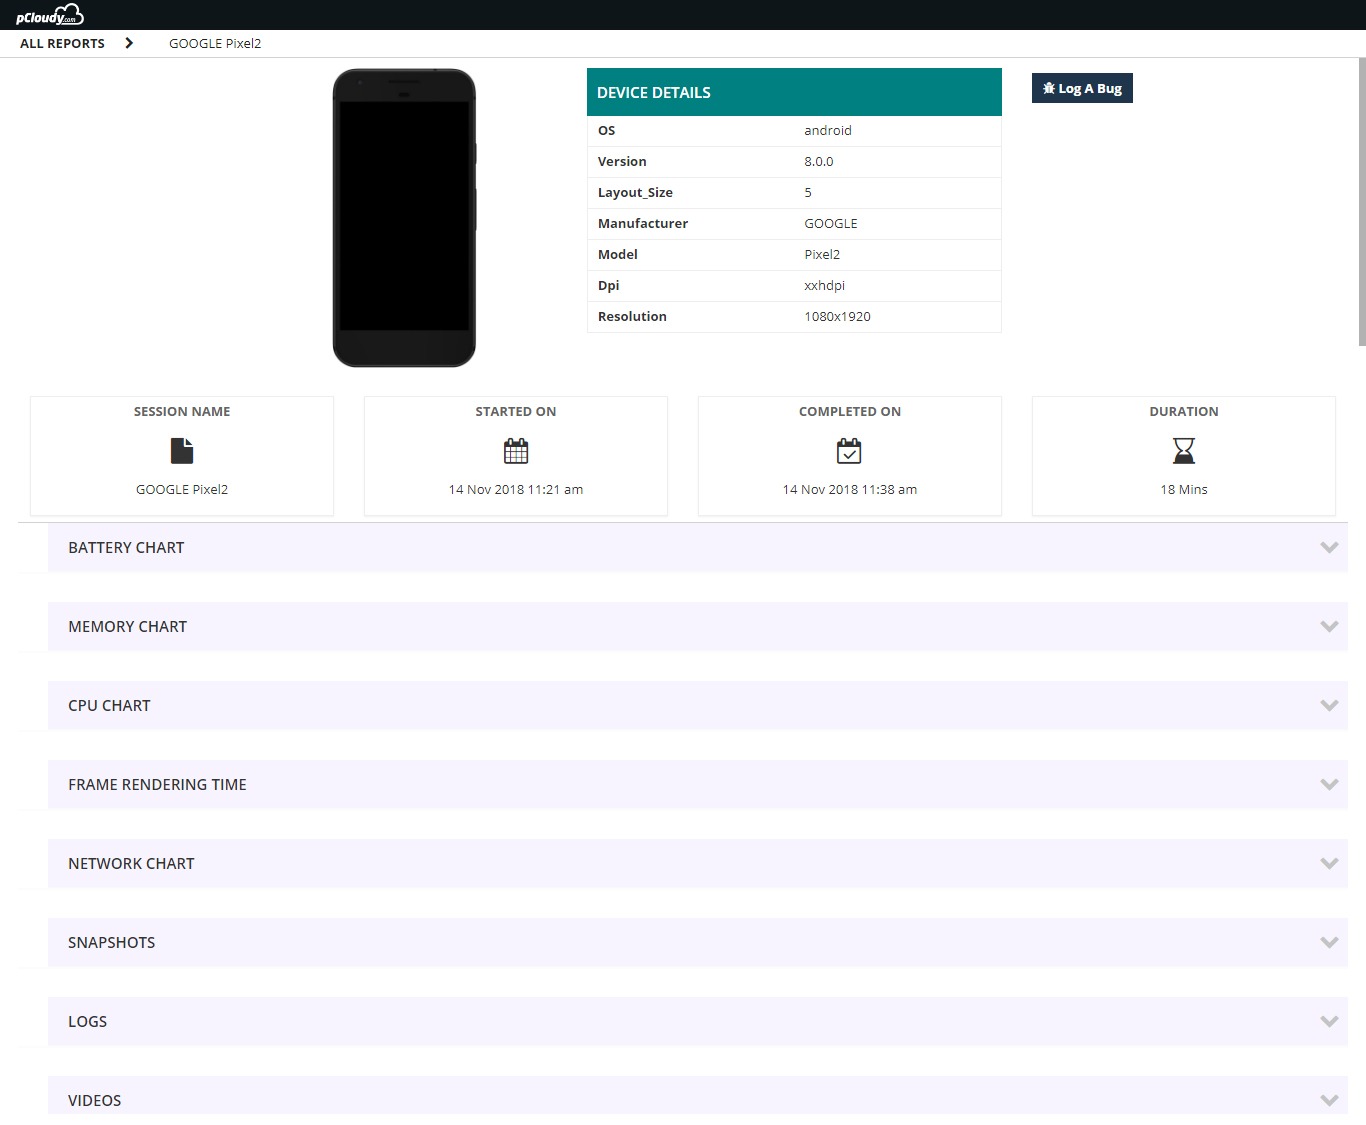
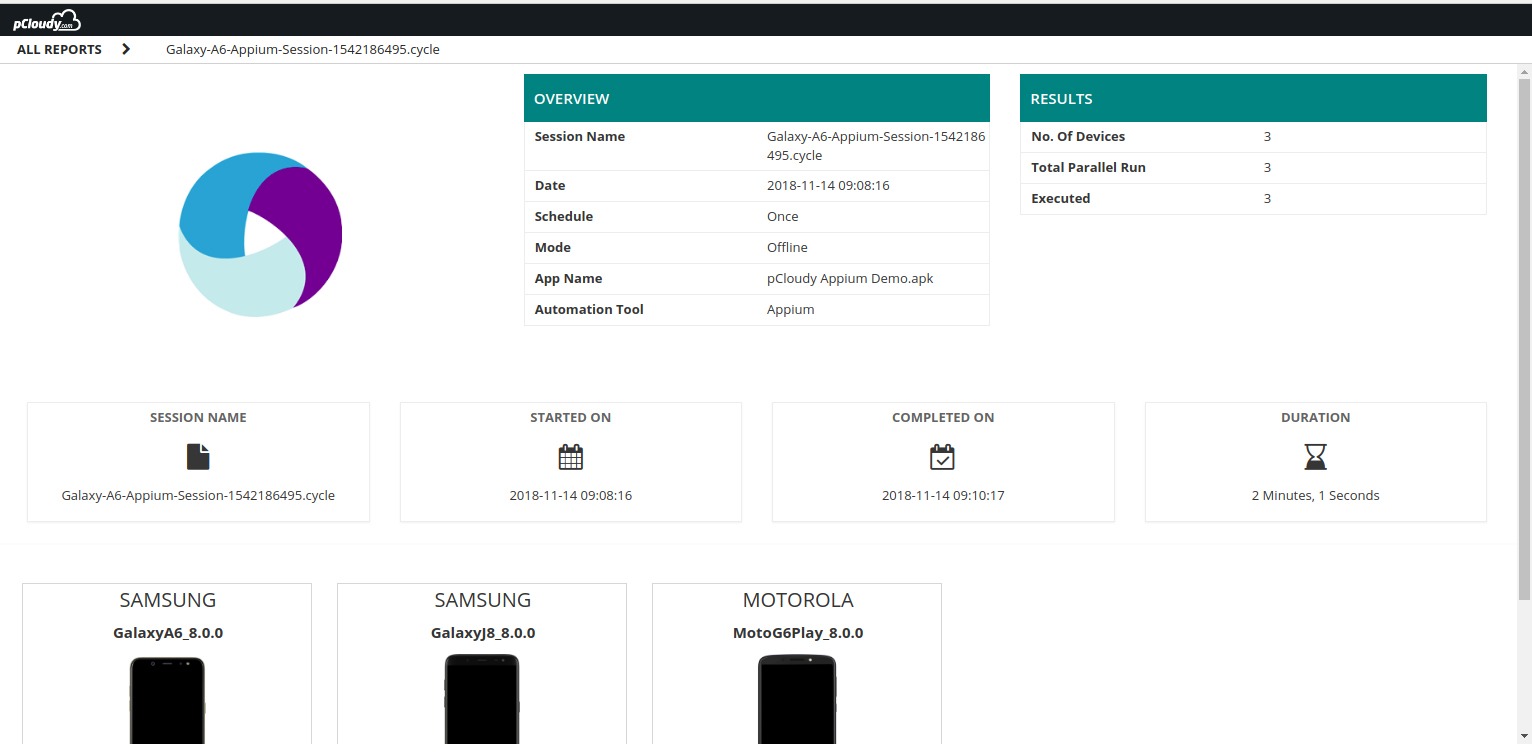
    The reports will open in another tab with video, logs and performance data.

    Appium Reports

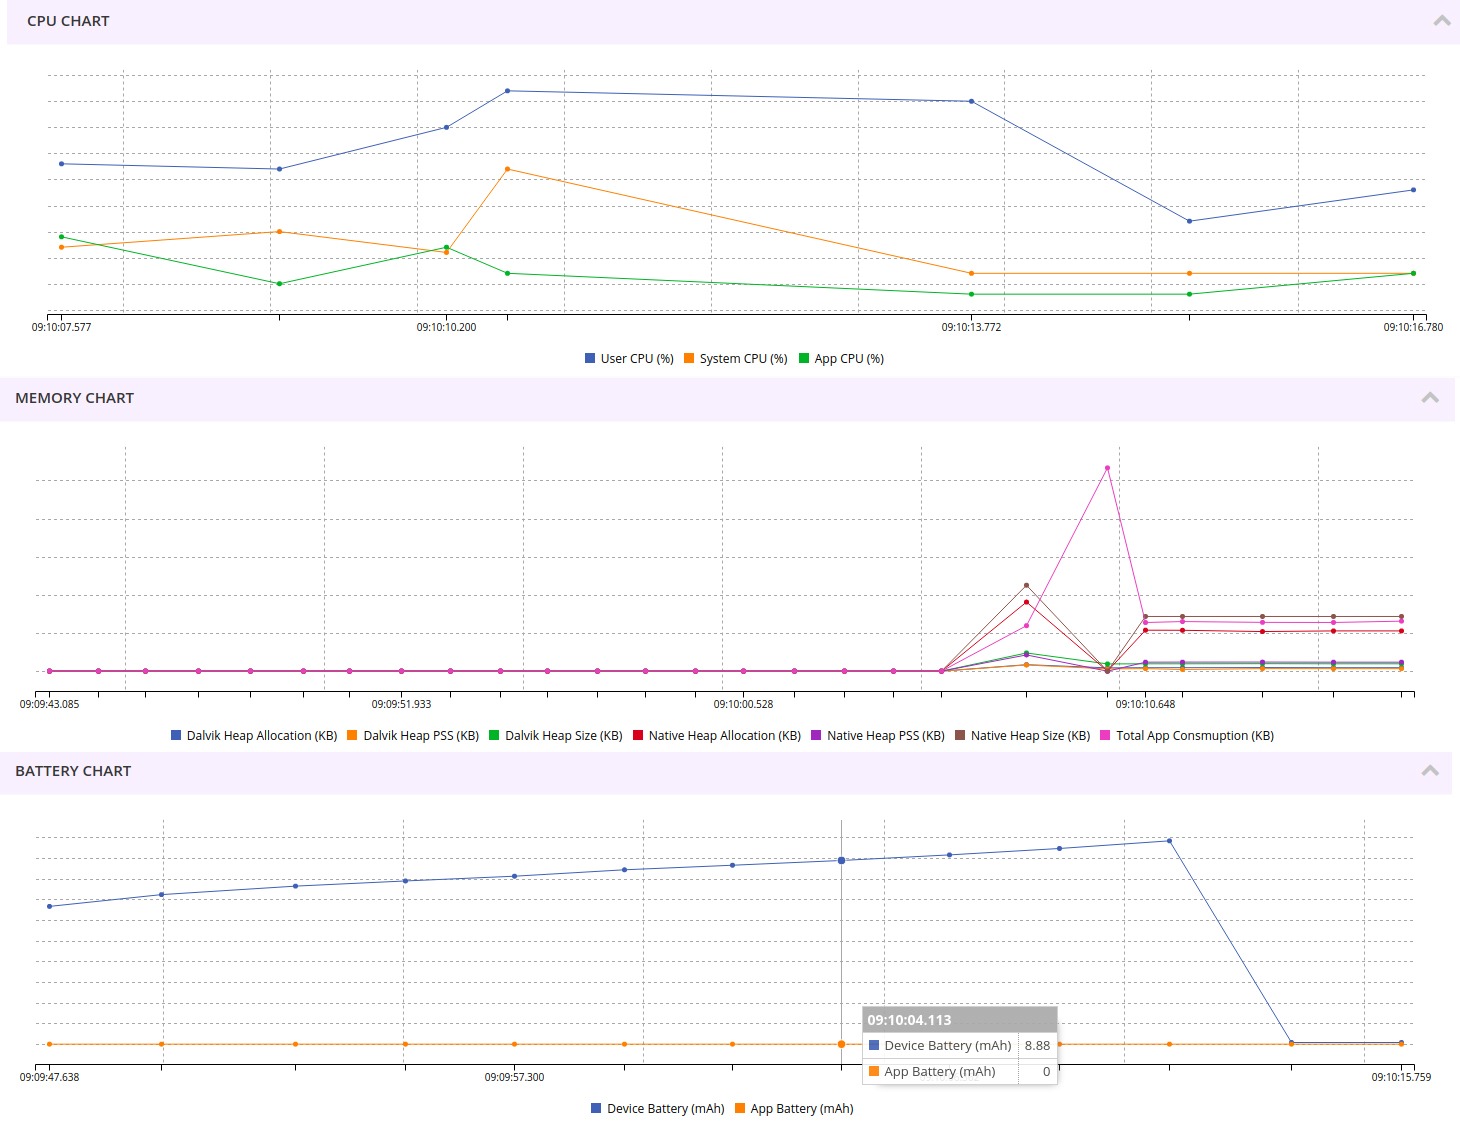
    To view the performance data for each device, please click on the device icon for each device.

    Performance Analytics

    Opkey Integration

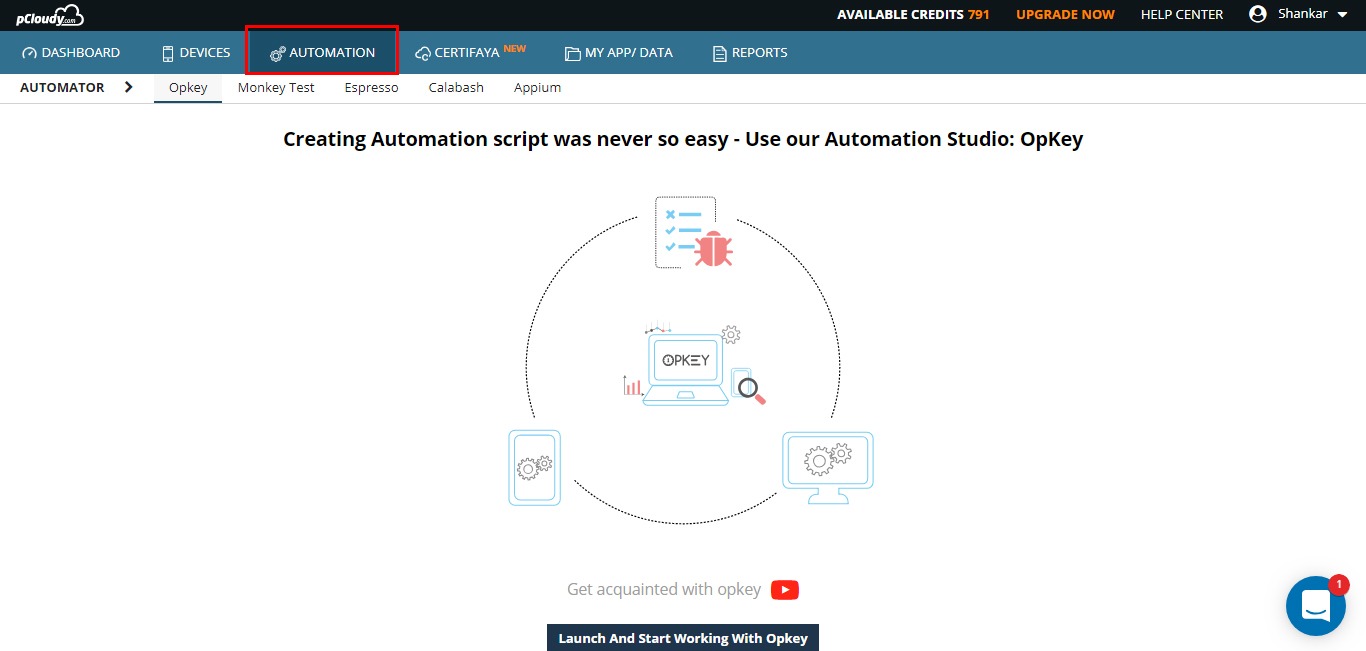
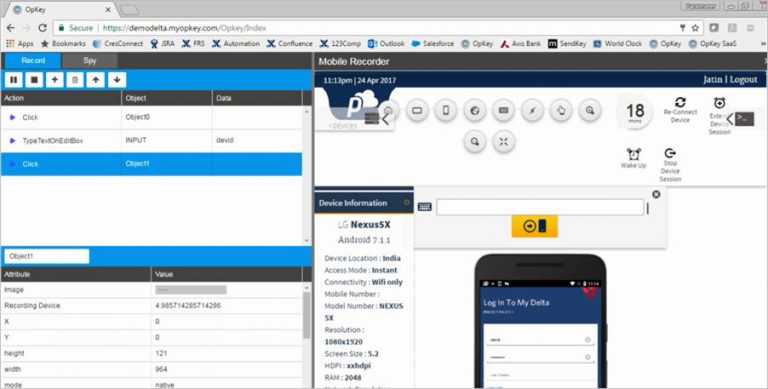
    pCloudy has seamless integration with OpKey, which is a zero code multi-channel automation tool. A unique combination of Mobile App Testing Tools for manual and Automation testing.

    OpKey allows single click recording and generation of automated scripts for Mobile Apps.

    OpKey Integration

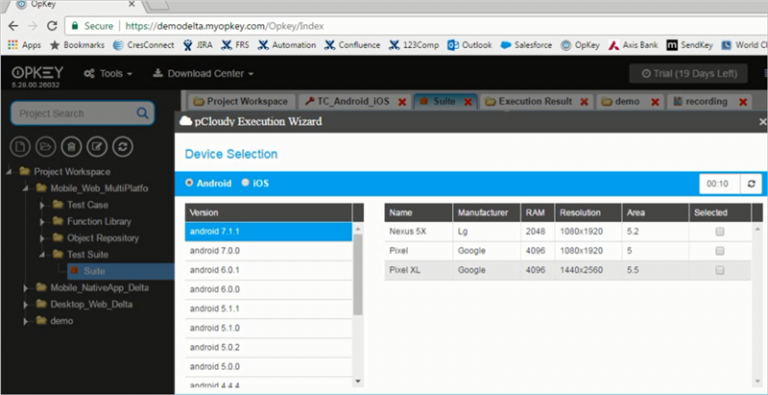
    You can run the automated scripts on multiple devices on pCloudy directly from OpKey interface.

    run the automated scripts

    Advance Features:

    pCloudy also provides many advanced Mobile App Testing tools like Network Virtualization Tests, Device Tunnel (access of devices from Developer IDE and Jenkins Integrations).

    Conclusion

    The quality of App is extremely important for its success in the market. Right devices and right mobile App testing tools are critical ask from every Mobile Dev and Test team. pCloudy with its comprehensive set of devices and tools could be a perfect companion to every Developer and Tester.