Test cases are the first step in any testing cycle and are very important for any project. If anything goes wrong at this step, the impact gets proliferated in the entire software testing process. This can be avoided if the testers use proper procedure and guidelines while creating the test case template.
In this blog, I am going to share some simple yet effective tips which you could use for writing effective test cases. These tips will save you time and effort while optimizing the use of resources.
How to write test cases in a better way
Let’s have a look a the tips to write better test case template.
1. Detailed Domain Knowledge
Domain knowledge in information technology means deep knowledge of business and operational dynamics, the risks involved and the opportunities in that particular project. It is required to follow the best practices in the domain.
2. Break long test cases into many smaller ones
It is better to break the test case into a group of smaller ones if it has too many steps. It would be easier for the developer to backtrack and repeat the test steps if an error occurs somewhere in the test script. If not done than there are high chances that the developer will miss the bug.
3. Preconditions
Before starting on the test case it is suggested confirm all the assumptions that apply to the test and the preconditions that must be met before execution. There can be data dependency or the dependencies on the test environment or any other test cases.
4. Attach Artifacts
Relevant artifacts should be attached to the test cases. This can be done using a test management tool. At the time of product delivery, It will help to track the changes in the application. I will be easy to understand the flow of the function when there is a change at any step which will not be easy to relate otherwise.
5. Test data input
While writing a new test case a tester can share test data wherever applicable to be used for the Test Case within the test case description or add with the specific test case step. This will save time as there is no need to look for the test data anywhere else.
If the values are to be verified then testers can specify the value range or describe what values are to be tested for a particular field. Choose a few values from each class which will give good coverage for your test.
It’s better not to mention the real test data value but the type of data which is required to run the test. In projects where multiple teams use the test data and it keeps changing, mentioning only the type of data will be a wise choice.
6. Organize your work
Use a test management tool to manages your test cases instead of using a spreadsheet. There are many test management tools that can be used to organize the test cases in one place which will increase the productivity of the team.
7. Stop Assuming
It is better to refer to the specification document. Assumptions about the features or functionalities can lead to disagreements between the client and the developers. This gap between the client’s requirement and the application under development will impact the business.
8. Test Case Naming Conventions
To write tests which are easy to understand, we have to stop coding on autopilot and pay attention to the naming conventions. It is required to name our test classes, fields of our test classes, test methods and the local variables while writing automated tests for our application.
It does not matter which team member wrote the test, others will know what feature is tested under what scenario without even looking at the test code.
9. Meet Customer’s Requirements
If the testers miss a bug or write test cases that do not relate to the real world scenarios then it’s just a waste of resources and time. The goal is to meet the customer’s expectations and that can be attained only if the testers think from the users perspective.
10. Cover All Verification Points
It is important to write well-defined test case verification steps covering all the verification points for the feature under test. To make sure that the test Case covers all the verification points match your test case steps with the artifacts given for your project.
11. Avoid Repetitions
Do test automation when needed as it will reduce the manual effort and save a lot of time. The test scripts should be written in such a way that they can be used afterward for some other project.
12. Make it Reusable
Create test case template which could be re-used in the future by other teams. Also, before writing a new test case for your module, find out if there are similar test cases written already for some other project. Doing this you will avoid any redundancies in your test management tools. Call the existing test case in pre-conditions or at a specific design step if there is a need for a particular test case to execute some other test case.
13. All-Inclusive Test Coverage
Test cases should include all the features and functionalities mentioned in the software requirement. Requirement traceability matrix will help in finding the untested functions of the application.
14. Group Similar Test Cases
A test run is a collection of test cases that testers should execute in a particular order. Test cases are often grouped in test runs. It’s preferred to put preconditions at the beginning of a test run rather than inserting them into each test case.
Actually, only a few of the test cases need preconditions, so the field is often left empty. A test management tool will help to customize your forms and create a test case template which will save your time and effort when writing test cases. Another thing to keep in mind is to avoid writing the same instructions several times by moving repeated preconditions to a test run.
15. Easy to Understand
The test cases should be well defined with comments where ever needed so that any other software tester can work on it in the future. Whatever project you work on, when designing test cases, you should always consider that the test cases will not always be executed by the one who designs them. Therefore, the tests should be easily understandable and to-the-point.
In a scenario where the person who wrote all those test cases leaves for some reason and you have a completely new testing team to work with, the entire effort spent during the design phase could go down the drain.
16. Test Case Description
In the description, the testers need to mention all the details about what is going to be tested, what needs to be verified, the test environment and test data.
The information mentioned below should be there in a well-written test case description:
Any dependencies like preconditions and assumptions
Test Data to be used
17. Maintenance and Update
All the test cases should be updated with the new requirements so it’s easier to execute them in the future if there is a need. Even if some other tester wants to use the test case he/she wouldn’t have to go through the details of the script.
Conclusion
The tester needs to have good domain knowledge and should write presentable test cases from the users perspective. A good test case template will make it easier for testers to write good test cases. If there are only a few test steps, consider making a checklist instead and have a look at some relevant test case examples before working on your test case. A test case example will be helpful in creating test case templates too. A test management tool will definitely help in improving the way test cases are created and managed.
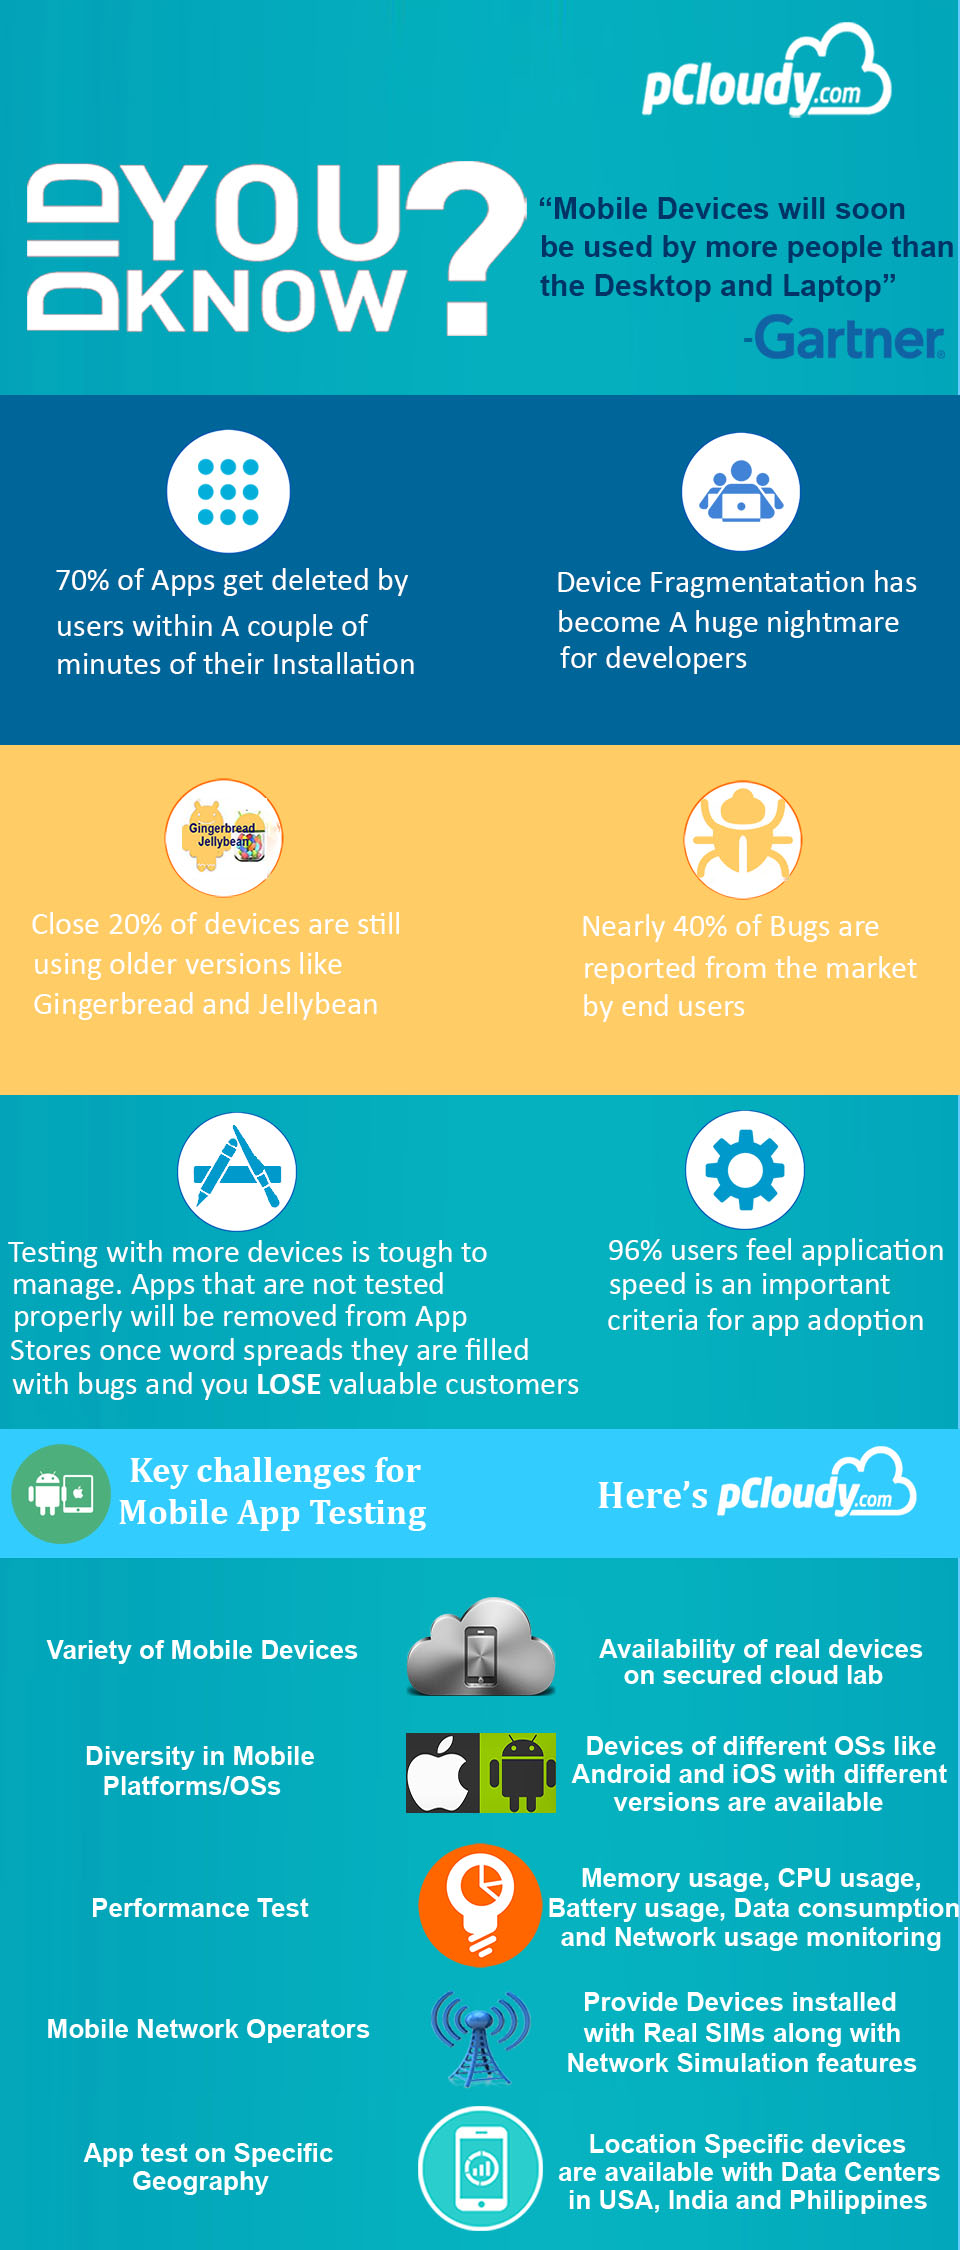
In the year 2028, there will be around 7.8 Billion mobile users which accounts for 70% of the world population. More mobile users mean more apps and more competition and to lead the competition we need to make sure that our app is flawless. If nearly half of the bugs in your mobile app are discovered by the users, your app’s ratings are going to decline and so are the downloads. This is why the right choice of mobile app testing techniques must be followed in the decision-making process.
Mobile App Testing Strategies
Today, the mobile app market is highly competitive. To be better every day and survive for long, the QA team has to follow a mix of plans that would be responsible for taking the right testing decisions. The testers have to formulate testing strategies to face every situation fearlessly and immaculately. Mobile apps have to be perfect before reaching to the end users so there have to be certain decisions to be taken regarding the testing plan. The following model of mobile app testing plans can be considered for better execution.
In the planning Stage, decisions like Selection of Device matrix, Test Infrastructure (In-house vs. Cloud, Simulator vs. Real device), Testing scope, Testing Tools, Automation (Framework/Tool) are taken. Since it is the first stage, it is the most important one as all the further stages would depend on these decisions. In the next stage which is execution and review, decisions regarding Test Case Design, Testing of user stories, testing types as per Sprint Objective, Progressive Automation, Regression Testing, Review and course correction are taken.
We are going to discuss the planning stage aspects more elaborately
Device Matrix:
It is an important factor, choosing the device as per your target audience’s behavior matters in decisions regarding resting. There are different approaches to the selection of the device matrix.
Approach 1- Selection of Devices based on market research.
Determine the set of devices with your target operating System that will have the highest occurrence of accessing your application by using app purchase data and analytics. For Example- if you support both Android and iOS, and your application will be used across millions of Samsung, Google Nexus and Moto G devices but only thousands of iPhones, you prioritize testing on the Google Nexus and Moto G above the iPhone device. So, this test plan will consist of testing on devices which are prioritized by your market analysis.
Approach 2: Categorize the devices based on Key mobile aspects
This approach highlights the categorization of the devices based on certain mobile aspects which can be considered in formulating the testing strategy. The categorization goes as:
Test infrastructure
This is another element of the planning stage. This focuses on Strategizing on the Infrastructure components like hardware, software, and network which are an integral part of test infrastructure. It ensures that the applications are managed in a controlled way.
Real device, Emulators or Mobile cloud-Where to test?
Choosing the right platform to test as per the testing needs is very important i.e whether to test on the Real device or an emulator or on the cloud
Real Devices
Testing on a real device is anytime more reliable than testing on a simulator. The results are accurate as real-time testing takes place on the device in a live environment. It carries its own disadvantages as it is a costly affair and not all the organizations are able to afford a complete real device laboratory of their own.
Pros:
Reliable- Testing on Real devices always gives you an accurate result
Live Environment- Testing on real devices enables you to test your application on the actual environment on which your target audience working on. You can test your application with different network technologies like HSPDA, UMTS, LTE, Wi-Fi, etc.
User experience- Testing on Real devices is the only way to test your Real-time User experience. It cannot be tested through Emulators or devices Available on Cloud.
Cons: Maintaining the matrix- You cannot maintain such a huge matrix of mobile devices in your own test lab. Maintenance- Maintaining these physical devices is a big challenge for organizations. Network providers- There are more than 400 network providers all over the world. Covering all these network providers in their own test lab is impossible. Locations- You cannot test how your application behaves when it is used in different locations.
Emulators
The emulator is another option to test mobile apps. These are free, open source and can be easily connected with the IDE for testing. The emulator simulates the real device environment and certain types of testing can be run on it easily. However, we cannot say that the results of emulators are as good as those of real devices. It is slower and cannot test issues like network connection, overheating, battery behavior, etc.
Pros:
Price- Mobile emulators are completely free and are provided as part of the SDK on every new OS release.
Fast- As Emulators are available on the local machine so they run faster and with less latency than Real devices connected to a local network or devices available on the cloud.
Cons:
The wrong impression- Even if you have executed all test cases on emulators, you cannot be 100 % sure it will actually work in the real environment.
Testing Gestures- Gestures like Pinching, Swipe or drag, long press using the mouse on simulators are different in using these gestures on real devices. We cannot test these functionalities on emulators. Can’t test Network Interoperability- With the help of Simulators you cannot test your application with different network technologies. Like HSPDA, UMTS, LTE, Wi-Fi, etc.
Testing on Mobile Cloud
Mobile cloud testing can overcome the cost challenges like purchasing and maintaining mobile devices. It has all different sets of device types are available in the cloud to test, deploy and manage mobile applications. The tests run virtually with the benefit of choosing the right type device-OS combinations. Privacy, security, and dependency on the internet can be a challenge in this case but it has many benefits that can cater to different testing scenarios.
The organization can choose the right mix of above-mentioned platforms as every platform carries its own advantages and disadvantages. Sometimes a combination of real and emulators is preferred and sometimes all three can be considered as per the testing strategy.
Pros:
Devices Availability- Availability of Devices and network providers is a big gain for cloud users. Maintenance- When you are using cloud services. Forget about maintenance. These providers take responsibility for maintaining these devices. Pay per use- You don’t need to buy a device. You only have to pay for the duration you use that device.
Parallel Execution- You can test your complete test suite on multiple devices.
Cons: Cost- Some providers are a bit costly
Automation Tools for Mobile App Testing on Android and iOS
Nowadays, there are so many automation tools available in the market. Some are expensive and some are freely available in the market. Every tool has its own pros and cons. Choosing the right tool for testing would reduce the QA team effort providing seamless performance at the same time. We will discuss the best mobile app testing automation tools for iOS and Android platforms in 2018.
1. Appium: It is one of the preferred MAT tools by testers. It is open source and free tool available for Android and iOS. It automates any mobile app across many languages and testing frameworks like TestNG. It supports programming languages like Java, C# and other Webdriver languages. It provides access to complete back end APIs and database of the test codes. Top Features:
-Appium supports Safari on Ios and Other browsers on Android
-Many Webdriver compatible languages can be used such as Java, Objective-C, JavaScript to write test cases
-Support languages like Ruby, Java, PHP, Node, Python.
2. Robotium: It is a free Android UI testing tool. It supports in writing powerful black box test cases for Android Applications. It supports Android version 1.6 and above. The tests are written in Java language and basically, Robotium contains a library of unit tests. Apart from this, Robotium takes a little more effort in preparing tests, one must work with program source code to automate tests. Robotium does not have play record and screenshot function.
Top Features:
-The tests can be created with minimum knowledge of the project
-Numerous android exercises can be executed simultaneously.
-Syncronises easily with Ant or Maven to run tests.
3. Calabash: It is an open source MAT tool allowing testers to write and execute tests for Android and iOS. Its libraries enable the test codes to interact with native and hybrid apps. It supports cucumber framework which makes it understandable to non-tech staff. It can be configured for Android and Ios devices. It works well with languages like Ruby, Java, .NET, Flex and many others. It runs automated functional testing for Android and ios. It is a framework that is maintained by Xamarin and Calabash.
4. Espresso: It is a mobile app testing automation tool for Android. It allows writing precise and reliable Android UI tests. It is a tool targeted for developers who believer automated testing is an important part of CI CD process. Espresso framework is provided by the Android X Test and it provides APIs for writing UI tests to simulate user interactions on the target app. Espresso tests can run on Android 2.33 and above. Provides automatic sync of test actions with the app UI.
5. Selendroid: An open source automation framework which drives off the UI of Android native, hybrid and mobile web application. A powerful testing tool that can be used on emulators and real devices. And because it still reuses the existing infrastructure for web, you can write tests using the Selenium 2 client APIs.
6. Frank: Is an open source automation testing tool for the only iOS with combined features of cucumber and JSON. The app code needs not to be modified in this tool. It includes Symboite live app inspector tool and allows to write structured acceptance tests. It is tough to use directly on the device but is flexible for web and native apps. It can run test both on simulator and device. It shows the app in action by showing its recorded video of test runs.
Above are a few promising, popular and most commonly used and mobile app testing automation tools. Choice of tools certainly resolves many testing-related problems faster and efficiently. Implementing these tools requires skill and experience and so an organization needs to have a proper testing team in place to make all of this possible.
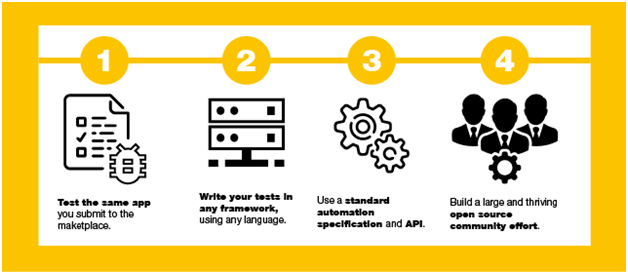
With Appium creating a buzz in enterprise mobility, mobility teams are still finding ways to successfully automate tests leveraging Appium. Appium being an open source tool is the perfect choice for automating native, mobile web and hybrid applications on their respective platforms.
Let us now see the major factors behind Appium being the best choice for mobile automation tool:
An impressive expression by Appium.io showing why to choose Appium
1. Use of standard API: Appium is widely popular because modification of codes or a recompilation of your app is not required as it uses the standard API in all the platforms. Appium makes it effortless to create your tests against iOS and Android platforms with same API. But, separate iOS and Android scripts are still needed as the UI elements vary on both the platforms.
2. Use any WebDriver compatible language: Appium gives the freedom from getting locked into a particular language or framework to write and run the tests. Any WebDriver compatible language like Perl with Selenium WebDriver API, Java, PHP, C#, Python, Ruby, Javascript with Node.js can be used for writing the tests.
3. Testing Framework of Choice: Appium gives flexibility to mobility teams to use testing framework of their choice. Earlier, tests could only be written through Javascript using the UI Automation of library for Apple or Java based tests could only be written through UI Automator of Google. Appium completely changed this scenario.
4. Cross-platform test automation: Having the capabilities to test on both Android and iOS devices makes it the best cross-platform mobile app test automation tool. In order to interact with Android and iOS with Selenium WebDriver, Appium uses the JSON wire protocol. Appium makes use of the libraries provided by Apple with the help of an application called Instruments to automate iOS apps. In newer versions of iOS after v9.3, the Instruments api has been deprecated and now use XCUITest framework.
The method is similar in Android also where Appium proxies the automation command to the UIAutomator test case running on the device. Android has a native UI automation framework called UIAutomator which supports running JUnit test cases from the command line directly into the device.
5. Open Source: Being an open source testing framework is one of the biggest advantages of Appium as it supports Simulators, Emulators, real devices, and of course, native, hybrid and web application testing of iOS and Android. Appium having a large and thriving open community makes it easier for new automation engineers to clarify their doubts.
You can instigate test scripts created from Appium libraries locally, on a session reserved by the Cloud, for any iOS or Android device. Appium integrates with continuous integration servers to ensure better results and drives GUI-related widgets and controls, allowing the same scripts to run for different software versions of various apps. Appium can automate native, web and hybrid mobile apps, and you can test on a real device, a simulator, or an emulator. It also supports Safari on iOS and Chrome Mozilla or any built-in ‘Browser’ app on Android.
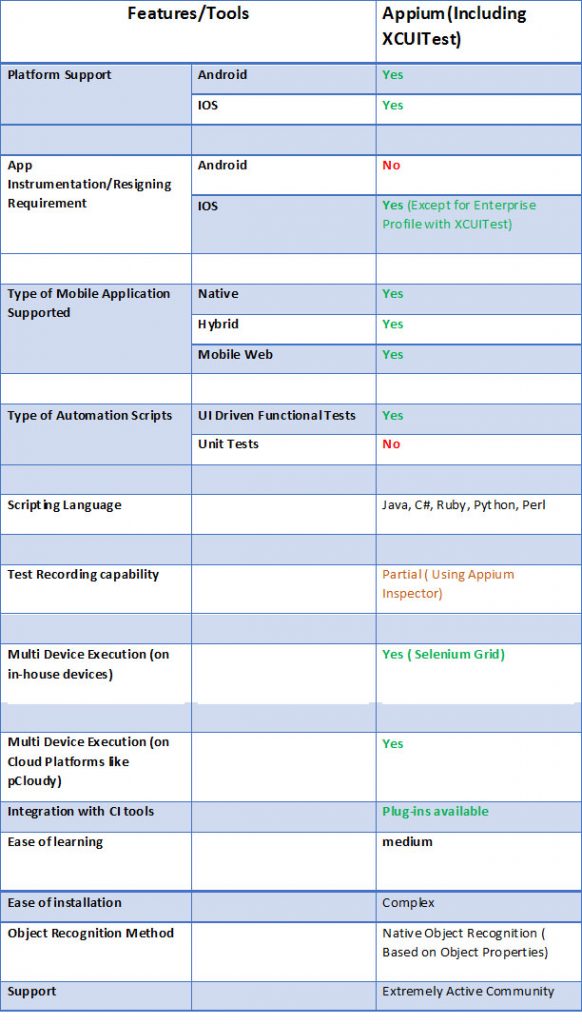
There are many automation tools for mobile application testing. Testers usually choose Appium as the best mobile testing tool. Mobile automation testing tools comparison can be done on the basis of language support and continuous integration. The most common automation testing tools used for mobile application testing are Appium, Robotium, and Calabash. If you are looking for iOS app automation testing tools then Appium and Calabash can do the job for you.
Here is tabular representation for you to understand Appium’s compatibility with different features and tools.
Teams who are getting started with Automation or are considering Appium as an option, must explore an alternative to go for a mobile device cloud with built-in Appium.
A mobile device cloud not only assists in managing and sharing devices, but also helps in streamlining automated testing and continuous delivery processes. A mobile device cloud with built-in Appium makes it easy for teams to get started with automation and scale up later. Furthermore, it will give additional cushion against any sort of roadblock that might occur while using an open-source platform for tests. Let’s have a look at some of the benefits of having a built-in Appium support on a mobile device cloud:
At pCloudy, we are dedicated towards helping enterprise mobility teams make the process of mobile development, testing and device sharing seamless and faster by integrating it with cutting edge tools like Appium. Read this blog to get a comprehensive analysis sheet to quickly choose which open-source test automation tool will be right for your automation testing.
Sign up on pCloudy and automate your tests using best open source automation tool for faster and better delivery of apps.
Automation testing forms the core of any CI/CD pipeline and enterprises are keen to practice test automation to enhance the efficiency of the development process. Test automation saves resources and reduces the cost of any project in the long run. But there are some important points to keep in mind while testing to avoid automation failure. Let’s have a look at these salient points.
Leverage Parallel Execution
Once you are done automating the test cases, the challenge will be the complex test suites taking a long time to get executed. It affects the quality of the test queue in the test automation framework or IDE. This leads to queue timeout issues and test cases being halted abruptly due to the sequential execution of the test cases.
Parallel execution in different test environments is preferred over sequential execution as it saves a lot of time. Although in automated testing, unintended code interactions could happen. This is why you need a thorough reporting mechanism to debug the causes of test failure.
Pick The Right Tools
Choosing the right tool for test automation is critical to the success of automation testing. There has to be a set of clear requirements/parameters on the basis of which the tools have to be selected. Some important points that are to be kept in mind while selecting the tool are:
The team should be clear about the test tool requirements.
The testing requirements of the application under test (AUT) should be analyzed thoroughly.
The team’s skill set should be accessed accurately.
The cost-benefit analysis should be performed to calculate the return on investment.
Tool vendor and capability should be evaluated as technical support might be required while using the tools.
One tool might not be enough to meet any organization’s automation needs. Also, test automation engineers have to be a part of the tool evaluation process so that they can help in selecting the right set of tools. For example, you can use Appium for test automation but you need pCloudy to perform automation testing on multiple real devices in parallel.
Analyze The Test Reports
Test reports provide insights into the underlying issues that are to be resolved. A detailed test report gives an idea of the efficiency of the test automation and the automation team can analyze the report to look for the scope of improvement. While selecting an automation tool you need to make sure that the tool generates test reports to be analyzed by the test automation engineer. There will always be some tests that will fail to execute and it is necessary to analyze the test report to get an understanding of the scenario.
Test Automation Metrics
Test automation metrics will help you gauge the quality of the tests performed based on some essential parameters like test duration, unit test coverage, path coverage, number of defects found, percentage of broken builds, etc. The test metrics will give you a clear picture of how well the code is tested. In an agile process, there are frequent iterations to the builds and it becomes important to track the quality of each build. With test automation metrics you can figure out what is the percentage of your tests that passed and what was the reason behind the failed tests.
Optimum Device Coverage
Test automation is effective when the tests are executed on multiple devices in parallel. Device coverage is the most prevalent challenge as we have witnessed growing device fragmentation across the world. To ensure the smooth functioning of mobile apps on all the devices, you need to perform automation testing on hundreds of device-OS combinations.
Test automation should be designed to make the app compatible with most of the popular devices. The frequent release of new versions of OS from both Android and iOS is a major factor that drives device fragmentation. The only way to overcome this challenge is by testing the app on a cloud-based testing platform. In pCloudy, you will get the benefit of testing the app on more than 5000 device browser combinations in parallel ensuring optimum device coverage.
Summing It Up
Test automation has many benefits like better test coverage, faster feedback, and accelerated results which reduces the time to market of any application. Using the practices mentioned above you can ensure coherent test automation and increased productivity. Apart from these points, there are many other things you can do like writing original code and not copying it as the code taken from other sources might not work in your test environment. But you will always find new roadblocks which you will have to deal with spontaneously.
‘Metrics’. This term has become one of the widely used terms today in enterprise mobility especially for measuring mobile app performance.
Let us first understand why are the metrics are so important to analyze the performance of an app.
Generally, app developers consider mobile app performance testing as an afterthought. Mobility teams have to meet stringent deadlines and for them, testing the performance of an app has the least priority. To them, passing the functional tests meet all critical criteria for launching an app. Well, let us find out why is performance such an important criterion for mobile app testing.
Reasons why measuring Mobile App performance is such an important criterion:
1. Speed wins: As per the Compuware report, users expect their apps to load in about two seconds. This can even be proven right by the SEO reports from Google, which considers the site speed as an important parameter for Page ranking.
It is important for mobility teams to understand that your users want their apps to respond in about two seconds or less. Anything beyond two seconds, and you might lose your business.
Once the app starts taking anywhere close to five or 10 seconds, users start shifting to your competitors.
2. Mobile App Error Rates are probably much higher than it seems: You must have struggled with issues like images not loading, network errors, content feeds leaving blank holes in the app, timeouts, crashes, freezing, upload failure etc. Most of these issues are not errors of apps but caused by unreliable networks.
The error rates are highly variable and depend on network conditions. In the United States, we’ll typically see 3% error rates, whereas in India, China, and on challenging networks in Europe and Asia, we see error rates up to a frustrating 12%. Not measuring and then getting a handle on mobile app errors will quickly result in frustrated customers, uninstalls and 1-star reviews in the app stores. And no one wants that.
3. 5 star app rating: Reviews and ratings have become important aspects of judgment for any user before downloading your app. And the app should be perfect in all the ways to ensure a 5 star rating.
If you focus on functional tests and miss out on the mobile app performance not knowing, if too much battery is drained on a particular device, or is consuming too much data, then your Playstore might be full of negative reviews even before you market it well.
In this post, you’ll know how app monitoring performance works so that you can get the best out of your Smartphone software.
What is application performance management? 10 APM features that we can tick right off our fingers are:
Troubleshooting of disruption of frequent speed and uptime
Monitoring of the speed at which transactions are performed by end-users and systems
Use of a single integrated suite of software tools
Load-testing
Synthetic monitoring
Real-use monitoring
Root-cause analysis
Web-performance monitoring, to gauge app speed and uptime
An end-to-end overview of bottlenecks
Review of service interruptions
APM is integrated through the lifecycle of an application including the pre-deployment and post-deployment stages. It is therefore important for developers, testers, and business teams. A slow load can be prevalent due to a host of issues related to APIs, servers, or browsers. APM techniques are what help pinpoint the actual problem.
Basic availability monitoring involves testing IP protocols and network services, but a user needs to establish some optimal performance thresholds and real-time alerts to monitor and manage both speed and reliability.
Tips for monitoring app performance
Performance monitoring must take into account certain things in order to optimize user experience. These include measuring from the user’s point of view, i.e. performance, stability, and resource utilization in real time the way the user perceives them.
The context is crucial too. It’s important to determine how many users were affected by a slowdown, and what action on a specific operating device prompted the disruption. To truly experience a ‘mobile moment,’ you should follow these tips for monitoring your app performance:
a) Measure Frame rendering time
Only measuring network time doesn’t cut it out for users, who are interested in when the network resumes as well as when it responds.
Measuring response time by the device or operating system allows the product manager to focus on one platform at a time, respond to performance issues, and deploy resources accordingly.
b) Measure battery usage
It’s crucial to measure the battery consumption of your mobile app, along with data plan impact and memory usage. If the app is responsible for draining your battery, you should bring it in line with best practices.
Frequent updates can also be minimized so that user satisfaction can be increased.
c) Measure cell data consumption
Recent studies by Dimensional Research have shown that 20% of respondents stopped using apps that were heavy on data usage. This indicates that you should measure the consumption by app version, the total number of users, KBs of data consumed per minute, the amount of data being transferred per hit, and the percentage of data being consumed per hit.
d) Measure errors
HTTP errors from certain URLs need to be captured. This will help track the number of users who received an error, the actions that resulted in it, number of users with errors on app launch, the percentage of actions that led to at least one error, and the app version.
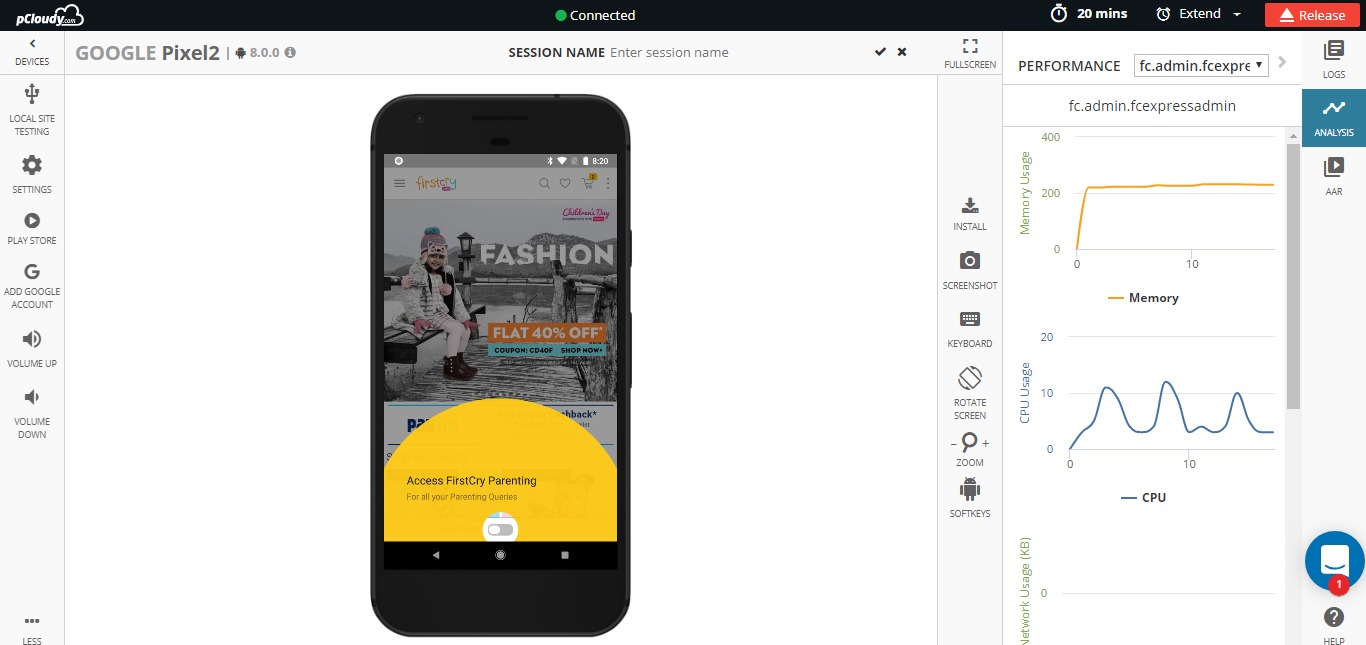
pCloudy helps you with performance profiling of your mobile apps. You can view the CPU usage, Memory usage, Data usage and Battery consumption while performing a series of actions on the app. The Real time mobile app performance monitoring feature helps you to keep track of the app’s performance while conducting manual tests. You can even check the performance consistency of the app by running automation test suites in parallel on multiple devices and by also simulating different network environments.
App Performance while conducting Manual Tests
The performance of an app can be viewed real-time while conducting functional tests. You can simply select the application installed on the device from the Tools section to view a graph of Memory and CPU usage, with the packets/bytes consumed in the Data Usage.
All information captured during a testing session is gathered by the platform and stored in a secure location to be used later. When a tester completes his testing session using a device, the performance related information can be found in the Cloud Drive.
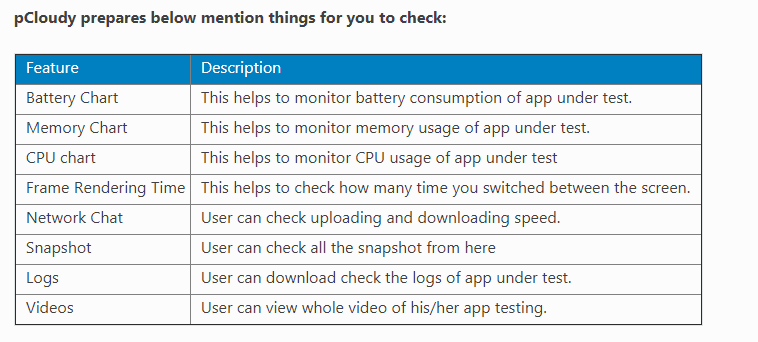
Battery Consumption
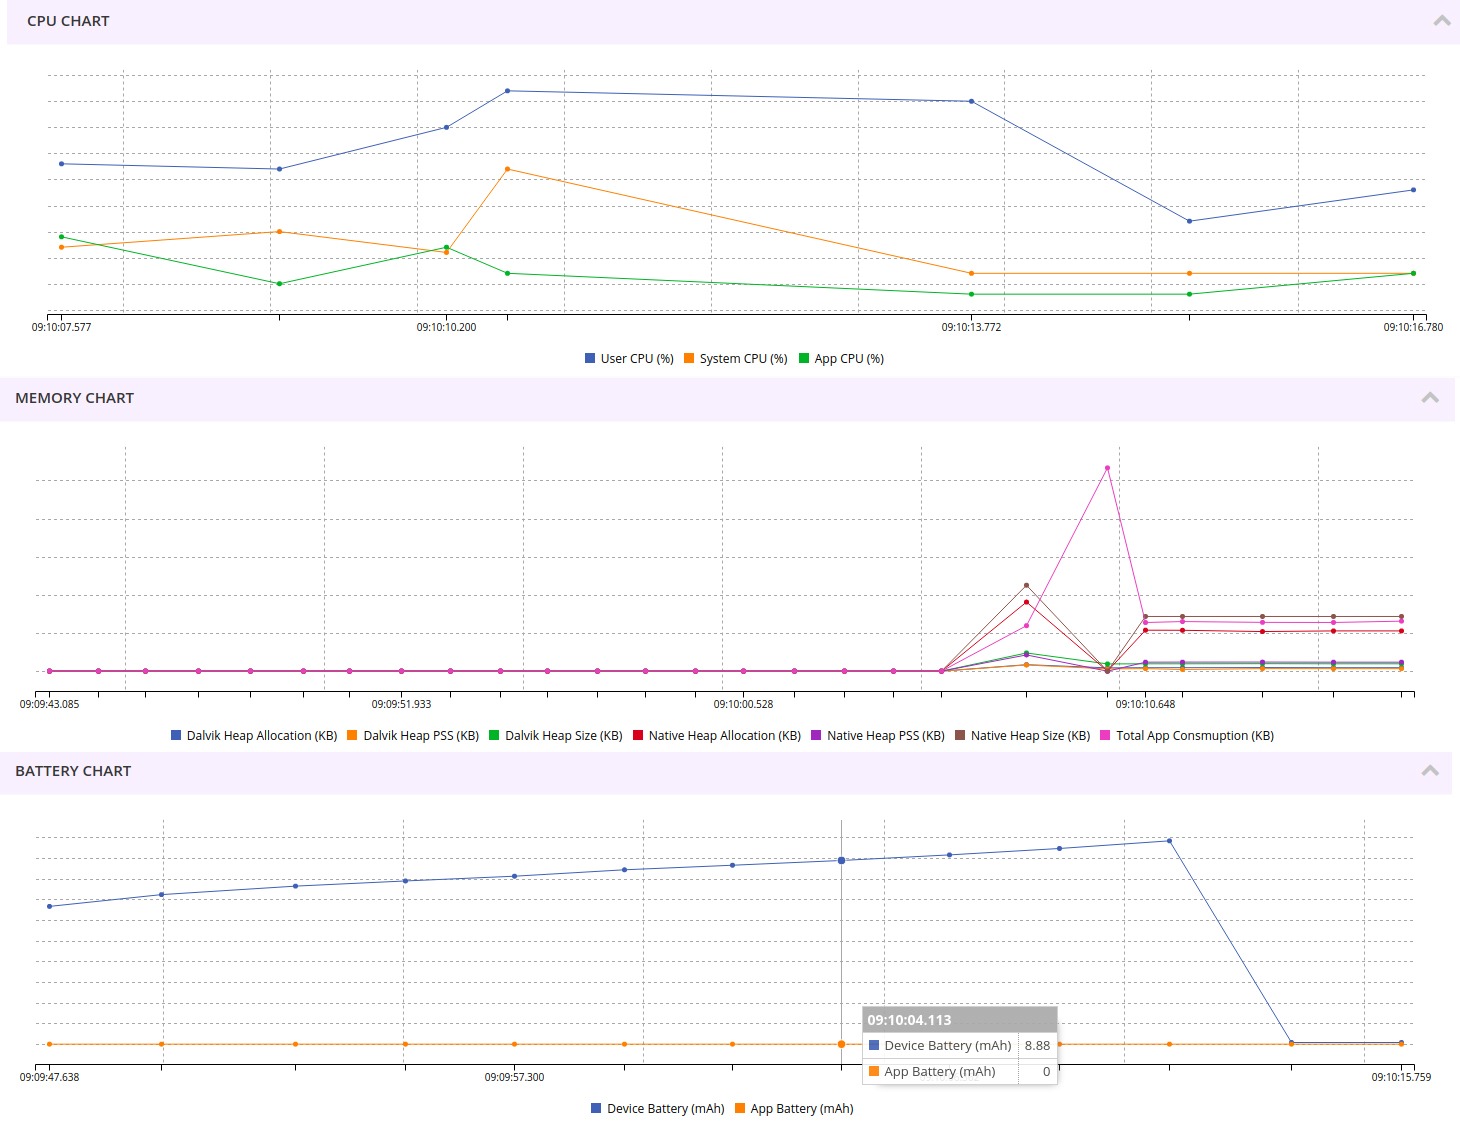
The Battery Consumption graph indicates Battery consumption by Device, Battery consumption by Application and Battery consumption in %.
CPU Consumption
The CPU consumption of an App is plotted as CPU consumption in percentage against Time Duration in seconds.
Memory Consumption
The CPU consumption of an App is plotted as Memory consumption in ‘Mb’ against Time Duration in seconds.
You can listen to this webinar on Performance testing to find out how a cloud based solution can help your app perform well in all situations.
Mobile is the key to the digital world in today’s era. The rise of Mobile Internet has ensured that we all are going to make most of our digital decisions on a Mobile device (primarily using an App). Mobile Apps are going to be everywhere.
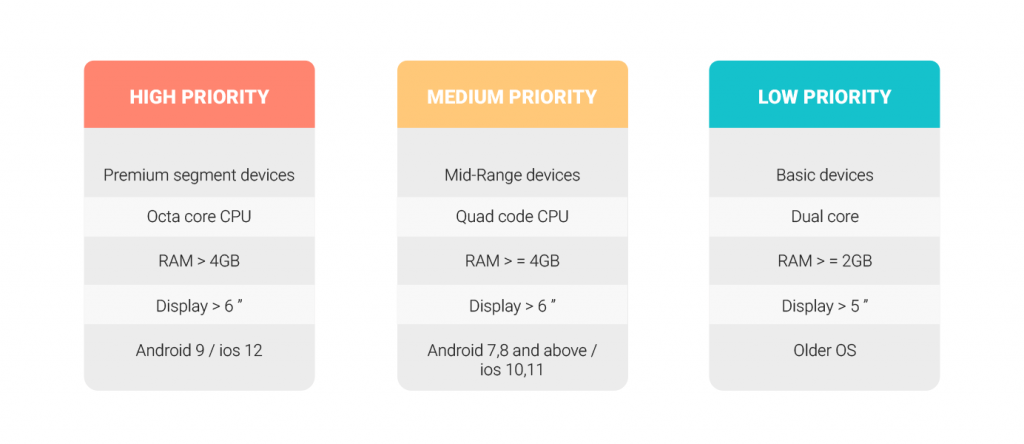
One of the biggest challenges for App Development teams is to ensure that their Apps works on the variety of devices. They need their apps tested on multiple devices before it is released to the market, simply because of the plethora of devices available in the market.
Each mobile from each OEM (Original Equipment Manufacturer) with different specifications is a unique device where the application should be tested.
Practically it is not possible to test the application on each and every mobile device available in the market. But the app must be tested on a large set of the devices depending on the market segment of App under test.
Introduction:
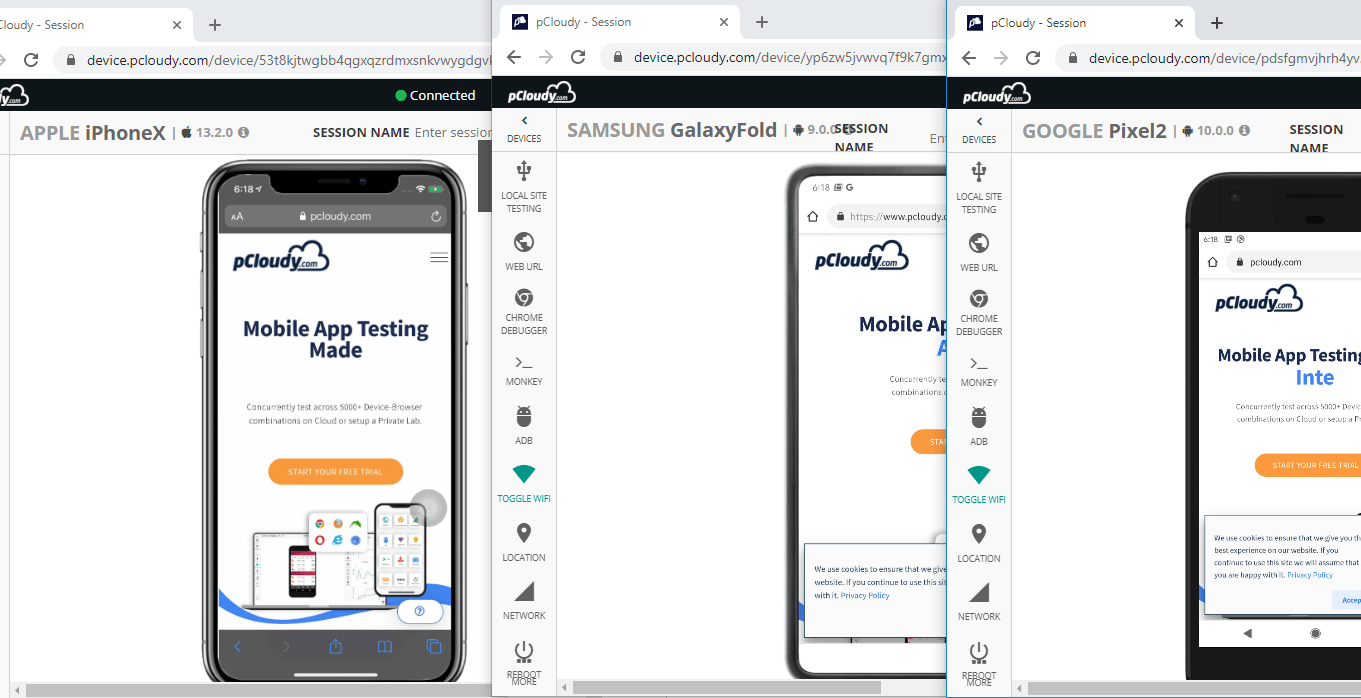
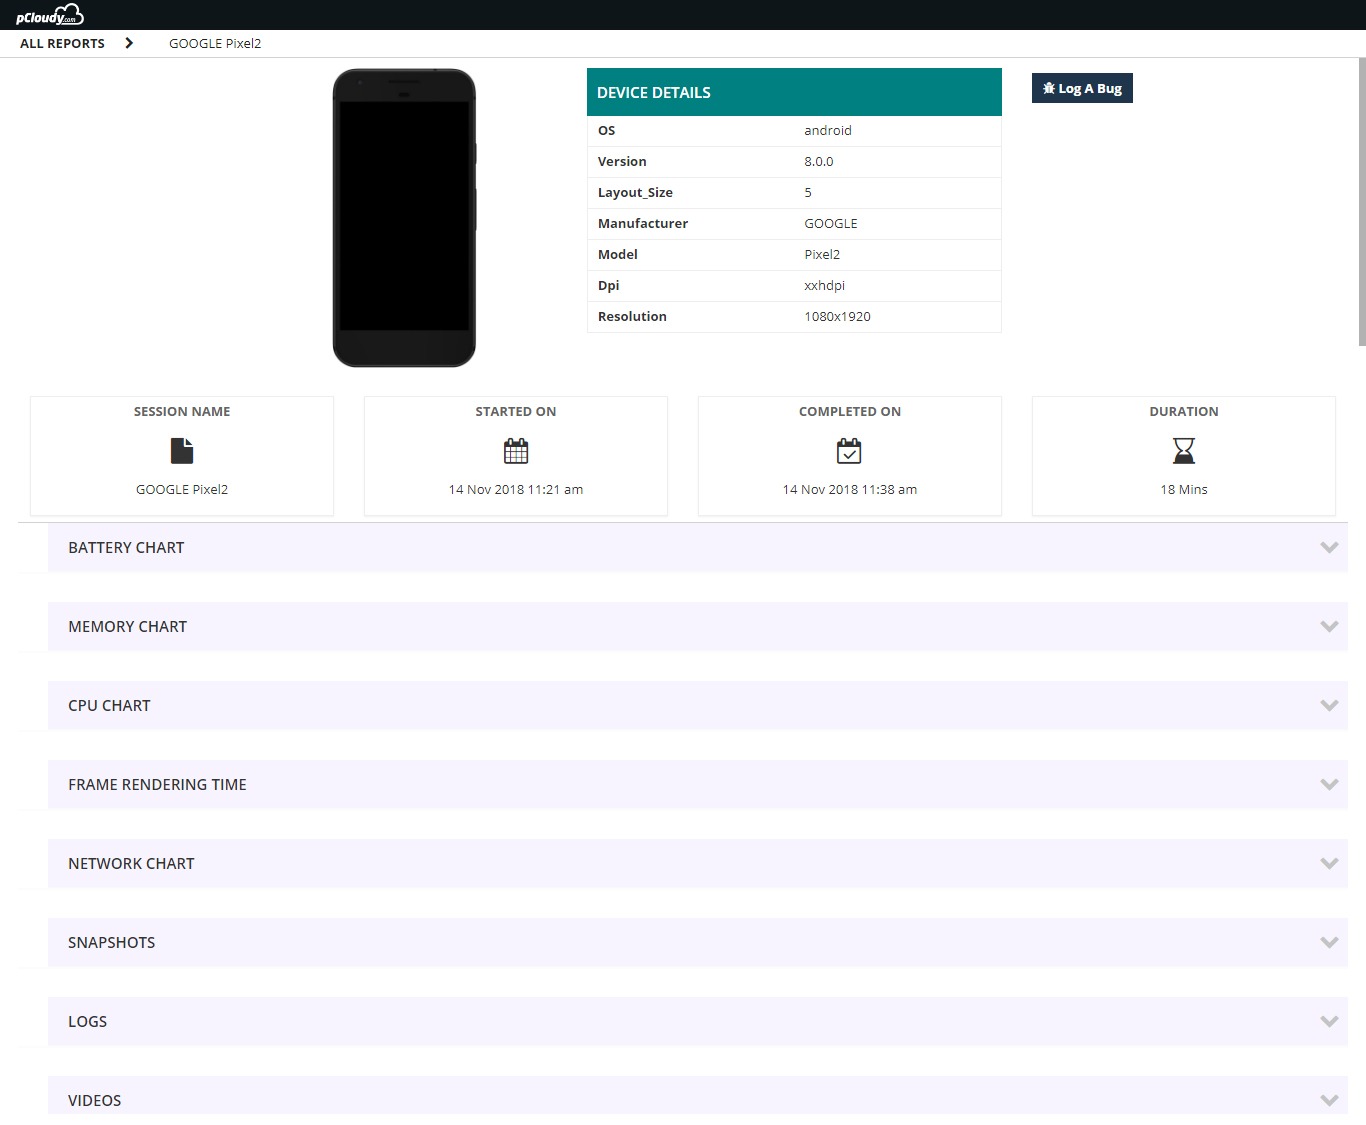
pCloudy is a cloud-based remote mobile app testing platform which allows testing of Android and iOS mobile applications on remote REAL devices. It allows the user to do Manual testing and also facilitate to run test automation on multiple devices in parallel.
It provides a whole lot of statistics like session video, device logs, Screenshots, data usage, memory usage, CPU usage, battery consumption and frame rendering count. The devices are also equipped with Real Operator SIM’s to make MO/MT calls and can receive and send SMS.
Preparing for Manual Test
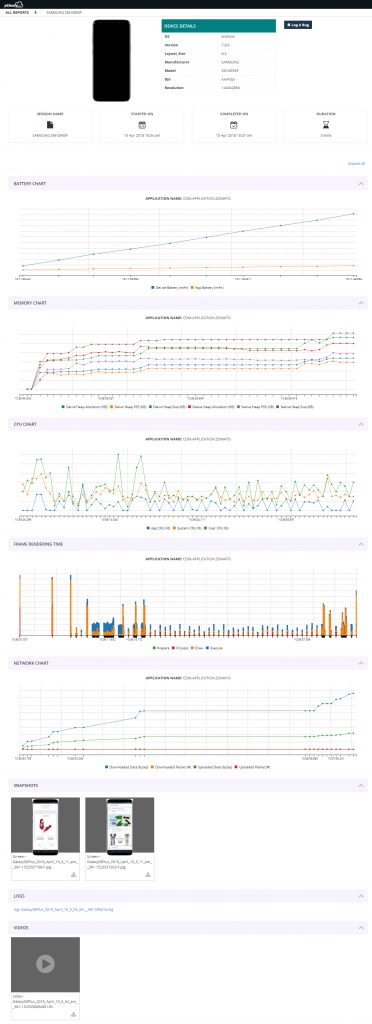
Before we start the test on pCloudy, we recommend uploading the test application, test data or even test suites to the cloud drive provided by pCloudy. This is the secured location for each user.
Click on the Upload button and select the file from your local system through file explorer. After selecting the file select upload and the file will be uploaded to your cloud drive.
You can also manage the cloud drive by download. These applications can be installed on the devices as explained below.
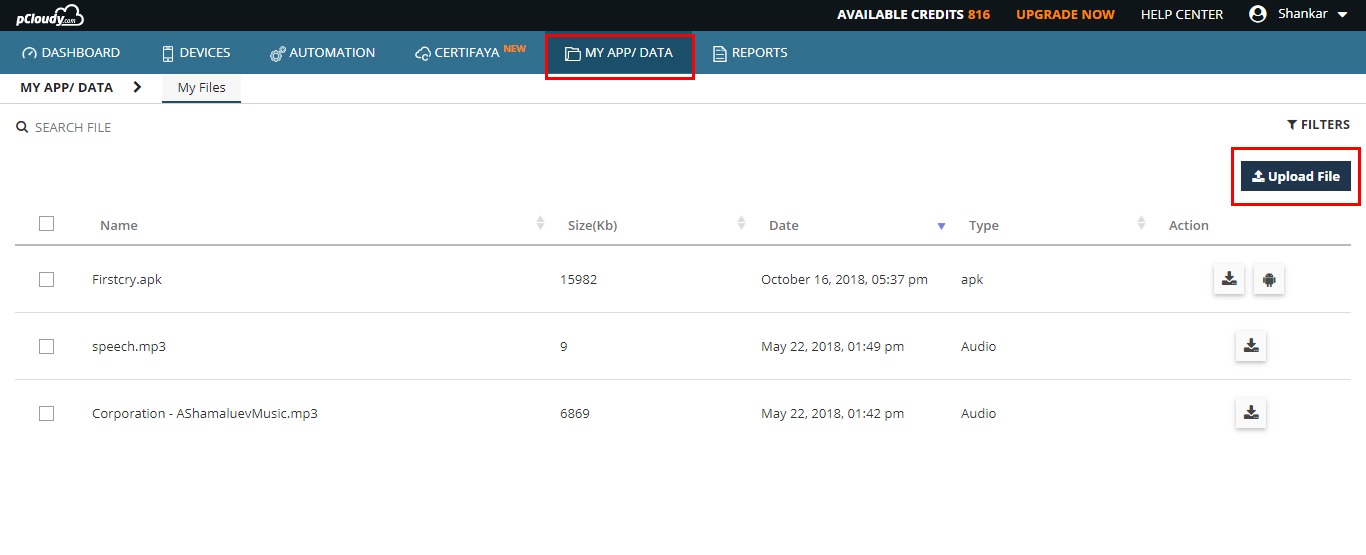
Performing Manual Test remotely
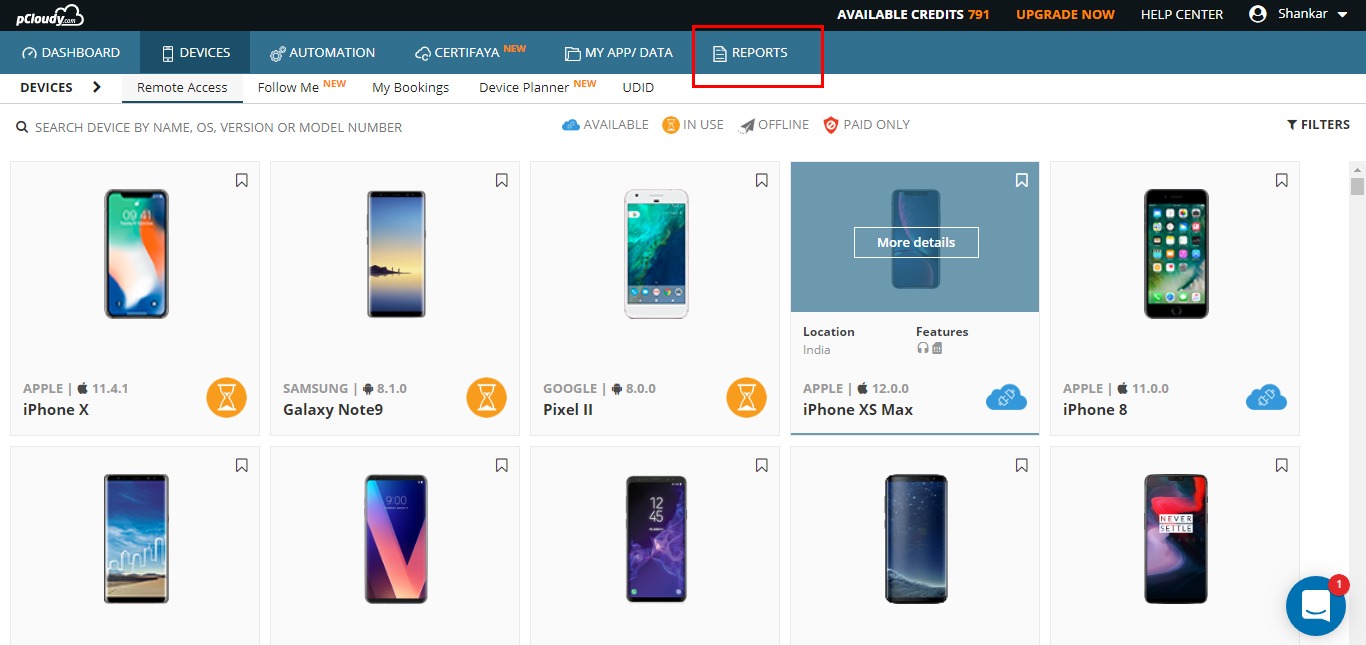
Based on test requirement, you can search for any specific device by using the filters provided at pCloudy.
(Note: Click on any image for enlarged view)
You can access any device for Instant Access. Also, you can book the device for a longer duration for your planned testing using “Book your Device” link.
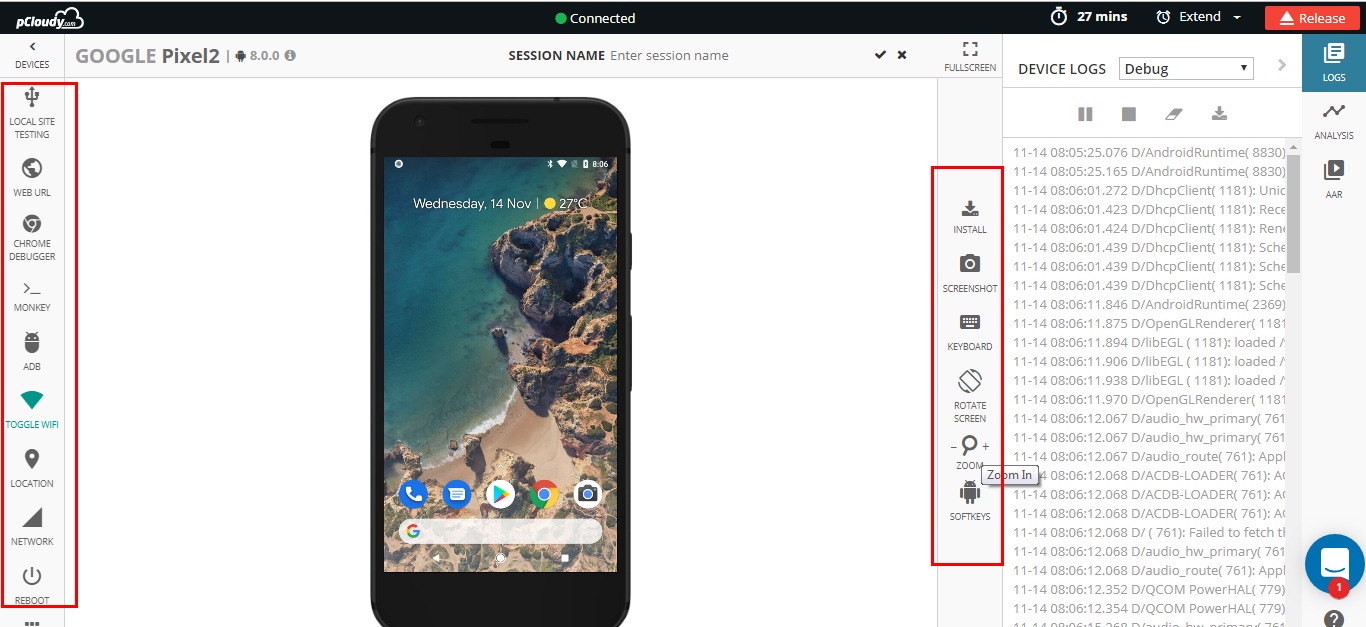
After selecting the device just click on the “Connect to a device” button to connect to the device. The below device page will be displayed with all the supported features.
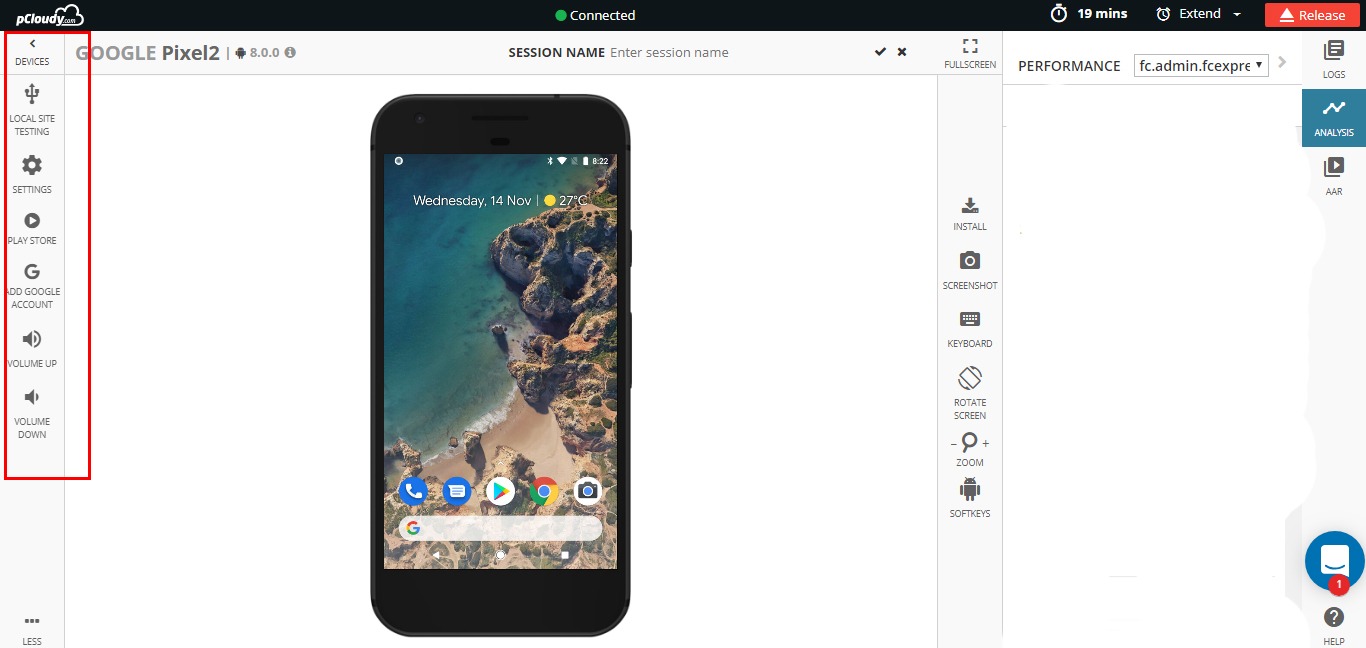
The device is displayed in the middle pane with some features on the right, left and top pane.
The Left pane where the device information is displayed, followed by other tabs like App/Data, Device Settings, Debug and Automation
The top pane with handy features & a timer to show the remaining time & wake up the device and release the device back to the cloud.
The right pane to view the device logs and Performance vitals for application under test.
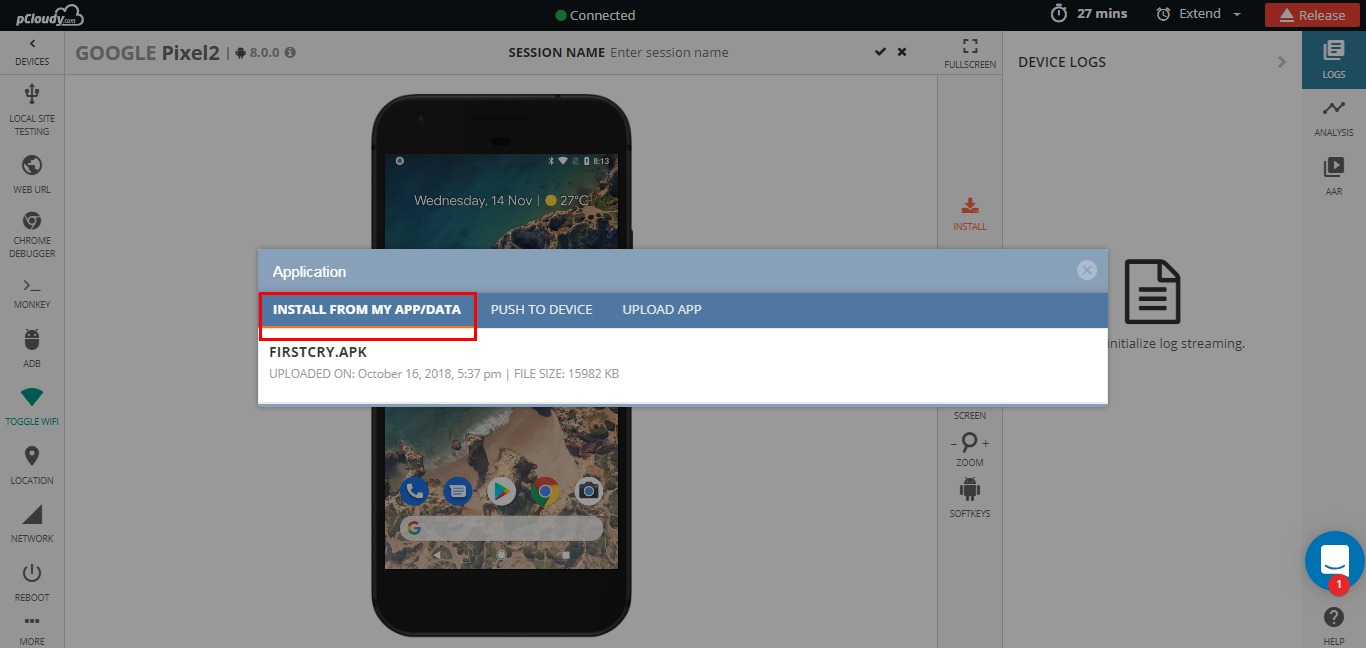
How to Install the application on the Remote Mobile device?
Install from my App data – enables user to upload app on device.
Push to Device – This feature allows you to transfer your test data to the device.
Upload App – Upload and install an app from your local system.
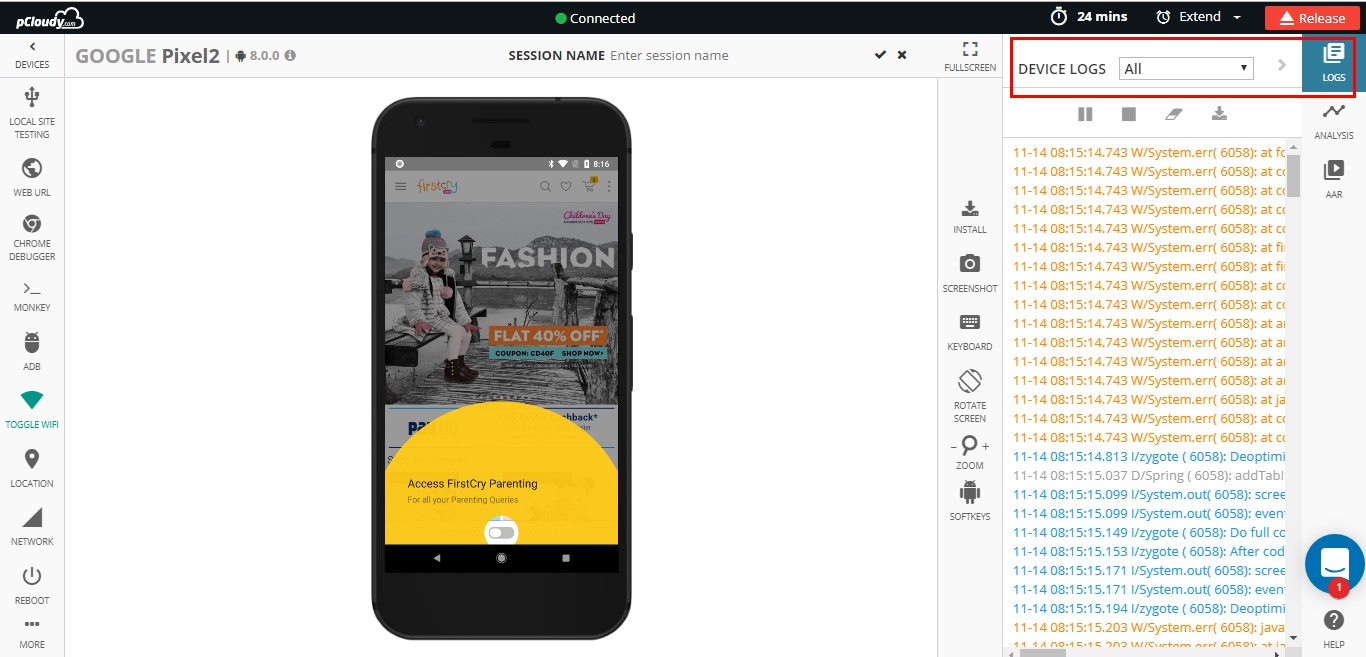
Once the application is installed you can test the application on REAL Remote Device the way you test the application with the phone in hand. You can use the mouse to give touch gestures to the device. You can click the button, drag the screen or double tap the image.
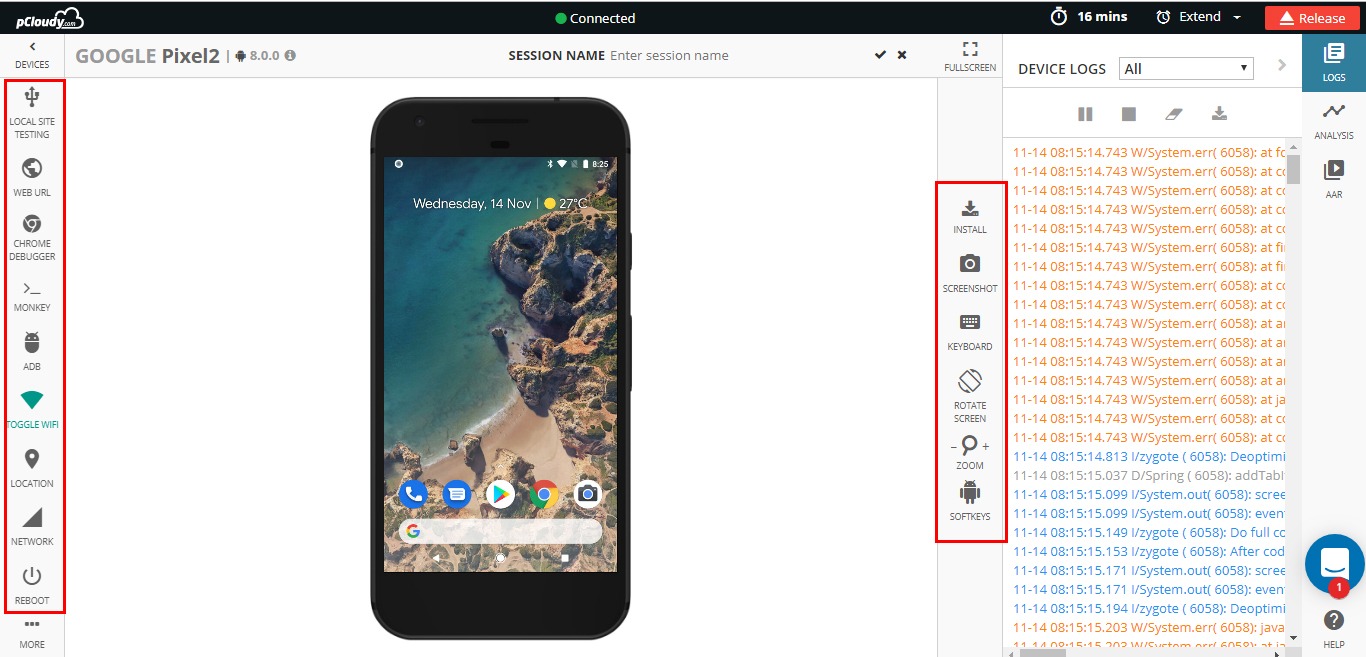
While doing functional testing on the remote device, you can also monitor the device logs next to the device. Please start the logs from the right page and start monitoring the logs next to the device.
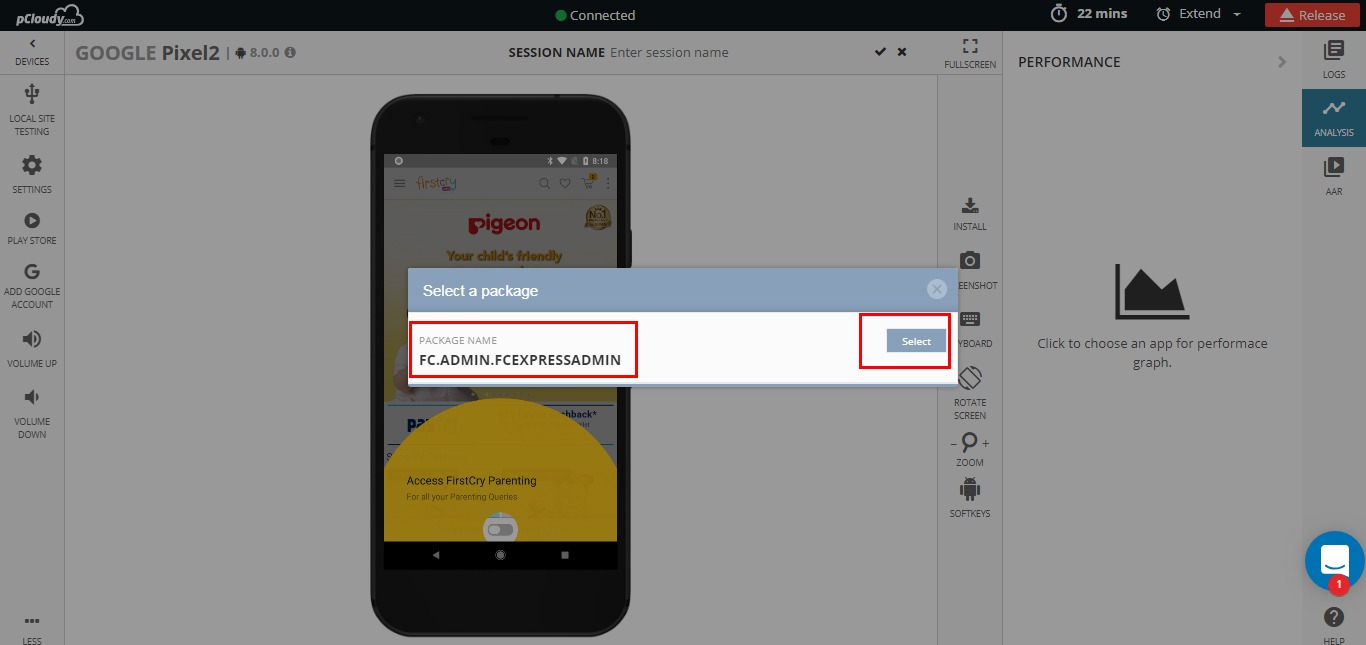
All Mobile App Testing tools at one place: One of the biggest advantages of pCloudy platform is it provides performance statistics like Memory Usage, CPU Usage, Battery usage, Data usage & frame rendering count of the application under test without any extra efforts by the test engineer.
To view this vital statistic on pCloudy platform, please select Performance tab -> Choose an APP -> Select the application under test.
Start navigating through the application to complete the function test flow.
On the right pane, you will start seeing the important vitals of the performance.
On the left pane, you can expand the device settings. All the important frequently used applications are made available to use on the device.
You can perform below actions on the remote device:
Reboot the device remotely
Toggle the Wi-Fi connection
Adjust the volume of the device
Manage the Apps
Open Developers options
Open Play store
Open Device settings
Use Set Phone Location
If your application under test is a location aware app and if it reads the geo-location from the device to provide the necessary results, “Set Phone Location” feature can be used to inject any location on the earth to the device and the device will be teleported to the selected location.
Once you select the “Set Phone Location”, the platform shows the google maps and you can select the location of your choice on this map. The same location is injected to the device.
Other key features during manual tests
You can capture high-resolution screen shots with the skin of the device
Change the orientation of the device to Landscape and portrait
Open the browser from the list of preinstalled browsers
Use the extended keyboard if you want to enter some text on the device. However, for Android ver 5.0 and above you can directly enter the text from your system keyboard.
Check the stack trace (crash logs) if the application is crashed
You can navigate the application with the buttons
Zoom in/out the device shown on the screen
Reset the zoom level to bring the device to default size
Extend the session if the device is available
Wake up the device from sleep mode or push the device to sleep mode
Release the device back to the cloud
Reporting
Under reports folder, you can see the entire device session data for all the devices you used. You can find Videos & Logs (by default platform generates), screen shots and performance data if selected by the user.
Running test automation remotely
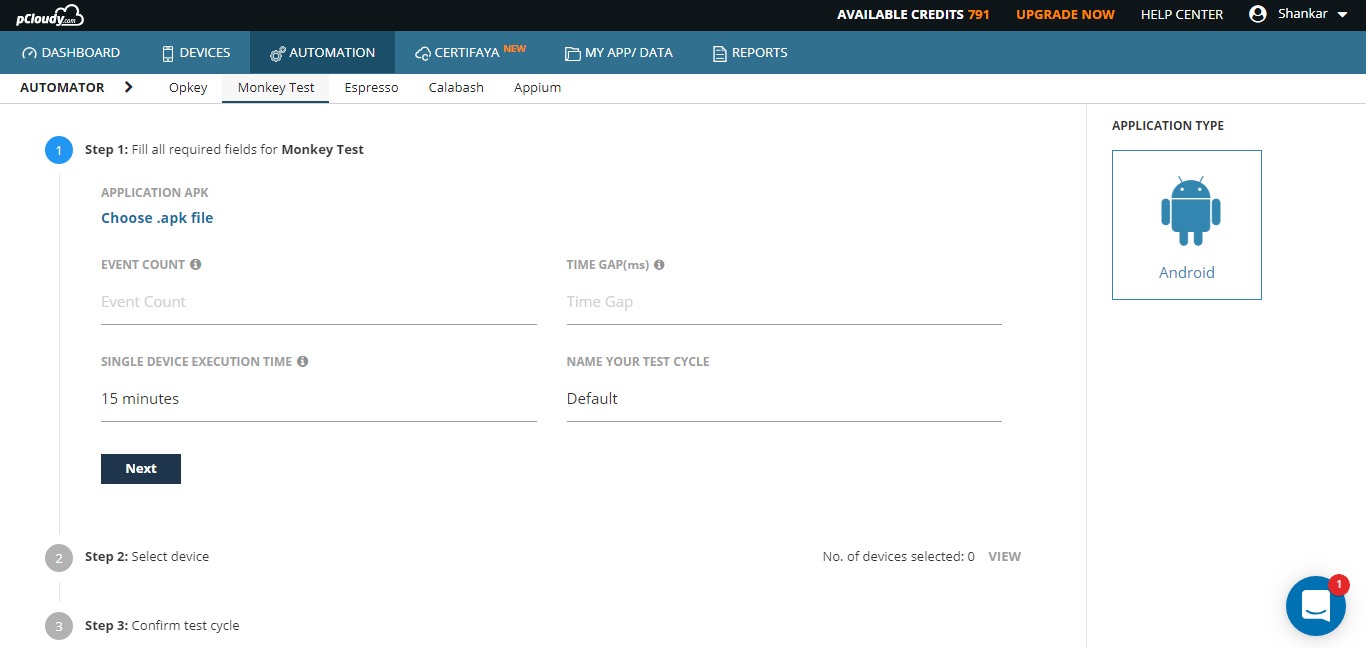
pCloudy platform supports test automation on multiple devices in parallel. Below test frameworks are supported for Android platform.
You just need to select the Test platform, Choose the application under test, Test Suite, time to run on single device and test cycle name.
The biggest advantage of this platform is it generates performance vitals for your test automation scripts without you adding any hooks in your scripts. Otherwise, you will be using multiple mobile App testing tools to achieve the same result.
Once the above data is provided, user can select the devices on which the test automation to be run. Once the devices are selected, the user can schedule the test cycle.
The platform will book the devices on your behalf and will start the test automation as soon as the devices are available. Once the execution is over, the user will be notified with an email and user can see the test reports.
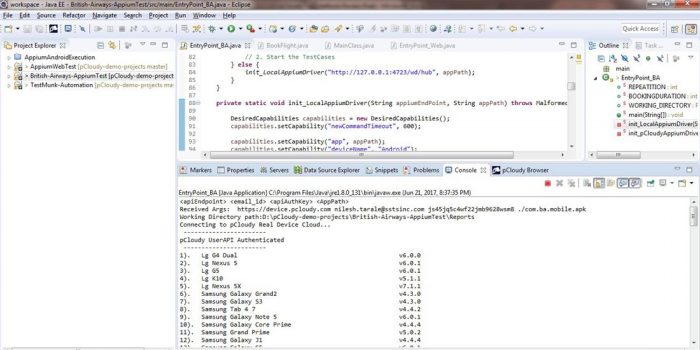
APPIUM Test Automation
You can run the Appium test automation scripts directly from Eclipse or Android Studio. The platform provides the plugin for both the IDE’s. Simply copy a small piece of code to your driver code and run the project, select the devices on which this tests to be run.
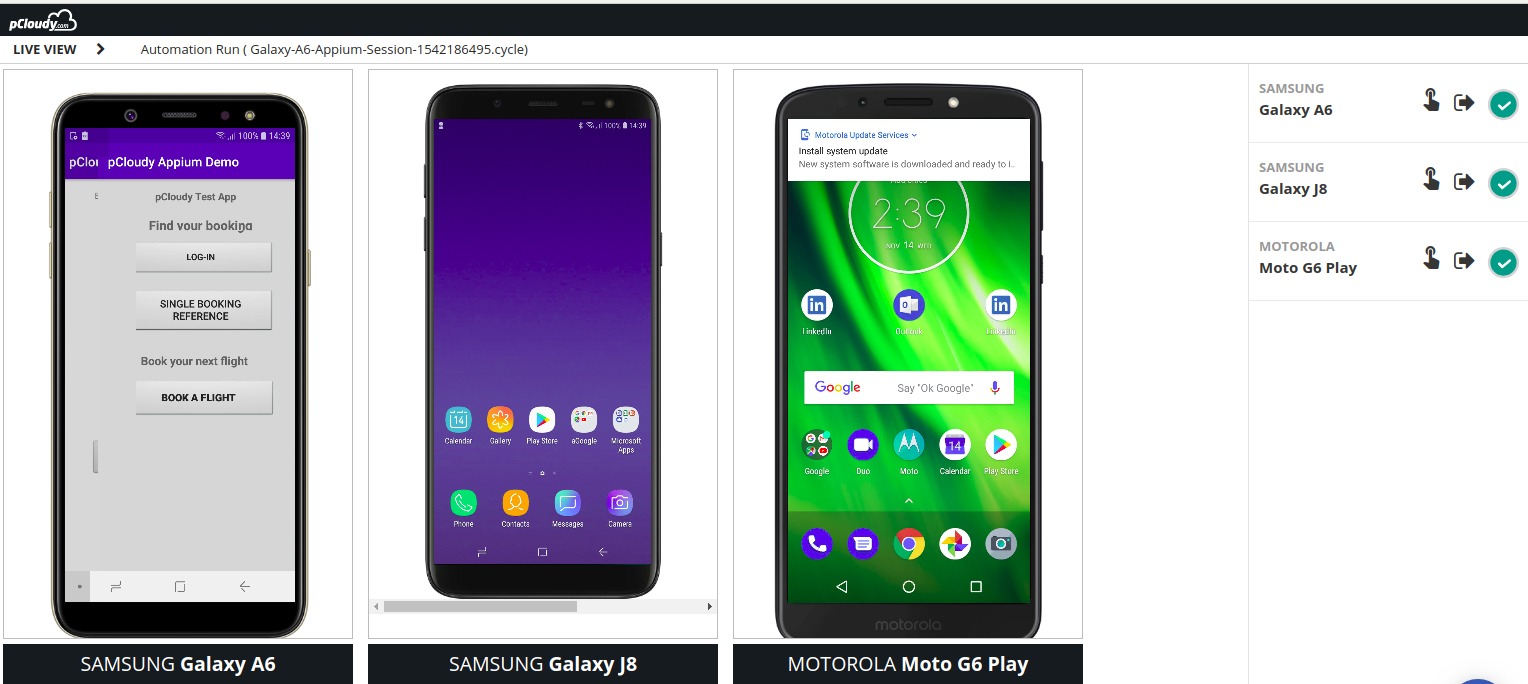
The “LIVE VIEW” feature will allow you to monitor the test automation runs through video streaming on the platform.
LIVE VIEW
Live view – To see the automation happening on devices
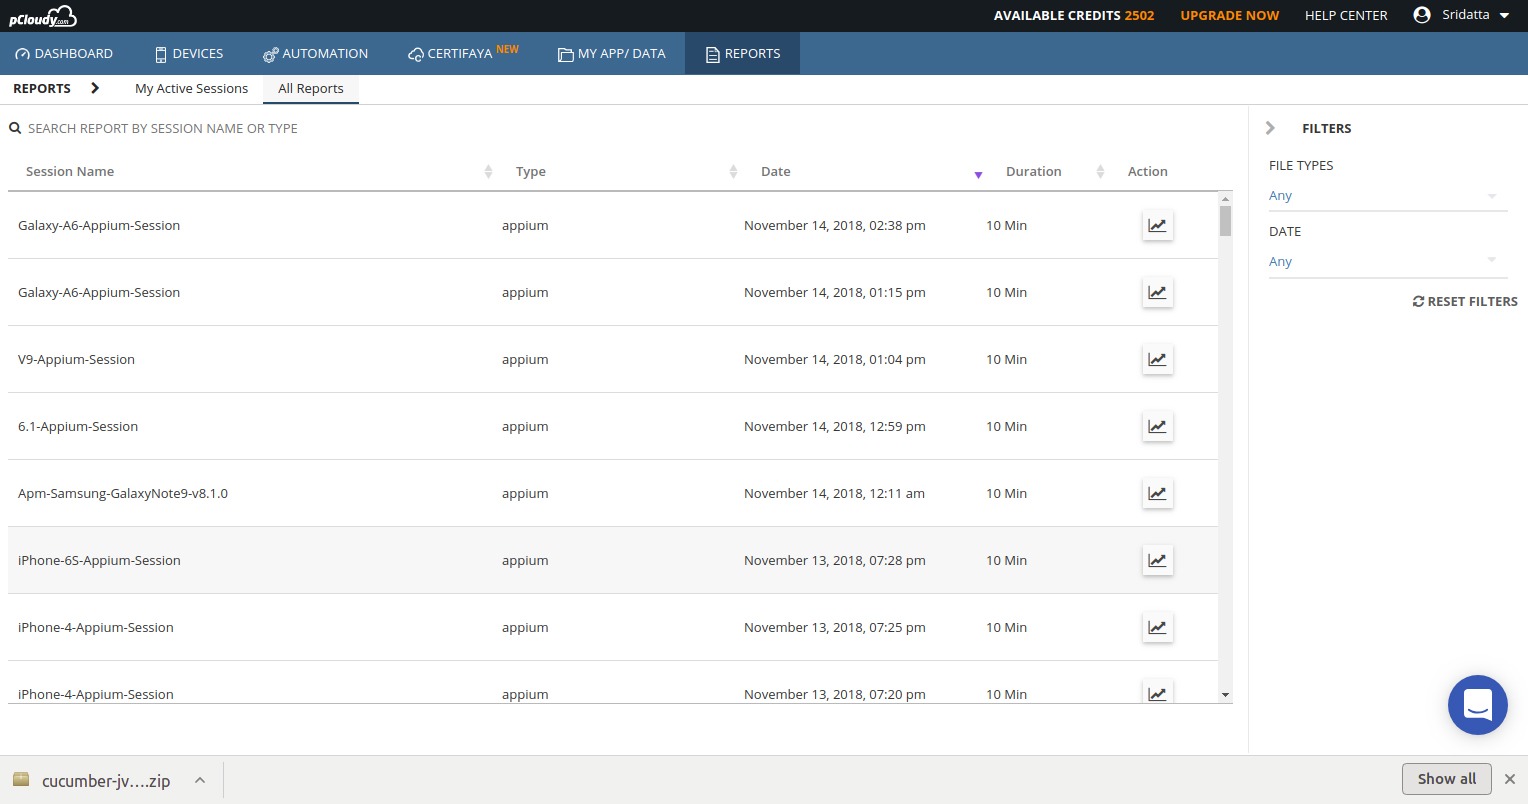
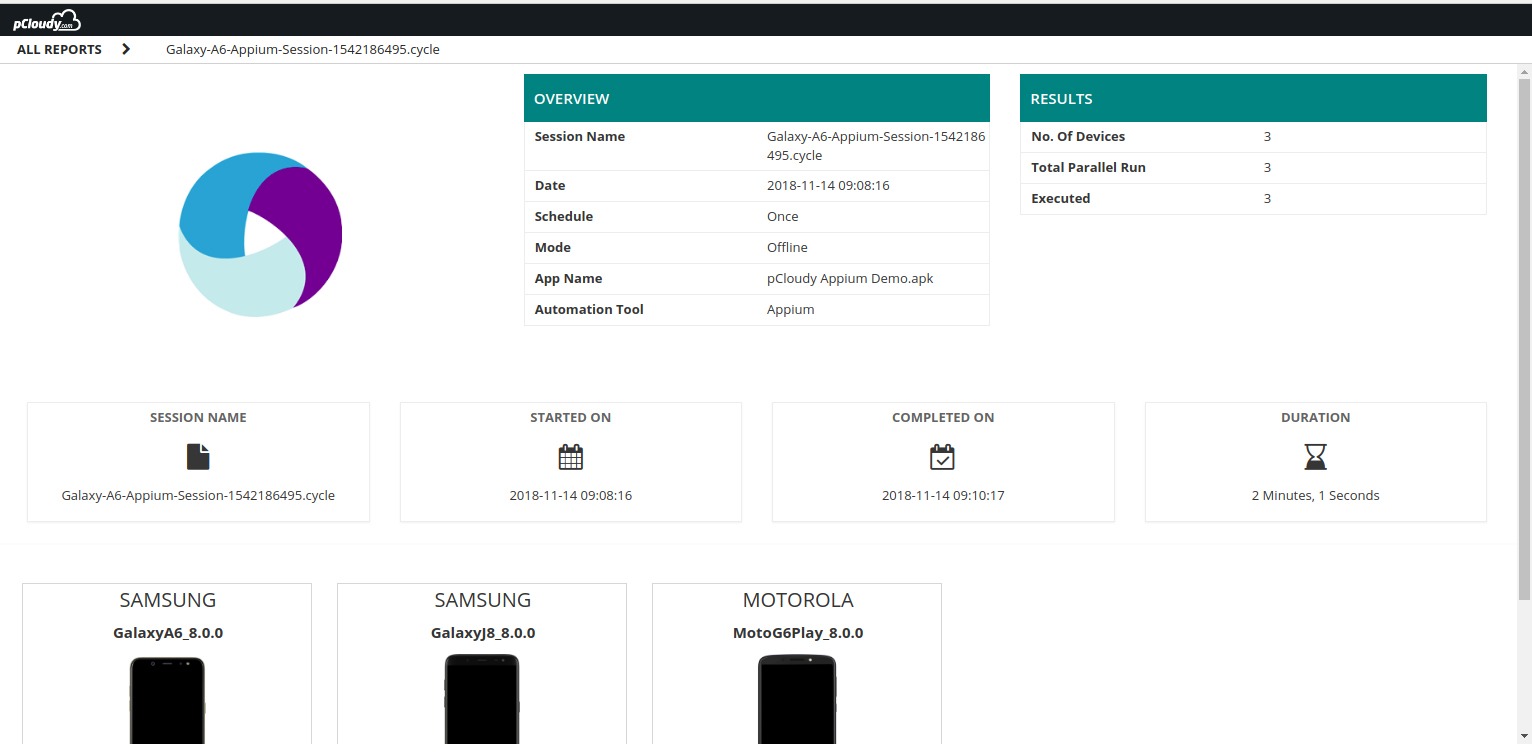
Automation Test Reports
All the test automation reports will be available under Reports folder.
The reports will open in another tab with video, logs and performance data.
To view the performance data for each device, please click on the device icon for each device.
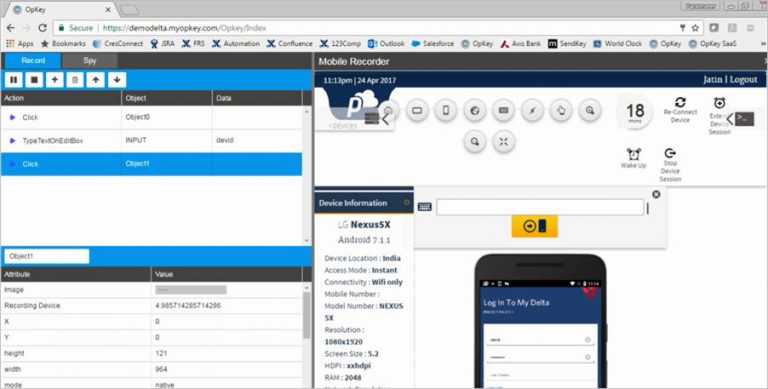
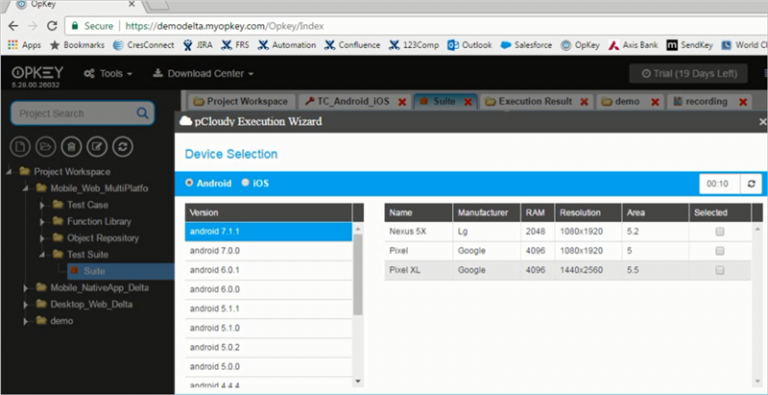
Opkey Integration
pCloudy has seamless integration with OpKey, which is a zero code multi-channel automation tool. A unique combination of Mobile App Testing Tools for manual and Automation testing.
OpKey allows single click recording and generation of automated scripts for Mobile Apps.
You can run the automated scripts on multiple devices on pCloudy directly from OpKey interface.
The quality of App is extremely important for its success in the market. Right devices and right mobile App testing tools are critical ask from every Mobile Dev and Test team. pCloudy with its comprehensive set of devices and tools could be a perfect companion to every Developer and Tester.