Suyash Dubey | Posted on | 2 min Read

Testing framework plays a crucial role in the success of any automated testing process. Choosing the right test automation framework is important as it will maximize the test coverage and improve test efficiency which means a better return on investment.

There are some key points you need to keep in mind while choosing a suitable python testing framework. The framework should justify your testing needs and it should be easy to use. Check if the framework has integrations with other tools and frameworks that you might use. The features, support, stability, and extensibility are also important. So let’s compare the most popular python testing frameworks to make it easier for you to choose the right one.

Robot framework

It is still the most popular python testing framework that uses a keyword-driven testing approach and is used for acceptance testing. To run Robot you will have to install python 2.7.14 or any later version, python package manager, and a development framework like Pycharm.
Advantages

  • Opensource
  • Platform independent
  • No need to learn a programming language to write Robot Framework test cases
  • Automatic report generation after executing each built
  • Supports behavior-driven, data-driven and keyword-driven approaches
  • Easy installation

Disadvantages

    • Not enough support for parallel testing
    • It’s difficult to create customized HTML reports

Gauge

It is an opensource tool developed by the team that made Selenium. Gauge is immensely useful while integrating continuous testing in the CI/CD pipeline. It is gaining popularity as it supports many plugins like python runner, IDE plugins, build management, java runner, etc.
Advantages

      • Quick defect detection
      • Easy to write test cases
      • Supports multiple programming languages
      • Command-line support
      • Supports all major plugins
      • Cross-browser tests can be automated

Disadvantages

      • It is relatively new so it will evolve in the coming years

Pytest

Although Pytest is used for different types of testing, it is more preferred for functional and API testing. There are no prerequisites needed for Pytest, just knowledge of python will be enough to get started. It has a simple syntax which makes test execution easier.
Advantages

      • Supports Fixtures and Classes that help in creating common test objects available throughout a module
      • It allows the use of multiple fixtures
      • It does not require a debugger
      • Xdist and other plugins support makes parallel execution easier
      • It supports parameterization, which is essential while executing the same test with different
      • configurations using a simple marker
      • Large community support

Disadvantages

      • Test written in Pytest cannot be shared with other platforms

Pyunit

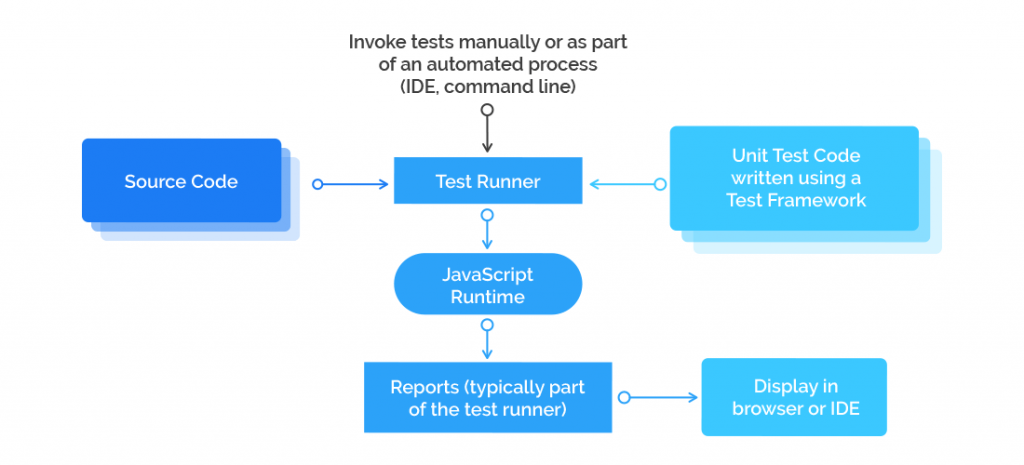
It is a unit testing framework much like Junit but for python language. Also referred to as unittest, it has five core modules. The test loader class is used to load all the test cases and test suites. The test runner shows the result of the test executed using an interface. The test suite is a collection of test cases that are clubbed logically based on the functionalities. A test case contains the actual implementation of the code and the test report contains the organized data of the test results.
python automation
Advantages

      • No need for high-level python knowledge for test execution
      • Extensive report generation
      • Pyunit comes with Python package, no need to install any additional module
      • Simple and flexible test case execution

Disadvantages

      • Requires boilerplate code
      • Pyunit is derived from Junit and so it still uses camelCase naming instead of snake_case naming method
      • It supports abstraction so the code intent sometimes becomes unclear

Behave

In Behave, test cases can be written in simple language and lets teams execute behavior-driven development (BDD) testing with ease. Behavior-driven development encourages quality analysts, developers, and business managers to work in collaboration to achieve higher efficiency.
Advantages

      • Easy execution of all kind of test cases and easy coordination
      • Better clarity on the developers and testers output as the format of the spec is similar
      • Domain vocabulary that keeps the behavior consistent in the organization and the system behavior is expressed in a semi-formal language
      • Detailed reasoning and thinking promotes better product specs

Disadvantages

      • Only for black-box testing

To sum it up

All the above-mentioned frameworks have their specialties like Pyunit is used for unit testing and Behave is good for behavior-driven testing. Although Robot framework is the best tool for a beginner to learn the nuances of automation framework. It’s always better to jot down your requirements based on their priority and then choose the right python testing framework.

Suyash Dubey | Posted on | 2 min Read

In the year 2028, there will be around 7.8 Billion mobile users which accounts for 70% of the world population. More mobile users mean more apps and more competition and to lead the competition we need to make sure that our app is flawless. If nearly half of the bugs in your mobile app are discovered by the users, your app’s ratings are going to decline and so are the downloads. This is why the right choice of mobile app testing techniques must be followed in the decision-making process.

Mobile App Testing Strategies

Today, the mobile app market is highly competitive. To be better every day and survive for long, the QA team has to follow a mix of plans that would be responsible for taking the right testing decisions. The testers have to formulate testing strategies to face every situation fearlessly and immaculately. Mobile apps have to be perfect before reaching to the end users so there have to be certain decisions to be taken regarding the testing plan. The following model of mobile app testing plans can be considered for better execution.

In the planning Stage, decisions like Selection of Device matrix, Test Infrastructure (In-house vs. Cloud, Simulator vs. Real device), Testing scope, Testing Tools, Automation (Framework/Tool) are taken. Since it is the first stage, it is the most important one as all the further stages would depend on these decisions. In the next stage which is execution and review, decisions regarding Test Case Design, Testing of user stories, testing types as per Sprint Objective, Progressive Automation, Regression Testing, Review and course correction are taken.

We are going to discuss the planning stage aspects more elaborately

Device Matrix:

It is an important factor, choosing the device as per your target audience’s behavior matters in decisions regarding resting. There are different approaches to the selection of the device matrix.

Approach 1- Selection of Devices based on market research.

Determine the set of devices with your target operating System that will have the highest occurrence of accessing your application by using app purchase data and analytics. For Example- if you support both Android and iOS, and your application will be used across millions of Samsung, Google Nexus and Moto G devices but only thousands of iPhones, you prioritize testing on the Google Nexus and Moto G above the iPhone device. So, this test plan will consist of testing on devices which are prioritized by your market analysis.

Approach 2: Categorize the devices based on Key mobile aspects

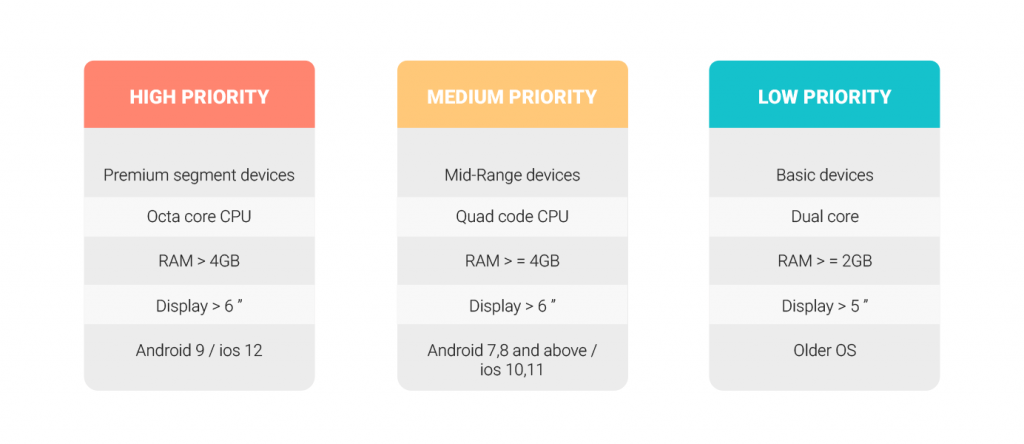
This approach highlights the categorization of the devices based on certain mobile aspects which can be considered in formulating the testing strategy. The categorization goes as:
Mobile device categorisation

Test infrastructure

This is another element of the planning stage. This focuses on Strategizing on the Infrastructure components like hardware, software, and network which are an integral part of test infrastructure. It ensures that the applications are managed in a controlled way.

Real device, Emulators or Mobile cloud-Where to test?

Choosing the right platform to test as per the testing needs is very important i.e whether to test on the Real device or an emulator or on the cloud

Real Devices

Testing on a real device is anytime more reliable than testing on a simulator. The results are accurate as real-time testing takes place on the device in a live environment. It carries its own disadvantages as it is a costly affair and not all the organizations are able to afford a complete real device laboratory of their own.

Pros:

Reliable- Testing on Real devices always gives you an accurate result

Live Environment- Testing on real devices enables you to test your application on the actual environment on which your target audience working on. You can test your application with different network technologies like HSPDA, UMTS, LTE, Wi-Fi, etc.

User experience- Testing on Real devices is the only way to test your Real-time User experience. It cannot be tested through Emulators or devices Available on Cloud.

Cons:
Maintaining the matrix- You cannot maintain such a huge matrix of mobile devices in your own test lab.
Maintenance- Maintaining these physical devices is a big challenge for organizations.
Network providers- There are more than 400 network providers all over the world. Covering all these network providers in their own test lab is impossible.
Locations- You cannot test how your application behaves when it is used in different locations.

Emulators

The emulator is another option to test mobile apps. These are free, open source and can be easily connected with the IDE for testing. The emulator simulates the real device environment and certain types of testing can be run on it easily. However, we cannot say that the results of emulators are as good as those of real devices. It is slower and cannot test issues like network connection, overheating, battery behavior, etc.

Pros:

Price- Mobile emulators are completely free and are provided as part of the SDK on every new OS release.

Fast- As Emulators are available on the local machine so they run faster and with less latency than Real devices connected to a local network or devices available on the cloud.

Cons:

The wrong impression- Even if you have executed all test cases on emulators, you cannot be 100 % sure it will actually work in the real environment.

Testing Gestures- Gestures like Pinching, Swipe or drag, long press using the mouse on simulators are different in using these gestures on real devices. We cannot test these functionalities on emulators.
Can’t test Network Interoperability- With the help of Simulators you cannot test your application with different network technologies. Like HSPDA, UMTS, LTE, Wi-Fi, etc.

Testing on Mobile Cloud

Mobile cloud testing can overcome the cost challenges like purchasing and maintaining mobile devices. It has all different sets of device types are available in the cloud to test, deploy and manage mobile applications. The tests run virtually with the benefit of choosing the right type device-OS combinations. Privacy, security, and dependency on the internet can be a challenge in this case but it has many benefits that can cater to different testing scenarios.
Mobile cloud

The organization can choose the right mix of above-mentioned platforms as every platform carries its own advantages and disadvantages. Sometimes a combination of real and emulators is preferred and sometimes all three can be considered as per the testing strategy.

Pros:

Devices Availability- Availability of Devices and network providers is a big gain for cloud users.
Maintenance- When you are using cloud services. Forget about maintenance. These providers take responsibility for maintaining these devices.
Pay per use- You don’t need to buy a device. You only have to pay for the duration you use that device.

Parallel Execution- You can test your complete test suite on multiple devices.

Cons:
Cost- Some providers are a bit costly

Automation Tools for Mobile App Testing on Android and iOS

Nowadays, there are so many automation tools available in the market. Some are expensive and some are freely available in the market. Every tool has its own pros and cons. Choosing the right tool for testing would reduce the QA team effort providing seamless performance at the same time. We will discuss the best mobile app testing automation tools for iOS and Android platforms in 2018.

1. Appium: It is one of the preferred MAT tools by testers. It is open source and free tool available for Android and iOS. It automates any mobile app across many languages and testing frameworks like TestNG. It supports programming languages like Java, C# and other Webdriver languages. It provides access to complete back end APIs and database of the test codes.
Top Features:
-Appium supports Safari on Ios and Other browsers on Android
-Many Webdriver compatible languages can be used such as Java, Objective-C, JavaScript to write test cases
-Support languages like Ruby, Java, PHP, Node, Python.

2. Robotium: It is a free Android UI testing tool. It supports in writing powerful black box test cases for Android Applications. It supports Android version 1.6 and above. The tests are written in Java language and basically, Robotium contains a library of unit tests. Apart from this, Robotium takes a little more effort in preparing tests, one must work with program source code to automate tests. Robotium does not have play record and screenshot function.

Top Features:
-The tests can be created with minimum knowledge of the project
-Numerous android exercises can be executed simultaneously.
-Syncronises easily with Ant or Maven to run tests.

3. Calabash: It is an open source MAT tool allowing testers to write and execute tests for Android and iOS. Its libraries enable the test codes to interact with native and hybrid apps. It supports cucumber framework which makes it understandable to non-tech staff. It can be configured for Android and Ios devices. It works well with languages like Ruby, Java, .NET, Flex and many others. It runs automated functional testing for Android and ios. It is a framework that is maintained by Xamarin and Calabash.

4. Espresso: It is a mobile app testing automation tool for Android. It allows writing precise and reliable Android UI tests. It is a tool targeted for developers who believer automated testing is an important part of CI CD process. Espresso framework is provided by the Android X Test and it provides APIs for writing UI tests to simulate user interactions on the target app. Espresso tests can run on Android 2.33 and above. Provides automatic sync of test actions with the app UI.

5. Selendroid: An open source automation framework which drives off the UI of Android native, hybrid and mobile web application. A powerful testing tool that can be used on emulators and real devices. And because it still reuses the existing infrastructure for web, you can write tests using the Selenium 2 client APIs.

6. Frank: Is an open source automation testing tool for the only iOS with combined features of cucumber and JSON. The app code needs not to be modified in this tool. It includes Symboite live app inspector tool and allows to write structured acceptance tests. It is tough to use directly on the device but is flexible for web and native apps. It can run test both on simulator and device. It shows the app in action by showing its recorded video of test runs.

Above are a few promising, popular and most commonly used and mobile app testing automation tools. Choice of tools certainly resolves many testing-related problems faster and efficiently. Implementing these tools requires skill and experience and so an organization needs to have a proper testing team in place to make all of this possible.
Related Articles:

Suyash Dubey | Posted on | 2 min Read

Today, there are many smartphone users in the world and so is the popularity of mobile apps. In order to be competent enough, mobile apps have to be unique and should provide the best user experience to increase the user base. With the users getting more informed and intelligent, the apps built should keep up with the pace. In order to be impeccable, the mobile app should undergo a rigorous testing process and during that process, the testing team faces many challenges in this aspect which will be covered in this blog. But before we dive in, let’s look at the different types of apps that are available in the market.

Types of mobile applications

The creation of mobile applications is a fantastic approach to boost brand recognition, attract new clients, and improve the user experience for existing customers. In light of this, let’s examine the three primary categories of mobile apps: native, web, and hybrid.

Native apps:

Native mobile applications are ones created exclusively for a given operating system. As a result, software created for one System cannot be used on another, and vice versa. Native applications are more effective, quick, and offer greater phone-specific functionality. Thus, the difficulties of testing mobile apps for compatibility with native user interfaces of devices involve ensuring that such traits are preserved strictly.

Web apps:

Similar to native apps, web applications do not require users to download them. Instead, the users’ web browsers on their phones can access these apps because they are incorporated within the website. So, it is envisaged that web applications will operate flawlessly across all platforms. Testing teams must carefully examine the application on a wide range of real devices and browsers to ensure high app quality. Yet in addition to taking a lot of time, this operation is essential because failing to work on a few devices can severely reduce the app quality and incur heavy losses when the app doesn’t function as required.

Hybrid apps:

The features of both online and native apps are available in hybrid apps. These are essentially web applications that mimic native apps in design. These applications are easy to maintain and load quickly. Teams that test mobile apps are in charge of making sure hybrid applications don’t lag on some devices. Any operating systems with the capacity to support the said features have access to all their functionality.

While each of these app types are slightly similar to each other the technical teams face a different challenge with each type of mobile application. Combining these challenges greatly increases the complexity, making the entire procedure laborious and time-consuming. Let’s quickly look into what some of these challenges are?

Challenges in Mobile App Testing


Different Operating Systems and their versions

There are different types of operating systems available in the market such as iOS, Android, Windows etc. Also, these OS have different versions too. So, it becomes challenging to test so many versions of the mobile app in a shorter period of time. One app that works well in one type of OS may not work well in the other. It is very important to test the application with all supported platforms and their version because we don’t know where the user is going to install the application. As per research, iOS users upgrade quickly as compared to Android but in Android the device fragmentation is larger. That means the developers have to support older versions and APIs and testers also have to test accordingly.

2019-03-27 (1)


Device Variations: Based on Screen size

Android comes with a mix of features and variations in pixels densities and ratios which varies in each screen size. Even in the case of Apple, the screen new size was introduced with the launch of the iPhone 6. Now, it is not just about being picture perfect screen design rather designing an adaptive screen design. Well with such a variety in screen sizes, the role of the tester becomes serious as they need to check if all the features are working well in different screens and pixel and aspect ratios are maintained well.

devices-screen-sizes


Based on the number of Devices

The picture below shows the number of devices in the market by different brands. The number of device manufacturers has increased. According to OpenSignal, there are around 1294 distinct Android phone manufacturers alone, imagine if we add up other brands. The pace with which this data is increasing is a bit alarming for the testers as the testers have to check the app performances on different devices, they would probably need a device library to do the same. The challenge remains in context to functionalities like Complex user interactions on touch screen and keypad devices as well. Having a device library is certainly is a costly affair unless emulation is adopted which can simulate multiple device types and testing can run easily on it.

OpenSignal-Brand-Fragmentation

Image Source: venturebeat.com


Various Networks

The QA team also faces challenges when it has to test the devices connected to different networks. Generally, there are 2G, 3G,4G mobile data available. These provide different data transfer speed and transmission. These varying speeds of the networks by various providers remain a challenge for the testers even today. In this case, testers have to check that the app must perform well at different network speeds and connectivity quality and a check on bandwidth usage of the app. This remains a challenge as it is partially controllable based on different network providers and connectivity access in different geographies.


Frequent OS releases

Mobile Operating Systems keeps changing. Both Android and iOS have more than 10 versions of their operating systems. They keep enhancing and updating their versions for better performance and user experiences. This frequent OS release comes as a testing challenge as the testers needs to validate the complete application with each of new OS release. It is very important to test the application with the latest OS release otherwise the app performance would be a major issue and consequently loss of users using the app.

screen-shot-2018-07-12-at-1.35.22-pm

Script Execution

Another major challenge of mobile testing is what we call scripting, the method of defining a test. Script execution can either be manual or automated. You can write down the scripts in a document, which is then used by a test engineer who manually interacts with the test environment to determine the result, else you can run automated scripts that in turn drive interaction with the device and app, and record the results.


Automated scripting needs to be kept away from the device to be of any real use because there are so many different devices with different interface options. A script that follows strict keystrokes on an Apple iPhone would not have any chance of working on a Samsung device, because the UI is different. Fortunately, most real device automated testing software provides high-level scripting that operates on the text, image, or object layer. Device emulators can automate testexecution using a higher-level, abstracted scripting language that is not device dependent. When you use automated scripting, the cost of setting up the script will typically be higher than the cost of a single manual execution of a test. But if it is a test script that you run on a periodic basis, every time that you subsequently run the script, the more time and effort you will save. You will eventually recover the cost of initial scripting If you run the script enough.


So to conclude, to build a better user experience, an app tester needs to work had in overcoming the challenges of testing. By adopting some analytical skills and methods, testers can really cope up with these situations. For eg. Testing only those apps and OS which are mostly used by their user segment, by adopting a strong testing strategy to take situational decisions eg. Decisions regarding when to choose Automation and manual testing. Strategically, the challenges can be overcome.


Screen Size

The Android world is not simple. The variety of different aspect ratios and pixel densities can be overwhelming. With the launch of iPhone Xs Max which has a screen size of 6.5 inches, Apple brings new screen sizes to the iOS world as well. Though iOS developers are used to pixel perfect screen design, they now need to change their mindset to the adaptive screen design instead. For testing, it means that we need to check on various devices that all the necessary screen elements are accessible with different screen sizes and aspect ratios. There are many phones with a screen size of 5 inches which are still popular.


2019-03-28

Security Issues

Traditional testing tools like selenium and QTP weren’t designed with cross-platform in mind. Automation tools for web apps and mobile apps are different. Operating systems especially Android further adds to the complexity with API level fragmentation. The most common automation testing tools for mobile app automation testing are Appium and calabash. Each tool has it’s own advantages and disadvantages and you need to choose on the basis for your app’s functioning.

Weak Hosting Controls is one of the most common issues. The server on which your app is hosted should have security measures to prevent unauthorized users Weak Encryptions can lead to data theft which will impact the trust factor of the users. Most of the mobile apps require user data such as email ID, password, age, location etc. This data should be encrypted and stored with proper security. Hackers often use this kind of data to get money out of users account online. Encryption will make it difficult for anyone unauthorized to intrude and retrieve that data rather than keeping it in plain text.

Power consumption and battery life

We haven’t seen much innovations in the mobile battery but the mobile usage and specifications are increasing rapidly. People are using more apps nowadays and the apps are more complex than ever. This is why testers need to test the apps power consumption because if the apps use lots of CPU cycles and some apps will also run in the background than the battery will drain out quickly. We need to make sure that the app uses less battery power so that users can use it for a longer period of time.

2019-03-27

Conclusion

Mobile apps are evolving with device technology and user expectations. Developers are emphasizing on reducing the app size and battery usage. Testers play a major role to ensure that the app works smoothly and does not crash or have bugs. This is why testers must be aware of the latest trends in mobile app testing to deal with the mobile app testing challenges.


whitepaper

Related Articles:

Suyash Dubey | Posted on | 2 min Read

pCloudy is committed to delivering the best solutions in mobile app testing and therefore we come up with product updates at regular intervals. This time we are thrilled to announce the release of pCloudy 5.6 with exciting new features to make app testing simpler than ever. Our customers trust us because we believe in exceeding their expectations and add new useful features to enhance the platform’s capabilities. For those who are new to pCloudy, it is a cloud-based continuous testing platform designed to enrich your apps. In this new version of pCloudy, we have addressed the concerns of our users and added new features like Wildnet, Capability configurator, Object spy, and more. Let’s know more about all these features.

Wildnet

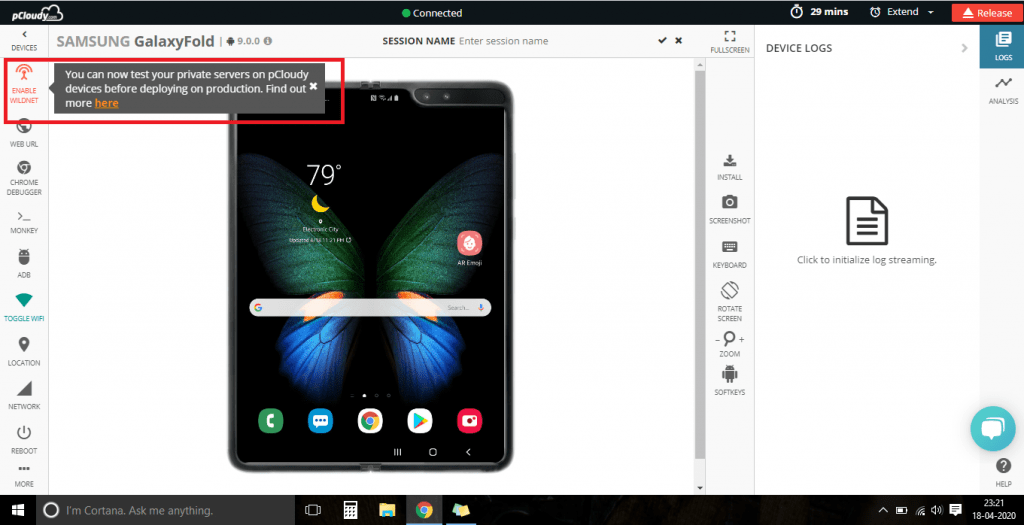
An application server is accessible only from within your lab and if you want to test your mobile application with that server, you are forced to work within that lab. If you move with the device in hand outside the lab, you will not have access to that server. How do you test such kind of setup using pCloudy? Because if you are using pCloudy, that means the devices are outside your network. The answer is Wildnet.
wildnet ss
This feature enables our users to test private or internal servers on any Android or iOS devices present on pCloudy. For this, you just need to download the executables for OS (Mac, Linux, Windows) on your local machine, Then fetch the user name and API access key for your pCloudy account settings and use it in the terminal to build a link between a device in pCloudy and your internal staging server. To connect a booked device to your internal staging server, you need to click on the Wildnet icon as shown in the picture below.

Object Spy

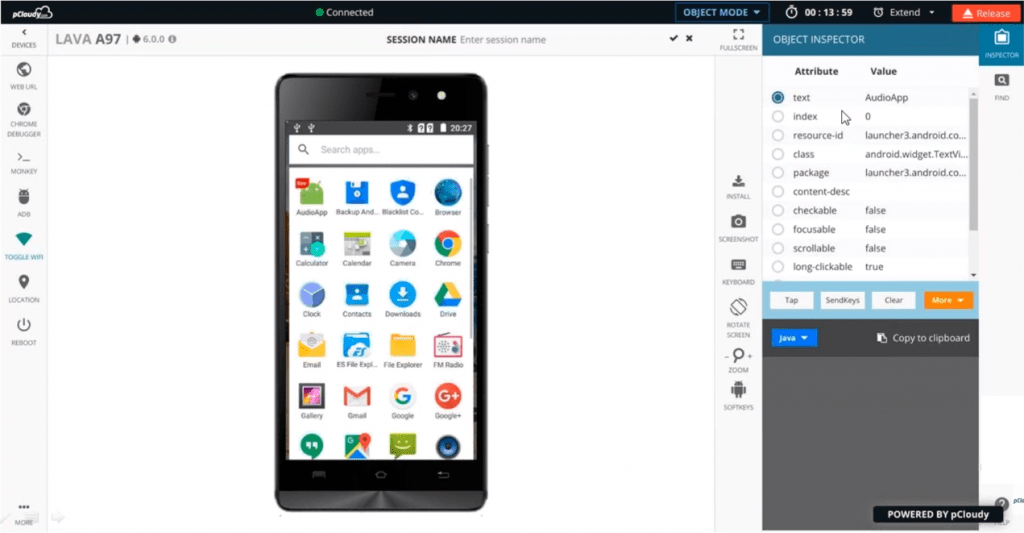
While creating automation test cases you need the object names of the objects that are available in your application. For example, if your app is launched on a device and you want to click on a particular button, you have to mention the object name in the script to perform that action in the app. Earlier testers used to extract the object name using Appium desktop, but now they don’t need Appium desktop for that. pCloudy now has an inbuilt object spy through which you can run the inspector sessions directly on Android and iOS devices. One big advantage is that its bilateral view which makes it easy for users to click on any element on one side and view the details another side. Also, the generated code can be copied for future use.
 
object spy ss
In the picture above you can see on the right side we have the object inspector where you will get all the attributes and values for any application. You can select any attribute and perform an action using the tap, send keys, clear and the more option. Following the action, an XPath will be generated which can be used in the automation script.

Data-Persistence

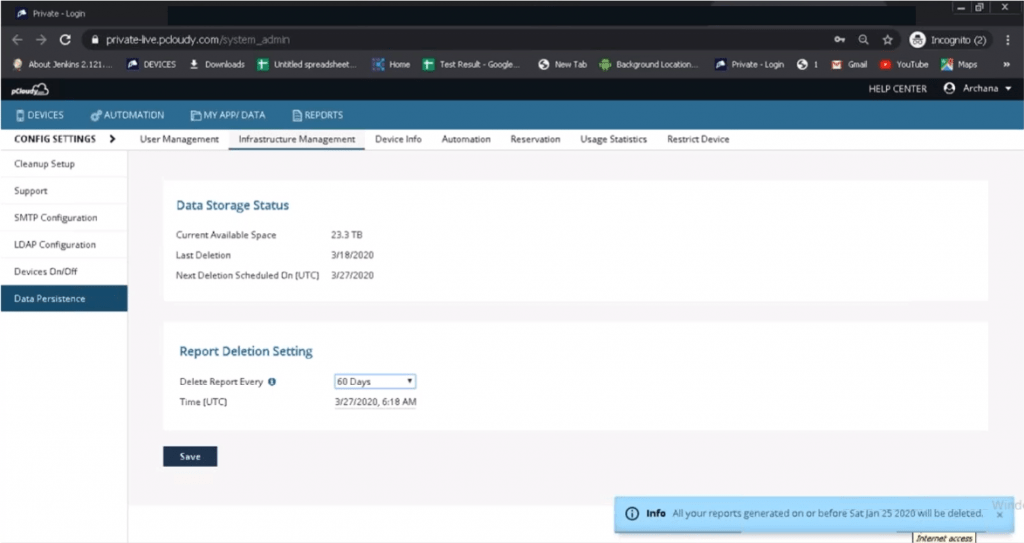
This feature will enable System-admins of our Private and On-Premises cloud to delete older reports based on pre-defined settings. To use this feature, system administrators will have to go to control settings in their pCloudy account and under Infrastructure Management there is an option for Data-Persistence. Whenever any user tests an app on any device in pCloudy, certain artifacts are generated in the form of test reports. Each report will have videos, logs, screenshots, and other elements. These artifacts take up a lot of space so now system admin can delete the older data using the data persistence feature.
data per
As shown in the pic, the system admin can select the date, time and the number of days for which the data has to be deleted. This will help in managing the limited space provided for every team account.

Capability Configurator

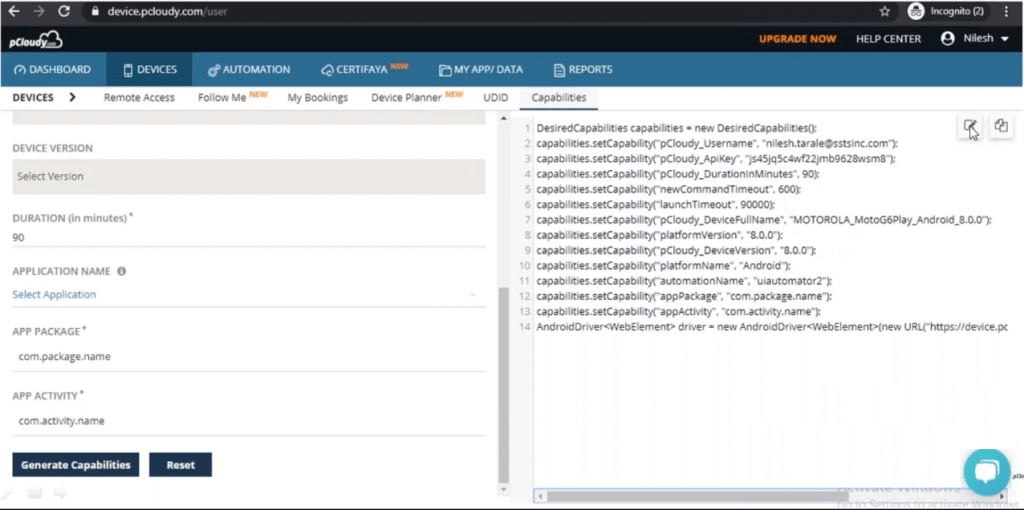
In an automation script, we have to include certain capabilities like device name, platform version, etc., to execute the test cases. But now you won’t have to gather the capabilities from different sources, capability configurator will generate the desired capabilities directly using certain filters.
capability
As you can see in the pic, you just need to go to the Devices page in pCloudy and click on the Capabilities tab. Under the capabilities tab, you can choose the parameters like OS, Automation type, Device location, Device name, etc., and the capabilities generated can be copied and pasted directly into the Appium script.

More updates

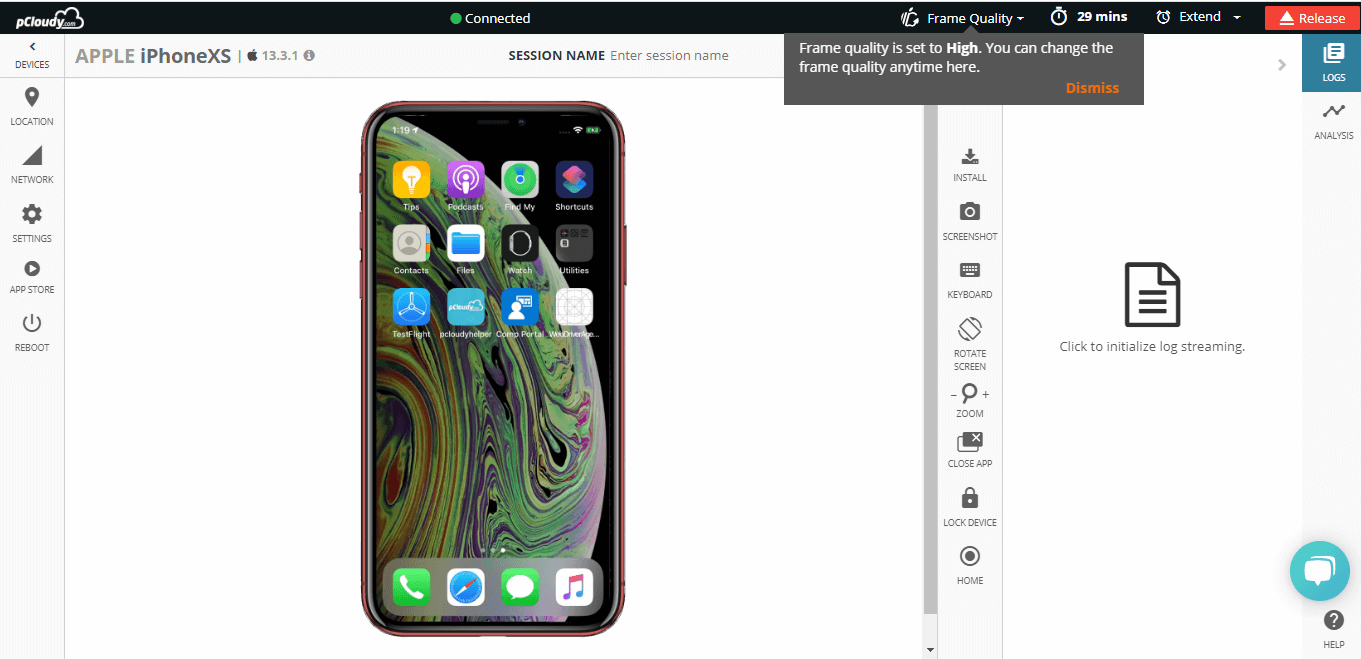
iOS is a close operating system, and there are many restrictions for testing apps on Apple devices. In pCloudy 5.6, you will have two more functions on iOS devices; close app and lock/unlock the device. The close app function will enable pCloudy users to close any launched application on a connected iOS device using the soft button. The second function will allow any connected iOS device on pCloudy to be locked and unlocked. These two functions will enhance user interaction on iOS devices by saving time and effort. One more new update is that pCloudy now supports Appium 1.15.1 which is one of the latest stable versions of Appium. This will make it easier to perform test automation on iOS 13 devices in pCloudy.

To sum up

The new features added to the platform will help our users to perform live testing on remote devices. Features like the latest Appium support and better user interaction on the iOS devices will empower our users to speed up automation. We are working on some new features, based on our customer feedback, which will be included in the next release. So stay connected for more updates.

Suyash Dubey | Posted on | 2 min Read

Remote working is going to be a new normal and remote access tools and platforms will play a key role in maintaining productivity. Working from home has many advantages both for enterprises and teams. There are many tools that help teams to collaborate and share all the information conveniently over the net. pCloudy is one such tool that gives you remote access to hundreds of real devices to test your app.
 
So let’s look at the 10 ways how pCloudy could help in maintaining business continuity while working remotely.
 
1. Remote access to devices: Test your apps from home by accessing remote devices on pCloudy. You don’t have to worry about touching or managing the devices.
 
Remote access to devices
 
2. Device access to geographically distributed teams: Since testing professionals are working remotely, the problem is sharing the limited number of devices for app testing among the team members. With pCloudy offering a range of devices over cloud, members across different locations can access hundreds of real devices on the cloud for their app testing needs.
 
Device access to geographically distributed teams
3. All in one: Manual and automation testing can be performed remotely on real devices. The platform is well suited for continuous testing and optimizes your DevOps process.
 
4. Autonomous testing bot: use our AI power autonomous testing bot to minimize the effort and time spent on testing.
 
Autonomous testing bot
5. Team management: Manage platform access to the team members and share detailed app test reports.
 
Team management
6. Parallel testing: Run automation tests in parallel on multiple devices to increase the testing efficiency.


7. Latest devices: No need to wait for the delayed shipments of the new devices as all the latest devices are available on pCloudy.
 
8. Fully integrated: pCloudy is integrated with most of the popular tools and frameworks used for task management, version control, test automation, etc.
 
Fully integrated
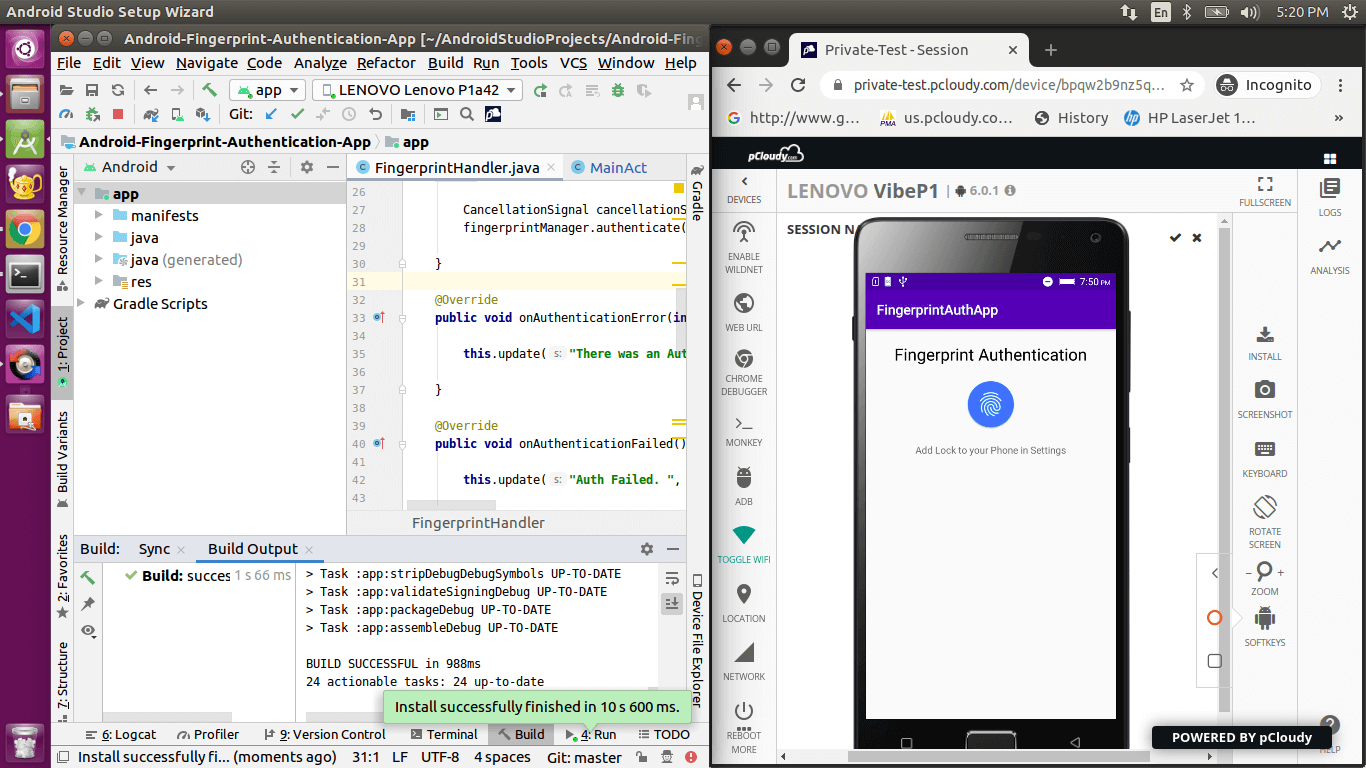
9. Device tunnel: Developers can use features like Device tunnel to access devices in their Dev environments like Android Studio or Xcode
 
Device tunnel
10. Quality support: Achieve quality@speed in mobile app testing while working from home. Our technical support team will be available to help you 24/7.
 
11. Device management: Hassle-free app testing for our users and our cloud infra team will take care of the continuous availability and maintenance of the devices.
 
It has been speculated that around 30% of the service sector workforce across the globe will be working from home by 2030. You can stay ahead of others in this initiative and adopt flexible work preferences. Contact us if you need more information on how pCloudy could help in enhancing productivity while working from home.
 

Suyash Dubey | Posted on | 2 min Read

[xyz-ihs snippet=”quickLinks-Appium”]
 
Appium is an open source mobile app UI testing framework. You can test all types of mobile apps and perform automation test on physical devices as well as on emulators and simulators. Appium mobile testing does not have a dependency on mobile device OS and it supports cross-platform app testing as a single API works for both Android and iOS. Appium supports many popular languages like C, PHP, Python, C#, Java, Ruby, JavaScript, etc.
 

What is Appium Mobile Testing?

 
When Appium is installed then a server is set up on your machine that exposes the REST API. It receives a command request from the client and executes that command on Android or iOS mobile devices. Then it responds back with an HTTP response. It uses mobile test automation frameworks like Apple instruments or UIAutomator2 to drive the UI of apps.
 

Approaches to Test Automation

 
There is two approaches for mobile test automation, Image-based and Object-based approach. Let’s understand both in detail.
 

Image-Based Approach for Test Automation

 
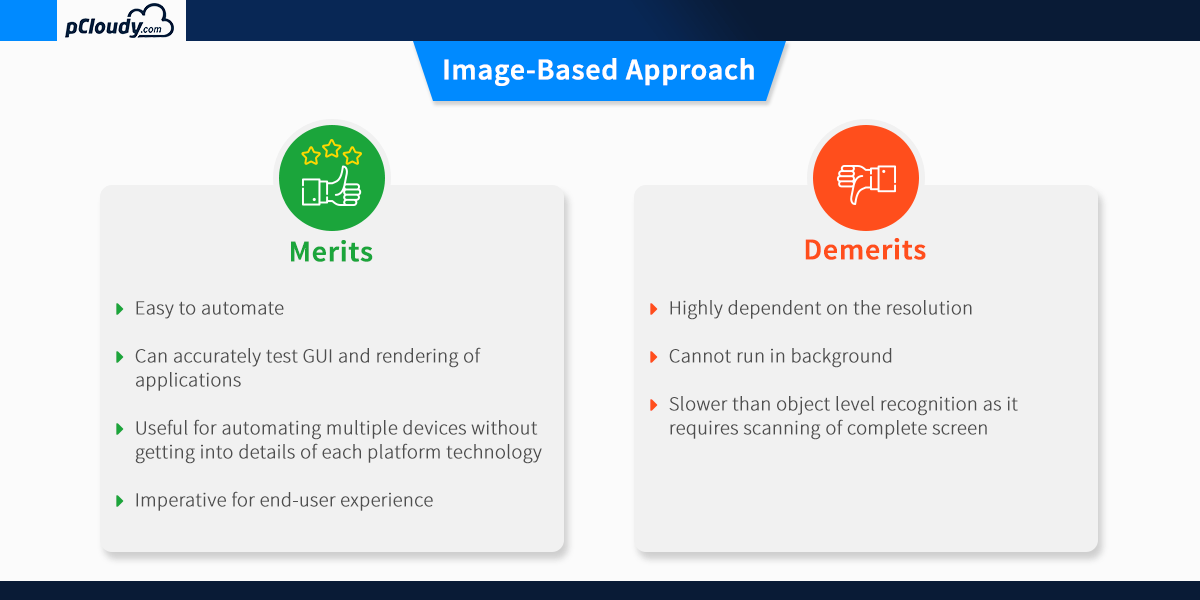
This technique of object identification is based on the image processing attributes of the objects in the Application Under Test (AUT). Example: Automate user options like “click, type, drag-drop, mouse actions, etc.”
 

Visual verification of the expected output

 
• Not dependent on the platform underneath
• Can be used to automate emulators as well as a real device.
 
Image based approach

The object-based approach of test automation

 
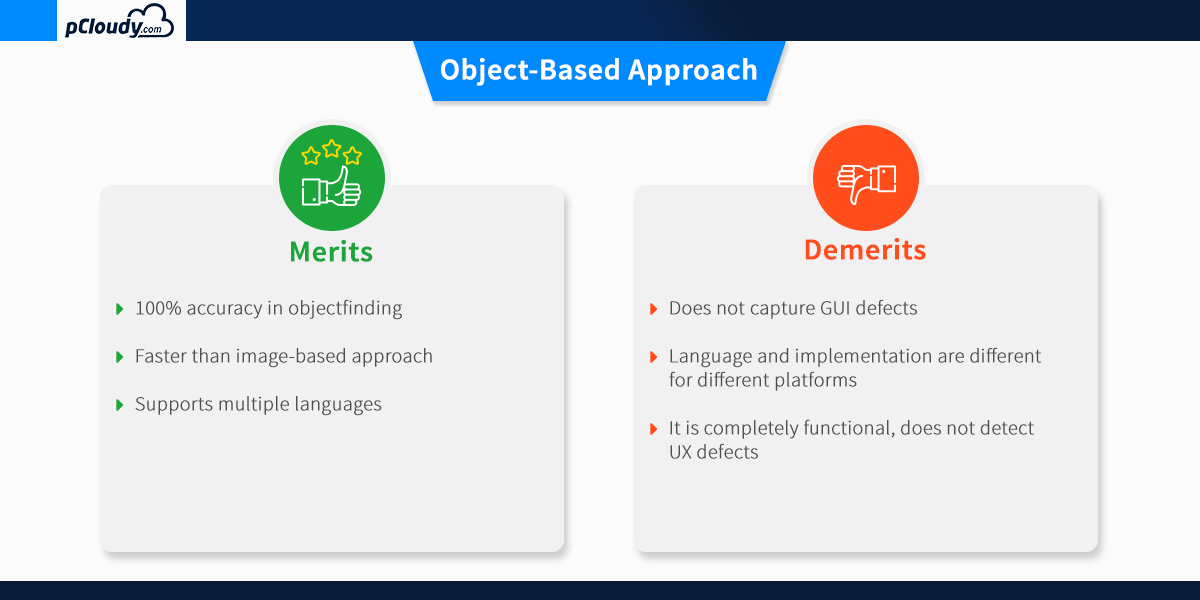
This technique of test automation is based on recognizing the nativity of the objects in AUT. This nativity reorganization process for each individual object in the application is carried out using different attributes that are assigned to the object.
 
It is used to extract the application object identifier with its properties from the actual native operating system source code, just like the developer used. This is an accurate and fast method to recognize the buttons, lists and other objects used by the application.
 
One drawback of the object-based approach is that the recognition of the individual attributes of the object involved restricts these techniques ability to function in test scenarios that require third-party application access. This reduces the automation coverage of utilizing this technique.
 
Object based approach

Which approach should we choose?

 
As we have seen, both approaches have their pros and cons. To get better results, you can merge both approaches and think about devising a hybrid test automation solution.
 
The combination of OCR (image based) and native (object-based) approach allows users to build a single script that will be portable across different devices. It will make your automation robust and efficient and allows the users to confidently detect the relevant native and GUI defect within the mobile application.
 

Appium Overview and Architecture

 
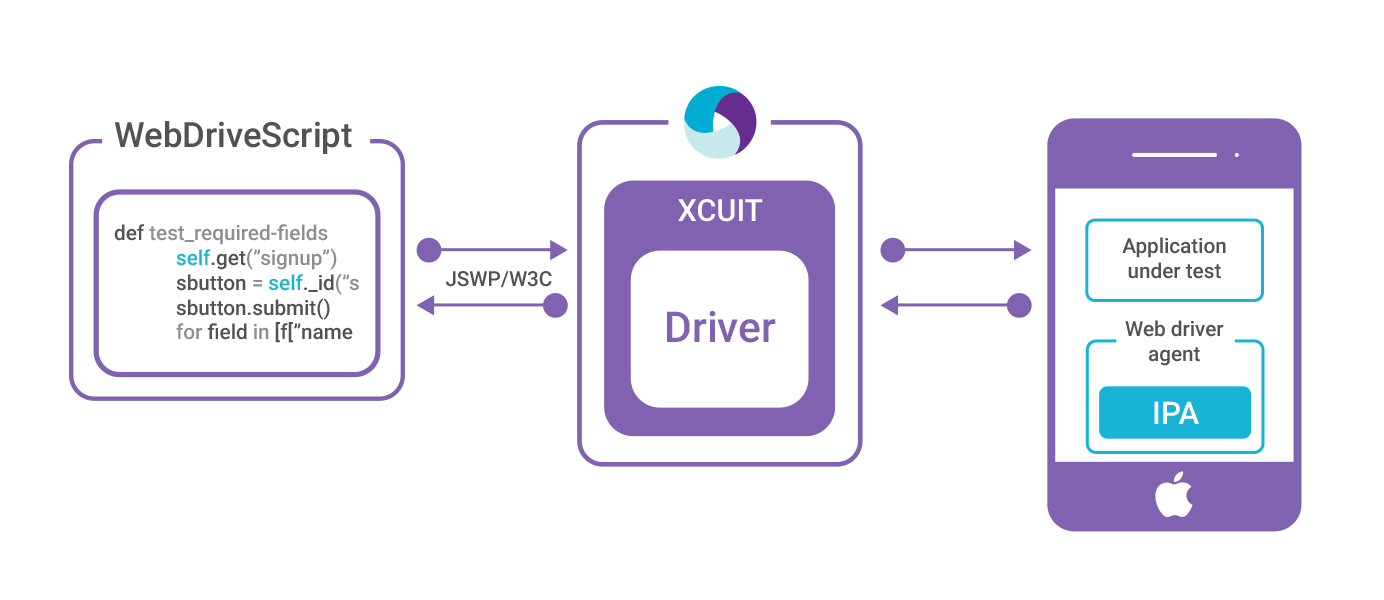
Appium is an HTTP server that manages WebDriver sessions. On iOS devices, Appium proxies command to a UI automation script running on Mac Instruments environment. Apple provides an application called instruments which are used to do a lot of activities like profiling, controlling and building iOS apps. It also provides an automation component where you can write some commands in JavaScript which uses UIAutomation APIs which interact with the app user interface. Appium mobile automation uses these same libraries to automate iOS apps.

Appium Overview and Architecture

The Webdriver Script sends a command in the form of HTTP (JSWP) to the Appium Server. Then the Appium Server will then decide as per the request which driver should be initiated. So, in this case, the Appium Server will initiate the XCUITest driver and it will pass the request to the WebdriverAgent which is an IPA (WebdriverAgent.xcproj) developed by Facebook. WebdriverAgent is responsible to send the command to the Application Under Test (AUT) to carry out the actions in the app. Then the response will be sent to the Webdriver Script through the Appium server.
 
Only iOS 9.3 and above version are supported by the XCUITest Driver. You can find all the capabilities for XCUITest Driver in the link mentioned below.

https://github.com/appium/appium-xcuitest-driver

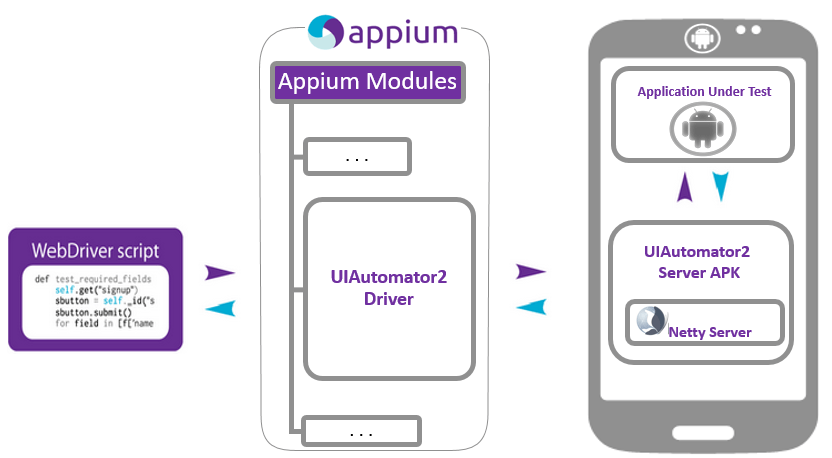
UI Automation Server flow diagram

The situation is very similar in the case of Android where Appium proxies command to a UIAutomator2 test case running on the device. UIAutomator2 is Android’s UI automation framework which supports running JUnit test cases directly into the device into the command line. It uses Java as the programing language but Appium will make it run from any of the web drivers supported languages.
 
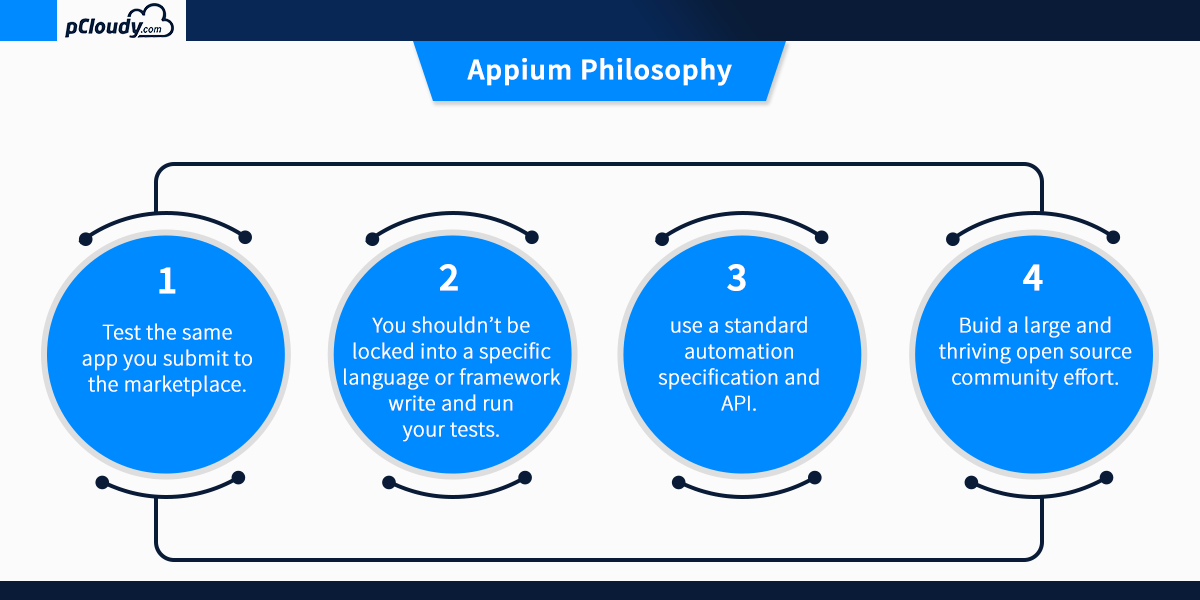
To answer the question “what is Appium automation?”, let’s have a look at the Appium philosophy.
 
Appium philosophy
Appium mobile testing is required for proper execution of continuous integration as it speeds up the overall testing process. Appium mobile testing helps to run the repetitive test which would take more time to perform manually. This is why appium mobile testing is the preferred choice for the developers when it comes to test automation.
 
In the next blog, we will learn more about Appium mobile testing and how to install/configure the Appium setup on a windows machine.

 
Related Articles:

  • How to use Appium Inspector for Test Automation
  • Appium Setup for Windows
  • Starting Appium Server and launching the app from code
  • How To Install Appium On A Mac Machine
  • Appium vs Espresso: The Most Popular Automation Testing Framework in 2019
  • Suyash Dubey | Posted on | 2 min Read

    Software testing has evolved a lot since the time when the waterfall model was used. All the work was done in a sequential manner and only after the development phase was complete the testers used to test the product. Testers used to find bugs but a lot of time and energy was wasted in the process to rebuild and code again.

    Now companies are using an Agile model where the main goal is to find the bugs in continuous development, fix them quickly and release the app faster. There is a need to improve the automated testing process to complement the manual testing. More emphasis has been given to CI, CD, and DevOps to make the software development effective.

    There has been a considerable change in the functioning of testing tools and test automation frameworks. The most important change is the introduction of AI in a test automation strategy.

    According to G2Crowd, AI-powered bots are expected to cut business cost by $8 billion by 2022. Testing bots are already empowering automation testing and will play a major role in reducing the time and effort spent in mobile app testing.

    Let’s have a look at how AI is breaking new ground for test automation.

    1. Running automated tests that matter

    It’s not a good strategy to run your entire test suite due to a very small change in your app that you couldn’t trace. You are probably already generating a lot of data from your test runs if you are doing continuous integration. But it will take a lot of time to go through the data and search for common patterns. So you need to know if you make a small change in code then what is the minimum number of test you need to run to figure out if the change is needed or not.

    2. Reducing maintenance and eliminating flaky test

    We can run several automated tests on a daily basis to ensure the functionalities of the app are still stable. Although, if we find out that half of this test failed. In that case, we would need to spend a lot of time to troubleshoot the failures and investigate the cause. Then there is a need to find ways to fix the failures and then work on the changes.


    software maintainance

    Using AI we can avoid issues and start detecting issues in the test before they even occur. So instead of reacting to it, we can proactively fix tests. AI can figure out which tests are stable or flaky based on the number of test runs and it can tell us what test needs to be modified to ensure test runs are stable. AI can also handle test running on different resolutions and can optimize the wait time used in the test to wait for the page to load.

    3. Dependencies on other modules

    Writing a test for systems having dependencies on other modules is also a challenge. AI can help us to mock responses from a database or server. The AI can start recording server responses once we have written the test and have run them for a period of time. So the next time we run the test it will access the stored responses and will continue to run without any obstacles. This will speed up the process as the delay in response is eliminated and the server or physical database is no more needed.

    4. Learning from production data

    Real user data can be used to create an automated test and with the help of AI, we can observe and learn how the customer is using our product. We can identify common actions such as search option, using filters, login/logout, etc and compile them into reusable components. These components can be used for our test as well. Therefore, we have an actual test written by AI based on the real data along with the reusable components.

    5. Easy execution of tests and speeding up the release

    In automation testing, the time and effort it takes to write and execute a test is a major challenge due to the complexity of the test automation tools, app, and programing language used. To mitigate these problems AI-based tools are being used. The use of dynamic locators and reusable components has made it possible to write and execute a test in hours which earlier used to take a week.

    Conclusion

    The DevOps theory says test early, test often, but this puts a lot of responsibility on the testing team. Also, it’s not feasible for testing teams to spend time to do exploratory testing manually for each new release. AI-based tools can perform codeless automation testing which will save us time and resources and give the testers some space to breathe.

     
    Related Articles:

  • The Role of Artificial Intelligence in Transforming DevOps
  • How to use Appium Inspector for Test Automation
  • Selenium Testing For Effective Test Automation
  • 8 Common Appium Mobile Test Automation Mistakes and How to Avoid Them
  • pCloudy Among Top 3 Test Automation Software
  • Suyash Dubey | Posted on | 2 min Read

    Types of Testing

    Since there are many players in the mobile app market, the competition is endless. To beat the heat and to keep providing an enhanced mobile app experience to the users, the app needs to be constantly updated with the changes happening and for doing this, there are different types of testing techniques. Let us have an insight into the types of testing methods.

    1. Compatibility Testing

    Compatibility testing is a critical QA task. It assures that a given application works as intended with selected operating systems, selected devices with different screen sizes resolutions, and internal hardware (memory size, processor speed, and button/input differences). It defines the feasible compatibility combinations of devices and interfaces for a specific testing assignment, in concurrence with the customer’s requirement.

    Want to test your Mobile App?

    Join pCloudy Platform!

    Signup for Free


    Compatibility Factors:

    There are different factors that play a very significant role in mobile compatibility testing strategy. Mobile operating systems and their supported versions, mobile devices developed by different manufacturers, different device screen sizes with different resolutions and internal hardware including different input types, processor speeds and memory size of devices.

    4
    Let’s develop a test strategy for compatibility testing. The first step is to identify the Operating systems and devices based on key factors described in the previous slide. Once you identified the devices based on different compatibility factors you need to set up your environment for testing. You can either set up your internal test lab or you can go for external cloud providers like pCloudy. Now, the next step is to execute your test cases on a defined set of environment. Report the defects to appear while testing and report these defects to your development team.

    The main purpose of compatibility testing is to ensure whether different software is compatible with different configurations and whether the application is compatible with the client’s environment.
    2. Installation Testing

    Mobile phones come with different types of mobile apps like Native and Web and Hybrid. Installation testing is a type of testing that is done at the initial stage of mobile app life span or maybe it is the first impression on the users, in other words. Installation testing checks whether the mobile app installs, uninstalls and updates properly without any interruption.

    Want to test your Mobile App?

    Join pCloudy Platform!

    Signup for Free


    Installation Testing Factors:

    There are some of the factors that play a significant role in installation testing of an application. Factors like which platforms and operating systems supported by the application and how they will be distributed whether it is directly available in the app store or are going to get the installable files on mail itself or is it available on an app distribution platform and can be accessed through public URL. The user behavior regarding installation changes from person to person. For eg: the developer may install the app (By using ADB install command) and a different user might directly install it from the app store or public URL.

    Important points to be noted in Installation Testing:

    Some of the common checkpoints which can be converted to standard test cases are:

    • Installing the app in phone memory.
    • Installing the app in phone memory is full.
    • Installing the app on an external SD card.
    • Installing the app on an external SD card is full.
    • Check the memory space after installing. It should not occupy more than promised.
    • Check if it is releasing the space after removing

    Another part of the installation and uninstallation testing is the testing of patches/updates
    These are the common situation when we need to test app after updates.

    Check for updates:

    • Can I download an update?
    • Can I update the app when there are multiple updates available?
    • What happens if I don’t update?


    When App is upgraded:

    • Check that the user is still logged in
    • Check that data is still the same
    • Backward compatibility:-Check that database changes will not affect the current data.
    • Test the update from an older version to the current version


    When OS is upgraded:

    • Check the app compatibility.
    • App updated gracefully without a crash.


    3. Interruption Testing

    Interrupt testing is a process to replicate abrupt (Unexpected) interrupt to the application. It is done to understand how the app behaves under certain interruptions before resuming to its original state. This can be achieved in various ways and techniques depending on the application under test.

    Following are some Common Interrupts:

    1. A phone call when the application is running or is in background
    2. Battery removal when the application is running or is in the background, battery high, battery low, incoming call or SMS
    3. Plugged in or out of charging
    4. Device shut down
    5. OS upgrade
    6. Network loss and restoration, etc.

    Some specific scenarios for an application using a network:

    1. Connect to the network but remove LAN connection from the router so the device can sense wifi state on the device but cannot connect to the internet
    2. Connection via VPN and VPN disconnected

    Scenario for Application using services:

    1. Kill service by clicking on the recent button and swiping the application right to kill app and services
    2. Kill app using third-party App killer
    3. Kill specific services from Settings->Manage Applications
    4. Scenarios for Application Linked to account Manager
    Remove account from Settings->Account Manager

    Incoming and Outgoing SMS and MMS:

    An application is running in your mobile and you send an SMS/MMS from another mobile to your mobile. In this situation, SMS/MMS notification should display for a while and then close and the application should continue to run.

    Incoming and Outgoing calls:

    You are in a login page trying to log in and you have just pressed the submit button that will take you to the application home page. This is a transition period because loading is happening.If we receive a call during this time then the application should not end abruptly or crash.

    Battery Removal:

    If the application is running, remove the battery of your mobile and it will shut down. After rebooting the mobile, run the application again, it should run smoothly and without a crash.

    Data Cable Insertion and Removal:

    When the application is running, connect the USB Cable, the system should display “USB Connection Screen” and if the user returns to the application then the application should not crash or end abruptly

    Interruption Testing Strategy

    Let’s prepare a test strategy to test interruption testing:
    The first step in this process is to decide the critical interrupts based on your application components and architecture. For example, if your application is using GPS include common interrupts related to GPS. Let’s Include two type of interrupts:

    Application specific interrupts:

    Prepare your test cases and try to fit theses interruption test cases with state of the application. For example, interrupt your Network while performing payment.

    Interrupt testing process:

    1

    List of common Interrupts:

    Phone calls, Text messages, App notifications, Battery Warning, Forced updates, Voicemail, Shaking the Phone, Different Gestures, Switching between apps, Locking and unlocking the screen, Changing the orientation, Music playing while using the app, Out of memory (general performance interruptions), Data app interruptions (What Sapp, Viber, Tango), Audio interrupts from multiple sources (iPod, Media player, Other audio apps), phone in standby mode, switch the network to plane mode.

    Tools to test interruption Testing:

    Use tools like Joule Unit (Android), On iOS use the Energy Usage Function of Instruments, Monkey for Android to stress test your app and see the handling of the interrupts, UI Auto Monkey for iOS

    Scenario

    A) Once the user connects the mobile earphone jack with Nokia Lumia and starts music Player.
    B) Now when the user resumes the application the cart gets empty.

    4. Localization Testing

    This type of testing is a technique in which we check whether the mobile app adheres to the local cultural settings, customizing the apps according to target country and language and also according to the linguistic aspects. Localization is also known as “L10N” as there are 10 characters between L & N. For eg: Chinese language-search engine offered by Baidu beats Google in China. Baidu does better than Google because it looks and feels fully native to the Chinese speaking audience.

    Also, regional language speakers can’t get many games in their own language, so they turn to race games, which are easy to understand. We must have noticed in these examples, language is the common issue. Apart from Translation there are different other elements in the localization, like Usage of proper Time zone, local formats of dates, addresses and phone numbers, Design and layout to fit translated text, Converting to local requirements (such as currencies and units of measure), Adapting graphics to target markets, Modifying content to suit the tastes and consumption habits of other markets, Addressing local regulations and legal requirements.

    Why should we localize?

    Localization is important in order to understand the cultural and linguistic aspects of a particular region. While testing, testers keep repeating the tests to check typographical, linguistic errors, cultural appropriateness of the UI, etc. Research says:
    1.  56.2 percent of consumers say that the ability to obtain information in their own language is more important than price. (Common Sense Advisory, Can’t Read, Won’t Buy: Why Language Matters on Global Websites, 2006)
    2.  74 percent of multinational enterprises believe it is either important or most important to achieve increased revenues from global operations. (California State University at Chico, 2007.
    3.  95 percent of Chinese online consumers indicate a greater comfort level with websites in their language. (Forrester Research, Translation and Localization of Retail Web Sites, 2009)
    4.   A critical success factor for cross-border merger and acquisition deals is the ability to communicate information clearly and accurately in multiple languages. (Merrill Corporation, How to do Better Multinational M&A Deals, 2008)

    Types of Localization Testing:

    In the localization testing, validating whether a mobile app is capable of performing given a geographical location, in particular, is found out. It includes four major types of testing like linguistic, culture, cosmetic, and functional tests.
    1. Linguistic testing– ensures that the UI text appears in the congregation with the language and is not mistranslated or misapplied. This requires language skill and knowledge of the product. Mistranslation, irrelevant usage of the language are few of the errors in this.

    2. Cultural Testing– Few words may imply different meanings in different cultures. So, this has to be translated properly in relation to the target culture.

    3. Cosmetic Testing– For easy understanding, let us use this scenario. For eg. In the apps used in Afghanistan, the text will be in Arabic and will start from right to left unlike other languages like English, French that are read from Left to right.

    4. Functional Testing– In this testing, testers follow prescribed test scripts to run through all aspects of the product to make sure it functions as designed in a localized environment. Often functional testing includes verification that the localized product is compatible with various operating systems and third-party products. Functional testing generally requires a good knowledge of the target language and total familiarity with the product. Some of the major Functional testing problems may include– Incorrect or missing UI elements, graphics, and windows, Incorrect error messages, Localization bugs that may cause software crashes, Errors generated by installing the localized software on a localized OS.

    5. Performance Testing

    Performance testing is to test the performance of the mobile application in expected workload scenarios and to eliminate the performance hurdles. It checks whether the response of the app is quick, the ability of the app to tale load, and app stability in those load situations. Performance is very critical because if the app is malfunctioning, it is more possible that the user might uninstall the app and might shift to a competitor’s app which is better.

    The three main pillars of Mobile app performance testing are:

    Device Performance

    App start-up time is the most critical performance parameter from the user’s point of view. It shouldn’t take more than 2 seconds for the app’s first screen to pop up after the user taps on the app’s icon. Battery time is the second most important issue. Some apps consume a high amount of battery life. Excessive resource usage creates a burden on the processor and the phone heats up. In some cases, it is observed that the new app installed uses the same amount of battery as the OS. If more features are added in the app its memory consumption also increases. This is why memory consumption should be checked while testing the app.

    Network Performance

    The app needs to be tested on different mobile networks and network properties. If there is packet loss then the app should generate alerts or resend the request for the information. Jitters or delay in receiving information

    Server/API Performance

    Performance is directly proportional to the response time from the Server. In this, tests are run to check how efficient the app is to handle data transfers from the server and how quickly and in what format the data is transported by the app. The number of API calls generated by apps should be lesser and how and where the data is saved in the ‘server down’ case is all that is tested here.

    Mobile app testing tools make it easier for the testers to identify and rectify any error that comes up. For different OS there are a different set of Mobile app tools. For Android, we can use Robotium and Monkey Runner and for IOS we can use Automator.

    6. Usability Testing

    Usability testing is a type of testing which is performed to check how user-friendly the mobile application is in terms of the navigation, ease to use the app, flexible app controls, etc. It is also known as user experience testing.
    What matters in Usability Testing?

    Workflow: To understand, below image represents the workflow of how the user reaches its goal while navigating through the app controls.
    3
    We must understand what the user needs to do in order to use the app’s functionality. If the workflow was overlong and included repetitive actions It may annoy the user while performing the task.
    Design and Layout: Good layout and design allow a user to easily complete tasks. An app need not offer so many features or content that the app is difficult to navigate. A friendly app has a design that allows less user text entry, helps differentiation between the selected items, finger-sized targets, should provide intuitive hints to texts, etc.

    The response time of the application: It is one of the key factors. This means how long the user takes to complete a task. Often long delays while the app interacts with the server hinders the user experience standards.

    The emotional state of users: Emotional state of user measures the user’s motivation to use the app. The apps should be smart enough to understand what the users want and how to engage them, this can be achieved by usability testing.

    Usability Testing Strategy:

    2
    The first step is to identify users who match your expected audience. Watch and listen to them as they use your products. You can use video and audio recording equipment for archiving test sessions, in case later review is needed. However, our primary tool is taking notes with paper and pencil! This is still the fastest way we have found to get information quickly to developers and designers. You have your data. You now need to organize and analyze it. How the results are absorbed as a report in order to be useful for product changes.

    Tools and techniques for usability testing

    1. Mr. Tappy: It is a tool set up to capture how users interact with the apps naturally. The user data so generated could be used for better user experience.

    2. Paper Prototyping: It is a technique that consists of creating hand drawings of user interfaces in order to enable them to be rapidly designed, simulated and tested. As simple as this technique may look like, it has been effectively used since the 1980s and is likely to continue to be used with a guaranteed degree of success for many more years to come.

    3. Magitest: It allows you to perform mobile user testing of native apps and websites. Captures the participant’s voice and facial expressions during the session. Here the users complete the tasks you specify and allows to listen to them speak their thoughts aloud as they interact with your mobile app.

    4. Reflector: This app allows us to see the iPad, iPod, iPhone screens on MAC or PC. The devices connect wirelessly to proceed with further functions.

    7. Conformance Testing

    Conformance/compliance testing is a type of testing which is performed to validate if the application is meeting the Market place and Enterprise policy guidelines. It is like an audit done to check whether certain standards are being met or not. Conformance Testing is focused on two main areas- App store guidelines and Enterprise policy compliance. Each Market place has their own guidelines. We need to validate if the application is following the guidelines of each of these app stores.

    1. App store Guidelines pertaining to User Interface, Media Content, Privacy, Spyware and Phishing, nudity, religion, culture, violence, etc.

    2. Enterprise Policy Compliance pertaining to a different set of industrial standards. For eg: For the pharmaceutical industry, the Food and Drug Administration (FDA) passed rule comes into the picture, For the pharmaceutical industry, the Food and Drug Administration (FDA) passed rule comes into the picture, In healthcare, the Health Insurance Portability and Accountability Act (HIPAA) includes an administrative simplification section, which mandates protecting the information assets of patients. So, it is a dire need for the testing organizations to follow the necessary guidelines and compliances to limit the risk that non-compliance might follow.

    Reap the benefits of different types of testing

    In this day and age, mobile app quality matters the most as the market is very competitive. We need to focus on user experience as well as the performance of the app. If the app contains bugs the app ratings will go down and so will the number of app downloads. If we can make our app bug free than the chances of app gaining popularity will increase. This can be achieved by performing different types of testing on the mobile application. In the next blog in this series, we will talk about mobile app testing strategies.

    Want to test your Mobile App?

    Join pCloudy Platform!

    Signup for Free


    Watch this video for more information:

    Related Articles:

    Suyash Dubey | Posted on | 2 min Read

    Do you know why Google has selected Gradle as the build system for Android Studio? Many Android developers work in a heterogeneous environment with different technology stacks. Gradle solves some of the hardest problems faced by the developers like how to automate the testing of apps and how to manage dependencies and variations that allow professional developers to develop variations of their app with one click. This is why pCloudy came up with a new update where you can now run Espresso with Gradle on pCloudy devices. Let’s get a brief introduction about Espresso and Gradle before we learn how to run Espresso with Gradle on pCloudy devices.
     
    Espresso is a testing framework for Android which automatically synchronizes your test actions with the UI of your app. It also let the test wait until all the background activities have finished.
     
    Gradle is an open source advanced build tool that allows seamless execution of tasks. It uses domain specific language and it is based on Groovy and Kotlin. It is a plugin based system so if you want to automate the task of building some package from sources then you can write the complete plugging in Java and share it with the world.
     
    Gradle allows efficient and repeatable use of espresso and Test Orchestrator which allows automated yet fine-tuned control of the way you run your test. You can decide which specific test suites to be run to distribute the test cases across different devices. It is preferred by developers as it allows deep unit and functional testing rigs.
     

    Power up your DevOps with Espresso and Gradle on pCloudy

    You would be running Espresso on your machine using Android Studio and Gradle. However, the test would be running on pCloudy device. There is a pCloudy Espresso script that is provided by us and you need to put that espresso script in the workspace of the project. Along with the Gradle script, you will also get a config file. The gradle script will read input parameters from this config file.
     
    Then you run Gradle to invoke the script which will upload your Application APK, test APK and other APK files to pCloudy. It would acquire a device to run your test on, it would execute those tests it will report back the status of what is happening into the Android Studio. After the test cases are run you can see the detailed reports and after that gradle script will release the device for other users to use.
     
    There is a one-time setup that you need to do to place the gradle script in the workspace and you need to fill in the configuration file. So when you run the gradle script it will complete all the task for you and generate the report.
     

    Steps to run Espresso with Gradle on pcloudy

     
    1. Download the espresso starter pack from here and Unzip it
    2. You will find three files,
    a. pCloudy_Espresso.jar
    b. Config.properties
    c. build.gradle.SAMPLE
    (This is a sample build.gradle that shows how to change your build.gradle to add the pCloudy Espresso jar.)
    3. Copy the contents of the file build.gradle.Sample to the build.gradle file of your Android Application to register the new Gradle task and update as appropriate (see the image below)
     
    33

    4. Place the config.properties file in your android workspace in the same directory as your build.gradle file.
     
    sdgef
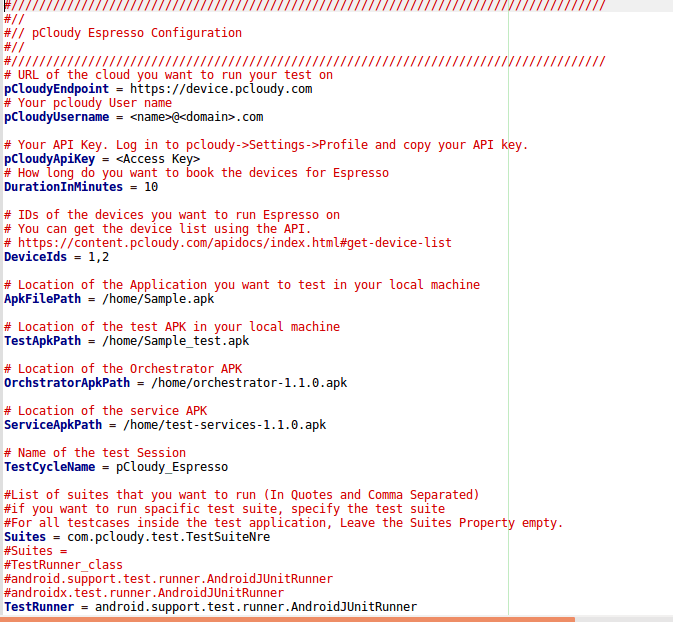
    5. Update the config.properties file as guided in the comments in the file.

    6. In your Android workspace run the command by typing the name of the gradle task as below.
     
    tttt
    7. Once the test execution is complete you will get a URL of the test execution report. Some fields in the report are empty right now. We will fix them in subsequent phases.
     
    rrr
    The use of gradle has made it easier to run Espresso test on pCloudy devices. We can just use the configuration file and easily run the test scripts on pCloudy devices. This will save time and effort as it further simplifies the app testing process in pCloudy.
     
    You can watch our webinar for more information.

     
    Related Articles:

  • How to Run Espresso Test on Remote Devices
  • Appium vs Espresso: The Most Popular Automation Testing Framework in 2019
  • Run Espresso on pCloudy using pCoudy Utility
  • Automated Testing Using Espresso
  • Espresso with pCloudy.com
  • Local Site Testing on pCloudy


    With no access to internal or private servers, complexity in the process of VPN connections, or the problems to test a software, website or service in a production-similar environment, testing your local or a private website or url on a cloud platform has always been a challenge for testing teams.


    For all the users who have been asking for a solution to test their private servers on pCloudy devices before deploying them on production, we have a good news for you.


    Now, you can access your site behind a firewall, on a staging server, or locally with pCloudy before it hits production.


    It’s a path breaking feature for enterprise mobility. You avoid the expense of setting up and maintaining a comprehensive and exhaustive testing setup.


    Since private servers are internal to your network, they have no public access which makes it difficult to test on a device on cloud. Local Site emulation Testing provides a platform to test private or internal servers on any Android device present on pCloudy.


    Let us see how to set up the connection for Local Site Testing:

    1. Login to your registered account on device.pcloudy.com

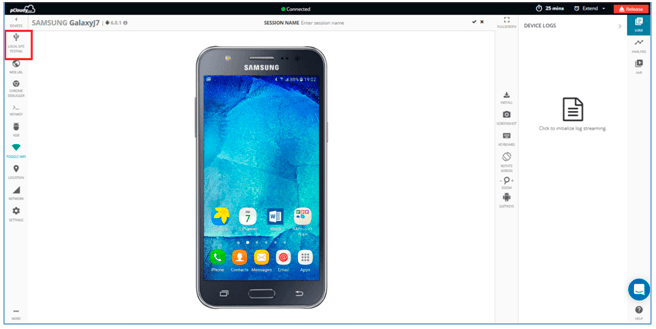
    2. Select desired device from the Device page and click on “Local Site Testing” icon present at top on right hand side as shown in below screenshot.


    Local Site Testing


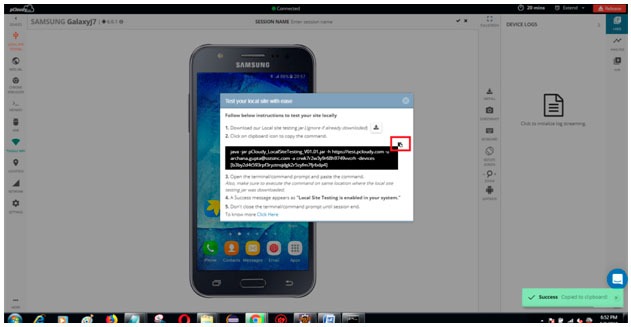
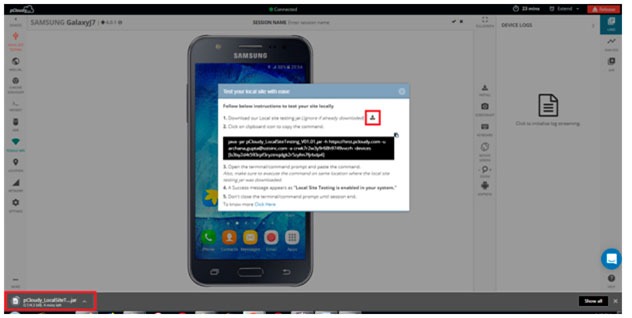
    3. Download the Local Site Testing jar file as shown in snapshot below.


    Local Site Testing
    Note: Ignore if jar is already downloaded.


    4. Copy the command by clicking on icon as shown in the snapshot.


    Copy Command


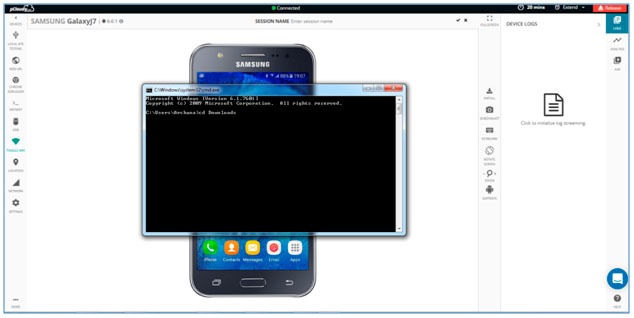
    5. After the file download is complete, Open your command prompt or terminal


    Open command prompt


    Let us see how to open Command Prompt in different Operating system.


    You can follow any of them among three mentioned ways


    For Mac-OS users:


    a. Open “Launch pad”: It’s the silver icon in the Dock that looks like a rocket. Type “terminal” in search bar and hit enter.

    b. Hold command button and hit space bar. Pop will appear and type terminal and hit enter.

    c. Open Launch pad and click the “Other” folder: It’s a square icon containing several smaller icons. Then look for terminal.


    For Windows users:


    a. Open Start and type in command prompt or cmd then hit enter.

    b. Click the Windows logo in the bottom-left corner of the screen, or press the ⊞ Win key. You can search for Command Prompt on all supported versions of Windows.

    c. Open the Run program. Hold the Win key and press the R key to open the Run window. Then enter “cmd” or “Command prompt” and press enter.


    For Ubuntu users:


    a. Using Keyboard Shortcuts: Press Ctrl+Alt+T This will launch the Terminal.

    b. Press Alt+F2 and type gnome-terminal. This will also launch the Terminal.

    c. Press Win+T (Xubuntu only). This Xubuntu-specific shortcut will also launch Terminal.


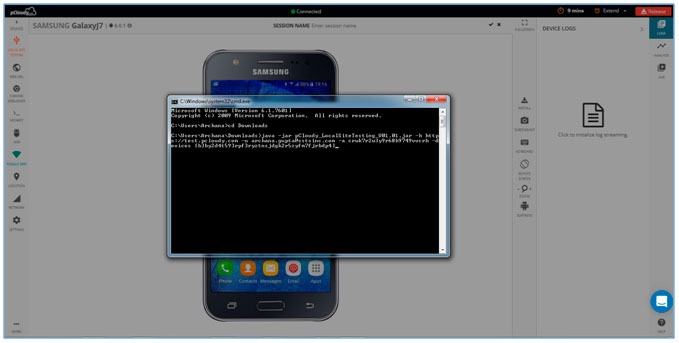
    6. Execute the command on same location where the local site testing jar file was downloaded.


    Command executed successfully


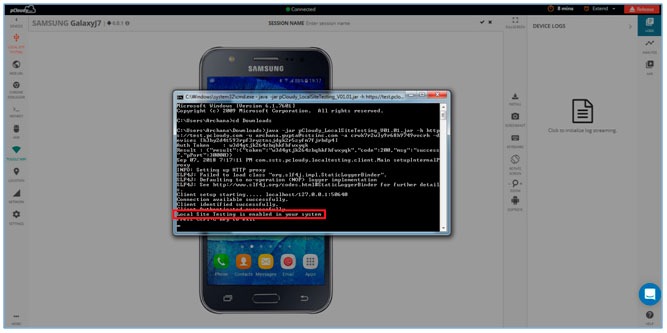
    7. After the command is successfully executed you will able to see a success message appearing as “Local Site Testing is enabled in your system”. This confirms that now you are ready to test your private server on the device connected on pCloudy.


    Local site testing enabled in your system
    Note: Don’t close the command prompt until session ends.


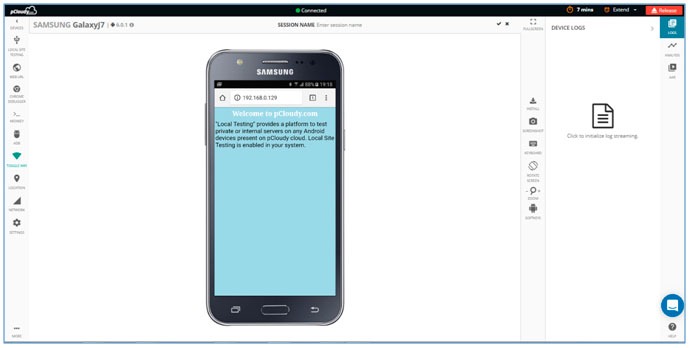
    8. Go to the connected device and using the browser open any private URL to test. That’s all you are all set.


    connect to the device for local site testing


    You can now find more bugs and defects on your local sites before deploying it to production with this breakthrough feature.


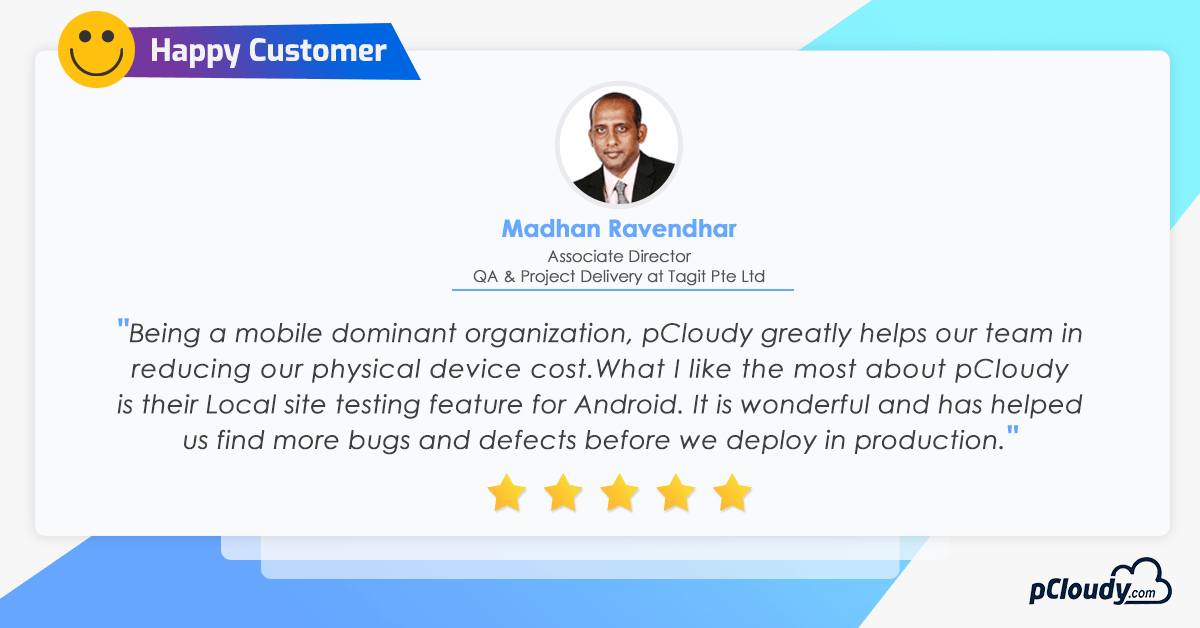
    Here’s testimony to it by one of our customers from TagIT mobile.
    pCloudy Testimonials Linkedin

    Why don’t you try it yourself and let us know your feedback in comments about how this feature is useful to you!