The Android App Bundle (AAB) is an innovative app publishing format introduced by Google to enhance the development, distribution, and user experience of Android applications. Unlike traditional APKs (Android Package Kits), which are directly installed on user devices, the App Bundle is a more efficient .aab file that contains all necessary resources, assets, and code. Google Play processes this bundle to generate optimized APKs tailored to individual devices, ensuring a smaller app size and improved delivery efficiency.
Think of the App Bundle as a dynamic and modular container that allows developers to streamline app building while providing users with a customized, lightweight experience.
Key Features of Android App Bundle
1. Dynamic Delivery
App Bundles utilize Google Play’s Dynamic Delivery system, ensuring that users only download the necessary resources for their specific device configurations, such as screen density, CPU architecture, and language packs. This eliminates unnecessary bloat, making app downloads faster and more efficient.
2. On-Demand Features
With Dynamic Feature Modules, developers can provide optional features that users can install later instead of bundling everything at once. This reduces the initial download size, enhances flexibility, and improves the overall user experience by allowing users to personalize their app features.
3. Smaller App Size
By excluding unnecessary resources, App Bundles significantly reduce the app’s overall size. This is especially beneficial for users with limited storage capacity as they no longer need to download assets that are irrelevant to their device. Reduced app size also improves installation speed and performance.
4. Google-Managed App Signing
Google Play manages the signing of APKs generated from the App Bundle, ensuring security and seamless updates. This eliminates the need for developers to manually handle key management, reducing the risk of key loss or compromise and ensuring app integrity.
5. Backward Compatibility
App Bundles are compatible with devices running Android Lollipop (API level 21) and above. This means developers can adopt the AAB format without worrying about excluding users with older Android versions, making it a flexible solution for app distribution.
Benefits of Android App Bundle (.aab)
Simplified Development & Deployment: Developers write less code and push apps to the Play Store more efficiently without needing to manage multiple APKs. The streamlined build process helps reduce complexity.
Storage Optimization: Users save storage space by downloading only the required APKs instead of a monolithic file, making the app more space-efficient.
Uncompressed Native Libraries: On Android 6.0 and above, app bundles store uncompressed native libraries inside APKs rather than the user’s device, reducing both download size and disk usage.
Efficient Feature Management: Users can install functions on demand rather than downloading all features during the initial installation, providing a tailored experience.
Easier Build & Release Management: Developers no longer need to build and maintain multiple APK variants for different device configurations, saving time and effort in the release cycle.
How Android App Bundle Works
The Android App Bundle leverages Google Play’s Dynamic Delivery system to generate and distribute optimized APKs specific to each user’s device. This eliminates unnecessary data, reducing app size and enhancing performance.
1. Split APK Mechanism
The App Bundle acts as a container file (.aab) that includes all app resources. Google Play then breaks it down into smaller modular APKs tailored for individual devices. Instead of downloading a large, universal APK, users receive only the parts necessary for their device.
Example:
A device supporting only English with a 1080p display will receive APKs specific to that language and resolution.
A different device configuration will get a customized APK set accordingly, reducing unnecessary file storage.
2. Types of APKs Generated
a) Base APK
Contains core app functionality, shared resources, and permissions.
Serves as the foundation for all other APKs and ensures the app can function without additional modules.b) Configuration APKs
Address device-specific factors such as screen density, CPU architecture, and language settings.
Help reduce unnecessary app components on a user’s device, optimizing space utilization.c) Dynamic Feature APKs
Offer additional functionality on demand, reducing initial app size.
Example: A banking app might provide an optional budgeting tool that users can download when needed, preventing unnecessary storage usage.
3. Dynamic Delivery by Google Play
Google Play processes the bundle and splits it into modular APKs.
The system identifies the user’s device specifications and delivers only the necessary APKs.
Users receive a personalized, efficient download experience tailored to their needs.
4. Security & App Signing
Developers upload an unsigned .aab file to Google Play.
Google Play securely signs APKs before distributing them to users.
Ensures app integrity, preventing tampering and unauthorized modifications.
5. Key Technologies Behind App Bundles
Bundletool: A command-line tool that converts App Bundles into APKs for testing and deployment.
Play Core Library: Enables dynamic feature downloads, in-app updates, and app bundle-specific functionalities to enhance flexibility and modularity.
Android Application Bundle Format
An Android App Bundle (.aab) is an upload format for Google Play that organizes app resources into modules. Google Play then generates multiple APKs based on this structure.
App Bundle’s Key Directories:
Base/, feature1/, feature2/ – Contain different modules of the app.
Bundle-Metadata/ – Stores metadata files like ProGuard mappings and DEX file listings, ensuring optimization.
Manifest/, DEX/ – Separate directories store the AndroidManifest.xml and compiled DEX files.
root/ – Contains files later relocated to the root of any APK.
How to Deploy an App Bundle
Unlike APKs, App Bundles cannot be directly installed on devices. Instead, developers upload a signed .aab file to Google Play, which then builds and signs APKs for distribution via Dynamic Delivery.
Testing Your App Bundle with Google Play Internal Test Track
To generate and upload a signed app bundle:
Select Build > Generate Signed Bundle/APK in Android Studio.
Choose Android App Bundle and click Next.
Select the base module and provide keystore credentials.
(Optional) Check Export Encrypted Key for Google Play App Signing.
Specify a Destination Folder, choose a Build Type, and click Finish.
Upload the signed .aab file to the Google Play Console.
Testing Your .aab File on Pcloudy
Pcloudy supports the .aab format, allowing developers to upload and test their App Bundles on real devices in the cloud. This ensures smooth functionality before releasing the app to users, making it a crucial step in the testing phase.
Conclusion
The Android App Bundle is a game-changer for app development and distribution. By optimizing APKs for individual devices, reducing app size, and streamlining feature management, AAB improves the overall efficiency of Android app publishing. Developers benefit from simplified build management, while users enjoy faster downloads and reduced storage consumption, leading to higher app adoption rates.
Automate with Selenium
Automate your web app testing by running your selenium scripts on multiple real desktop browsers with ease.
Get a free demo
Android 14 Behavior Changes for Apps: What Developers Need to Know
As Android continues to evolve, new versions bring significant changes that affect how apps function. Android 14 introduces several behavior updates that developers must address to ensure app compatibility and maintain seamless user experiences. From security enhancements to accessibility improvements, these updates refine the platform’s efficiency and privacy while promoting better performance. Let’s explore the most important changes and how they impact app development.
User Experience Enhancements
Foreground Notifications Can Be Dismissed
Starting with Android 14, users can dismiss certain foreground notifications that were previously non-dismissible. This affects notifications that use Notification.FLAG_ONGOING_EVENT, except for specific cases like media playback, active calls, or device policy controller notifications. Developers should test their apps to ensure important notifications remain accessible while allowing unnecessary ones to be dismissed. This change grants users more control over their notifications, preventing clutter and improving usability.
Accessibility Improvements
Font Scaling Up to 200%
Android 14 aligns with Web Content Accessibility Guidelines (WCAG) by allowing users to scale fonts up to 200%. This is particularly useful for individuals with visual impairments, as it provides greater readability and customization of text size. Developers should verify their app’s UI responsiveness to large text sizes, ensuring that text elements do not overlap or get cut off, and that overall usability is maintained across different screen sizes and orientations.
Security Enhancements
Minimum Target API Level Requirement
To improve security and reduce vulnerabilities, Android 14 enforces a minimum targetSdkVersion of 23 for all new app installations. This means older, outdated apps that do not meet modern security standards can no longer be installed on new devices. Developers must ensure their apps comply with newer security frameworks and best practices, such as using secure storage, enforcing modern encryption techniques, and handling user data responsibly.
Redaction of Media Owner Package Name
In Android 14, the OWNER_PACKAGE_NAME field in the media store is now redacted unless the querying app has explicit permissions (QUERY_ALL_PACKAGES) or the storing app’s package name is always visible. This update enhances user privacy by limiting access to metadata about media files. Apps that rely on accessing media ownership information will need to request appropriate permissions or adapt their workflows to accommodate this restriction.
Core Functionality Changes
Foreground Service Type Requirement
Apps targeting Android 14 must specify at least one foreground service type when starting a foreground service. This prevents apps from misusing foreground services, ensuring they are only used for necessary and well-defined purposes like media playback, location tracking, or health monitoring. Developers should update their app manifest and logic accordingly to comply with this requirement and avoid unexpected app terminations.
Stricter Bluetooth Permissions
Android 14 now strictly enforces the BLUETOOTH_CONNECT permission when calling BluetoothAdapter.getProfileConnectionState(). This change prevents unauthorized access to Bluetooth connection states, enhancing user security and privacy. Developers should ensure that their apps request and handle Bluetooth permissions correctly, prompting users for approval when necessary and explaining why the permission is required.
Open Mobile API (OMAPI) Enhancements
1. Carrier Privilege Rules Parsing
Android 14 enhances OMAPI’s ability to parse and enforce carrier privileges. This ensures that only authorized apps can access certain network-based services, benefiting apps that deal with mobile payments, SIM-based authentication, and telecom services. Developers working on applications that interact with carrier networks should update their logic to incorporate these privileges seamlessly.
2. Embedded Secure Element (eSE) Access Customization
Developers now have more control over how apps interact with embedded secure elements (eSEs), including system-privileged permissions and configurable Application Identifier (AID) rules. These improvements provide more flexibility for secure transactions, identity verification, and device authentication. By leveraging these changes, app developers can create robust security measures for mobile wallets, enterprise authentication, and other security-sensitive applications.
3. Device Capability Filtering Indicators
Android 14 introduces better filtering mechanisms for detecting device capabilities related to secure elements. This helps apps determine whether a device supports necessary hardware, reducing crashes or compatibility issues. Apps that rely on specific hardware security features can now more accurately tailor their functionality based on device compatibility, offering a more streamlined user experience.
How These Changes Benefit Developers and Users
Improved Security: Stricter permissions, better API enforcement, and data redaction make Android 14 a more secure platform for both developers and users. This ensures that sensitive data is protected and that security vulnerabilities are minimized.
Better User Experience: Enhanced accessibility features and notification controls improve usability and engagement, making Android 14 a more user-friendly experience for all.
Greater Compatibility: The new API-level requirements and capability filtering ensure apps work optimally across a wide range of Android devices, reducing inconsistencies and improving overall app stability.
Preparing Your App for Android 14
Test UI Scaling: Ensure your app remains functional and visually appealing when fonts are scaled up to 200%. Use responsive layouts and dynamic text sizing techniques to maintain readability.
Check Foreground Notification Handling: Review notification behaviors to confirm essential alerts remain non-dismissible while allowing users to manage less critical notifications.
Update Permissions: Verify and declare required permissions, particularly for Bluetooth and media storage access. Ensure proper handling of permission requests to avoid unnecessary disruptions to user workflows.
Adopt Secure API Practices: Utilize the latest OMAPI improvements for secure transactions and data handling. Ensure compliance with new security requirements to protect user data and app integrity.
Android 14 brings numerous behavior changes designed to enhance security, accessibility, and app compatibility. Developers should proactively update their apps to align with these modifications, ensuring a seamless experience for users while leveraging the platform’s latest advancements. Staying informed about Android updates and testing apps thoroughly will be key to maintaining high performance and compliance with evolving platform standards. By adapting to these changes early, developers can ensure their apps remain secure, efficient, and user-friendly in the ever-evolving Android ecosystem.
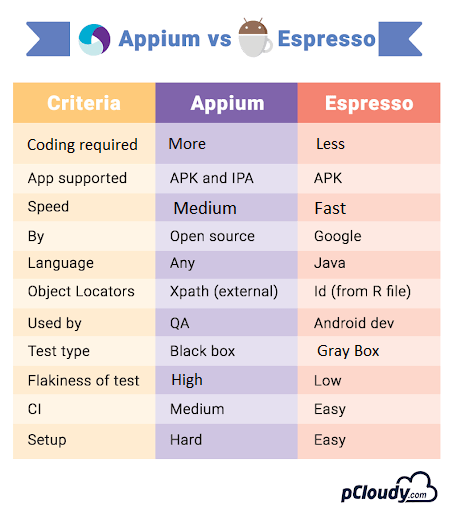
Mobile app automation testing has become essential for ensuring the quality and performance of apps in today’s competitive market. With shorter release cycles and tighter budgets, choosing the right automation testing framework can significantly impact your app’s success. While there are many automation frameworks available, Appium and Espresso have emerged as two of the most widely used frameworks for mobile app testing.
This blog provides a detailed comparison of Appium vs Espresso, highlighting their strengths, weaknesses, and ideal use cases to help you decide which framework is right for your needs.
Appium vs Espresso
Mobile app automation testing has evolved as a crucial aspect of the mobile app development process to help deliver better quality solutions, under controlled time cycles and cost schedules. But for delivering bug-free app, choosing the best suitable automation testing framework for your app is very important. There are many automation testing frameworks available in the market with exceptional capacities. This blog is all about Appium vs Espresso and we will analyze which of these two most widely used Automation testing frameworks is preferable for your app testing.
Espresso was not preferred because of its flakiness and instability issues. But, from the time Google has brought Android Test Orchestrator, a Gradle test option, instability and unreliability of Android Espresso tests have vanished. This, in turn, is creating a serious problem for the most popular automation framework Appium.
Let’s find out in this blog if Espresso now comes with a power to kill Appium or Appium can hold its stand in this fiercely competitive market.
What is Appium?
Appium is an open-source, cross-platform mobile automation testing framework that supports the testing of native, hybrid, and web apps. It enables testing on real devices, emulators, and simulators, making it a versatile choice for mobile app testing. Appium’s architecture uses the Selenium WebDriver protocol, which allows cross-platform compatibility, enabling the same test scripts to work for both Android and iOS apps.
Advantages of Using Appium
Facilitates Test Execution Without a Server Machine Appium is built on a Node.js-based runtime, making it lightweight and capable of running on local machines without requiring a dedicated server.
No App Code Recompilation Required
Appium enables testers to run automation tests without modifying or recompiling the app code, making it highly flexible for both native and cross-platform apps.
3. Automates Various Types of Mobile Apps
Whether it’s a web, hybrid, or native app, Appium supports automation across all app types using the same framework.
4. Supports Real Devices, Emulators, and Simulators
Appium enables testers to run tests on real devices for accurate usability testing while also supporting emulators and simulators for faster test execution.
5. Record and Playback Tool for Quick Test Creation
Appium’s inspector allows testers to record app behavior and generate scripts in multiple programming languages such as Java, Python, Ruby, and C#.
6. Cross-Platform Compatibility
Appium enables you to run the same test script on both Android and iOS platforms, reducing the effort required for cross-platform app testing.
7. Supports Multiple Programming Languages
Appium integrates with WebDriver-compatible languages, including Java, JavaScript, Python, PHP, Ruby, C#, and Objective-C, allowing testers to write scripts in their preferred language.
Disadvantages of Using Appium
Limited Gesture Support
Common mobile gestures, such as double-tap, may not be natively supported in Appium’s Java-client libraries, requiring workarounds.
2. No Support for Concurrent iOS Simulator Testing
Appium does not allow running multiple test scripts on iOS simulators concurrently, which can slow down large-scale iOS testing.
3. Limited Image Recognition Capability
Appium struggles with image-based testing as it cannot recognize images automatically and requires screen coordinates for locating visual elements.
4. No Support for Older Android Versions
Appium only supports Android 4.2 and above, making it difficult to test apps targeting older Android APIs.
What is Espresso?
Espresso is Google’s UI testing framework for Android apps. It provides fast, reliable UI testing by synchronizing test actions with the app’s user interface and ensuring that the app’s activities have completed before the test starts.
With the introduction of Android Test Orchestrator, Google has addressed common issues like flaky tests and shared states, making Espresso more stable and reliable.
Advantages of Using Espresso
Integration with Gradle Espresso is fully integrated with Android Studio and Gradle, enabling developers to run tests directly from the command line or IDE with minimal setup.
Android Test Orchestrator for Reliability
The Android Test Orchestrator runs each test in its own sandboxed environment, ensuring minimal shared state and isolating crashes, leading to more reliable test results.
3. Less Flakiness
Espresso’s built-in synchronization mechanism ensures that test actions are executed only when the app’s UI is idle, reducing flakiness caused by asynchronous operations.
4. Developer-Friendly Test Automation
Since Espresso is based on Java and JUnit, Android developers can quickly adopt it without additional learning curves or external dependencies.
5. Fast Feedback Loop
Unlike Appium, Espresso runs alongside the app without requiring a server, resulting in faster test execution and immediate feedback.
6. Simple Test Suite Management
Espresso allows developers to package their tests as standalone APKs, which can be installed alongside the app and executed easily.
Disadvantages of Using Espresso
1.Requires Access to the App’s Source Code
Espresso requires access to the app’s source code, limiting its use for black-box testing or when working with third-party apps.
2. Narrow Focus (Android-Only)
Espresso is designed exclusively for Android, so separate frameworks (like XCTest) are required for iOS testing, resulting in increased effort for cross-platform apps.
3. Requires Emulator Experience
Running Espresso tests requires familiarity with launching and managing Android apps on emulators, which may add complexity for QA teams unfamiliar with Android development.
Appium vs Espresso: Key Differences
Criteria
Appium
Espresso
Platform Support
Android and iOS
Android only
Source Code Access
Not required
Required
Test Type
Black-box and white-box testing
Primarily white-box testing
Programming Language
Supports multiple languages (Java, Python, C#, etc.)
Java and Kotlin (via JUnit)
Test Execution
Requires Appium server
Runs directly in the app process
Cross-Platform
Yes
No
Test Reliability
May face flakiness due to external dependencies
High reliability with built-in synchronization
Integration
Requires WebDriver integration for advanced features
When you require black-box testing without access to the app’s source code.
When you want to use a familiar WebDriver-based framework with support for multiple languages.
When to Use Espresso
When you are building a native Android app and need fast, reliable UI testing.
When you need a developer-friendly testing framework that integrates seamlessly with Android Studio.
When you prioritize faster feedback loops for CI/CD pipelines.
Conclusion
Both Appium and Espresso offer powerful capabilities for mobile app testing, but the right choice depends on your app’s requirements. If you need a cross-platform solution that supports both Android and iOS, Appium is the better option. However, if you’re focused solely on Android and need a reliable, fast UI testing framework, Espresso is ideal.
Comprehensive Test Coverage
Test your apps on 5000+ real device and browser combinations and ensure a complete test coverage.
Get a free demo
Mobile App Testing Challenges: A Comprehensive Guide
The mobile market has seen exponential growth over the past decade, largely driven by the mobile application industry. With more than 3.5 billion smartphone users worldwide, mobile apps have become an integral part of our daily lives. This booming sector is expected to generate over $189 billion in revenue by 2020 through app stores and in-app advertising, and the demand shows no signs of slowing down. As mobile apps become more ubiquitous, the competition to create unique, high-performing apps has intensified.
Yet, as apps grow more complex and diverse, so do the challenges faced in ensuring their quality. Mobile app testing plays a pivotal role in meeting these challenges, especially as the industry evolves at a rapid pace. Below, we explore the common issues in mobile app testing and offer solutions to ensure apps remain competitive, reliable, and user-friendly.
1. Device Fragmentation: The Complexity of Multiple Devices
One of the most significant challenges in mobile app testing is device fragmentation. With countless manufacturers, models, operating systems, and screen sizes, testing across all devices is a daunting task. Android alone has a wide range of OS versions, with older versions still in circulation despite new releases. This fragmentation means that an app may perform flawlessly on one device but crash on another.
The Challenge
Operating System Fragmentation: Apps must function across multiple operating systems, such as Android and iOS. Even within these operating systems, there are variations in performance and compatibility across different versions (e.g., Android 10 vs. Android 12).
Device Variability: Different devices have varying processing capabilities, screen sizes, and resolutions, all of which can affect app performance.
The Solution
Testing on a range of real devices is the best way to ensure compatibility. This is where cloud-based platforms like Pcloudy come in. Pcloudy offers access to real devices with varying OS versions and configurations, allowing testers to check how their app behaves across multiple devices without needing physical access to each one.
Pro Tip: It’s crucial to prioritize testing on the most popular devices and operating systems to maximize your app’s reach.
2. Network Conditions: Testing for Real-World Scenarios
In today’s connected world, apps must perform well across a variety of network conditions. However, this introduces another layer of complexity in mobile app testing. Network issues, such as low bandwidth or weak signal strength, can drastically affect an app’s performance, leading to poor user experiences. According to studies, 53% of users will uninstall an app if it crashes, freezes, or has performance issues.
The Challenge
Network Fluctuations: Users frequently switch between Wi-Fi and cellular networks, both of which offer different speeds and signal strengths.
Latency and Packet Loss: Poor network conditions can lead to latency issues, dropped packets, or complete loss of connectivity, which can make even the best-designed apps frustrating to use.
The Solution
Testing apps under real-world network conditions is essential to ensure that they perform smoothly, even under poor network environments. Pcloudy offers network simulation tools that enable testers to replicate varying network conditions, from weak 2G signals to high-speed 5G or Wi-Fi, on real devices.
Pro Tip: Regularly test your app’s performance in low-bandwidth scenarios to ensure seamless user experiences in all conditions.
3. Choosing the Right Tools: Making or Breaking Mobile App Testing
The choice of testing tools can significantly impact the efficiency and effectiveness of mobile app testing. There are numerous tools available in the market, each with its strengths and weaknesses. Selecting the right one based on your app type (native, hybrid, or web) and testing needs is critical.
The Challenge
Tool Overload: The number of tools available can be overwhelming. Each offers different features for automation, debugging, performance monitoring, and security testing.
Incompatibility: Not all tools are suitable for every app type. For instance, some may work well for native apps but not for hybrid or web-based apps.
The Solution
To navigate this landscape, it’s crucial to evaluate tools based on your specific app requirements. Pcloudy supports a wide range of automation tools, such as Appium, Espresso, and Selenium, making it easier for teams to test apps across multiple environments.
Consider the following when evaluating tools:
App Type: Your chosen tool should support native, hybrid, and web-based apps.
Cross-Platform Support: Ensure that the tool supports Android, iOS, and other potential operating systems like Windows.
Cloud Integration: Leveraging cloud platforms for test automation allows teams to access devices and results from any location, improving collaboration and efficiency.
4. Screen Size Variations: Ensuring Consistency Across Devices
Mobile devices come in various screen sizes, and ensuring that your app displays correctly on all of them can be challenging. Apps that look perfect on a large-screen phone may appear cluttered or disjointed on a smaller device.
The Challenge
Pixel Density: Different devices have varying pixel densities, which can affect the sharpness and clarity of app content.
Layout Adjustments: App elements need to adjust dynamically to fit various screen sizes without compromising user experience.
The Solution
Adopt responsive design principles to create adaptable UI layouts. This approach ensures that your app looks good on all screen sizes, from small smartphones to large tablets. Testing your app on real devices of varying screen sizes is crucial, and platforms like Pcloudy allow for testing on multiple screen configurations to ensure a seamless experience.
Pro Tip: Focus on adaptive designs rather than pixel-perfect layouts, as adaptive designs scale more effectively across different screen sizes.
Native Apps: Developed for specific platforms (iOS or Android), native apps tend to offer better performance but require separate testing for each platform.
Hybrid Apps: These apps combine elements of native and web apps. While easier to develop and maintain across platforms, they often face performance and compatibility issues.
Web Apps: Running in browsers, web apps must be tested across multiple browsers and operating systems, making compatibility a primary concern.
The Solution
Each app type comes with its own set of testing challenges, and it’s essential to customize your testing strategy accordingly. Pcloudy supports testing for all three app types, allowing teams to ensure that their apps meet the required standards of performance, usability, and functionality.
6. AI-Powered Test Automation: The Future of Mobile Testing
Artificial intelligence is revolutionizing mobile app testing by automating complex testing tasks, generating test cases, and predicting defects. AI-driven testing can significantly reduce time and effort, allowing testers to focus on more critical aspects of app development.
The Challenge
Resistance to Change: Many teams are still reliant on traditional testing methods, hesitant to adopt AI-powered testing solutions.
Implementation Complexity: Integrating AI testing into existing workflows can be challenging without the right expertise or tools.
The Solution
AI-powered test automation, like the solutions offered by Pcloudy, helps automate repetitive tasks such as regression testing, bug detection, and performance analysis. AI-driven bots can create test cases, execute tests, and analyze results, enabling faster releases and higher accuracy.
Pro Tip: Embrace AI-based testing early to stay ahead of the competition. Automating repetitive tests frees up resources for more creative problem-solving.
7. Security and Compliance Testing: Safeguarding Data and Trust
In an era where data privacy and security are of paramount importance, ensuring that your app is secure and compliant with regulations is vital. The increasing number of cyberattacks and data breaches highlights the need for robust security testing.
The Challenge
Security Vulnerabilities: Apps are often vulnerable to attacks such as data leaks, insecure storage, and unauthorized access.
Compliance Regulations: Apps must comply with regulations like GDPR, HIPAA, or PCI DSS, depending on the region and industry.
The Solution
Incorporate security and compliance testing into your QA process. Test for data encryption, authentication, and security vulnerabilities. Pcloudy offers features like biometric authentication testing and encrypted device communication to ensure that your app meets the highest security standards.
Pro Tip: Regularly update your app’s security protocols to keep up with emerging threats and regulations.
8. Usability Testing: Ensuring a Seamless User Experience
Usability testing focuses on how user-friendly your app is, evaluating its ease of navigation, intuitive design, and overall user experience.
The Challenge
User Expectations: As mobile users grow more tech-savvy, they expect apps to be easy to use and navigate.
Cross-Platform Usability: Usability can differ across iOS and Android devices due to interface design differences.
The Solution
Conduct usability testing on real devices to gather feedback from real users. Cloud-based platforms like Pcloudy allow for real-device usability testing, providing insights into the app’s user experience across different devices and operating systems.
9. Battery Usage: Avoiding Power-Hungry Apps
Battery consumption is a critical factor that can impact app usage and customer retention. An app that drains battery quickly is likely to be uninstalled by users.
The Challenge
Performance Optimization: Apps that use GPS, background processes, or frequent notifications can quickly drain battery power.
Device-Specific Impact: Battery usage can vary across devices, especially those with older hardware.
The Solution
Test for battery efficiency on various devices using real-device cloud testing environments like Pcloudy. Analyze how your app consumes battery power and optimize where needed to ensure it runs smoothly without excessive battery drain.
10. Memory Leaks: Preserving Device Performance
Memory leaks occur when an app uses excessive memory, causing performance issues like slowdowns or crashes. This can lead to a poor user experience, especially on devices with limited resources.
The Challenge
Resource Management: Apps need to manage memory effectively to avoid crashing or slowing down the device.
Device-Specific Issues: Memory management can vary depending on the device’s hardware.
The Solution
Implement memory profiling tools during your app’s development and testing phases. Regularly test your app on different devices using Pcloudy to identify and fix memory leaks.
11. Geolocation Testing: Apps that Depend on Location
For apps that rely on geolocation features, such as navigation or ride-hailing apps, ensuring that location services work across different regions is crucial.
The Challenge
Location Variability: GPS performance can vary based on the user’s location and the accuracy of their device’s GPS hardware.
Testing Across Regions: Simulating different geolocation scenarios can be difficult without access to real devices in those regions.
The Solution
Use cloud platforms like Pcloudy to simulate geolocation testing on real devices in different geographic regions. This ensures your app’s location services work accurately across the globe.
12. App Localization: Adapting for Global Markets
Apps often need to be localized to different languages, currencies, and cultural contexts. Ensuring proper localization is essential for expanding into global markets.
The Challenge
Text Expansion: Some languages, like German or Russian, take up more space than English, which can break layouts or text boxes.
Cultural Sensitivity: Localization isn’t just about language—it’s also about ensuring that the app’s design and functionality make sense in the target culture.
The Solution
Conduct thorough localization testing, focusing on the user interface, translations, and regional features. Pcloudy allows testing in real-world scenarios for apps localized into multiple languages and regions.
13. Accessibility Testing: Meeting User Needs
Accessibility testing ensures that your app is usable by people with disabilities, such as visual or hearing impairments. Ensuring your app meets accessibility standards is vital for inclusivity and can be a regulatory requirement in many regions.
The Challenge
Regulatory Compliance: Many countries have strict accessibility regulations, such as the Americans with Disabilities Act (ADA) in the U.S. or the Accessibility for Ontarians with Disabilities Act (AODA) in Canada.
Wide Range of Disabilities: Apps must be tested for a range of disabilities, including vision impairments, hearing impairments, and physical disabilities.
The Solution
Use accessibility testing tools to check your app’s compatibility with screen readers, voice commands, and other assistive technologies. Test your app on different devices using Pcloudy to ensure it meets accessibility guidelines.
Interruption testing evaluates how well an app handles interruptions like phone calls, text messages, or low battery alerts. These interruptions are common during real-world app usage.
The Challenge
App Stability: Apps must be able to handle interruptions without crashing or losing user progress.
Consistent Experience: Interruption handling should be seamless across different devices and operating systems.
The Solution
Perform interruption testing on real devices to evaluate how your app reacts to common disruptions. Cloud platforms like Pcloudy allow testers to replicate interruptions during active app sessions, ensuring smooth recovery and minimal disruption.
15. App Store Compliance: Ensuring Successful Submissions
Each app store (Google Play, Apple App Store) has specific guidelines for app submission. Failing to comply with these guidelines can result in rejection, delaying your app’s release.
The Challenge
Guideline Variations: App store guidelines differ between platforms, and ensuring compliance with both can be time-consuming.
Performance Criteria: Stores often have performance benchmarks that apps must meet to be approved.
The Solution
Before submitting your app, ensure it meets all necessary guidelines. Test your app’s experience, security, and overall quality on multiple devices and operating systems using Pcloudy to minimize the risk of rejection.
Conclusion: A Holistic Testing Strategy
Mobile app testing involves overcoming a wide range of challenges, from ensuring compatibility across numerous devices to handling network variability, memory leaks, and accessibility. A successful testing strategy combines real-device testing, cloud-based automation, AI-driven test automation, and comprehensive security testing to deliver a high-quality app experience.
Pcloudy provides a robust cloud-based platform for mobile app testing, offering access to real devices, network simulation, and AI-powered automation. By adopting a well-rounded approach to testing, you can ensure
Good news for Android users!!! The wait for the new version of the Android is over as it is likely to be released in the first week of September. Yes, you read it right.
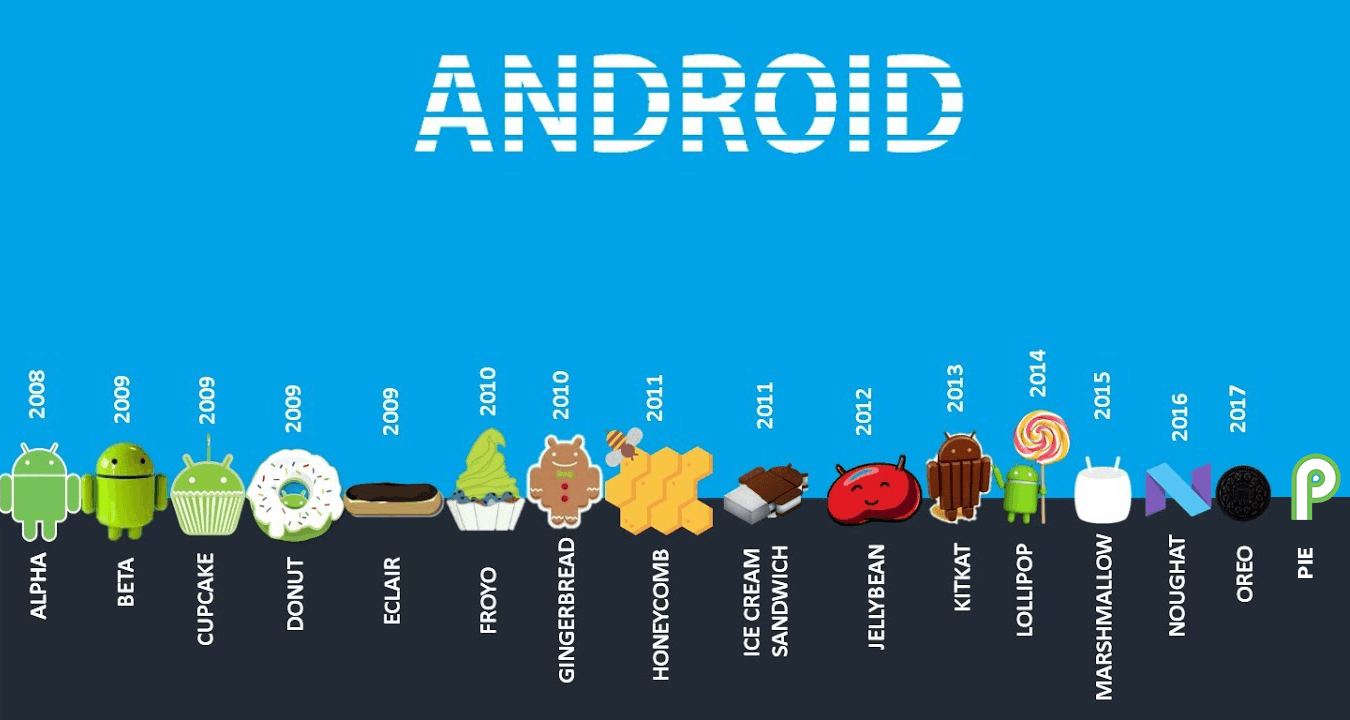
Finally, Google has ditched its sweet flavours that started with Android 1.5 naming as “Cupcake”. After that, the trend followed as — Donut, Eclair, Froyo, Gingerbread, Honeycomb, Ice Cream, Jellybean, KitKat, Lollipop, Marshmallow, Nougat, Oreo, and Pie.
For the first time in its history, Android released its OS without a dessert name. It has discontinued the tradition permanently. It is simply called Android Q or Android 10.
However, the previous version Android 9 or Pie was most focused to introduce the best of intelligence, simplicity, digital wellbeing and ultimate navigation.
The new version Android Q is filled with functions like Android Q desktop mode offering more control to apps and features to its users. Fans and tech junkies had lots of expectations from Android 10 as it comes with lots of interesting and innovative features.
Android Q Features
Let us look at major changes in the Android 10.
Fully Gesture-based Navigation
Putting forward the gesture-based navigation added to the Android Pie, the new version will have fully-gesture based navigation. The traditional back button of the Android OS will not be available. It’s one of the remarkable changes that users will find in the Android OS navigation.
Some of the gestures are:
Swipe up to access home;
Swipe up and hold to show the multitasking menu,
Swipe from the left or right edge of your screen to go back.
First, swipe to open a side menu and a double swipe to go back.
However, user can anytime switch between various system navigation options that include: Gesture navigation, 2-button navigation, and the traditional 3-button navigation.
System-Wide Dark Mode
The feature which every Android user was waiting for- the Dark mode. Google’s Android 10 will have a system-wide dark theme that can be turned on and off at any time via a Quick Settings toggle.
Adding to that, Google has also created APIs that third-party app developers can use to activate the dark theme mode within their apps.
Live caption transcription
Live Caption will provide real-time captions for just about anything on your phone where someone is talking or reading. The best part is that it happens locally on-device. In other words, no internet connection of any kind is required. Anyone can turn Live Caption on through Android 10’s accessibility settings.
This will be a godsent gift for users who have difficulty in hearing or partially deaf. They generally face difficulty to understand the media contents like video, games, podcasts and so on, they can turn on the “Live caption” feature to better understand the media being displayed.
Privacy
Privacy is the biggest concern for our generation. New steps have been taken by the Android 10 developers to give us a better understanding and more control over what exactly apps on your phone have access to like calendar, location, camera, contacts, and microphone.
Now the apps that ask for your location will now show a new pop-up asking you if you want to grant location access all the time, only when the app’s being used, or not at all. This is a major step where the user has more command over third-party apps.
Permission Usage
The Permissions Usage page in settings has been completely modified to show which permissions are being used by how many of your apps, the ability to filter by permissions to see which apps are using certain ones, and a new User Interface for the App info page.
Sharing Shortcut
The direct share is replaced by sharing shortcut. It allows apps to return lists of direct targets for sharing for use within share menus. Unlike its previous versions, apps publish their targets in advance and do not have to be polled at runtime, improving performance.
Wi-Fi QR Code
Using a password to connect to a Wi-Fi will no longer be required. Android 10 has a built-in feature called “Easy connect”, where the system lets us make a QR code that others can access to use your Wi-Fi.
Bubbles
Bubbles are just like you see chat heads in facebook messenger. It will be a circular floating head that shows the latest notification on the screen. The new notification bubbles will now pop up on your screens while using other applications. The bubble is created for multitasking purposes; however, the user has an option to disable it.
Audio Features
Android 10 lets us record or listen to audio on two different apps. Previously, if an app started to capture audio, all other apps had no way to access the audio input until the capturing app was stopped. But now, you will be able to get two applications to listen to audio input at the same time.
Settings Panel
User need not jump through multiple pages to get to the phone settings you want. Settings Panel on the screen let you access phone settings that are contextual and correlated to the app that users currently have open.
Foldable Devices
There is a high possibility that foldable smartphones will be introduced in the market by the end of the year. Android 10 will offer support for application developers to develop apps specifically for such devices, even with different folding patterns. The support addresses the app’s resizing, screen ratios, multi-window functions and aspect ratios.
Undo App Removal
This feature can be saviour for users, as it happens to most of us, we accidentally remove any app and then we realize, we shouldn’t do that.
Google has understand this issue and has given to undo the removal. After you have removed any app, you have a few seconds to undo it by pressing the “undo” button that you can find within the bottom of the screen.
Smart Battery Indicator
The new indicator will reveal the remaining battery capacity. Currently, we see a certain percentage showing on the screen. Now the OS will show a text like “Until 10 PM” instead of a percentage. This text will only appear when the battery decreases to a certain level.
Android 10 will give extra privacy to the smartphone users and with the help of innovative technologies, the Android OS users will be able to function more efficiently. All these features will surely make things easier and navigable.
When to Expect the Release
Google had released the first Android Q Beta version in early March this year for the Pixel phones and multiple Beta versions were released including Android Q Beta 6 which appeared on August 7. As of now the announcement of the Q3 has been made on August 22, so we can expect the final release of the Android 10 at any point of time when Q3 is over.
These Android Q features of the Beta versions are live on 20 different phones across multiple manufacturers. People can sign up and enroll to get the new updates on Android 10.
The current compatible Phone after launch with Android 10 is – Pixel 3, Pixel 3XL, Pixel 2, Pixel 2 XL, Pixel, Pixel XL, OnePlus 6T, Sony Xperia Z3, and LG G8, Nokia 7.1, Nokia 8.1.
We are committed to keeping you ahead of others. pCloudy is one of the fastest to release the support of Android Q beta devices on the cloud.
Google has launched the final Android Q beta and Android Q official release is just a few weeks away. Testers and developers can test their app against this final beta version. Android Q beta 6 includes the final API 29 SDK and updated build tools for Android Studio. It also supports all the features, developer APIs and system behaviors that will be in the final release.
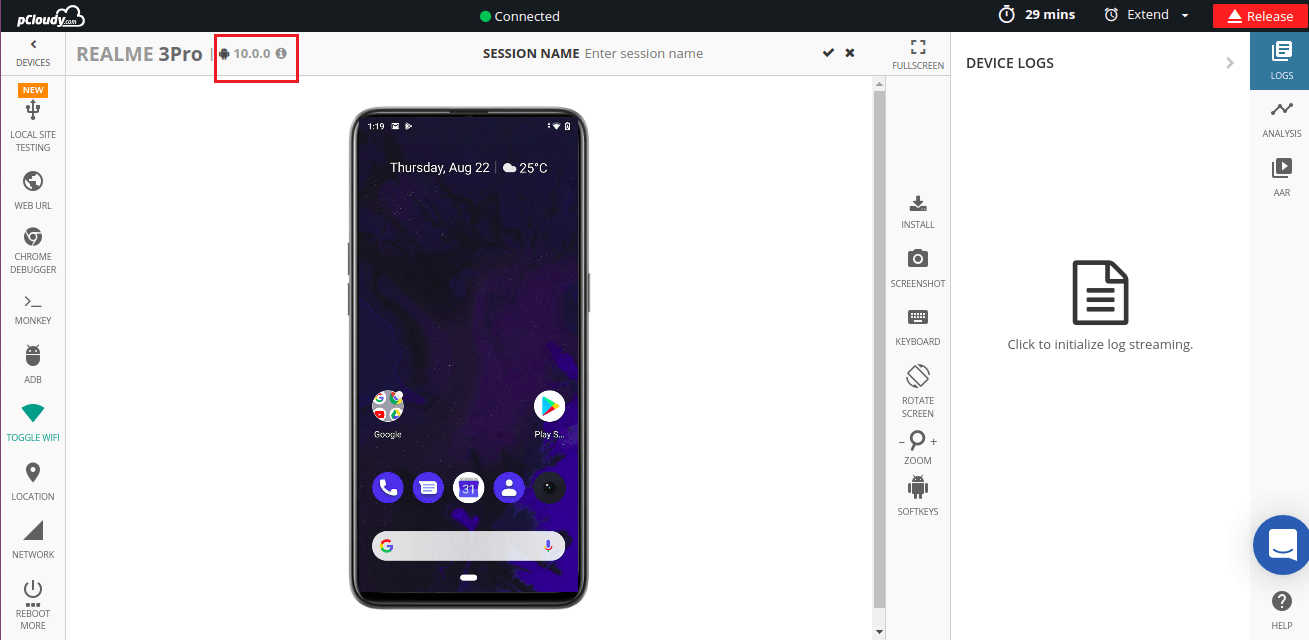
Now you can test your mobile apps on devices loaded with Android Q beta version in pCloudy.
The second blog in the series “Start to end guide for mobile app testing”
Basics and Comparison
In the previous blog in this series, we talked about the evolution of mobile technology. In this blog, you will know more about the two most popular mobile operating systems, Android and iOS. Here you can also learn about the Android architecture, concepts of Android SDK, emulators and iOS architecture and mobile cloud. Let’s start by getting familiar with Android versions.
What is Android?
Android is a software bunch comprising not just the operating system but also middleware and key applications. It is developed by Google and later by the Open Handset Alliance but it is not limited to only mobiles. In other words, it is a complete set of software required for the development of smart devices such as smartphones, tablets, notebooks, set-top boxes, TVs, smart watches, etc. Android is a Linux based open source software platform. The application development in Android is done in the Java language.
Versions of Android
The first version of Android was launched on the HTC Dream mobile in the year 2008. Since then Android has been evolving constantly and now it has the largest user base of around 88% global market share. Android OS versions are released with a name following the alphabetical order, such as Android 1.1, 1.5-Cupcake, 1.6-Donut, 2.0/2.1-Eclair,2.2-Froyo,2.3-Gingerbread,3.X-Honeycomb,4.0-Ice Cream Sandwich, 4.1/4.2/4.3-Jelly Bean, 4.4-KitKat, 5.0-Lollipop, 6.0-Marshmallow, 7.0-Nougat, 8.0-Oreo and 9.0- Pie being the latest of all the versions.
Why so buzz about Android?
Whenever we hear the word Android, we usually think about the ‘smart phones’. This is how Android is placed in our minds. It is one of the most successful mobile operating systems in the market today. Android apps are the most downloaded apps in the app stores. It runs on millions of mobile devices in more than 190 countries in the world. Around 1.5 billion apps and games are downloaded from Google play store in a month. It does not fail to impress its users by consistently introducing new features. It is open source, so any android variant can be developed using the source code. It supports wireless communication including 3G, 4G, WiFi, and Bluetooth. Android keeps introducing its new and upgraded versions, often. Due to its popularity, around 1million new Android devices are activated worldwide in a day. Google play is an open marketplace for developers to sell and distribute their mobile apps. It has already entered the field of Artificial Intelligence enabling the apps to be more intuitive and user-friendly.
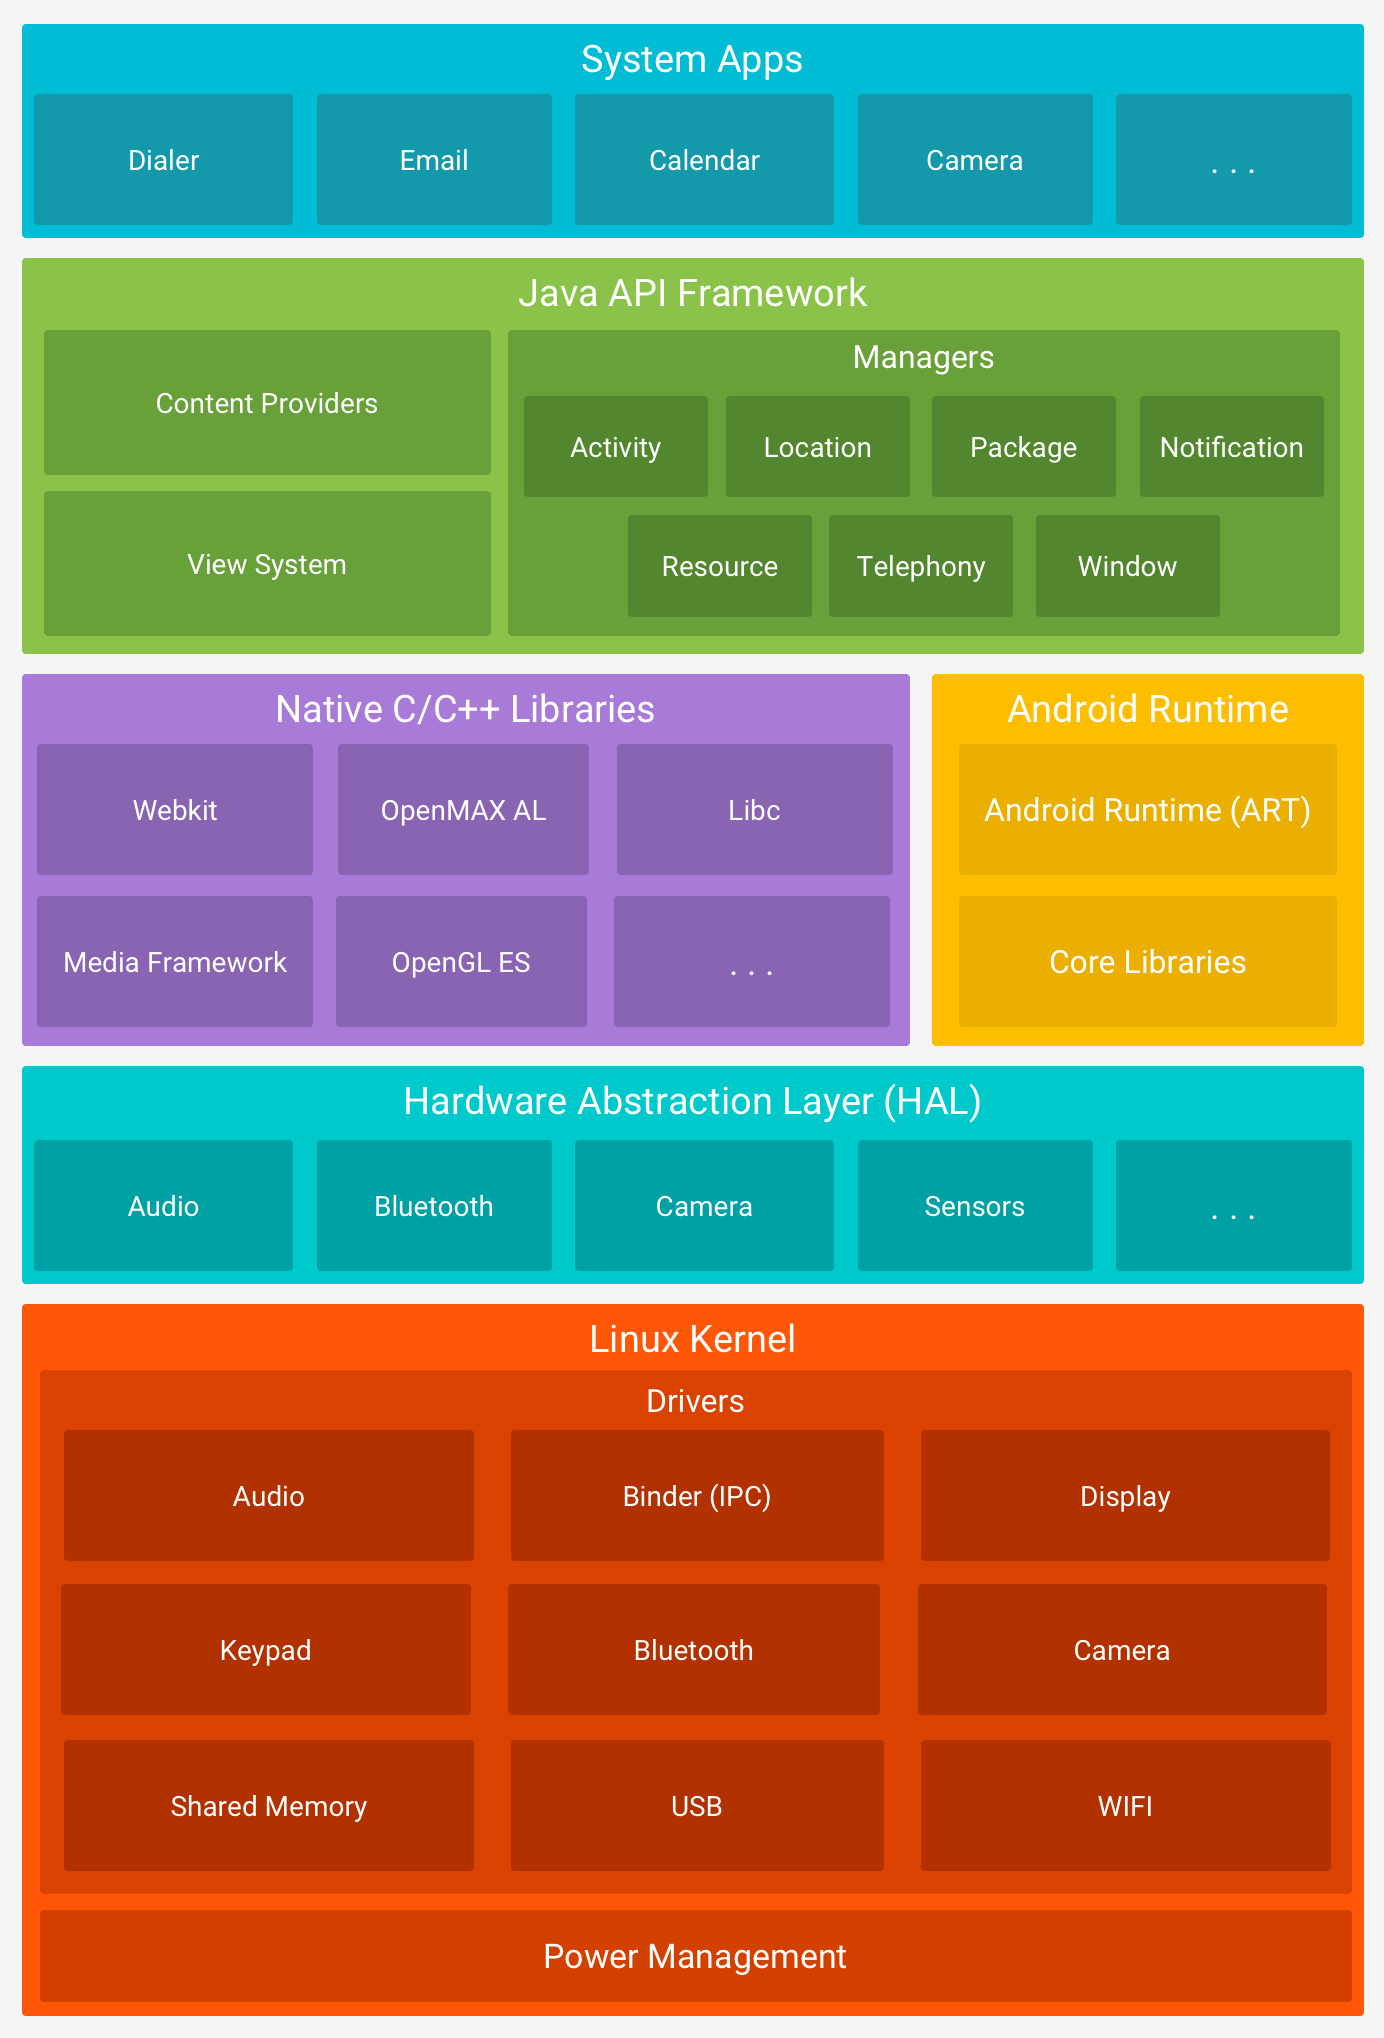
Android Architecture
Android is architected in the form of a software stack comprising applications, an operating system, run-time environment, middleware, services, and libraries. The following figure is the visual outline of the elements integrated layer by layer. These all elements are the prerequisites of the mobile app development and to make the app environment ready. Android Architecture is categorized as Linux kernel, native libraries(middleware), Android runtime, Application framework, and applications.
Linux Kernel- It exists at the root of the Android architecture. It contains all drivers for hardware components, battery and memory management, resource access and device management. Android only uses the Linux Kernel.
Libraries – It is the layer above the Linux Kernel, including native libraries such as WebKit, OpenGL, FreeType, SQLite, Media framework, C runtime library(Libc), etc. Webkit library supports the web browsing engine, SQLite is used for sharing and storing application data, Media to play record audio/video, etc. FreeType is for processing fonts, SSL libraries are for internet security, OpenGL and SGL are responsible for rendering 3D,2D graphics, respectively, the Surface manager is responsible for rendering windows and drawing surfaces of apps on the screen. Libraries also contain C++ libraries used by android system components.
Android Runtime (ART)- these have the core libraries also known as Dalvik Libraries (DVM) which are responsible for running an android application. Android Runtime is built to run apps in a restricted environment where there is limiter power in terms of battery, processing, and memory. ART uses DEX files, a type of byte code designed for Android to manage memory more efficiently.
Android Framework- On the top of Android runtime is Android Framework. It includes a collection of Android APIs written in Java. Enables and simplifies the reuse of core components and services such as Window, view, Activity, telephony, resources, locations, Content Providers (data) and package managers. It provides access to Android feature set fir developers to build a mobile app for Android OS.
Applications- Over the Android Framework lies the application layer covering system and other apps that the users can download from the Google Play Store. The core apps like email, SMS, calendar, maps, browser, contacts, etc are pre-packed in the mobile device. This layer uses all other layers for enhancing the performance of these mobile apps.
Concepts of Android SDK and .apk file and emulators
Android SDK is a Software Development Kit which allows the developers to develop an application for the Android platform. The Android SDK comprises of software programs with the sample source codes, developer tools, documentation, tutorials, an emulator and essential libraries to build, test and debug mobile apps for Android. Apps are written in Java language and are run on Dalvik(DVM) that runs on Linux Kernel.
APK stands for Android Application Package. It is a package file format used by Android OS for distribution and installation of mobile apps and middleware. For installing any mobile app/games, we require APK files with an extension .apk. These can be downloaded from the play store. Apk files are just like .exe files for windows. Apk file is in zip format and contains all necessary files required for app installation. The Apk archive usually contains META-INF directory:
MANIFEST.MF: the Manifest file
CERT.RSA: The certificate of the application.
CERT.SF
Android Emulators-
Android emulator or Android Virtual Device (AVD) is a device that is a functional replica of an Android device that can be used to run and test the Android applications on the PC even before they are published in the market for final use. Android emulator comes as part of the Android SDK. It is a virtual device that lets the developer develop the apps without using a physical device. Android emulator requires JRE –Java Runtime Environment and Android SDK to function. The applications can be either downloaded or installed directly on the device from the Google play store or if the application is available in ‘.apk’ format, it can be installed using the “add” command.
iOS and its versions
iOS is a mobile operating system developed by Apple Inc. It was originated in 2007 for iPhone and later extended its support to other Apple devices like iPad and iPod touch. It is the second most popular mobile device in the world after Android. The iOS mobile apps can be downloaded from Apple’s App Store. The App store contains more than 2 million iOS apps today. The iOS apps are programmed in Objective C, C, and C++ languages. Version updates for iOS are released through iTunes software until the introduction of iOS 5 in 2011. Now, the software updates and data sync can happen wirelessly through Apple iCloud service. iOS has expanded its market by introducing new products powered by Apple like iWatch and AppleTV.
It was formerly known as iPhone OS and the name was used for its other 3 subsequent versions until 2010 when Apple released iOS4. In 2011, iOS5 was released providing access to around 500000 iOS apps and some additional features. iOS 6, 7, 9 were released in the succeeding years with more advanced features and performance. The latest versions iOS 10,11 and 12 are released in 2017 and 2018 respectively.
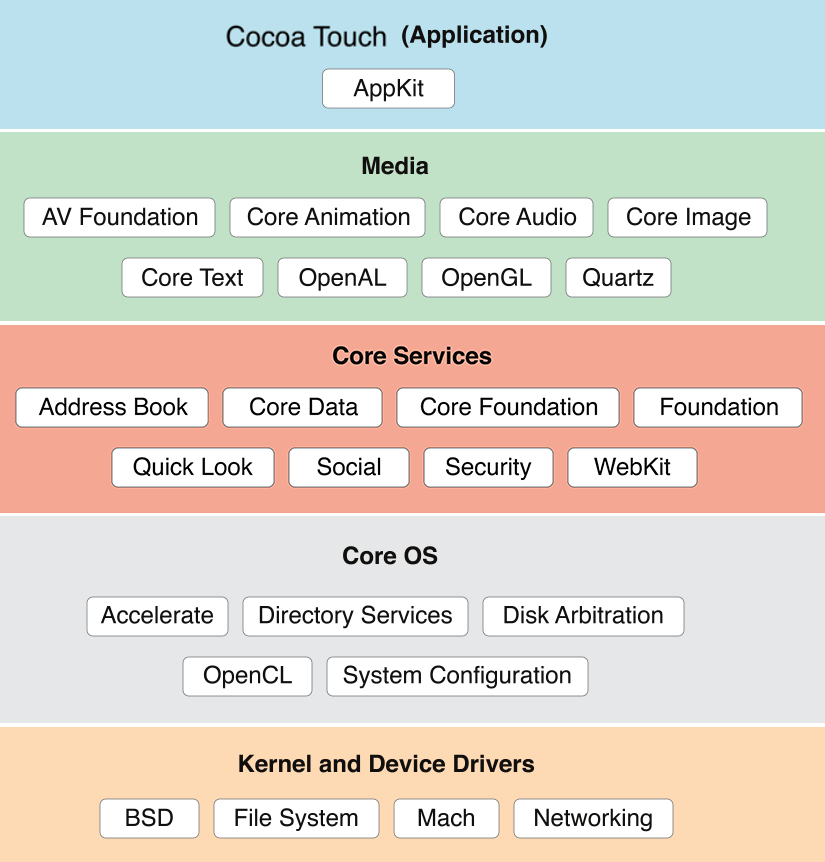
iOS Architecture
iOS Architecture is also a layered one. Each layer is built with a variety of frameworks which can be assimilated in the iOS apps. The layers communicate with the hardware with the help of clearly described system interfaces that make it easy for the developer to build the app that is ready for different devices. Let us discuss each layer below:
Core OS- This layer is the foundation layer of the OS on which other layers are dependent. This layer is responsible for managing memory, system and OS tasks, networking and also interacts directly with the hardware. This layer comprises of frameworks like accelerate, external accessory, core Bluetooth, security and local authentication.
Core Services Layer- It consists of technologies that provide certain services to the app but are not directly related to the UI of the app. It contains high-level features like iCloud storage. The core services include address book framework(provides access to contacts and user database), CloudKit (medium of transferring the data between app and cloud), Core Data (to manage the data model of a model view controller app), Core Foundation( Technologies to provide Data management services to IOS), Core Location(gives location info to apps),Core Motion(ton access motion-based info on the device),Foundation(Using Objective C), Healthkit (handles health-related info of the user),Homekit(controlling connected devices of the user at home),Social( to access user’s social media accounts) and Storekit Framework( supports in making in-app purchases from iOS apps).
Media Layer- Media layer in iOS architecture enables the Graphics, Audio, Video technologies. Graphic Technologies like UIKit Graphics, Core Graphics framework, Core Animation, Core Images, OpenGl ES which handles 2D vector and animating views and 2D and 3D figures, GLKit and Metal. Audio Framework supports rich Audio experience and includes- Media Player Framework, AV Foundation, OpenAL.
Video Framework includes AV Kit, AV Foundation, Core Media, Also the iOS support
for the playback of movie files with the .mov, .mp4, .m4v. and .3gp filename
extensions.
Cocoa Touch Layer – The layer defines the basic application and support for key technologies such as multitasking, touch-based input, push notifications, and many high-level system services. It includes EventKit, GameKit, iAd, MapKit, PushKit, Twitter and UIKit frameworks.
IPA stands for iOS App Store Package. Any file with .ipa extension is an iOS application. It is an archive like ZIP that contains software sets used to develop the iOS app. Each .ipk file can be opened with Apple’s iTunes program. An IPA file has a binary for ARM architecture and can only be installed on an iOS device. IPA files cannot be installed on the iPhone Simulator. To run applications on the simulator, original project files which can be opened using the Xcode SDK are required.
iOS Simulators – These are again programs to test and run the iOS applications without having any physical or the ‘real’ device. The iOS Simulator allows you to rapidly prototype and test builds of your app during the development process. Installed as part of the Xcode tools along with the iOS SDK, iOS Simulator runs on Mac and behaves like a standard Mac app while simulating an iPhone or the iPad environment. iOS simulators require MAC Environment and Xcode to function. To start the iOS simulator, firstly launch the Xcode and then do one of the following:
1. Choose Xcode > Open Developer Tool > iOS Simulator.
2. Control-click the Xcode icon in the Dock, and choose Open Developer Tool > iOS
Conclusion
Operating systems are being revamped using AI and connectivity to the Internet of Things. These technologies are still evolving and both Android community and Apple are trying to lead the way by enhancing the user experience. Android had an upper hand in the past as it has a very active open community to support the development. Although, Apple in the recent past has taken a new approach in getting ahead with technology for e.g. Air Pods and their own coding language Swift. We can be sure that both Android and iOS will be more convenient and interactive as both Google and Apple are the torch bearers of the future.
In the next blog, we will talk about the types of mobile applications.
AndroidX is an improved version of the android support libraries that the android team uses to develop, test, package, version and release libraries within the jetpack. AndroidX fully replaces the support library by providing feature parity and new libraries. In addition, AndroidX includes the following features:
All packages in AndroidX are in consistent namespace starting with the string AndroidX. The support library packages have been mapped into androidx.* packages. For a full mapping of all the old classes and built artifacts to the new ones.
Unlike the support libraries, AndroidX packages are separately maintained and updated. The AndroidX uses strict semantic versioning.
All new android development will occur in the AndroidX library. This includes maintenance of the original support library artifacts and introduction of new jetpack components.
Android Jetpack
Android jetpack is a set of components and tools along with architecture guidance designed to help you accelerate your android development. It gives a template to write production ready android code. Jetpack is made up of components in four categories, foundation architecture behaviour and UI. Each component is individually adaptable and build to maintain backwards compatibility. Android architecture components are very modular, so we are allowed to choose what feature sets we want that are compatible to our app.
Espresso is now a part of the AndroidX family
Espresso is a testing framework designed to provide a fluent API for writing concise and reliable UI test. Writing reliable UI test is difficult as user interfaces are asynchronous driven by events, transitions and data loaded from background threats. Coding around that without any help from UI testing framework would require a lot of boilerplate. Espresso takes care of any UI events, so that in most cases you don’t have to worry about any view state transition and implementation details. The basic UI test flow when using Espresso includes:
View Matchers: To find view in the current view hierarchy for e.g. to find UI elements like buttons, textbox etc.
View Action: To perform action on the view, e.g. to click on a button, double click, scrolling etc.
View Assertions: Allows to assert state of a view.
Application of Espresso test recorder
Allows us to create effective UI test cases with user interactions.
We can capture assertions and interactions without accessing app structure directly which increases execution speed and optimizes test case.
Saves time searching for locators and then writing the test cases.
It supports multiple assertions making more reliable test cases.
Pcloudy supports androidX instrumentation with Espresso
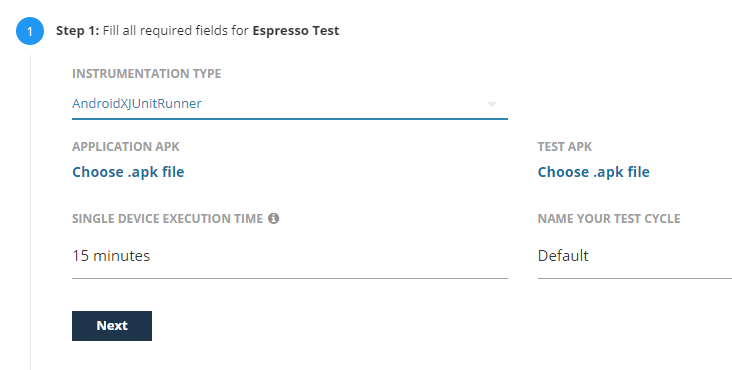
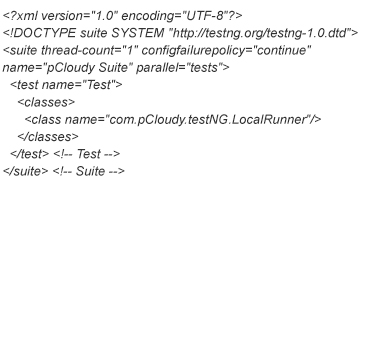
Now you can write test cases in espresso and test the APIs in pCloudy using androidX Junit instrumentation. Here are the steps for running your Test scripts on multiple android devices:
Login over https://device.pcloudy.com with your registered Email ID & Password.
To schedule “Espresso” over pCloudy, follow the below mentioned steps-
Go to the “Automation” page.
Select the Automation tool as “Espresso”.
Select “Instrumentation Type” based on your Test Scripts you’ve written.
Note: pCloudy provides support for Instrumentation Type (InstrumentationTestRunner, AndroidJUnitRunner and AndroidXJUnitRunner) for Android.
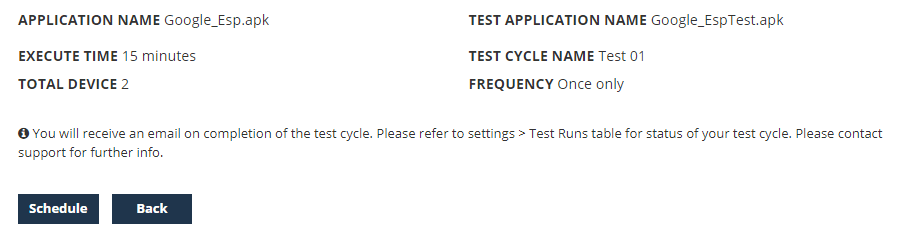
Select the Application APK and Test APK that you must have uploaded in the MY APP/DATA section.
Select the single device execution time and assign a name to your test cycle.
In the next step, Click on “ADD” to add the device for testing and click on ”
Next”.
Click on “Schedule” to start the test.
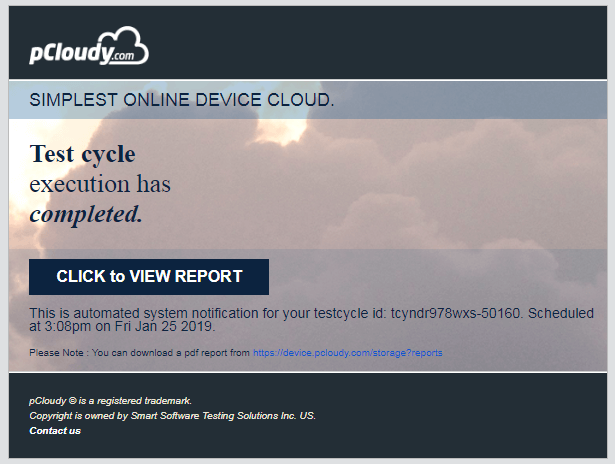
Go to your mailbox and open pCloudy Automation Alert mail.
Click on the given link “Click to view Report”.
Now you have the result of your scheduled test automation.
How to migrate to AndroidX?
To migrate from support libraries to AndroidX the Google has provided a refractor tool in Android Studio. Projects can be migrated to AndroidX by clicking on ‘Refractor’ in the menu bar and then clicking on ‘Refactor to AndroidX’. Then it will search for the usage and show the result. To refactor click ‘Do Refactor’.
pCloudy is leading the way in the field of automated mobile testing solutions.
With no access to internal or private servers, complexity in the process of VPN connections, or the problems to test a software, website or service in a production-similar environment, testing your local or a private website or url on a cloud platform has always been a challenge for testing teams.
For all the users who have been asking for a solution to test their private servers on pCloudy devices before deploying them on production, we have a good news for you.
Now, you can access your site behind a firewall, on a staging server, or locally with pCloudy before it hits production.
Since private servers are internal to your network, they have no public access which makes it difficult to test on a device on cloud. Local Site emulation Testing provides a platform to test private or internal servers on any Android device present on pCloudy.
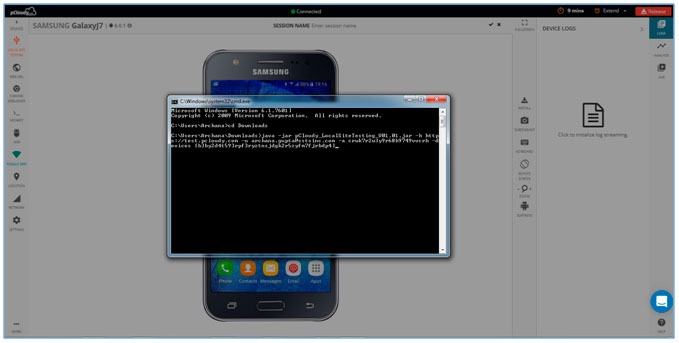
Let us see how to set up the connection for Local Site Testing:
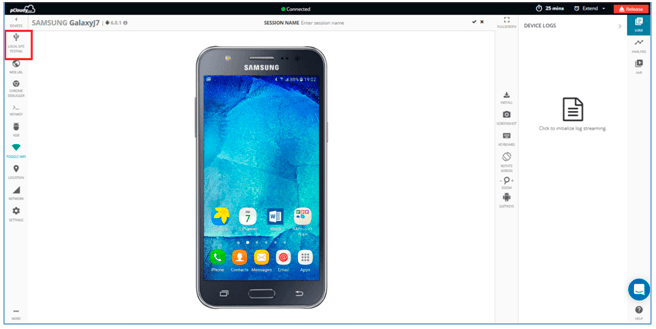
2. Select desired device from the Device page and click on “Local Site Testing” icon present at top on right hand side as shown in below screenshot.
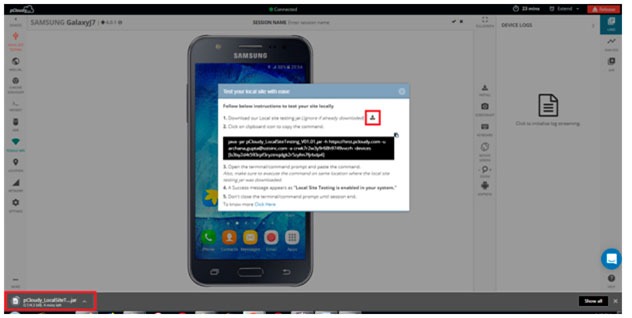
3. Download the Local Site Testing jar file as shown in snapshot below.
Note: Ignore if jar is already downloaded.
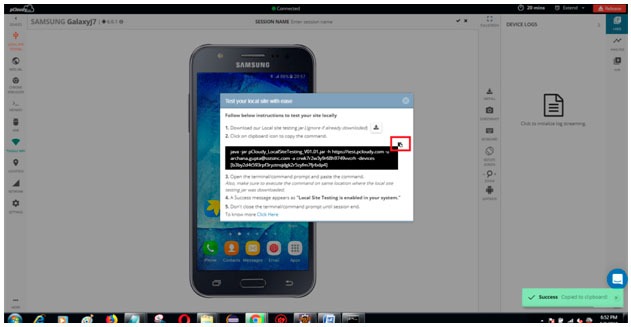
4. Copy the command by clicking on icon as shown in the snapshot.
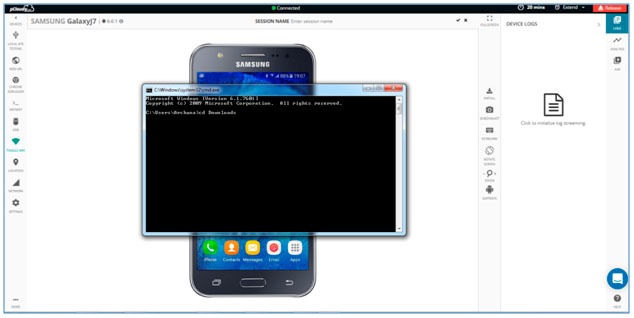
5. After the file download is complete, Open your command prompt or terminal
Let us see how to open Command Prompt in different Operating system.
You can follow any of them among three mentioned ways
For Mac-OS users:
a. Open “Launch pad”: It’s the silver icon in the Dock that looks like a rocket. Type “terminal” in search bar and hit enter.
b. Hold command button and hit space bar. Pop will appear and type terminal and hit enter.
c. Open Launch pad and click the “Other” folder: It’s a square icon containing several smaller icons. Then look for terminal.
For Windows users:
a. Open Start and type in command prompt or cmd then hit enter.
b. Click the Windows logo in the bottom-left corner of the screen, or press the ⊞ Win key. You can search for Command Prompt on all supported versions of Windows.
c. Open the Run program. Hold the Win key and press the R key to open the Run window. Then enter “cmd” or “Command prompt” and press enter.
For Ubuntu users:
a. Using Keyboard Shortcuts: Press Ctrl+Alt+T This will launch the Terminal.
b. Press Alt+F2 and type gnome-terminal. This will also launch the Terminal.
c. Press Win+T (Xubuntu only). This Xubuntu-specific shortcut will also launch Terminal.
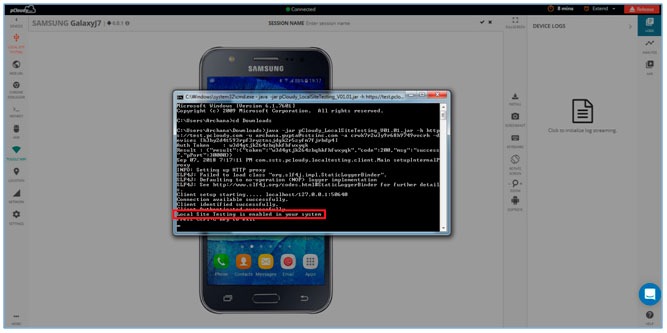
6. Execute the command on same location where the local site testing jar file was downloaded.
7. After the command is successfully executed you will able to see a success message appearing as “Local Site Testing is enabled in your system”. This confirms that now you are ready to test your private server on the device connected on pCloudy.
Note: Don’t close the command prompt until session ends.
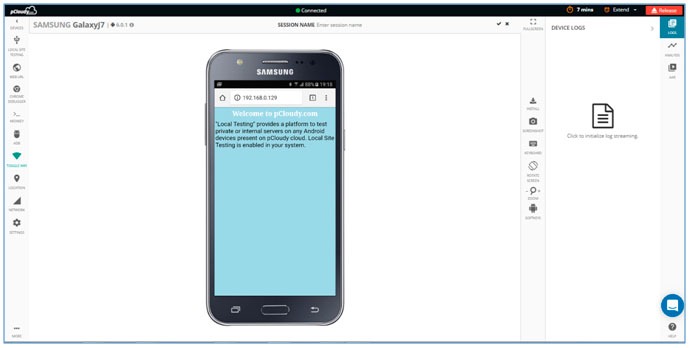
8. Go to the connected device and using the browser open any private URL to test. That’s all you are all set.
You can now find more bugs and defects on your local sites before deploying it to production with this breakthrough feature.
Here’s testimony to it by one of our customers from TagIT mobile.
Why don’t you try it yourself and let us know your feedback in comments about how this feature is useful to you!
The much awaited bonanza for Appium users is here. We are up with a newer and simpler Appium integration architecture which can simplify your Appium test automation execution on Android and iOS devices with pCloudy. The newer architecture make developers’ life simpler with lesser changes in the code. The older architecture demanded using APIs and also changes in your code that required some level of expertise. We addressed this issue and have come up with a simpler architecture where you need to mention some desired capabilities instead of calling APIs or doing changes in the code to run the Appium scripts. And wonder what! it makes you save 50% of your app testing time.
Watch the video to know more about the new simpler and faster pCloudy Appium architecture.
Pre-requisites
Appium Script
APK or IPA file
pCloudy Account
The basic steps to replace your local Appium driver to pCloudy Appium Driver are given below:
Upload the apk/ipa from your local system to pCloudy. Check this link to know steps to upload an app for test.
Set pCloudy capabilities
pCloudy_Username: Enter the email ID with which you have registered on pCloudy. For reference, check this linkExample: capabilities.setCapability(“pCloudy_Username”, ‘{e-mail-id}’);
pCloudy_ApiKey: API key is important for user’s verification. You can generate the API key from Settings page on device.pcloudy.com. Check this link to get your API key.Example: capabilities.setCapability(“pCloudy_ApiKey”, “{api-key}”);
pCloudy_ApplicationName: Enter the application name for the apk/ipa file which you already uploaded in the MyApp/Data.Example: capabilities.setCapability(“pCloudy_ApplicationName”, “pCloudyAppiumDemo.apk”);
pCloudy_DurationInMinutes: Enter the duration in minutes for which you want to run the test.Example: capabilities.setCapability(“pCloudy_DurationInMinutes”, 5);
pCloudy_DeviceFullName: If you know the device manufacturer, device name and version then enter the full device name.Example: capabilities.setCapability(“pCloudy_DeviceFullName”, “Samsung_GalaxyTabA_Android_7.1.1”);
Note: If you don’t know the Device full name then you can enter pCloudy_DeviceManufacturer and pCloudy_DeviceVersion in the code and it will automatically run command on those devices.