Category Page

Suyash Dubey | Posted on | 2 min Read

pCloudy is committed to delivering the best solutions in mobile app testing and therefore we come up with product updates at regular intervals. This time we are thrilled to announce the release of pCloudy 5.6 with exciting new features to make app testing simpler than ever. Our customers trust us because we believe in exceeding their expectations and add new useful features to enhance the platform’s capabilities. For those who are new to pCloudy, it is a cloud-based continuous testing platform designed to enrich your apps. In this new version of pCloudy, we have addressed the concerns of our users and added new features like Wildnet, Capability configurator, Object spy, and more. Let’s know more about all these features.

Wildnet

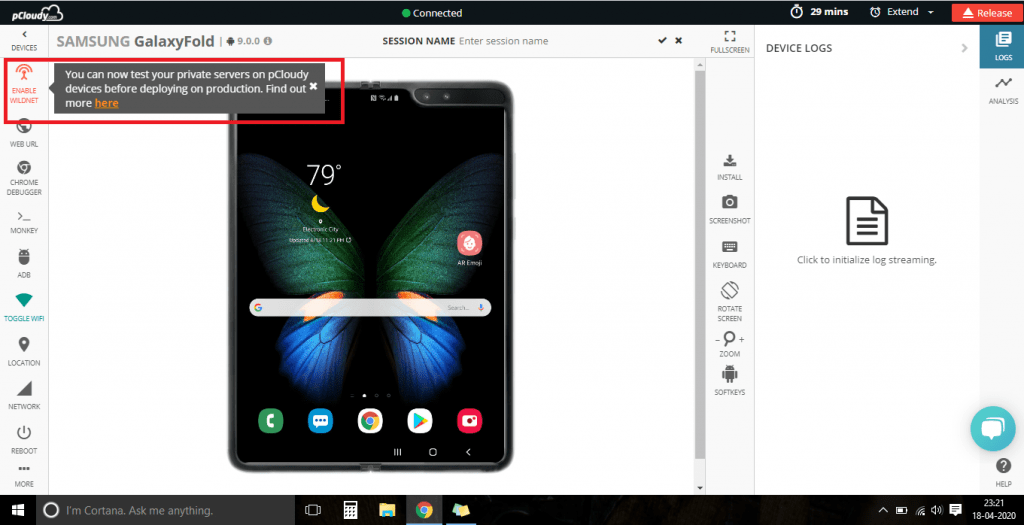
An application server is accessible only from within your lab and if you want to test your mobile application with that server, you are forced to work within that lab. If you move with the device in hand outside the lab, you will not have access to that server. How do you test such kind of setup using pCloudy? Because if you are using pCloudy, that means the devices are outside your network. The answer is Wildnet.
wildnet ss
This feature enables our users to test private or internal servers on any Android or iOS devices present on pCloudy. For this, you just need to download the executables for OS (Mac, Linux, Windows) on your local machine, Then fetch the user name and API access key for your pCloudy account settings and use it in the terminal to build a link between a device in pCloudy and your internal staging server. To connect a booked device to your internal staging server, you need to click on the Wildnet icon as shown in the picture below.

Object Spy

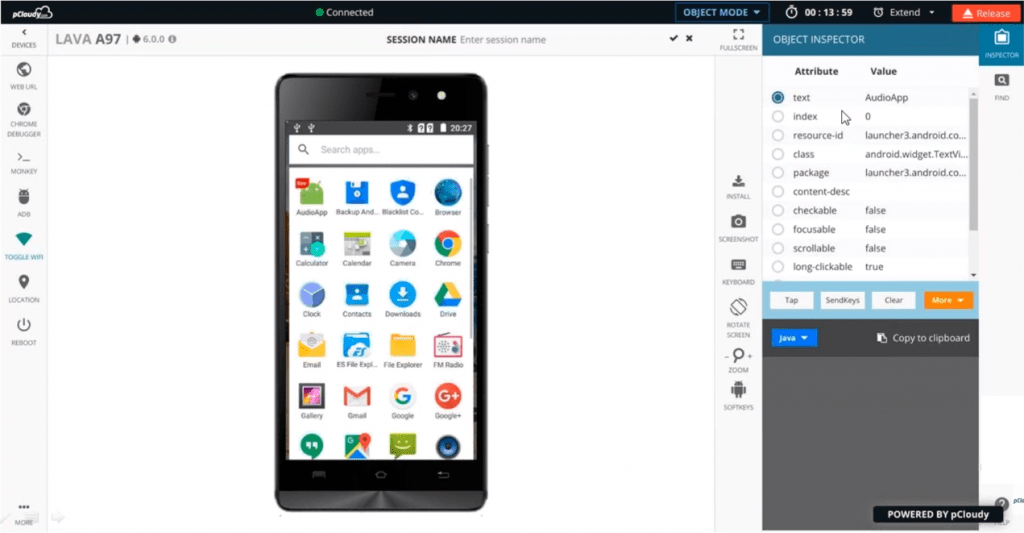
While creating automation test cases you need the object names of the objects that are available in your application. For example, if your app is launched on a device and you want to click on a particular button, you have to mention the object name in the script to perform that action in the app. Earlier testers used to extract the object name using Appium desktop, but now they don’t need Appium desktop for that. pCloudy now has an inbuilt object spy through which you can run the inspector sessions directly on Android and iOS devices. One big advantage is that its bilateral view which makes it easy for users to click on any element on one side and view the details another side. Also, the generated code can be copied for future use.
 
object spy ss
In the picture above you can see on the right side we have the object inspector where you will get all the attributes and values for any application. You can select any attribute and perform an action using the tap, send keys, clear and the more option. Following the action, an XPath will be generated which can be used in the automation script.

Data-Persistence

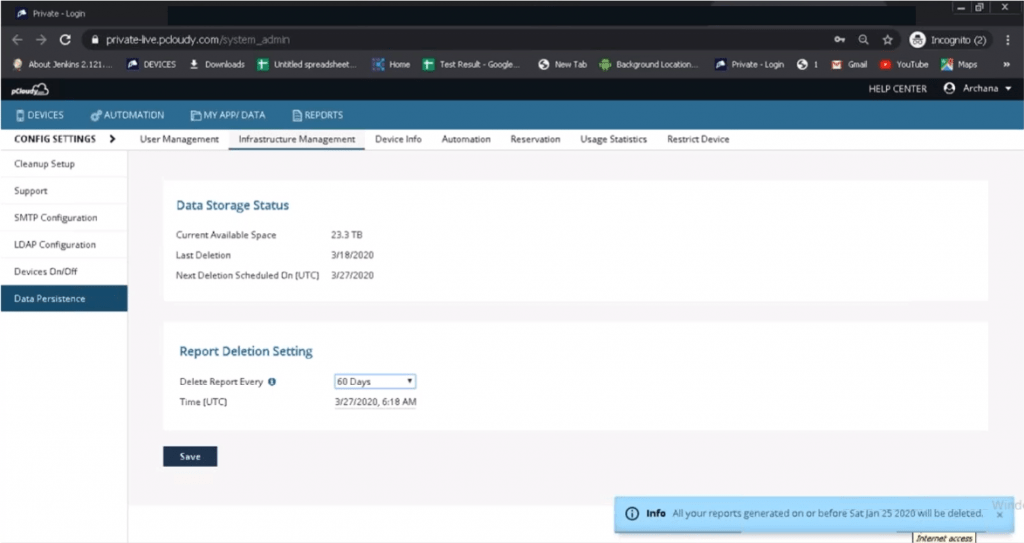
This feature will enable System-admins of our Private and On-Premises cloud to delete older reports based on pre-defined settings. To use this feature, system administrators will have to go to control settings in their pCloudy account and under Infrastructure Management there is an option for Data-Persistence. Whenever any user tests an app on any device in pCloudy, certain artifacts are generated in the form of test reports. Each report will have videos, logs, screenshots, and other elements. These artifacts take up a lot of space so now system admin can delete the older data using the data persistence feature.
data per
As shown in the pic, the system admin can select the date, time and the number of days for which the data has to be deleted. This will help in managing the limited space provided for every team account.

Capability Configurator

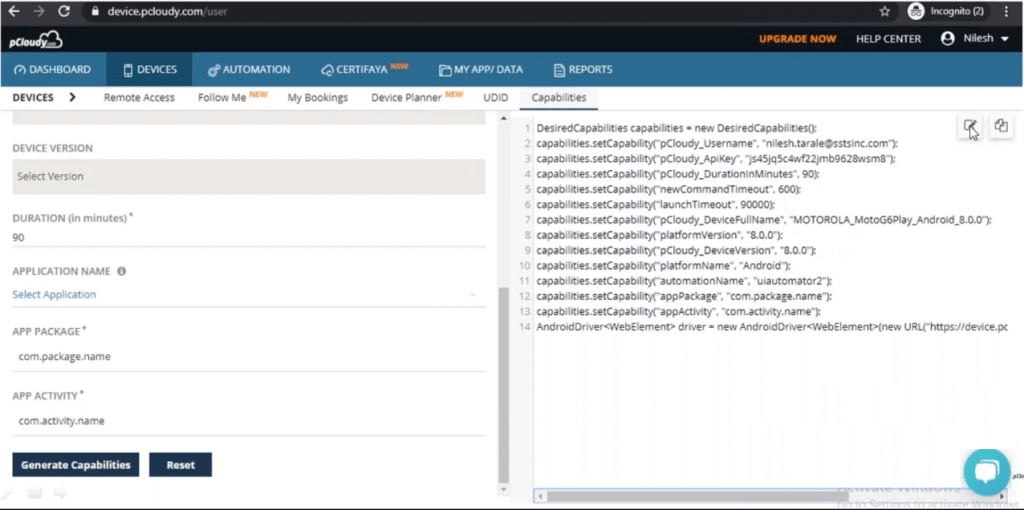
In an automation script, we have to include certain capabilities like device name, platform version, etc., to execute the test cases. But now you won’t have to gather the capabilities from different sources, capability configurator will generate the desired capabilities directly using certain filters.
capability
As you can see in the pic, you just need to go to the Devices page in pCloudy and click on the Capabilities tab. Under the capabilities tab, you can choose the parameters like OS, Automation type, Device location, Device name, etc., and the capabilities generated can be copied and pasted directly into the Appium script.

More updates

iOS is a close operating system, and there are many restrictions for testing apps on Apple devices. In pCloudy 5.6, you will have two more functions on iOS devices; close app and lock/unlock the device. The close app function will enable pCloudy users to close any launched application on a connected iOS device using the soft button. The second function will allow any connected iOS device on pCloudy to be locked and unlocked. These two functions will enhance user interaction on iOS devices by saving time and effort. One more new update is that pCloudy now supports Appium 1.15.1 which is one of the latest stable versions of Appium. This will make it easier to perform test automation on iOS 13 devices in pCloudy.

To sum up

The new features added to the platform will help our users to perform live testing on remote devices. Features like the latest Appium support and better user interaction on the iOS devices will empower our users to speed up automation. We are working on some new features, based on our customer feedback, which will be included in the next release. So stay connected for more updates.

Test automation is gradually taking over manual testing as it saves time and improves the quality of testing. Especially in the case of regression testing, automation can improve efficiency by manifold. It is a waste of time and resources to do repetitive testing manually. Also, there is a scope for an error as repetitive testing can be exhausting but the chances of errors occurring in automation are slim. But what is automation testing? In simple terms, automation testing is replacing the manual human activity with a system that performs test cases by repeating predefined actions. To get the most out of automation it is necessary to select the right automation testing tool.
 

Types of Automation Testing Tools

 
Record & Replay: Tools in this category provide a recording option for the automated script. Every interaction on the screen like tapping, scrolling or typing will be recorded and converted into automation steps. The recorded scripts can be replayed to perform the actions and to verify the AUT.
 
Coordinate based recognition: Tools in this category interact with the application under test with the help of x/y coordinates, to automate and verify the application.
 
Native object recognition: Tools that use the native object recognition detect the UI or control elements on their given element tree. This tree is built by XPATH, XML or CSS to identify the elements, verify and automate the script.
 
Text recognition: Text recognition: Text recognition or (OCR) Optical Character Recognition tools identify elements based on their text. These tools use visible texts to drive automation and to verify the app.
 
Image recognition: These tools take screenshots of the UI elements in the product to add them to the automation scripts. The AUT will be automated with the help of these screenshots.
 
A lot of test automation tools support more than one recognition approach which can be useful to get more robust automation scripts. Now let us look at the factors to consider while selecting the automation testing tools.

Platform Support

Are you looking for automation testing tools for web apps or mobile apps? If mobile app then is it hybrid, native or PWA? The scripting language is also an important factor in many cases as mobile automation testing tools do not support all the languages. So if you developed your app using JavaScript then it’s not recommended to use UFT for test automation. In that case, go for a tool like Selenium that is flexible with the scripting language.
 
There are a lot of test automation tools that support freeware frameworks like Selenium and Appium. Framework integration helps in reducing the effort put into the testing and increasing the collaboration between the teams. Tool integration forms an ecosystem of a collaborative effort that helps in object identification, bug logging, test case management, report sharing, and shared repository.
Ease of Adoption

Ease of adoption can be measured on the basis of the skills required to use the tool and the learning curve. If there are resources available easily on the internet to learn the functioning of the tool then it is a plus point. Also, the support should be good and it’s an advantage if there is an active community that will give a rough idea about the complexities of the tool. We have observed that the installation process is also lengthy for some tools and frameworks. But overall the team should be able to use the tool easily with the skill set or the experience they have.

Ease of Scripting

Most of the automation testing tools provide flexible scripting options. It allows testing teams to write test scripts in their preferred languages. A good test automation tool helps in getting better reusability of test components and provides flexibility in scripts that can be reused across projects. Scripting time with object identification, speed of script execution, support for CI/CD tools like Jenkins, usually these attributes are considered before selecting the tool.

Integrations

If the testing team is using a test case or a bug management tool then the team would prefer an automation tool that can be easily integrated into those tools. It helps in managing the app development lifecycle properly.
 
The keyword-driven or data-driven automation framework should be easily integrated into any data source. It is convenient if the tool provides connectivity with different data sources easily.

Test Analytics

Analytical reports form the backbone of test automation as it provides insights into the success of the process. Automation tools must provide customizable dashboards to view different types of reports shared across various teams.
 
Real-time reports traceability and sharing ensure feature validation and efficient test coverage. Quality metrics such as injection rate, defect density, and test execution status allow you to maintain quality at every stage of continuous testing. It’s convenient to analyze results to identify bugs, patterns, and do a root cause analysis with a good automation tool.

License Type and Cost

It’s better to go for open-source tools but not every open-source automation tool has all the attributes that you might be looking for. Even if you opt for the proprietary licensed tools, you need to figure out how much you need to spend on the maintenance.
 
Some companies offer live support and training for premium plans. So you might want to upgrade to avail of these services. There is also something called runtime license if you just want to execute the automation on different machines. Apart from that, there are options for a node-locked license for a single machine and a concurrent floating license to use the tool on multiple systems.
 
giphy-min

To Sum Up

If you are still confused and want to further simplify the tool selecting process, then use a tool comparison matrix. Jot down your preferred 2,3 or even 5 tools and then rate them on the basis of all the factors that we have discussed earlier in this blog. This way it will be easier to make a decision on the basis of your requirements.
 
As far as mobile test automation tools are concerned, device coverage holds the key. It is recommended to use a cloud-based testing platform to run your automated test on multiple devices. Automation is the soul of any CI/CD pipeline and for the successful implementation of DevOps, it is crucial to choose the right automation testing tools.
 

[xyz-ihs snippet=”quickLinks-Appium”]
 
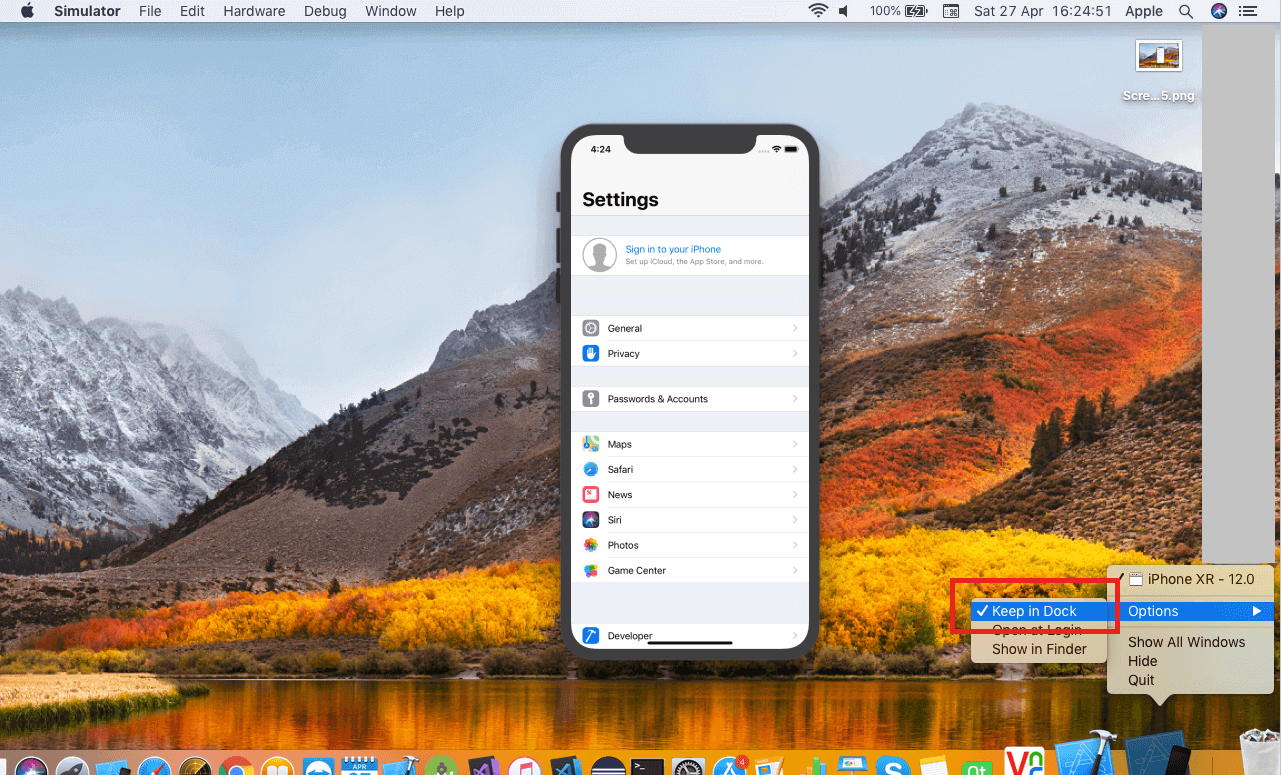
In our previous chapter on Android, we learned about UI Automator Viewer, Which is available on Android SDK, to get the properties of the application object. In the case of iOS, Appium itself provides an Inspector which helps users to locate those elements in the application.
 
First, open the simulator by clicking on the dock option.
 
Open the simulator

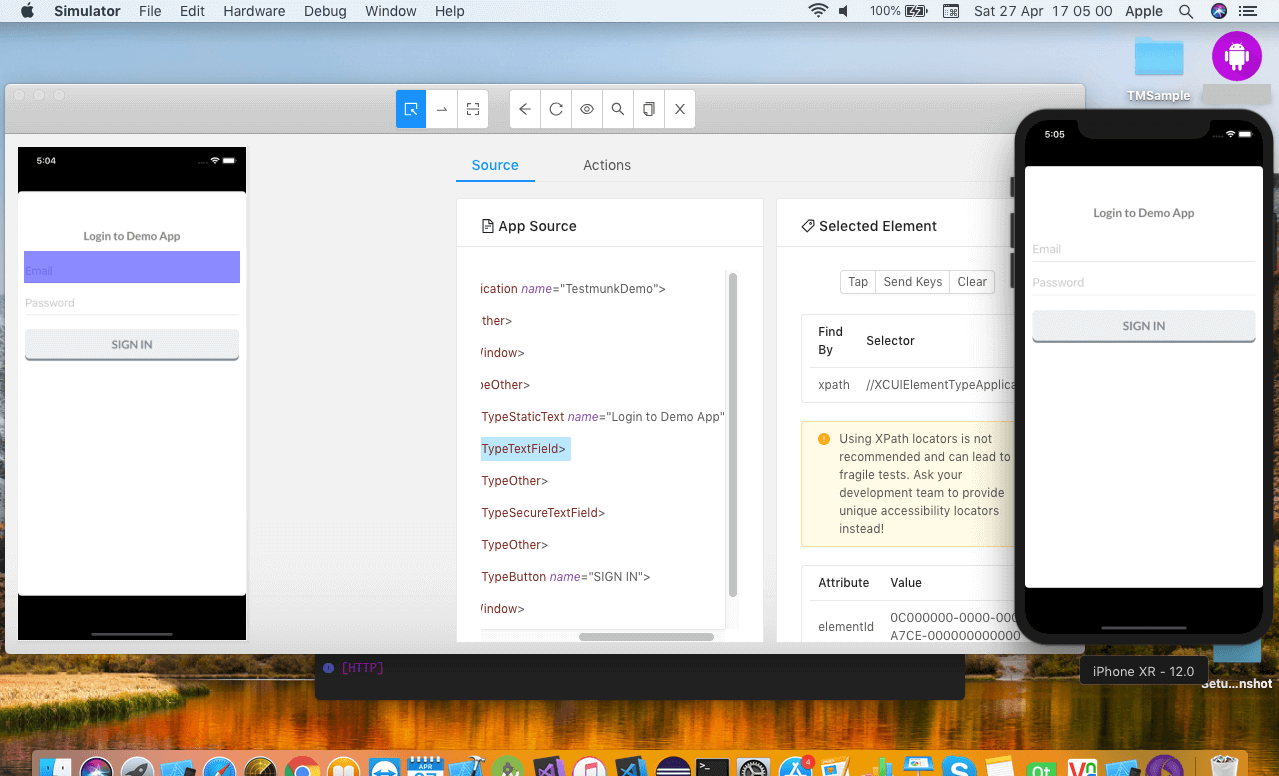
Now in the Device/Simulators window, select the simulator. Open the Appium Desktop and keep the simulator side by side.
 
Device-Simulators

Once the inspector is started, select any of the objects on the screen. It will show you the complete hierarchy and properties of that object.
 
Appium-Test-Automation

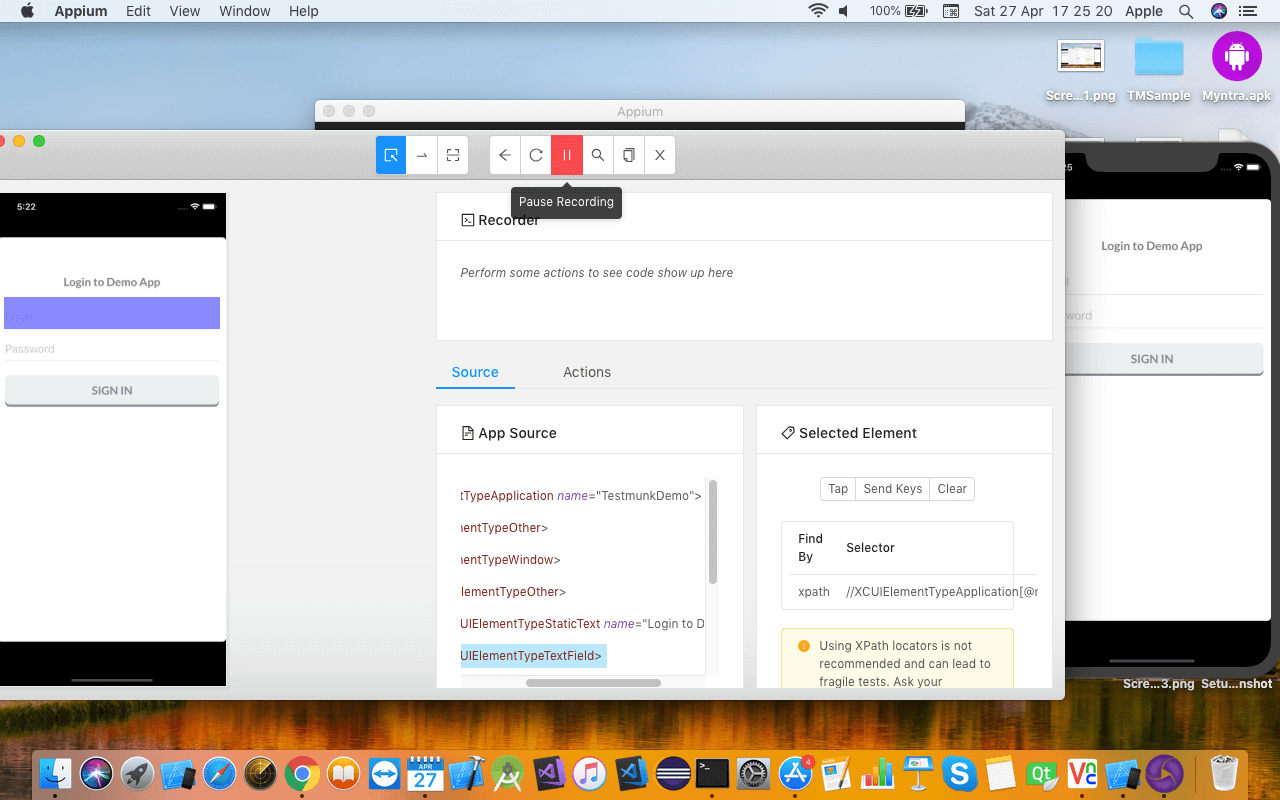
At the top of the window, you can see the Record button which is used to record all the actions taken and record the script.
 
Appium-Test-Automation

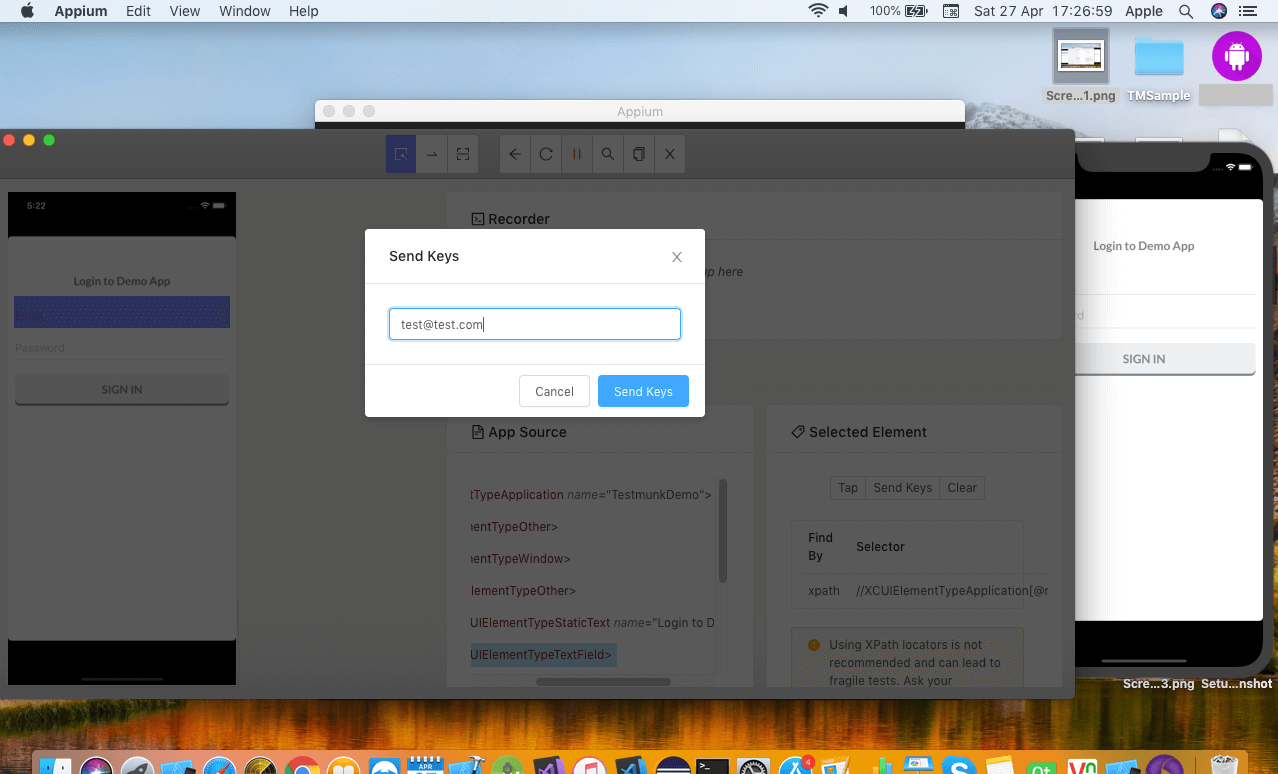
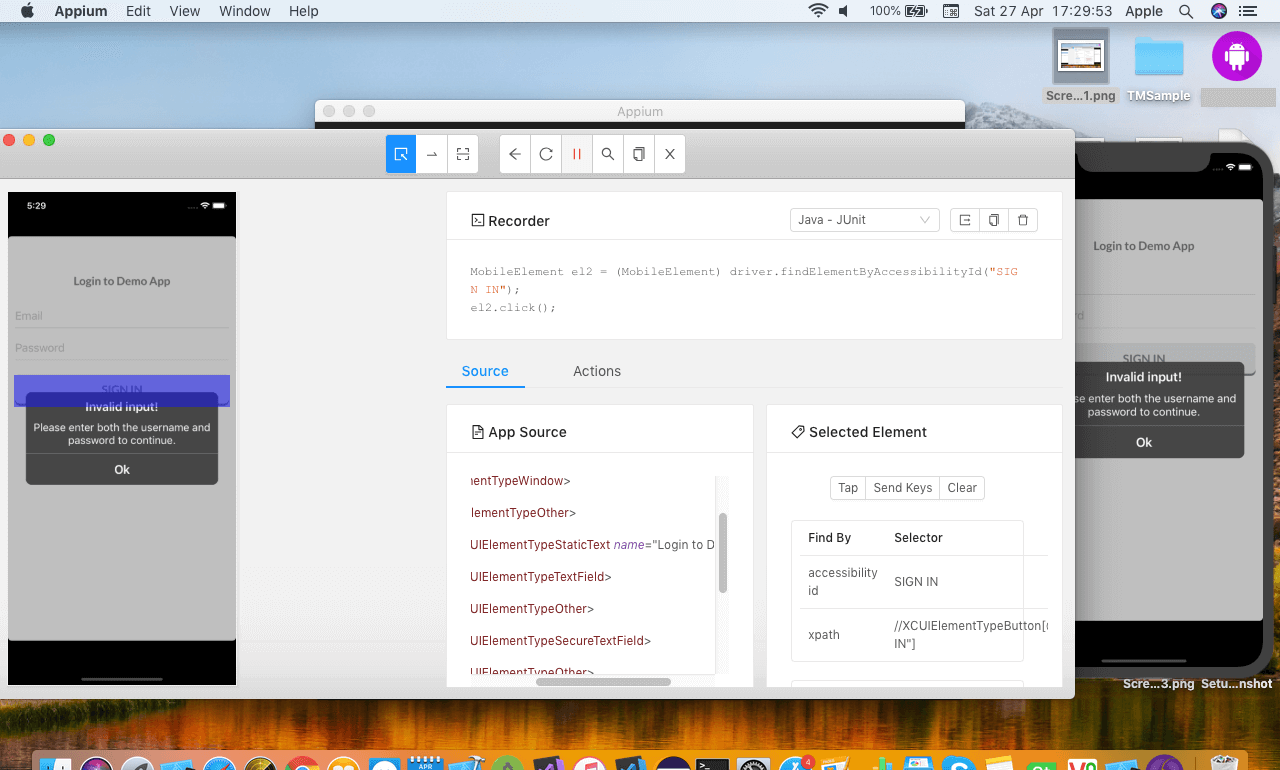
To select any object, click on the Select Element button and then you can use Tap button to click on an object, Send Keys to enter text and clear to undo the action.
 
Appium-Test-Automation5

As soon as you perform an action on an object, it is recorded in the form of a script.
 
Appium-Test-Automation
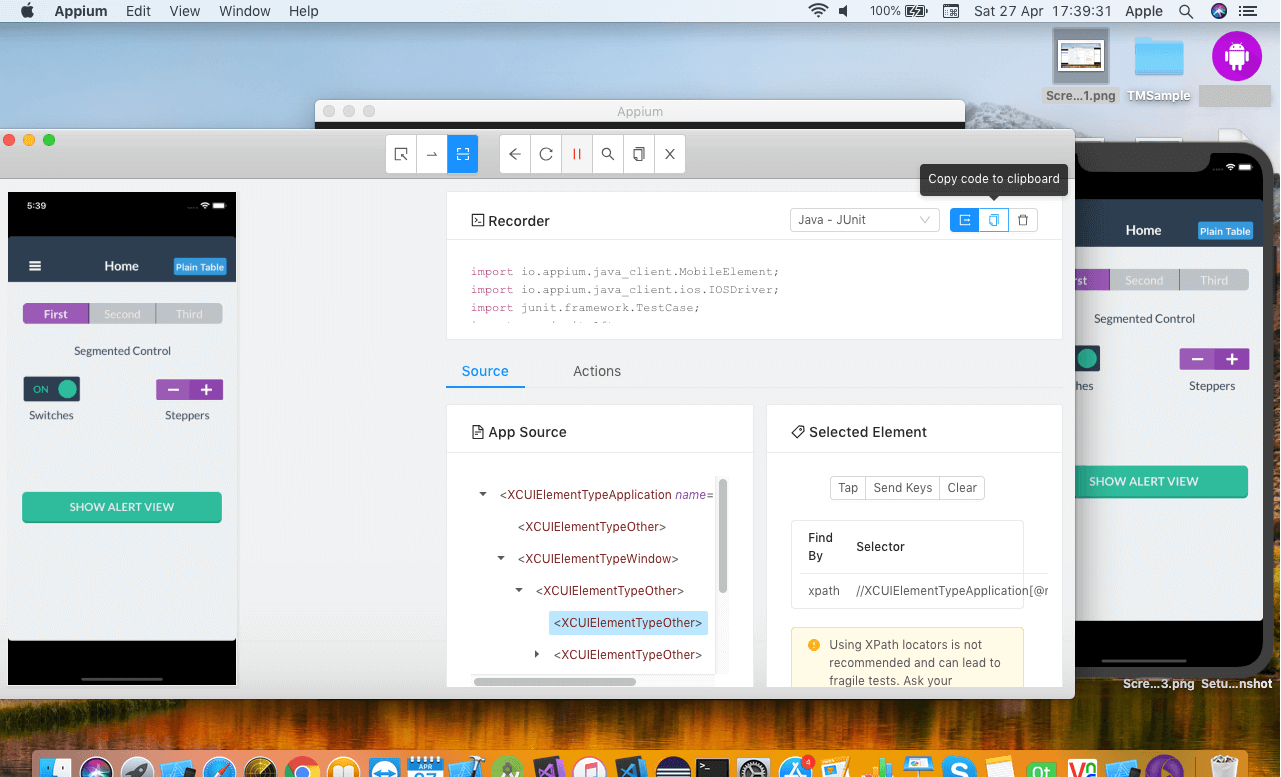
Once you are done with the recording you can copy the script and paste in eclipse editor.
 
Appium-Test-Automation
In the next blog, we will learn how to write the first appium script for iOS.
 
Related Articles:

  • Appium vs Espresso: The Most Popular Automation Testing Framework in 2019
  • How To Install Appium On A Mac Machine
  • Writing The First Appium Test Automation Script (Android)
  • Basics of Appium Mobile Testing
  • 8 Common Appium Mobile Test Automation Mistakes and How to Avoid Them
  • In the previous blog in this series, we learned how to write the first Appium script for Android devices. Now in this blog, we will understand how to start the Appium server.

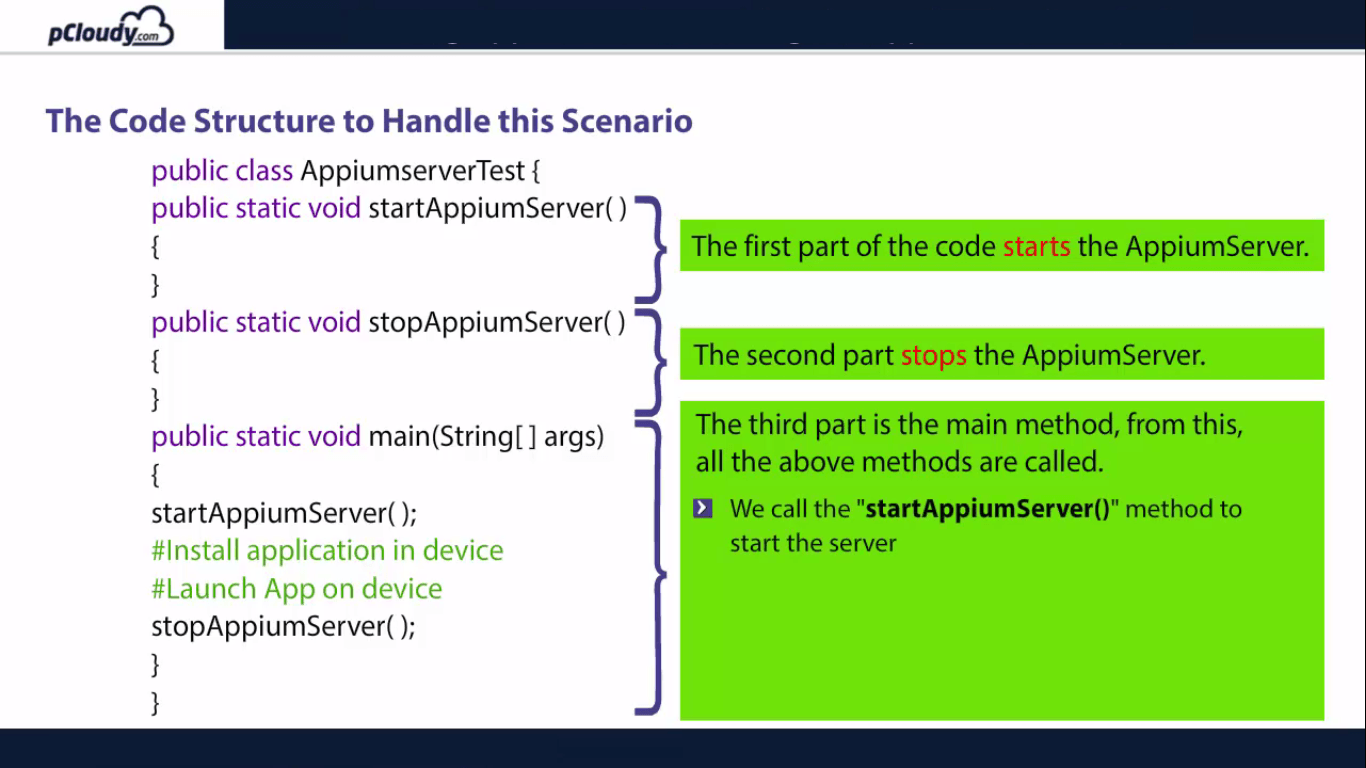
    The code structure is segregated into three parts, the first part of the code starts the Appium server, the second part stops the Appium server.

    The Code Structure

    The third part is the main method which is necessary to execute the class and from this main method, all the above method are called.

    Starting Appium from code requires a path of two files which are kept inside the Appium folder.

    • node.exe
    • js


    Starting Appium Server

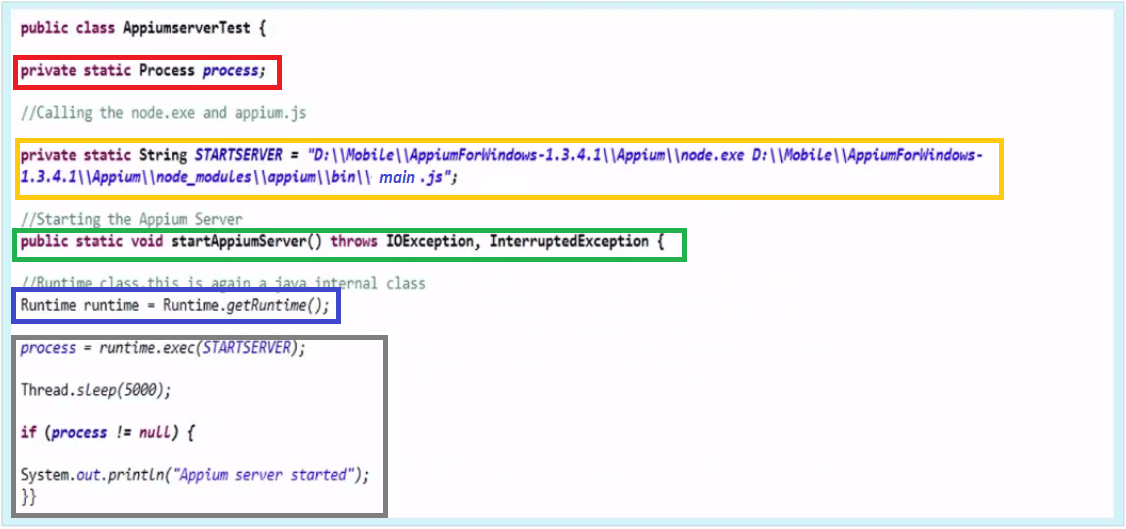
    In the code highlighted in red, we have called process class which is a Java class and declared it static.

    Starting Appium Server

    We then created a start server variable and pass the path to node.exe and main.js, highlighted in yellow. In the code highlighted in green, we added both paths into the same variable with spaces and created a method called startAppiumServer() which takes care of the Appium server startup process. Next step is to create an object of Runtime class which is again a java class and call the method getRuntime(), highlighted in blue. We will pass the variable “STARTSERVER” into runtime.exec() method. It will start the Appium Server.

    Once the process is started, we have to store the current state of the process into this variable. We will give a sleep time of 5 seconds as it takes time to start the process. what we are trying to validate here is, if the process is not null; it means that the process is started as highlighted in the gray box.

    Stop Appium Server

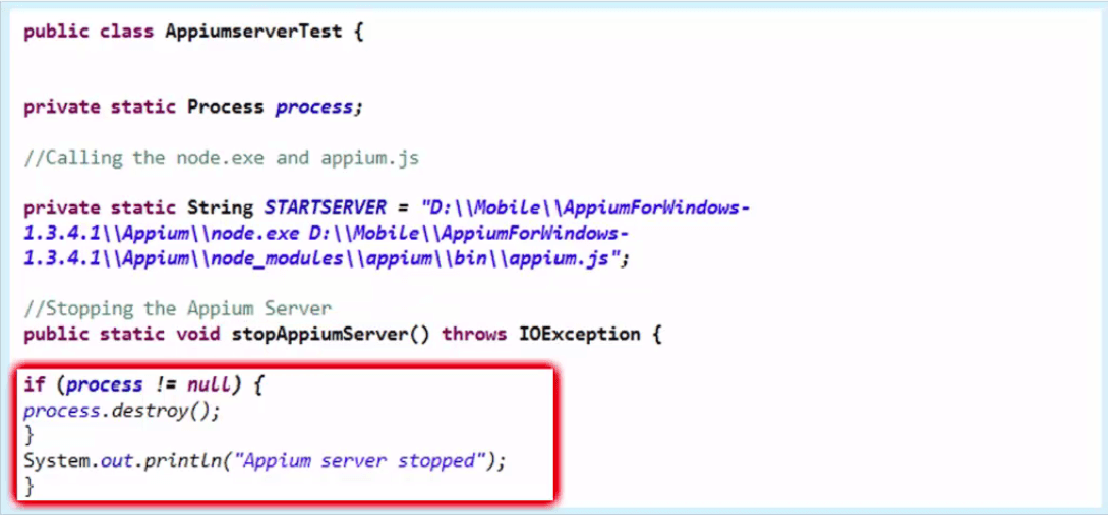
    Here we need to create another method named stopAppiumServer(). We again verify the state of the process and if it is not null, call a method of process class destroy().

    Stop Appium Server

    So now we know how to start and stop the Appium server from code. Let’s try to install and launch an app on a mobile device. Let’s see how we can install a .apk file on an Android device and launch it automatically without providing the path in Appium Server.

    Installing and launching the application

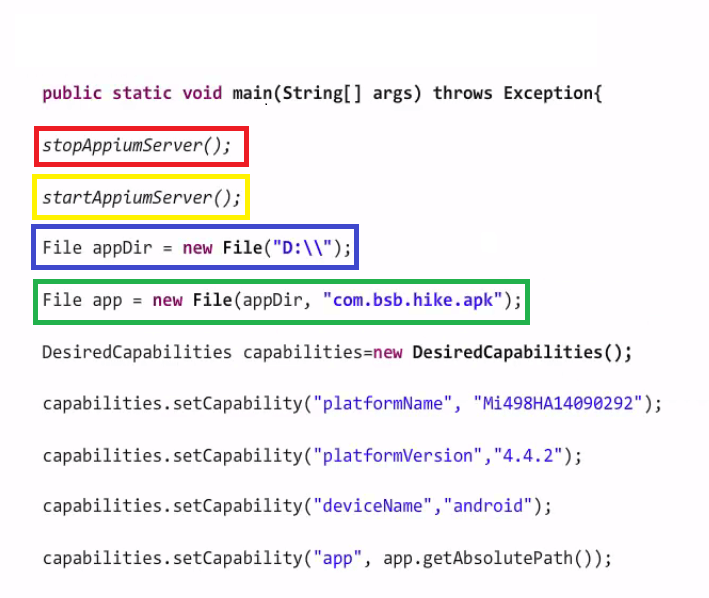
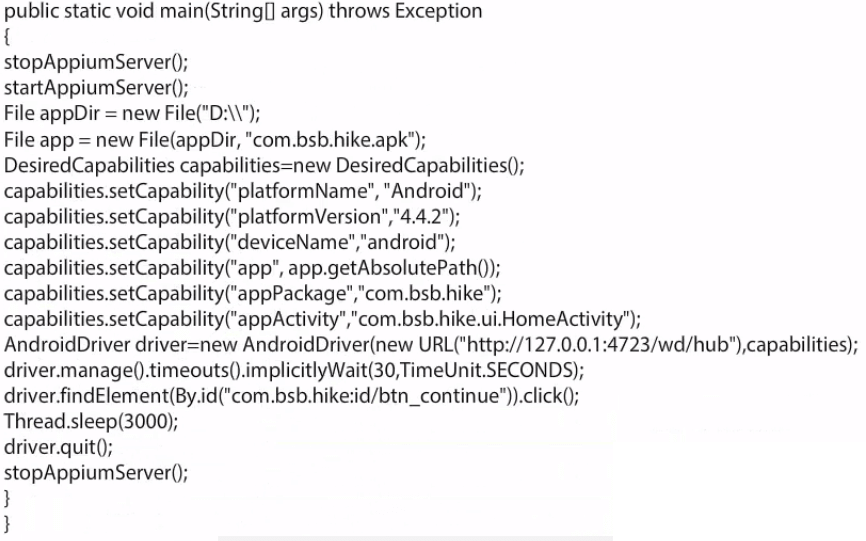
    To begin with, we call the stopAppiumServer() method to verify if any instance of Appium Server is already running and if so, then it closes that instance, as highlighted in red. The method highlighted in yellow starts the Appium Server.

    Installing and launching the application

    Then store the apk path file into a variable of File class, which is a Java class as highlighted in blue. Create another variable of File class app. It takes two parameters:

    • The absolute path of the apk file.
    • Name of the apk file.

    Now the absolute path is stored into appDir variable and the name of apk file in the second part as highlighted in the green box. The rest of the things are the same as discussed in the earlier sessions.

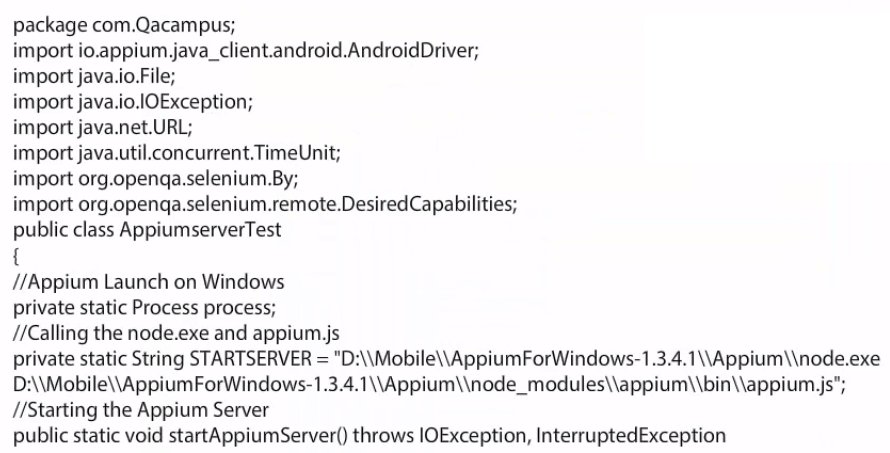
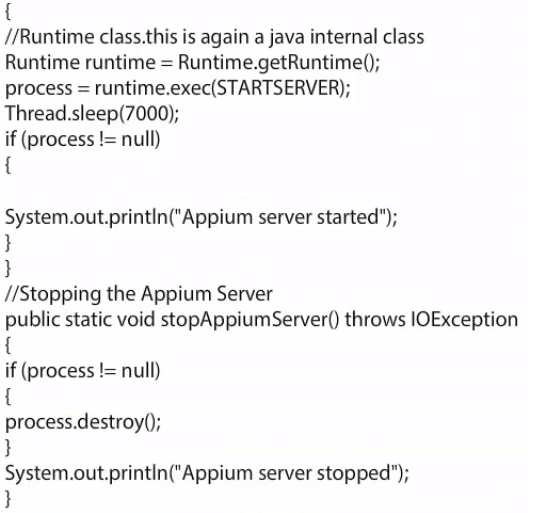
    The complete code is shown here.

    Package QA campus

    Appium server installation

    Appium server installation

    Now that you have learned how to launch app from code, let’s move on to the next blog where we will learn how to set up Appium on a Mac machine.

    In the last blog in this series, we learned how to set up Appium for test automation on a Windows machine. Now we will handle the application by writing the Java code. We will require the following software:

    Eclipse

    Selenium standalone Jar

    Appium Java Client
     

    This process consists of five steps as depicted in the picture below.

    Test Automation

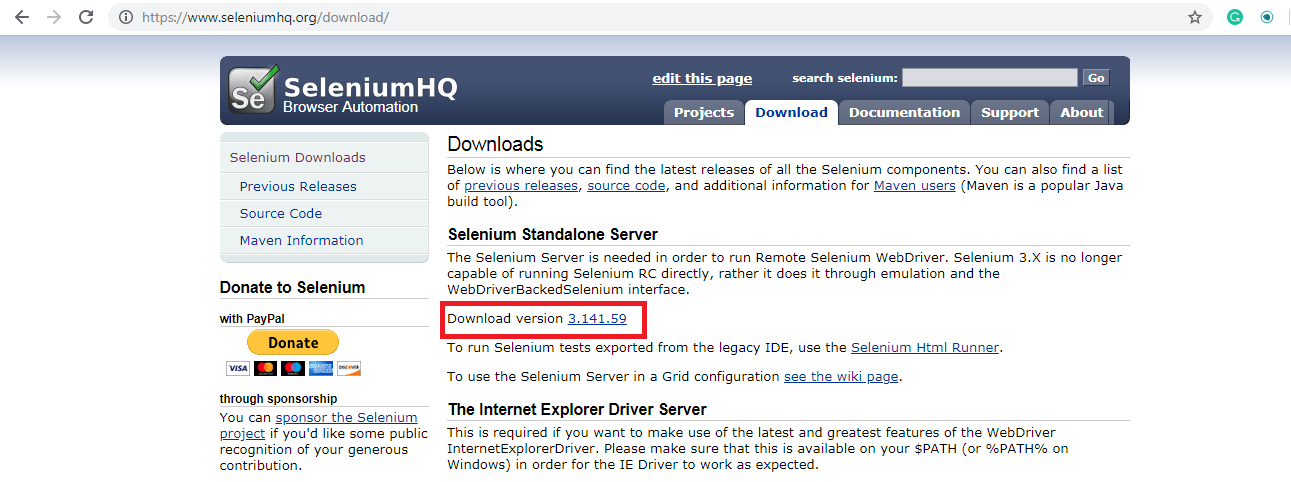
    First, we need to collect the Selenium Standalone JAR and Appium Java Client Libraries. To download the Selenium standalone JAR file, go to seleniumhq.org/download then click on the Download version.

    Test Automation SeleniumHQ

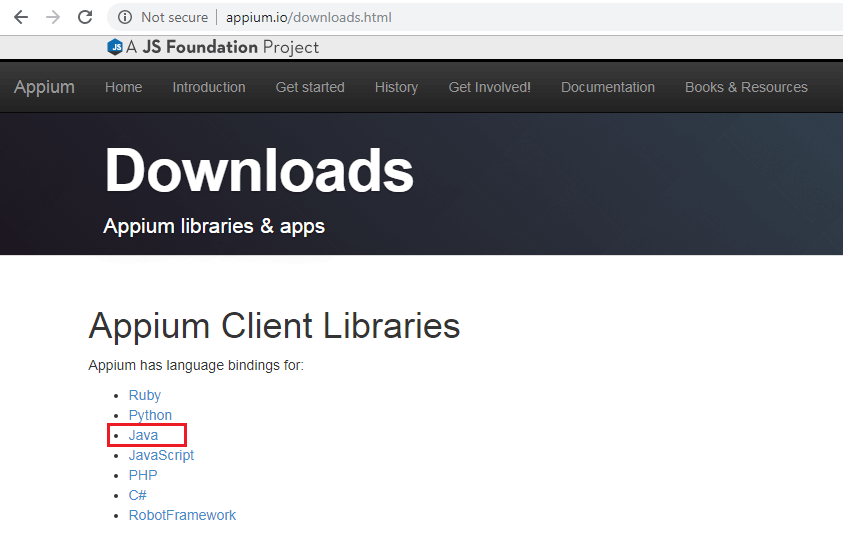
    For Appium Java client you need to go to appium.io/downloads and download the libraries for the selected language.

    Test Automation Downloads

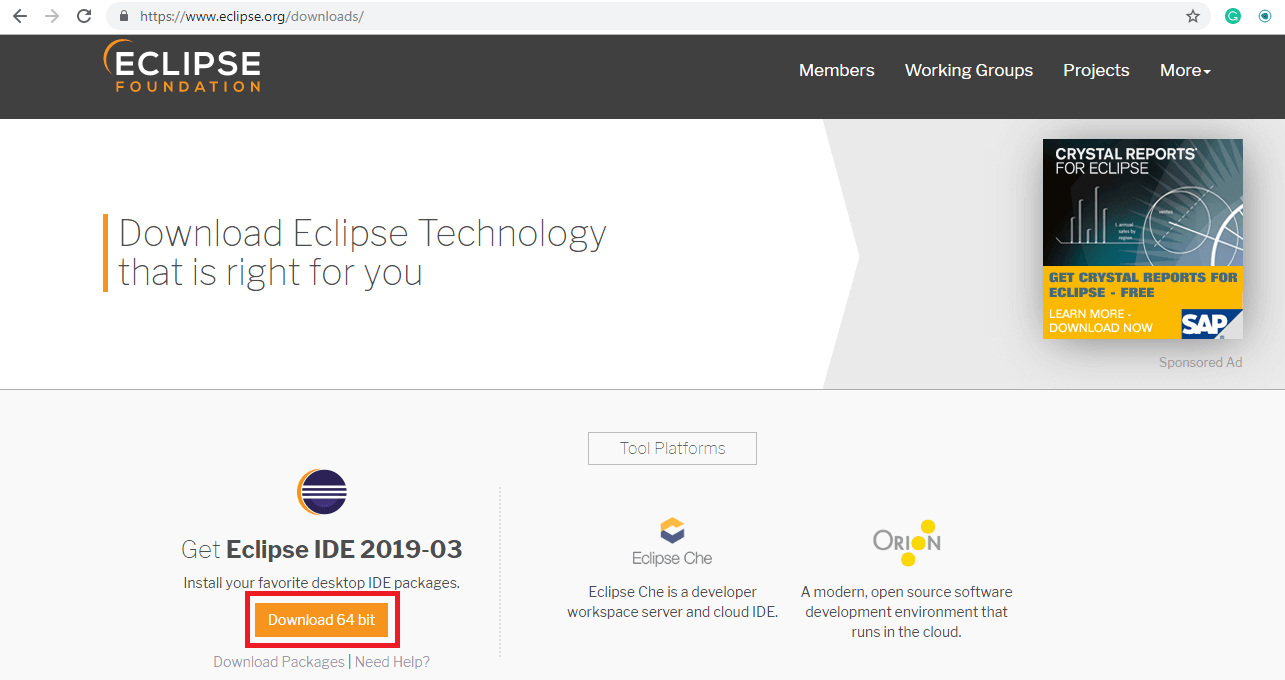
    Now to create a java project download Eclipse from eclipse.org/downloads. Launch Eclipse and select the workspace location.

    Test Automation Eclipse

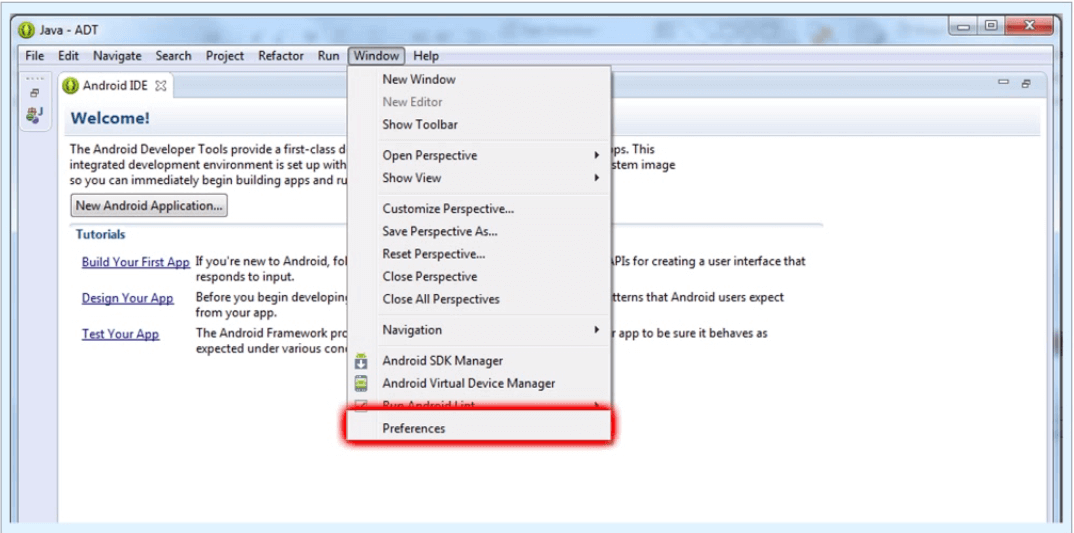
    To set the Android SDK path into Eclipse, click on the Windows tab in the menu bar and select Preferences in the drop-down list.

    Test Automation

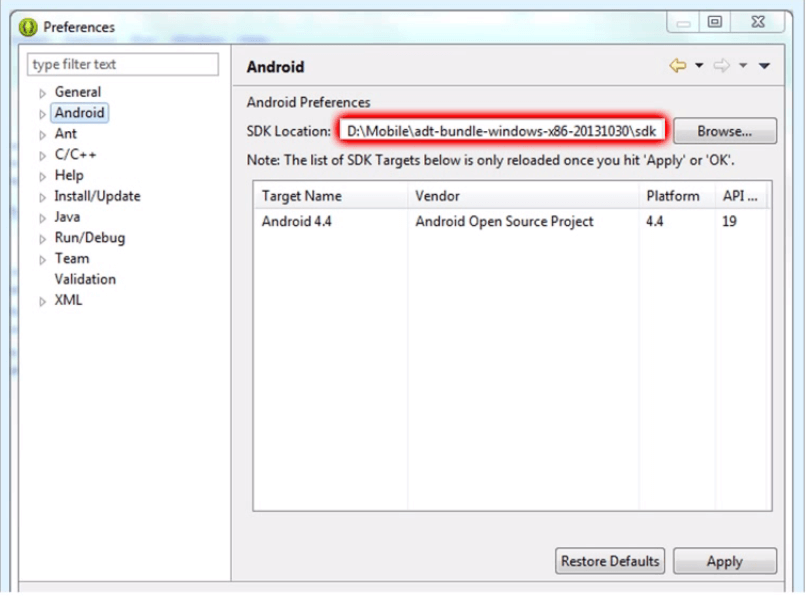
    Then select the Android option and browse your Android SDK location and click on Apply.

    Test Automation Preference

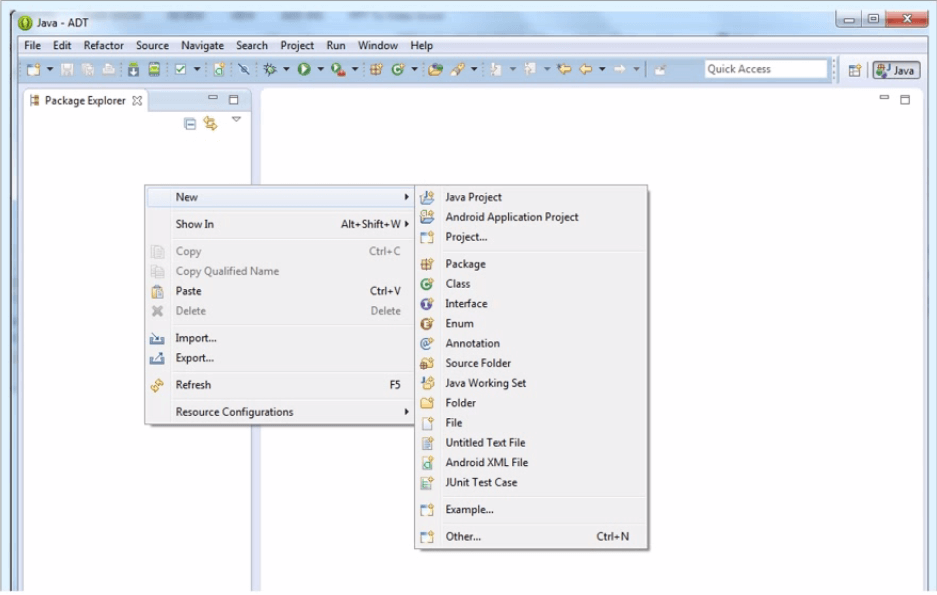
    Launch Eclipse and right-click on Package Explorer. Then select a new Java Project.

    Test Automation Java ADT

    Enter a project name and click finish.

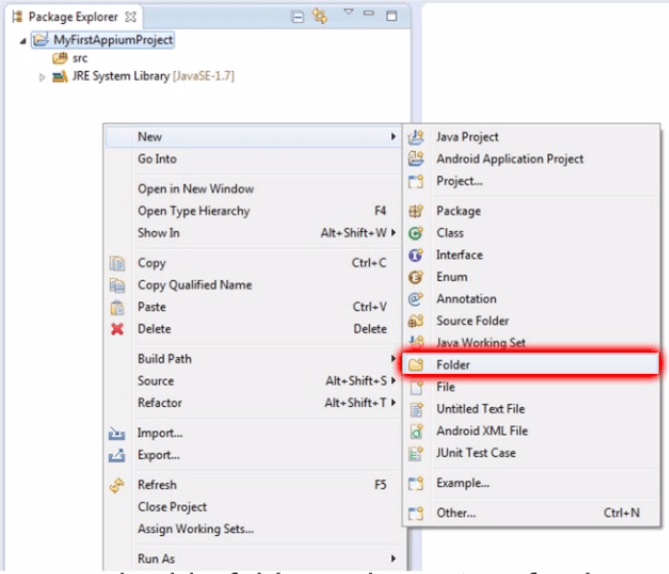
    Once the project is created, add a folder to the project, for the project dependency files [Selenium Standalone] and [Appium Client Library] which you have downloaded.

    Test Automation Package Explorer

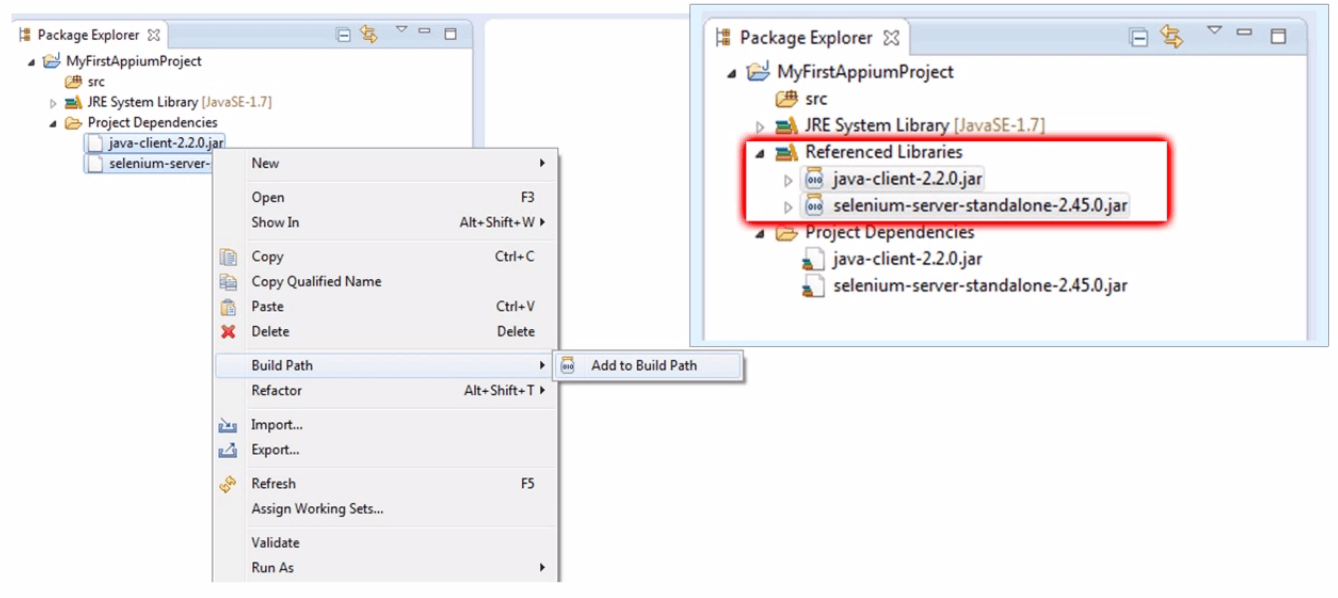
    Copy the downloaded file into the newly created project dependencies folder. Select both files and right-click. Then select the add to Build path option and then Add to Build Path. Thus both classes have been added to your project reference libraries.

    Test Automation Package Exp

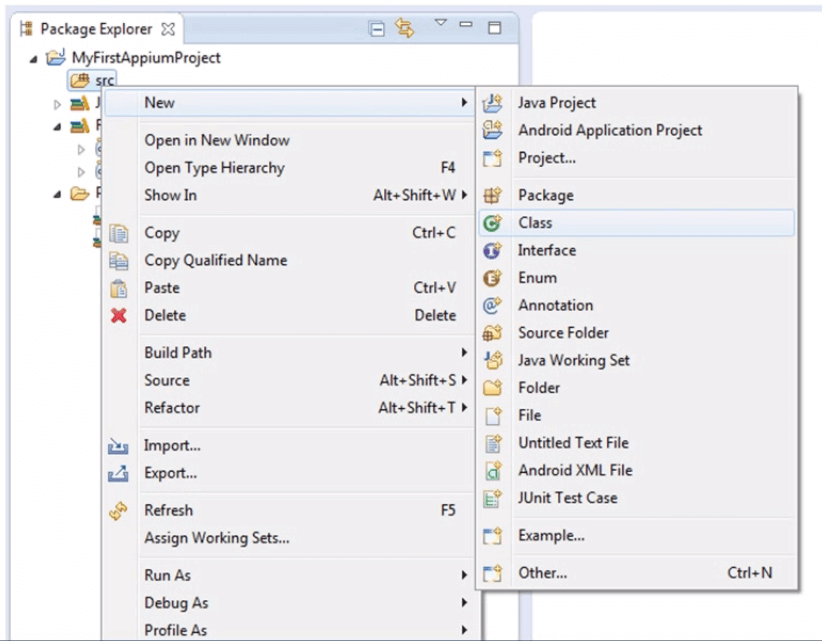
    Create a class and import the required packages. Now right click on the src folder, hover the mouse over the new option and select the Class option.

    Test Automation Class

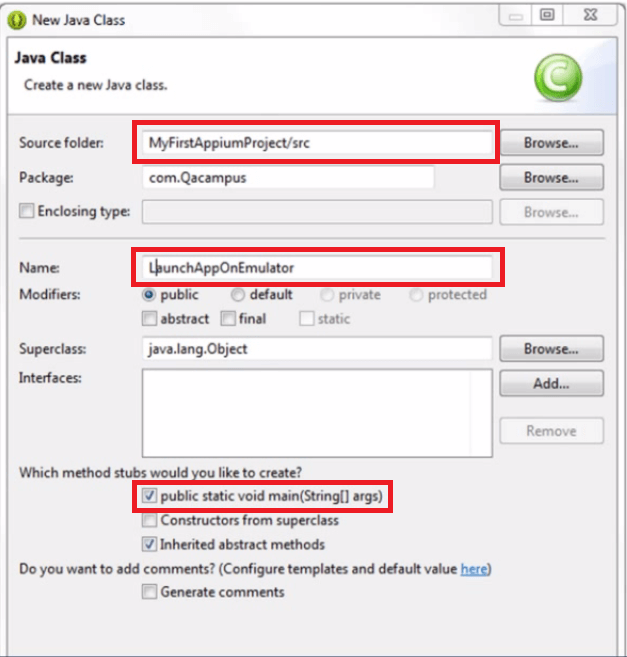
    Provide a package name, the name of class then select the main method checkbox.

    Test Automation Java Class

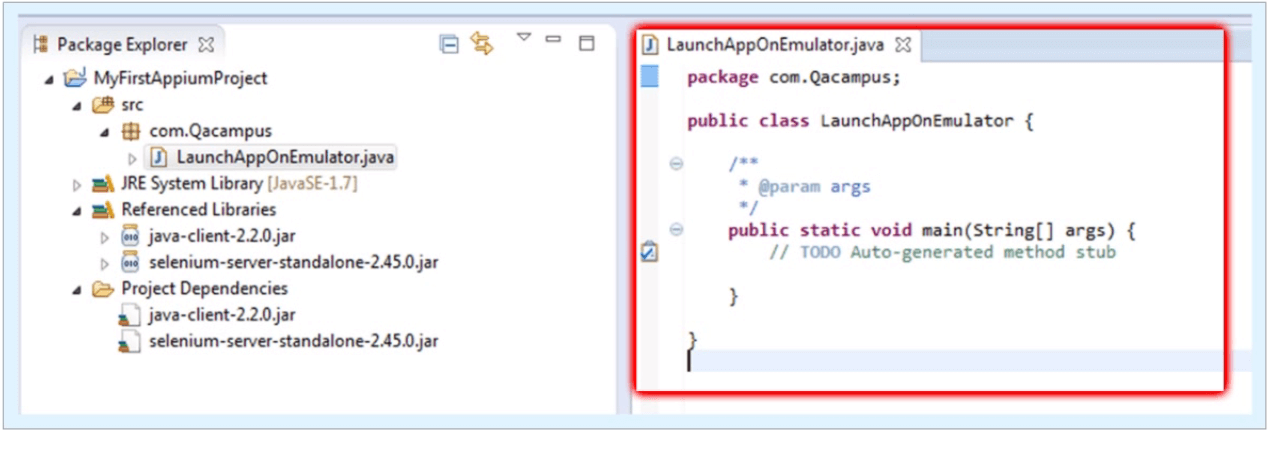
    A .java file within the package is created in Package Explorer panel. An auto-generated the main method is generated on the right panel.

    Test Automation Lauchapp

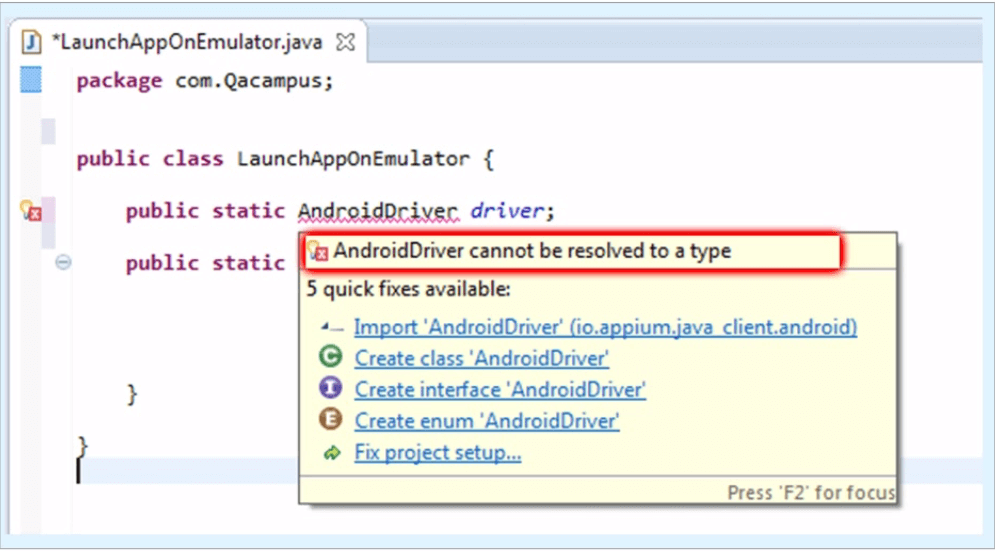
    You need to define a public class variable of AndroidDriver as your first line of code. You will now see an error for an android driver. Now hover your mouse over the error, you will get a list of quick fixes. Select Import ‘AndroidDriver’. Once you select the import package option, the android driver package will be imported and the error will be removed.Test Automation Android Driver

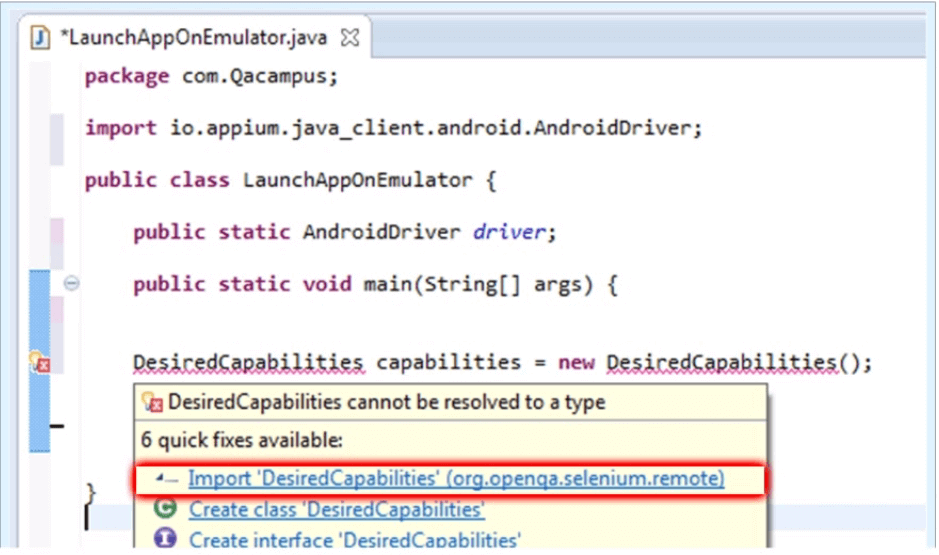
    Create an object of DesiredCapabilities. Again you will get an error for DesiredCapabilities. Hover the mouse over DesiredCapabilities and then select Import ‘DesiredCapabilities’ from the quick fix list.

    Test Automation Emulator

    Once you select the import package option, the DesiredCapabilities package will be imported and the error will be removed.

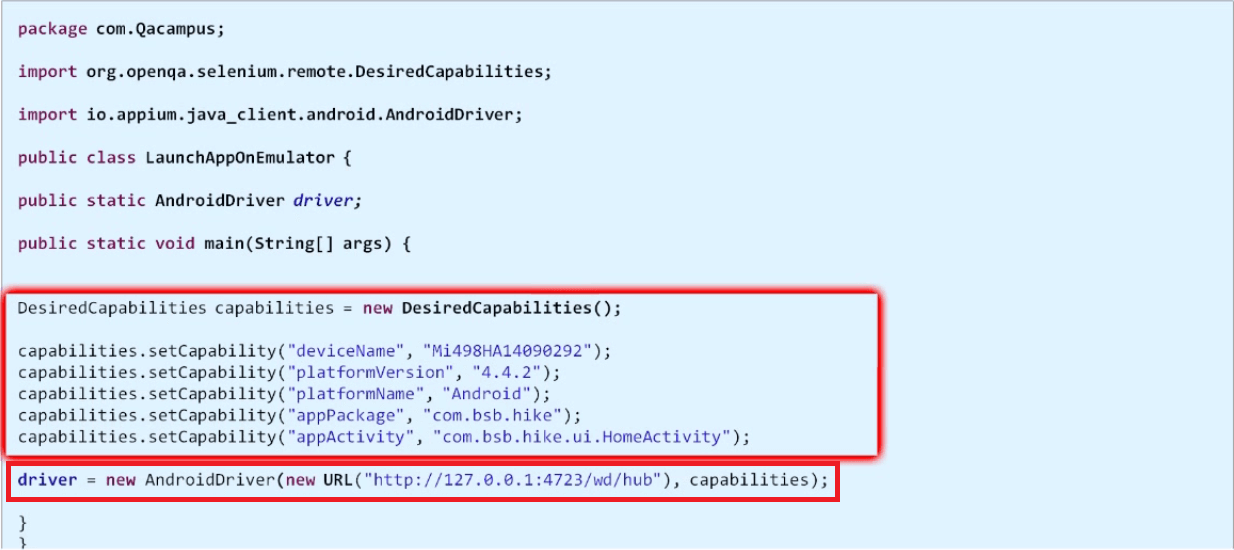
    Now set the DesiredCapabilities and also provide the package of an application and the name of application launcher activity.

    Now you need to instantiate the Android driver.

    To do this we need to have two parameters, the first is the Appium server address with the port number which it is running and the Capabilities.

    Test Automation capabilities

    Hover mouse on URL and import URL from Java.net. You will get an error for complete new URL section, hover mouse on the error and select Add throws declaration. By doing so exception has been added into your main method.

    Test Automation Driver

    Now start the Appium server and connect a device to the system. Now return to Eclipse and execute the code. This will launch the app in the device.

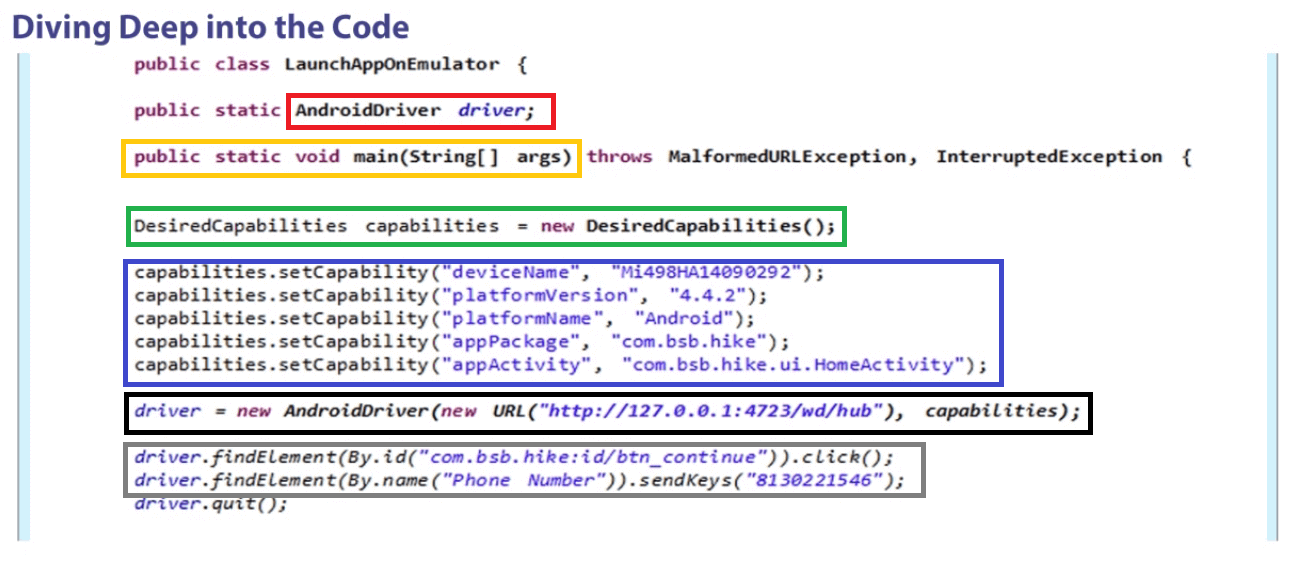
    In the code, we have declared the class as public so that we can access it anywhere inside out test.

    Test Automation Diving Deep

    The java main method is highlighted in yellow. We created an object of desired capabilities class which you can see in the green box. In method setCapability, there are two parameters. First is the capability name and second is the capability value as highlighted in blue. Then we created an object of AndroidDriver class highlighted in the black box. The code highlighted in gray is the findElement(By) method which can locate an element on the screen.

    Now that you have learned how to write a mobile test automation script using Appium test automation framework, we can move on to the next blog where we will learn how to start the Appium server and launch the app from code.

     
    Related Articles:

  • How to use Appium Inspector for Test Automation
  • Basics of Appium Mobile Testing
  • Inspecting Element on pCloudy Devices Using Appium Desktop
  • Help Guide for pCloudy-java-Connector for Appium
  • Appium vs Espresso: The Most Popular Automation Testing Framework in 2019
  • Suyash Dubey | Posted on | 2 min Read

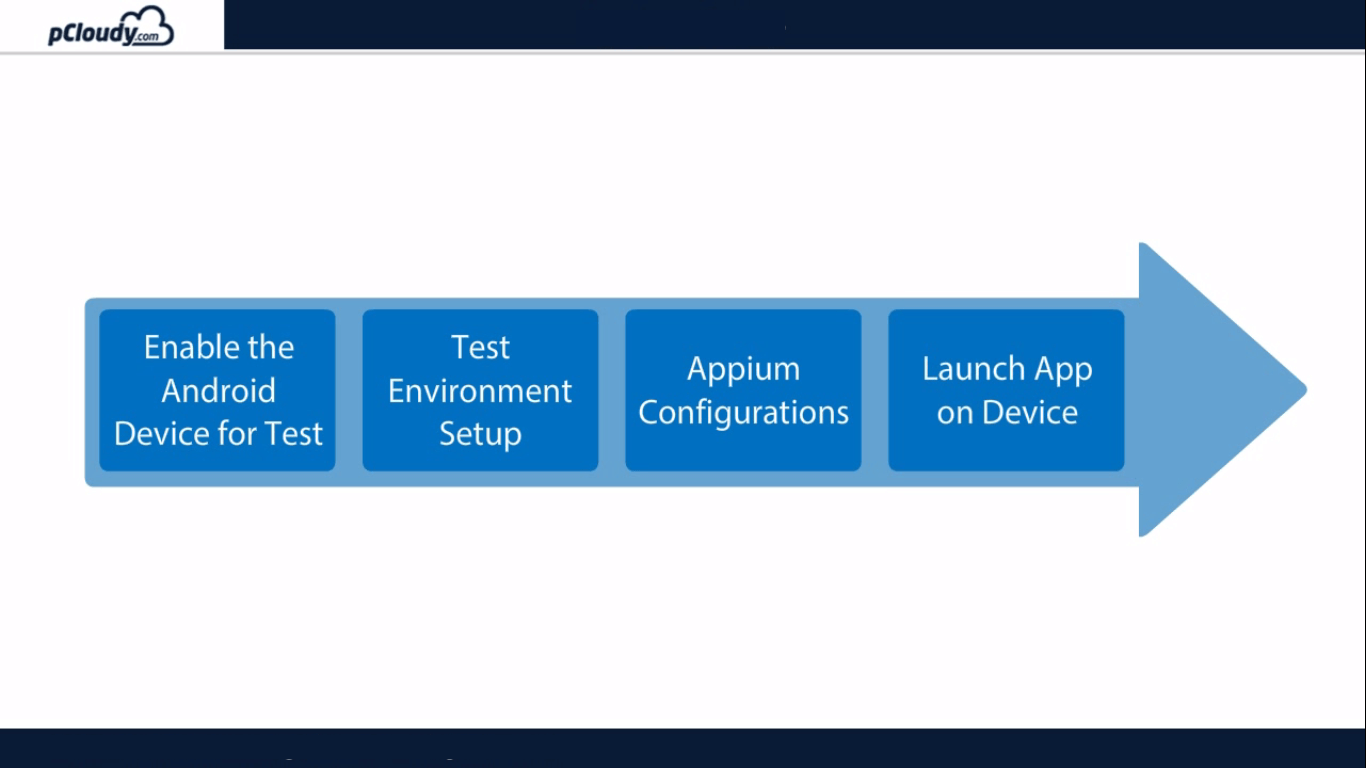
    In the previous blog, we informed about the basics of Appium and its architecture. Now let’s understand how to setup Appium. There are four steps required to setup Appium, they are enabling the Android device for test, test environment setup, Appium Configurations, Launch the app on the device.
     
    Appium Mobile Testing

    Pre-requisites for Appium Mobile Testing

     
    1. An Android device with OS 4.2+
    2. AUT(Application Under Test) file (.apk)
    3. Phone USB Drivers
    4. Java (JDK)
    5. Android Studio (SDK)
    6. Eclipse
    7. Selenium Standalone JAR
    8. Appium Java Client
    9. Appium for Windows
    10. .NET Framework 4.5
     

    Want to test your Mobile App?

    Join pCloudy Platform!

    Android Developer Options in device

     
    Every Android smartphone contains a secret set of Android developer options which are used by app developers who need additional functions to test their apps they are making for Android devices. It allows you to enable debugging over USB, capture bug reports on your Android device and show CPU usage on the screen to measure the impact of your software.
     
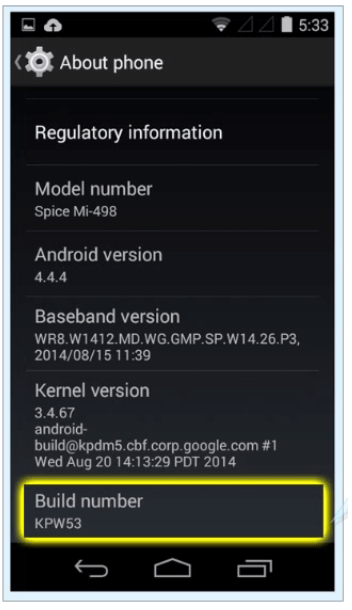
    To enable developer option in the phones to go to the settings, click on the about phone options and click on the build number 7 times to enable the developer options.
     
    About Phone

    Doing so will display a toast message for enabling the developer option. the current message appears if the developer message is already enabled on the phone.
     

    Phone Drivers

     
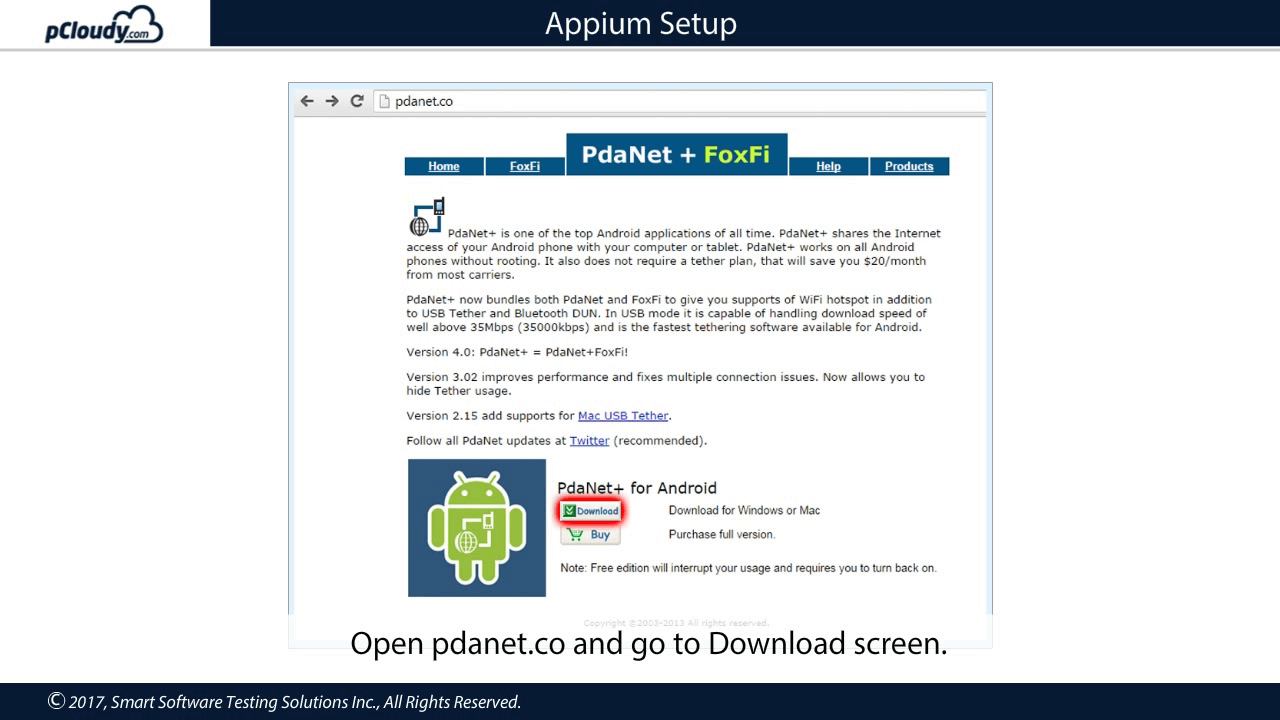
    The phone can communicate with the PC only if there are proper drivers installed for the USB cable. Each phone manufacturers provides its own drivers for the phone. PDA net is a driver which works with all the Android devices. It makes sure that your phone is detected in DDMS.
     
    Open pdanet.co and go to download screen and download the latest version to install it on your PC.
     
    Appium Setup

    Let’s verify if the phone is prepared.
     
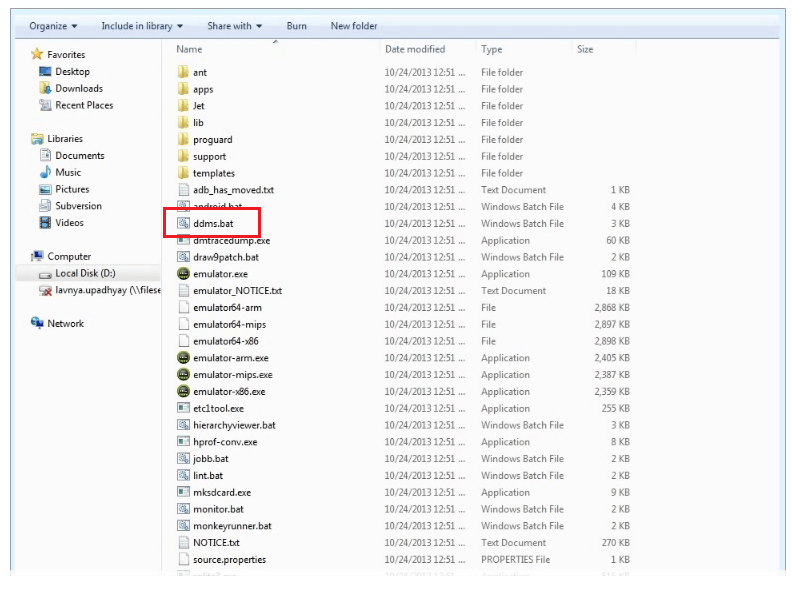
    The ddms.bat file is present in the Android SDK tools folder.
     
    Dalvic Debug Monitor

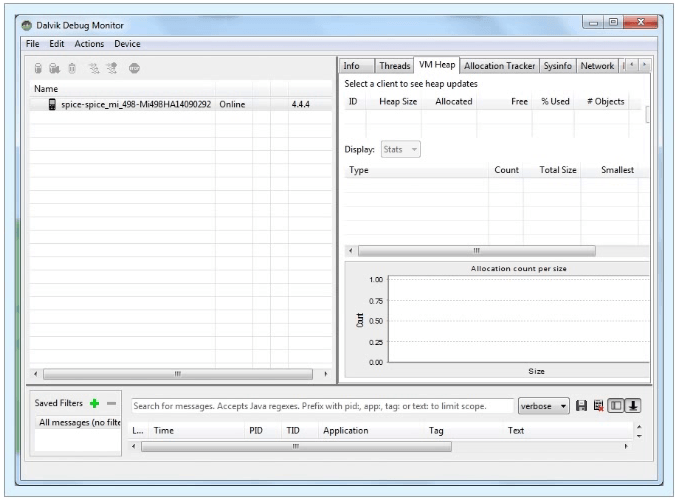
    Double click on the file and you will see the Dalvic Debug Monitor window.
     
    DDMS

    If your DDMS option is enabled i.e. if you have installed the PDA net software and connected the device to the machine, that device should be detected in this monitor. Now let’s move on to the second step.
     

    Test Environment Setup

     
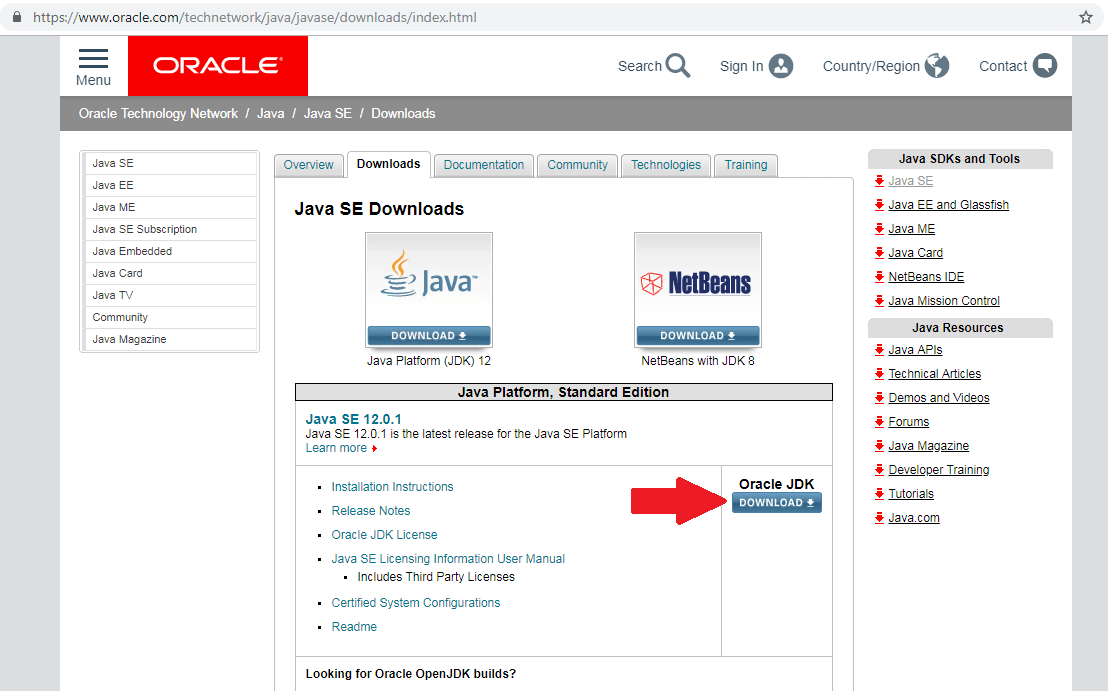
    First, you need to download JDK from the Oracle website.
    Oracle download

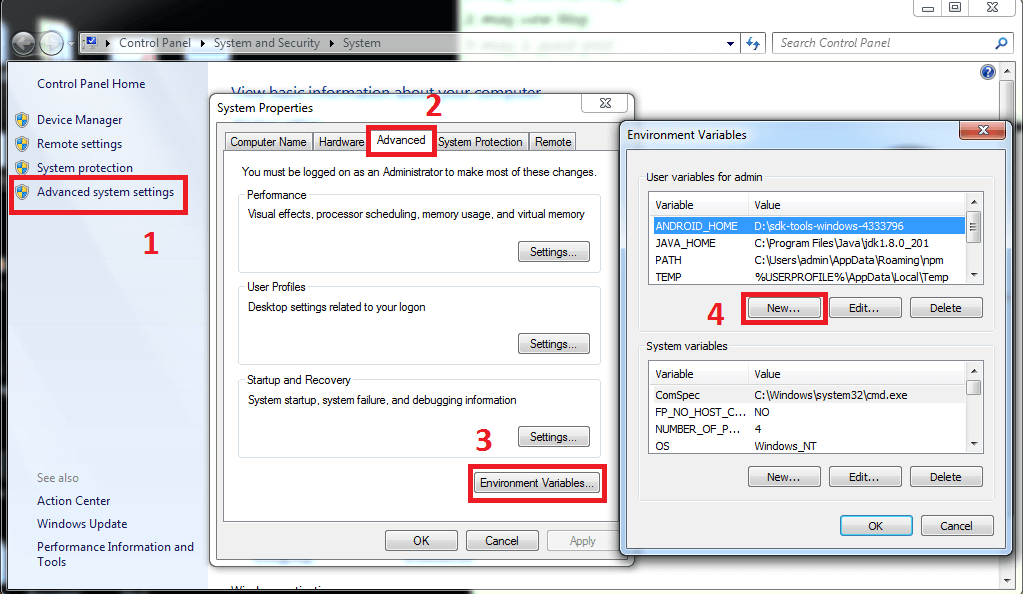
    Once downloaded, install it to your machine. Now you need to set the Java installation path in your Environment variable. Right-click on Computer option in the Start menu and select the Properties option. Select Advanced system settings and then select the Environment variables option in the Advanced tab.
     
    Advanced system setting

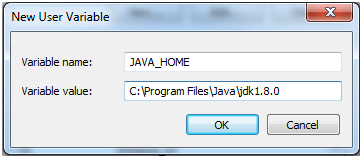
    Then select the new option and enter the new variable name as JAVA_HOME.
     
    Java Home

    Set the path of JDK to variable value and then click OK.
     
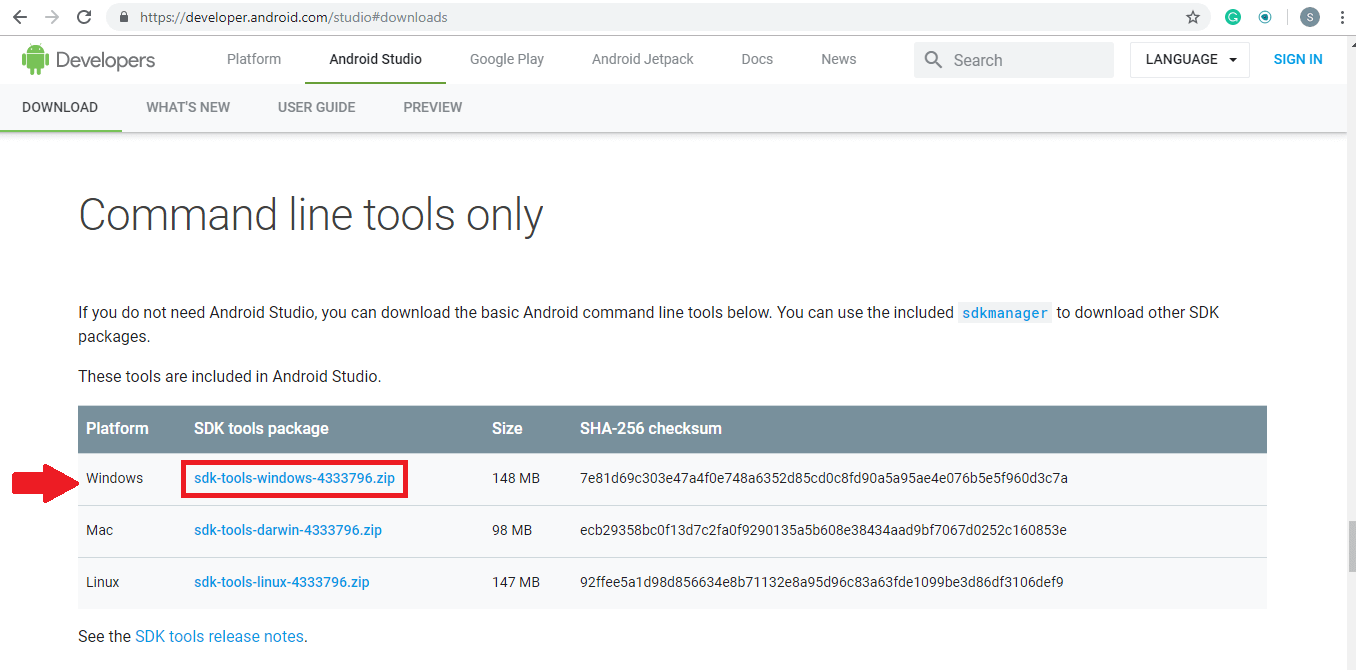
    To get an Android emulator you need to go to www.developer.android.com\studio#downloads and Scroll down to Command-line tools only section to download the zip file of SDK tools package for Windows.
     
    Command line tools only

    Don’t download the EXE file. Once the SDK file is downloaded, copy it to the C drive, make a new folder and extract the zip file in the new folder.
     
    Now you need to search for SDK manager in the bins folder and open SDK manager. Once the SDK manager window is open, go to tools and then get into the bin folder and in the address bar type cmd and hit enter. Now in the command prompt type SDK manager “platform-tools” “platforms; Android-28 and then hit enter. So now you will be able to see Platform tools and Platform folders in now folder you created for the extracted files.
    Click on platform tools and copy the address bar text and then again go to an environment variable. Then go to the path, a new window will pop up, make a new path and enter the copied text there and then click on OK.
     
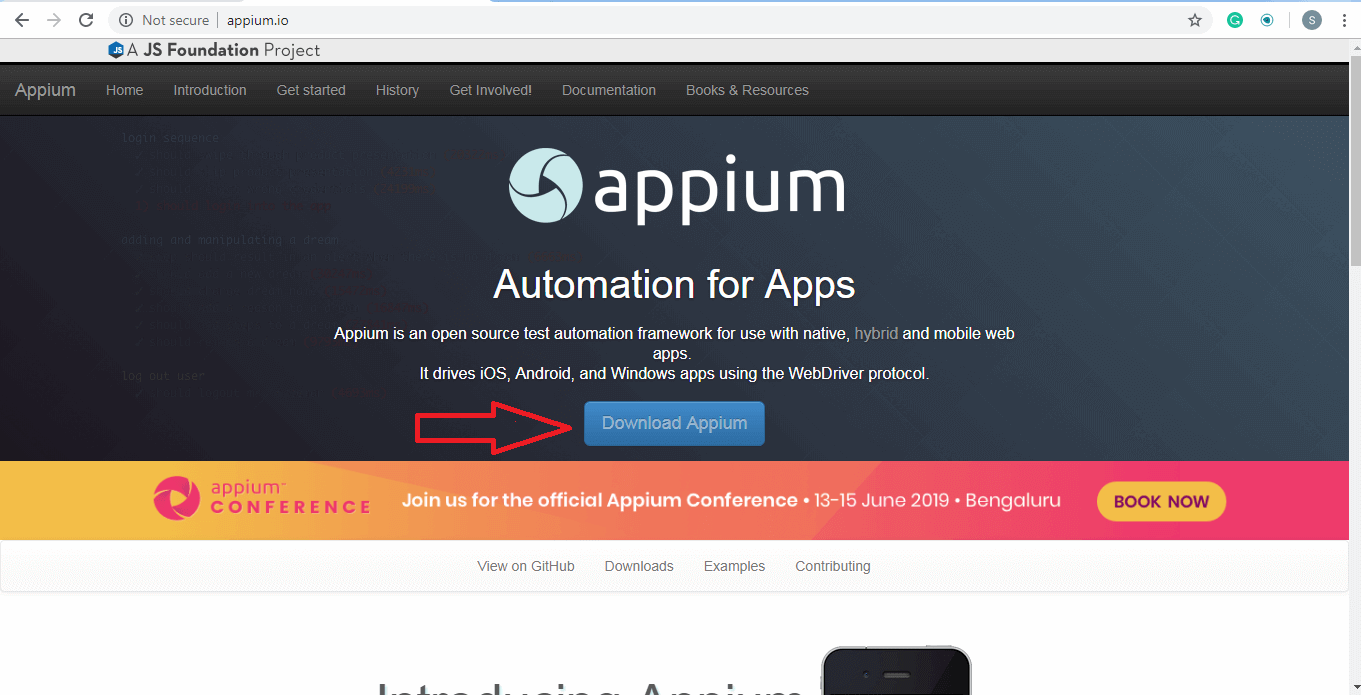
    To download Appium go to www.appium.io and click on the Download button.
     
    Download Appium
     
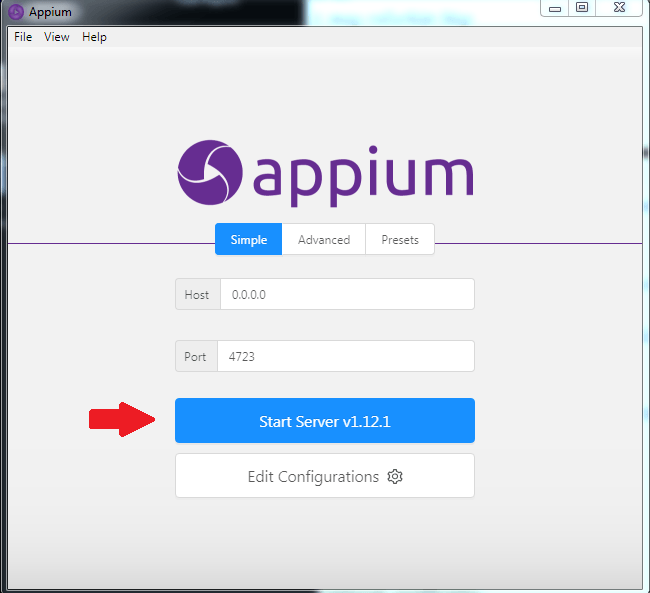
    Under the latest version, click on the Appium-windows-1.12.1.exe file. Once the file is downloaded, open the appium.exe file. Click on the Start Server v1.12.1 button.
     
    ApAppium Start Server v1.12.1

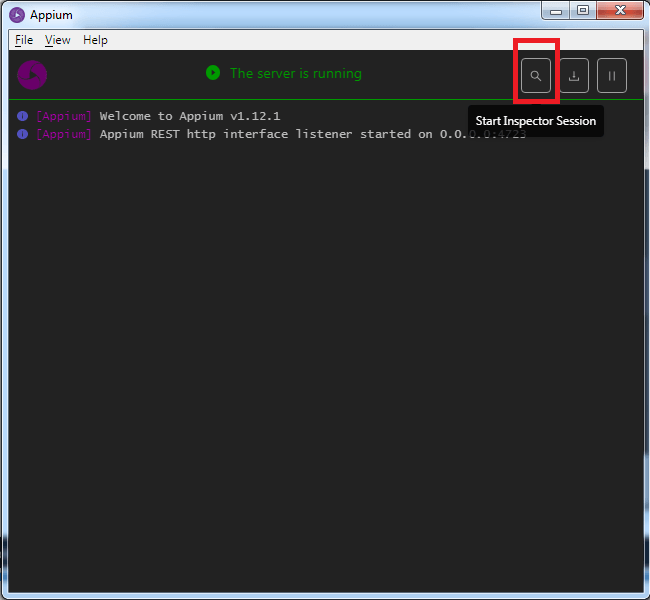
    Then in the server window click on the Start inspection session icon at the top right corner.
     
    Appium server

    Now you can get started with Appium automation testing. Do read our next blog to get more information about Appium mobile automation and how to inspect elements using Appium Desktop.

    Want to test your Mobile App?

    Join pCloudy Platform!

     
    Related Articles:

  • Writing The First Appium Test Automation Script (Android)
  • How To Install Appium On A Mac Machine
  • Basics of Appium Mobile Testing
  • Inspecting Element on pCloudy Devices Using Appium Desktop
  • Cross Platform Mobile Test Automation Using Appium
  • Suyash Dubey | Posted on | 2 min Read

    [xyz-ihs snippet=”quickLinks-Appium”]
     
    Appium is an open source mobile app UI testing framework. You can test all types of mobile apps and perform automation test on physical devices as well as on emulators and simulators. Appium mobile testing does not have a dependency on mobile device OS and it supports cross-platform app testing as a single API works for both Android and iOS. Appium supports many popular languages like C, PHP, Python, C#, Java, Ruby, JavaScript, etc.
     

    What is Appium Mobile Testing?

     
    When Appium is installed then a server is set up on your machine that exposes the REST API. It receives a command request from the client and executes that command on Android or iOS mobile devices. Then it responds back with an HTTP response. It uses mobile test automation frameworks like Apple instruments or UIAutomator2 to drive the UI of apps.
     

    Approaches to Test Automation

     
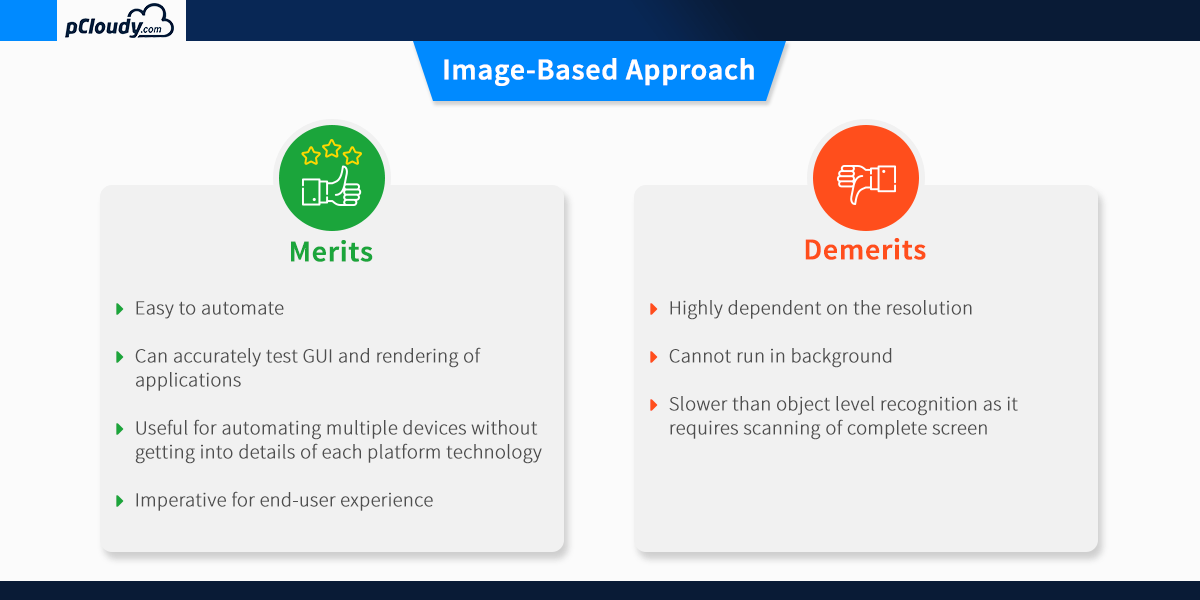
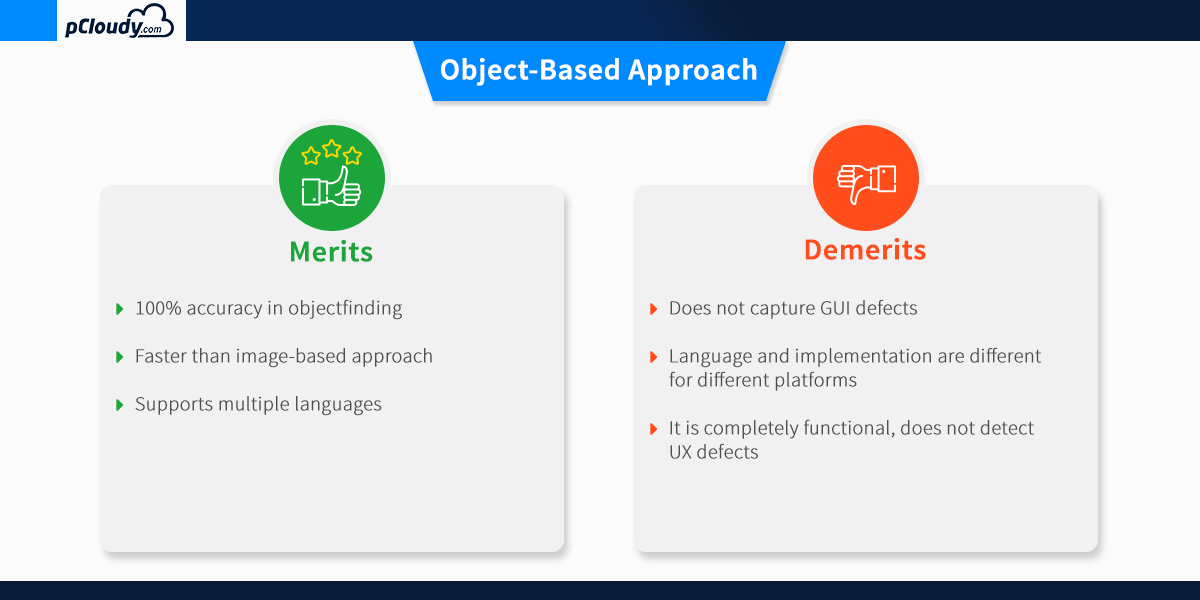
    There is two approaches for mobile test automation, Image-based and Object-based approach. Let’s understand both in detail.
     

    Image-Based Approach for Test Automation

     
    This technique of object identification is based on the image processing attributes of the objects in the Application Under Test (AUT). Example: Automate user options like “click, type, drag-drop, mouse actions, etc.”
     

    Visual verification of the expected output

     
    • Not dependent on the platform underneath
    • Can be used to automate emulators as well as a real device.
     
    Image based approach

    The object-based approach of test automation

     
    This technique of test automation is based on recognizing the nativity of the objects in AUT. This nativity reorganization process for each individual object in the application is carried out using different attributes that are assigned to the object.
     
    It is used to extract the application object identifier with its properties from the actual native operating system source code, just like the developer used. This is an accurate and fast method to recognize the buttons, lists and other objects used by the application.
     
    One drawback of the object-based approach is that the recognition of the individual attributes of the object involved restricts these techniques ability to function in test scenarios that require third-party application access. This reduces the automation coverage of utilizing this technique.
     
    Object based approach

    Which approach should we choose?

     
    As we have seen, both approaches have their pros and cons. To get better results, you can merge both approaches and think about devising a hybrid test automation solution.
     
    The combination of OCR (image based) and native (object-based) approach allows users to build a single script that will be portable across different devices. It will make your automation robust and efficient and allows the users to confidently detect the relevant native and GUI defect within the mobile application.
     

    Appium Overview and Architecture

     
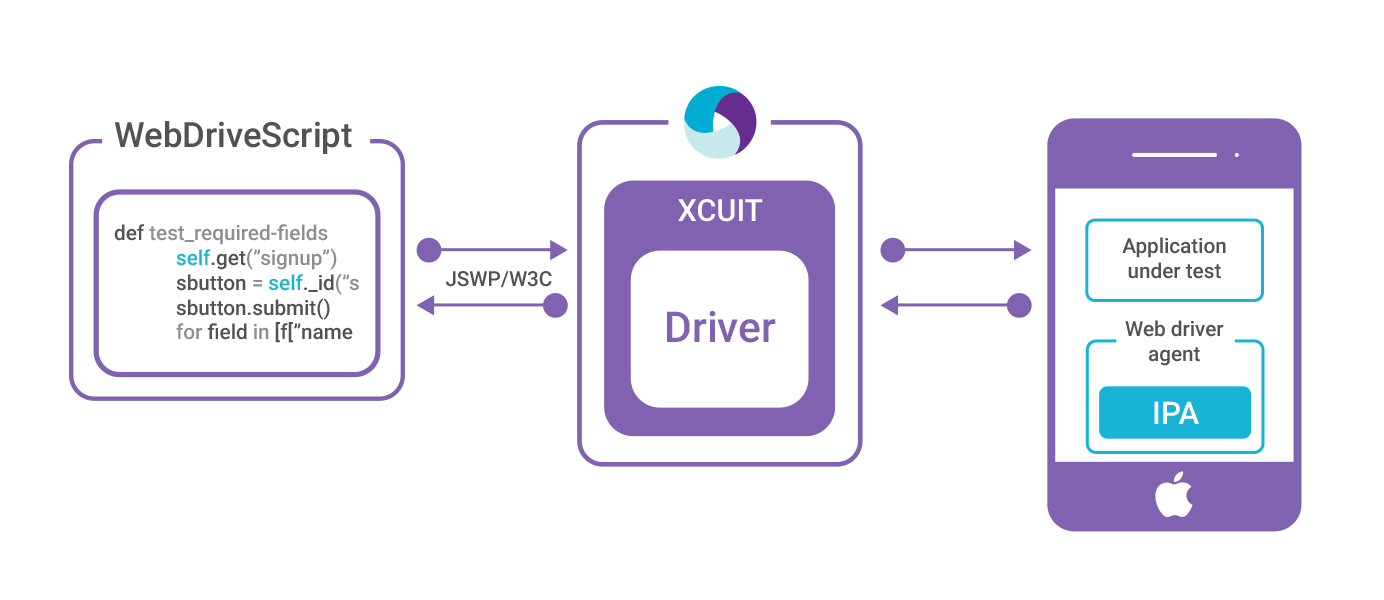
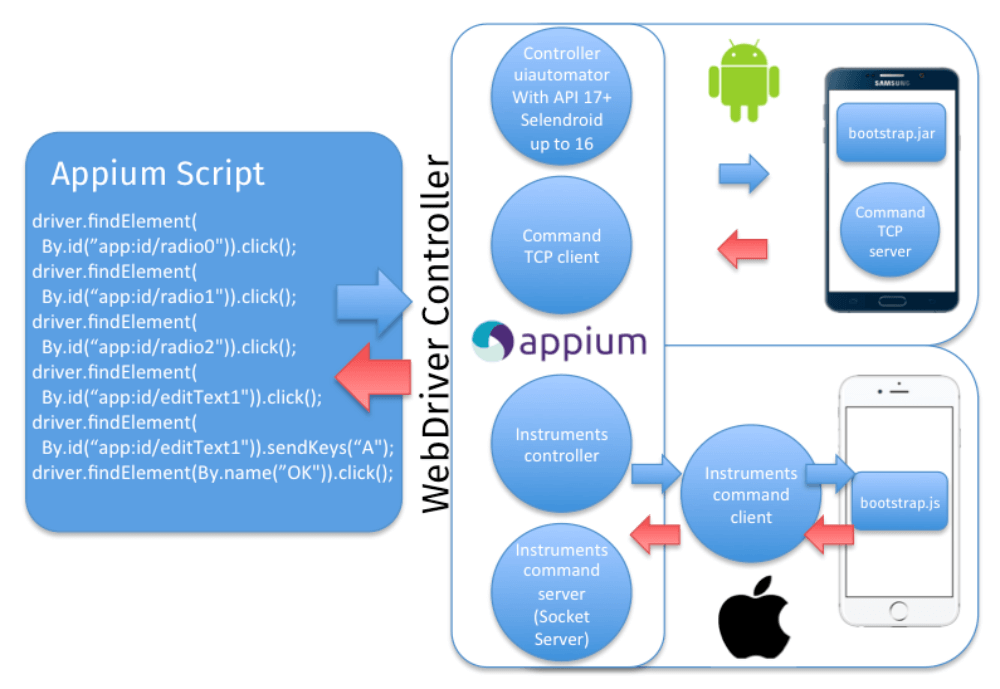
    Appium is an HTTP server that manages WebDriver sessions. On iOS devices, Appium proxies command to a UI automation script running on Mac Instruments environment. Apple provides an application called instruments which are used to do a lot of activities like profiling, controlling and building iOS apps. It also provides an automation component where you can write some commands in JavaScript which uses UIAutomation APIs which interact with the app user interface. Appium mobile automation uses these same libraries to automate iOS apps.

    Appium Overview and Architecture

    The Webdriver Script sends a command in the form of HTTP (JSWP) to the Appium Server. Then the Appium Server will then decide as per the request which driver should be initiated. So, in this case, the Appium Server will initiate the XCUITest driver and it will pass the request to the WebdriverAgent which is an IPA (WebdriverAgent.xcproj) developed by Facebook. WebdriverAgent is responsible to send the command to the Application Under Test (AUT) to carry out the actions in the app. Then the response will be sent to the Webdriver Script through the Appium server.
     
    Only iOS 9.3 and above version are supported by the XCUITest Driver. You can find all the capabilities for XCUITest Driver in the link mentioned below.

    https://github.com/appium/appium-xcuitest-driver

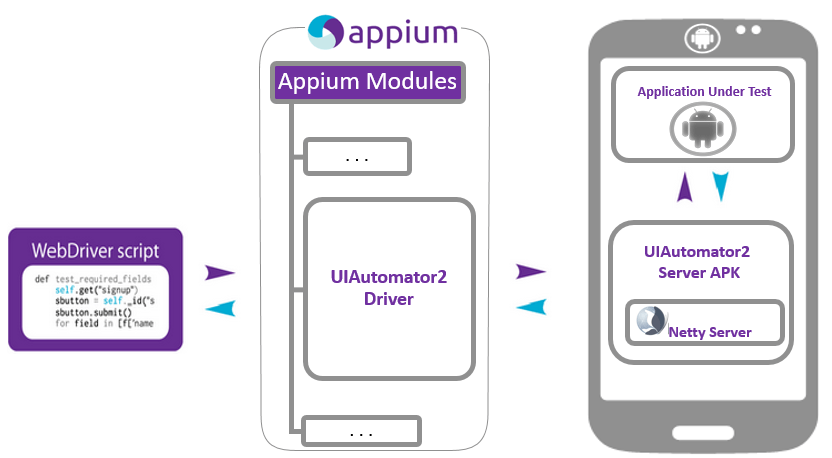
    UI Automation Server flow diagram

    The situation is very similar in the case of Android where Appium proxies command to a UIAutomator2 test case running on the device. UIAutomator2 is Android’s UI automation framework which supports running JUnit test cases directly into the device into the command line. It uses Java as the programing language but Appium will make it run from any of the web drivers supported languages.
     
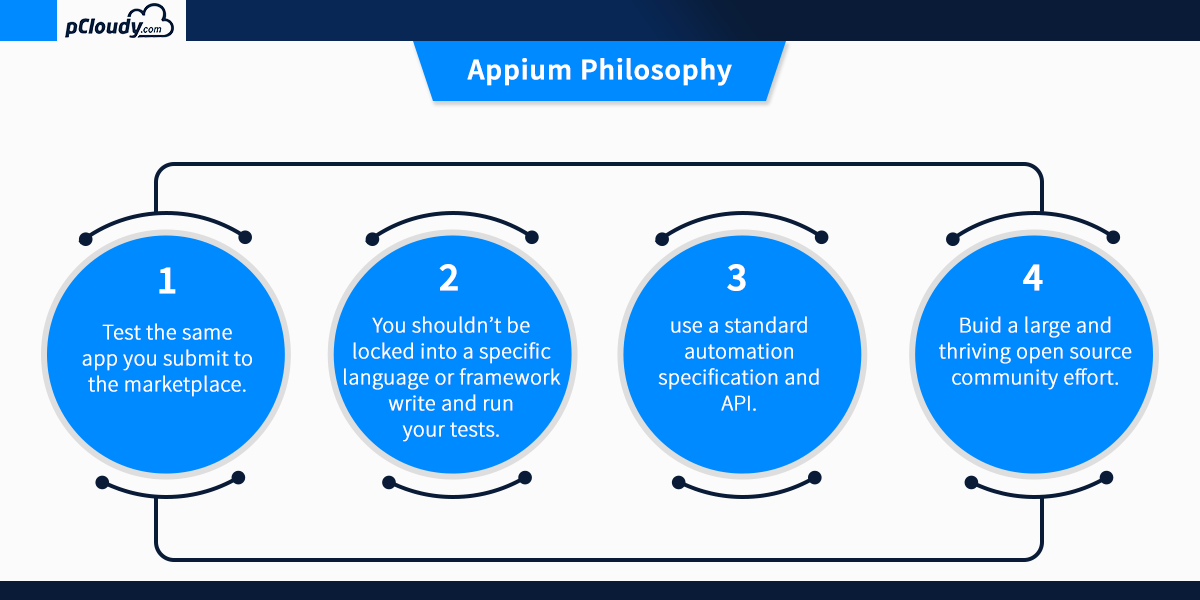
    To answer the question “what is Appium automation?”, let’s have a look at the Appium philosophy.
     
    Appium philosophy
    Appium mobile testing is required for proper execution of continuous integration as it speeds up the overall testing process. Appium mobile testing helps to run the repetitive test which would take more time to perform manually. This is why appium mobile testing is the preferred choice for the developers when it comes to test automation.
     
    In the next blog, we will learn more about Appium mobile testing and how to install/configure the Appium setup on a windows machine.

     
    Related Articles:

  • How to use Appium Inspector for Test Automation
  • Appium Setup for Windows
  • Starting Appium Server and launching the app from code
  • How To Install Appium On A Mac Machine
  • Appium vs Espresso: The Most Popular Automation Testing Framework in 2019
  • Mobile Test Automation Using Appium

     
    With growing demand in the market, enterprise mobility has undergone a paradigm shift. Speed, quality and user-friendliness are the need of the hour for modern enterprises. Mobile apps have become a major source of revenue boosters for enterprises today.

    It is a well-known fact today that the numbers of platforms and device types are more varied now than ever before. Customers continue to demand the latest devices, features and functionality, as well as increased mobility and accessibility. With the proliferation of mobile and portable device platforms and the Internet of Things, the workload of developers, and especially testers, has greatly increased. As traditional testing practices of manual app testing prove unable to keep up with the demand, businesses of all types are experiencing significant product delivery delays and, in some cases, costly product defects. Naturally, there is a growing demand for more efficient and cost-effective testing across all platforms.

    Appium: Addressing the complexities of mobile app testing

    To address the demands of complex testing needs, an effective mobile app testing platform is needed which is secure, supports functional and automated testing without losing an eye on the speed and quality. So, in this era where consumers have adopted smartphones, use multi-platforms to access mobile devices, do you think your app is delivering the best experience to your users? If not, then Appium is the solution. Appium is an open source, cross-platform mobile automation tool to automate the test for native, hybrid and mobile web apps.

    Appium being one of the best solutions for automation comes with support for Android and iOS real devices. In fact, it also comes with support for simulators and emulators. At its core, it an HTTP server written in node.js. It has similar working as Selenium which actually perceives HTTP requests from selenium client libraries and handles those requests in different ways depending upon the platforms.

    Being the best and widely used option available today in the market, it is widely adopted by modern enterprises to create a comprehensive mobile automation framework. With a growing user base and a stronger community, it is easier to adopt and implement which is why enterprises are adopting it on a very large scale. The best thing about Appium is that it lets you write in any language supported by Selenium using WebDriver API.

    While testing an Android app, Appium automates it with the help of UIAutomator library, a part of Android SDK. This actually makes the learning and implementation easier for Selenium users. Having the capabilities to test on both Android and iOS devices makes it the best cross-platform mobile app test automation tool. Automation scripts can be run on real Android and iOS devices using the WebDriver JSON Wire protocol.

    Appium starts a test case on the device that spawns a server and listens for proxy commands. On iOS, Appium proxies command to a UIAutomation script running in instruments.

    AppiumSource: cloud.netlifyusercontent.com

    Appium: Why should you Choose?


    • Opens the door to cross-platform mobile testing which means the same test would work on multiple platforms.
    • Unlike other tools, it doesn’t require any third-party code to compile into your app to make it automation friendly.
    • Enables a variety of frameworks and programming languages by wrapping the vendor-provided frameworks in the WebDriver API that specifies a client-server protocol.
    • For a tester, the programming language and the whole experience would remain same irrespective of the automating platform as all complexities are under the hood of Appium server
    • Possible to Execute multiple tests on multiple platforms without the need to manage them.
    • Able to run test sequences with hundreds of test cases, across multiple platforms.
    • Enables the view and share of device interactions with colleagues using in real-time built-in collaborative screen casting
    • On-demand testing and leverage results directly
    • It supports automation frameworks like JUnit and TestNG


    Appium has some challenges when it comes to scaling up with continuous integration. pCloudy brings to you a solution for this where you can automate your app tests with zero learning. Sign up on pCloudy and automate your tests on Appium for faster and better delivery of apps.

    pCloudy Appium integration


    1. pCloudy-java-Connector for Appium


    1.1 Overview

    Appium is an open source test automation framework which is used with wide range of mobile apps that supports only android/ios or both. pCloudy is a popular mobile testing platform integrated with Appium script which enables you to automate test of mobile apps as well. If you have your Appium Scripts (or you plan to build them) in Java then you can use the pCloudy-java-connector.jar to integrate with the pCloudy platform. In case, you don’t have your Appium script then, you will need to use the rest web services APIs which are given in the end of this document.


    1.2 Objective of this document

    This user help guide has been developed for pCloudy end users. This help guide will help you to understand the APIs that pCloudy platform provides to integrate your existing Appium Scripts with pCloudy. After the integration, you will be able to execute your Appium scripts from your PC directly to the pCloudy real device cloud.


    1.3 System Requirements

    • Java based Appium Script
    • Eclipse or Netbeans
    • >APK or IPA file
    • pCloudy Account
    • pCloudy-java-connector jar

    NoteThe APIs are evolving and we will come back with a better set of APIs & the jar soon. You might need a little tweaking in the code.


    1.4 Stepwise Workflow of the APIs for getting an Appium Driver


    The basic steps to get APIs for Appium Driver are given below:

    appium testing


    1.5 How to get my API Key for using the services

    If you are a registered user then you just need to follow few simple steps to get API key for using our services.

    Login to pcloudy.com –


    Appium


    After successful login, Instant Access page opens. Now, you finds different devices which can be filtered from the above given dropdown list of devices. From this page, you can book your device by clicking on Book your Device link. Furthermore, you can connect with any given device to perform mobile testing but you will be given 10 minutes only. While performing testing operation on selected device, you cannot perform testing on other device simultaneously.  For this, you need to release previously connected device.

    When you click on settings option, support page opens by default which helps you to drop support ticket. It also includes various options like support, History, Test Runs, UDID, Profile, Credits, Unsubscribe, and API.


    1.6 How to integrate my existing Appium Scripts on Java with pCloudy

    You need pCloudy java connector jar file and corresponding APIs for Appium based mobile testing platform, pCloudy. You should add the pCloudy-java-connector.jar in its build path as a reference within the your java project containing appium scripts. See this link to learn how to add reference in eclipse.You can download pCloudy-java-connector.jar from this link –

    http://support.pcloudy.com/solution/articles/9000062255-adding-reference-to-jars-in-eclipse

    While downloading such file, you may come across message as given below which alerts you regarding safety of your computer.


    pCloudy java connector jar file


    Now, you can reference the JAR file in Eclipse or Android studio. Please refer the link.

    The pCloudy-java-connector.jar comprises the following methods which gives you a wrapper code over the web services. Furthermore, you will not need to call the Rest APIs if you are working on JAVA:


    Appium Automation Testing


    1.7 Useful Codes to get Web-Driver Object


    A. Run on Android Native


    public void runExecutionOnPCloudy() {
    Connector pCloudyCONNECTOR = new Connector();

    // User Authentication over pCloudy
    String authToken = pCloudyCONNECTOR.authenticateUser(“abc@gmail.com”, “asd53sd3fa4asd5fsasda”);
    ArrayList selectedDevices = new ArrayList<>();

    // Populate the selected Devices here
    selectedDevices.add(MobileDevice.getNew(“Gionee_Ctrl-V6L_Android_4.4.2”, 73, “Ctrl-V6L”, “Ctrl V6L”, “android”, “4.4.2”, “Gionee”));

    // Book the selected devices in pCloudy

    BookingDtoDevice[] bookedDevicesIDs = pCloudyCONNECTOR.bookDevicesForAppium(authToken, selectedDevices, 5, “friendlySessionName”);
    System.out.println(“Devices booked successfully”);

    // Upload apk in pCloudy
    PDriveFileDTO pDriveFile = pCloudyCONNECTOR.uploadApp(authToken, new File(appPath));
    System.out.println(“ipa file uploaded successfully”);
    pCloudyCONNECTOR.initAppiumHubForApp(authToken, pDriveFile);

    // Get the endpoint from pCloudy
    URL endpoint = pCloudyCONNECTOR.getAppiumEndpoint(authToken);
    System.out.println(“Appium Endpoint:” + endpoint);

    // Create multiple driver objects in multiple threads
    for (int i = 0; i < bookedDevicesIDs.length; i++) {
    Thread.sleep(5000);
    new Thread(getTestCaseClass(endpoint, bookedDevicesIDs[i])).start();
    }
    }

    private Runnable getTestCaseClass(final URL endpoint, final BookingDtoDevice dto) {

    // this will give a Thread Safe TestScript class.

    // You may also like to have this as a named class in a separate file

    return new Runnable() {
    @Override

    public void run() {
    DesiredCapabilities capabilities = new DesiredCapabilities();
    capabilities.setCapability(“newCommandTimeout”, 600);
    capabilities.setCapability(“launchTimeout”, 90000);
    capabilities.setCapability(“deviceName”, dto.capabilities.deviceName);
    capabilities.setCapability(“browserName”, dto.capabilities.deviceName);
    capabilities.setCapability(“platformName”, “Android”);
    capabilities.setCapability(“appPackage”, appPackage);
    capabilities.setCapability(“appActivity”, appActivity);
    capabilities.setCapability(“rotatable”, true);
    AppiumDriver driver = new AndroidDriver(endpoint, capabilities);

    // Your Test Script Goes Here…

    }
    };
    }


    B. Run on Android Web


    public void runExecutionOnPCloudy() {
    Connector pCloudyCONNECTOR = new Connector();

    // User Authentication over pCloudy

    String authToken = pCloudyCONNECTOR.authenticateUser(“uttam.kumar@sstsinc.com”, “sadf54sad65fds6sdsdsw”);
    ArrayList selectedDevices = new ArrayList<>();

    // Populate the selected Devices here
    selectedDevices.add(MobileDevice.getNew(“Gionee_Ctrl-V6L_Android_4.4.2”, 73, “Ctrl-V6L”, “Ctrl V6L”, “android”, “4.4.2”, “Gionee”));

    // Book the selected devices in pCloudy

    BookingDtoDevice[] bookedDevicesIDs = pCloudyCONNECTOR.bookDevicesForAppium(authToken, selectedDevices, 5, “friendlySessionName”);
    System.out.println(“Devices booked successfully”);
    pCloudyCONNECTOR.initAppiumHubForBrower(authToken, “Chrome”);

    // Get the endpoint from pCloudy
    URL endpoint = pCloudyCONNECTOR.getAppiumEndpoint(authToken);
    System.out.println(“Appium Endpoint:” + endpoint);

    // Create multiple driver objects in multiple threads
    for (int i = 0; i < bookedDevicesIDs.length; i++) {
    Thread.sleep(5000);
    new Thread(getTestCaseClass(endpoint, bookedDevicesIDs[i])).start();
    }
    }

    private Runnable getTestCaseClass(final URL endpoint, final BookingDtoDevice dto) {

    // this will give a Thread Safe TestScript class.

    // You may also like to have this as a named class in a separate file
    return new Runnable() {
    @Override

    public void run() {
    DesiredCapabilities capabilities = new DesiredCapabilities();
    capabilities.setBrowserName(“chrome”);
    capabilities.setCapability(“newCommandTimeout”, 600);
    capabilities.setCapability(“deviceName”, dto.capabilities.deviceName);
    capabilities.setCapability(“platformName”, dto.capabilities.platformName);
    AppiumDriver driver = new AndroidDriver(endpoint, capabilities);
    // Your Test Script Goes Here…
    }
    };
    }


    C. Run on IOS

    public void runExecutionOnPCloudy() {
    Connector pCloudyCONNECTOR = new Connector();

    // User Authentication over pCloudy
    String authToken = pCloudyCONNECTOR.authenticateUser(“uttam.kumar@sstsinc.com”, “sadf5sd5fds5sfd5a5fdas1”);
    ArrayList selectedDevices = new ArrayList<>();

    // Populate the selected Devices here
    selectedDevices.add(MobileDevice.getNew(“Apple_iPad2_Ios_7.1.2”, 70, “iPad2”, “iPad 2”, “ios”, “7.1.2”, “Apple”));

    // Book the selected devices in pCloudy
            BookingDtoDevice[] bookedDevicesIDs = pCloudyCONNECTOR.bookDevicesForAppium(authToken, selectedDevices, 5, “friendlySessionName”);
    System.out.println(“Devices booked successfully”);

    // Upload apk in pCloudy
    PDriveFileDTO pDriveFile = pCloudyCONNECTOR.uploadApp(authToken, new File(appPath));
    System.out.println(“ipa file uploaded successfully”);
    pCloudyCONNECTOR.initAppiumHubForApp(authToken, pDriveFile);

    // Get the endpoint from pCloudy

    URL endpoint = pCloudyCONNECTOR.getAppiumEndpoint(authToken);
    System.out.println(“Appium Endpoint:” + endpoint);

    // Create multiple driver objects in multiple threads
    for (int i = 0; i < bookedDevicesIDs.length; i++) {
    Thread.sleep(5000);
    new Thread(getTestCaseClass(endpoint, bookedDevicesIDs[i])).start();
    }
    }

    private Runnable getTestCaseClass(final URL endpoint, final BookingDtoDevice dto) {
    // this will give a Thread Safe TestScript class.
    // You may also like to have this as a named class in a separate file

    return new Runnable() {
    @Override
    public void run() {
    DesiredCapabilities capabilities = new DesiredCapabilities();
    capabilities.setCapability(“newCommandTimeout”, 600);
    capabilities.setCapability(“launchTimeout”, 90000);
    capabilities.setCapability(“deviceName”, dto.capabilities.deviceName);
    capabilities.setCapability(“browserName”, dto.capabilities.deviceName);
    capabilities.setCapability(“platformName”, “ios”);
    capabilities.setCapability(“bundleId”, bundleId);
    IOSDriver driver = new IOSDriver(endpoint, capabilities);
    // Your Test Script Goes Here…
    }
    };
    }


    2. Rest APIs if needed to be used in platforms other than Java


    https://s3.amazonaws.com/pcloudy-content-distribution/v2/API_USAGE_V2.pdf