Mobile App Testing Challenges: A Comprehensive Guide
The mobile market has seen exponential growth over the past decade, largely driven by the mobile application industry. With more than 3.5 billion smartphone users worldwide, mobile apps have become an integral part of our daily lives. This booming sector is expected to generate over $189 billion in revenue by 2020 through app stores and in-app advertising, and the demand shows no signs of slowing down. As mobile apps become more ubiquitous, the competition to create unique, high-performing apps has intensified.
Yet, as apps grow more complex and diverse, so do the challenges faced in ensuring their quality. Mobile app testing plays a pivotal role in meeting these challenges, especially as the industry evolves at a rapid pace. Below, we explore the common issues in mobile app testing and offer solutions to ensure apps remain competitive, reliable, and user-friendly.
1. Device Fragmentation: The Complexity of Multiple Devices
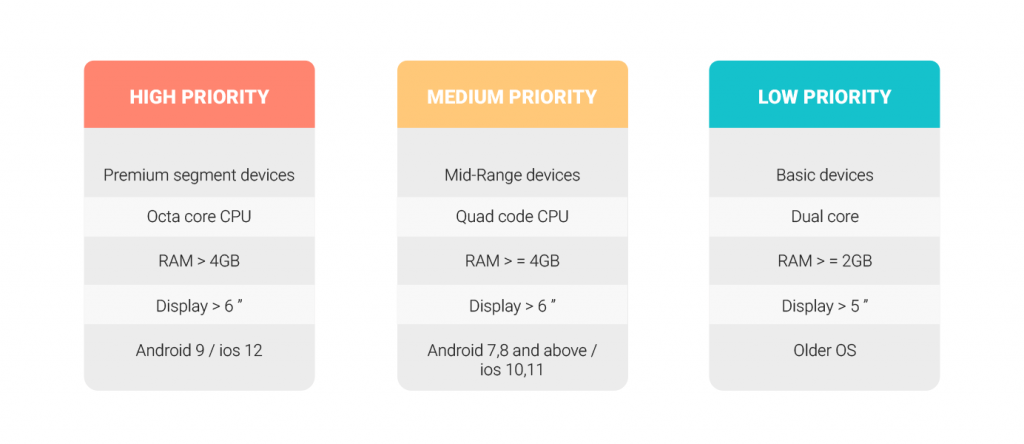
One of the most significant challenges in mobile app testing is device fragmentation. With countless manufacturers, models, operating systems, and screen sizes, testing across all devices is a daunting task. Android alone has a wide range of OS versions, with older versions still in circulation despite new releases. This fragmentation means that an app may perform flawlessly on one device but crash on another.
The Challenge
- Operating System Fragmentation: Apps must function across multiple operating systems, such as Android and iOS. Even within these operating systems, there are variations in performance and compatibility across different versions (e.g., Android 10 vs. Android 12).
- Device Variability: Different devices have varying processing capabilities, screen sizes, and resolutions, all of which can affect app performance.
The Solution
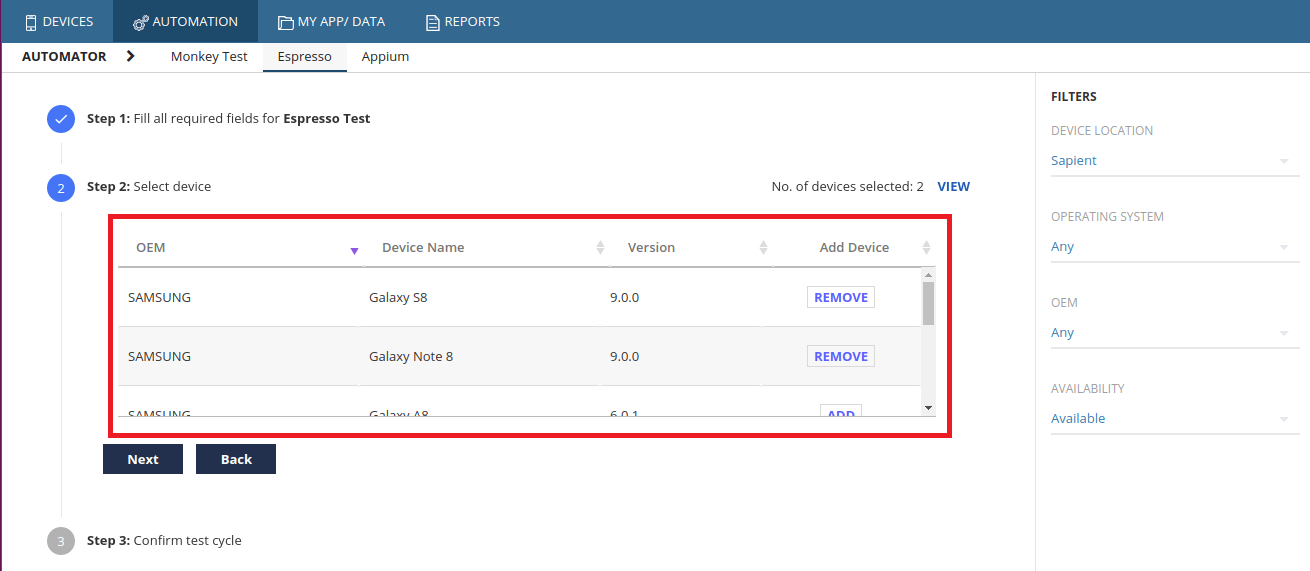
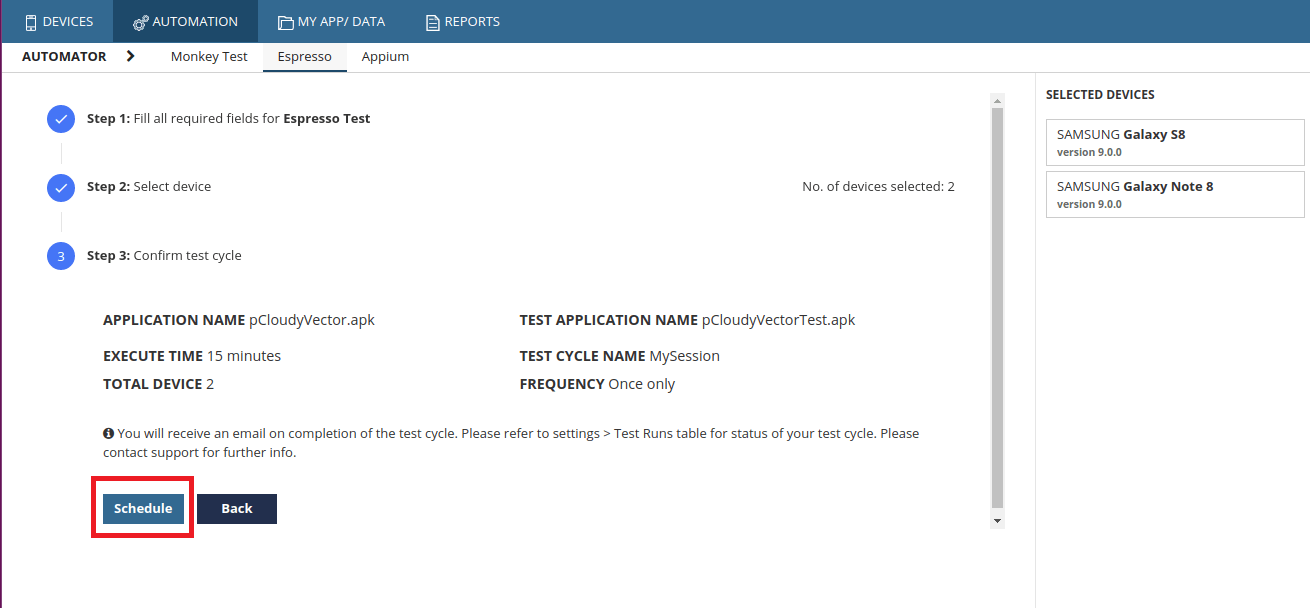
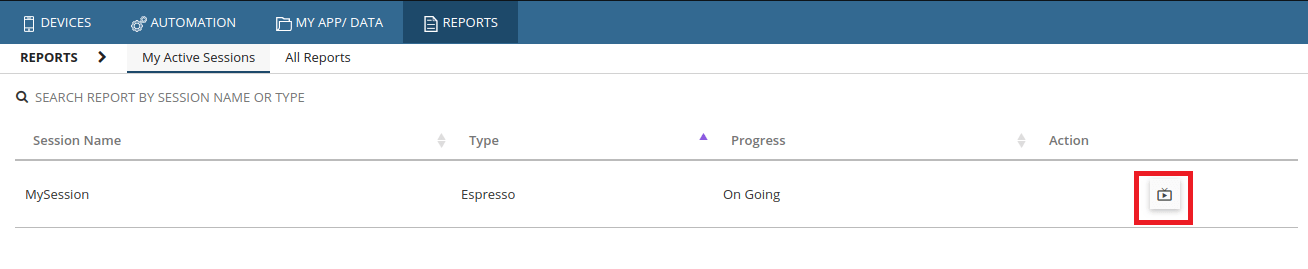
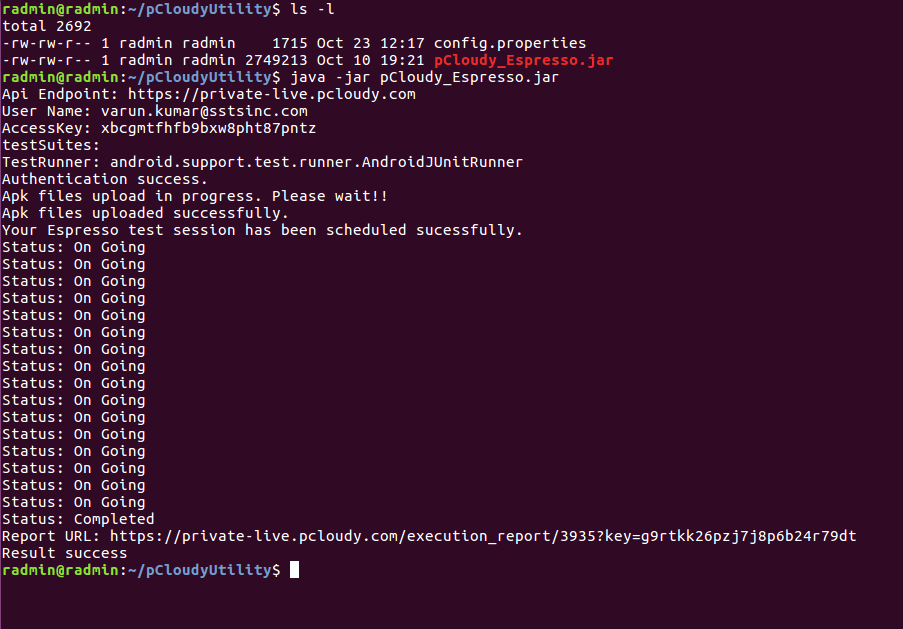
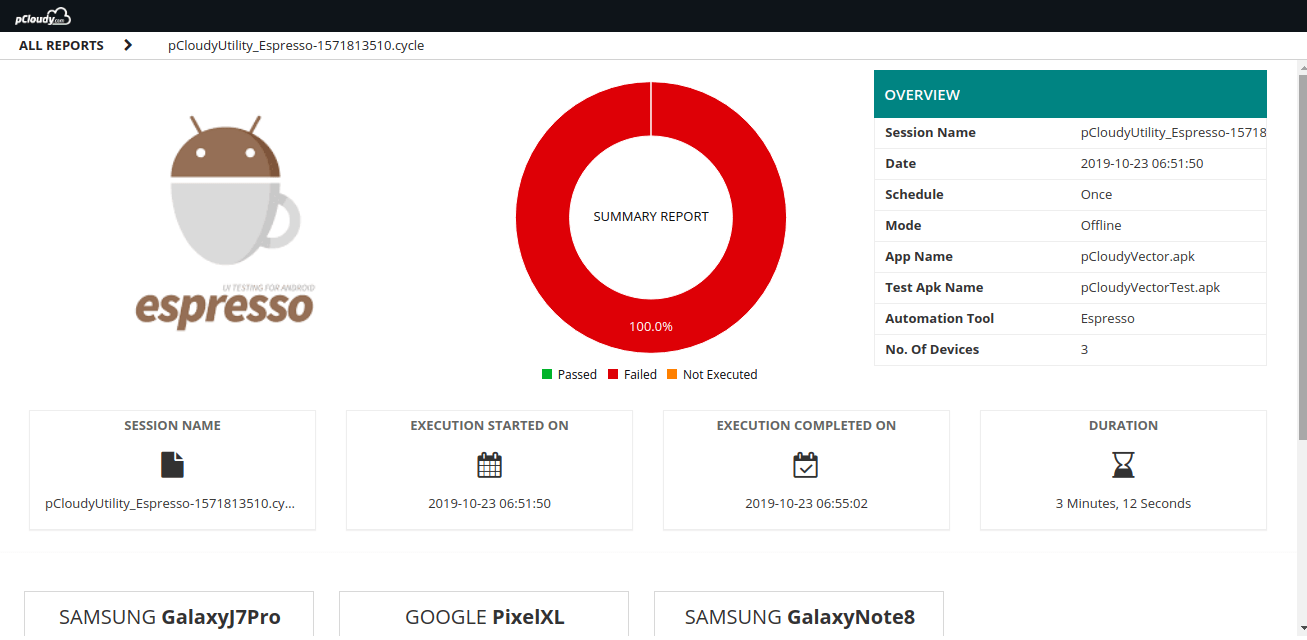
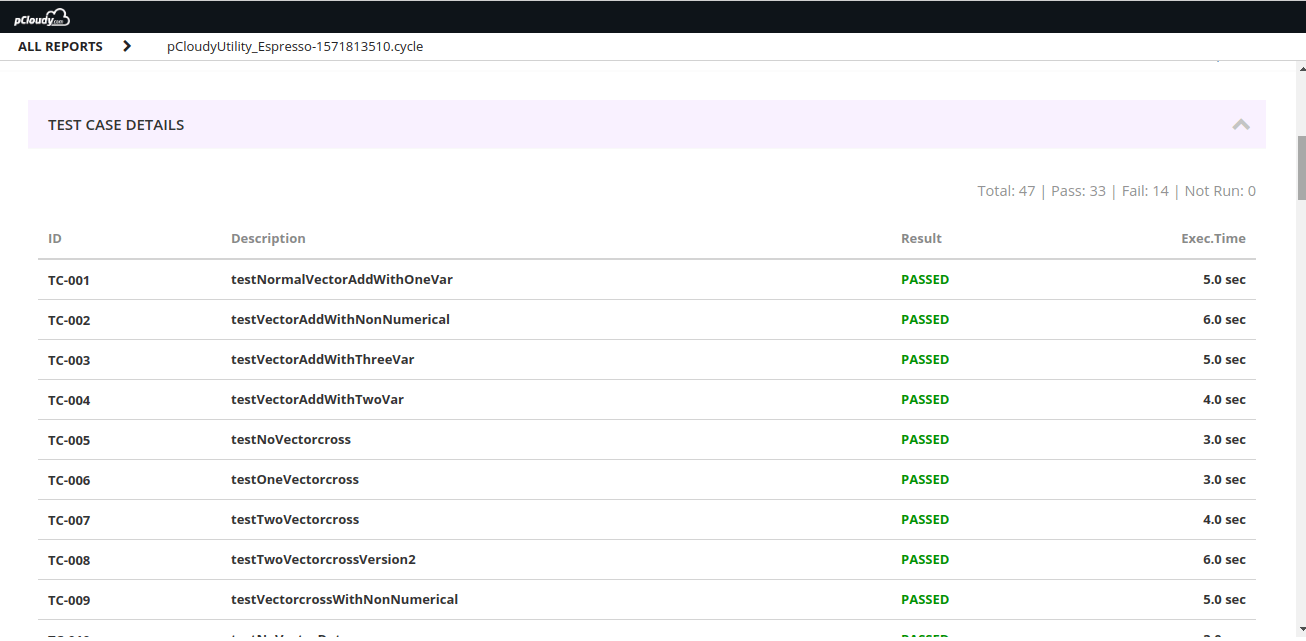
Testing on a range of real devices is the best way to ensure compatibility. This is where cloud-based platforms like Pcloudy come in. Pcloudy offers access to real devices with varying OS versions and configurations, allowing testers to check how their app behaves across multiple devices without needing physical access to each one.
Pro Tip: It’s crucial to prioritize testing on the most popular devices and operating systems to maximize your app’s reach.
2. Network Conditions: Testing for Real-World Scenarios
In today’s connected world, apps must perform well across a variety of network conditions. However, this introduces another layer of complexity in mobile app testing. Network issues, such as low bandwidth or weak signal strength, can drastically affect an app’s performance, leading to poor user experiences. According to studies, 53% of users will uninstall an app if it crashes, freezes, or has performance issues.
The Challenge
- Network Fluctuations: Users frequently switch between Wi-Fi and cellular networks, both of which offer different speeds and signal strengths.
- Latency and Packet Loss: Poor network conditions can lead to latency issues, dropped packets, or complete loss of connectivity, which can make even the best-designed apps frustrating to use.
The Solution
Testing apps under real-world network conditions is essential to ensure that they perform smoothly, even under poor network environments. Pcloudy offers network simulation tools that enable testers to replicate varying network conditions, from weak 2G signals to high-speed 5G or Wi-Fi, on real devices.
Pro Tip: Regularly test your app’s performance in low-bandwidth scenarios to ensure seamless user experiences in all conditions.
3. Choosing the Right Tools: Making or Breaking Mobile App Testing
The choice of testing tools can significantly impact the efficiency and effectiveness of mobile app testing. There are numerous tools available in the market, each with its strengths and weaknesses. Selecting the right one based on your app type (native, hybrid, or web) and testing needs is critical.
The Challenge
- Tool Overload: The number of tools available can be overwhelming. Each offers different features for automation, debugging, performance monitoring, and security testing.
- Incompatibility: Not all tools are suitable for every app type. For instance, some may work well for native apps but not for hybrid or web-based apps.
The Solution
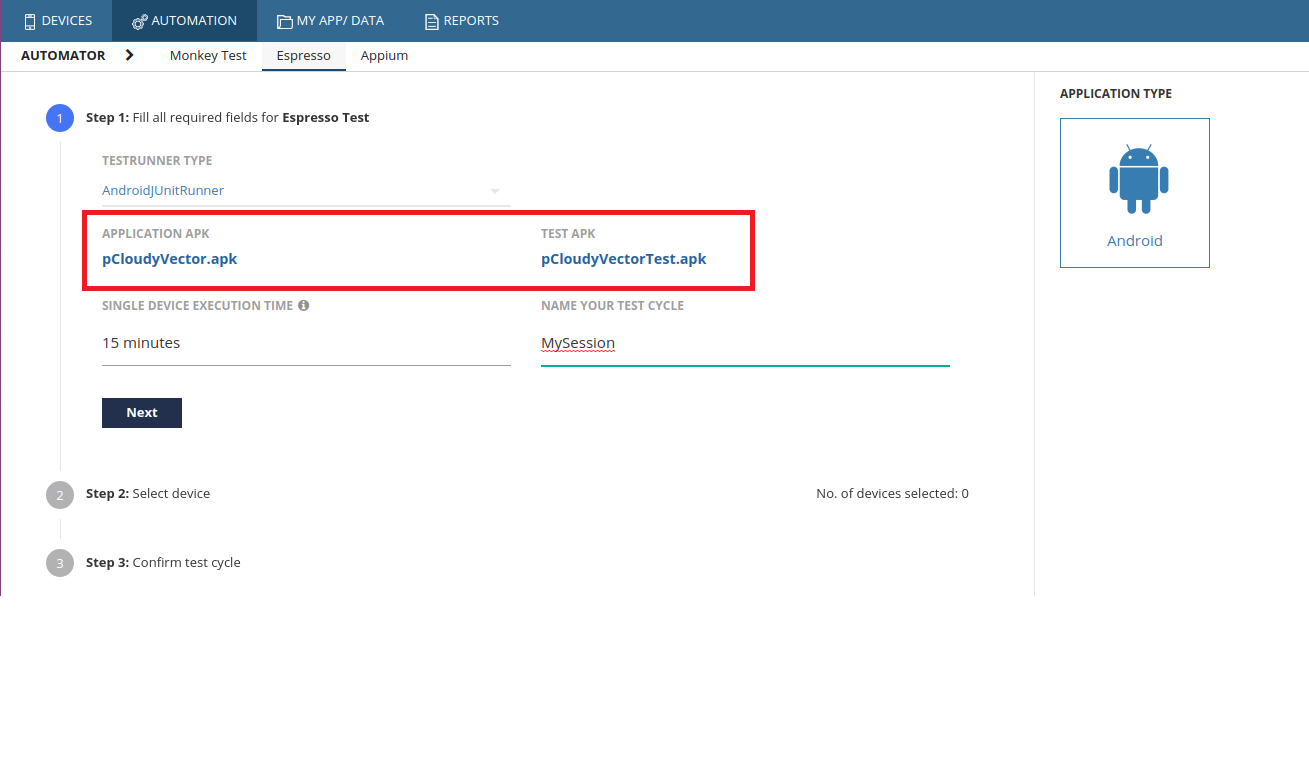
To navigate this landscape, it’s crucial to evaluate tools based on your specific app requirements. Pcloudy supports a wide range of automation tools, such as Appium, Espresso, and Selenium, making it easier for teams to test apps across multiple environments.
Consider the following when evaluating tools:
- App Type: Your chosen tool should support native, hybrid, and web-based apps.
- Cross-Platform Support: Ensure that the tool supports Android, iOS, and other potential operating systems like Windows.
- Cloud Integration: Leveraging cloud platforms for test automation allows teams to access devices and results from any location, improving collaboration and efficiency.
4. Screen Size Variations: Ensuring Consistency Across Devices
Mobile devices come in various screen sizes, and ensuring that your app displays correctly on all of them can be challenging. Apps that look perfect on a large-screen phone may appear cluttered or disjointed on a smaller device.
The Challenge
- Pixel Density: Different devices have varying pixel densities, which can affect the sharpness and clarity of app content.
- Layout Adjustments: App elements need to adjust dynamically to fit various screen sizes without compromising user experience.
The Solution
Adopt responsive design principles to create adaptable UI layouts. This approach ensures that your app looks good on all screen sizes, from small smartphones to large tablets. Testing your app on real devices of varying screen sizes is crucial, and platforms like Pcloudy allow for testing on multiple screen configurations to ensure a seamless experience.
Pro Tip: Focus on adaptive designs rather than pixel-perfect layouts, as adaptive designs scale more effectively across different screen sizes.
5. Types of Mobile Apps: Native, Hybrid, and Web
Mobile apps come in three main forms: native, hybrid, and web-based apps. Each type requires a unique approach to testing.
The Challenge
- Native Apps: Developed for specific platforms (iOS or Android), native apps tend to offer better performance but require separate testing for each platform.
- Hybrid Apps: These apps combine elements of native and web apps. While easier to develop and maintain across platforms, they often face performance and compatibility issues.
- Web Apps: Running in browsers, web apps must be tested across multiple browsers and operating systems, making compatibility a primary concern.
The Solution
Each app type comes with its own set of testing challenges, and it’s essential to customize your testing strategy accordingly. Pcloudy supports testing for all three app types, allowing teams to ensure that their apps meet the required standards of performance, usability, and functionality.
6. AI-Powered Test Automation: The Future of Mobile Testing
Artificial intelligence is revolutionizing mobile app testing by automating complex testing tasks, generating test cases, and predicting defects. AI-driven testing can significantly reduce time and effort, allowing testers to focus on more critical aspects of app development.
The Challenge
- Resistance to Change: Many teams are still reliant on traditional testing methods, hesitant to adopt AI-powered testing solutions.
- Implementation Complexity: Integrating AI testing into existing workflows can be challenging without the right expertise or tools.
The Solution
AI-powered test automation, like the solutions offered by Pcloudy, helps automate repetitive tasks such as regression testing, bug detection, and performance analysis. AI-driven bots can create test cases, execute tests, and analyze results, enabling faster releases and higher accuracy.
Pro Tip: Embrace AI-based testing early to stay ahead of the competition. Automating repetitive tests frees up resources for more creative problem-solving.
7. Security and Compliance Testing: Safeguarding Data and Trust
In an era where data privacy and security are of paramount importance, ensuring that your app is secure and compliant with regulations is vital. The increasing number of cyberattacks and data breaches highlights the need for robust security testing.
The Challenge
- Security Vulnerabilities: Apps are often vulnerable to attacks such as data leaks, insecure storage, and unauthorized access.
- Compliance Regulations: Apps must comply with regulations like GDPR, HIPAA, or PCI DSS, depending on the region and industry.
The Solution
Incorporate security and compliance testing into your QA process. Test for data encryption, authentication, and security vulnerabilities. Pcloudy offers features like biometric authentication testing and encrypted device communication to ensure that your app meets the highest security standards.
Pro Tip: Regularly update your app’s security protocols to keep up with emerging threats and regulations.
8. Usability Testing: Ensuring a Seamless User Experience
Usability testing focuses on how user-friendly your app is, evaluating its ease of navigation, intuitive design, and overall user experience.
The Challenge
- User Expectations: As mobile users grow more tech-savvy, they expect apps to be easy to use and navigate.
- Cross-Platform Usability: Usability can differ across iOS and Android devices due to interface design differences.
The Solution
Conduct usability testing on real devices to gather feedback from real users. Cloud-based platforms like Pcloudy allow for real-device usability testing, providing insights into the app’s user experience across different devices and operating systems.
9. Battery Usage: Avoiding Power-Hungry Apps
Battery consumption is a critical factor that can impact app usage and customer retention. An app that drains battery quickly is likely to be uninstalled by users.
The Challenge
- Performance Optimization: Apps that use GPS, background processes, or frequent notifications can quickly drain battery power.
- Device-Specific Impact: Battery usage can vary across devices, especially those with older hardware.
The Solution
Test for battery efficiency on various devices using real-device cloud testing environments like Pcloudy. Analyze how your app consumes battery power and optimize where needed to ensure it runs smoothly without excessive battery drain.
10. Memory Leaks: Preserving Device Performance
Memory leaks occur when an app uses excessive memory, causing performance issues like slowdowns or crashes. This can lead to a poor user experience, especially on devices with limited resources.
The Challenge
- Resource Management: Apps need to manage memory effectively to avoid crashing or slowing down the device.
- Device-Specific Issues: Memory management can vary depending on the device’s hardware.
The Solution
Implement memory profiling tools during your app’s development and testing phases. Regularly test your app on different devices using Pcloudy to identify and fix memory leaks.
11. Geolocation Testing: Apps that Depend on Location
For apps that rely on geolocation features, such as navigation or ride-hailing apps, ensuring that location services work across different regions is crucial.
The Challenge
- Location Variability: GPS performance can vary based on the user’s location and the accuracy of their device’s GPS hardware.
- Testing Across Regions: Simulating different geolocation scenarios can be difficult without access to real devices in those regions.
The Solution
Use cloud platforms like Pcloudy to simulate geolocation testing on real devices in different geographic regions. This ensures your app’s location services work accurately across the globe.
12. App Localization: Adapting for Global Markets
Apps often need to be localized to different languages, currencies, and cultural contexts. Ensuring proper localization is essential for expanding into global markets.
The Challenge
- Text Expansion: Some languages, like German or Russian, take up more space than English, which can break layouts or text boxes.
- Cultural Sensitivity: Localization isn’t just about language—it’s also about ensuring that the app’s design and functionality make sense in the target culture.
The Solution
Conduct thorough localization testing, focusing on the user interface, translations, and regional features. Pcloudy allows testing in real-world scenarios for apps localized into multiple languages and regions.
13. Accessibility Testing: Meeting User Needs
Accessibility testing ensures that your app is usable by people with disabilities, such as visual or hearing impairments. Ensuring your app meets accessibility standards is vital for inclusivity and can be a regulatory requirement in many regions.
The Challenge
- Regulatory Compliance: Many countries have strict accessibility regulations, such as the Americans with Disabilities Act (ADA) in the U.S. or the Accessibility for Ontarians with Disabilities Act (AODA) in Canada.
- Wide Range of Disabilities: Apps must be tested for a range of disabilities, including vision impairments, hearing impairments, and physical disabilities.
The Solution
Use accessibility testing tools to check your app’s compatibility with screen readers, voice commands, and other assistive technologies. Test your app on different devices using Pcloudy to ensure it meets accessibility guidelines.
14. Interruption Testing: Handling Disruptions Gracefully
Interruption testing evaluates how well an app handles interruptions like phone calls, text messages, or low battery alerts. These interruptions are common during real-world app usage.
The Challenge
- App Stability: Apps must be able to handle interruptions without crashing or losing user progress.
- Consistent Experience: Interruption handling should be seamless across different devices and operating systems.
The Solution
Perform interruption testing on real devices to evaluate how your app reacts to common disruptions. Cloud platforms like Pcloudy allow testers to replicate interruptions during active app sessions, ensuring smooth recovery and minimal disruption.
15. App Store Compliance: Ensuring Successful Submissions
Each app store (Google Play, Apple App Store) has specific guidelines for app submission. Failing to comply with these guidelines can result in rejection, delaying your app’s release.
The Challenge
- Guideline Variations: App store guidelines differ between platforms, and ensuring compliance with both can be time-consuming.
- Performance Criteria: Stores often have performance benchmarks that apps must meet to be approved.
The Solution
Before submitting your app, ensure it meets all necessary guidelines. Test your app’s experience, security, and overall quality on multiple devices and operating systems using Pcloudy to minimize the risk of rejection.
Conclusion: A Holistic Testing Strategy
Mobile app testing involves overcoming a wide range of challenges, from ensuring compatibility across numerous devices to handling network variability, memory leaks, and accessibility. A successful testing strategy combines real-device testing, cloud-based automation, AI-driven test automation, and comprehensive security testing to deliver a high-quality app experience.
Pcloudy provides a robust cloud-based platform for mobile app testing, offering access to real devices, network simulation, and AI-powered automation. By adopting a well-rounded approach to testing, you can ensure