
Mobile app automation testing has become essential for ensuring the quality and performance of apps in today’s competitive market. With shorter release cycles and tighter budgets, choosing the right automation testing framework can significantly impact your app’s success. While there are many automation frameworks available, Appium and Espresso have emerged as two of the most widely used frameworks for mobile app testing.
This blog provides a detailed comparison of Appium vs Espresso, highlighting their strengths, weaknesses, and ideal use cases to help you decide which framework is right for your needs.
Appium vs Espresso
Mobile app automation testing has evolved as a crucial aspect of the mobile app development process to help deliver better quality solutions, under controlled time cycles and cost schedules. But for delivering bug-free app, choosing the best suitable automation testing framework for your app is very important. There are many automation testing frameworks available in the market with exceptional capacities. This blog is all about Appium vs Espresso and we will analyze which of these two most widely used Automation testing frameworks is preferable for your app testing.
Espresso was not preferred because of its flakiness and instability issues. But, from the time Google has brought Android Test Orchestrator, a Gradle test option, instability and unreliability of Android Espresso tests have vanished. This, in turn, is creating a serious problem for the most popular automation framework Appium.
Let’s find out in this blog if Espresso now comes with a power to kill Appium or Appium can hold its stand in this fiercely competitive market.
What is Appium?
Appium is an open-source, cross-platform mobile automation testing framework that supports the testing of native, hybrid, and web apps. It enables testing on real devices, emulators, and simulators, making it a versatile choice for mobile app testing. Appium’s architecture uses the Selenium WebDriver protocol, which allows cross-platform compatibility, enabling the same test scripts to work for both Android and iOS apps.
Advantages of Using Appium
- Facilitates Test Execution Without a Server Machine
Appium is built on a Node.js-based runtime, making it lightweight and capable of running on local machines without requiring a dedicated server. - No App Code Recompilation Required
Appium enables testers to run automation tests without modifying or recompiling the app code, making it highly flexible for both native and cross-platform apps.
3. Automates Various Types of Mobile Apps
Whether it’s a web, hybrid, or native app, Appium supports automation across all app types using the same framework.
4. Supports Real Devices, Emulators, and Simulators
Appium enables testers to run tests on real devices for accurate usability testing while also supporting emulators and simulators for faster test execution.
5. Record and Playback Tool for Quick Test Creation
Appium’s inspector allows testers to record app behavior and generate scripts in multiple programming languages such as Java, Python, Ruby, and C#.
6. Cross-Platform Compatibility
Appium enables you to run the same test script on both Android and iOS platforms, reducing the effort required for cross-platform app testing.
7. Supports Multiple Programming Languages
Appium integrates with WebDriver-compatible languages, including Java, JavaScript, Python, PHP, Ruby, C#, and Objective-C, allowing testers to write scripts in their preferred language.
Disadvantages of Using Appium
- Limited Gesture Support
Common mobile gestures, such as double-tap, may not be natively supported in Appium’s Java-client libraries, requiring workarounds.
2. No Support for Concurrent iOS Simulator Testing
Appium does not allow running multiple test scripts on iOS simulators concurrently, which can slow down large-scale iOS testing.
3. Limited Image Recognition Capability
Appium struggles with image-based testing as it cannot recognize images automatically and requires screen coordinates for locating visual elements.
4. No Support for Older Android Versions
Appium only supports Android 4.2 and above, making it difficult to test apps targeting older Android APIs.
What is Espresso?
Espresso is Google’s UI testing framework for Android apps. It provides fast, reliable UI testing by synchronizing test actions with the app’s user interface and ensuring that the app’s activities have completed before the test starts.
With the introduction of Android Test Orchestrator, Google has addressed common issues like flaky tests and shared states, making Espresso more stable and reliable.
Advantages of Using Espresso
- Integration with Gradle
Espresso is fully integrated with Android Studio and Gradle, enabling developers to run tests directly from the command line or IDE with minimal setup. - Android Test Orchestrator for Reliability
The Android Test Orchestrator runs each test in its own sandboxed environment, ensuring minimal shared state and isolating crashes, leading to more reliable test results.
3. Less Flakiness
Espresso’s built-in synchronization mechanism ensures that test actions are executed only when the app’s UI is idle, reducing flakiness caused by asynchronous operations.
4. Developer-Friendly Test Automation
Since Espresso is based on Java and JUnit, Android developers can quickly adopt it without additional learning curves or external dependencies.
5. Fast Feedback Loop
Unlike Appium, Espresso runs alongside the app without requiring a server, resulting in faster test execution and immediate feedback.
6. Simple Test Suite Management
Espresso allows developers to package their tests as standalone APKs, which can be installed alongside the app and executed easily.
Disadvantages of Using Espresso
1.Requires Access to the App’s Source Code
Espresso requires access to the app’s source code, limiting its use for black-box testing or when working with third-party apps.
2. Narrow Focus (Android-Only)
Espresso is designed exclusively for Android, so separate frameworks (like XCTest) are required for iOS testing, resulting in increased effort for cross-platform apps.
3. Requires Emulator Experience
Running Espresso tests requires familiarity with launching and managing Android apps on emulators, which may add complexity for QA teams unfamiliar with Android development.
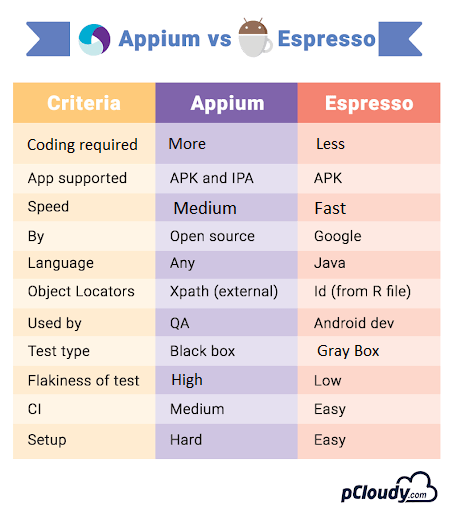
Appium vs Espresso: Key Differences
Criteria | Appium | Espresso |
Platform Support | Android and iOS | Android only |
Source Code Access | Not required | Required |
Test Type | Black-box and white-box testing | Primarily white-box testing |
Programming Language | Supports multiple languages (Java, Python, C#, etc.) | Java and Kotlin (via JUnit) |
Test Execution | Requires Appium server | Runs directly in the app process |
Cross-Platform | Yes | No |
Test Reliability | May face flakiness due to external dependencies | High reliability with built-in synchronization |
Integration | Requires WebDriver integration for advanced features | Fully integrated with Android Studio |
When to Use Appium
- When you need to perform cross-platform testing for both iOS and Android apps.
- When you require black-box testing without access to the app’s source code.
- When you want to use a familiar WebDriver-based framework with support for multiple languages.
When to Use Espresso
- When you are building a native Android app and need fast, reliable UI testing.
- When you need a developer-friendly testing framework that integrates seamlessly with Android Studio.
- When you prioritize faster feedback loops for CI/CD pipelines.
Conclusion
Both Appium and Espresso offer powerful capabilities for mobile app testing, but the right choice depends on your app’s requirements. If you need a cross-platform solution that supports both Android and iOS, Appium is the better option. However, if you’re focused solely on Android and need a reliable, fast UI testing framework, Espresso is ideal.