Suyash Dubey | Posted on | 2 min Read

Do you know why Google has selected Gradle as the build system for Android Studio? Many Android developers work in a heterogeneous environment with different technology stacks. Gradle solves some of the hardest problems faced by the developers like how to automate the testing of apps and how to manage dependencies and variations that allow professional developers to develop variations of their app with one click. This is why pCloudy came up with a new update where you can now run Espresso with Gradle on pCloudy devices. Let’s get a brief introduction about Espresso and Gradle before we learn how to run Espresso with Gradle on pCloudy devices.
 
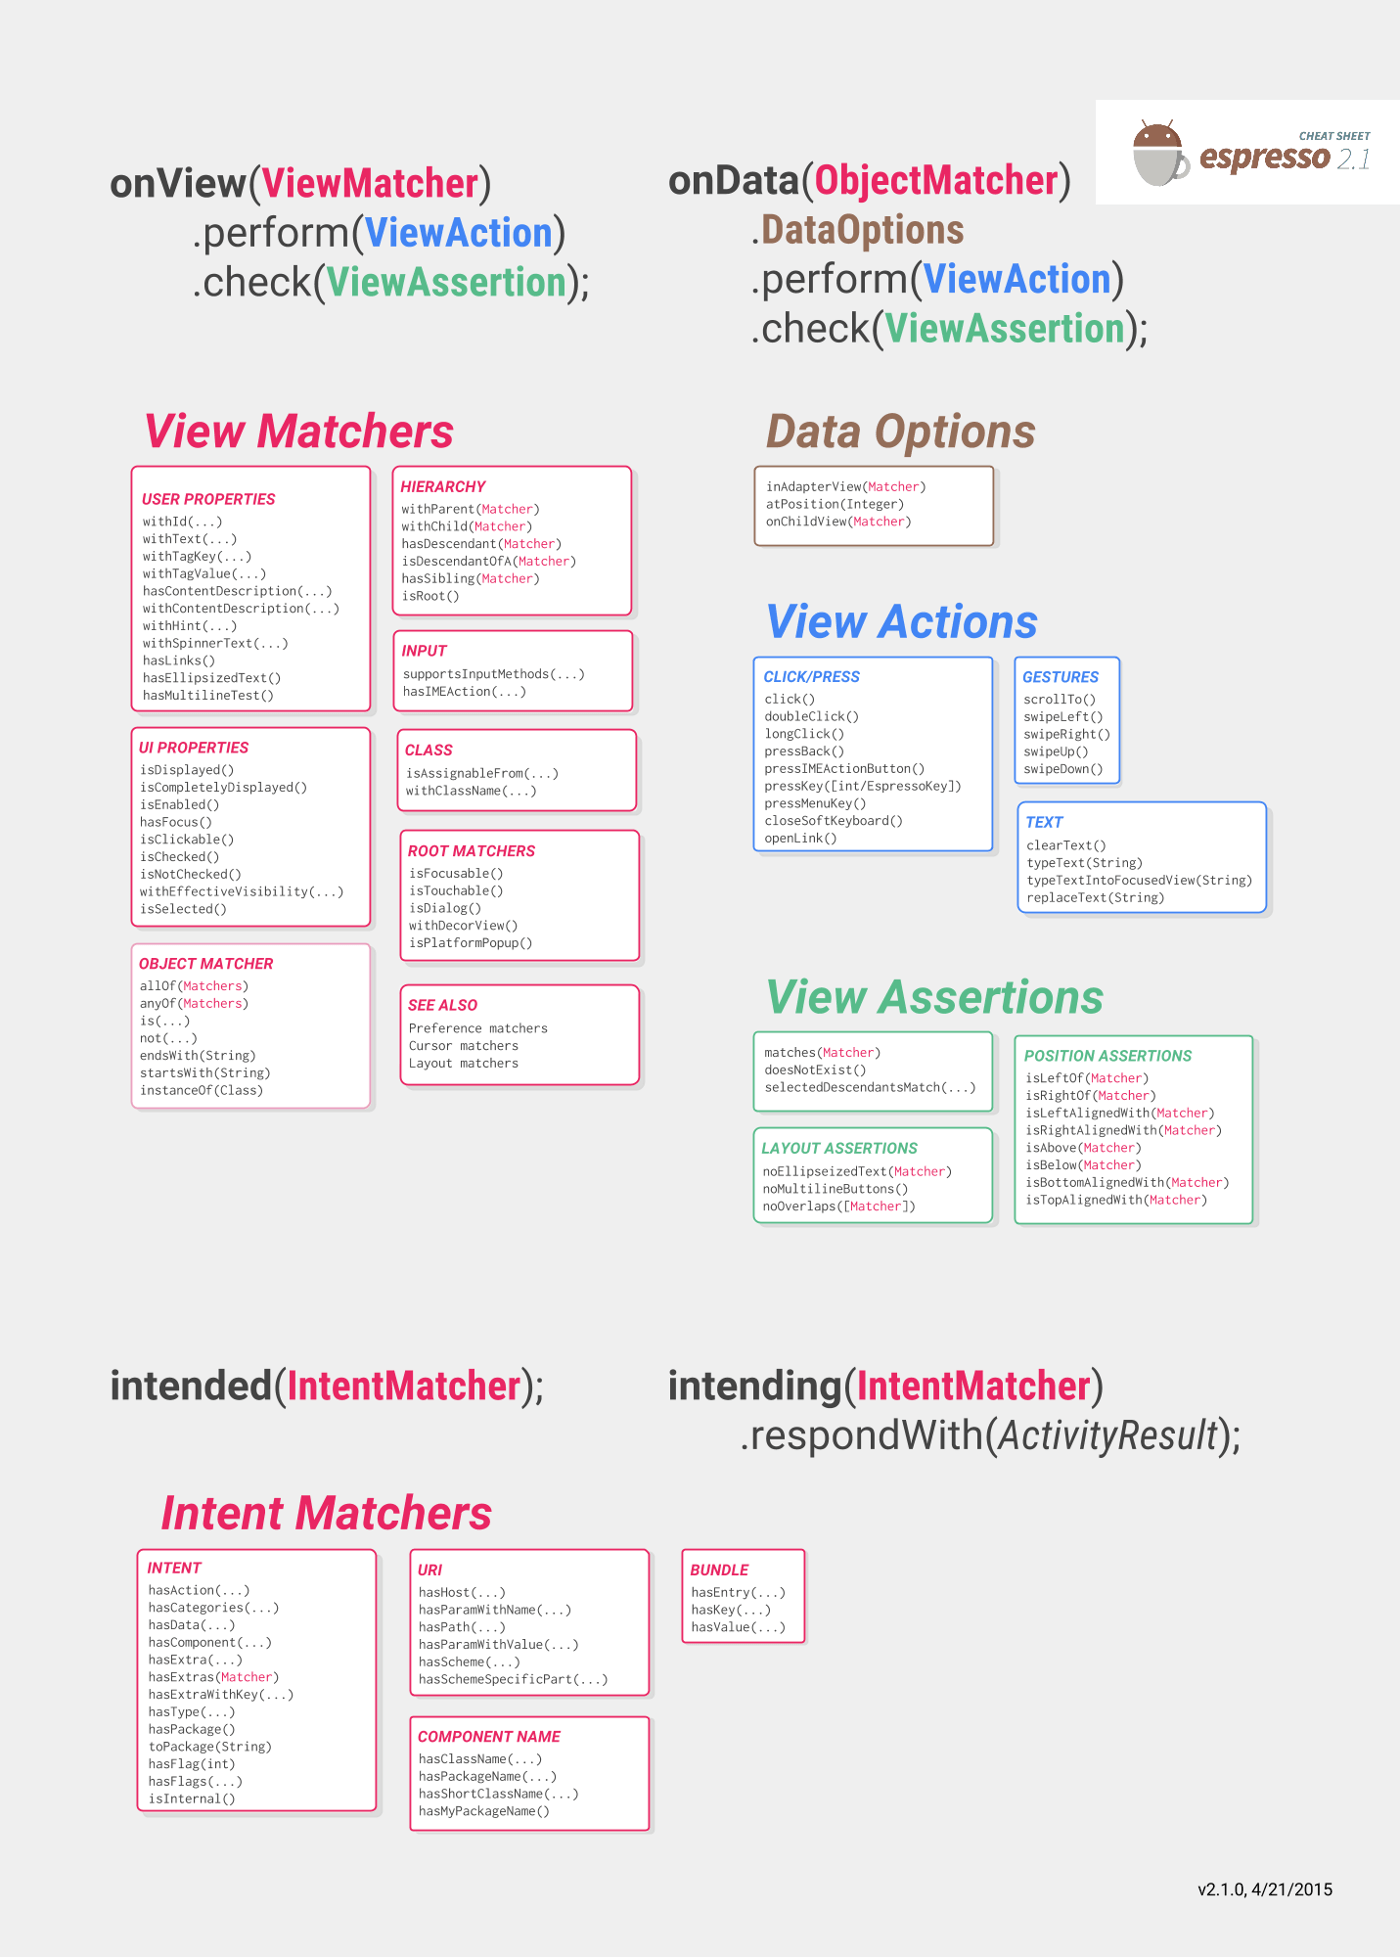
Espresso is a testing framework for Android which automatically synchronizes your test actions with the UI of your app. It also let the test wait until all the background activities have finished.
 
Gradle is an open source advanced build tool that allows seamless execution of tasks. It uses domain specific language and it is based on Groovy and Kotlin. It is a plugin based system so if you want to automate the task of building some package from sources then you can write the complete plugging in Java and share it with the world.
 
Gradle allows efficient and repeatable use of espresso and Test Orchestrator which allows automated yet fine-tuned control of the way you run your test. You can decide which specific test suites to be run to distribute the test cases across different devices. It is preferred by developers as it allows deep unit and functional testing rigs.
 

Power up your DevOps with Espresso and Gradle on pCloudy

You would be running Espresso on your machine using Android Studio and Gradle. However, the test would be running on pCloudy device. There is a pCloudy Espresso script that is provided by us and you need to put that espresso script in the workspace of the project. Along with the Gradle script, you will also get a config file. The gradle script will read input parameters from this config file.
 
Then you run Gradle to invoke the script which will upload your Application APK, test APK and other APK files to pCloudy. It would acquire a device to run your test on, it would execute those tests it will report back the status of what is happening into the Android Studio. After the test cases are run you can see the detailed reports and after that gradle script will release the device for other users to use.
 
There is a one-time setup that you need to do to place the gradle script in the workspace and you need to fill in the configuration file. So when you run the gradle script it will complete all the task for you and generate the report.
 

Steps to run Espresso with Gradle on pcloudy

 
1. Download the espresso starter pack from here and Unzip it
2. You will find three files,
a. pCloudy_Espresso.jar
b. Config.properties
c. build.gradle.SAMPLE
(This is a sample build.gradle that shows how to change your build.gradle to add the pCloudy Espresso jar.)
3. Copy the contents of the file build.gradle.Sample to the build.gradle file of your Android Application to register the new Gradle task and update as appropriate (see the image below)
 
33

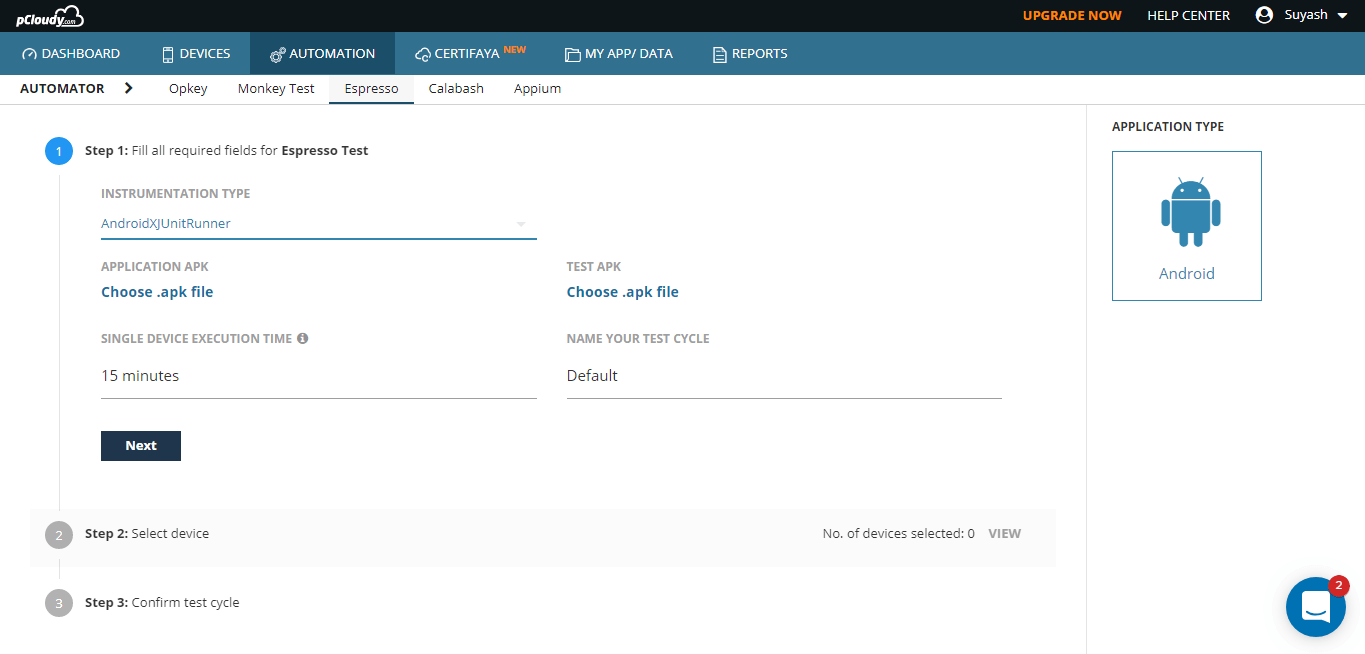
4. Place the config.properties file in your android workspace in the same directory as your build.gradle file.
 
sdgef
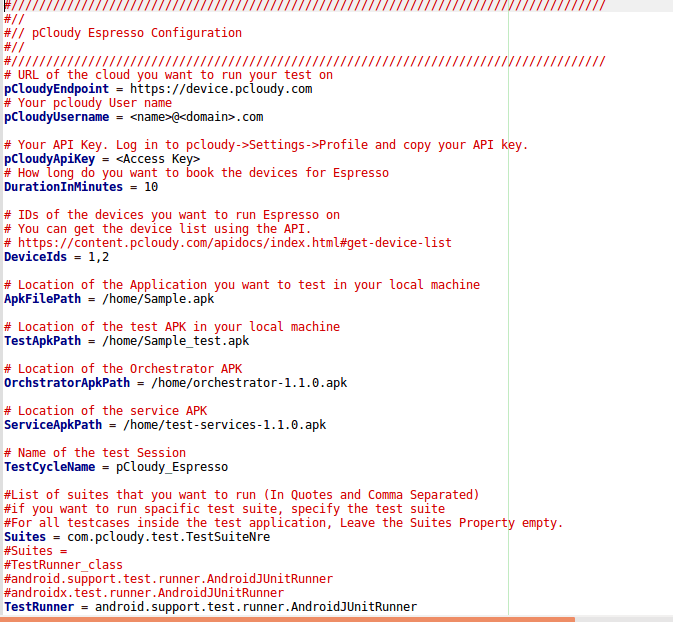
5. Update the config.properties file as guided in the comments in the file.

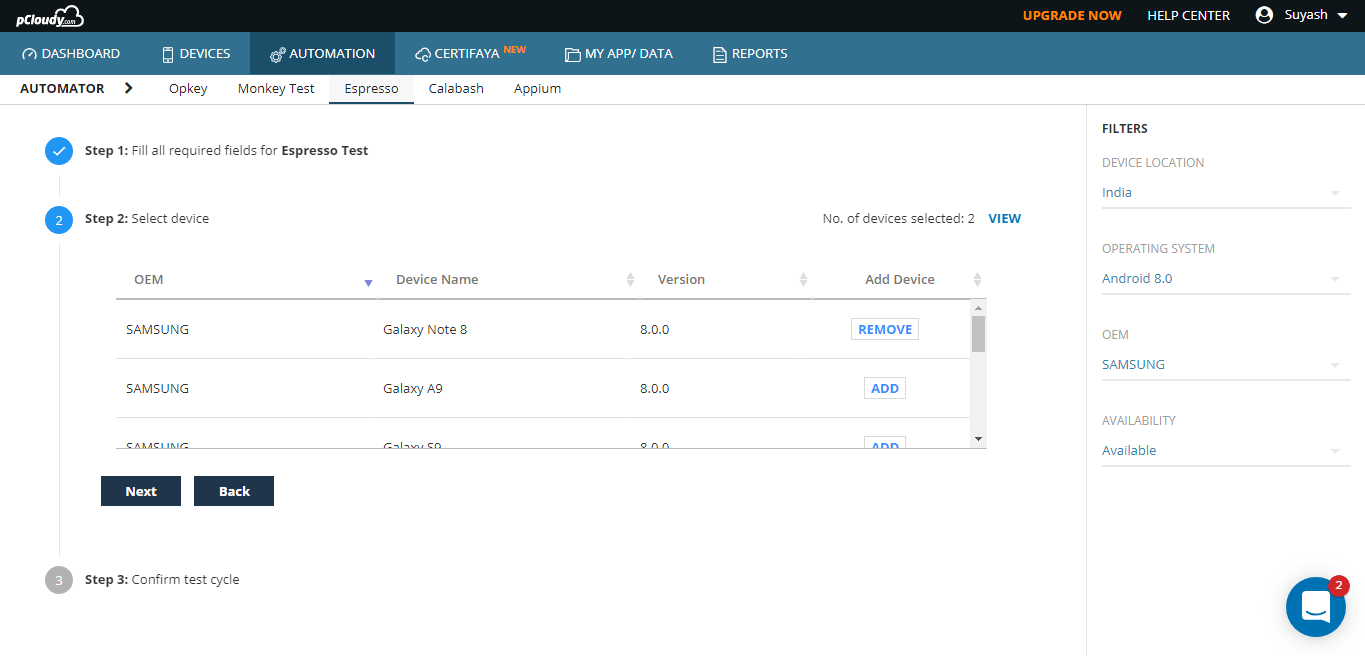
6. In your Android workspace run the command by typing the name of the gradle task as below.
 
tttt
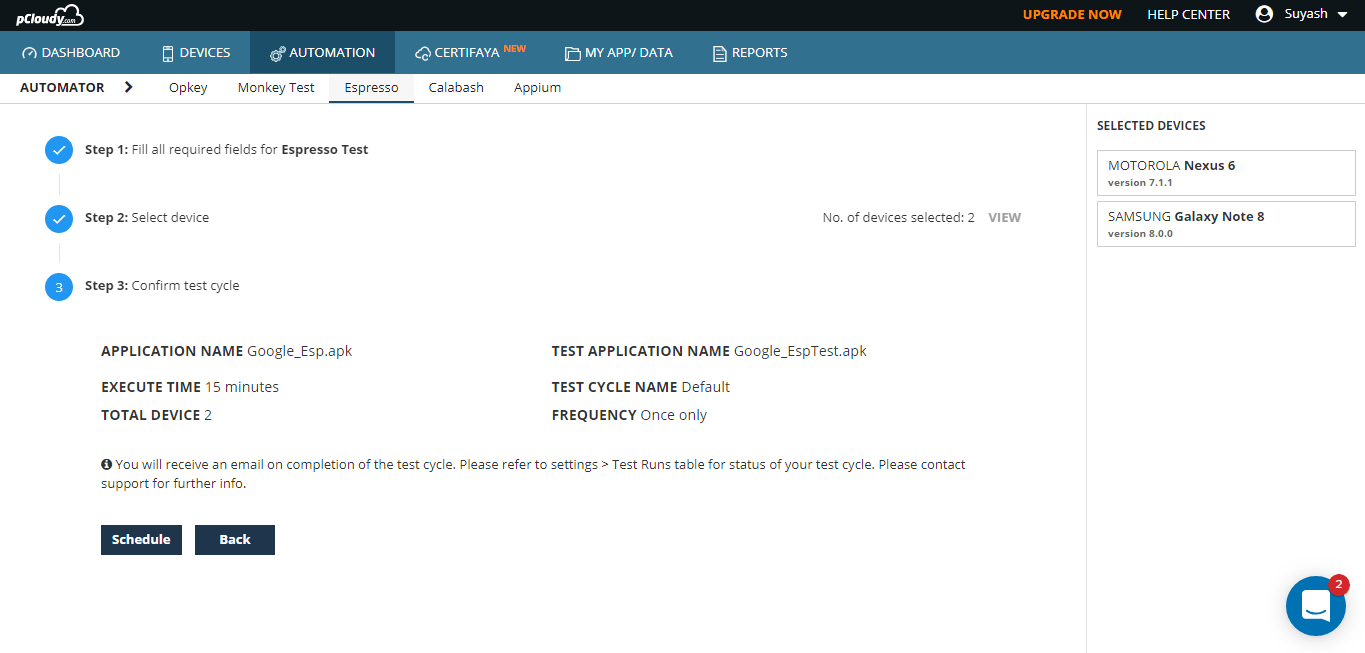
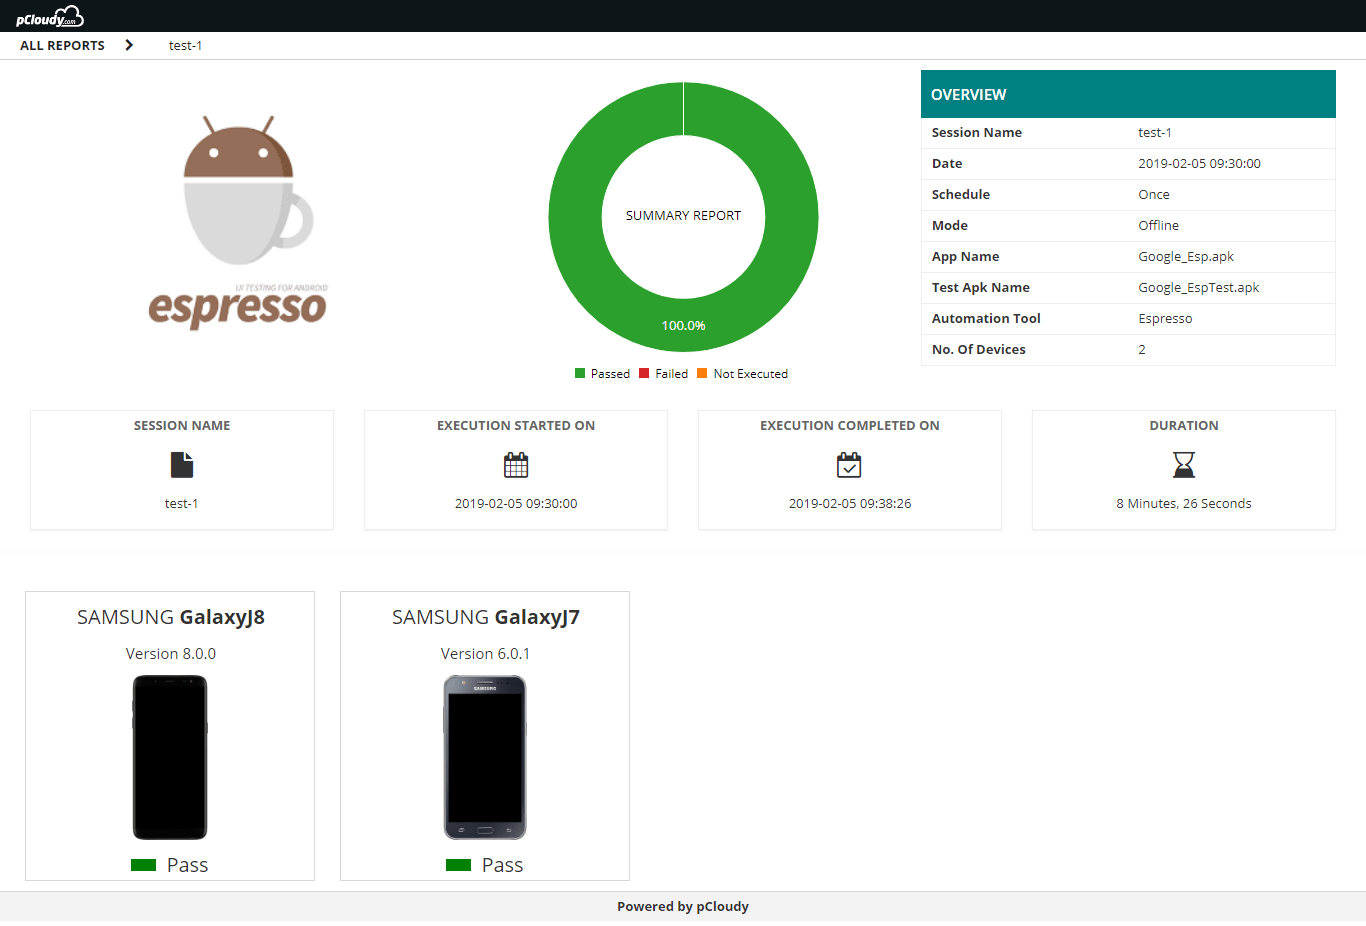
7. Once the test execution is complete you will get a URL of the test execution report. Some fields in the report are empty right now. We will fix them in subsequent phases.
 
rrr
The use of gradle has made it easier to run Espresso test on pCloudy devices. We can just use the configuration file and easily run the test scripts on pCloudy devices. This will save time and effort as it further simplifies the app testing process in pCloudy.
 
You can watch our webinar for more information.

 
Related Articles:

  • How to Run Espresso Test on Remote Devices
  • Appium vs Espresso: The Most Popular Automation Testing Framework in 2019
  • Run Espresso on pCloudy using pCoudy Utility
  • Automated Testing Using Espresso
  • Espresso with pCloudy.com
  • Suyash Dubey | Posted on | 2 min Read

    What is Expresso Framework?

    Espresso is a testing framework used to write UI test cases. It automatically tests your actions with the UI of your application. The framework also ensures that your activity is started before the test run. It can be used to test across multiple applications. If used for testing outside application, you can perform only black box testing. as you cannot the classes inside the application.
     

    Espresso has three components:

    ViewMatchers: Allows to find the view in the current view library.
    ViewActions: Allows to perform actions on the view
    ViewAssertions: Allows to assert state of the view
     

    Why Espresso?

    It's fast: It is really important to run test cases at a fast pace as there can be many tests. UI test takes time and is costly and it is possible that you might not be able to run all the tests.
     
    It's easy to setup: Setup process on local machines is easy and Android developers feel comfortable in the mobile SDK language which they use every day.
     
    It's less flaky: Automated DevOps process required fast and reliable feedback. Test written in native tools is much less flaky. It gives more control over the application: It is white box testing, Espresso is inside the application, it has access to and knows how to use the code that actually runs the application for more thorough testing of each element.
     
    You can use Espresso cheat sheet for quick reference as it contains most available instances of Matcher, ViewAction, and ViewAssertion.
     
    espresso-cheatsheet

    Source: https://developer.android.com/training/testing/espresso/cheat-sheet


    Steps for running your Test scripts in Espresso using pCloudy:

    Login over https://device.pcloudy.com with your registered Email ID & Password.
    To schedule "Espresso" over pCloudy, follow the following steps-

    • Go to the "Automation" page.
    • Select the Automation tool as "Espresso".
    • Select "Instrumentation Type" based on the Test Scripts you've written.
    •  
      espresso 1
      Note: pCloudy provides support for Instrumentation Type(InstrumentationTestRunner, AndroidJUnitRunner, and AndroidXJUnitRunner) for Android.
       

    • Select the Application APK and Test APK that you must have uploaded in the MY APP/DATA section.
    • Select the single device execution time and assign a name to your test cycle.
    • In the next step, Click on "ADD" to add the device for testing and click on " Next".
    • Now you can select the devices by clicking on the "ADD" button. You can also use the device filter to make it easier to search for a device. Click on next once the devices are selected.
    •  
      E2

    • Click on "Schedule" to start the test.
    •  
      E3

    • Go to your email inbox and open pCloudy Automation Alert mail. Click on the given link “Click to view Report”.
    •  
      E4-

    • Now you have the result of your scheduled test automation.

     
    E-5
     

    Take a look at this GIF to understand the flow of actions taken to run the test cycle.
    Webp.net-gifmaker (2)
    Software developers tend to make mistakes as app development is a very complex process. This means that the app will contain bugs. Espresso helps us detect errors that may have been made in the development, ensuring the reliability of the client and his satisfaction with the application.

     
    Related Articles:

  • Automated Testing Using Espresso
  • Run Espresso in pCloudy Using Gradle
  • Appium vs Espresso: The Most Popular Automation Testing Framework in 2019
  • Espresso with pCloudy.com
  • Basics of Appium Mobile Testing
  • Espresso with pCloudy

     
    Now, run your Espresso Scripts on hundreds of Mobile devices and build quality apps faster than ever.

    Several Mobile Automation Frameworks like Robotium, Calabash, Appium , KIF & uiautomator have been developed in recent years. Among a few popular ones, Espresso is one of them.

    You probably know, Espresso is a testing framework for Android apps. It is predominantly used by developers and testers for testing user interactions (UI) to ensure that users do not encounter crashes or unexpected results while using an app.

    There are several benefits of using Espresso, the primary ones are:

    • It automatically synchronises test actions with the UI of the app being tested. Meaning? To improve the reliability of tests, it detects when the main thread is idle and runs the test commands at the appropriate time.
    • This capability also relieves you from having to add any timing workarounds, such as a sleep period in your test code.
    • Espresso has an API that is small, easy to learn and built on top of the Android instrumentation framework.
    • It also supports testing activities outside the app like camera, browser and dialer etc which Appium does not support.

    However, when you have limited time and money it is a challenge to take full advantage of your Espresso scripts in improving the quality of your apps. Luckily, there are ways to overcome this.

    Conventionally, you would spend a huge amount of money to purchase several Android devices, and spend endless hours running your scripts independently on each device. Today, thankfully you don’t have to do this anymore, there is good news. With the help of a cloud-based testing platform like pCloudy.com, you can run your scripts on hundreds on real mobile devices in parallel.

    Yes, using pCloudy.com you can test your apps on any device of your choice and pay a just minimum price for the time you’ve used the device. You can not only save money, but you can also save your time by running your test scripts on multiple devices in parallel and get a detailed execution report.
     

    Here’s how you can use Espresso on pCloudy devices: