Mobile app automation testing has become essential for ensuring the quality and performance of apps in today’s competitive market. With shorter release cycles and tighter budgets, choosing the right automation testing framework can significantly impact your app’s success. While there are many automation frameworks available, Appium and Espresso have emerged as two of the most widely used frameworks for mobile app testing.
This blog provides a detailed comparison of Appium vs Espresso, highlighting their strengths, weaknesses, and ideal use cases to help you decide which framework is right for your needs.
Appium vs Espresso
Mobile app automation testing has evolved as a crucial aspect of the mobile app development process to help deliver better quality solutions, under controlled time cycles and cost schedules. But for delivering bug-free app, choosing the best suitable automation testing framework for your app is very important. There are many automation testing frameworks available in the market with exceptional capacities. This blog is all about Appium vs Espresso and we will analyze which of these two most widely used Automation testing frameworks is preferable for your app testing.
Espresso was not preferred because of its flakiness and instability issues. But, from the time Google has brought Android Test Orchestrator, a Gradle test option, instability and unreliability of Android Espresso tests have vanished. This, in turn, is creating a serious problem for the most popular automation framework Appium.
Let’s find out in this blog if Espresso now comes with a power to kill Appium or Appium can hold its stand in this fiercely competitive market.
What is Appium?
Appium is an open-source, cross-platform mobile automation testing framework that supports the testing of native, hybrid, and web apps. It enables testing on real devices, emulators, and simulators, making it a versatile choice for mobile app testing. Appium’s architecture uses the Selenium WebDriver protocol, which allows cross-platform compatibility, enabling the same test scripts to work for both Android and iOS apps.
Advantages of Using Appium
Facilitates Test Execution Without a Server Machine Appium is built on a Node.js-based runtime, making it lightweight and capable of running on local machines without requiring a dedicated server.
No App Code Recompilation Required
Appium enables testers to run automation tests without modifying or recompiling the app code, making it highly flexible for both native and cross-platform apps.
3. Automates Various Types of Mobile Apps
Whether it’s a web, hybrid, or native app, Appium supports automation across all app types using the same framework.
4. Supports Real Devices, Emulators, and Simulators
Appium enables testers to run tests on real devices for accurate usability testing while also supporting emulators and simulators for faster test execution.
5. Record and Playback Tool for Quick Test Creation
Appium’s inspector allows testers to record app behavior and generate scripts in multiple programming languages such as Java, Python, Ruby, and C#.
6. Cross-Platform Compatibility
Appium enables you to run the same test script on both Android and iOS platforms, reducing the effort required for cross-platform app testing.
7. Supports Multiple Programming Languages
Appium integrates with WebDriver-compatible languages, including Java, JavaScript, Python, PHP, Ruby, C#, and Objective-C, allowing testers to write scripts in their preferred language.
Disadvantages of Using Appium
Limited Gesture Support
Common mobile gestures, such as double-tap, may not be natively supported in Appium’s Java-client libraries, requiring workarounds.
2. No Support for Concurrent iOS Simulator Testing
Appium does not allow running multiple test scripts on iOS simulators concurrently, which can slow down large-scale iOS testing.
3. Limited Image Recognition Capability
Appium struggles with image-based testing as it cannot recognize images automatically and requires screen coordinates for locating visual elements.
4. No Support for Older Android Versions
Appium only supports Android 4.2 and above, making it difficult to test apps targeting older Android APIs.
What is Espresso?
Espresso is Google’s UI testing framework for Android apps. It provides fast, reliable UI testing by synchronizing test actions with the app’s user interface and ensuring that the app’s activities have completed before the test starts.
With the introduction of Android Test Orchestrator, Google has addressed common issues like flaky tests and shared states, making Espresso more stable and reliable.
Advantages of Using Espresso
Integration with Gradle Espresso is fully integrated with Android Studio and Gradle, enabling developers to run tests directly from the command line or IDE with minimal setup.
Android Test Orchestrator for Reliability
The Android Test Orchestrator runs each test in its own sandboxed environment, ensuring minimal shared state and isolating crashes, leading to more reliable test results.
3. Less Flakiness
Espresso’s built-in synchronization mechanism ensures that test actions are executed only when the app’s UI is idle, reducing flakiness caused by asynchronous operations.
4. Developer-Friendly Test Automation
Since Espresso is based on Java and JUnit, Android developers can quickly adopt it without additional learning curves or external dependencies.
5. Fast Feedback Loop
Unlike Appium, Espresso runs alongside the app without requiring a server, resulting in faster test execution and immediate feedback.
6. Simple Test Suite Management
Espresso allows developers to package their tests as standalone APKs, which can be installed alongside the app and executed easily.
Disadvantages of Using Espresso
1.Requires Access to the App’s Source Code
Espresso requires access to the app’s source code, limiting its use for black-box testing or when working with third-party apps.
2. Narrow Focus (Android-Only)
Espresso is designed exclusively for Android, so separate frameworks (like XCTest) are required for iOS testing, resulting in increased effort for cross-platform apps.
3. Requires Emulator Experience
Running Espresso tests requires familiarity with launching and managing Android apps on emulators, which may add complexity for QA teams unfamiliar with Android development.
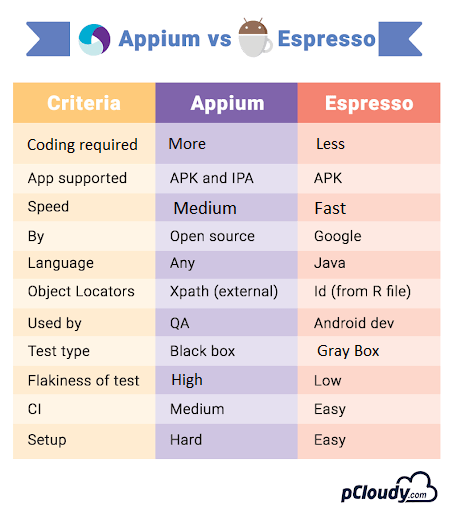
Appium vs Espresso: Key Differences
Criteria
Appium
Espresso
Platform Support
Android and iOS
Android only
Source Code Access
Not required
Required
Test Type
Black-box and white-box testing
Primarily white-box testing
Programming Language
Supports multiple languages (Java, Python, C#, etc.)
Java and Kotlin (via JUnit)
Test Execution
Requires Appium server
Runs directly in the app process
Cross-Platform
Yes
No
Test Reliability
May face flakiness due to external dependencies
High reliability with built-in synchronization
Integration
Requires WebDriver integration for advanced features
When you require black-box testing without access to the app’s source code.
When you want to use a familiar WebDriver-based framework with support for multiple languages.
When to Use Espresso
When you are building a native Android app and need fast, reliable UI testing.
When you need a developer-friendly testing framework that integrates seamlessly with Android Studio.
When you prioritize faster feedback loops for CI/CD pipelines.
Conclusion
Both Appium and Espresso offer powerful capabilities for mobile app testing, but the right choice depends on your app’s requirements. If you need a cross-platform solution that supports both Android and iOS, Appium is the better option. However, if you’re focused solely on Android and need a reliable, fast UI testing framework, Espresso is ideal.
Comprehensive Test Coverage
Test your apps on 5000+ real device and browser combinations and ensure a complete test coverage.
Get a free demo
Espresso is a testing framework for Android which automatically synchronizes your test actions with the UI of your app. It also lets the test wait until all the background activities have finished.
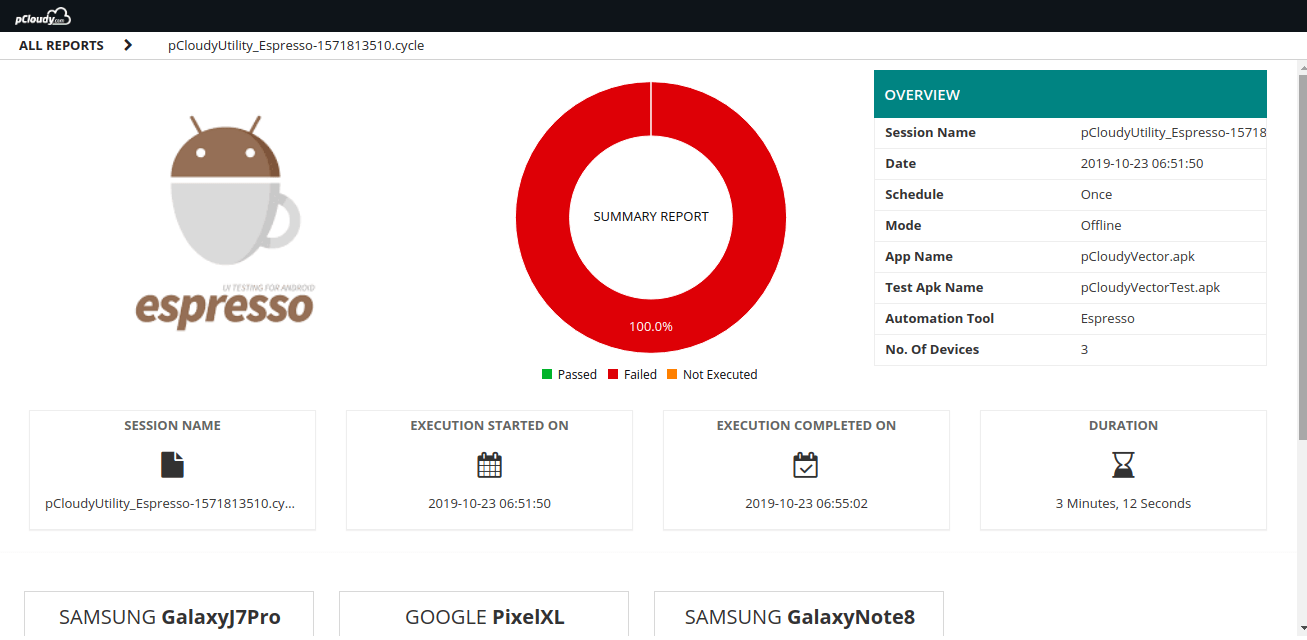
The pCloudy utility uploads your Application APK, test APK and other APK files to pCloudy. It will then acquire a device to run your test on, execute those tests and report back the status and test report.
In pCloudy you don’t have to set up the environment. Just follow these simple steps.
After the test cases are run you can see the detailed reports. Once automation ends, the device under test will be released automatically so that you or other users can use it later.
There are two ways you can execute espresso test cases. Here are the steps for both
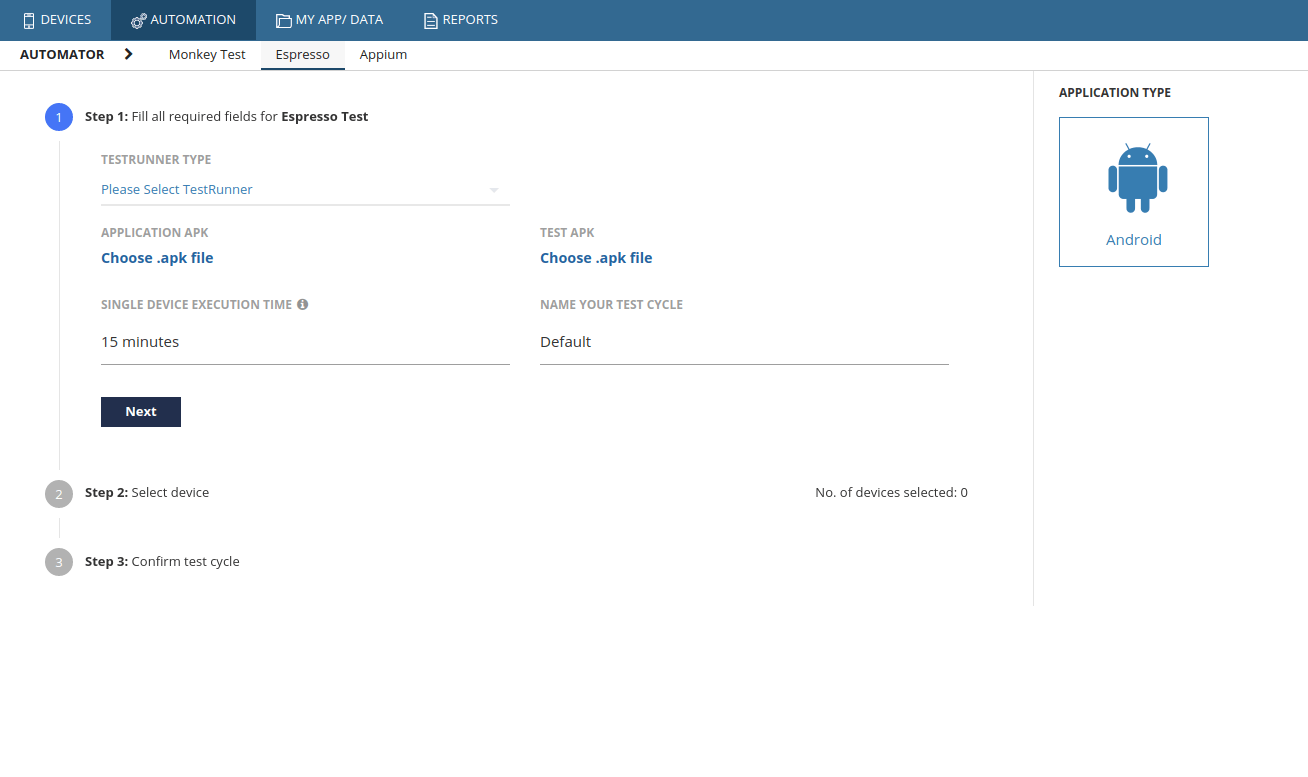
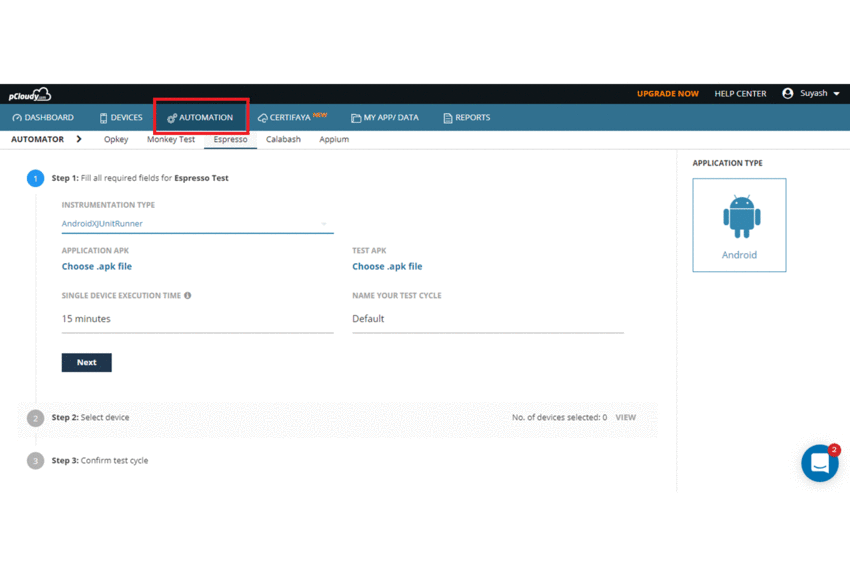
1. pCloudy UI Dashboard a. In pCloudy UI there is a section called Automation where you will find multiple automation frameworks integrated to the platform. b.Select the Espresso automation and to fill in the required details.
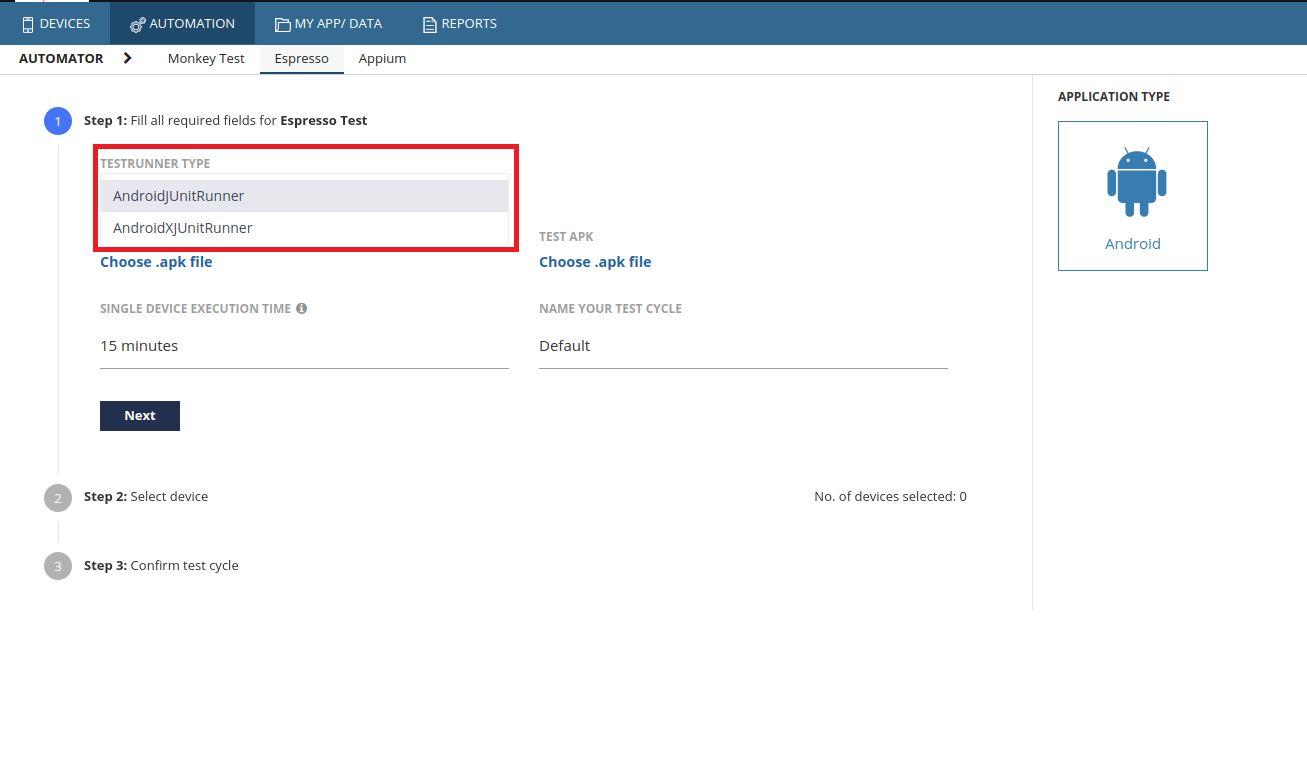
c. pCloudy Support two TestRunners.
i. AndroidJUnitRunner (android.support.test.runner.AndroidJUnitRunner)
ii. AndroidXJUnitRunner (androidx.test.runner.AndroidJUnitRunner)
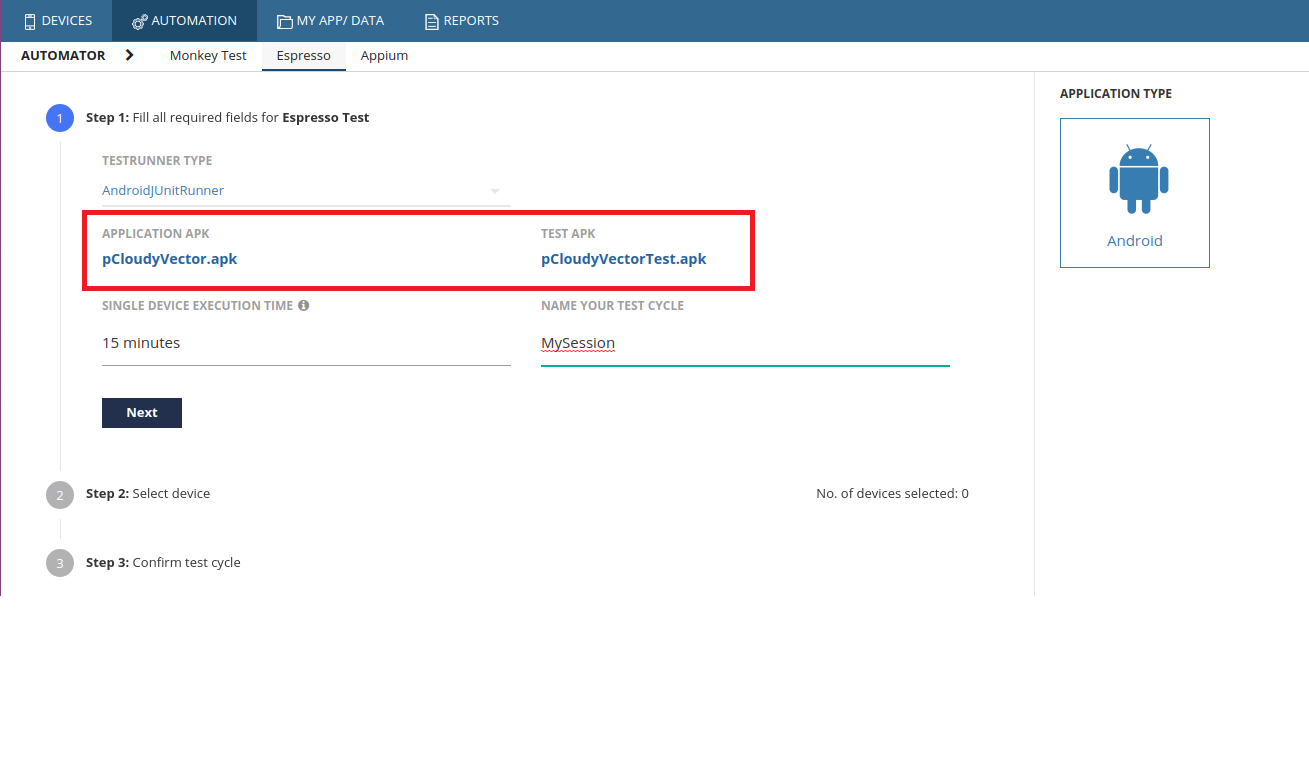
d. Select your Application and Test Application.
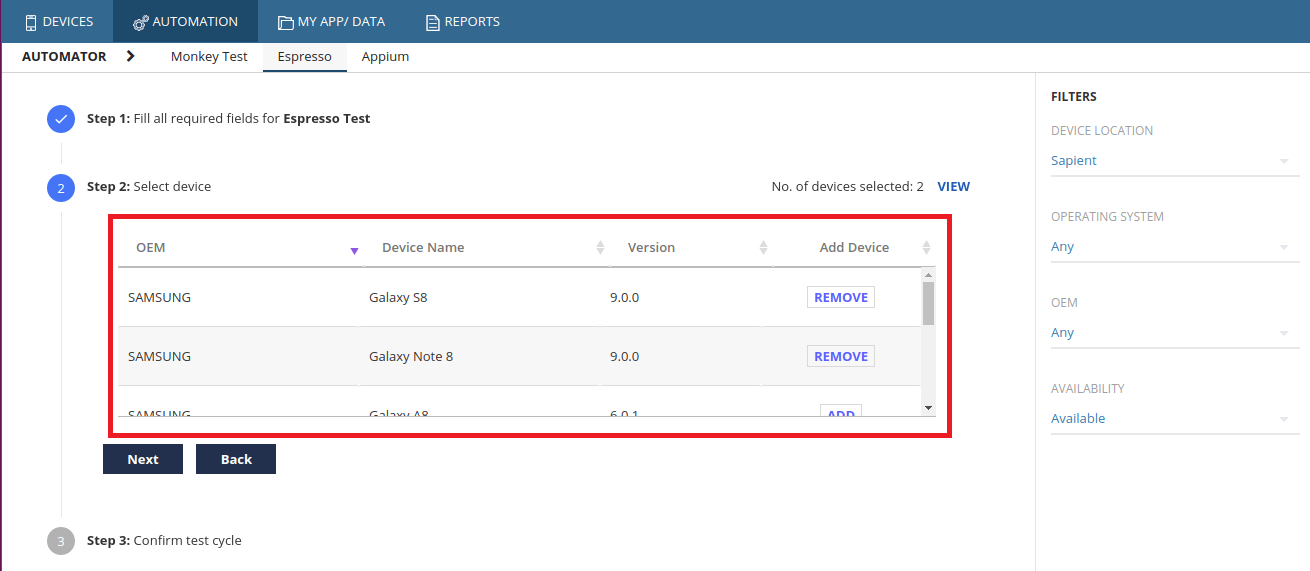
e. Select the required devices.
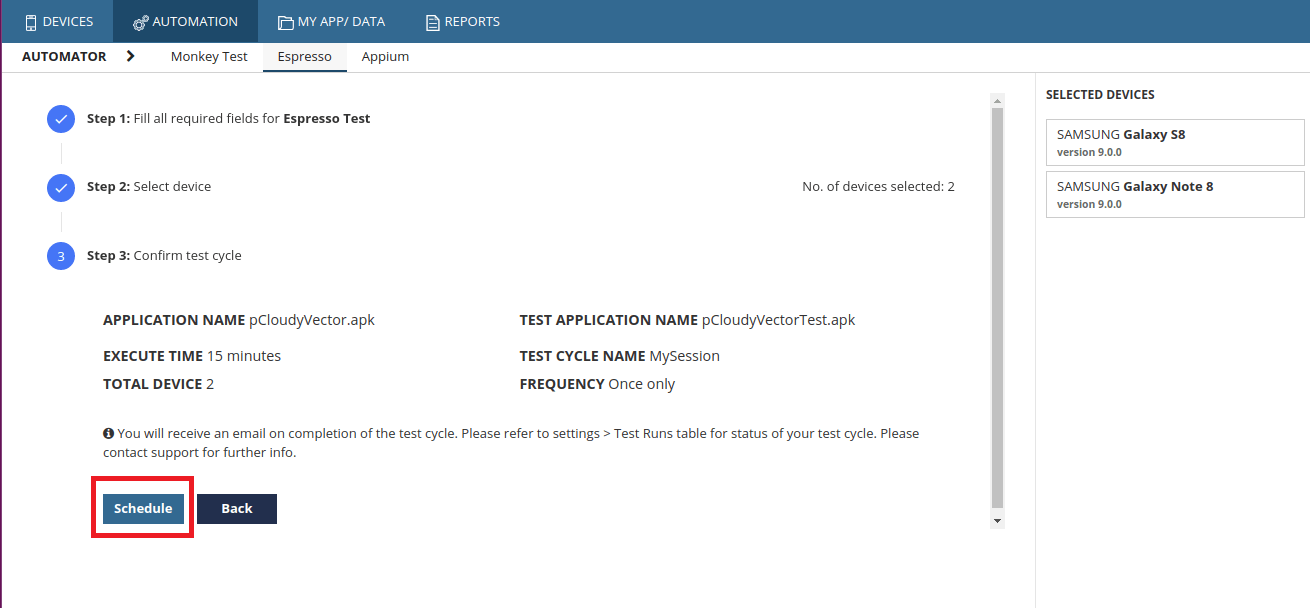
f. Click on Next button and Schedule the automation by clicking on the Schedule button.
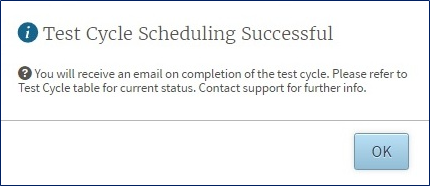
g. You will get a dialog box. Click on Ok.
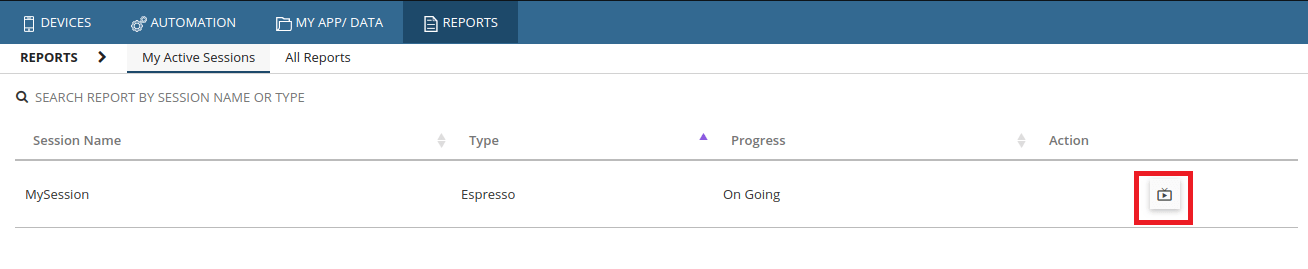
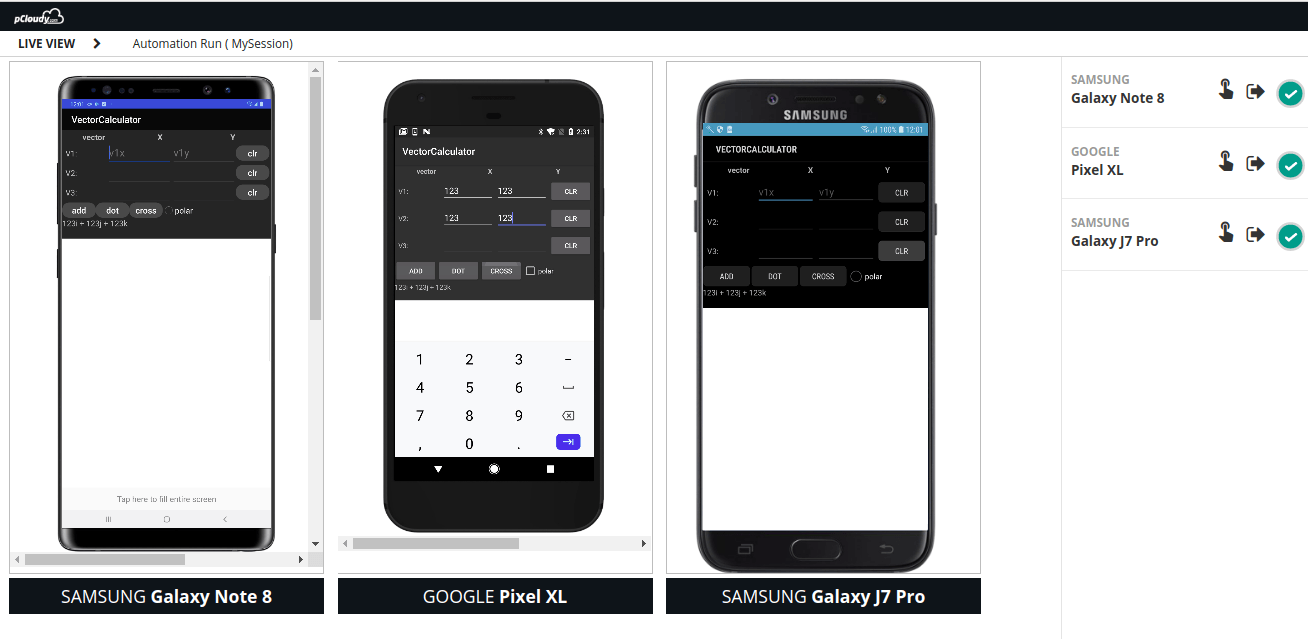
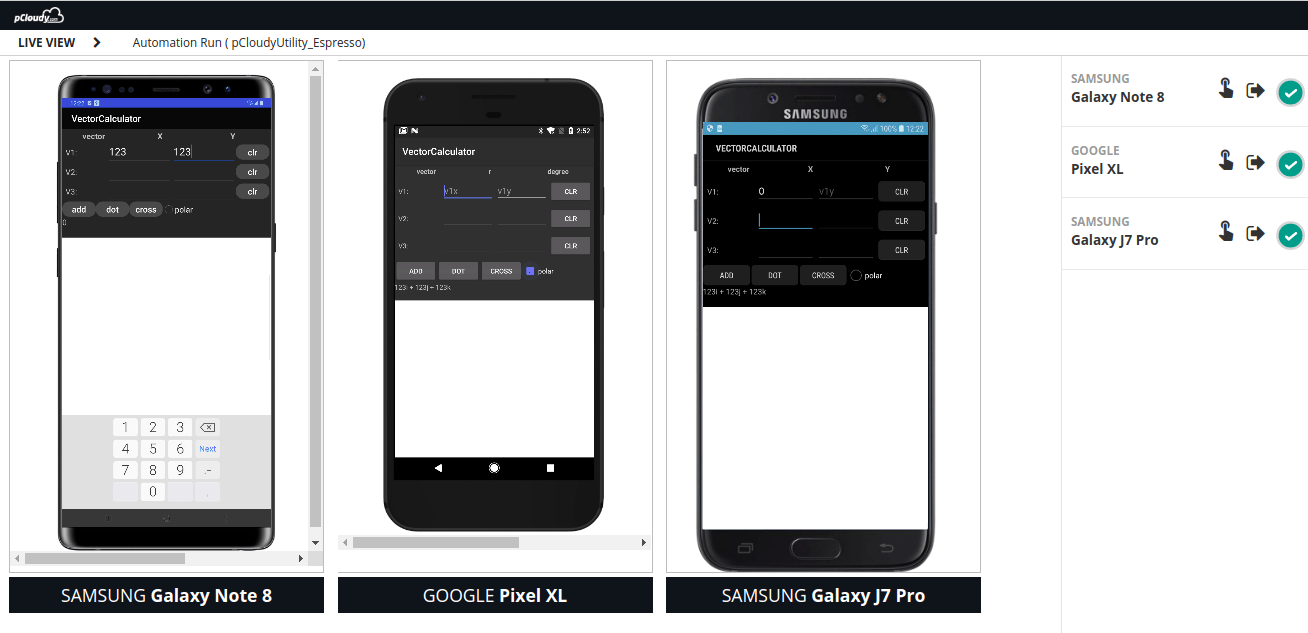
h. You will get the active session details on the Dashboard and you will also be able to see the Live view.
i. Liveview will help you to see the live execution on your test cases. Click on the Liveview icon
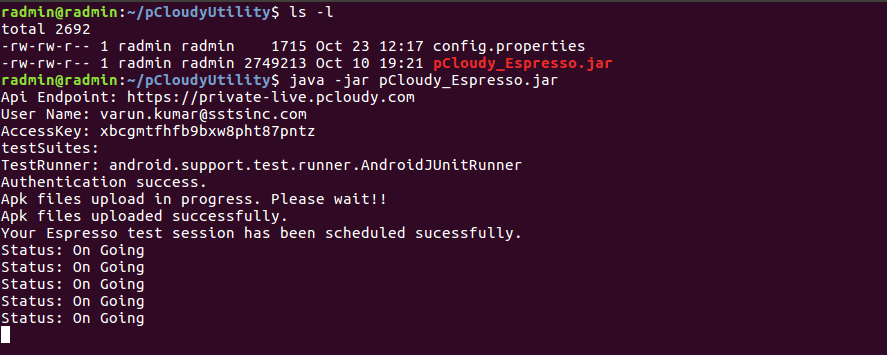
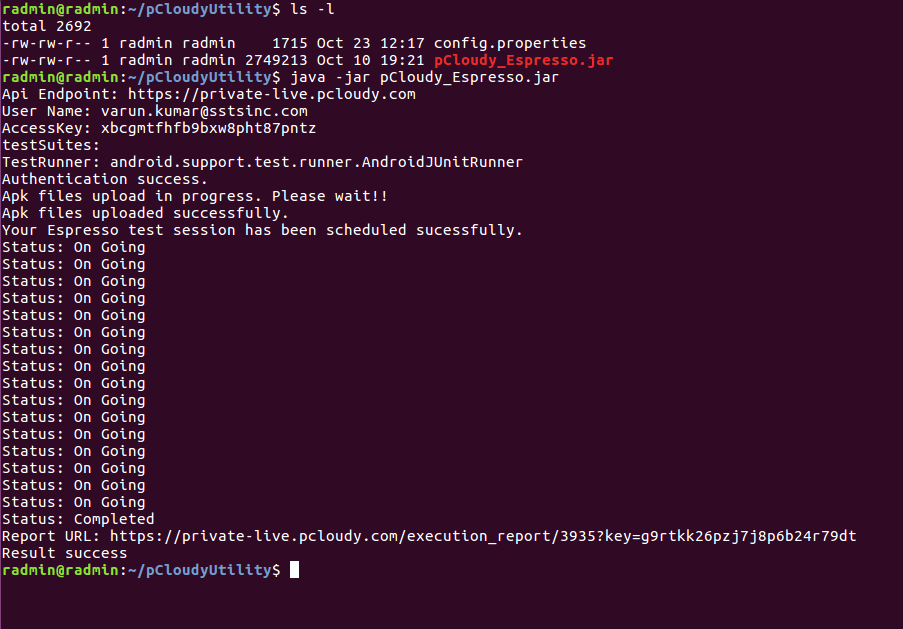
2.pCloudy Utility
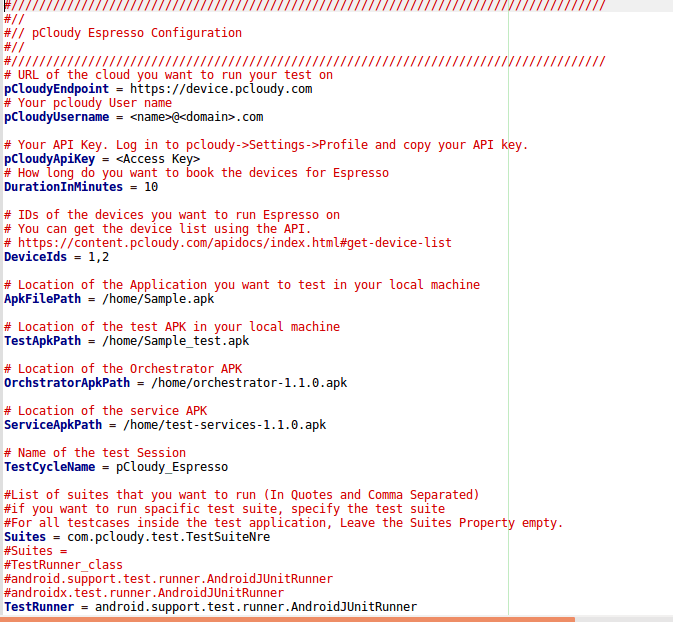
a. Download the espresso starter pack from here and Unzip it b. You will find two files,
i. pCloudy_Espresso.jar
ii.Config.properties c. Place the config.properties file and pCloudy_Espresso.js file into the same directory. d. Update the config.properties file as guided in the comments in the file. e. In your workspace, run the command by typing the java -jar pCloudy_Espresso.jar
f. This will upload the required files which you have mentioned inside the config.properties files.
g. You will get the status of the Automation in pCloudy Dashboard ActiveSession.
h. Even on the pCloudy dashboard, you can use the Liveview by which you can see the running test cases.
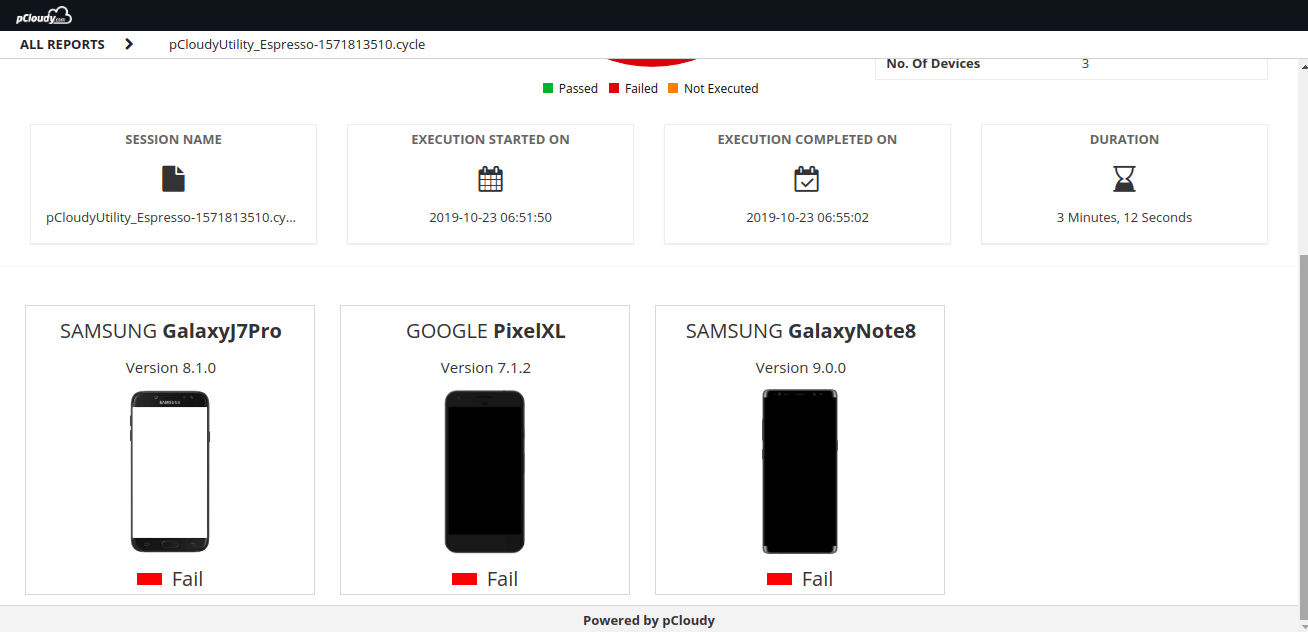
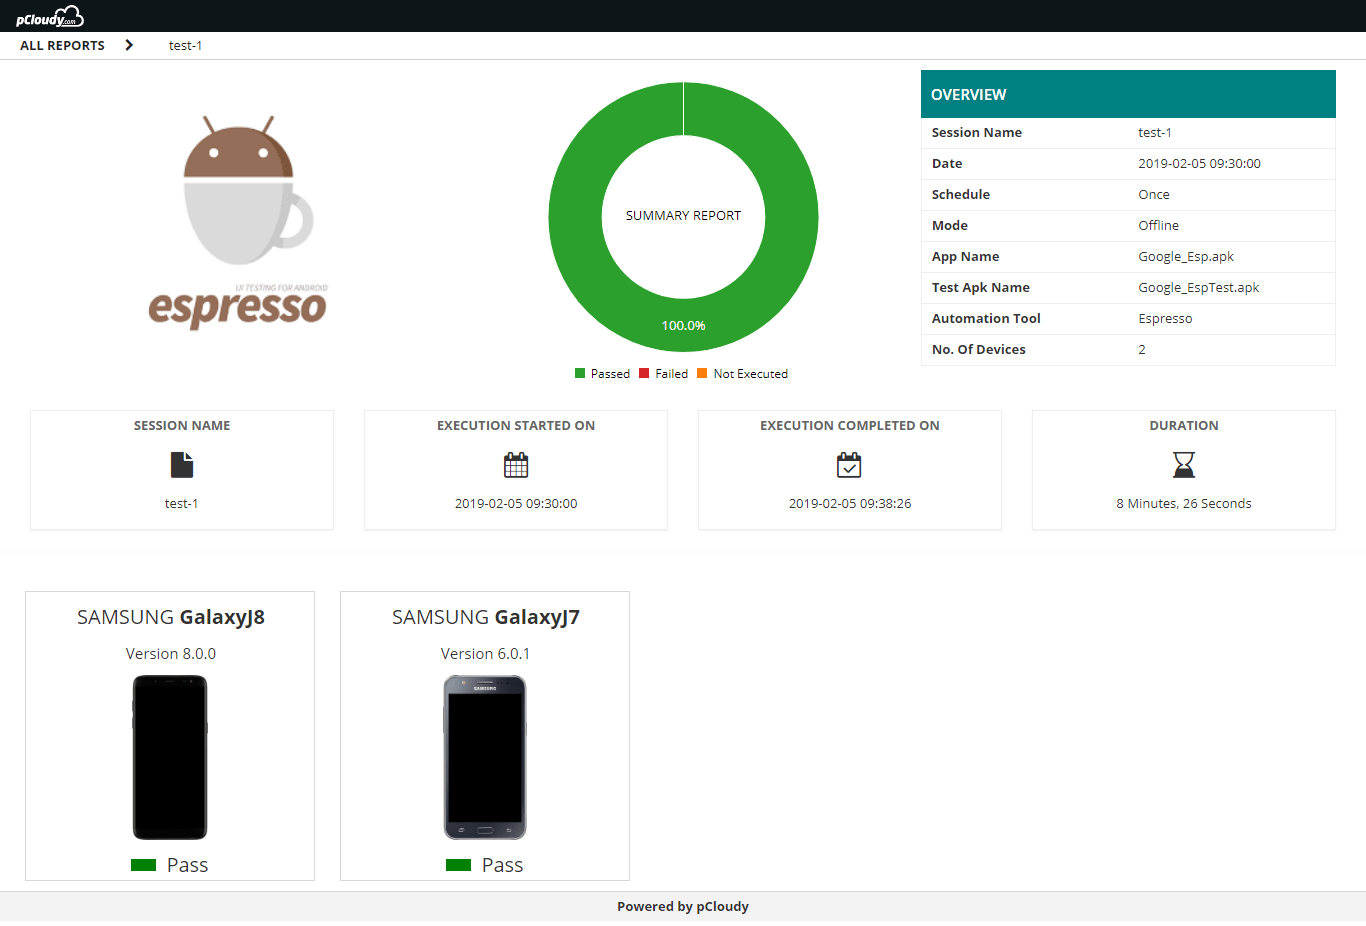
i. Once the test execution is over, You will get a URL of the test execution report on the terminal.
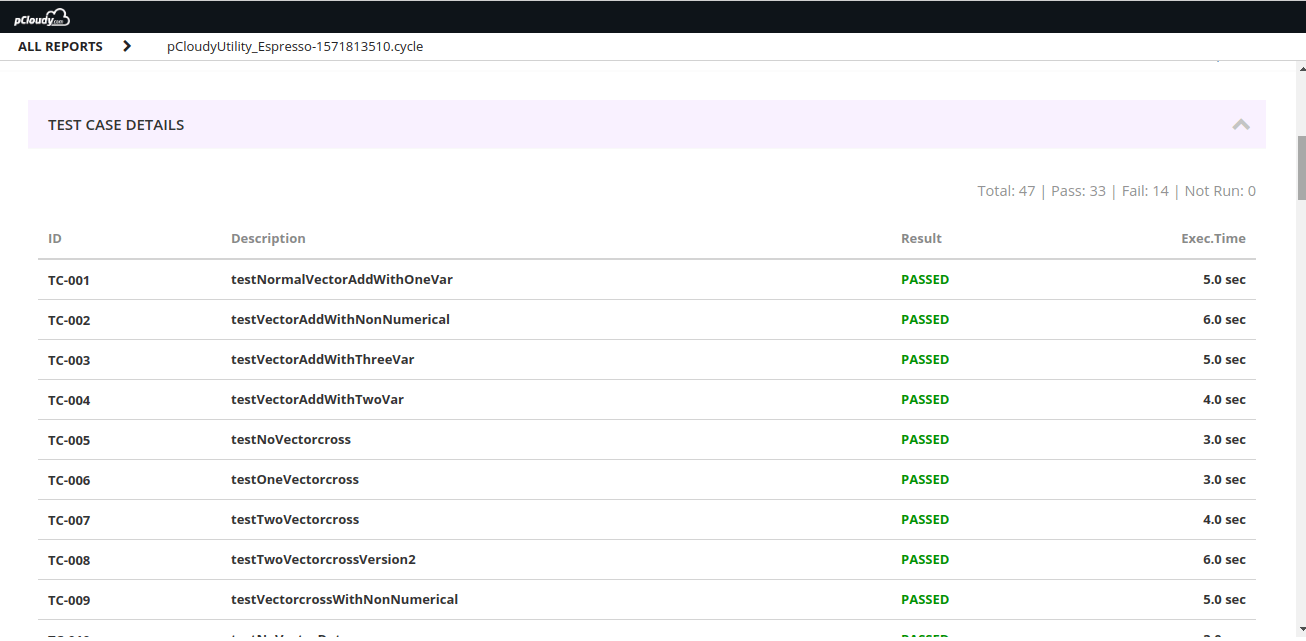
j. You can open the report from the dashboard Report section also. In the report, all the test details will be there as shown in the screenshots below.
k. You will also get individual device reports. Inside the test case level details, you will find performance details, test case logs, device logs, and video files.
Do you know why Google has selected Gradle as the build system for Android Studio? Many Android developers work in a heterogeneous environment with different technology stacks. Gradle solves some of the hardest problems faced by the developers like how to automate the testing of apps and how to manage dependencies and variations that allow professional developers to develop variations of their app with one click. This is why pCloudy came up with a new update where you can now run Espresso with Gradle on pCloudy devices. Let’s get a brief introduction about Espresso and Gradle before we learn how to run Espresso with Gradle on pCloudy devices.
Espresso is a testing framework for Android which automatically synchronizes your test actions with the UI of your app. It also let the test wait until all the background activities have finished.
Gradle is an open source advanced build tool that allows seamless execution of tasks. It uses domain specific language and it is based on Groovy and Kotlin. It is a plugin based system so if you want to automate the task of building some package from sources then you can write the complete plugging in Java and share it with the world.
Gradle allows efficient and repeatable use of espresso and Test Orchestrator which allows automated yet fine-tuned control of the way you run your test. You can decide which specific test suites to be run to distribute the test cases across different devices. It is preferred by developers as it allows deep unit and functional testing rigs.
Power up your DevOps with Espresso and Gradle on pCloudy
You would be running Espresso on your machine using Android Studio and Gradle. However, the test would be running on pCloudy device. There is a pCloudy Espresso script that is provided by us and you need to put that espresso script in the workspace of the project. Along with the Gradle script, you will also get a config file. The gradle script will read input parameters from this config file.
Then you run Gradle to invoke the script which will upload your Application APK, test APK and other APK files to pCloudy. It would acquire a device to run your test on, it would execute those tests it will report back the status of what is happening into the Android Studio. After the test cases are run you can see the detailed reports and after that gradle script will release the device for other users to use.
There is a one-time setup that you need to do to place the gradle script in the workspace and you need to fill in the configuration file. So when you run the gradle script it will complete all the task for you and generate the report.
Steps to run Espresso with Gradle on pcloudy
1. Download the espresso starter pack from here and Unzip it
2. You will find three files,
a. pCloudy_Espresso.jar
b. Config.properties
c. build.gradle.SAMPLE
(This is a sample build.gradle that shows how to change your build.gradle to add the pCloudy Espresso jar.)
3. Copy the contents of the file build.gradle.Sample to the build.gradle file of your Android Application to register the new Gradle task and update as appropriate (see the image below)
4. Place the config.properties file in your android workspace in the same directory as your build.gradle file.
5. Update the config.properties file as guided in the comments in the file.
6. In your Android workspace run the command by typing the name of the gradle task as below.
7. Once the test execution is complete you will get a URL of the test execution report. Some fields in the report are empty right now. We will fix them in subsequent phases.
The use of gradle has made it easier to run Espresso test on pCloudy devices. We can just use the configuration file and easily run the test scripts on pCloudy devices. This will save time and effort as it further simplifies the app testing process in pCloudy.
Espresso is a testing framework used to write UI test cases. It automatically tests your actions with the UI of your application. The framework also ensures that your activity is started before the test run. It can be used to test across multiple applications. If used for testing outside application, you can perform only black box testing. as you cannot the classes inside the application.
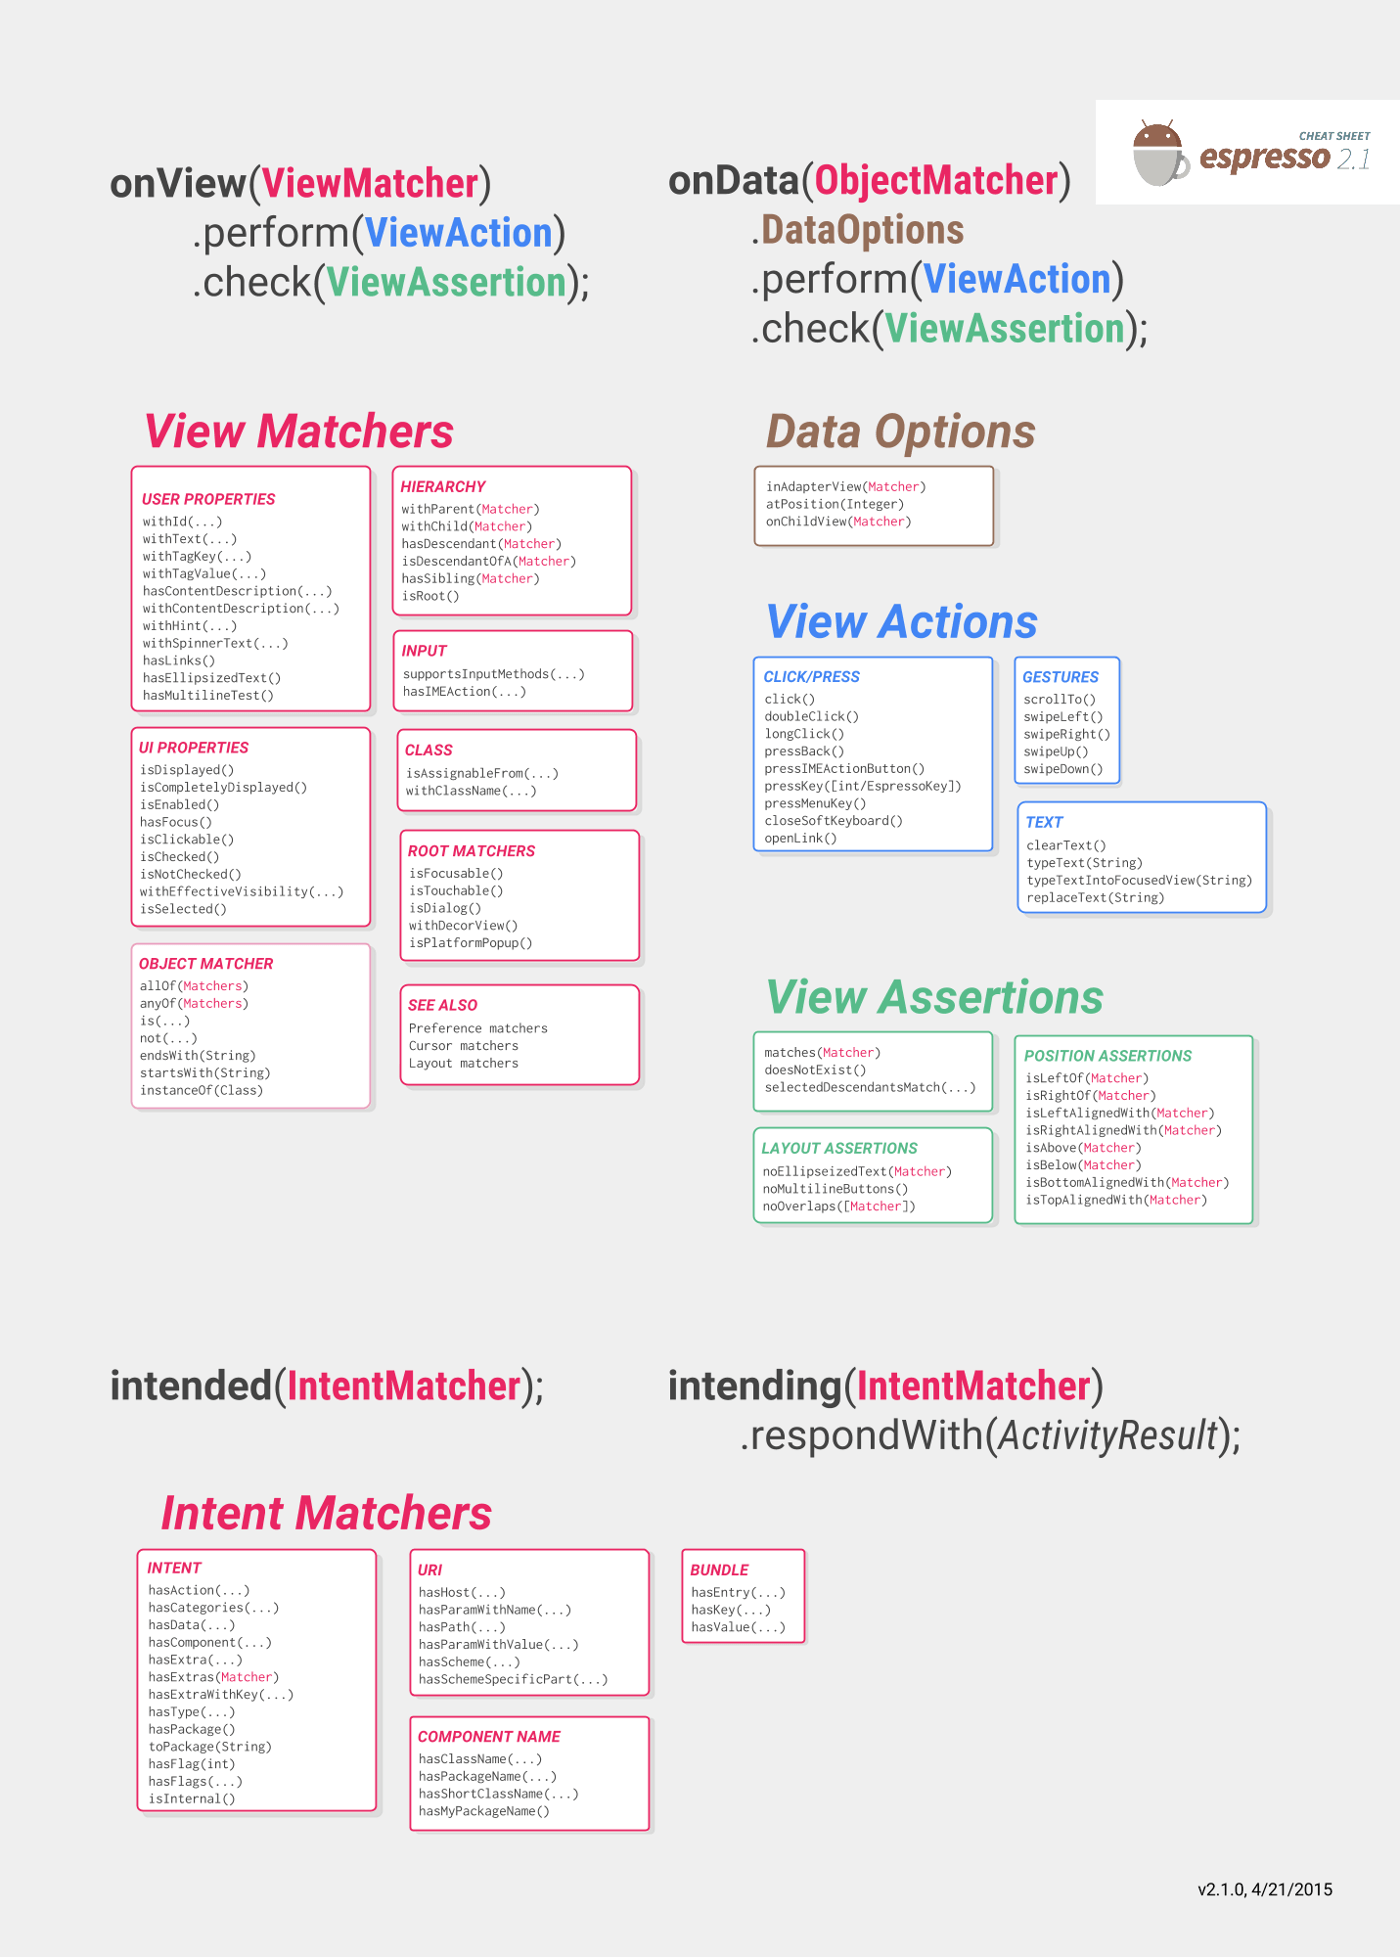
Espresso has three components:
ViewMatchers: Allows to find the view in the current view library. ViewActions: Allows to perform actions on the view ViewAssertions: Allows to assert state of the view
Why Espresso?
It's fast: It is really important to run test cases at a fast pace as there can be many tests. UI test takes time and is costly and it is possible that you might not be able to run all the tests.
It's easy to setup: Setup process on local machines is easy and Android developers feel comfortable in the mobile SDK language which they use every day.
It's less flaky: Automated DevOps process required fast and reliable feedback. Test written in native tools is much less flaky. It gives more control over the application: It is white box testing, Espresso is inside the application, it has access to and knows how to use the code that actually runs the application for more thorough testing of each element.
You can use Espresso cheat sheet for quick reference as it contains most available instances of Matcher, ViewAction, and ViewAssertion.
Steps for running your Test scripts in Espresso using pCloudy:
Login over https://device.pcloudy.com with your registered Email ID & Password.
To schedule "Espresso" over pCloudy, follow the following steps-
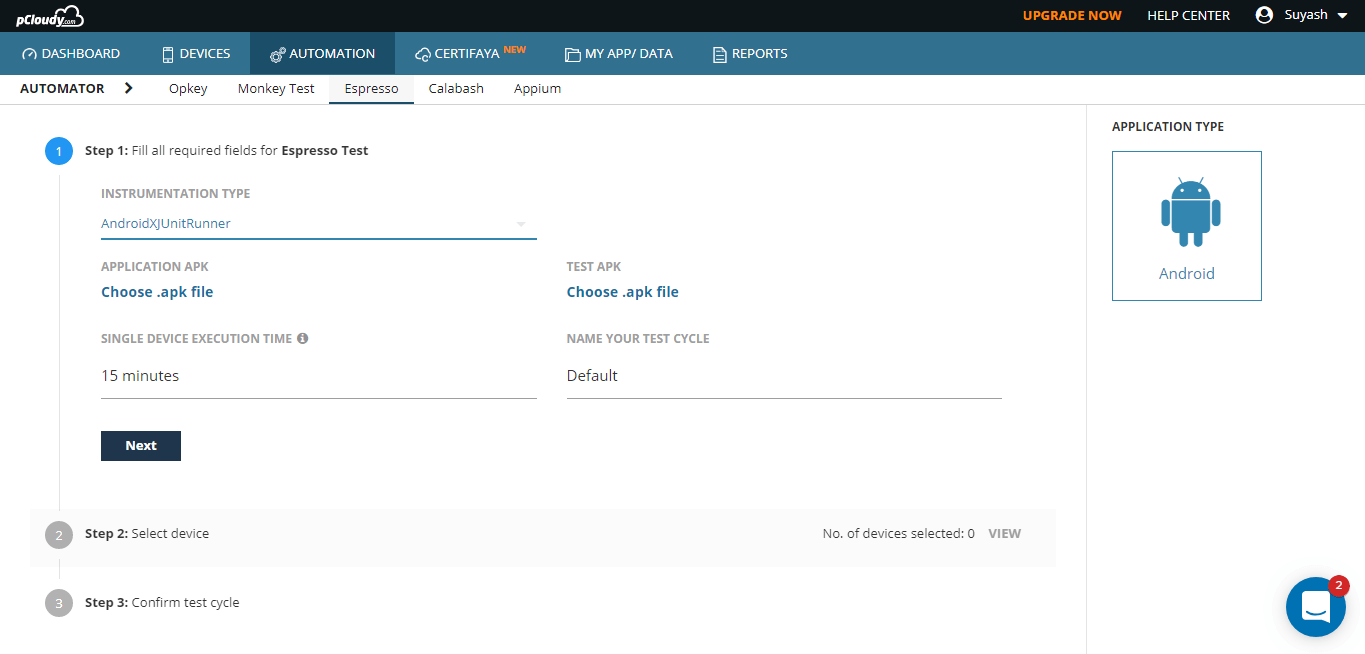
Go to the "Automation" page.
Select the Automation tool as "Espresso".
Select "Instrumentation Type" based on the Test Scripts you've written.
Note: pCloudy provides support for Instrumentation Type(InstrumentationTestRunner, AndroidJUnitRunner, and AndroidXJUnitRunner) for Android.
Select the Application APK and Test APK that you must have uploaded in the MY APP/DATA section.
Select the single device execution time and assign a name to your test cycle.
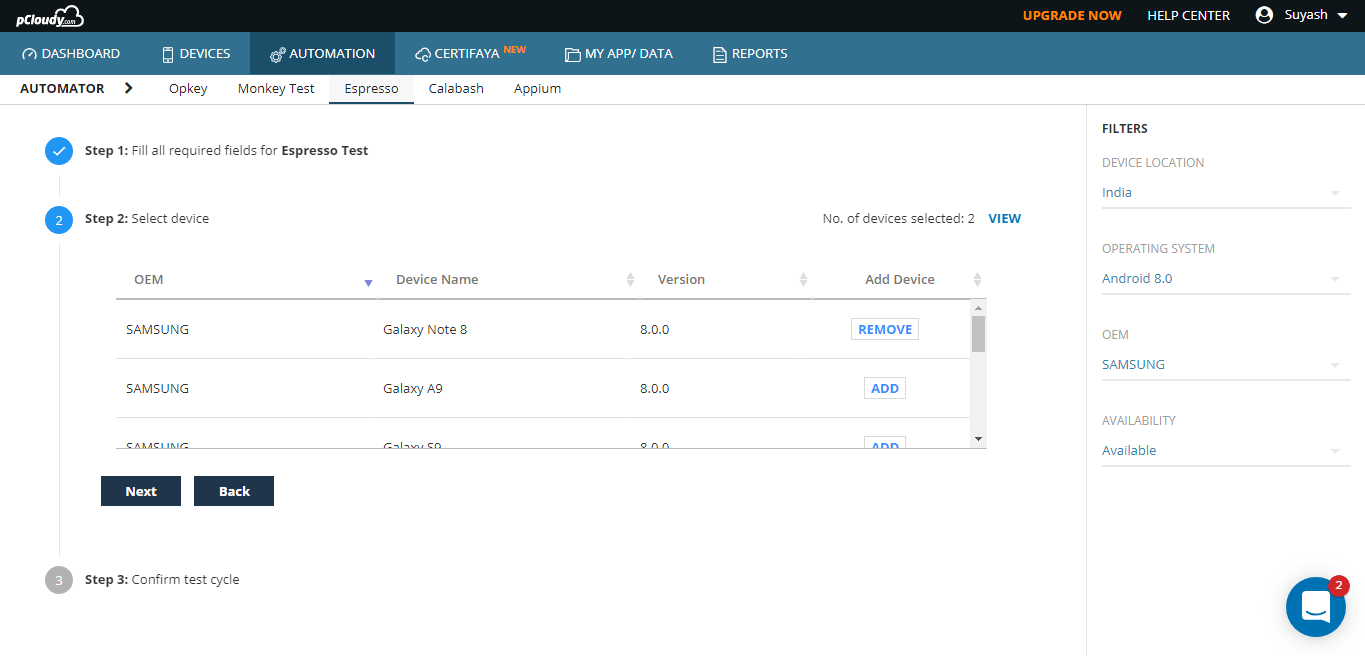
In the next step, Click on "ADD" to add the device for testing and click on " Next".
Now you can select the devices by clicking on the "ADD" button. You can also use the device filter to make it easier to search for a device. Click on next once the devices are selected.
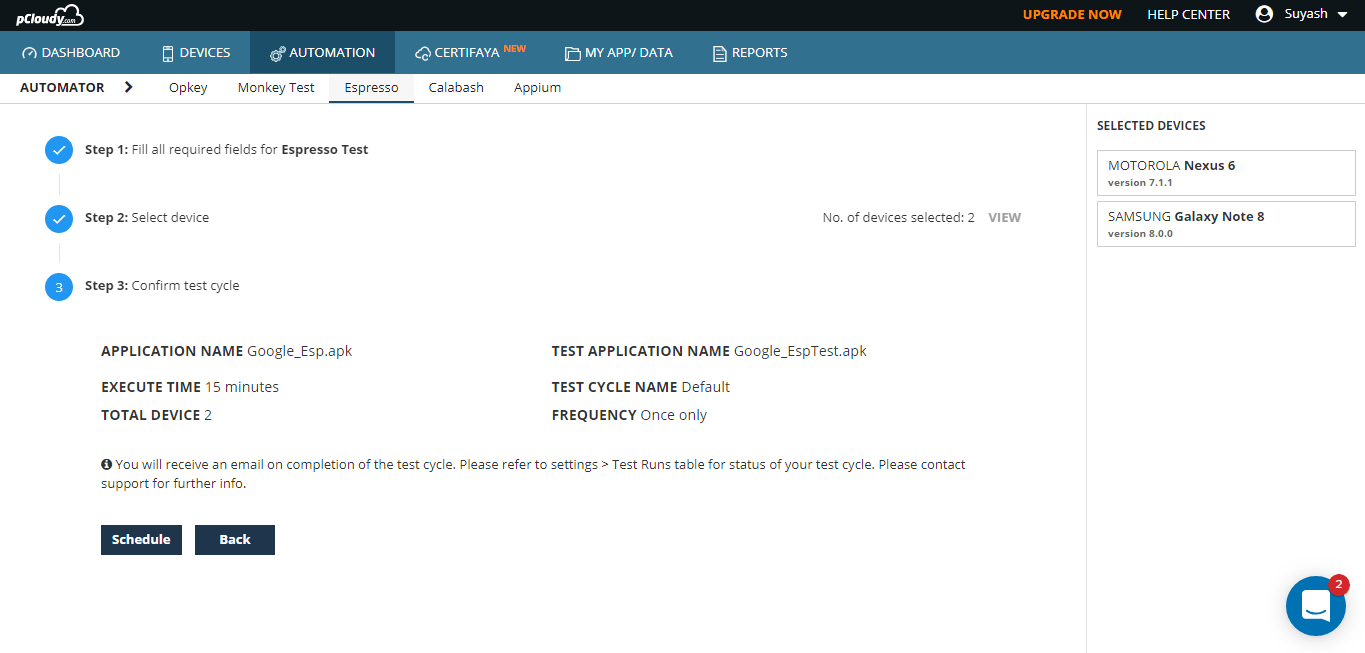
Click on "Schedule" to start the test.
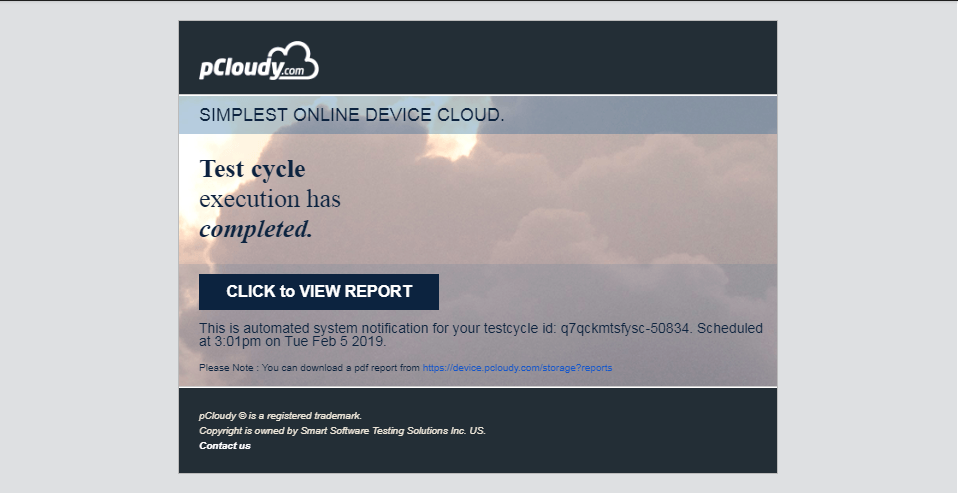
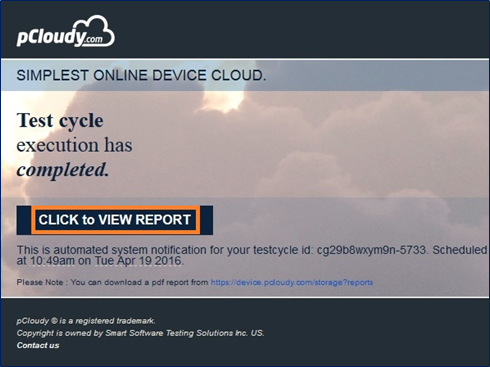
Go to your email inbox and open pCloudy Automation Alert mail. Click on the given link “Click to view Report”.
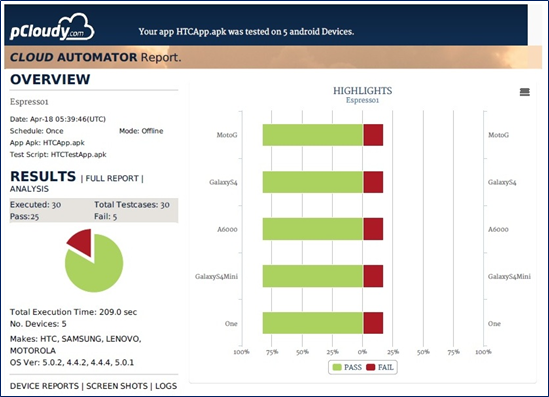
Now you have the result of your scheduled test automation.
Take a look at this GIF to understand the flow of actions taken to run the test cycle.
Software developers tend to make mistakes as app development is a very complex process. This means that the app will contain bugs. Espresso helps us detect errors that may have been made in the development, ensuring the reliability of the client and his satisfaction with the application.
Now you can run your Espresso Scripts on hundreds of Mobile devices over pCloudy.com.
Espresso is a testing framework for Android apps. The platform allows you to write concise and reliable Android UI tests. pCloudy.com provides you the platform to run these scripts on multiple mobile devices of your choice.
Here are the steps for running your Test Scripts on multiple Android Devices:
Login over www.pcloudy.com with your registered Email ID & Password.
Choose Instrumentation Type based on your Test Scripts you’ve written. pCloudy provides support for Instrumentation Type
(InstrumentationTestRunner, AndroidJUnitRunner) for Android. For more information, see Instrumentation in the Testing Fundamentals section of the Android Developer Tools documentation.
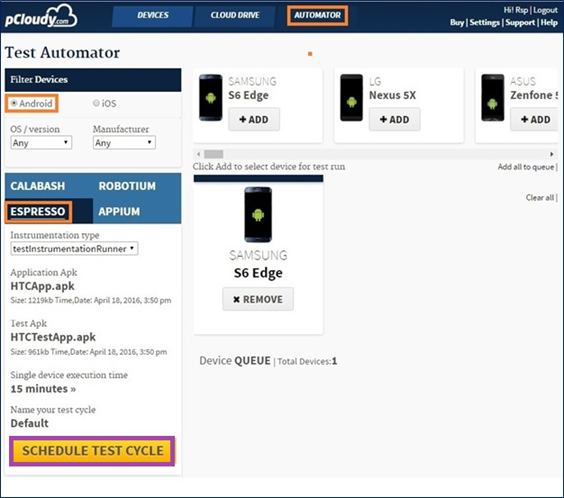
Go to the Automator Page
Select Android OS version & Manufacturer
Choose Espresso (to run Espresso Scripts)
Select Instrumentation Type (TestInstrumentationRunner/AndroidJUnitRunner).
Select Application .apk file (the App to be tested)
Select Test Script .apk file (the Test Script developed for testing)
Enter Single Device execution Time (Time required for the entire script to be executed on single device)
Enter Name of your Test Cycle (this name will represent your Test Cycle)
Click on Schedule Test Cycle
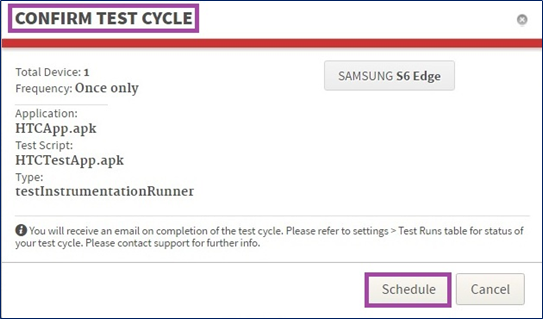
In the next step, you need to confirm schedule of test automation. Here, you can see your selected application, test script, device etc.
Further, you get a pop up message of test automation schedule confirmation.
Click on OK to proceed.
Go to your mailbox and open pCloudy Automation Alert mail.
Click on the given link “Click to view Report”.
Finally, you get result of your scheduled test automation.