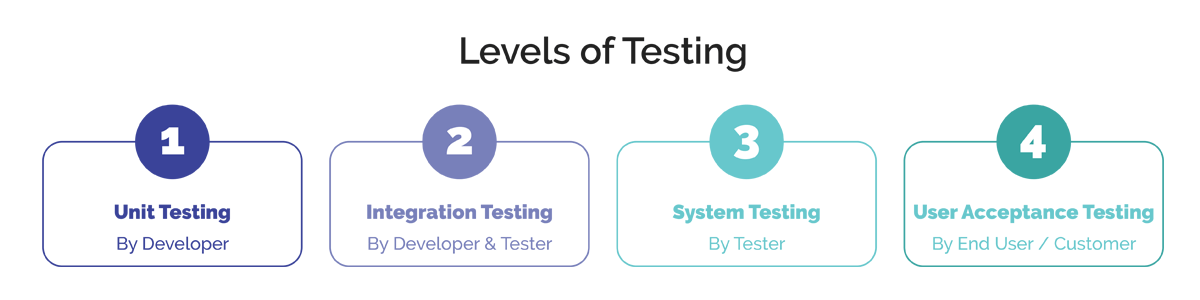
In the dynamic world of software development, ensuring the reliability and stability of your application is of utmost importance. Unit testing stands as a first line of defense against bugs and errors, playing a crucial role in securing the application’s robustness. Let’s delve deeper into the intriguing world of unit testing, beginning with what it is and then exploring its indispensable role in modern app development.
What is Unit testing?
Unit testing, a fundamental practice in app development, is the process of testing individual units or components of a software application. It is generally conducted during the development phase, primarily by developers, to validate that each unit of the software performs as designed.
A “unit” in this context refers to the smallest part of a software system that can be tested in isolation. It might be a function, method, procedure, or an individual module, depending on the complexity of the software. The primary goal is to validate that each unit functions correctly and meets its design specifications.
Importance of Unit Testing
Below, we delve into the importance of unit testing in the realms of web and mobile applications:
1. Early Bug Detection
Unit testing allows developers to identify bugs early in the development cycle, which not only saves time but also significantly reduces the cost of bug fixing. Early bug detection ensures that issues are nipped in the bud before they escalate to more critical stages.
2. Facilitating Changes and Refactoring
With a well-established unit testing practice, developers can make changes to the code or refactor it with confidence. Unit tests act as a safety net, helping to identify unforeseen impacts of the modifications, thus ensuring the consistency of the application.
3. Enhanced Code Quality
When developers write unit tests, it naturally leads to better code quality. Developers are more likely to write testable, modular, and maintainable code, fostering an environment of excellence in code craftsmanship.
4. Improved Developer Productivity
Unit testing can significantly improve developer productivity. Since bugs are caught early, developers spend less time debugging and more time building new features. Moreover, the immediate feedback provided by unit tests helps streamline the development process.
5. Simplified Debugging
When a unit test fails, it is much easier to identify and fix the issue, as you only need to consider the latest changes. This contrasts sharply with higher-level tests where a failure might be the result of a myriad of factors, making debugging a complex and time-consuming task.
6. Seamless Integration
Unit tests facilitate smoother integration processes. When integrating various components or modules, unit tests can quickly pinpoint issues at the unit level, making the integration process more efficient and less error-prone.
7. Robust Security
In web and mobile applications, security is paramount. Unit testing helps in identifying vulnerabilities at the code level, allowing developers to fortify the application against potential security breaches, thus safeguarding user data and privacy.
8. Customer Satisfaction
By ensuring the stability and reliability of web and mobile applications through unit testing, developers can significantly enhance customer satisfaction. A bug-free, smooth-running application is more likely to earn user trust and build a loyal customer base.
How to Perform Unit Testing
Performing unit testing is an essential practice in ensuring the robustness and reliability of your application. Whether you are working on a mobile or web application, incorporating unit testing into your development process can help you deliver a high-quality product. Here is a step-by-step guide to effectively performing unit testing on apps:
Step 1: Understanding the Codebase
Before you start with unit testing, familiarize yourself with the codebase and understand the functionalities of different units. Having a clear picture will aid in writing more effective and relevant tests.
Step 2: Setting Up the Testing Environment
Set up a separate testing environment where the unit tests will be executed. This environment should be isolated from production to avoid any unintended consequences. Utilize unit testing frameworks suitable for your programming language to streamline the process.
Step 3: Writing Unit Tests
3.1 Choose the Units to be Tested
Identify the critical components that need testing. Start with the core functionalities that form the backbone of your application.
3.2 Create Test Cases
For each unit, create test cases that cover various scenarios including edge cases. Each test case should focus on a single functionality.
3.3 Mock External Dependencies
Use mocking frameworks to simulate external dependencies, ensuring the unit is tested in isolation. This helps in pinpointing the issues more accurately.
Step 4: Executing the Tests
Run the tests using the testing framework. Ensure to cover different cases including:
Positive Cases: Where the input meets the expected criteria.
Negative Cases: Testing with inputs that are supposed to fail, to ensure proper error handling.
Edge Cases: Testing the limits of the input parameters.
Step 5: Analyzing the Results
After execution, analyze the results thoroughly. If a test fails, investigate the cause and fix the issue before proceeding.
Step 6: Integrating with Continuous Integration (CI) Systems
Integrate the unit tests into a Continuous Integration system to automate the testing process. The CI system should be configured to run the unit tests automatically each time code is pushed to the repository.
Step 7: Maintenance of Test Cases
As the application evolves, continually update the test cases to mirror the changes in the application. Remove obsolete tests and add new ones for the newly added functionalities.
Step 8: Documentation
Maintain a well-documented record of all the test cases, including the input parameters and expected outcomes. This documentation will serve as a reference and aid in understanding the expected behavior of the application units.
Step 9: Team Collaboration
Encourage collaboration in the team where code and test cases are reviewed by peers to ensure the quality and effectiveness of the unit tests.
Step 10: Training and Learning
Continuously improve your unit testing skills through training and learning. Stay updated with the latest trends and best practices in unit testing to enhance the quality of your tests.
Best Practices in Unit Testing
The process of unit testing can be substantially improved by adhering to a set of best practices and methodologies. These practices not only streamline the testing process but also enhance the overall quality and reliability of the software product. Here are several strategies to consider for optimizing your unit testing efforts:
1. Adopt Consistent Naming Conventions
Implement a coherent and descriptive naming convention for your test cases. This facilitates easier identification and understanding of the tests, fostering smoother collaboration and maintenance.
2. Test Singular Units of Code Independently
Focus on testing individual units of code separately to isolate potential issues effectively. This strategy ensures that each component functions correctly in isolation, paving the way for a more robust application.
3. Develop Corresponding Test Cases During Code Changes
Whenever there is a modification in the code, ensure to create or update the corresponding unit test cases. This practice helps maintain the relevance and effectiveness of your test suite, allowing for the timely detection of issues introduced by the changes.
4. Prompt Bug Resolution
Prioritize the immediate resolution of identified bugs before progressing to the next development phase. Quick bug resolution minimizes the potential for escalating issues and maintains the stability of the codebase.
5. Integrate Testing with the Code Commit Cycle
Integrate unit testing into your code commit cycle to foster a test-driven development environment. Conducting tests as you commit code helps in the early detection of issues, reducing the chances of errors proliferating through the codebase.
6. Focus on Behavior-Driven Testing
Concentrate your testing efforts on scenarios that significantly influence the system’s behavior. Adopt a behavior-driven testing approach to ensure that the application behaves as expected under various conditions, enhancing reliability and user satisfaction.
7. Utilize Virtualized Environments for Testing
Leverage virtualized environments, such as online Android emulators, to conduct unit tests in scenarios that closely resemble real-world conditions. These environments offer a convenient platform to test the application under different settings without the need for physical devices.
8. Implement Continuous Integration
Incorporate unit testing into a continuous integration (CI) pipeline to automate the testing process. CI allows for the regular and systematic execution of unit tests, ensuring that the codebase remains stable and bug-free as it evolves.
9. Encourage Peer Reviews
Promote the practice of peer reviews for both code and test cases. Reviews foster collaboration and knowledge sharing, enhancing the overall quality and robustness of the application.
Disadvantages of Unit Testing
1. Limited Scope of Testing
A notable limitation of unit testing is its inability to verify all execution paths and detect broader system or integration errors. Since unit tests focus on individual components, they might overlook issues that only emerge during the interaction between different units or systems.
2. Potential for Missing Complex Errors
Unit testing might not be comprehensive enough to identify complex errors that are generally captured during integration or system testing. It is, therefore, essential to complement unit tests with other testing methodologies for a well-rounded verification of the software.
Conclusion
In light of the above discussion, it becomes unequivocally clear that unit testing stands as a cornerstone in safeguarding the integrity and reliability of software development. Steering clear of it is not only detrimental to the code quality but could potentially escalate the costs and efforts involved in the later stages of development.
Adopting a Test-Driven Development (TDD) approach further amplifies the benefits of unit testing. In this paradigm, developers construct tests before writing the corresponding code, thereby ensuring that the codebase develops with testing at its core. This not only engrains a quality-first mindset but also facilitates a workflow that is more organized and less prone to errors.
Moreover, the utilization of appropriate tools and frameworks can streamline the unit testing process substantially, making it less cumbersome and more efficient. These tools can automate various aspects of testing, helping to detect issues swiftly and reducing manual effort considerably.
As we navigate through an era where software forms the backbone of many critical systems, the role of unit testing in fostering robust, secure, and reliable applications cannot be understated. It emerges not as an option but a necessity, carving pathways for innovations that are both groundbreaking and resilient.
By embracing unit testing as an integral part of the development cycle, developers are not only upholding the quality and reliability of their applications but are also taking a step towards crafting products that stand the test of time, offering optimal performance and user satisfaction.
It is necessary to check cross-browser compatibility to ensure that the app is working fine on all the web browsers. Sometimes when you open an app on a web browser it might not look or feel convenient and there might be some issues like image/test overlapping, navigation, alignment, etc. These issues degrade the user experience which will eventually lead to low traffic and existing user attrition. This is why cross-browser testing is an integral part of the QA process and should not be avoided.
What is Cross Browser Testing?
Browser compatibility testing can be automated or done manually.
In manual cross-browser testing, the testers have to test the app on multiple OS, device and browser combinations. This is why it is a time-consuming process.
The main issues are with the UI and the main features are tested on different screen sizes to check if the look and feel are similar to what was expected.
In automated cross-browser testing, there is a need to create the test script initially then there is minimal human supervision is required.
Efficient automation tools will take much less time to perform the testing.
Automation for Cross Browser Testing
Automation has reduced the time and effort put into cross-browser testing by 80 percent. The only human work goes into writing the initial test script and selecting the tool. Let’s look at the reasons why we should automate cross-browser testing.
Run Multiple tests simultaneously: When it comes to regression testing and running multiple tests for an app, automated testing saves the day. So if your app is already in the market and you launch a new version then automated cross-browser testing helps you to deliver faster. When a new feature is to be launched in the app and the build is sent to the testing team, they will take some weeks to perform all types of testing. This time can be reduced to a few hours using Automation testing tools.
Improved test accuracy: Even the experienced testers can make an error while testing the app manually. Although in Automation testing the accuracy is very high and the detailed reports are recorded. Testers can review the testing process and create new Automated test with the help of those reports.
Save Time and Money: Cross-browser testing require repetitive tests and so it can be a boring and time-consuming process. These repetitive tests can be automated to save time, effort and return on investment. You just need to make sure that everything is included in the test script to avoid gray areas in the app functioning.
Better Test Coverage: The time taken to perform any web app testing is dependent on the type of feature or functionality you have to test. The length of the test affects the cross-browser testing process. For example, end to end testing can be difficult if done manually. It will take much time and effort to do so. This why automation testing can be used if you have to run the test on multiple devices with multiple browser-OS combinations.
Feasibility of Local Test Environment
There are many types of devices in the market with different screen sizes, OS versions, Browsers, etc. To create the desired test environment, you will have to have all these combinations and you will have to set up a device lab. This will take huge investments and efforts to maintain the lab. Also, there is an issue of geographically distributed teams accessing the devices. Apart from that, you will have minimum flexibility as scaling up or down will be difficult.
Advantages of Cloud-Based Cross Browser Testing
There are many Cloud-based cross-browser testing tools in the market which will help you achieve your testing goal without investing a lot. This is one of the reasons why cloud-based cross-browser testing is better than setting up a local test environment. Let’s have a look at some other advantages which will give you a reason to opt for cloud-based option.
Multiple Test Environment Support: Heterogeneity in the operating system versions, device screen sizes, browser versions makes it necessary to perform tests on many combinations of device/OS/browser. This means a lot of effort will be put in to test the functions of an app on multiple devices. This could be avoided by testing the app on a cloud-based device platform.
In the cloud-based testing platform, you will be able to select the devices of your choice and perform parallel testing on multiple devices without buying one. This will save you money and effort to put up a device lab. While running the test in parallel on multiple devices with different OS browser combination will save time, it will also increase the accuracy significantly as compared to testing the app feature manually.
All time access to resources: The testing team can access the tool at any time by just logging into the tool and selecting the devices according to the market research report on popular devices in the region. Testing can be performed at any time which means there is no foundation and this comes in handy when the deadline is near. Having all time access to the device cloud will contribute to continuous testing and ensure faster deployment.
Scalability: While handling multiple projects the team might have needed many devices at times and very few on some occasions. This means that most of the devices in your device lab might rarely be used and sometimes you might have to buy more to add in the environment. This improper management of resources can be avoided by using Cloud-based device platform. Here you can select the devices which you actually need to perform the cross-browser testing and as all the devices are virtual, there is no worry of managing the extra devices.
Collaboration: There are tools to communicate and collaborate with the team which impacts on your productivity in a good way. Test reports can be generated which are elaborate and provides all the information about the health of the app. These reports can be shared with the team online to analyze and resolve the issue.
Initial time and cost: To set up an actual device lab you will require dedicated cloud/network expertise and suitable infrastructure. On the contrary, if you use cloud-based platform for cross-browser testing then you don’t have to worry about the infrastructure and initial setup cost. Also, you will save a lot on maintenance cost and everything is preconfigured.
Comprehensive testing: To perform thorough cross-browser testing, you need a permutation and combination of mobile devices with different screen size, OS, browser, other features relevant to the app function. This will make a big hole in your pocket if you wish to buy that many devices. This is why cloud-based testing platforms are the best option.
Types of Cross Browser Functional Testing
There are three types of cross-browser functional testing, multi-browser testing, multi-version testing, and concurrent testing. Let’s get familiar with all three of them.
Multi-Browser Testing: The application under test is opened on different browsers like Chrome, Safari, Opera, UC Browser, etc to check if the app works consistently across all the browsers. The app feature can be tested on multiple devices of different configurations and browser combinations.
Multi-Version Testing: In this type of testing the AUT is tested with different versions of any browser to check if the functioning is smooth. So if your app supports chrome version 40.0.2214, then the app must be tested on all the versions of chrome after 40 to check the functionality. One tester can perform the task and multiple devices will be used to perform the testing.
Concurrent Testing: In this, the application under test is checked simultaneously on different web browsers. There are four variations of this testing – single browser distributed concurrent testing, multi-browser distributed concurrent testing, Multi-browser concurrent testing, and single browser and single browser concurrent testing.
Conclusion
Cross browser testing combined with cross-platform testing will ensure that the app works smoothly in any type of environment. Especially for web apps, cross-browser testing cannot be avoided. Studies have suggested that people uninstall the app after using it once if the UI is not user-friendly. Even the app ratings on App Store and Play Store are affected by the user experience, leading to a lower number of downloads. Enterprises can save a lot of money and build a good report among the users by proactively testing their app thoroughly.
In the year 2028, there will be around 7.8 Billion mobile users which accounts for 70% of the world population. More mobile users mean more apps and more competition and to lead the competition we need to make sure that our app is flawless. If nearly half of the bugs in your mobile app are discovered by the users, your app’s ratings are going to decline and so are the downloads. This is why the right choice of mobile app testing techniques must be followed in the decision-making process.
Mobile App Testing Strategies
Today, the mobile app market is highly competitive. To be better every day and survive for long, the QA team has to follow a mix of plans that would be responsible for taking the right testing decisions. The testers have to formulate testing strategies to face every situation fearlessly and immaculately. Mobile apps have to be perfect before reaching to the end users so there have to be certain decisions to be taken regarding the testing plan. The following model of mobile app testing plans can be considered for better execution.
In the planning Stage, decisions like Selection of Device matrix, Test Infrastructure (In-house vs. Cloud, Simulator vs. Real device), Testing scope, Testing Tools, Automation (Framework/Tool) are taken. Since it is the first stage, it is the most important one as all the further stages would depend on these decisions. In the next stage which is execution and review, decisions regarding Test Case Design, Testing of user stories, testing types as per Sprint Objective, Progressive Automation, Regression Testing, Review and course correction are taken.
We are going to discuss the planning stage aspects more elaborately
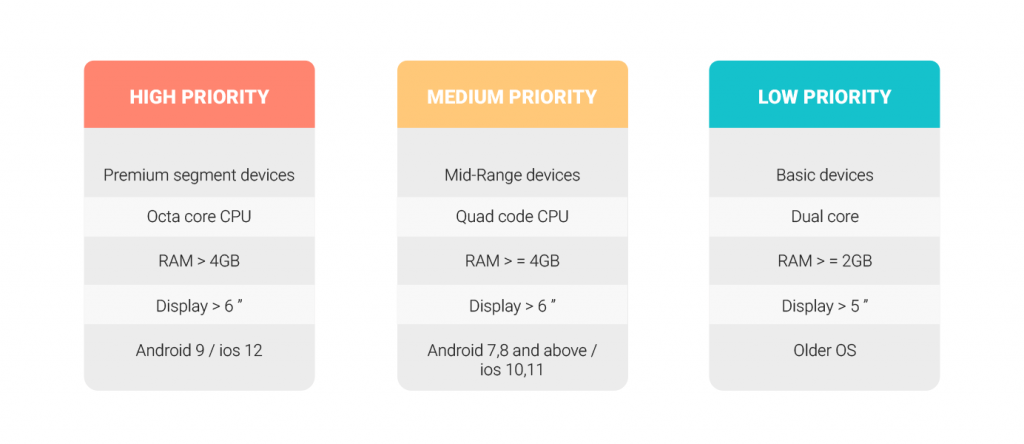
Device Matrix:
It is an important factor, choosing the device as per your target audience’s behavior matters in decisions regarding resting. There are different approaches to the selection of the device matrix.
Approach 1- Selection of Devices based on market research.
Determine the set of devices with your target operating System that will have the highest occurrence of accessing your application by using app purchase data and analytics. For Example- if you support both Android and iOS, and your application will be used across millions of Samsung, Google Nexus and Moto G devices but only thousands of iPhones, you prioritize testing on the Google Nexus and Moto G above the iPhone device. So, this test plan will consist of testing on devices which are prioritized by your market analysis.
Approach 2: Categorize the devices based on Key mobile aspects
This approach highlights the categorization of the devices based on certain mobile aspects which can be considered in formulating the testing strategy. The categorization goes as:
Test infrastructure
This is another element of the planning stage. This focuses on Strategizing on the Infrastructure components like hardware, software, and network which are an integral part of test infrastructure. It ensures that the applications are managed in a controlled way.
Real device, Emulators or Mobile cloud-Where to test?
Choosing the right platform to test as per the testing needs is very important i.e whether to test on the Real device or an emulator or on the cloud
Real Devices
Testing on a real device is anytime more reliable than testing on a simulator. The results are accurate as real-time testing takes place on the device in a live environment. It carries its own disadvantages as it is a costly affair and not all the organizations are able to afford a complete real device laboratory of their own.
Pros:
Reliable- Testing on Real devices always gives you an accurate result
Live Environment- Testing on real devices enables you to test your application on the actual environment on which your target audience working on. You can test your application with different network technologies like HSPDA, UMTS, LTE, Wi-Fi, etc.
User experience- Testing on Real devices is the only way to test your Real-time User experience. It cannot be tested through Emulators or devices Available on Cloud.
Cons: Maintaining the matrix- You cannot maintain such a huge matrix of mobile devices in your own test lab. Maintenance- Maintaining these physical devices is a big challenge for organizations. Network providers- There are more than 400 network providers all over the world. Covering all these network providers in their own test lab is impossible. Locations- You cannot test how your application behaves when it is used in different locations.
Emulators
The emulator is another option to test mobile apps. These are free, open source and can be easily connected with the IDE for testing. The emulator simulates the real device environment and certain types of testing can be run on it easily. However, we cannot say that the results of emulators are as good as those of real devices. It is slower and cannot test issues like network connection, overheating, battery behavior, etc.
Pros:
Price- Mobile emulators are completely free and are provided as part of the SDK on every new OS release.
Fast- As Emulators are available on the local machine so they run faster and with less latency than Real devices connected to a local network or devices available on the cloud.
Cons:
The wrong impression- Even if you have executed all test cases on emulators, you cannot be 100 % sure it will actually work in the real environment.
Testing Gestures- Gestures like Pinching, Swipe or drag, long press using the mouse on simulators are different in using these gestures on real devices. We cannot test these functionalities on emulators. Can’t test Network Interoperability- With the help of Simulators you cannot test your application with different network technologies. Like HSPDA, UMTS, LTE, Wi-Fi, etc.
Testing on Mobile Cloud
Mobile cloud testing can overcome the cost challenges like purchasing and maintaining mobile devices. It has all different sets of device types are available in the cloud to test, deploy and manage mobile applications. The tests run virtually with the benefit of choosing the right type device-OS combinations. Privacy, security, and dependency on the internet can be a challenge in this case but it has many benefits that can cater to different testing scenarios.
The organization can choose the right mix of above-mentioned platforms as every platform carries its own advantages and disadvantages. Sometimes a combination of real and emulators is preferred and sometimes all three can be considered as per the testing strategy.
Pros:
Devices Availability- Availability of Devices and network providers is a big gain for cloud users. Maintenance- When you are using cloud services. Forget about maintenance. These providers take responsibility for maintaining these devices. Pay per use- You don’t need to buy a device. You only have to pay for the duration you use that device.
Parallel Execution- You can test your complete test suite on multiple devices.
Cons: Cost- Some providers are a bit costly
Automation Tools for Mobile App Testing on Android and iOS
Nowadays, there are so many automation tools available in the market. Some are expensive and some are freely available in the market. Every tool has its own pros and cons. Choosing the right tool for testing would reduce the QA team effort providing seamless performance at the same time. We will discuss the best mobile app testing automation tools for iOS and Android platforms in 2018.
1. Appium: It is one of the preferred MAT tools by testers. It is open source and free tool available for Android and iOS. It automates any mobile app across many languages and testing frameworks like TestNG. It supports programming languages like Java, C# and other Webdriver languages. It provides access to complete back end APIs and database of the test codes. Top Features:
-Appium supports Safari on Ios and Other browsers on Android
-Many Webdriver compatible languages can be used such as Java, Objective-C, JavaScript to write test cases
-Support languages like Ruby, Java, PHP, Node, Python.
2. Robotium: It is a free Android UI testing tool. It supports in writing powerful black box test cases for Android Applications. It supports Android version 1.6 and above. The tests are written in Java language and basically, Robotium contains a library of unit tests. Apart from this, Robotium takes a little more effort in preparing tests, one must work with program source code to automate tests. Robotium does not have play record and screenshot function.
Top Features:
-The tests can be created with minimum knowledge of the project
-Numerous android exercises can be executed simultaneously.
-Syncronises easily with Ant or Maven to run tests.
3. Calabash: It is an open source MAT tool allowing testers to write and execute tests for Android and iOS. Its libraries enable the test codes to interact with native and hybrid apps. It supports cucumber framework which makes it understandable to non-tech staff. It can be configured for Android and Ios devices. It works well with languages like Ruby, Java, .NET, Flex and many others. It runs automated functional testing for Android and ios. It is a framework that is maintained by Xamarin and Calabash.
4. Espresso: It is a mobile app testing automation tool for Android. It allows writing precise and reliable Android UI tests. It is a tool targeted for developers who believer automated testing is an important part of CI CD process. Espresso framework is provided by the Android X Test and it provides APIs for writing UI tests to simulate user interactions on the target app. Espresso tests can run on Android 2.33 and above. Provides automatic sync of test actions with the app UI.
5. Selendroid: An open source automation framework which drives off the UI of Android native, hybrid and mobile web application. A powerful testing tool that can be used on emulators and real devices. And because it still reuses the existing infrastructure for web, you can write tests using the Selenium 2 client APIs.
6. Frank: Is an open source automation testing tool for the only iOS with combined features of cucumber and JSON. The app code needs not to be modified in this tool. It includes Symboite live app inspector tool and allows to write structured acceptance tests. It is tough to use directly on the device but is flexible for web and native apps. It can run test both on simulator and device. It shows the app in action by showing its recorded video of test runs.
Above are a few promising, popular and most commonly used and mobile app testing automation tools. Choice of tools certainly resolves many testing-related problems faster and efficiently. Implementing these tools requires skill and experience and so an organization needs to have a proper testing team in place to make all of this possible. Related Articles:
Today, there are many smartphone users in the world and so is the popularity of mobile apps. In order to be competent enough, mobile apps have to be unique and should provide the best user experience to increase the user base. With the users getting more informed and intelligent, the apps built should keep up with the pace. In order to be impeccable, the mobile app should undergo a rigorous testing process and during that process, the testing team faces many challenges in this aspect which will be covered in this blog. But before we dive in, let’s look at the different types of apps that are available in the market.
Types of mobile applications
The creation of mobile applications is a fantastic approach to boost brand recognition, attract new clients, and improve the user experience for existing customers. In light of this, let’s examine the three primary categories of mobile apps: native, web, and hybrid.
Native apps:
Native mobile applications are ones created exclusively for a given operating system. As a result, software created for one System cannot be used on another, and vice versa. Native applications are more effective, quick, and offer greater phone-specific functionality. Thus, the difficulties of testing mobile apps for compatibility with native user interfaces of devices involve ensuring that such traits are preserved strictly.
Web apps:
Similar to native apps, web applications do not require users to download them. Instead, the users’ web browsers on their phones can access these apps because they are incorporated within the website. So, it is envisaged that web applications will operate flawlessly across all platforms. Testing teams must carefully examine the application on a wide range of real devices and browsers to ensure high app quality. Yet in addition to taking a lot of time, this operation is essential because failing to work on a few devices can severely reduce the app quality and incur heavy losses when the app doesn’t function as required.
Hybrid apps:
The features of both online and native apps are available in hybrid apps. These are essentially web applications that mimic native apps in design. These applications are easy to maintain and load quickly. Teams that test mobile apps are in charge of making sure hybrid applications don’t lag on some devices. Any operating systems with the capacity to support the said features have access to all their functionality.
While each of these app types are slightly similar to each other the technical teams face a different challenge with each type of mobile application. Combining these challenges greatly increases the complexity, making the entire procedure laborious and time-consuming. Let’s quickly look into what some of these challenges are?
Different Operating Systems and their versions
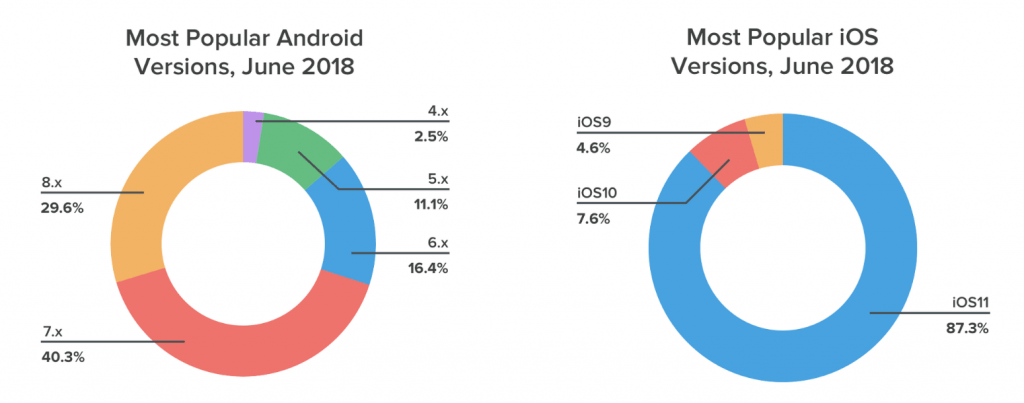
There are different types of operating systems available in the market such as iOS, Android, Windows etc. Also, these OS have different versions too. So, it becomes challenging to test so many versions of the mobile app in a shorter period of time. One app that works well in one type of OS may not work well in the other. It is very important to test the application with all supported platforms and their version because we don’t know where the user is going to install the application. As per research, iOS users upgrade quickly as compared to Android but in Android the device fragmentation is larger. That means the developers have to support older versions and APIs and testers also have to test accordingly.
Device Variations: Based on Screen size
Android comes with a mix of features and variations in pixels densities and ratios which varies in each screen size. Even in the case of Apple, the screen new size was introduced with the launch of the iPhone 6. Now, it is not just about being picture perfect screen design rather designing an adaptive screen design. Well with such a variety in screen sizes, the role of the tester becomes serious as they need to check if all the features are working well in different screens and pixel and aspect ratios are maintained well.
Based on the number of Devices
The picture below shows the number of devices in the market by different brands. The number of device manufacturers has increased. According to OpenSignal, there are around 1294 distinct Android phone manufacturers alone, imagine if we add up other brands. The pace with which this data is increasing is a bit alarming for the testers as the testers have to check the app performances on different devices, they would probably need a device library to do the same. The challenge remains in context to functionalities like Complex user interactions on touch screen and keypad devices as well. Having a device library is certainly is a costly affair unless emulation is adopted which can simulate multiple device types and testing can run easily on it.
Image Source: venturebeat.com
Various Networks
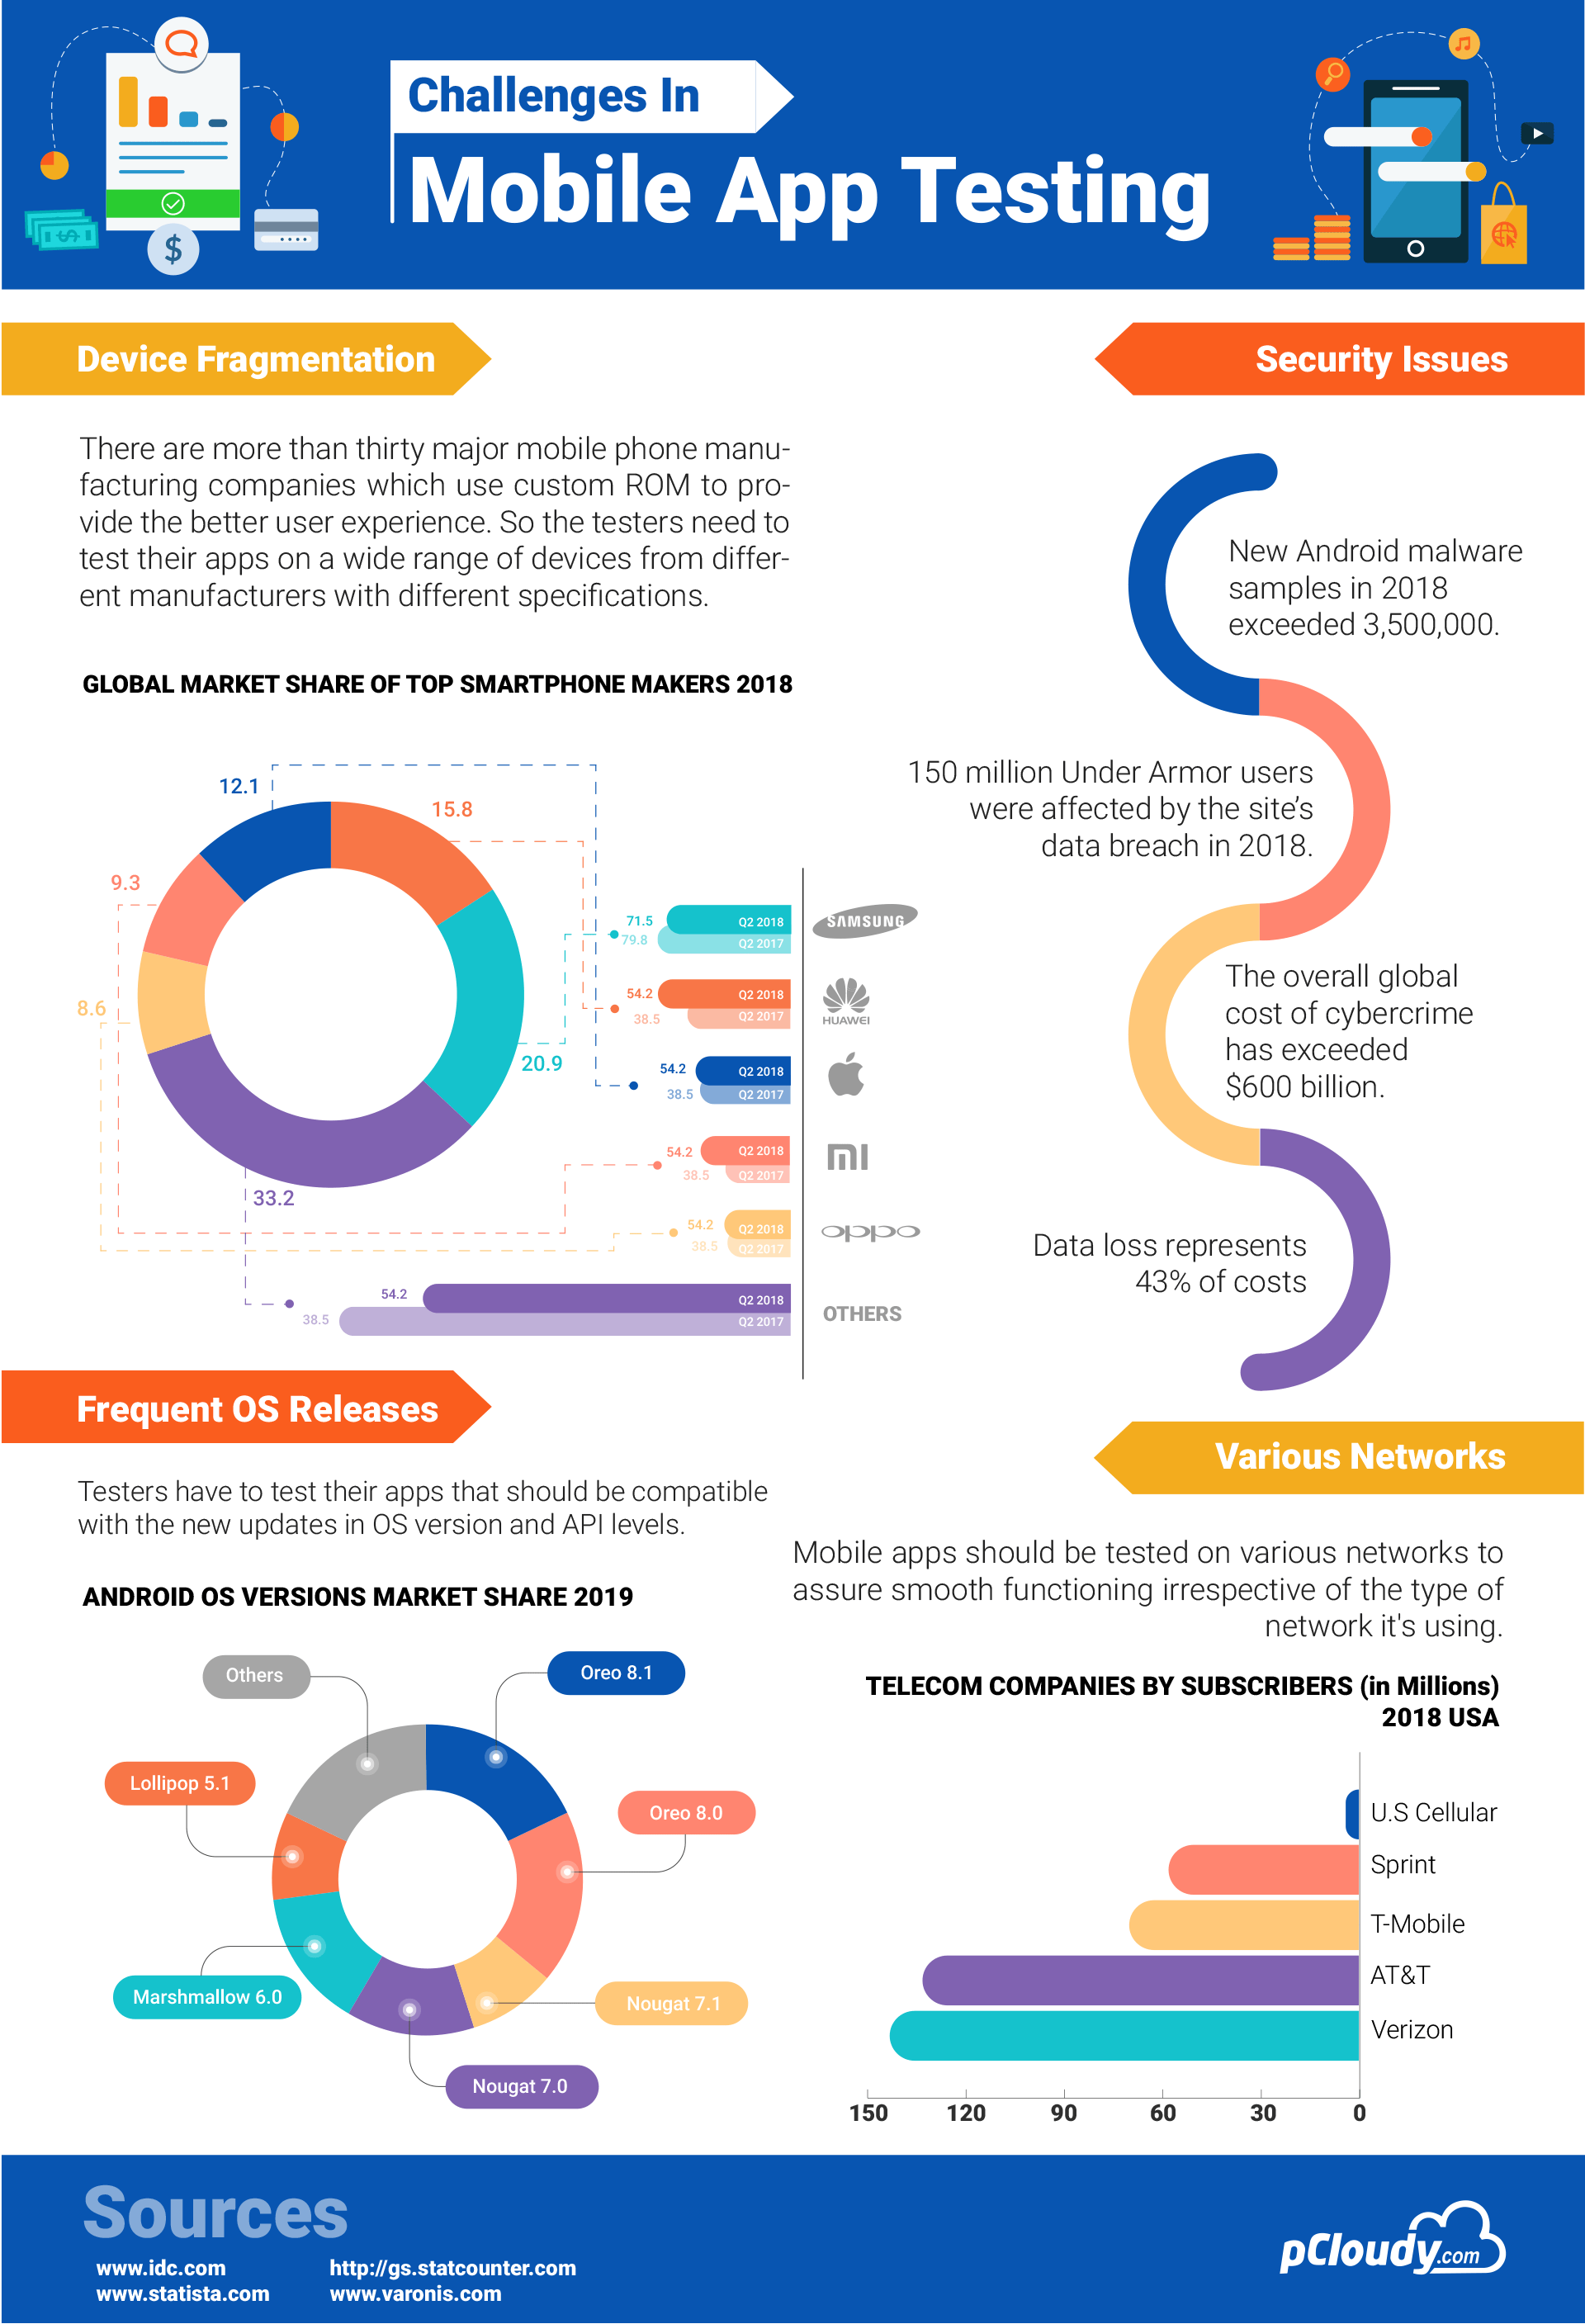
The QA team also faces challenges when it has to test the devices connected to different networks. Generally, there are 2G, 3G,4G mobile data available. These provide different data transfer speed and transmission. These varying speeds of the networks by various providers remain a challenge for the testers even today. In this case, testers have to check that the app must perform well at different network speeds and connectivity quality and a check on bandwidth usage of the app. This remains a challenge as it is partially controllable based on different network providers and connectivity access in different geographies.
Frequent OS releases
Mobile Operating Systems keeps changing. Both Android and iOS have more than 10 versions of their operating systems. They keep enhancing and updating their versions for better performance and user experiences. This frequent OS release comes as a testing challenge as the testers needs to validate the complete application with each of new OS release. It is very important to test the application with the latest OS release otherwise the app performance would be a major issue and consequently loss of users using the app.
Script Execution
Another major challenge of mobile testing is what we call scripting, the method of defining a test. Script execution can either be manual or automated. You can write down the scripts in a document, which is then used by a test engineer who manually interacts with the test environment to determine the result, else you can run automated scripts that in turn drive interaction with the device and app, and record the results.
Automated scripting needs to be kept away from the device to be of any real use because there are so many different devices with different interface options. A script that follows strict keystrokes on an Apple iPhone would not have any chance of working on a Samsung device, because the UI is different. Fortunately, most real device automated testing software provides high-level scripting that operates on the text, image, or object layer. Device emulators can automate testexecution using a higher-level, abstracted scripting language that is not device dependent. When you use automated scripting, the cost of setting up the script will typically be higher than the cost of a single manual execution of a test. But if it is a test script that you run on a periodic basis, every time that you subsequently run the script, the more time and effort you will save. You will eventually recover the cost of initial scripting If you run the script enough.
So to conclude, to build a better user experience, an app tester needs to work had in overcoming the challenges of testing. By adopting some analytical skills and methods, testers can really cope up with these situations. For eg. Testing only those apps and OS which are mostly used by their user segment, by adopting a strong testing strategy to take situational decisions eg. Decisions regarding when to choose Automation and manual testing. Strategically, the challenges can be overcome.
Screen Size
The Android world is not simple. The variety of different aspect ratios and pixel densities can be overwhelming. With the launch of iPhone Xs Max which has a screen size of 6.5 inches, Apple brings new screen sizes to the iOS world as well. Though iOS developers are used to pixel perfect screen design, they now need to change their mindset to the adaptive screen design instead. For testing, it means that we need to check on various devices that all the necessary screen elements are accessible with different screen sizes and aspect ratios. There are many phones with a screen size of 5 inches which are still popular.
Security Issues
Traditional testing tools like selenium and QTP weren’t designed with cross-platform in mind. Automation tools for web apps and mobile apps are different. Operating systems especially Android further adds to the complexity with API level fragmentation. The most common automation testing tools for mobile app automation testing are Appium and calabash. Each tool has it’s own advantages and disadvantages and you need to choose on the basis for your app’s functioning.
Weak Hosting Controls is one of the most common issues. The server on which your app is hosted should have security measures to prevent unauthorized users Weak Encryptions can lead to data theft which will impact the trust factor of the users. Most of the mobile apps require user data such as email ID, password, age, location etc. This data should be encrypted and stored with proper security. Hackers often use this kind of data to get money out of users account online. Encryption will make it difficult for anyone unauthorized to intrude and retrieve that data rather than keeping it in plain text.
Power consumption and battery life
We haven’t seen much innovations in the mobile battery but the mobile usage and specifications are increasing rapidly. People are using more apps nowadays and the apps are more complex than ever. This is why testers need to test the apps power consumption because if the apps use lots of CPU cycles and some apps will also run in the background than the battery will drain out quickly. We need to make sure that the app uses less battery power so that users can use it for a longer period of time.
Conclusion
Mobile apps are evolving with device technology and user expectations. Developers are emphasizing on reducing the app size and battery usage. Testers play a major role to ensure that the app works smoothly and does not crash or have bugs. This is why testers must be aware of the latest trends in mobile app testing to deal with the mobile app testing challenges.
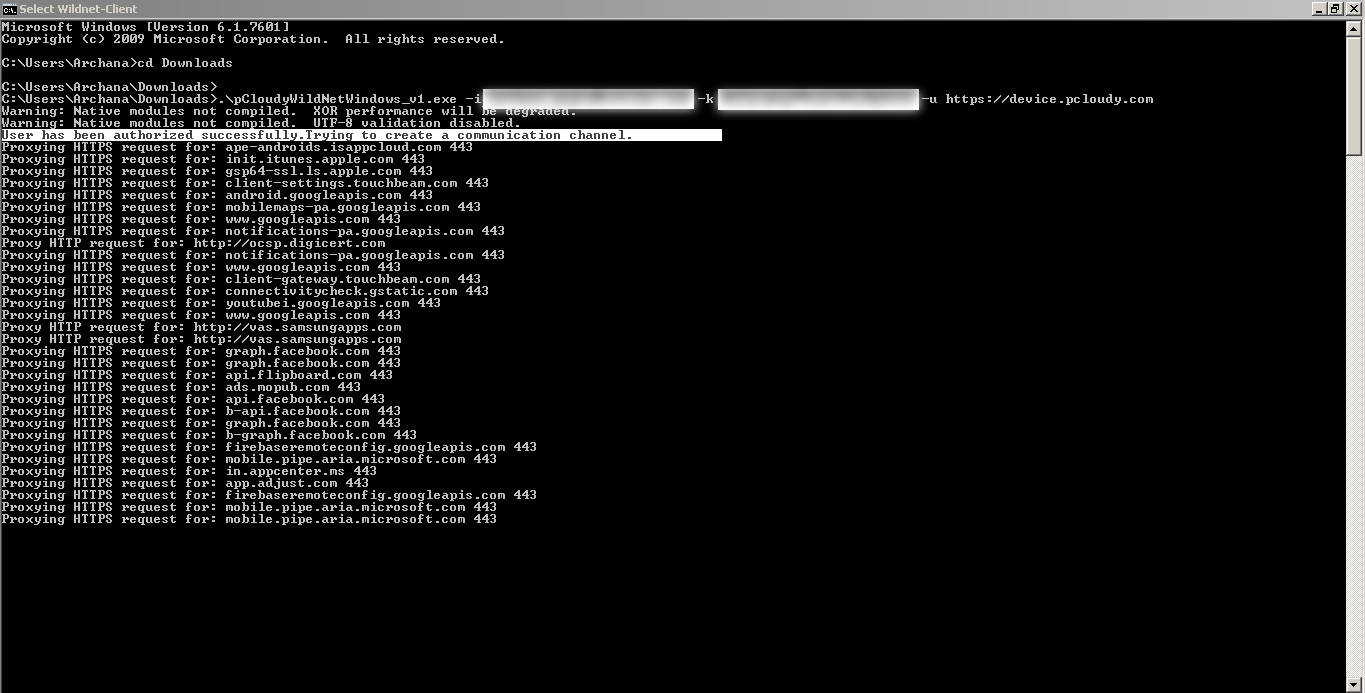
Some testing teams set up their own staging environment to test internal servers but as there is no public access which makes it difficult to perform local testing on remote devices. So how would you test your app which can be accessed through your internal network? We launched a feature called Wildnet, that enables you to test private or internal servers using pCloudy. You can test your privately hosted apps on any Android or iOS devices and implement continuous testing to ensure reduced release cycle.
Some times testers want to test their internal servers to protecting unsecured data and credentials, hide new features, and general security. But if an app hasn’t been made public, it should not delay testing across environments. When the Wildnet feature is enabled, a secure connection is created between your machine and pCloudy remote devices so you can perform testing even if the devices are connected remotely.
Let’s see how you can test local or private servers using Wildnet.
Prerequisite:
User should be registered on pCloudy platform
Executables can be downloaded from below links
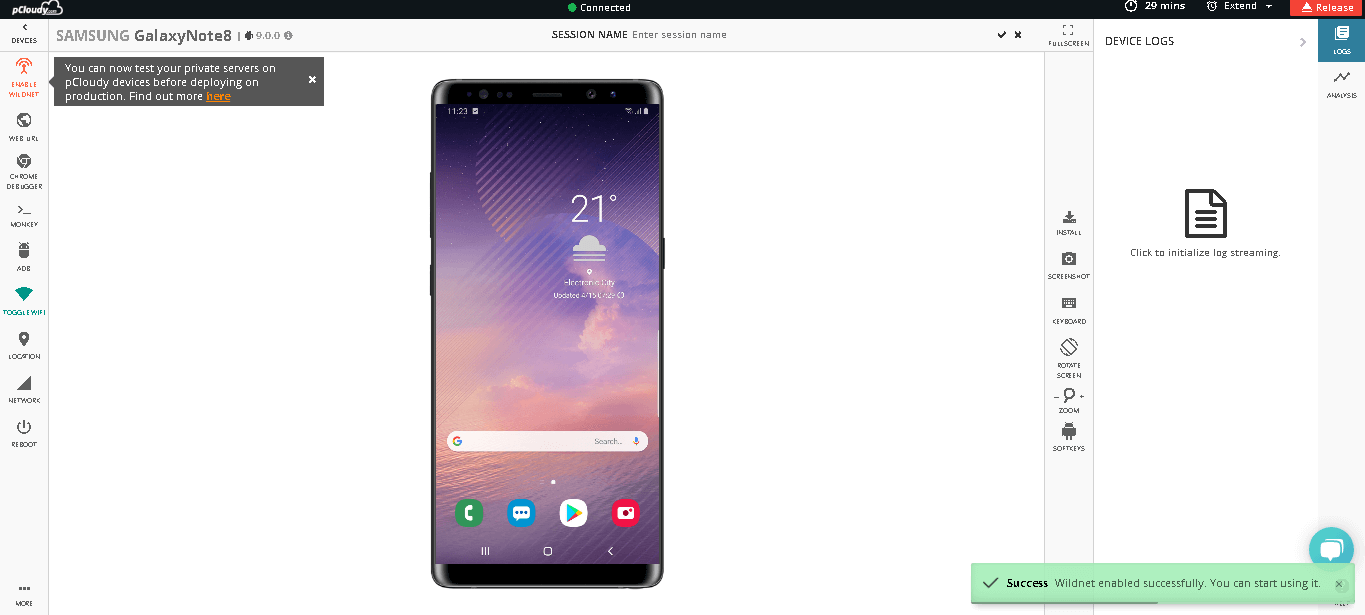
Once “Wildnet” is enabled, the user can connect more than one device.
User will get authenticated as shown in the below screenshot
This is how users can initiate Wildnet.
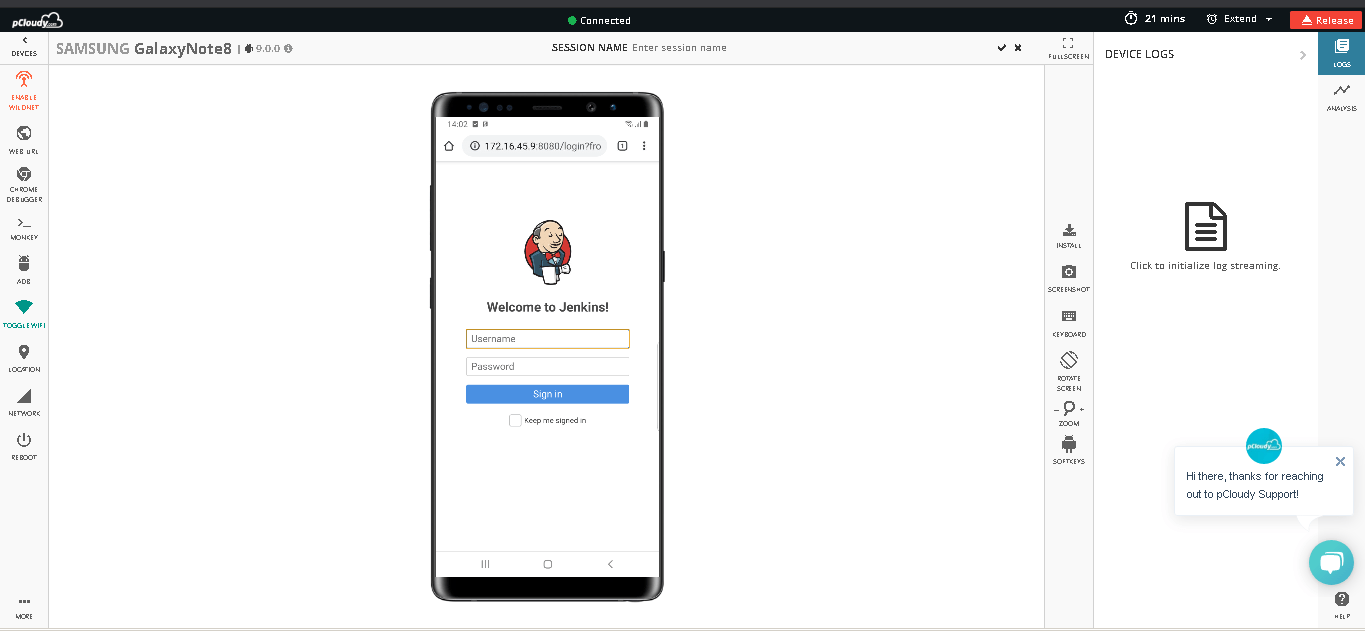
2. Go to the Device page in pCloudy platform, connect the device and click on Enable Wildnet as shown in the screenshot:
Open any local URL that you wish to test and enjoy local testing on pCloudy platform.
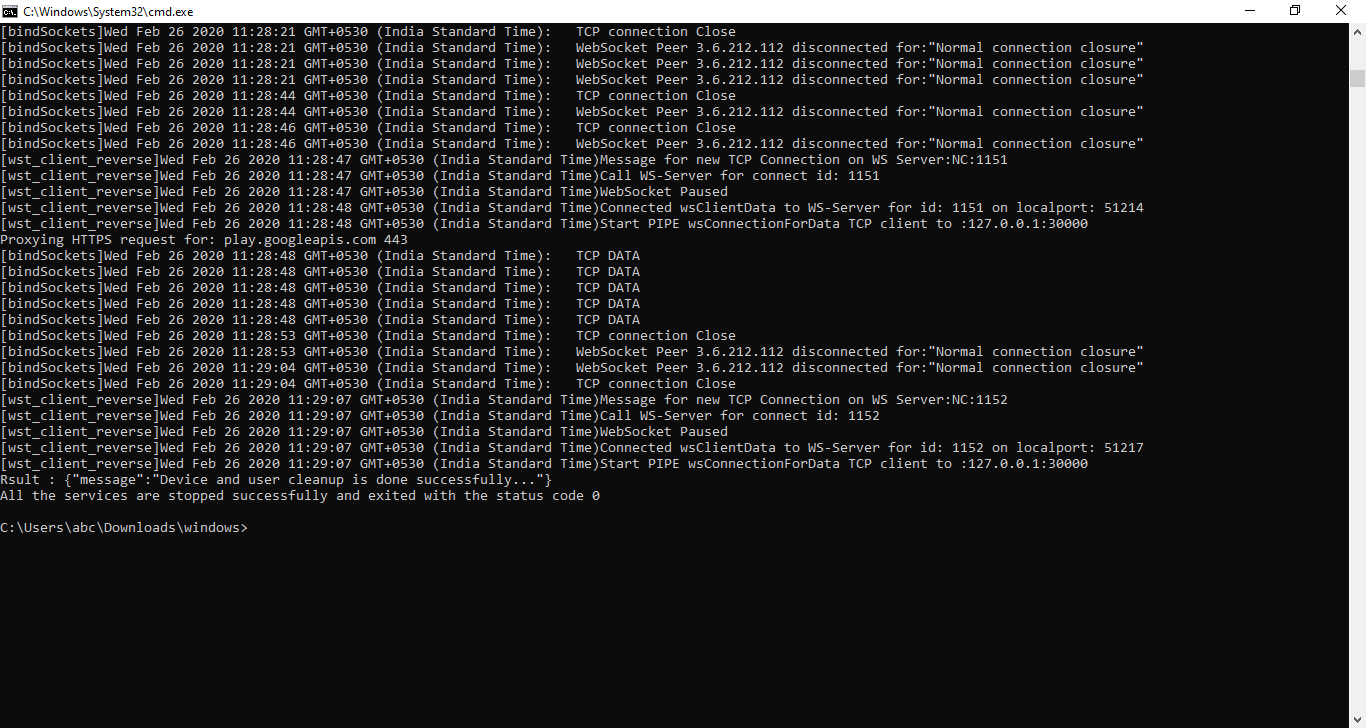
3. To disable the service simply run ctrl+c to exit
Activating Wildnet for Appium Automation
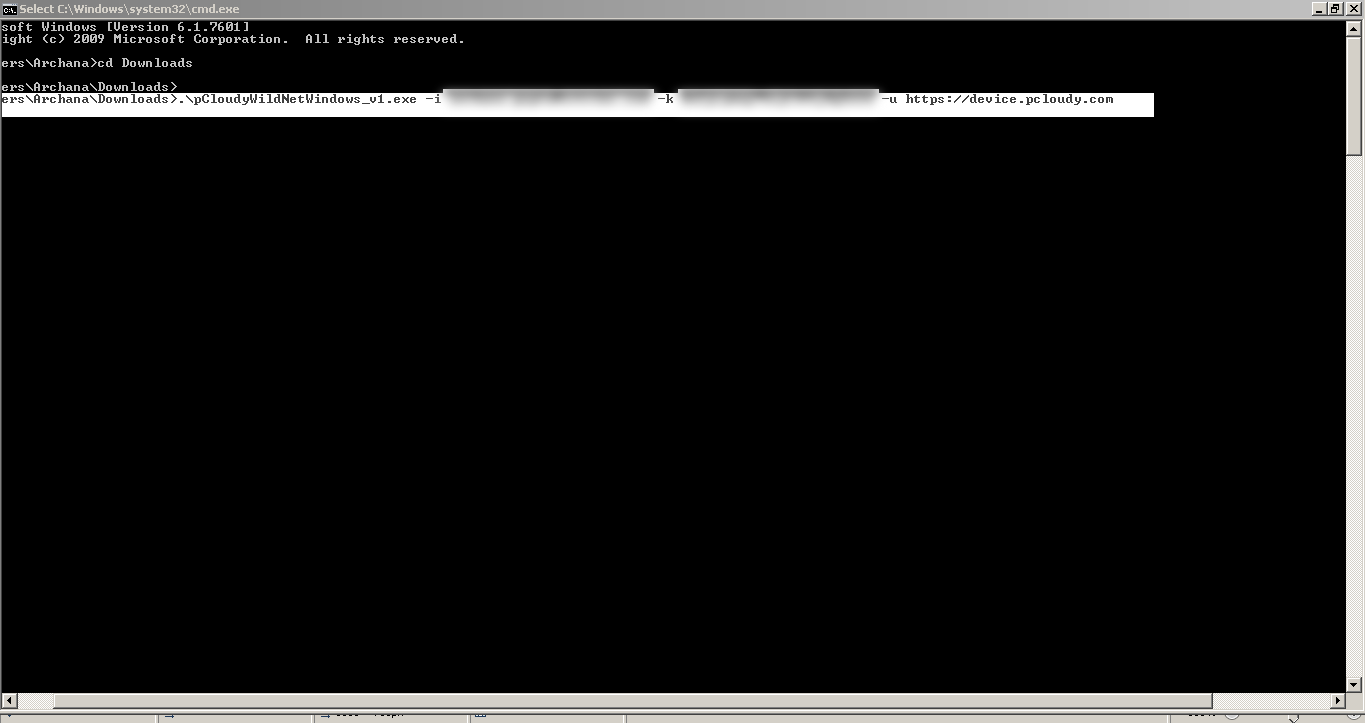
1. Run the below mentioned executable command on the terminal:
For Windows:
.\pCloudyWildNetWindows -i Emailadress –k accesskey -u URL
For Mac:
./pCloudyWildNetOSX -i Emailadress –k accesskey -u URL
For Linux
./pCloudyWildNetLinux -i Emailadress –k accesskey -u URL
3. Once the capability is added, users can perform local testing on pCloudy devices and verify the execution in live view page.
The most important advantage of Wildnet is that you can be confident about the application as you can rectify all the defects prior to delivery. Try it yourself. Use Wildnet to find more bugs and defects in your internal server before deploying it to production.
Flutter has been creating waves in the app development space since its launch. The reason is simple, it solves the problem of creating two different codebases for a single app to run on Android and iOS devices. Some experts say that Flutter which was launched by Google is to counter React Native which is used by Facebook. Nevertheless, this is a much-needed relief for enterprises as Flutter will help them save a lot of their time and resources. So let’s first understand what is Flutter.
What is Flutter
Flutter is an opensource mobile UI framework that can create Android and iOS apps from a single codebase. The Flutter framework includes the Flutter engine, Dart platform, the Foundation library, and design-specific widgets. Flutter apps are written in Dart programming language and runs on dart virtual machine.
How to Create a Flutter App
Before we start the process of app development it is important to know that there are two types of widgets, stateless and stateful. A stateless widget describes part of the UI by building a structure of other widgets that describe the UI more definitive. Stateful widgets are the widgets that can change their state multiple times and can be redrawn on to the screen any number of times while the app is in action.
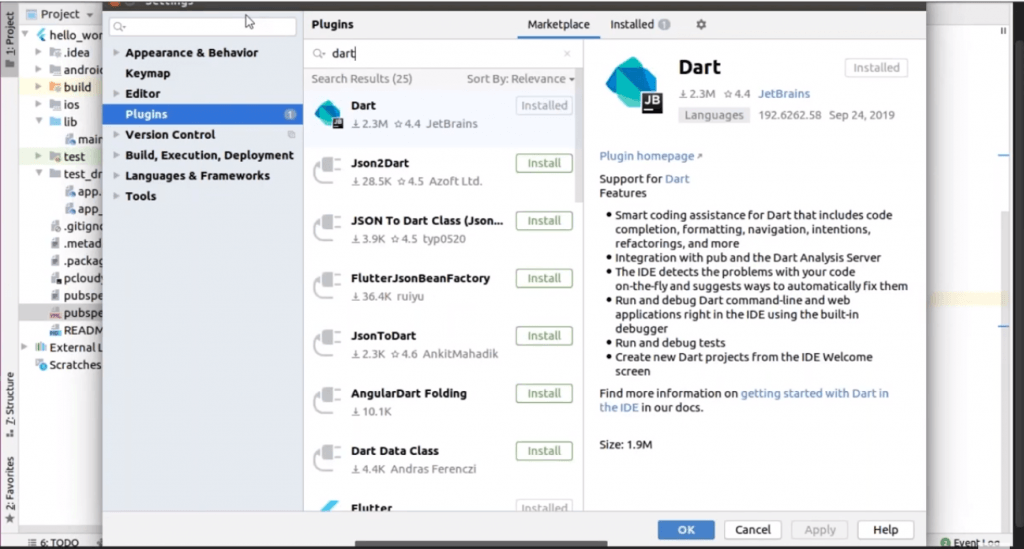
To create a Flutter app you need to install Flutter SDK and other tools required to support the framework. We will create the app in Intelli J IDE and for that, you need to install two plugins. The first one is Dart and the second plugin is Flutter. You can install the plugins by clicking on File in the menu bar of the IDE and then click on Settings.
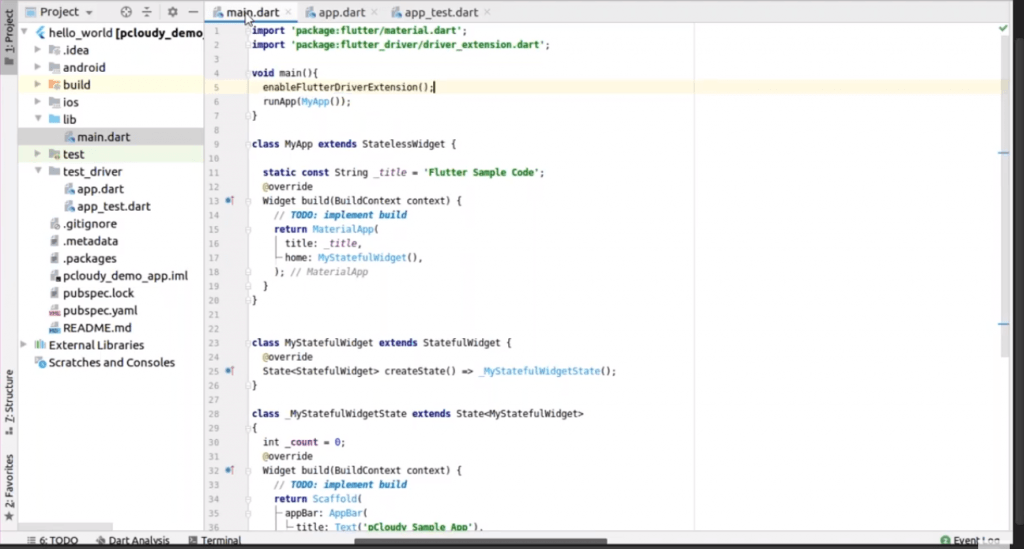
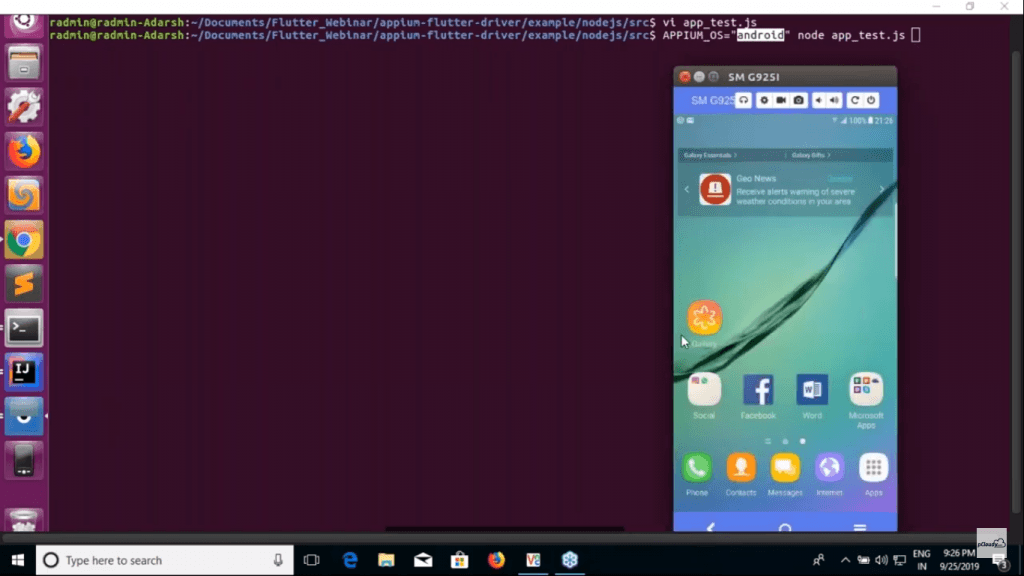
Then you need to create a new project and you will get a basic code layout to start with your app development. In the first line, we have the main method where we will enable the flutter driver extension and there is a run app method with MyApp class instance, to run the app.
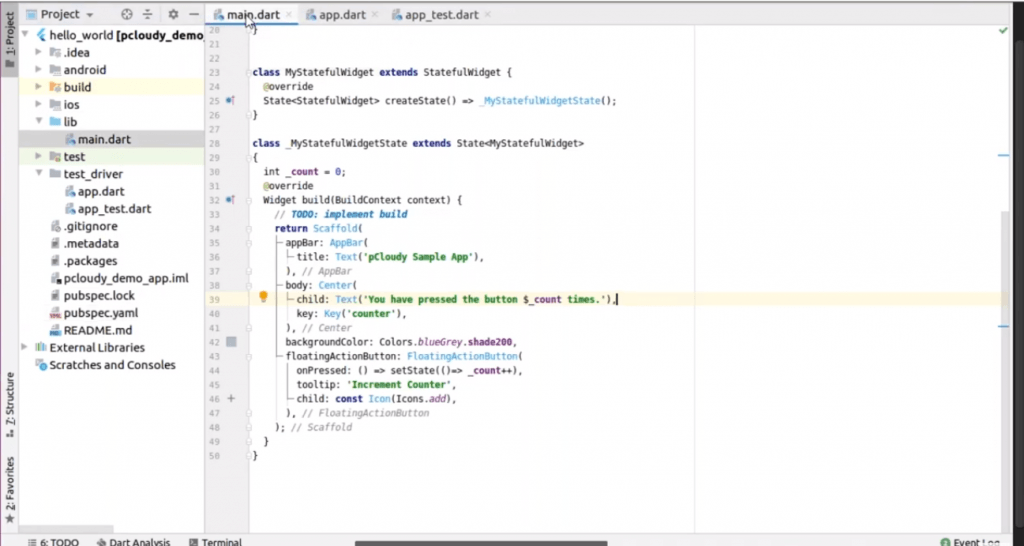
In this sample code, we have used the title as the stateless widget and we have set the title as the key and for the home screen, we are using one more instance which is MyStatefulWidget(). So in this class, we have a small piece of code, where we have set values for elements like appBar, background color, and in the body, we have placed a floating action button for a counter.
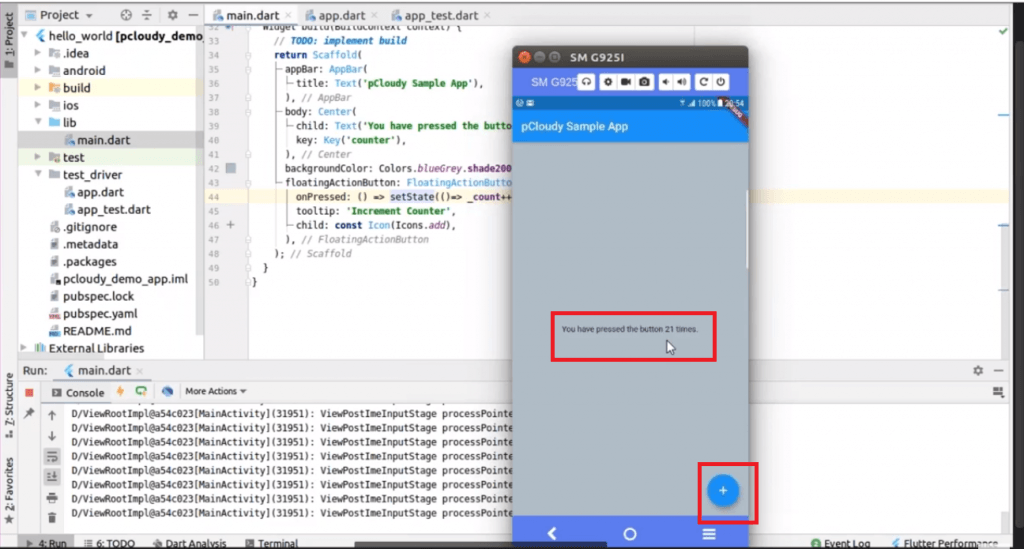
After adding the code you can run the program and you will be able to see the changed state of the counter with every click on the action button.
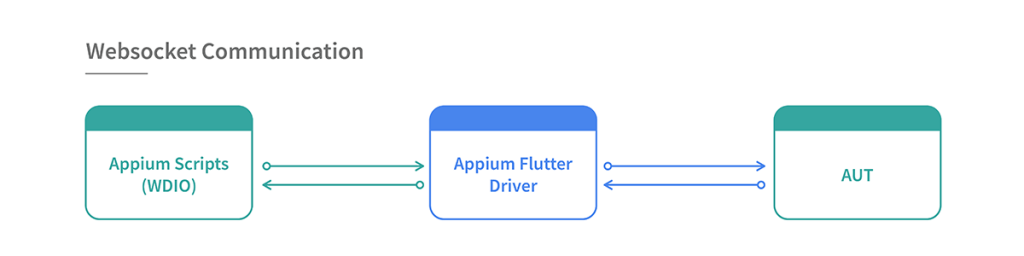
Appium Flutter Driver
Appium Flutter driver is a test automation tool for flutter apps on multiple platforms. It is a part of the Appium mobile test automation tool. But how does the Appium Flutter driver work? It uses webSocket communication to carry WDIO script to instantiate the flutter driver and the request will be sent to the particular application. Then the AUT will send the response to the script through the Appium Flutter driver. Appium Flutter driver
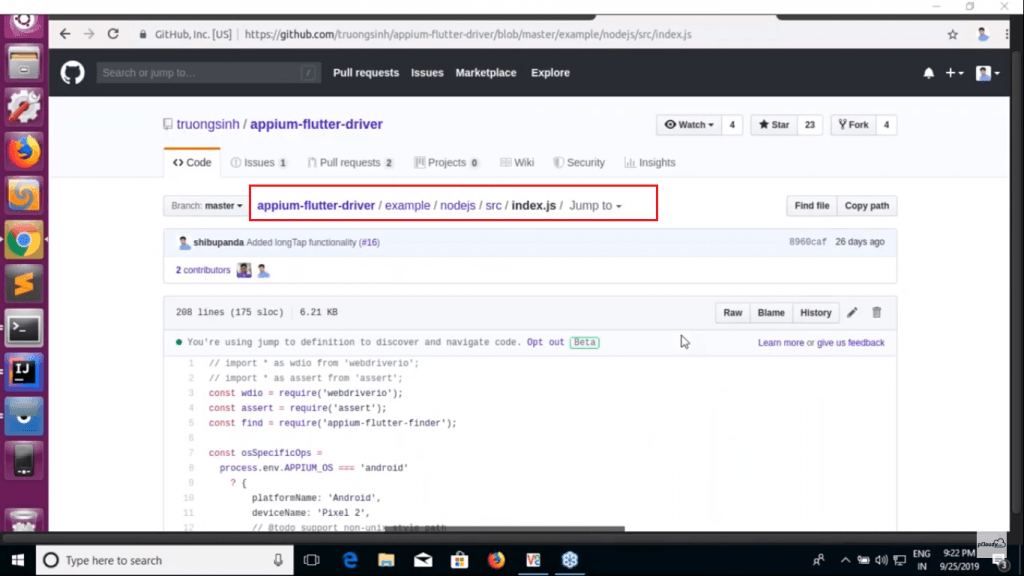
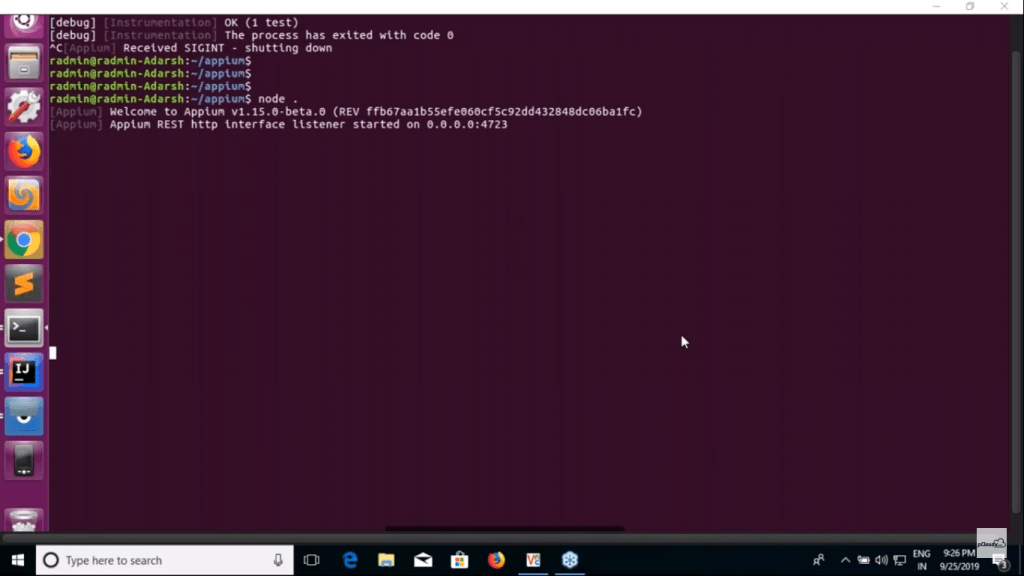
You can also build Appium in your machine through the source code. Once you have cloned the source code, run npm install then npm run built and type a command node to start the Appium server. You can download the package from GitHub. The package contains Appium Flutter Driver and Appium Flutter Finder. You can clone the sample project to get the WDIO code.
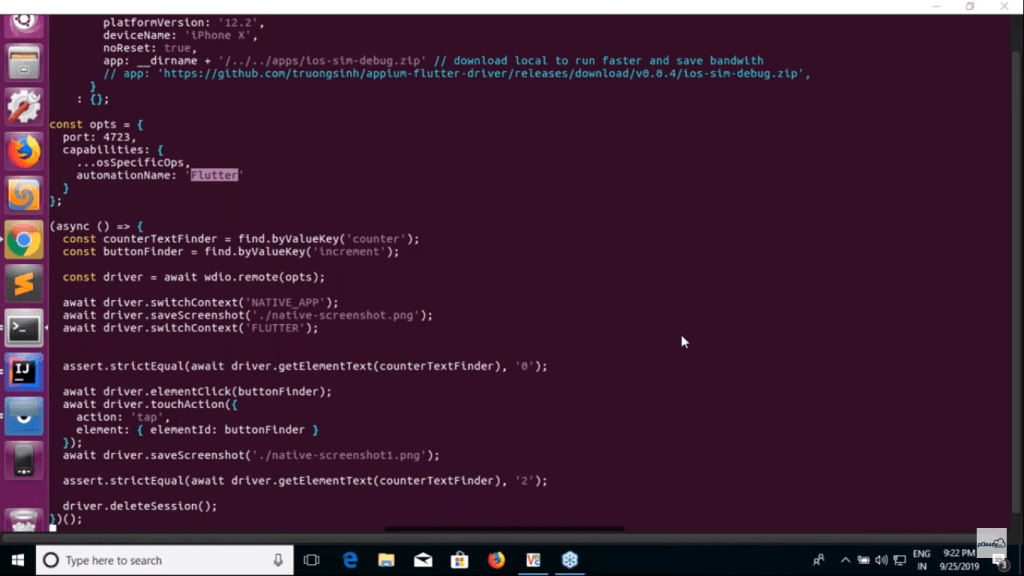
In the terminal, you can see that to automate flutter application we have used Flutter as an automation name for both Android and iOS apps. You can see that port is 4723 and in the capabilities, we have mentioned osSpecificOps, automation name: ‘Flutter’. We have mentioned the app path at the top with the device name and platform name and we created an object.
Appium==OS environment is ‘android’ which will pick all the information and specify in the capabilities and it will pass a post request to the server.
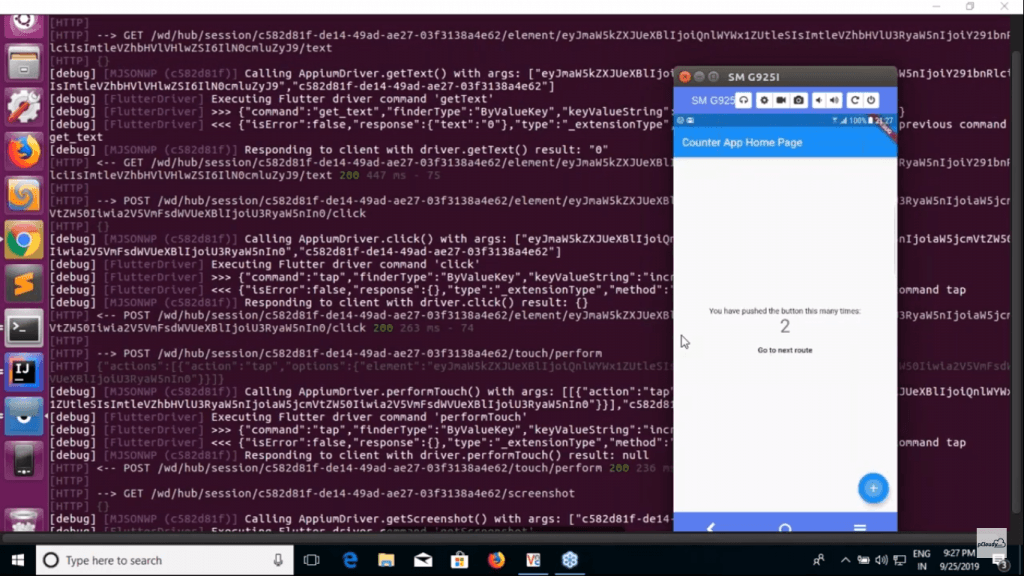
Now here we are trying to find the element using CounterTestFinder and a ButtonFinder to click on the button. In the next line, we have created a driver using a remote method.
Then we have switched the Native App context to Flutter. You can switch this if you are using the Flutter app. Once the app is launched, we are validating that the counter text finder has value as zero by calling Flutter APIs internally. So here we are using two actions, one is clicking and the other is touch.
The button is to be clicked two times and thus we have used strictEqual function. In the last line of code, we are deleting the session.
Now to run the test we need to pass the environment variable to connect the device.
Then we will check if our Appium server is running.
Then once you run the code you will be able to see the actions performed on the device and the counter will change to two.
This is how you can automate your Android and iOS app testing using Appium Flutter driver. Although there are many benefits of using Flutter, there are some limitations as well. The first thing is that you need to learn Dart language to develop and automate the Flutter app.
Suppose you need to run automated tests on multiple devices, then you will have to fire multiple commands in the terminal. Appium flutter driver depends on Flutter Driver APIs and as it’s still not matured enough, some actions cannot be performed.
Espresso is a testing framework for Android which automatically synchronizes your test actions with the UI of your app. It also lets the test wait until all the background activities have finished.
The pCloudy utility uploads your Application APK, test APK and other APK files to pCloudy. It will then acquire a device to run your test on, execute those tests and report back the status and test report.
In pCloudy you don’t have to set up the environment. Just follow these simple steps.
After the test cases are run you can see the detailed reports. Once automation ends, the device under test will be released automatically so that you or other users can use it later.
There are two ways you can execute espresso test cases. Here are the steps for both
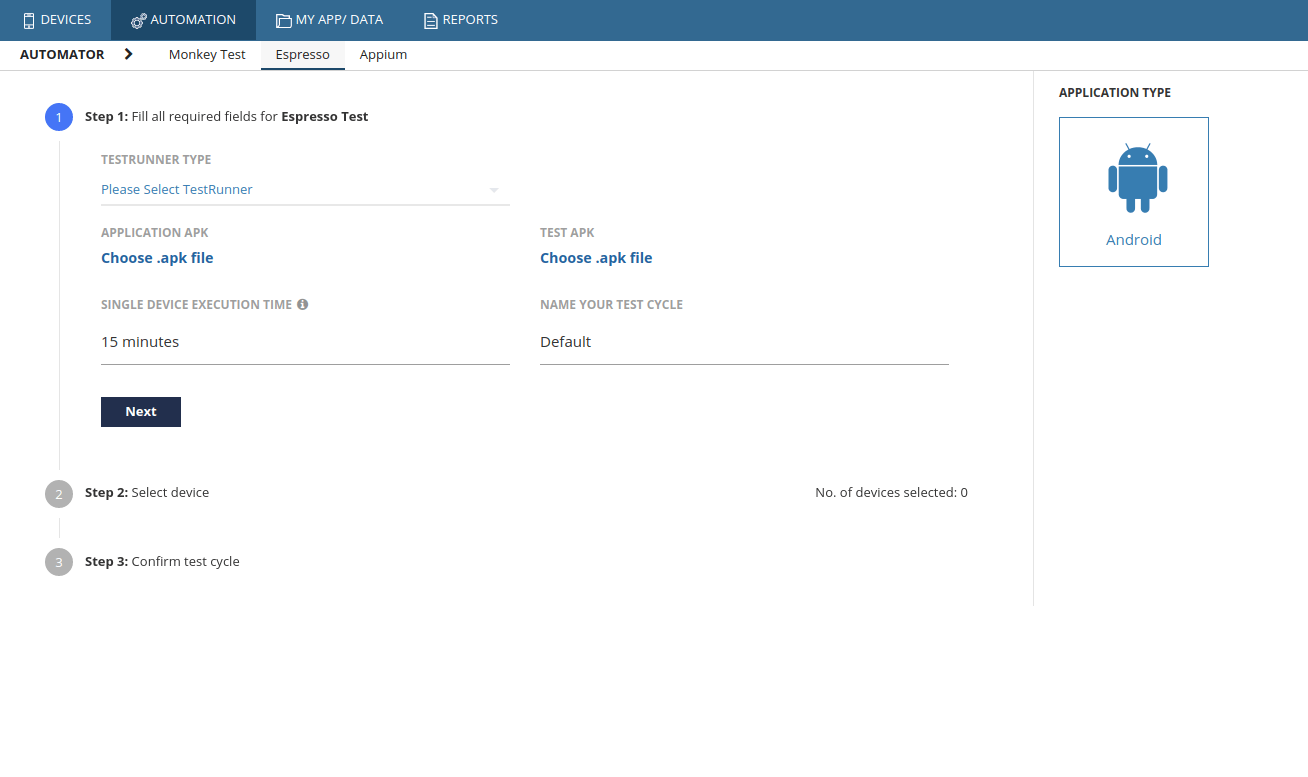
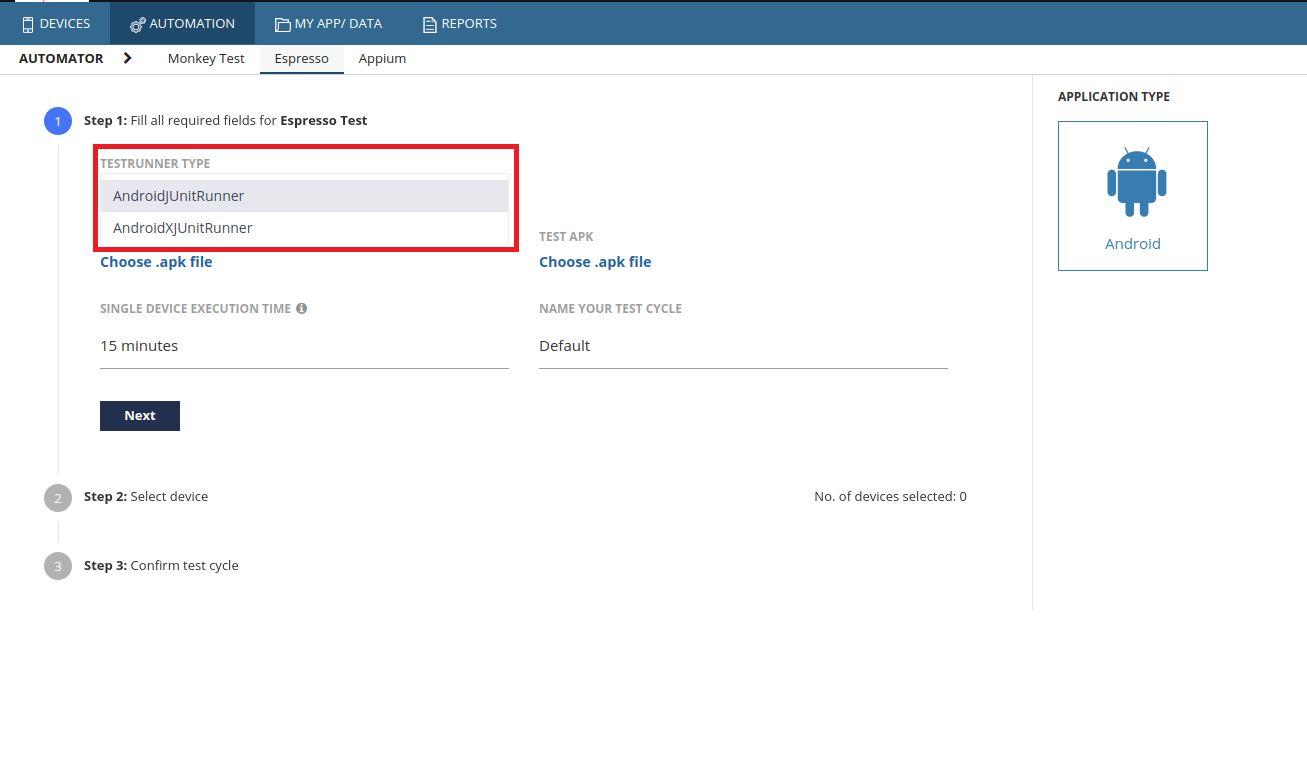
1. pCloudy UI Dashboard a. In pCloudy UI there is a section called Automation where you will find multiple automation frameworks integrated to the platform. b.Select the Espresso automation and to fill in the required details.
c. pCloudy Support two TestRunners.
i. AndroidJUnitRunner (android.support.test.runner.AndroidJUnitRunner)
ii. AndroidXJUnitRunner (androidx.test.runner.AndroidJUnitRunner)
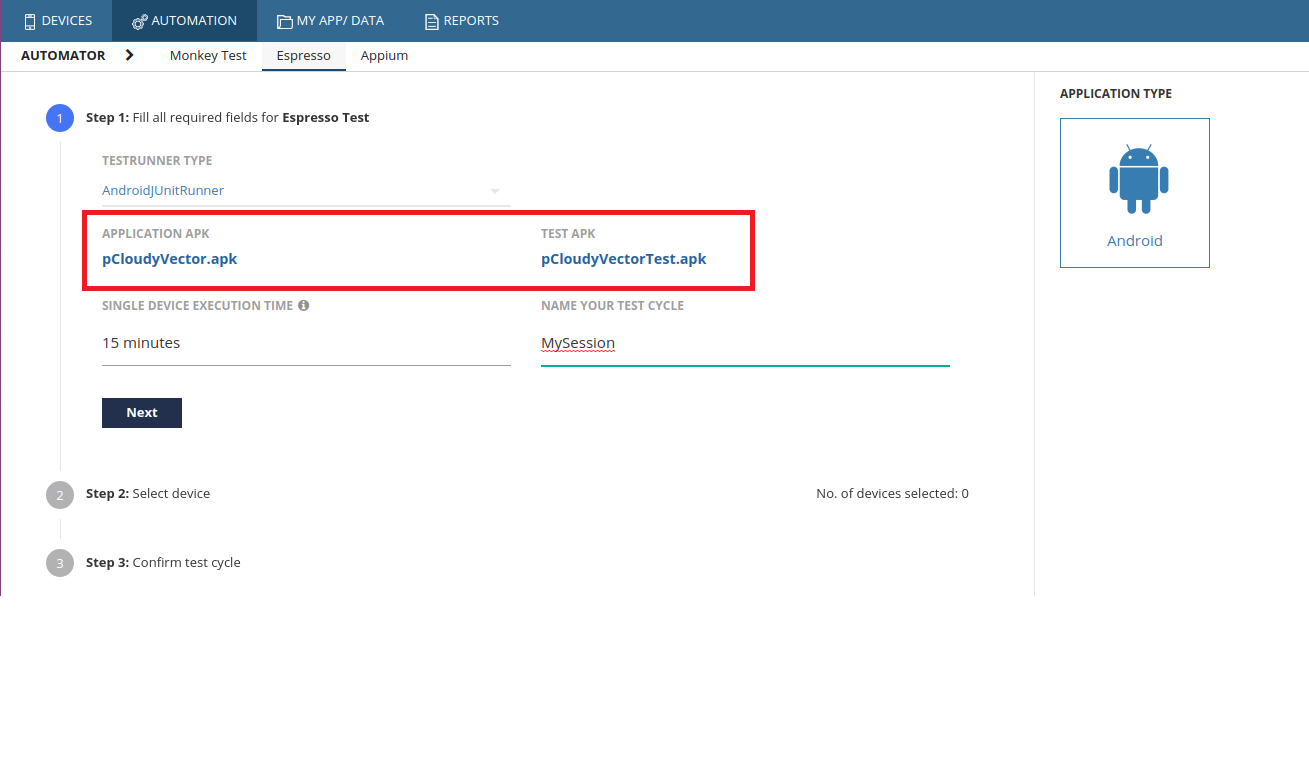
d. Select your Application and Test Application.
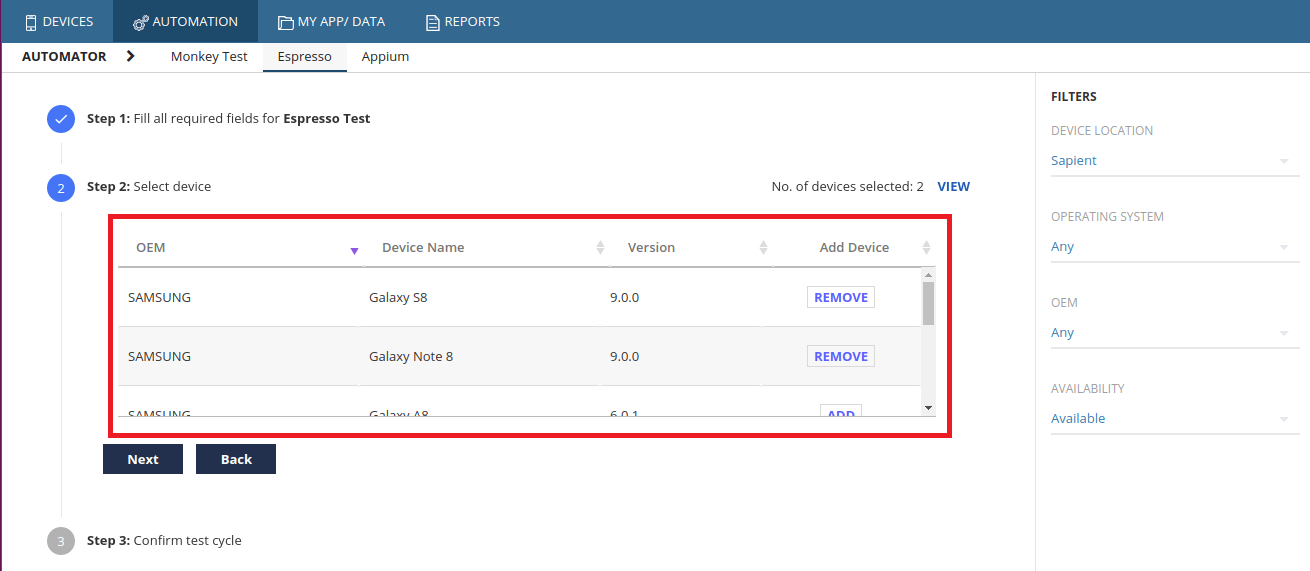
e. Select the required devices.
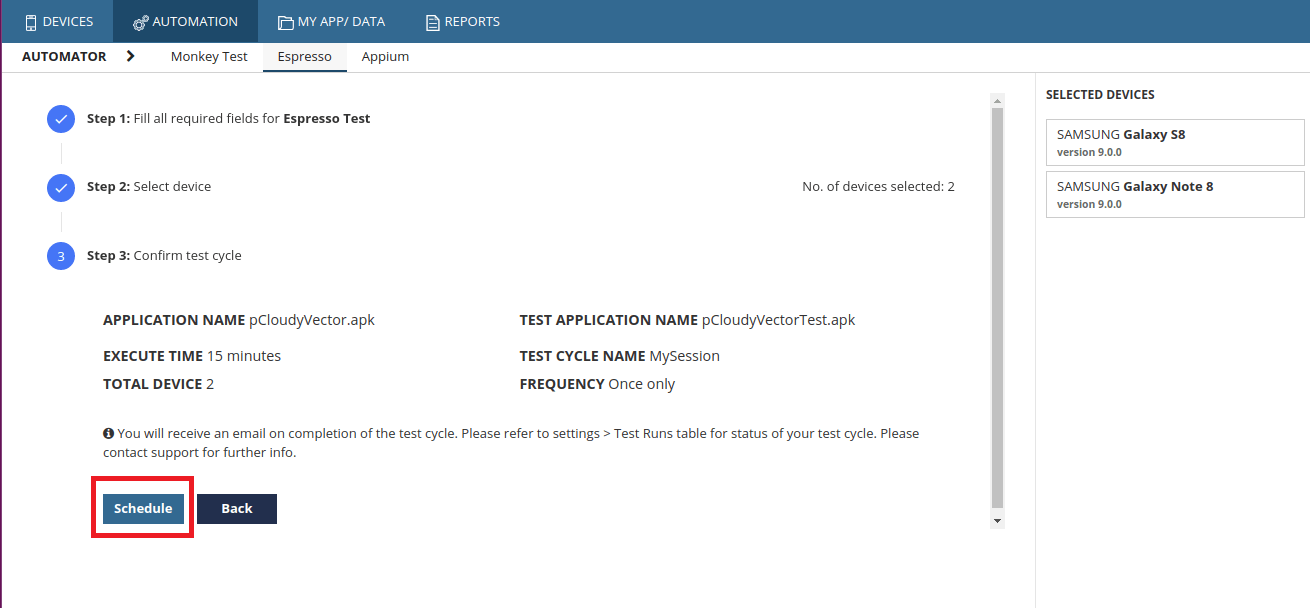
f. Click on Next button and Schedule the automation by clicking on the Schedule button.
g. You will get a dialog box. Click on Ok.
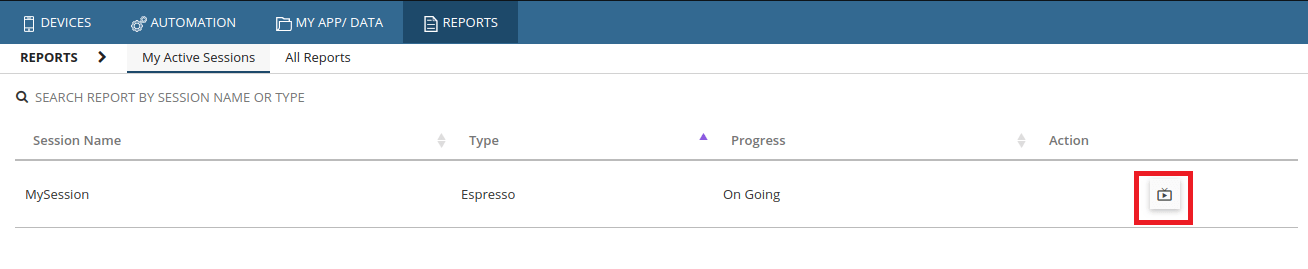
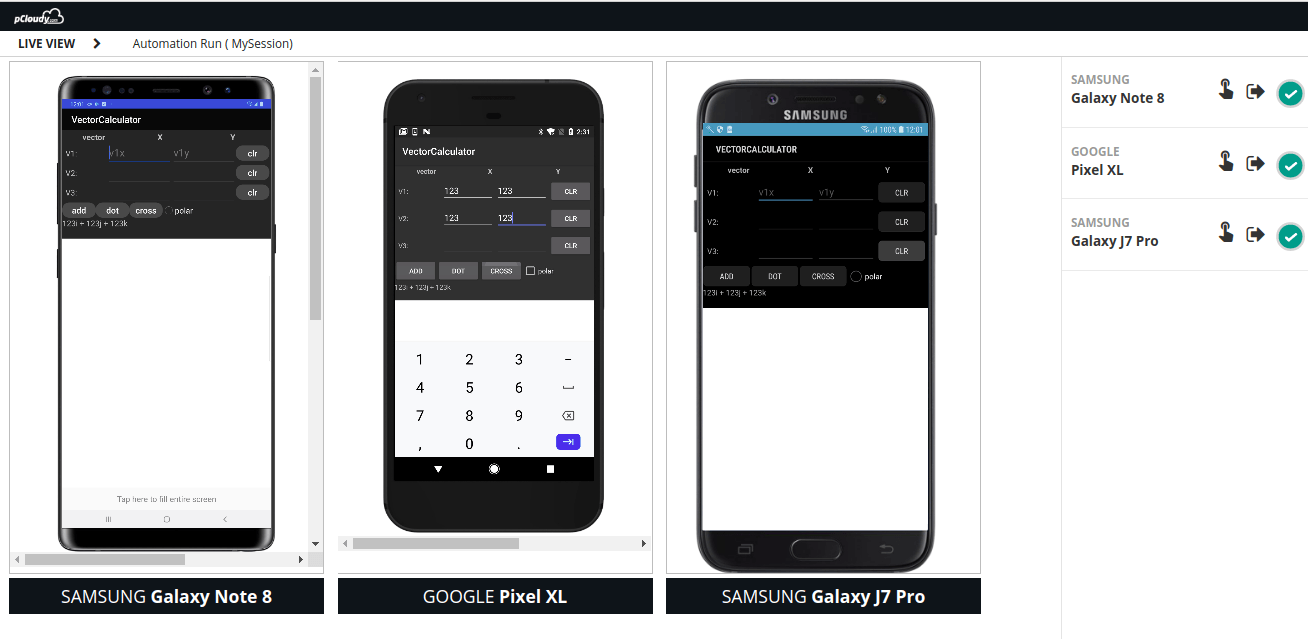
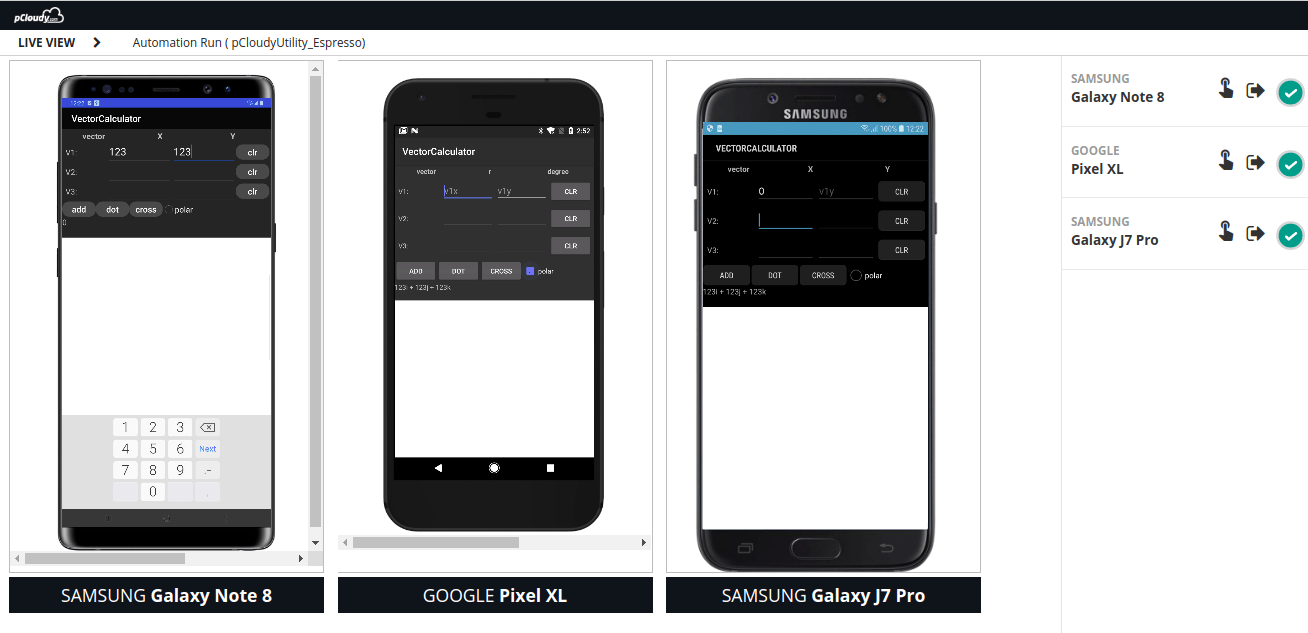
h. You will get the active session details on the Dashboard and you will also be able to see the Live view.
i. Liveview will help you to see the live execution on your test cases. Click on the Liveview icon
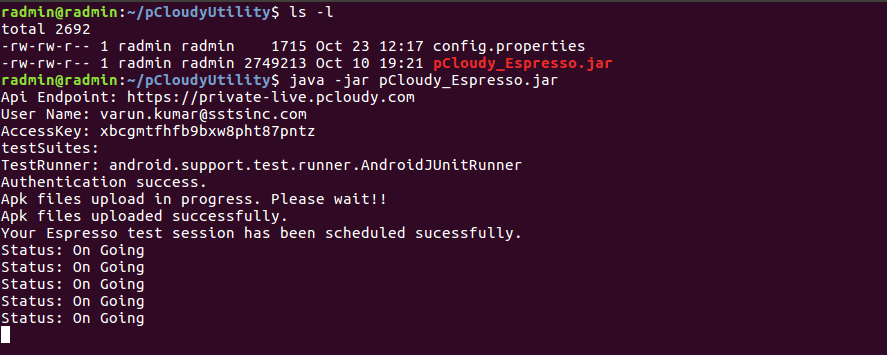
2.pCloudy Utility
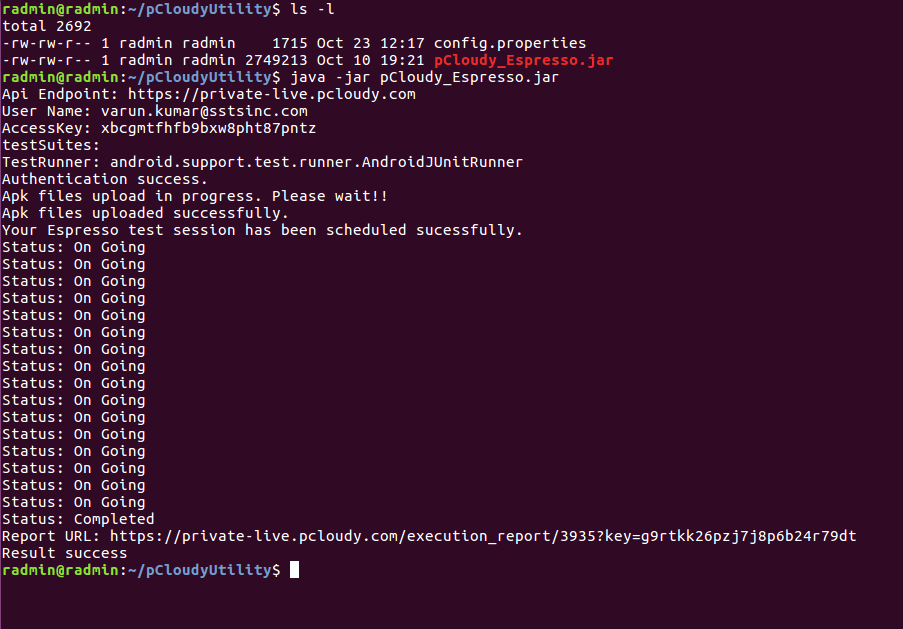
a. Download the espresso starter pack from here and Unzip it b. You will find two files,
i. pCloudy_Espresso.jar
ii.Config.properties c. Place the config.properties file and pCloudy_Espresso.js file into the same directory. d. Update the config.properties file as guided in the comments in the file. e. In your workspace, run the command by typing the java -jar pCloudy_Espresso.jar
f. This will upload the required files which you have mentioned inside the config.properties files.
g. You will get the status of the Automation in pCloudy Dashboard ActiveSession.
h. Even on the pCloudy dashboard, you can use the Liveview by which you can see the running test cases.
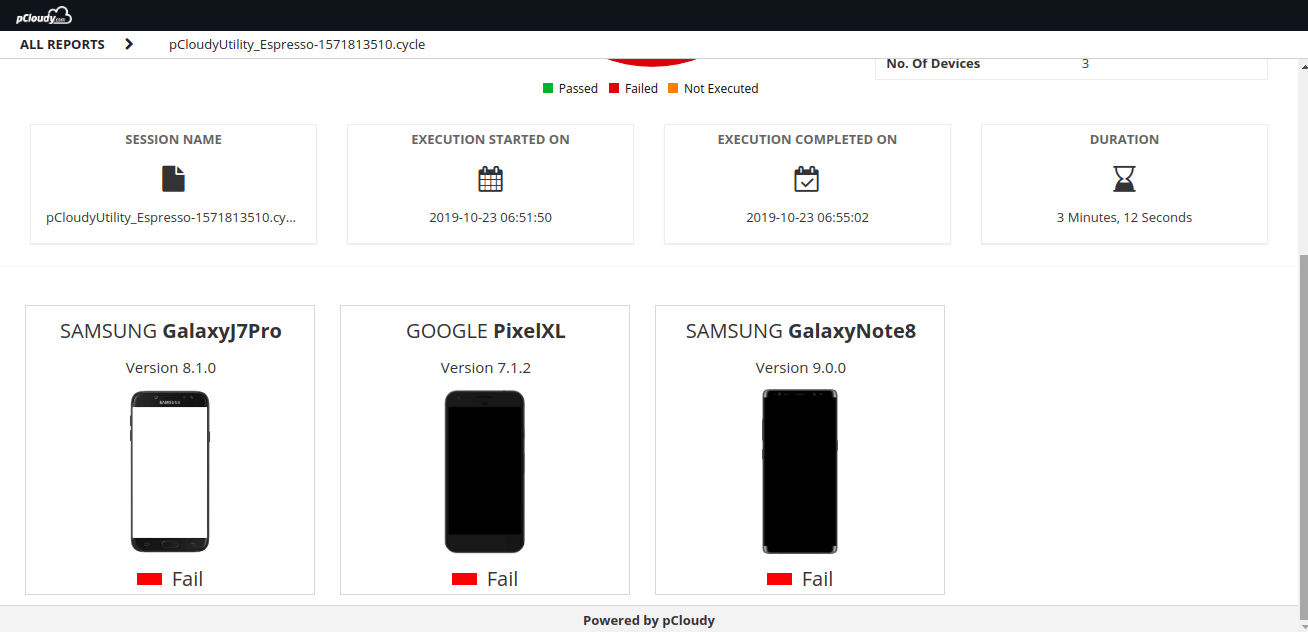
i. Once the test execution is over, You will get a URL of the test execution report on the terminal.
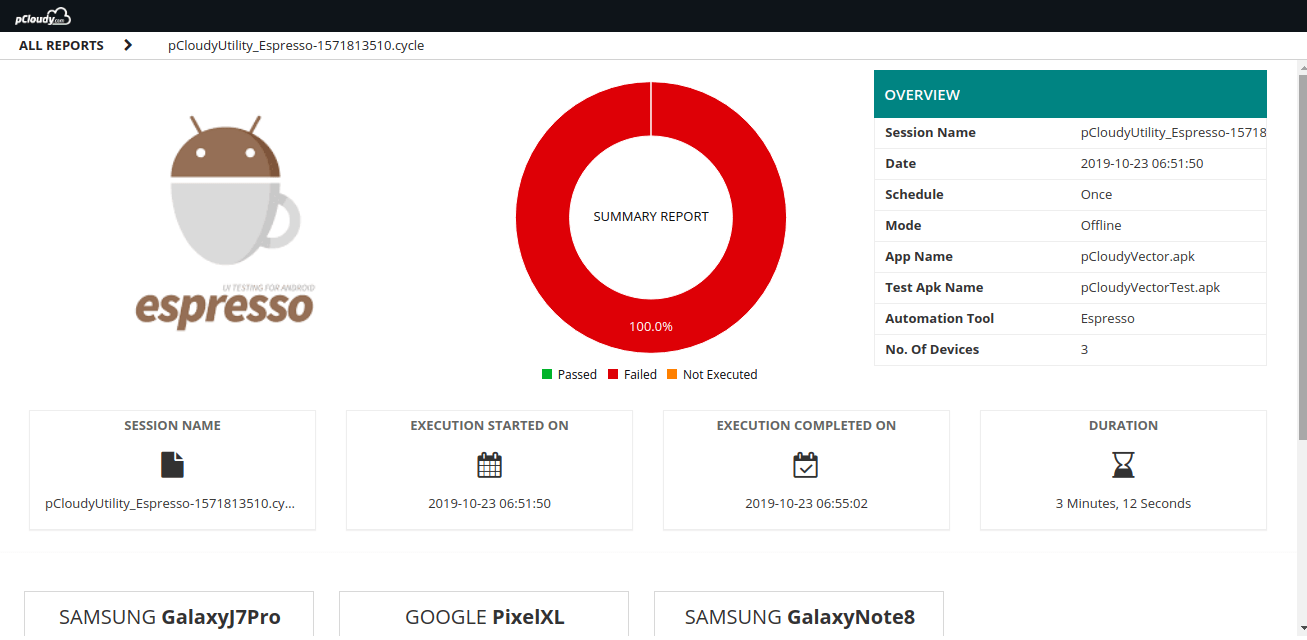
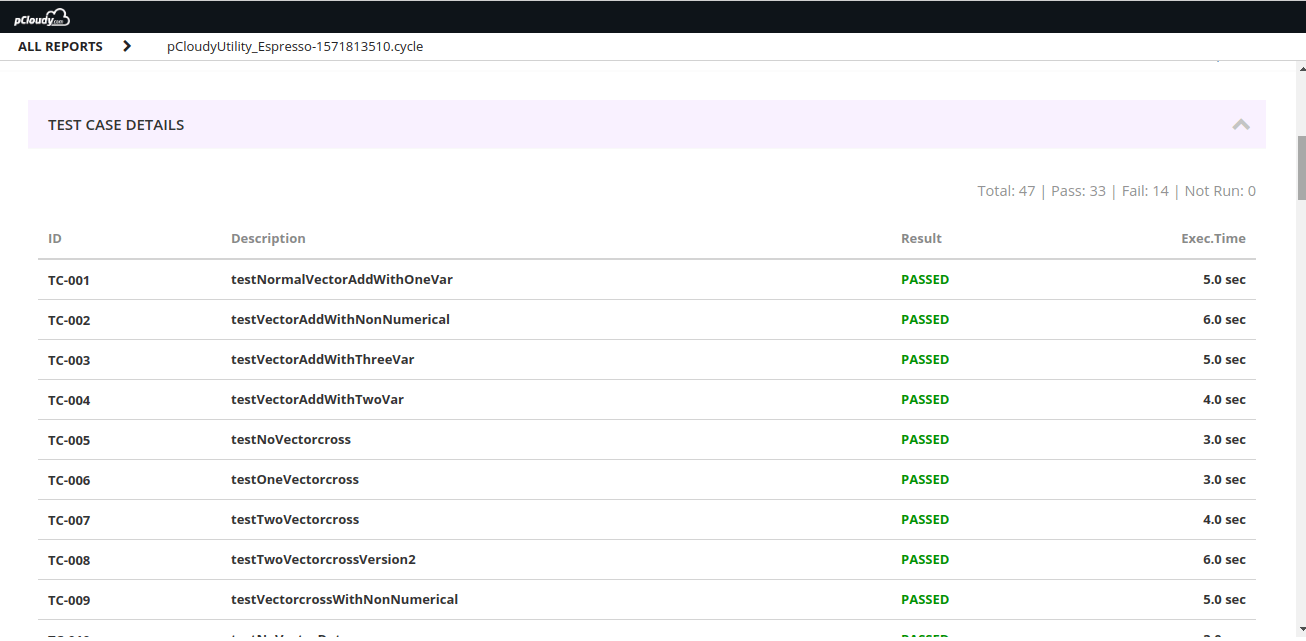
j. You can open the report from the dashboard Report section also. In the report, all the test details will be there as shown in the screenshots below.
k. You will also get individual device reports. Inside the test case level details, you will find performance details, test case logs, device logs, and video files.
Studies have indicated that after installing a new app, only a quarter of the users return to the app on the second day. The retention rate is eminently low and the majority of the users uninstall the app after the first use. You might have guessed the reason for this. If you think the reason is scanty testing then you are correct. A lot of times testers show little interest when testing is repetitive. Although regression testing is crucial to the success of the project, it is often overlooked to some extent. So let’s understand the concept of regression testing.
What is Regression Testing
In simple terms, regression testing can be defined as retesting a computer program after some changes are made to it to ensure that the changes do not adversely affect the existing code. Regression testing increases the chance of detecting bugs caused by changes to the application. It can help catch defects early and thus reduce the cost to resolve them.
Regression testing ensures the proper functioning of the software so that the best version of the product is released to the market. Although, creating and maintaining a near-infinite set of regression tests is not feasible at all. This is why enterprises are focusing on automating most of the regression tests to save time and effort.
Types of Regression Testing
There are different types of regression testing for different phases of testing. Let’s understand the types of regression testing.
Unit Testing: It is done when coding changes are made for a single unit and a tester re-runs all previously-passed unit tests. Often automated unit tests are built into the code to make unit testing efficient.
Progressive Testing: This type of testing works effectively when there are changes done in the software/application specifications as well as new test cases are designed.
Selective Testing: In this to cut down the retesting cost and effort, testers use a subset of the current test cases. A test unit must be rerun when there are changes in the program entities it covers.
Retest-All Testing: In this, we reuse all test cases even where the changes have not been made. It shouldn’t be done where there is a small change in the application as it is very time-consuming.
Complete Testing: Complete testing is effective when multiple changes have been done in the existing code. It is done to identify unexpected bugs and the final system can be made available to the user once complete testing is done.
How to Derive a Regression Testing Plan
Whenever there is a change in the app or a new version is released the developer carries out these tests as a part of the regression testing process.
First, the developer executes unit-level regression tests to validate the code that they have modified along with any new test that is created to cover any new functionality. Then the changed code is merged and integrated to create a new build of AUT. After that smoke tests are performed to assure that the build that we have created in the previous step is good before any additional testing is performed.
These tests can be executed automatically by continuous integration services such as Jenkins. Once we get the assurance that the build is perfect then we do the sanity testing to confirm that the functionality works as expected and known defects are resolved before conducting integration testing.
Integration testing is performed to verify that the units of the apps interact with each other and with backend services such as databases. The next step is to schedule regression tests depending on the size and the scope of the code either a partial or a full regression test may take place.
Defects are reported back to the development team and many require additional runs of regression testing to confirm the resolution. So based on the test reports you can analyze and figure out what test cases can be added for the next checking process as well and you create your report on that.
Regression Testing Challenges
Automation is always a smart move but there will be some challenges that would need your attention. Let’s have a look at the challenges that you might face in automation testing.
Cost is High
In terms of business expenses, the company will have to invest a lot of time and money in repetitive testing. Also, there’s no specific return on investment that is attached to regression testing. It is a complicated process and to explain the importance of regression testing in terms of business benefits to the management is really difficult. But this has to be done to draw the budget for the testing even though it is expensive from a management point of view.
Unstructured Information
If new testers are recruited during the ongoing software testing project, either to speed up the process or to release some of the tasks. The existing testers in the organization might not have time to give complete details about the functionalities and features of the app, existing bugs, delivery time, etc. The new testers might have to initiate testing with inadequate data about the ongoing testing project. Challenges like these need an appropriate test strategy for efficient collaboration.
Time Restrictions
The focus of enterprises is on developing quality apps and delivering them faster. This is why regression testing is always time-bound. Testers always get a deadline to complete the process of regression testing. To keep pace with time, The testers might have to take chances to give more importance to the critical regression tests and skip a few tests. It is a serious challenge as it is critical to decide which tests can be skipped.
Maintenance and Optimization
A major challenge is to maintain and optimize the existing regression test suites. The existing regression test suites might need modification like adding, removing or editing the existing test cases, whenever there are new changes. All this need to be done before the deadline fixed for the regression testing. Therefore, optimization and maintenance is another challenge that needs attention.
Best Practices to Perform Regression Testing
Now that we are aware of the challenges in regression testing. Let’s have a look at the key changes we can do to enhance it.
Focus on the Frequently Used Paths
Frequently used paths also make the most frequent use cases for your app. They must include the most popular features and the basic functionality of your app. You should be aware of the core group of users and their usual interaction with the app features. The regression test cases must ensure that this core functionality is working as expected.
Update the Regression Pack Regularly
A regression pack is a collection of test cases that are performed when a new app version is released or if there are any new updates. The tests in a regression pack are created keeping in mind the app’s older version requirement specifications. Ad-hoc tests should be included in the regression pack to keep it up to date. You wouldn’t want to waste your time on tests to validate an old feature that is not included in the latest version of the app.
Create an Entry/Exit Criteria
The entry/exit criteria that we usually follow in the software development lifecycle can be implemented in regression testing as well.
As entry criteria, a fixed set of conditions need to be met like reviewing bugs and performing regression testing to fix those bugs. Exit criteria can be applied with a fixed set of conditions like making sure that all the tests are executed and no bugs remain unfixed.
Automate Regression Tests
Automating regression tests makes the process much more efficient and saves time and effort. Repetitive testing can make testers lethargic and testers might lose motivation. It also affects the quality of their work as the testing is repetitive. Automated regression testing will free up resources to work on the more complicated tests. When we use automation, the test cases along with the software can also be reused which increases the return on investment.
In a Nutshell
Change is hardest at the beginning, messiest in the middle and best at the end. This quote by Robin Sharma suits the importance of regression testing in delivering a smooth functioning app. As mentioned earlier in this blog, different types of regression testing can be performed at all stages of the testing life cycle. And there are ways to overcome the challenges in regression testing too.
One option is to use a cloud-based app testing platform which will enhance the effectiveness of regression testing by many folds. There will be hundreds of devices to perform testing in parallel and features which complement regression testing automation.
In the last blog in this series we learned how to start the Appium server and launch app from the code. In this blog we will understand how to setup Appium on a Mac machine.
Pre-requisite
• Mac Book
• Xcode
• Simulator or real device
• Appium
• Eclipse
• Java
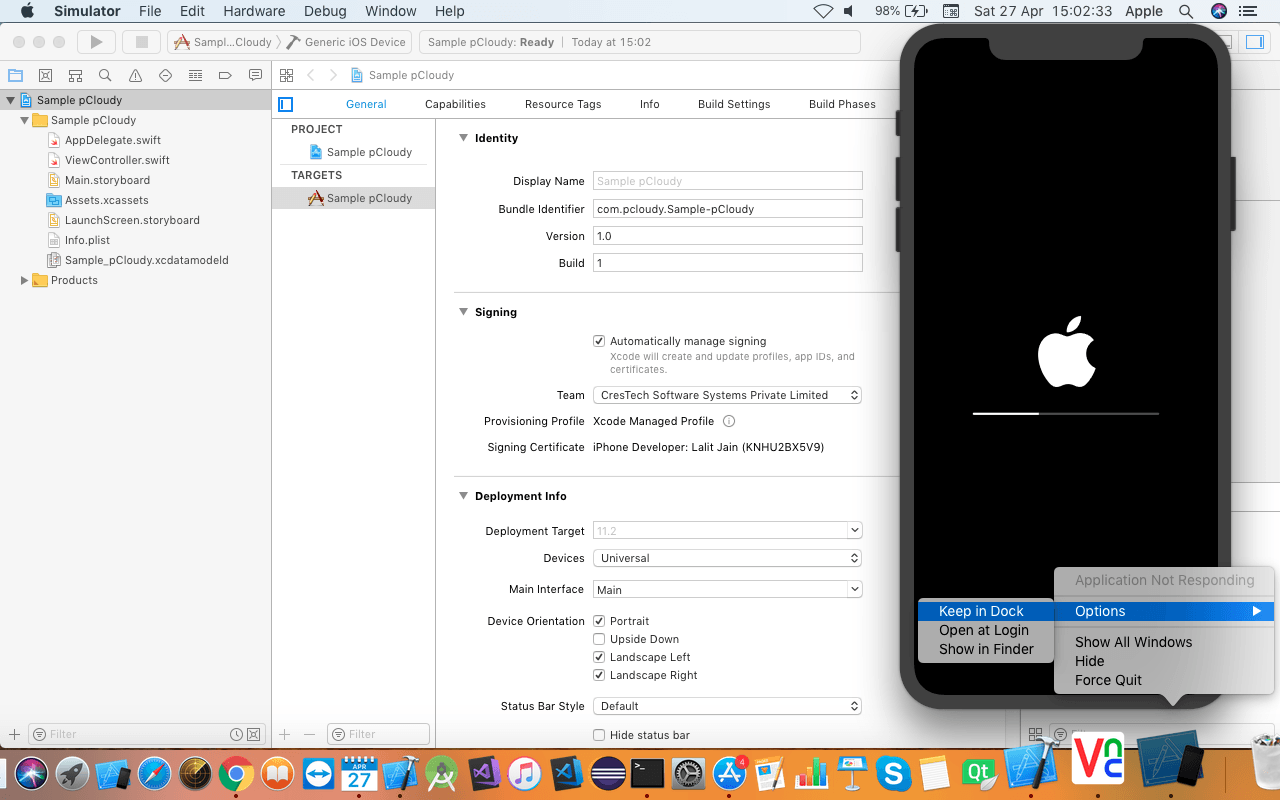
The first step is to install Xcode in the Mac Book. To do that, open app store and search for Xcode and click on the Get button to download Xcode.
Then click on the Install App option. This will install Xcode on your Mac machine. Now click on the Agree button if you agree with the terms and conditions and it will start installing components.
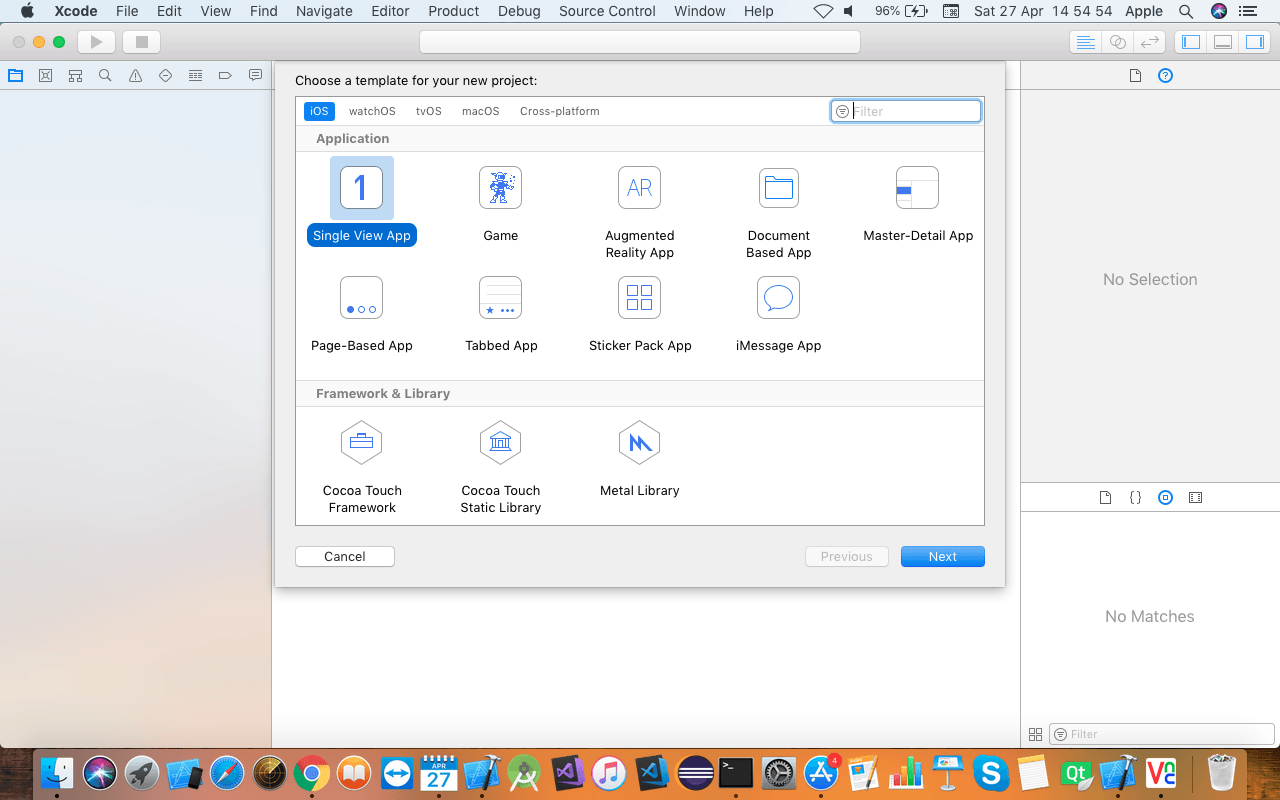
Once the Xcode is installed, you need to select “Create a new Xcode project” and you will be redirected to the template selection option.
You may select any of the templates or leave default settings as they are. Click on the next button to navigate to the next screen.
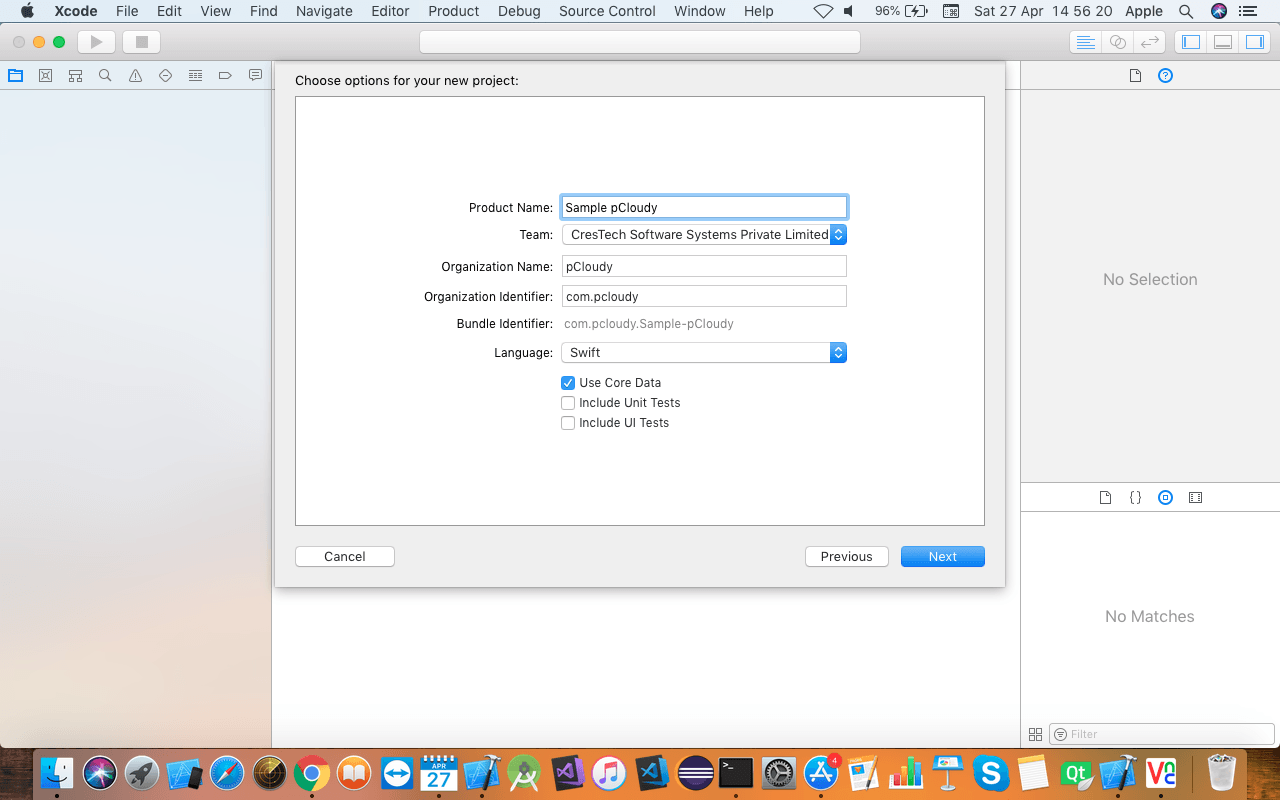
Now you will be asked to provide a product name and other product-related settings.
Enter the required details and click on the next button. In the last seen of product settings, you will be asked to give the location in which to save your project.
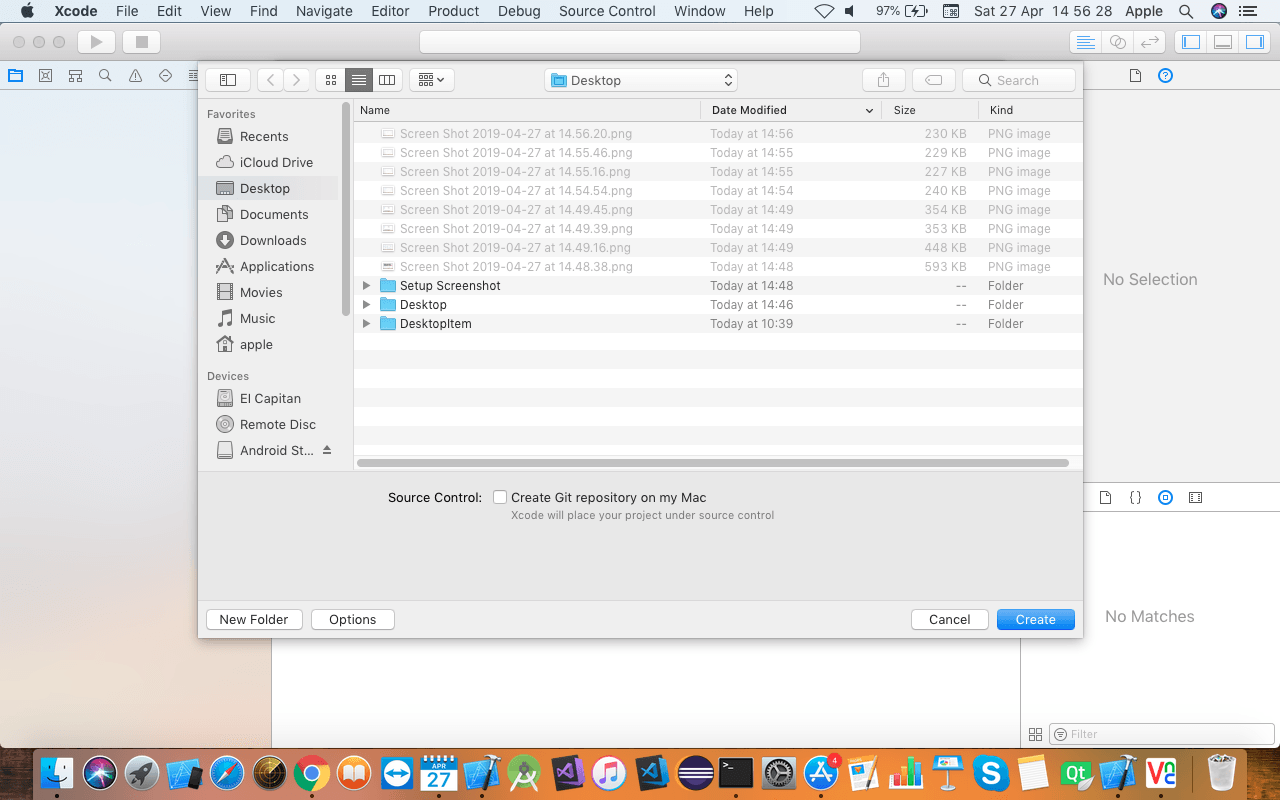
Select the location anywhere as per your requirements and click on the create button.
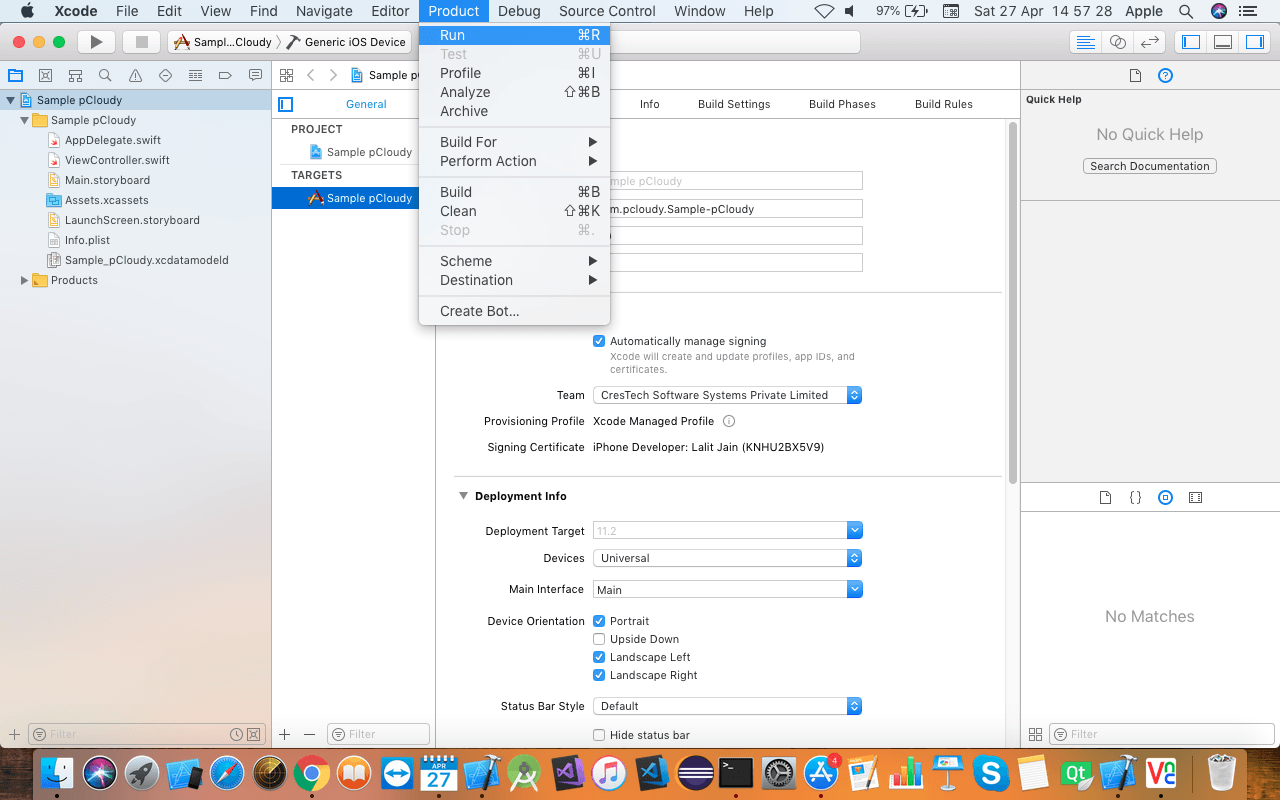
Once the project is loaded go to the Product menu option and click on the Run option.
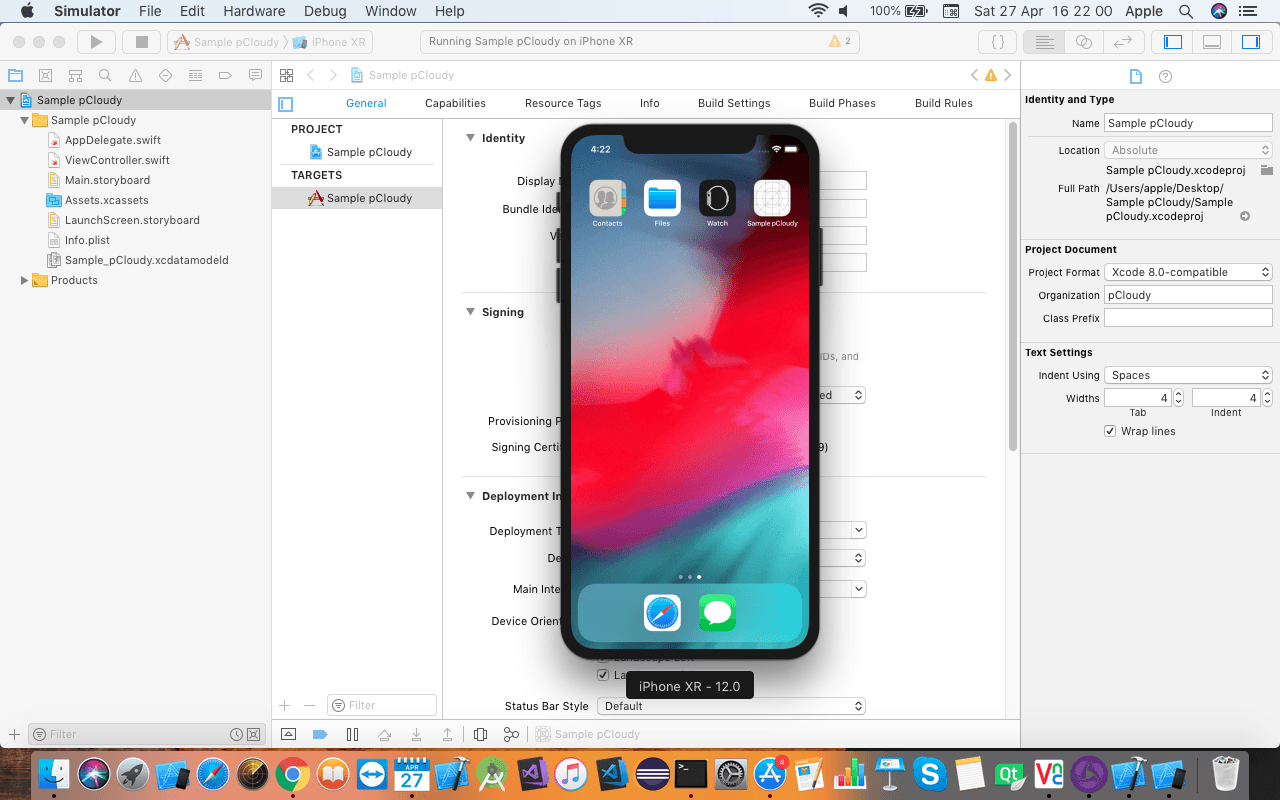
Once you click on the run option, it will launch iOS simulator.
Now right click on the simulator icon on the doc panel and select the keep in doc panel. In this way, you don’t need to start Xcode to launch the simulator. Thus you don’t need to open the Xcode project each time to launch iPhone simulator. If you want to see the list of simulators, got to the Window menu and select the Devices option. You will get a list of all the simulators available with this version of Xcode.
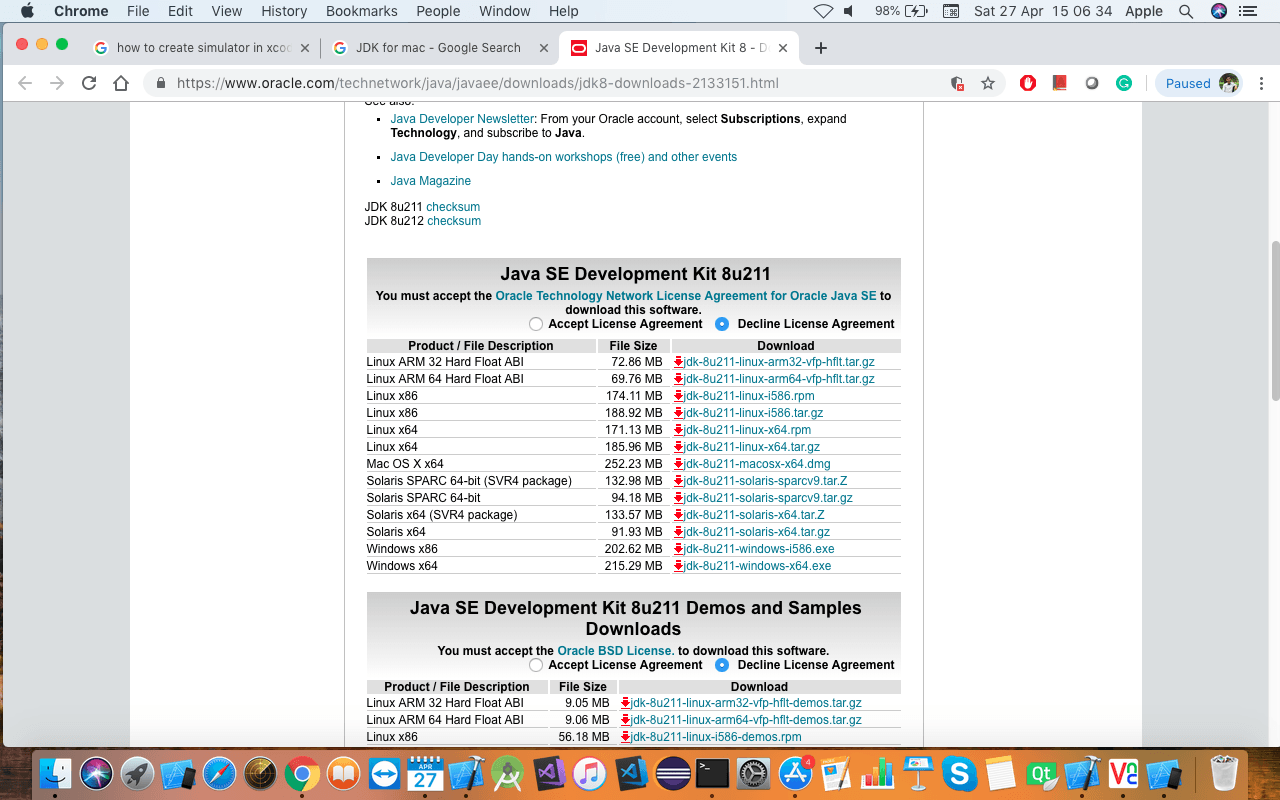
Installing JDK and setting the path
Download JDK for Mac OS and once the file is downloaded, double click on the file and install Java.
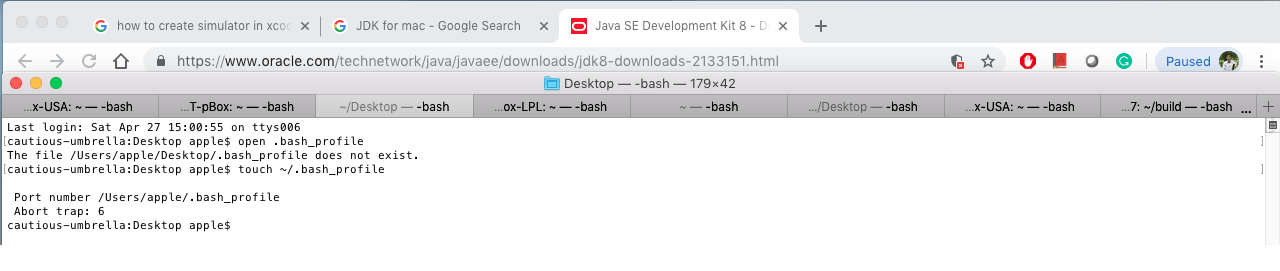
Now you need to set the Java installation path in your environment variable. Open a terminal and write “open.bash_profile”.
If “.bash_profile” does not exist then execute the command “touch~/.bash_profile”. This will create the file. So when you execute the command, it opens the “.bash_profile” file.
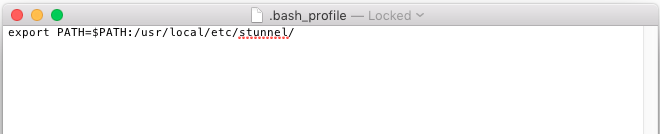
Copy the path to JDK home, write export JAVA_Home= and then save this file. Open command prompt and execute the java – version command. Open Appium.io and click on Download Appium button.
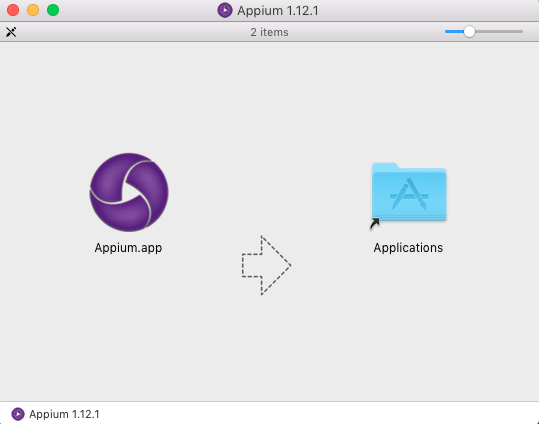
Now download the latest .dmg file and once downloaded, double click on the .dmg file.
It will open a new window where you need to drag and drop Appium into the application folder.
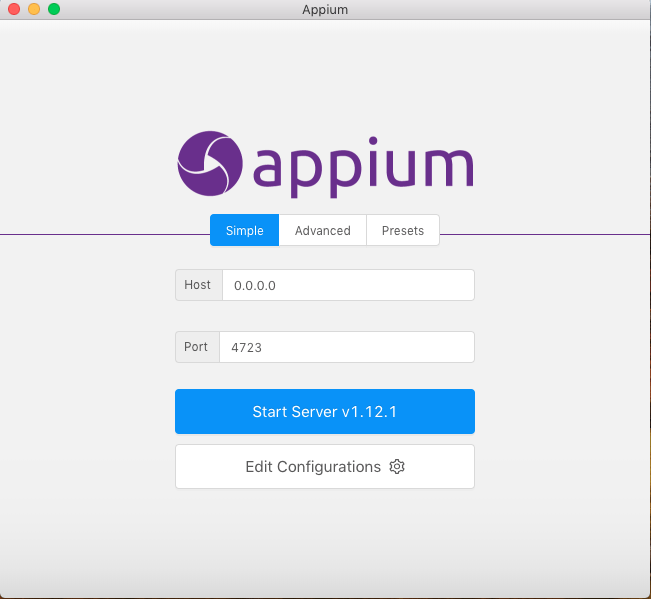
Search for Appium and double click on the Appium icon. This will launch the Appium server on your Mac machine.
To Launch Appium on a simulator click on the Start Server button.
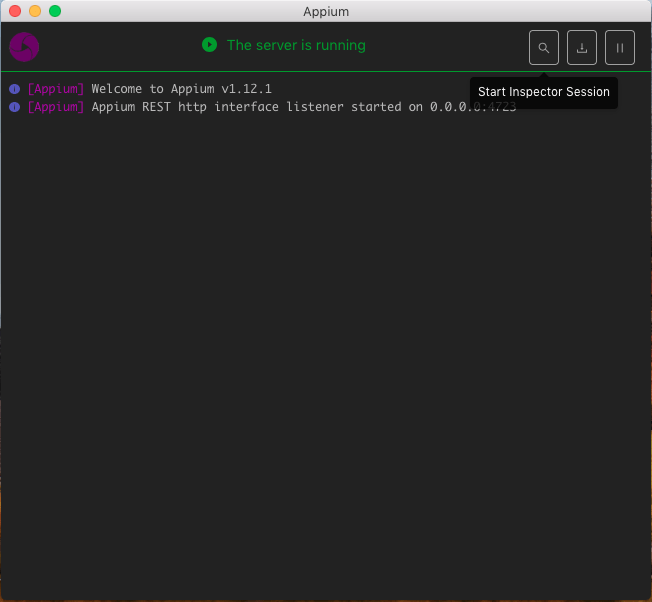
Now click on the Start Inspector Session button in the Appium server.
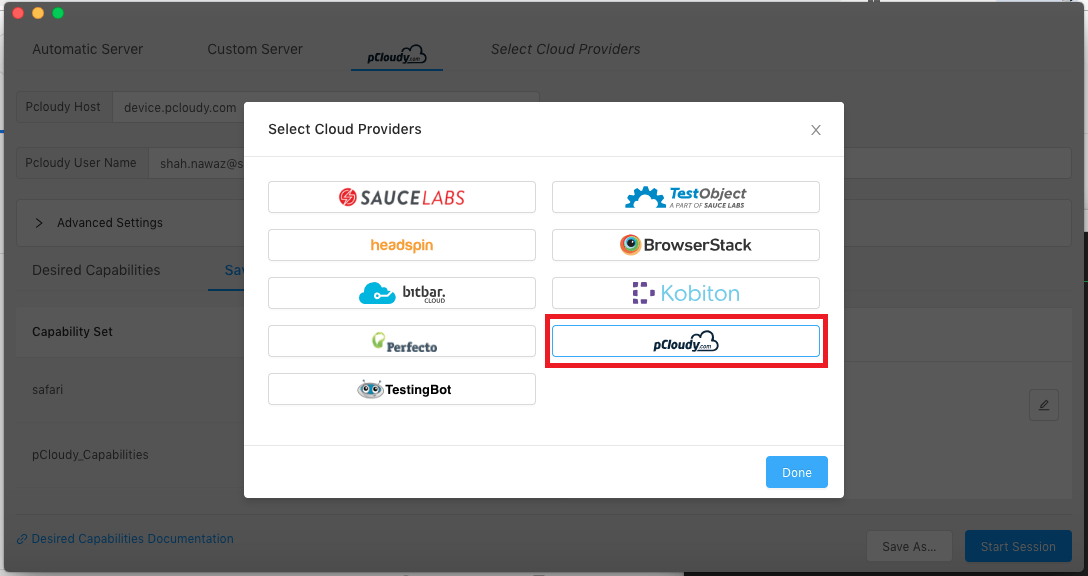
Once you select pCloudy as the cloud provider from the list you can click on Done.
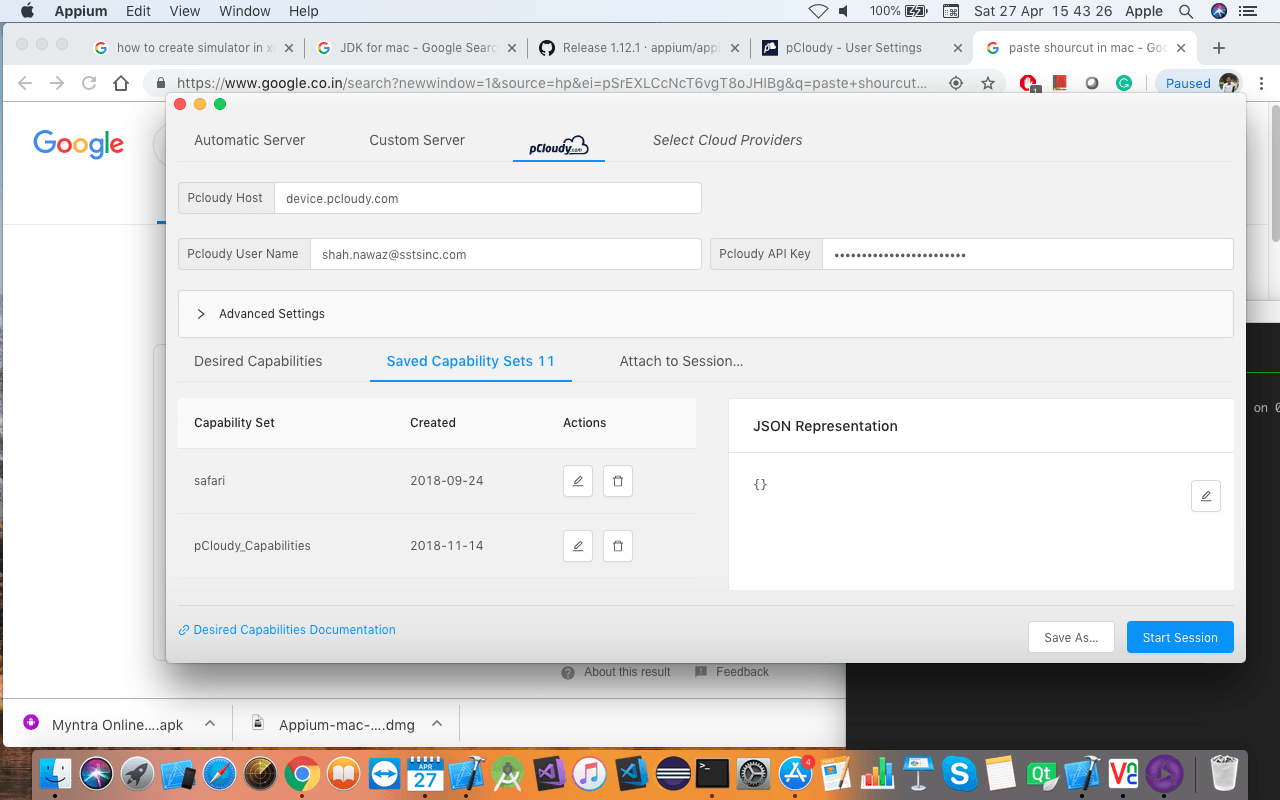
Then you need to enter the Hostname, User name, API Key, Desired Capabilities and then click on Start Session.
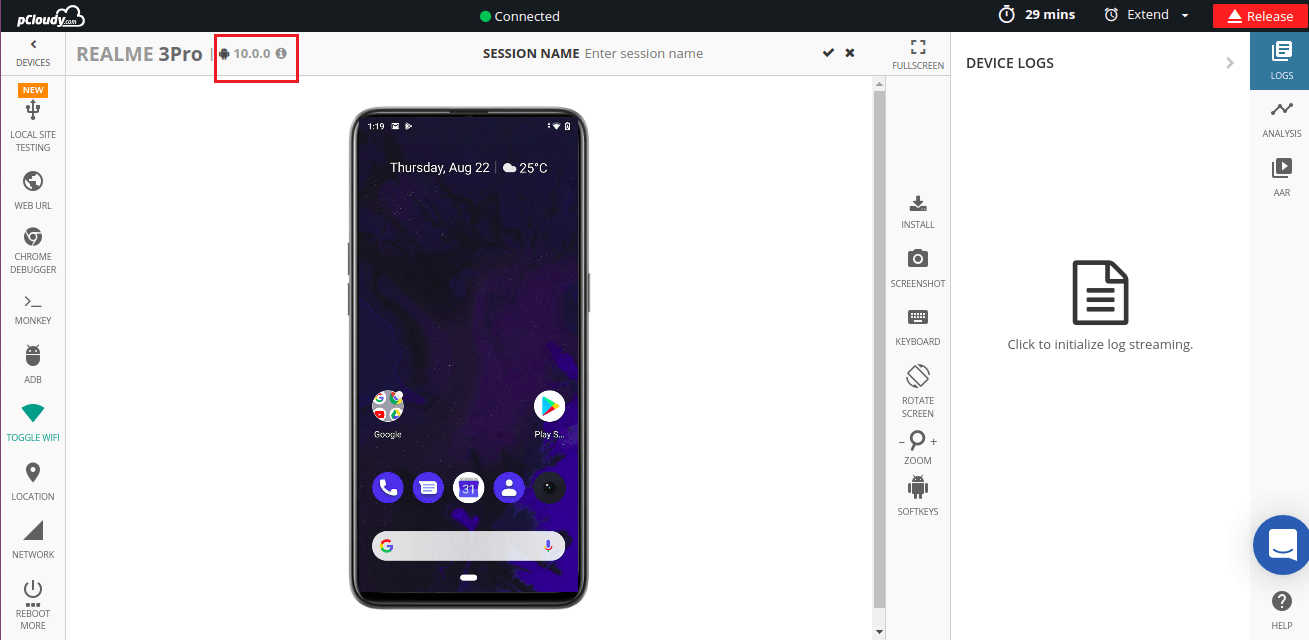
Your simulator is now connected.
Now you know how to setup Appium on Mac and in the previous blogs in this series we explained how to write the test script and start Appium server. In the next blog we will learn how to use Appium inspector to identify elements in an app.
We are committed to keeping you ahead of others. pCloudy is one of the fastest to release the support of Android Q beta devices on the cloud.
Google has launched the final Android Q beta and Android Q official release is just a few weeks away. Testers and developers can test their app against this final beta version. Android Q beta 6 includes the final API 29 SDK and updated build tools for Android Studio. It also supports all the features, developer APIs and system behaviors that will be in the final release.
Now you can test your mobile apps on devices loaded with Android Q beta version in pCloudy.