Chrome Developer Tools

Introduction

Testing a Mobile Web App can get knotty, especially when there are issues like obfuscated HTML/CSS/javascript code, improperly implemented HTTPS, browser inconsistencies, page load performance and so on. Moreover, few things like can be extremely agonizing while striving to support as wide a range of mobile devices as possible. So how do you overcome these issues? Using a Web Developer Tools or debugging extensions make debugging your web application easier. Here we’ll talk about the most popular one – the open source Google Chrome Developer Tools.

The Google Chrome Developer Tools is a consolidated environment built into Google Chrome Browser. It is used for web authoring, debugging, monitoring, optimizing, and understanding web applications or websites. (Sourced from Google Chrome DevTools)

Here are some of the key Chrome DevTools features

  • Inspect and edit the DOM and CSS of your website in real-time
  • Run code snippets from any page
  • Debug Obfuscated code
  • Set advanced breakpoints and debug JavaScript using graphical debugger
  • Troubleshoot Security issues
  • Analyze run-time and page performance to improve the speed of your app
  • Trace reflows and repaints as your app loads

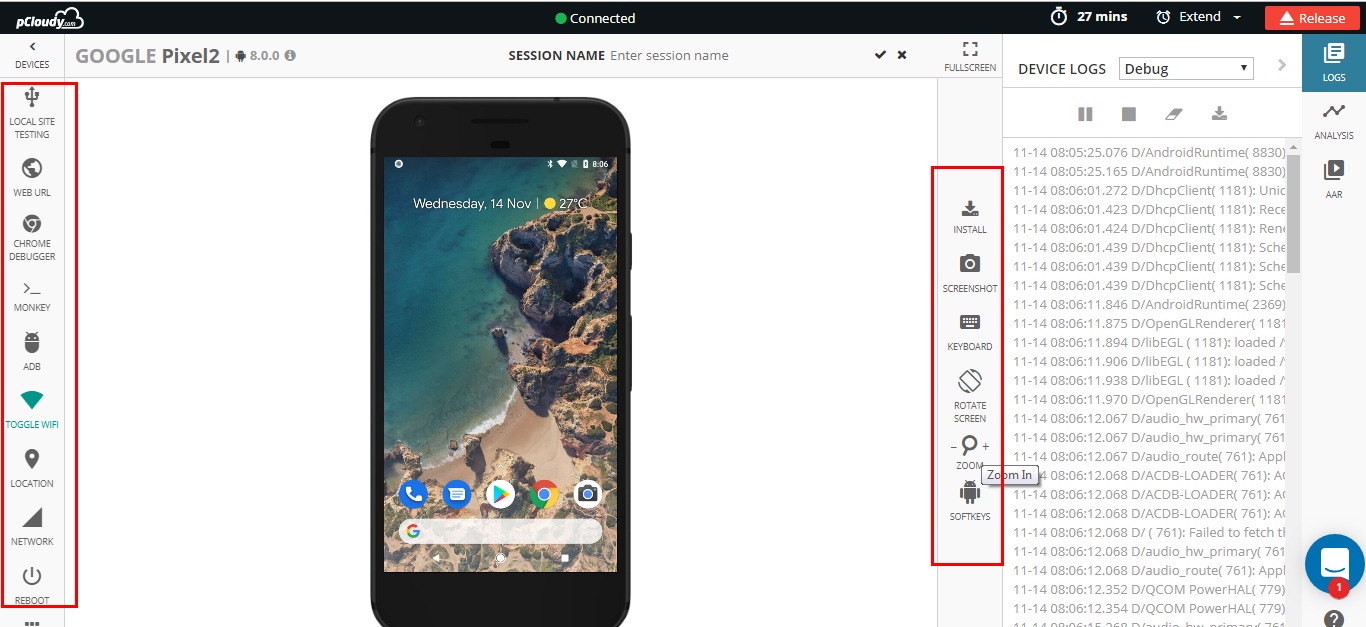
The Chrome DevTools provides almost all the gears required to inspect, debug and monitor the performance of a Web App/mobile web. It also provides additional capabilities to simulate Mobile Devices to test and build mobile-first, responsive web sites. You can even debug web content on a real Android Device from a development machine. But, is it enough to test your Web App on just one or two devices?

Remote debugging using Chrome DevTools in integration with pCloudy’s Mobile Device Lab

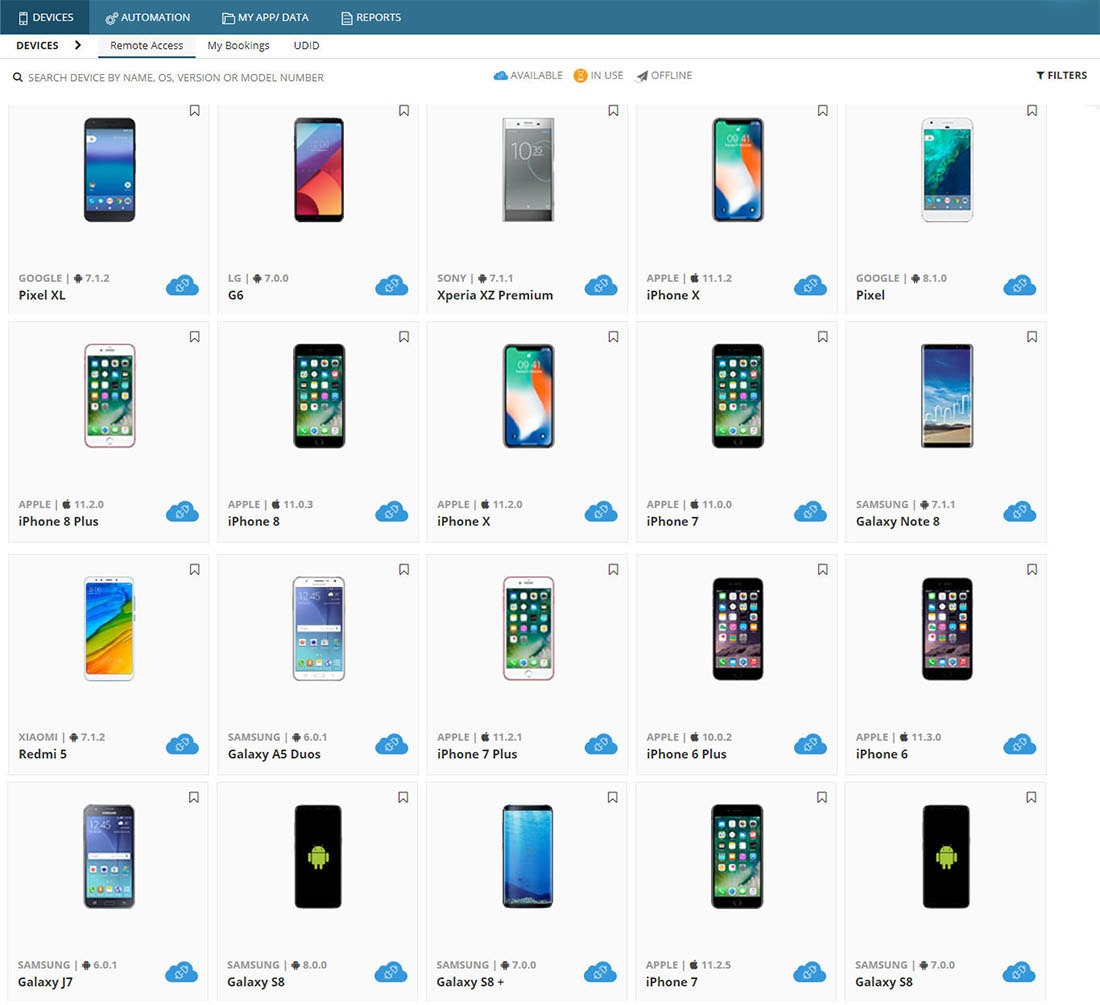
Device fragmentation is a very real problem when testing Web apps on real devices, particularly for UI and functional tests. The number of devices with unique specifications and proprietary build variations has increased. At an advanced level, to fully test your Web App’s responsiveness and performance on real devices you will need to experiment your site on various platforms, across a number of device form factors. pCloudy’s Mobile Device Lab offers complete integration with Chrome DevTools to test your apps on real devices. This integration allows you to test Web Apps on a myriad of android devices with different sizes and configurations.

Here’s how most App developers test their Web Apps

Inspect and live edit your site’s design and content

Test and edit your site in live mode by inspecting all the HTML and CSS in your page. In the Elements Panel, you can live-edit a DOM node by simply double-clicking a selected element and making changes.

Chrome Developer Tools

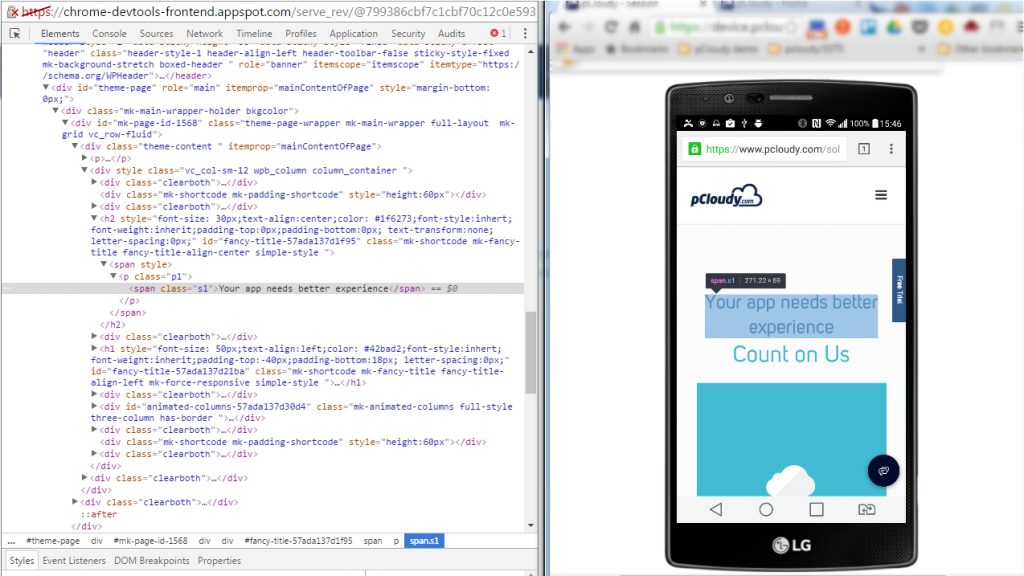
You can even live-edit style property names and values in the Styles pane. Examine and edit box model parameters.

Live-Edit_Styles

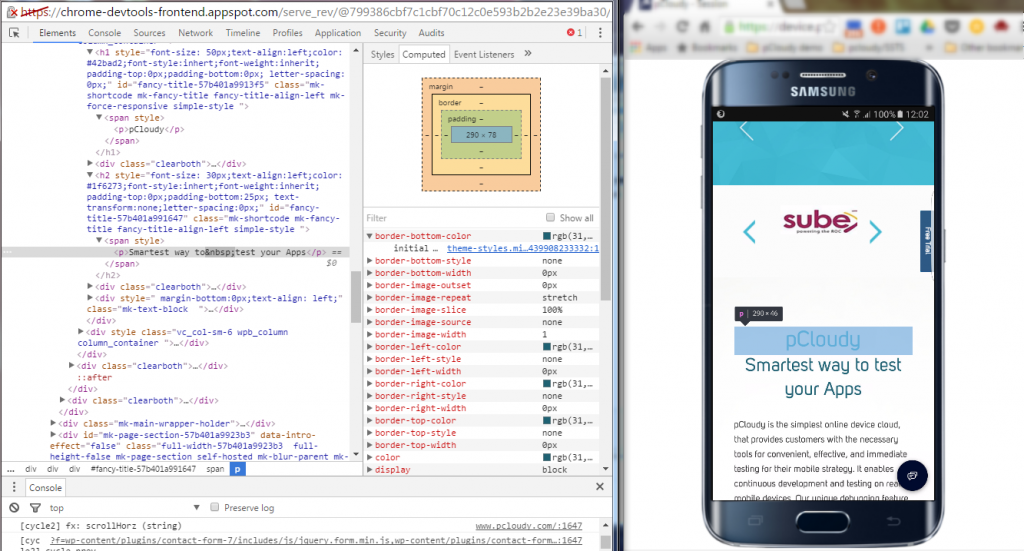
It is also possible to edit the current element’s box model parameters by making changes to top, bottom, left, right values for the current element’s padding, border, and margin properties using the Computed pane.

Box_Parameters

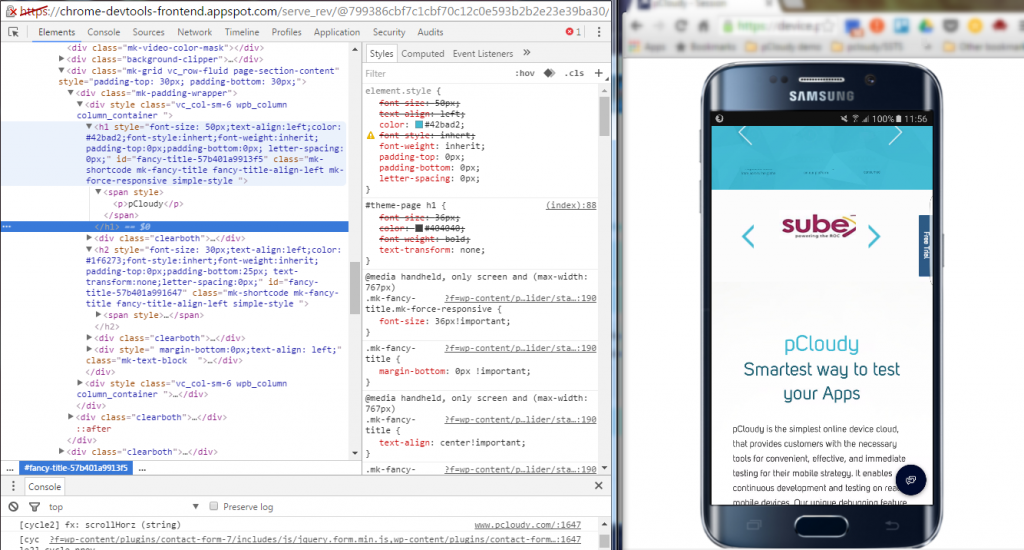
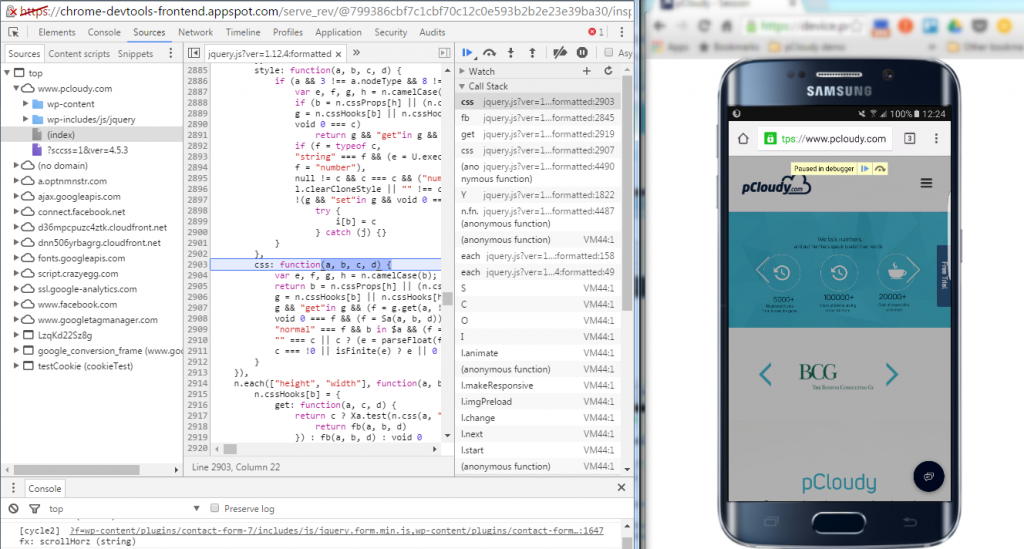
Remote Debugging on real devices to fix errors in the code

Debugging Obfuscated Code: Make your code readable and easy to debug even after you’ve combined, minified or compiled it. You can easily change the formatting of your minimized code by clicking on { }.
Debug-Obfuscated

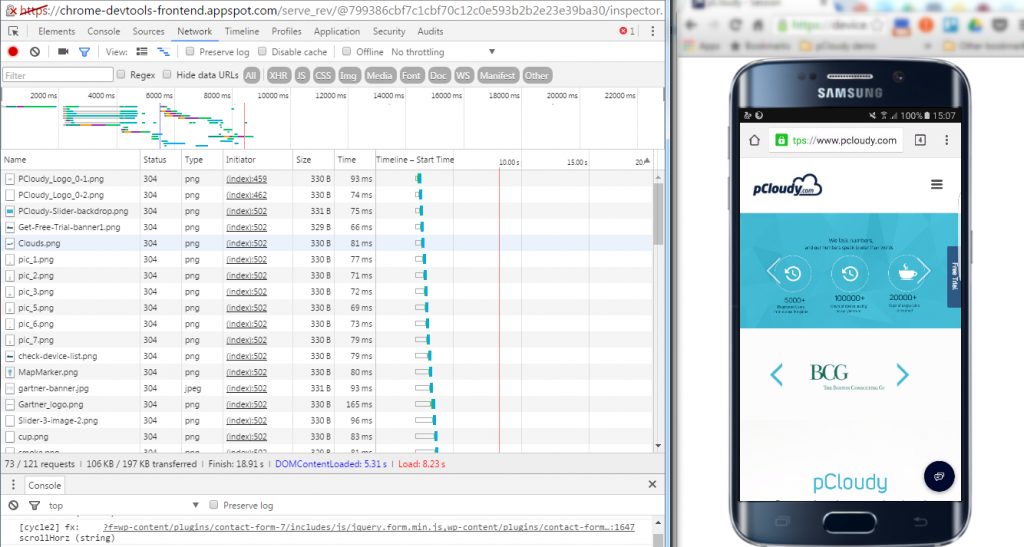
Test the and optimize the performance of the Web App

The Network Panel allows you to see how your page renders, and time taken to render from start to end. To do this click into the “Network” panel, click on the camera icon and refresh the page on the device.

Chrome Dev Tools

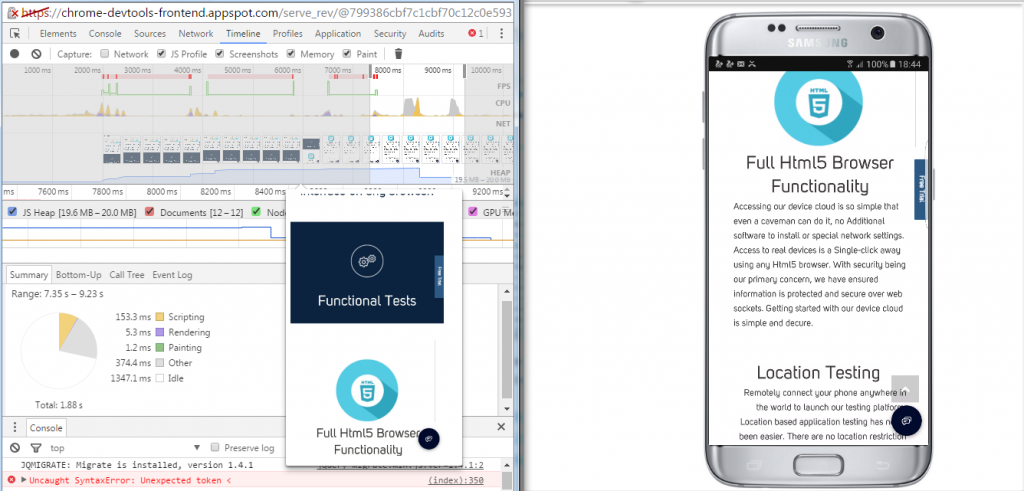
The Timeline panel helps you to record and analyze all the activities in your application as it runs. It’s the best place to start investigating perceived performance issues in your application.

To make a recording of a page load, open the Timeline panel, open the page that you want to record, and then reload the page. The Timeline panel automatically records the page reload. You can also record page interactions on the page and view the performance details through the recorded timeline.

Here are some more details you can view using the Record Timeline

  • Record the Timeline to analyze every event that occurred after a page load or a user interaction
  • View FPS, CPU, and network requests in the Overview pane
  • Click on an event within the Flame Chart to view details about it
  • Zoom in on a section of a recording to make analysis easier

Timeline

Conclusion

“Using the right tools for the right job” is an old aphorism that applies to all domains including Software Development. As we’ve seen, Chrome Developer Tools has several features that helps you develop better, debug faster, and measure efficiently the performance of your website or application. The features discussed here are some of the most common ones used by developers, designers and testers to write, debug, monitor and optimize Websites and Web Apps. Using these features in integration with Mobile Device Lab like pCloudy can transmogrify the entire process of creating, testing and launching Websites and Web Apps.

Testing Mobile Apps


If you are someone using a smartphone to get through most of your day, then I’m sure would you’ve experienced it – You are in an elevator using your smartphone trying to find a restaurant for dinner but the app you are using unexpectedly crashes, or you are in a crowded subway using your smartphone to upload a video to some social media portal but the app you are using takes too long to respond, or you are just waiting for a friend in the basement of a parking lot and in the meanwhile you decide to shop for some new shoes but the e-commerce app you are using does not respond the way it should. Isn’t it frustrating when the apps you are using does not work when you require it the most? In these situations, the first thing you do is simply uninstall it, or in the worst case write a bad review.

Strangely, though most of the apps are functional and performance tested, they are still found to be defective by the users. It could be possible that not all scenarios are covered during testing. So, where is the gap? Deeper investigations have revealed that mobile apps behave differently in different network environments. In the above scenarios particularly, it seems like there is more evidence indicating that these issues are caused due to irregular mobile networks in locations such as the Elevator, or the crowded Subway, or the basement of a parking lot.


Why do apps behave differently in different network environments?

The network has a huge impact on the behaviour of your apps. Most of the apps that we use today are functioning by constantly communicating and fetching information from some servers or users that are miles away. The communication that happens is on wireless networks that are unfortunately not always reliable or consistent. Though most MNOs have established wider and better networks, it is practically difficult to achieve absolute seamless connectivity with excellent signal stability using existing wireless technologies. This is because, inherently, wireless networks have several inconsistencies like the lack of bandwidth in some places, the drop in packets caused by handovers and routing while moving, and more interference from other networks. Additionally, the networks through which data is transferred wirelessly also vary based on the technology used like GPRS, UMTS, HSDPA, LTE etc.


Why should apps be tested in different network environments?

The unpredictability of wireless networks has a huge impact on the functionality, performance and user-experience of an app. This is why we often see certain functional defects, performance defects, and sometimes crashes only when the app is running on a certain network or in some specific locations. Besides, mobile apps are expected to function on everything from an excellent Wifi connection, to a snail-paced 2.5G connection. Hence mobile apps have to undergo a wide range of tests on different networks with a variety of conditions before they are released to the users.


Are you testing your apps on different network conditions?

Traditionally, mobile apps are tested using the best networks in perfect conditions. But in real environments when the apps are being used anything can go wrong – the network bandwidth might not be enough, the latency might be high, data losses might occur, or there might be interference from other networks. App development companies have now realised the impact a network can have on their apps and are slowly filling up the gaps in mobile app testing. They are now focused on ensuring the app’s functional stability and relentless performance despite network inconsistencies. But testing mobile apps on different varieties of networks with a range of uncommon conditions is overwhelming and challenging. Moreover, these apps have to be tested on numerous mobile devices. It’s a tedious but crucial task. Additionally, tools that support such testing are scarce.


How can you test your apps in different network environments?

  1. Testing Mobile Apps using live networks – Live networks can be used for testing mobile apps. The apps can be installed on real devices and can be tested on various networks like GPRS, UMTS, LTE, CDMA, etc. But the procedure of using real networks for app testing is slow, cumbersome, and mostly provides inaccurate results. Testers need to travel to different locations or wait for the network conditions to occur for conducting the tests. Furthermore, when the developers try to reproduce the bugs in order to fix it, the exact network conditions are hard to be replicated; eventually, most of the bugs will be closed as “Cannot Reproduce” while the bug still remains.
  2. Simulated networks – Network related tests for mobile apps need not be such a hassle if the testers are given full control of the network being used. Using a simulated lab network, testers can easily test their mobile apps by simply selecting and applying the type of network profile to be used. They can also create and customize different network profiles by simply changing parameters like Uplink Bandwidth, Downlink Bandwidth, Latency, Loss Percentage, Packets Corruption, etc. This setup helps testers to replicate a myriad of network conditions for testing mobile apps.
    On a larger view, when a mobile device cloud like pCloudy is being used you can test your mobile apps on varieties of networks, on hundreds of real mobile devices in parallel, through manual tests or automation runs. It is one platform that takes care of your entire app testing needs by helping app developers to easily test and experience the app functionality and performance on different networks and different mobile devices.

Introduction to iOS TestFlight

TestFlight is an online service used to distribute and test beta iOS applications. Developers can use Test Flight to evade the Apple’s bitter binding procedure for testing new versions of their apps. It provides over-the-air installation, testing, tracking and managing of Beta apps. In simple words, TestFlight acts as a link between the developer, the tester, and the Apple Developer Center.

How is it useful?

  • Distribution of the app over-the- air to Testers
  • Tracking and managing testing using TestFlight’s dashboard
  • Receiving feedback from testers to improve the app
  • To obtain reports about the device models, OS version used while testing the App
  • Automatically records any crashes the testers encounter and sends it to the Developer

This tutorial will walk you through integrating TestFlight into your own apps.

What do you need to start?

You have to have your certificates, app ID, and provisioning profiles in place before distributing your apps using Test Flight. Here’s the list of items you need:

  • A Developer ID to login to your developer account.
  • A Certificate for Distribution to export builds and distribute apps
  • An App ID
  • A Device UDID
  • Ad Hoc Provisioning Profile to distribute your app on testers devices
  • Sign your app with a valid ad hoc provisioning profile

These items will help you obtain an .ipa file that can be distributed for testing in iOS devices with UDIDs mentioned in the provisioning profile of the app.

Uploading your app for Beta Testing

Open up your project in Xcode, make sure you have a correct Bundle Identifier and that you’ve chosen the correct Distribution Certificate:

Choose Product\Archive from the top toolbar:

Once Xcode finishes archiving your project, click the shiny blue Submit to App Store… button:

Choose your development team

Hit Submit

Wait for your build to upload. Once done you will receive a “Submission Successful message”

Inviting Testers

Choose the Right Testing Platform

 
As a mobile app maker, how sure are you about the success of your app? A small failure to recognize bugs can cost you thousands of dollars! A small mistake can turn you into a big failure among the users. Now, the question is, how to choose the best platform for testing.

Every mobile application is created differently from the other and the right platform to test can be the most important reason for your app’s success.

Right Testing Platform for Your App


Choosing the right platform among the various competing ones require a set of clear evaluation.

  • The nature of the targeted audience for your app. This will define the device matrix you should be targeting for your App Testing. Does that platform provide right device matrix for your testing needs?
  • Cloud based vs in-house setup – Does you testing process allow Apps to be allowed on outside cloud? Does your App have functionalities which work with in a secured network?
  • Type of Testing required for your App – Whether your current testing is manual or automated? Does your App require non-functional Testing?
  • Reliability and Scalability of the platform- Can it scale with your needs? Can the platform integrate with your existing tools and frameworks?
  • Return on Investment


Criterion

Description

Device Fragmentation

Can the platform handle you need of devices?

Availability

How critical for you instant availability of devices. Is you testing planned?

Automation

How much of testing is done using Automated scripts? Does the platform support the Automation tool that you are using or planning to use.

Type of Testing

What all functional features that you need to test? Does your App require non-functional Testing?

Extensibility ( integration with in-house frameworks)

Can the platform integrate with your in-house frameworks ( Automation, Test Management , Bug Management etc..)

DevOps

Can the platform support DevOps? Can it integrate with your build systems/dev IDEs or continuous integration systems.

Security

Can you upload your app on an external cloud? Does you App require interaction with your internal server?
Usage level and Cost

What is the usage pattern of your test and developing team and what is your budget?


Market Share: Andriod VS iOS


pCloudy provides the necessary tools for convenient, effective and immediate mobile app testing. Our device is based on cloud and it enables continuous development and testing on real devices. Our unique debugging feature recognizes potential errors that will significantly reduce costs and time. Our platform provides single-click access to end numbers of real Android and Ios devices.

To experience the best with your app, we have developed three different types of cloud environments for you.

Public Cloud

With pCloudy’s publicly accessed cloud, you can perform tests directly from your browser. You won’t get confused to choose between manual or automated because both are available in our public cloud environment. We allow our users to test on a comprehensive list of real IOS and Android devices. You can also test your app over various network conditions like 2G, 3G, 4G or Wi-Fi. You can either configure your own browser or choose from our wide range of pre-installed browsers.

Private Cloud

This option is similar to our public cloud environment, except it comes with additional benefits of personalized security and dedicated access. Here, we would provide you a host of devices in our enterprise grade data center and you can choose your own device. If you have a geographically distributed team, then they will have secured devices over a browser. We make sure that your data is safe on our platform, as we allow only authorized team members to access.

On-premise cloud

In this option, we provide you with the necessary hardware and give you the freedom to set up your own secure device lab. You will have complete control of your own on-premise lab.

In addition to have exactly the same features of our public cloud, on-premise model contains supplementary benefits. On-premise cloud gives you the freedom of plug-in with your existing set of devices and provides you access to a geographically distributed team. Manual and automated- both the testing techniques can be used and with a simple plug-in, you can access it from any rack. Also, there is no limit for the number of devices which can be linked!

At the end of the day, the developer has to choose the best platform for his app. But choosing the right one saves so much of hassles.


pCloudy – On Boarding Document


Thank you very much for opting pCloudy.

We appreciate your business and welcome you to our long list of satisfied and much valued customers. Our success comes from the continuous faith in the excellence of our products and services, something we are committed to and would never sacrifice.


Our customer service, especially in the after sales phase, guarantees the satisfaction of our clients. In line with this strategy, we ask you to share with us your feedback at any time, be it positive or negative. There is always room for improvement, so if we can serve you better in anyway, please do inform us.


Introduction


This document is created to serve as a guide while you explore the pCloudy platform. It will help you understand how to use, to get quick help and whom to contact while starting off with pCloudy. Though this is not a complete help document, it will act as a quick reference to begin using the platform.


About pCloudy


pCloudy is a mobile application testing platform which will help you to test your apps on hundreds of real devices. You can remotely access real devices and carry out Manual and Automation Testing.


Quick Start


Registration


The platform has a secure login process to protect the apps you test. In order to use the platform you must setup your login credentials first.


Where do I do this?


Simply, enter your details at https://device.pcloudy.com/signup, after a short verification you will be ready to sign-in.


In case of any issues, drop an email to support@pcloudy.com


Sign-in


Once you’ve signed up, you can access the platform with the help of your registered Email ID and Password.


In case of any issues, drop an email to support@pcloudy.com


Note: If your workstation has touch screen feature, enable TouchScreenBrowserSettings


Where do we go from here?


Once you login, you will be exposed to an array of devices and platform features. You might get overwhelmed and lost, but don’t worry, we have you covered.


A typical pCloudy user will follow these steps for testing mobile apps using the platform.


Divided into five parts –


1. How to select right device from the platform?
2. How to manage apps on the platform?
3. How to start testing your apps on the selected devices?
4. How to run automation scripts on cloud-based devices?
5. Additional Features


1. How to select right device from the platform?


To select the right device on the cloud the platform provides various filters. These filters will help you to select devices based on the OS versions, OEMs, Screen Size, Network, or Device Location.


Mobile Device Testing


There are two modes to access the devices on the cloud –


1. Instant Access – This provides immediate access to the available devices at that moment. Just hit the ‘Connect’ button on any device displayed in the Instant Access page and you will be ready to use the device.


2. Book your Device – In some cases you might want to reserve a device for the future. You can book a device in advance to keep yourself prepared for testing. With careful planning, with the help of ‘Book your Device’ mode you can make sure the devices are available when you need them and save time.


To learn more, refer to these links:


Managing your credits


To use the devices you need to have enough credits in your account:

  • To view the remaining credits in your account refer to this link
  • To buy more credits, click this link


How to manage apps on the platform?


The platform provides secure limited disk space to store the apps on the platform. This space can be used to store app installation files (apk or ipa) or test data (image files, zip, etc).


Refer these links to know how to upload your app files to the platform:


Manual Testing of Mobile Apps


The dashboard provides you with quick and easy access to use the different features to test your mobile apps.


Device Information


1. Device Screen: You can use the device same as how you use a device physically. You can use swipe actions, zoom-in, zoom-out and various gestures to control the device.

2. Main Panel: This panel provides options to view device info, install/uninstall apps, change device settings, tools to debug apps and run automation, and more.

3. Quick Action Bar: Frequently used controls like taking Screenshots, changing device orientation, sending text to device, and more

4. Logs and Performance: Real time device logs and app performance are displayed


Features

Here’s a list of some important features to test your apps –


1. Functional Tests

You can install/uninstall apps on the devices, you can use various gestures on cloud based devices just like how you do testing on physical device, you can mock GPS location, take screenshots, and much more. Here are some links that will help you:


2. Performance Profiling


Performance profiling of Android Apps – You can monitor the CPU usage, memory usage, battery consumption, frame render count of the app in real-time while testing an app.

Performance on iOS Device – You can monitor the CPU usage & memory usage of the device in real-time during testing.


3. Debugging mobile apps

You can capture bug and crash information in the form of logs, screenshots, videos, and stack trace information while testing your apps on devices.


4. Test Mobile Web Apps

You can test your web apps or website on various browsers on various devices.


5. Network Virtualization Tool

The app you tested in your lab environment will not work the same way when you use it in an elevator, or in a basement, or while you are travelling on a highway. The Network Virtualization Tool will help you to emulate different network environments and test your apps.


6. Device Tunnel

You can connect and use a device with ADB just like the way you connect it physically with USB/Wireless ADB. This is used to control a device using ADB commands and debug apps.


7. Reports


The reports section will contain the complete details of all your testing sessions. It will hold the screenshots, logs, videos and the performance details of the testing.


8. Automation


You can run your automation scripts on multiple devices in parallel. The pCloudy platform supports several automation tools. Here are some links to help you –


Other than the reports generated from the automation tools, you can view additional testing reports stored on the platform as well – Automation Testing Reports. This will contain the videos, logs, and performance graphs of the devices on which Automation execution was run.


9. Integration with Continuous Integration tool – Jenkins


You can use CI tools like Jenkins in integration with the pCloudy platform. This integration will leverage your testing practices to a whole new level. You can deliver quality mobile apps continuously by automating the process of build integration using pCloudy plugin for Jenkins.


Team Admin


To effectively manage the devices, users, apps, or credits on the platform you can use Team Admin.
Refer to article – Team Admin


Contact


Find detailed pCloudy knowledge base articles from support@pcloudy.com
You can reach out to us – support@pcloudy.com or info@pcloudy.com