

Nowadays, most businesses operate digitally and rely on mobile applications or websites to perform their operations. Mobile applications have become a must these days for operating a successful business.
The primary goal of every business is to release their application or websites to the end users as early as possible. As a result, businesses are constantly searching for ways to test, measure, and improve their products. In today’s time, faster time to market has become vital for any business to survive in the face of increasing competition. However, release cycles get extended due to several reasons like frequently changing requirements, security vulnerabilities, and many more.
Different techniques and approaches are tried to check business requirements, development, quality, and overall progress. All of this is done to ensure that quality apps are released to the market as early as possible, allowing business to operate smoothly.
One of the most critical factors in this process is testing, which is necessary to ensure that the app works as expected. Since time-to-market is a key factor, automated testing is a must to save time and effort. This is precisely the topic of this blog!
In this blog we will be discussing how to automate apps using Appium and TestNG.
What is Appium?
Appium is a popular open-source mobile app testing framework that helps automate the tests for iOS, Android, and Windows platforms. It can be used to test native, mobile web, and hybrid apps. It also supports multiple programming languages like Java, Javascript, C#, Python, PHP, and Ruby. Additionally, Appium can be used to run tests on real devices on both local and cloud platforms.
How to Perform Automated App Testing using Appium and TestNG?
Before we begin writing the tests, let’s take a look at the tools we will be using to write and run them.
Tools for Automated Mobile Testing
The following programming language and tools have been used in writing and performing mobile testing:
- Programming Language: Java 11
- Web Automation Framework: Appium (Appium Java client – 7.6.0)
- Test Runner: TestNG
- Build Tool: Maven
- Cloud Platform for test execution: pCloudy
Demo Android and iOS Applications for Automated testing
Let’s take a look at the Android and iOS demo apps that will be used to write the tests. These are demo apps built by pCloudy.
Android Demo App – pCloudy_Appium_Demo.apk
iOS Demo App – pCloudy_Appium_Demo.ipa
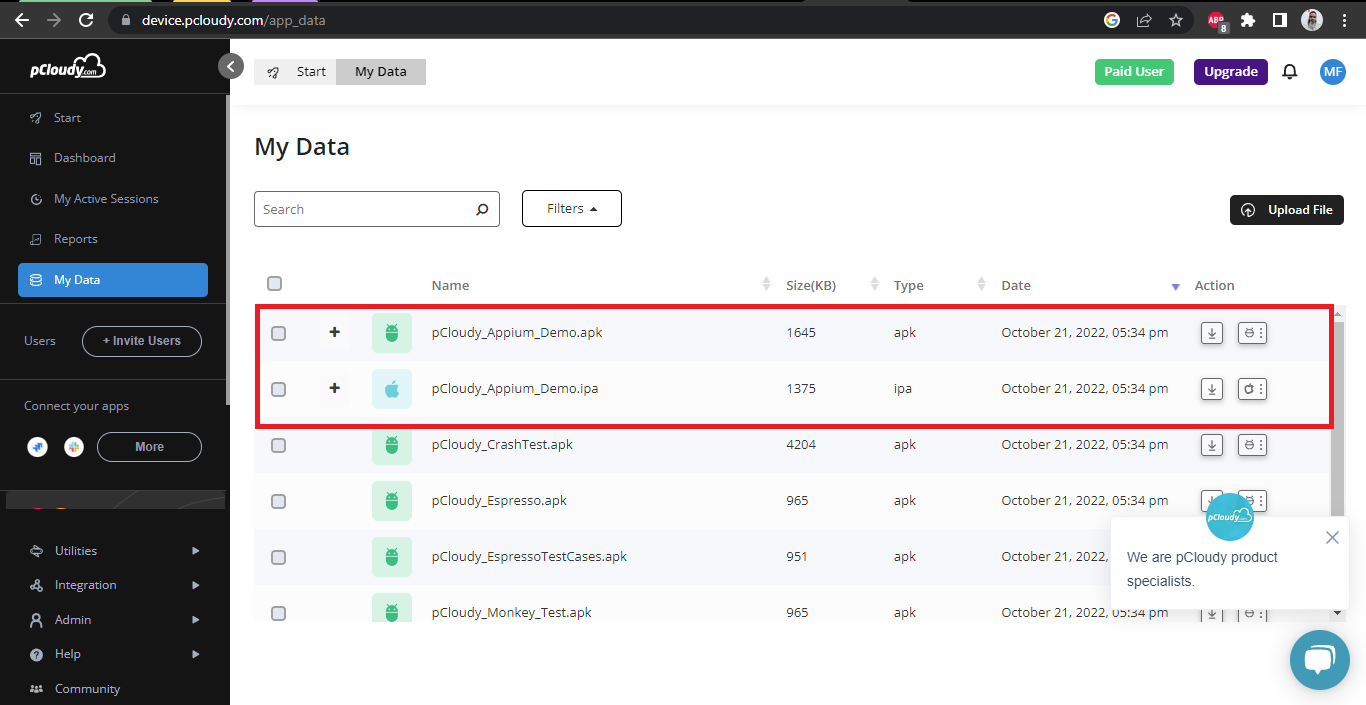
To download these mobile applications, simply log into your pCloudy account and navigate to the My Data menu.
Now, let’s discuss the mobile automation testing strategy for the Demo Android and iOS applications.
Automation Test Strategy for Android application
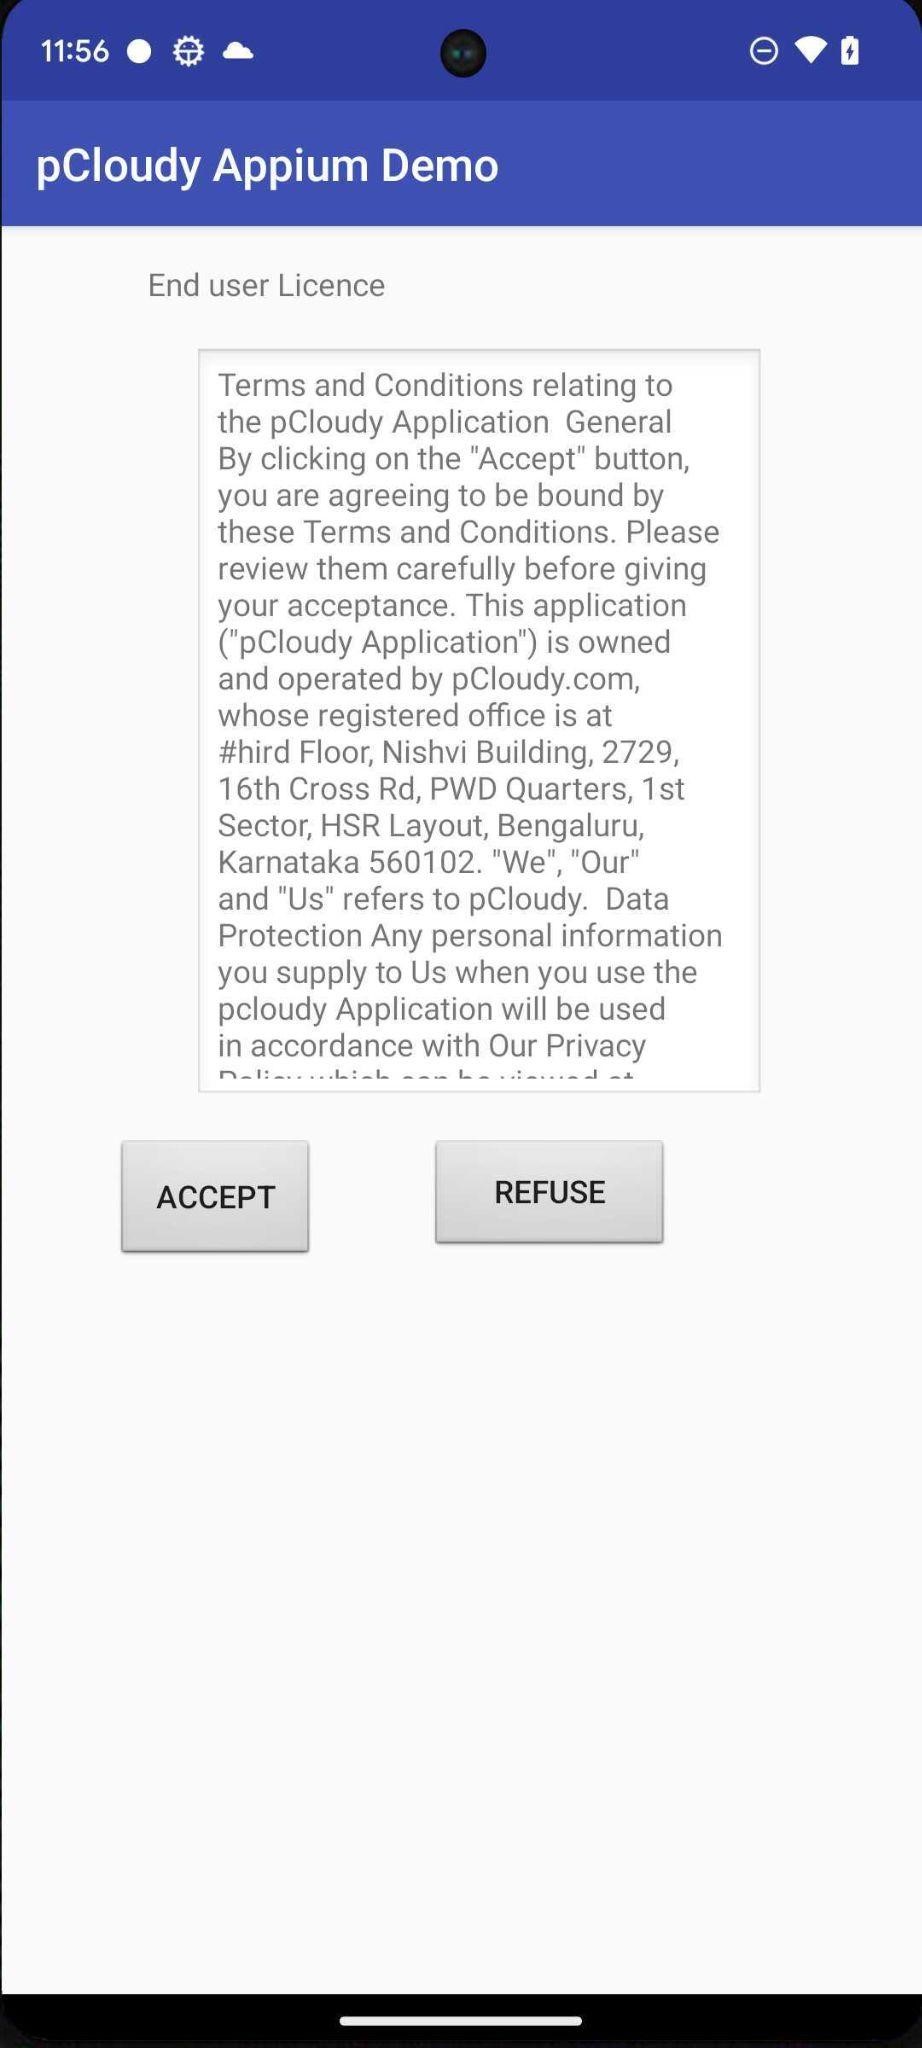
When the Demo Android application starts, it displays the end user license agreement screen.
- The first test will be to verify the end user license text and accept the license.
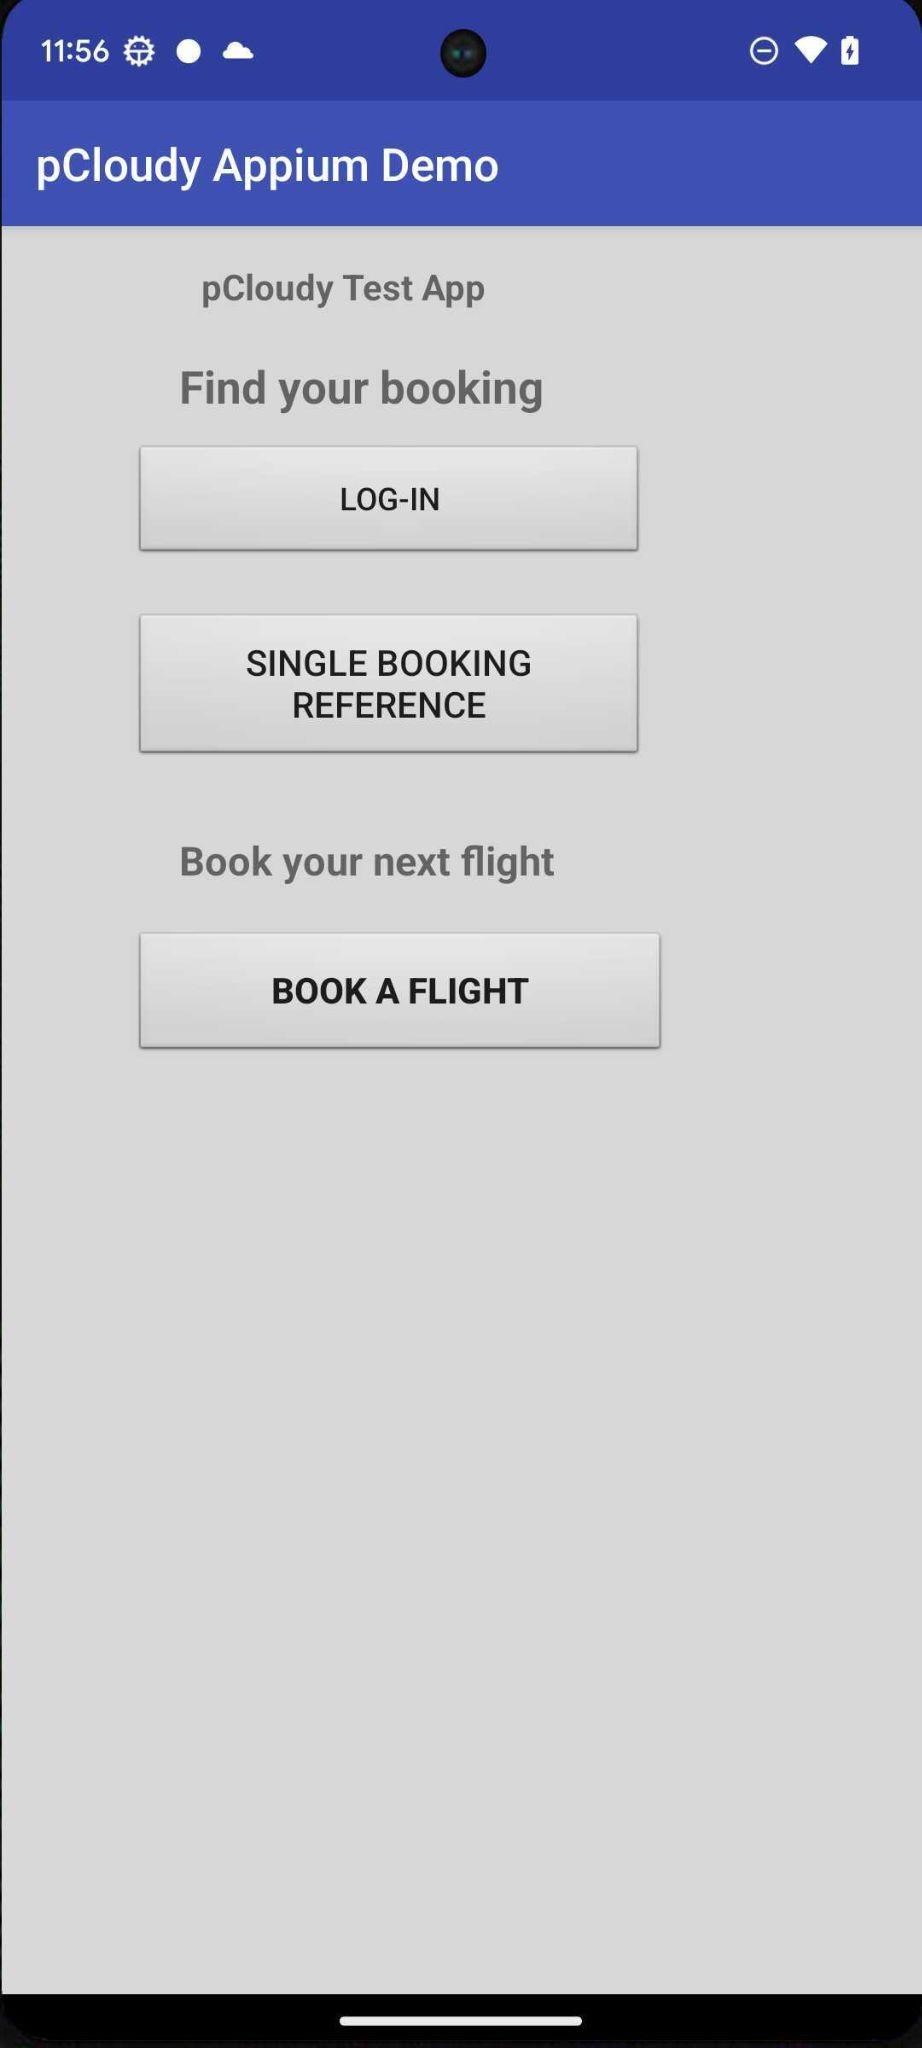
Next, it will take us to the Find Booking page, here we will click on the Login button.
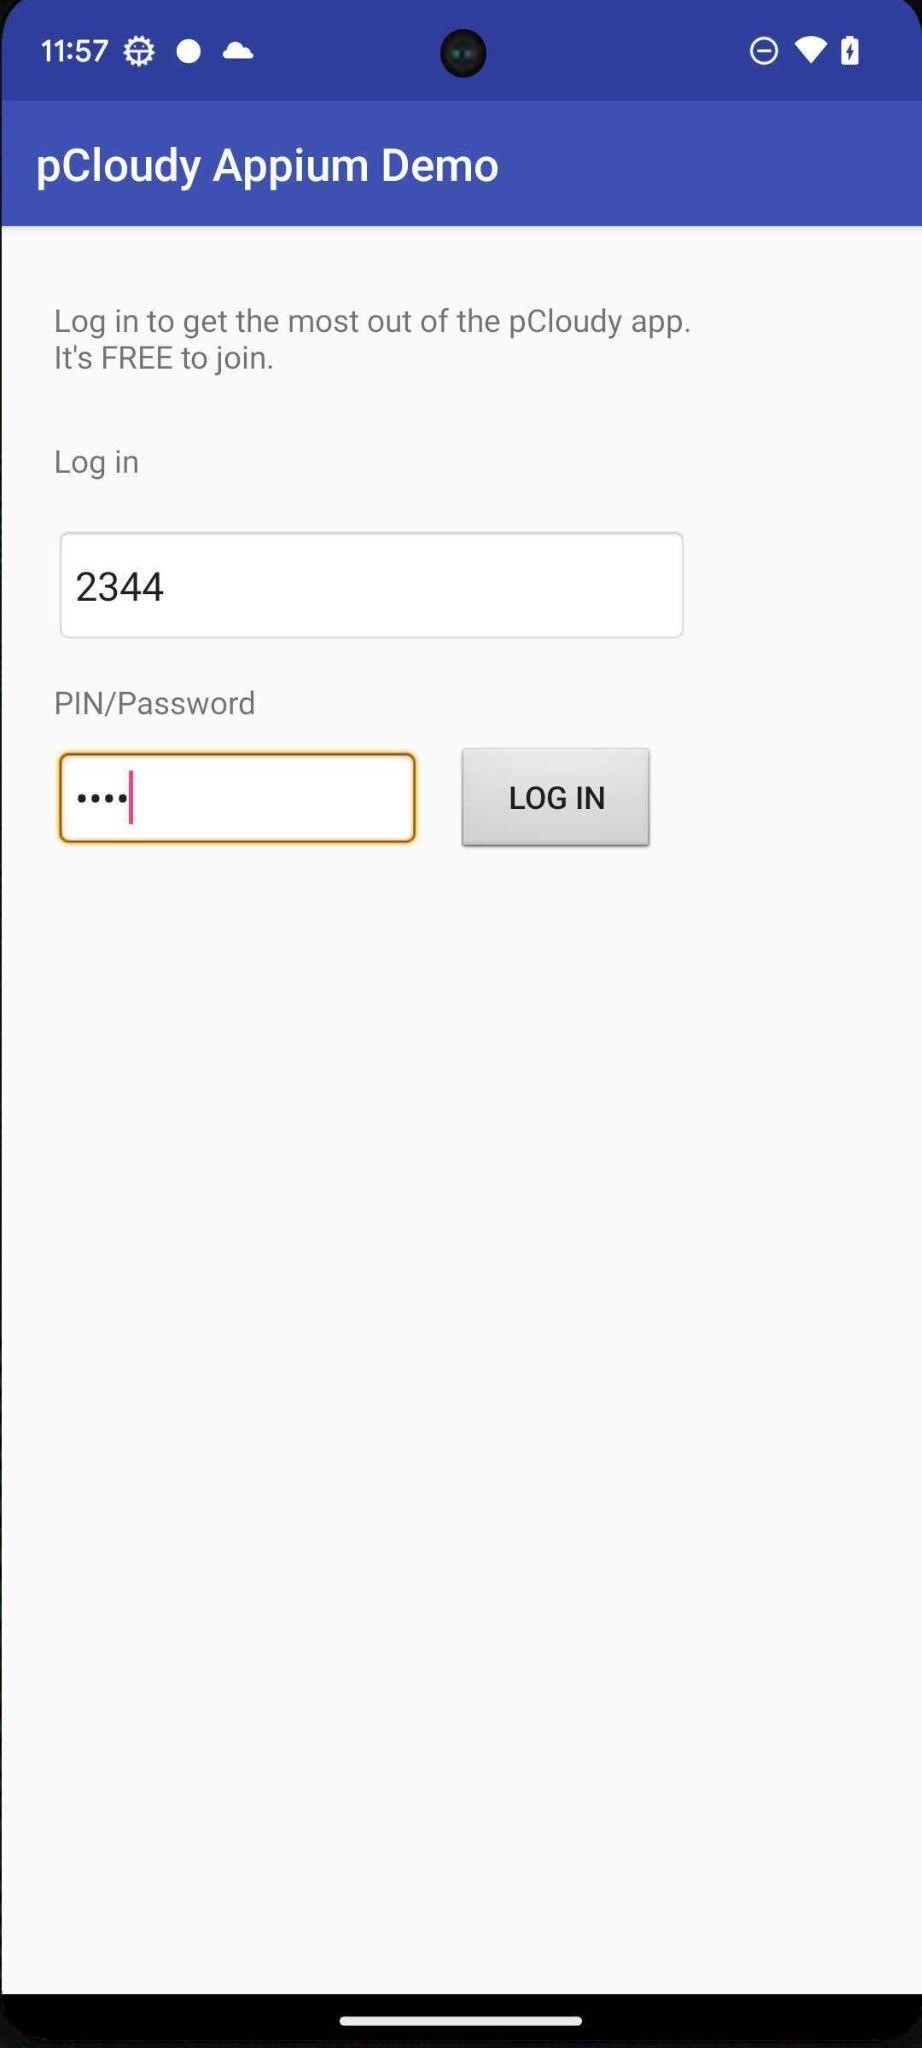
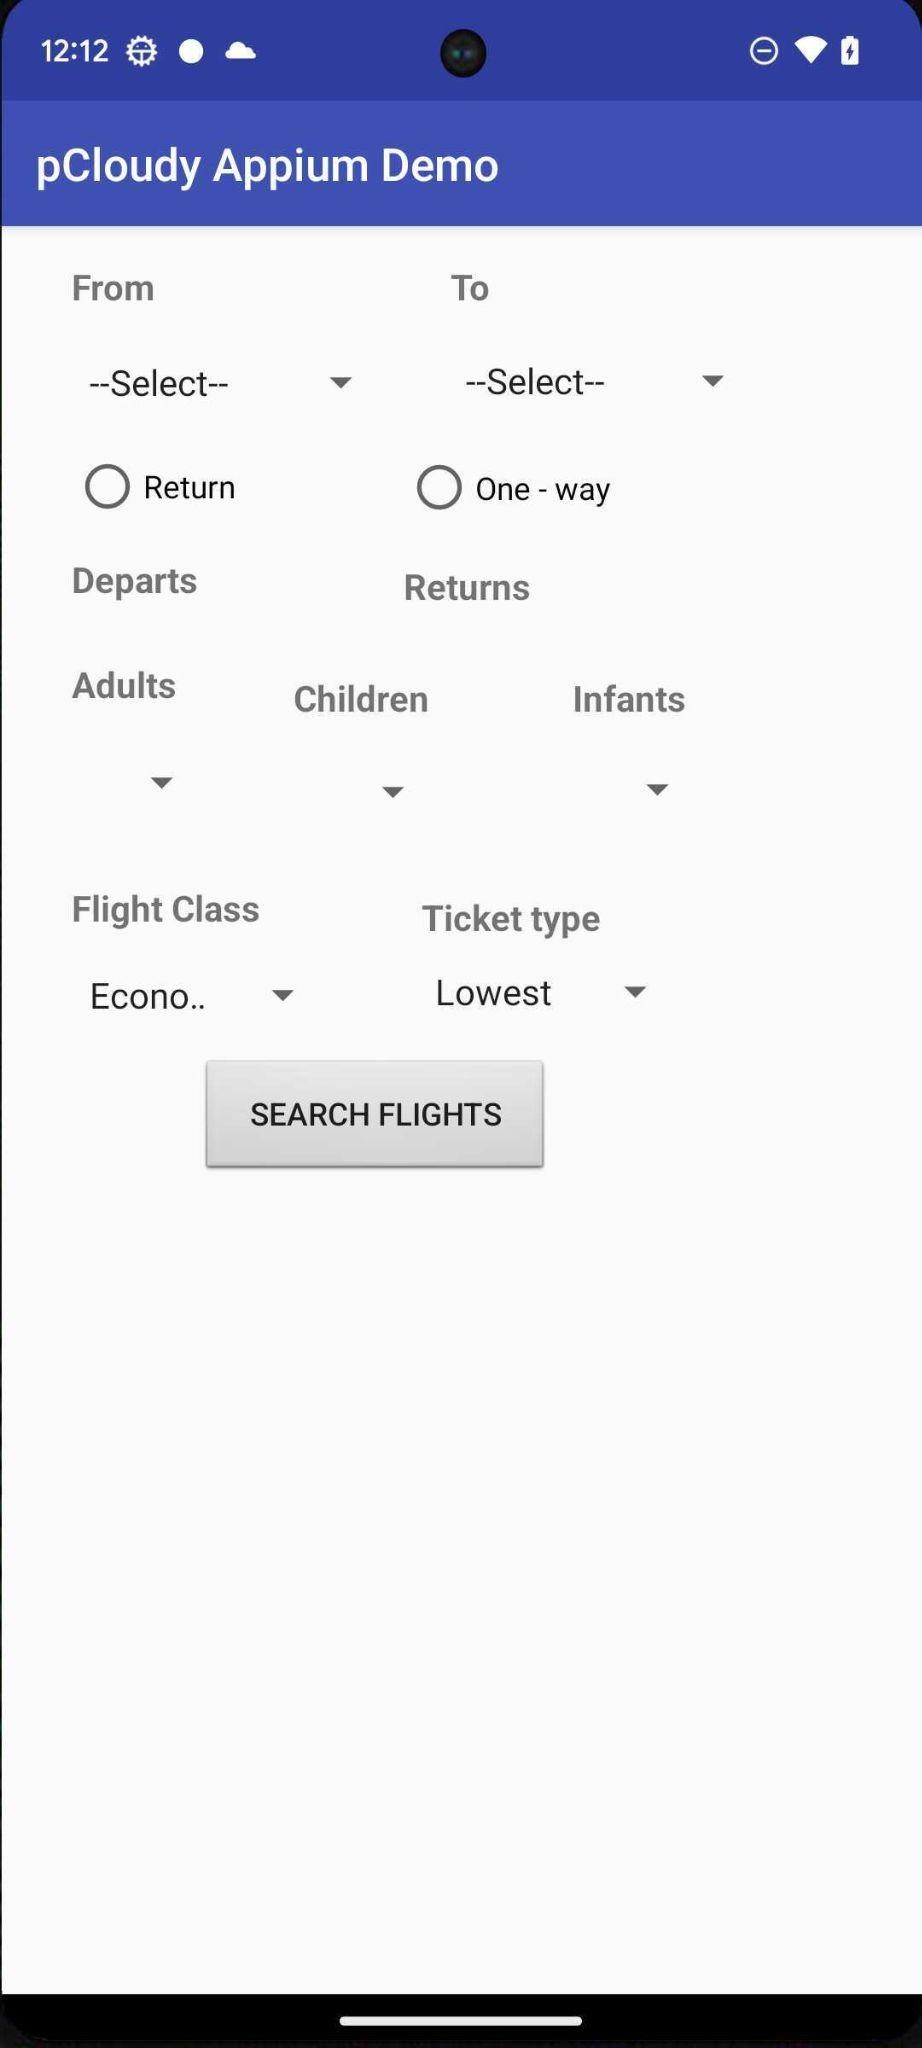
- The Second test will be to login by entering the club number and pin and verify that the Search Flight button is displayed after a successful login .
Login Screen
Find booking Screen
Search Flight Screen
Let’s create the test strategy for the iOS Demo application.
Automation Test Strategy for iOS application
Application opens with a login screen.
- The first Scenario will be to automate this login screen by entering the username and password and clicking on the Sign in button.
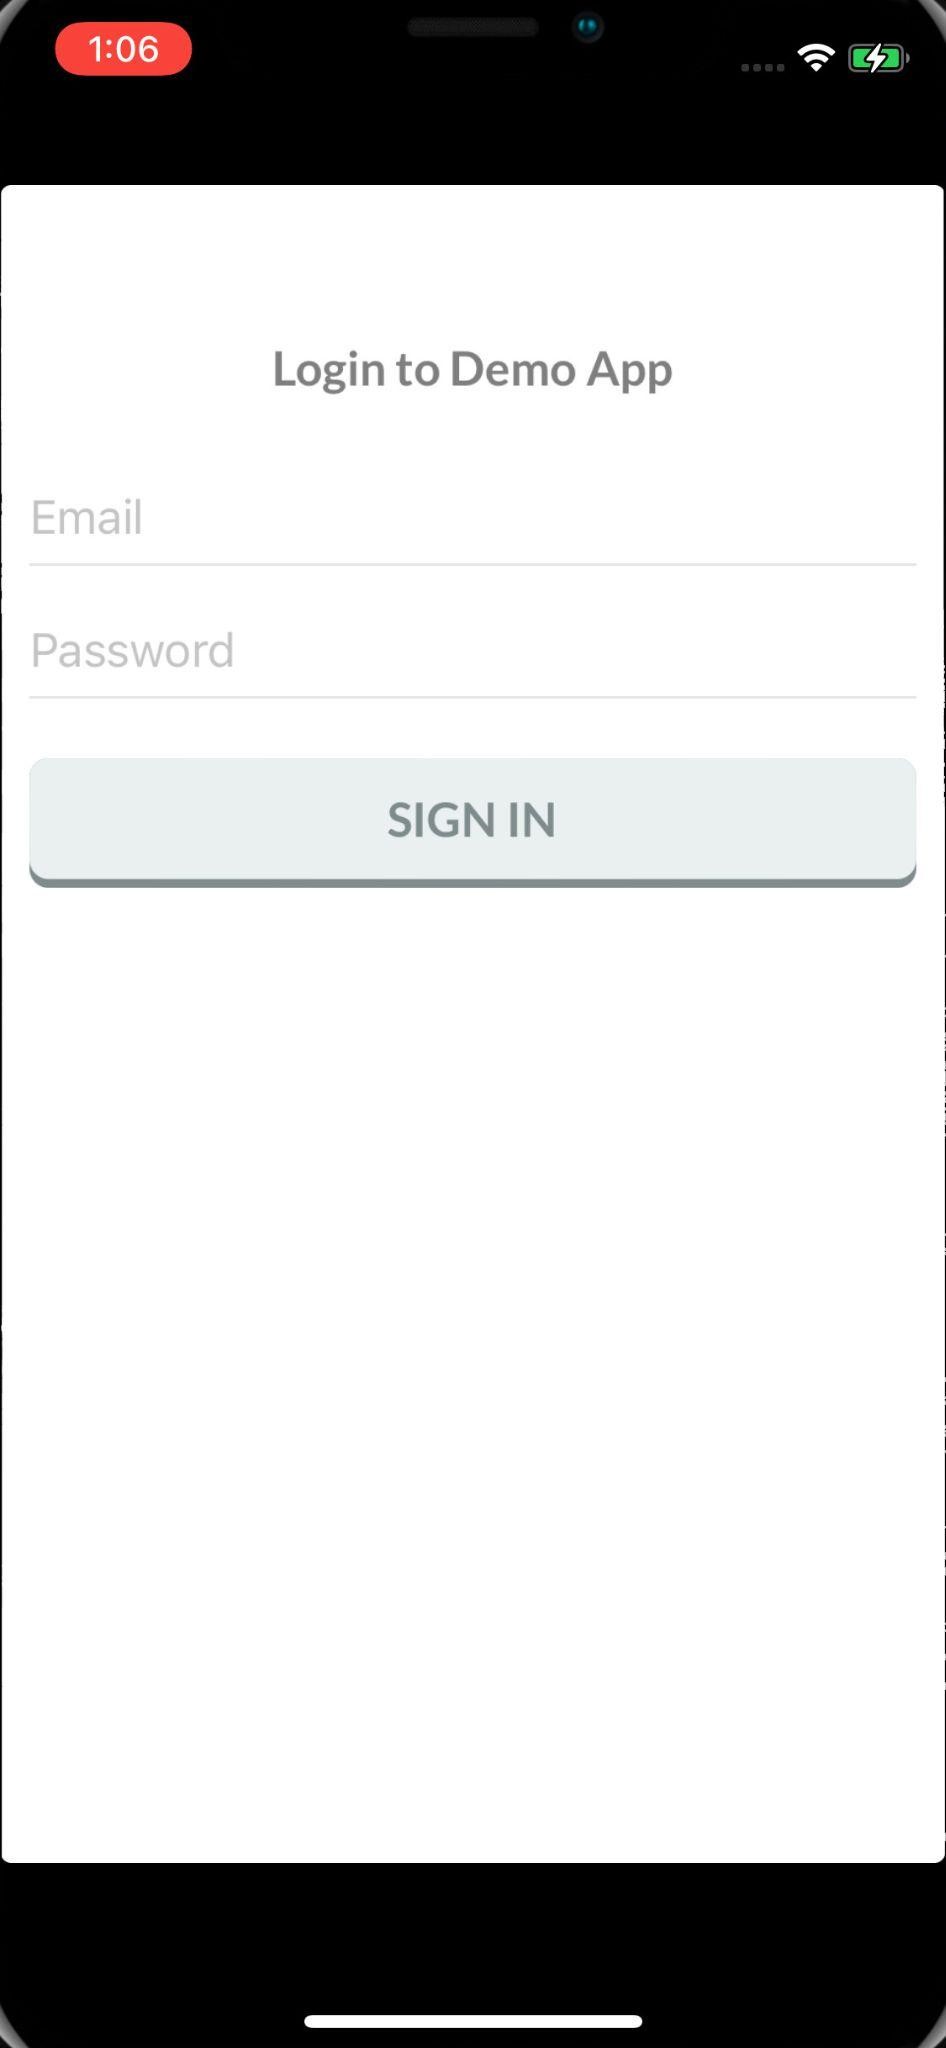
Sign In Screen
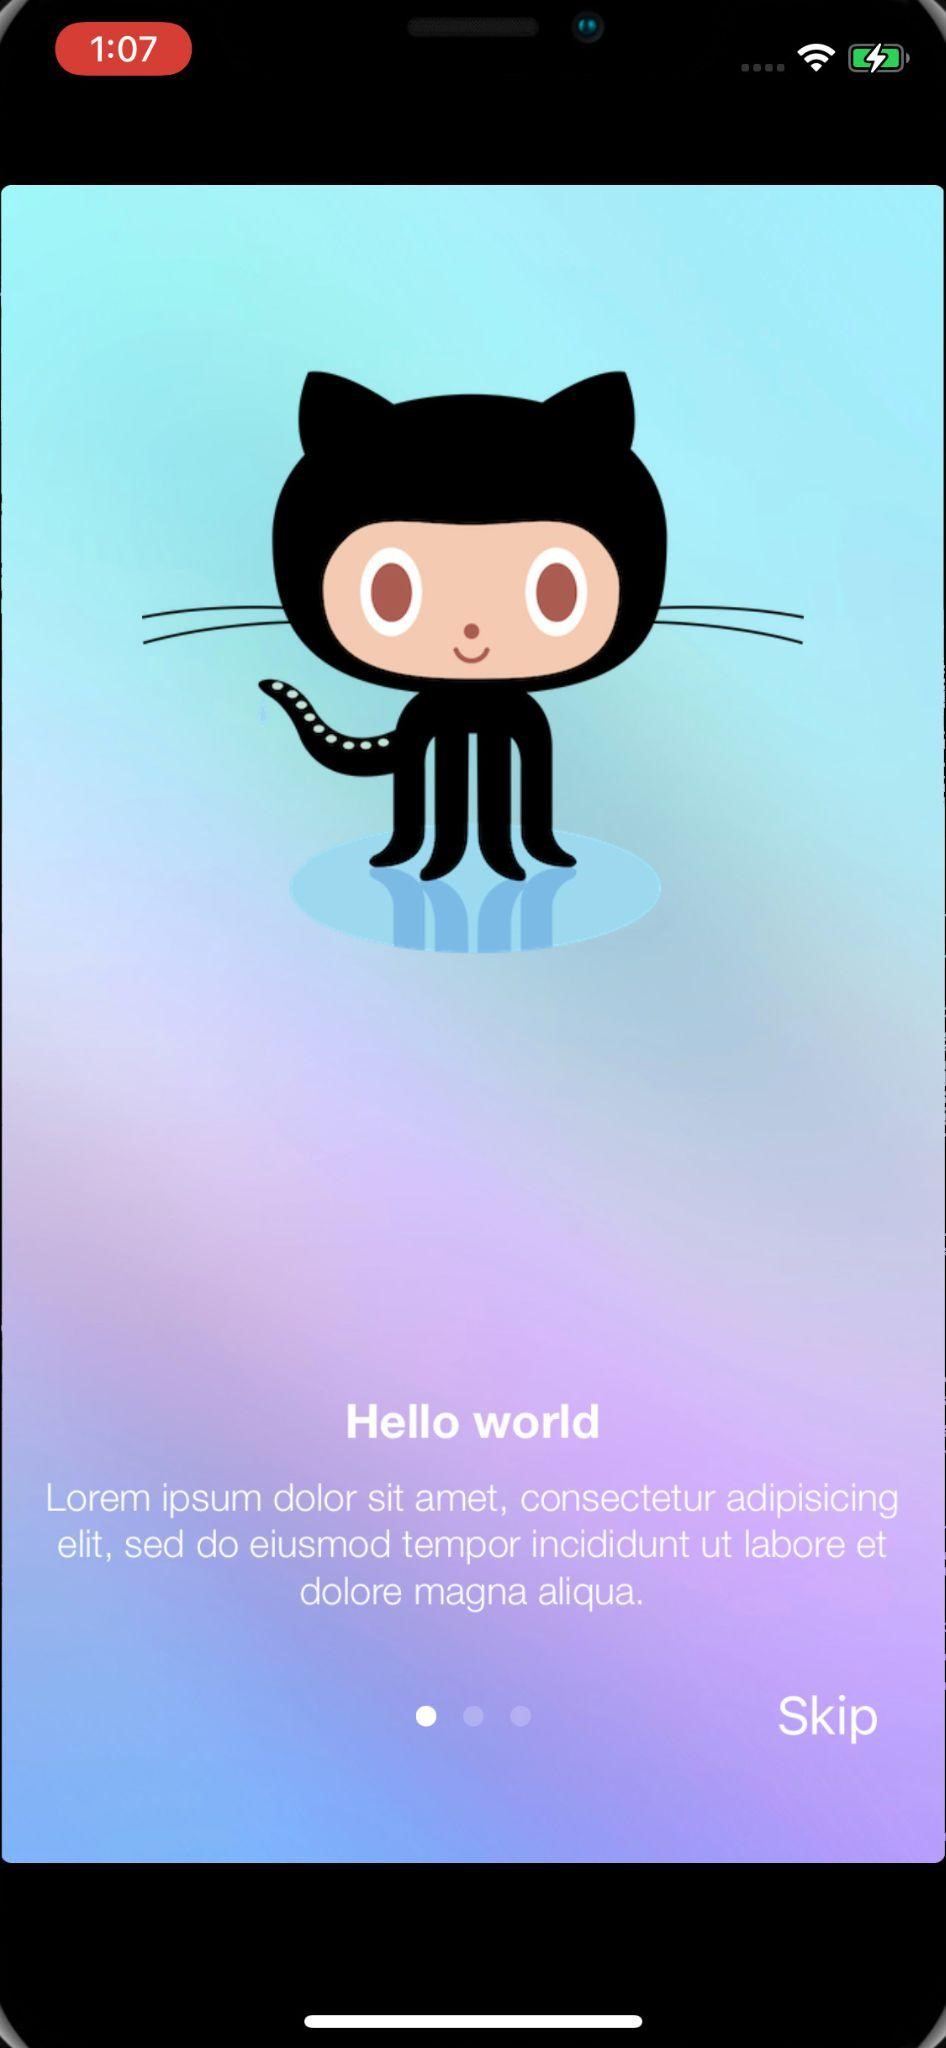
2. Next scenario to test will be clicking on the Skip button to close the Intro window.
Intro Window
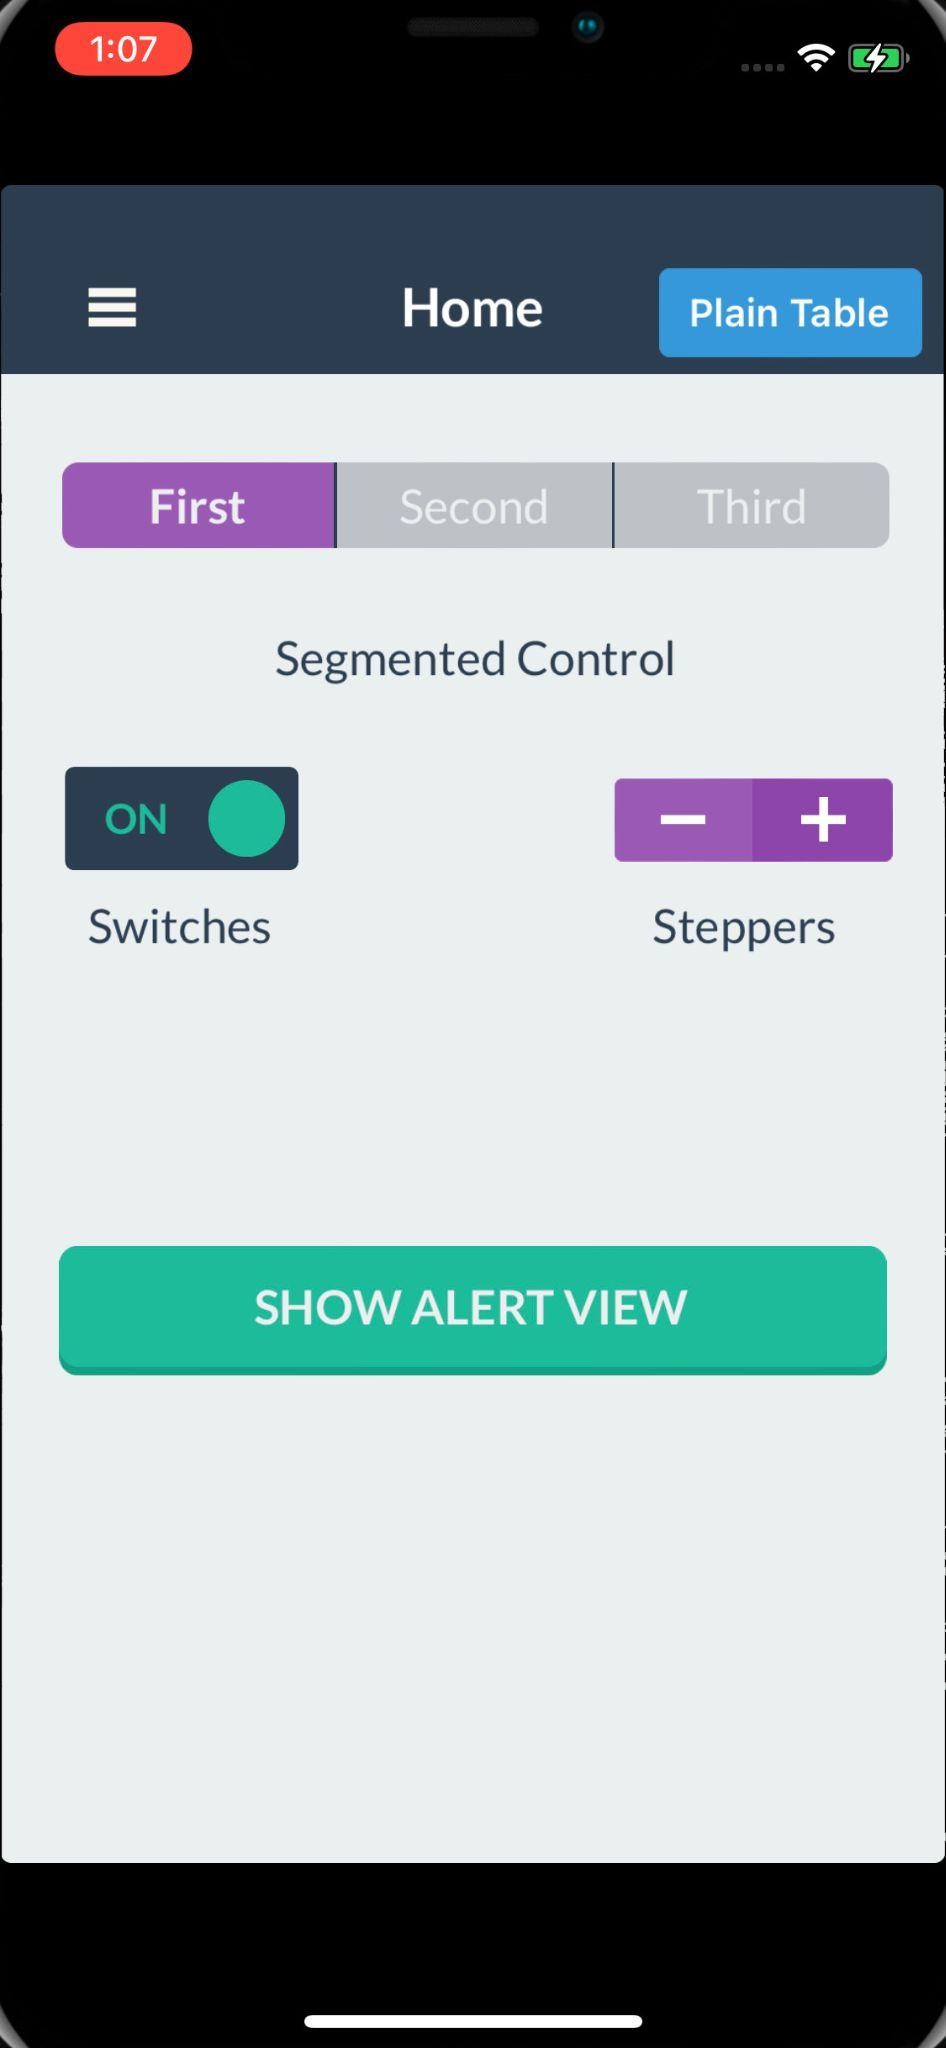
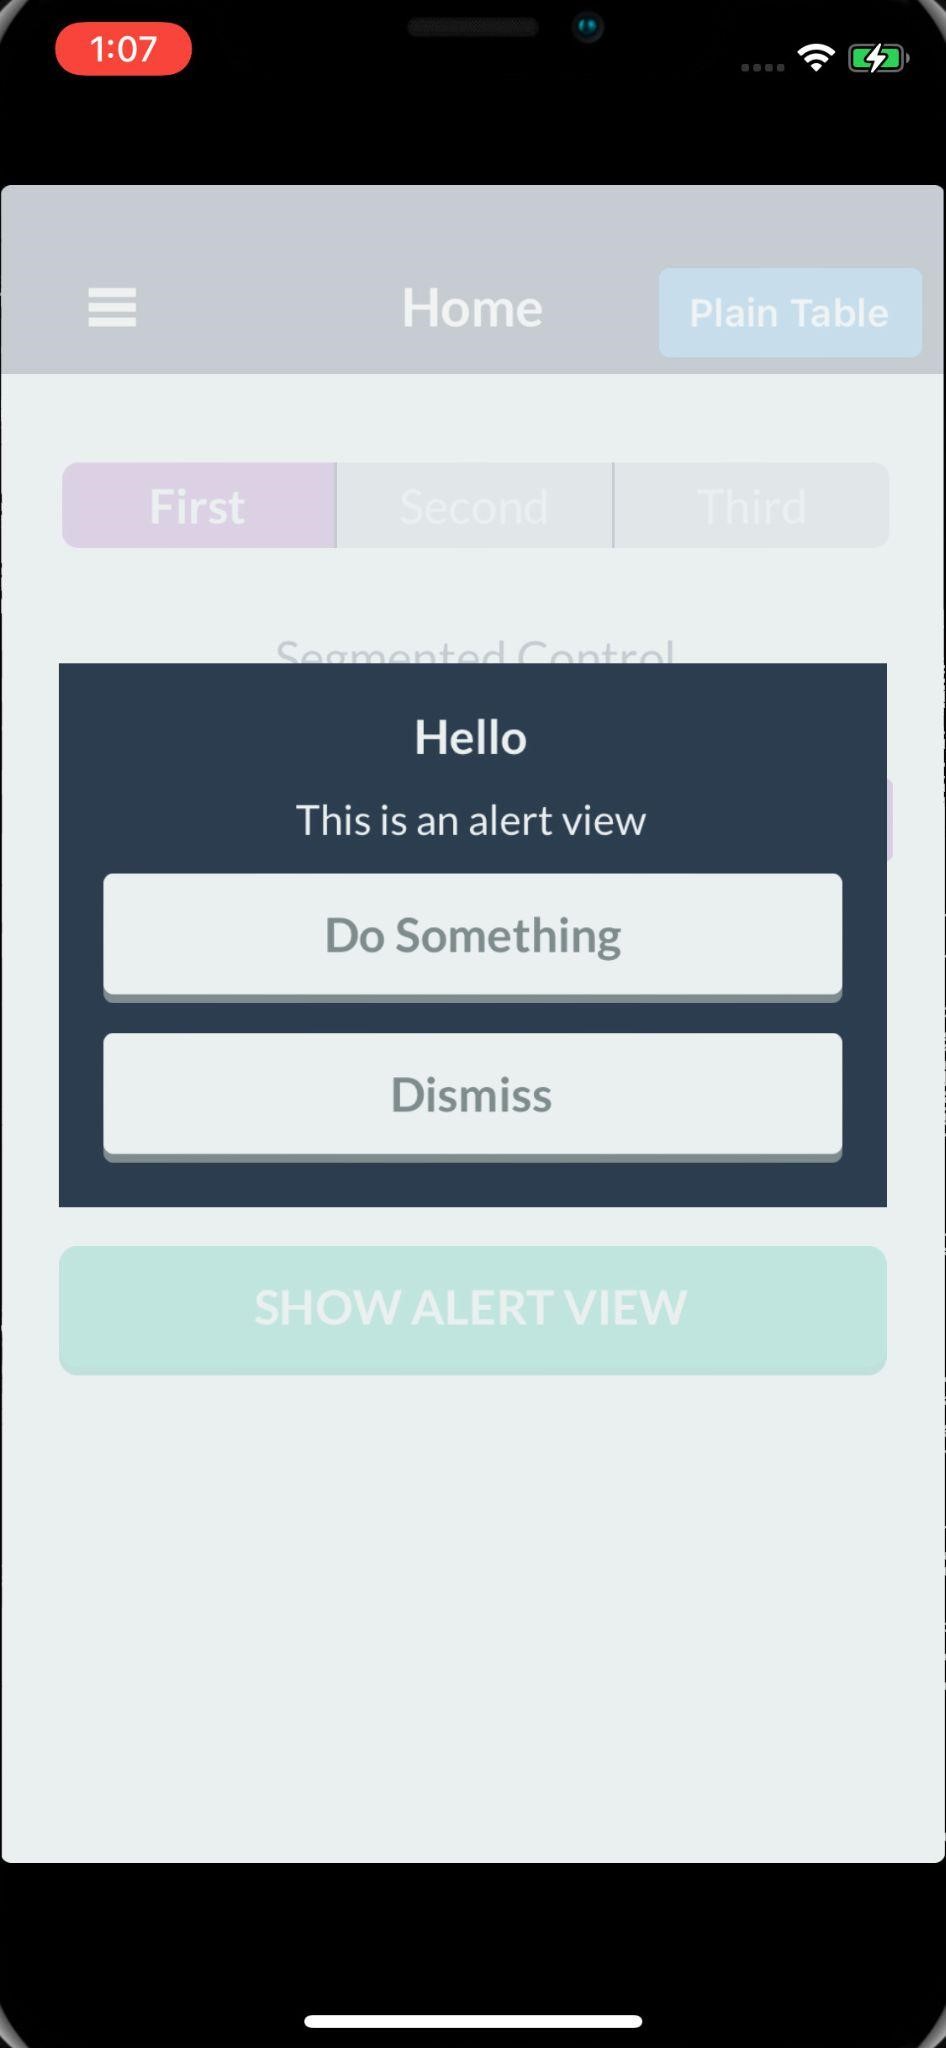
After that on the Home page, the Show Alert View button will be clicked and the alert text will be verified. Dismiss button will be clicked to dismiss the alert.
Home Page
Alert View
Getting Started
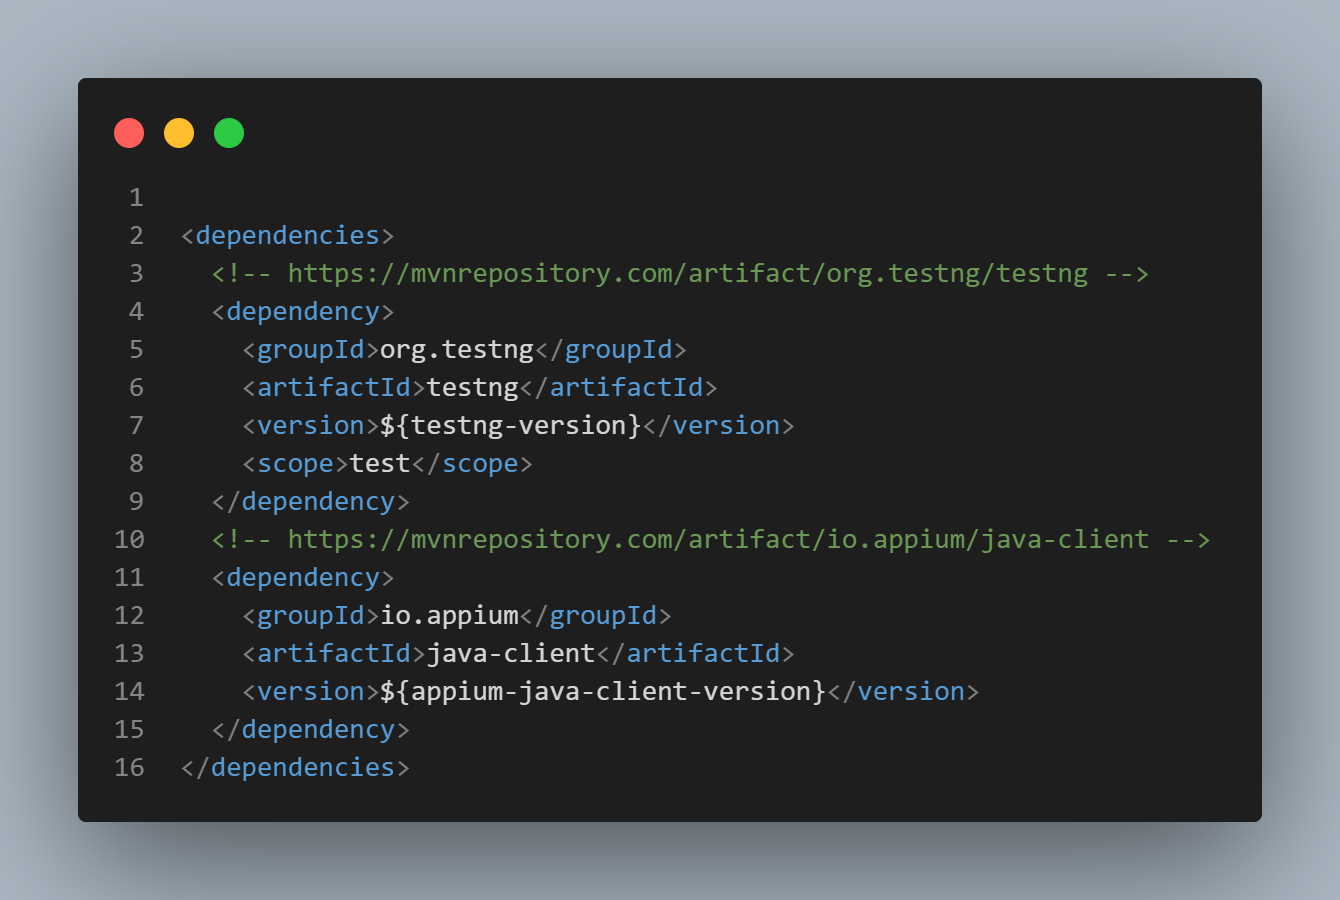
As discussed earlier, this project has been created using Maven with TestNG as the test runner. Once the project is created, the dependencies for Appium and TestNG will be added in the `pom.xml` file.
Pom.xml
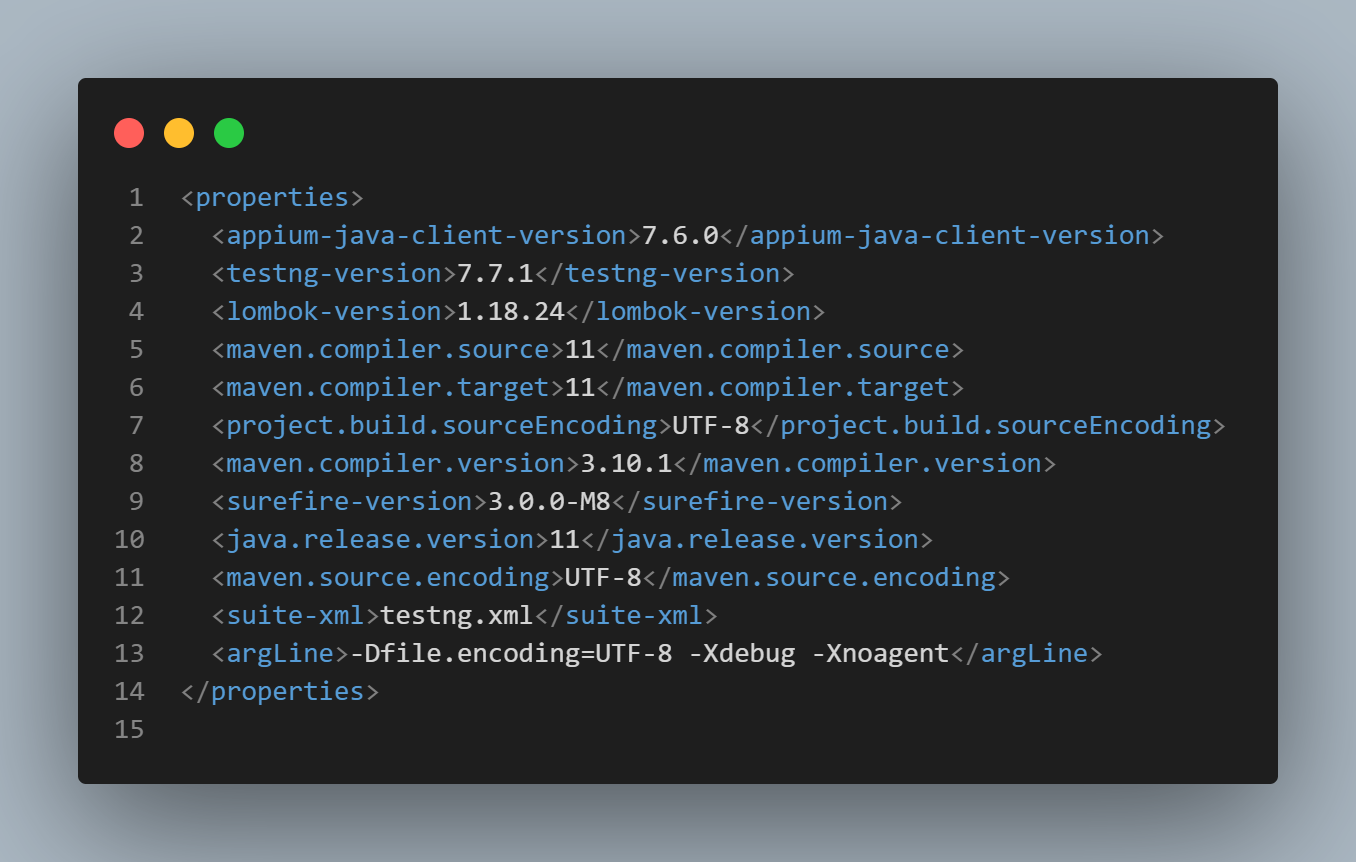
Versions of the dependencies are set in a separate properties block. This is done for maintainability, so if we need to update the versions, we can do it easily without having to search throughout the pom.xml file.
Properties Block
GitHub Repository
All the code demoed in this blog is updated in this repository on GitHub.
Page Object Model
The Page Object Model is used for writing the automated tests as it helps organize the tests, maintains their readability and reuse, and makes them easy to manage.
A class is created for each web page where all the related elements of the respective page are stored, and also the relevant action methods are created inside that class.
In this blog, as per the automation test strategy, we will create different classes for all the different pages in the Android and iOS mobile applications, namely, HomePage, LoginPage, MainPage, etc., where specific locators of their respective pages will be stored. Specific action methods in these page object classes will also be created and used in tests to check the application.
Writing Automated Tests
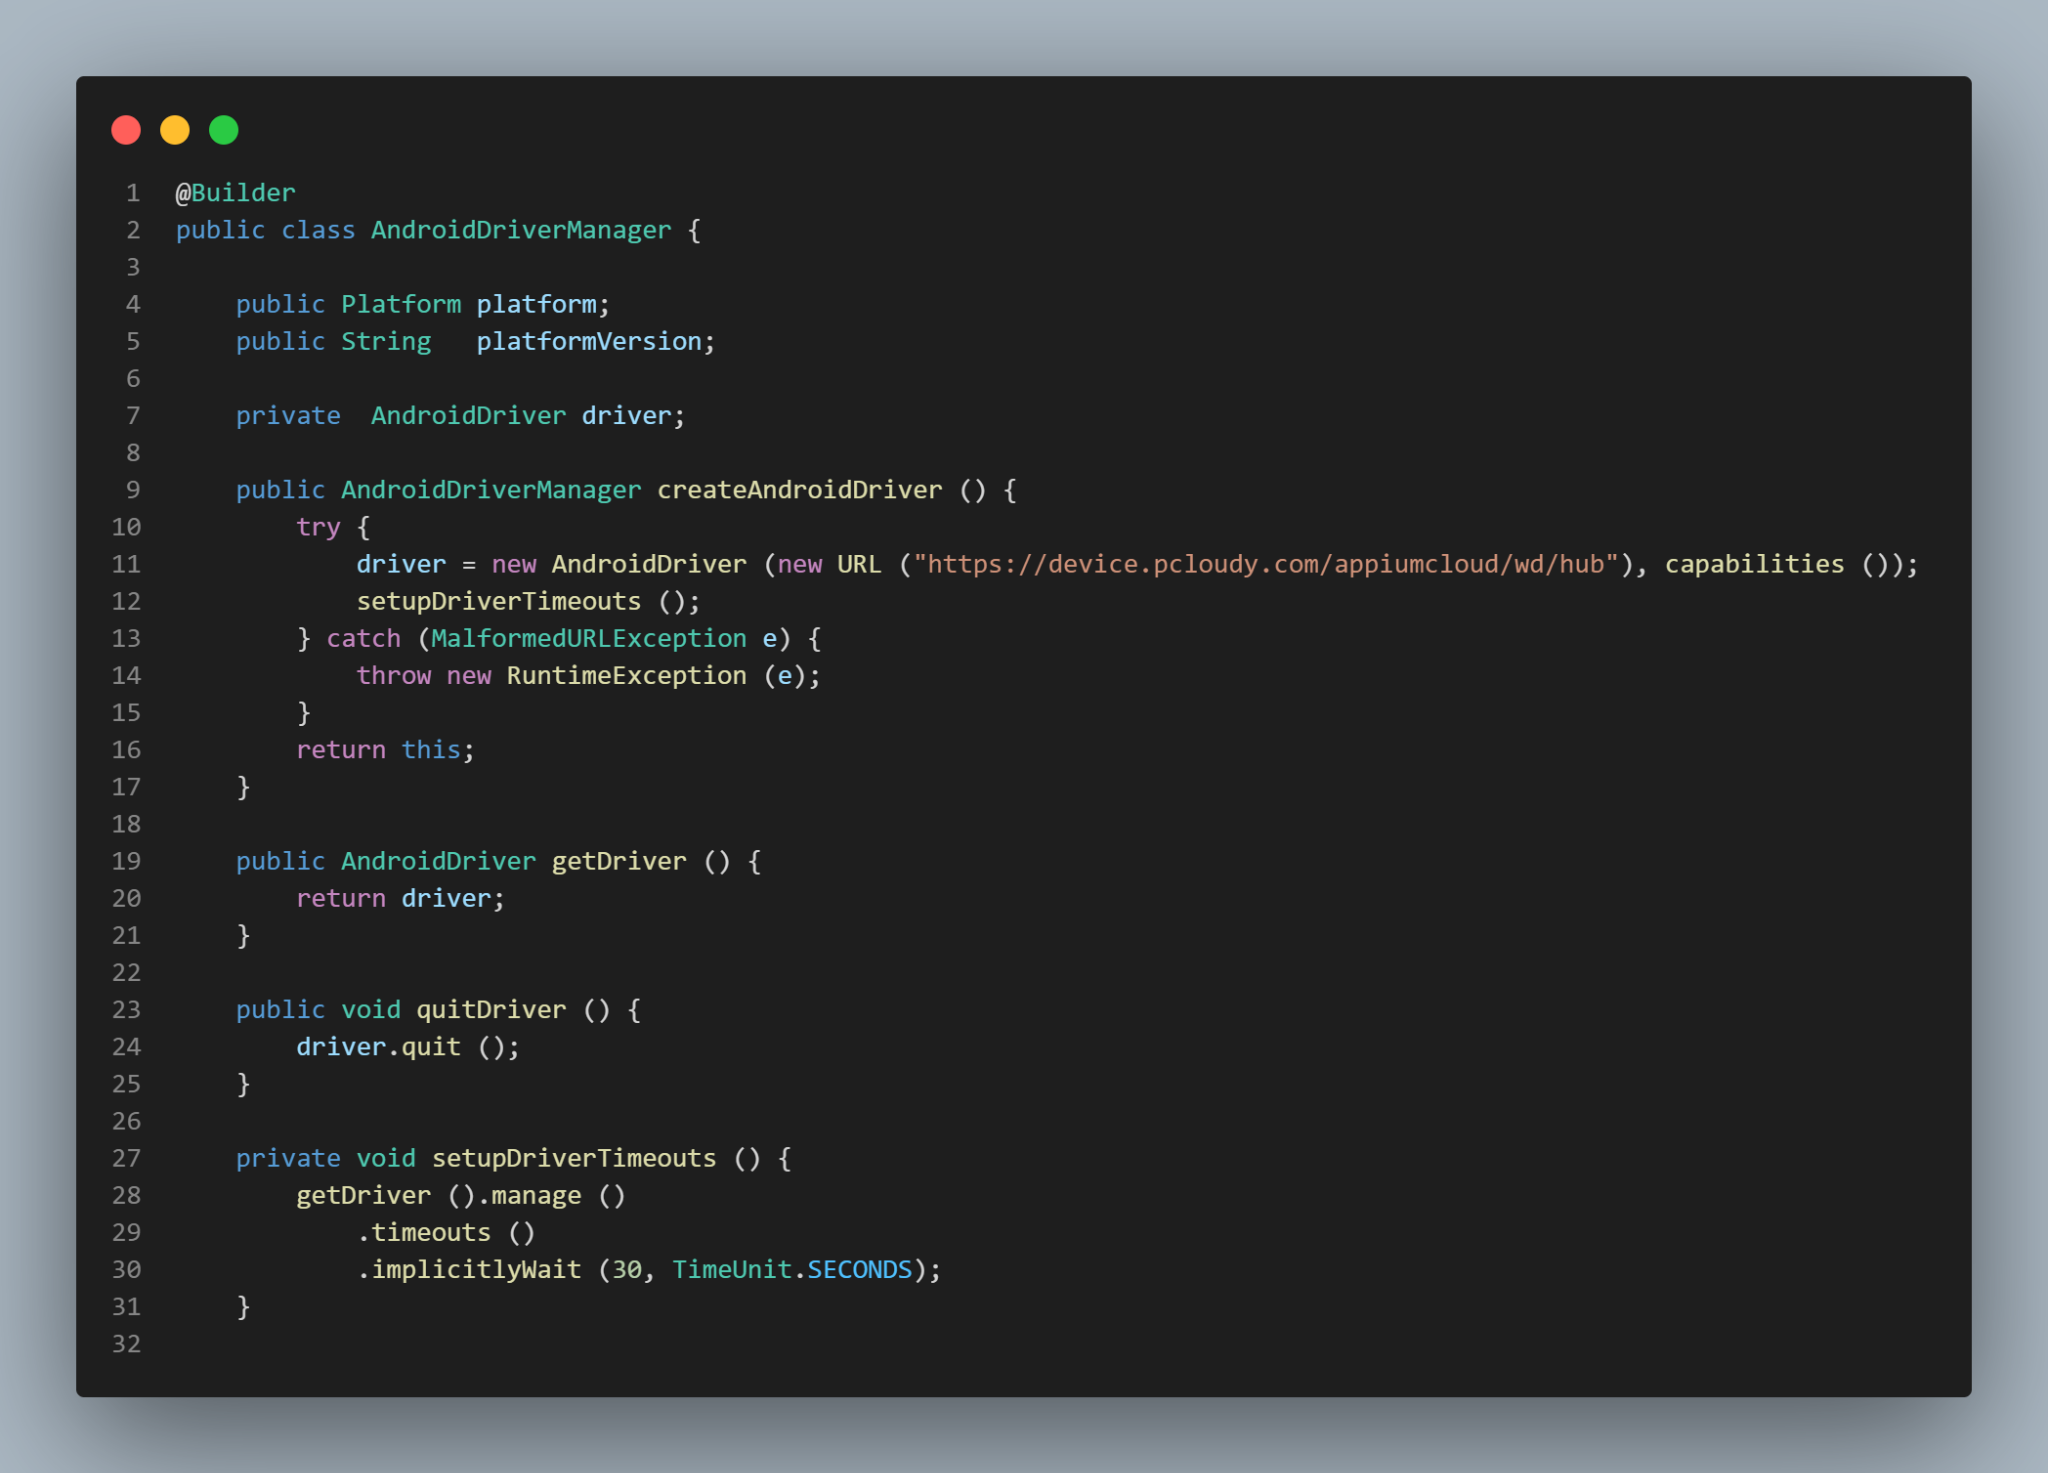
The first step is to create a specific DriverManager class that starts the specific driver according to the selected platform. This class also helps instantiate the driver and use it with the findElements method to locate the elements and perform actions on the app and run the tests.
AndroidDriver Manager
Here is the AndroidDriverManager class which handles the Android Driver.
AndroidDriverManager.java
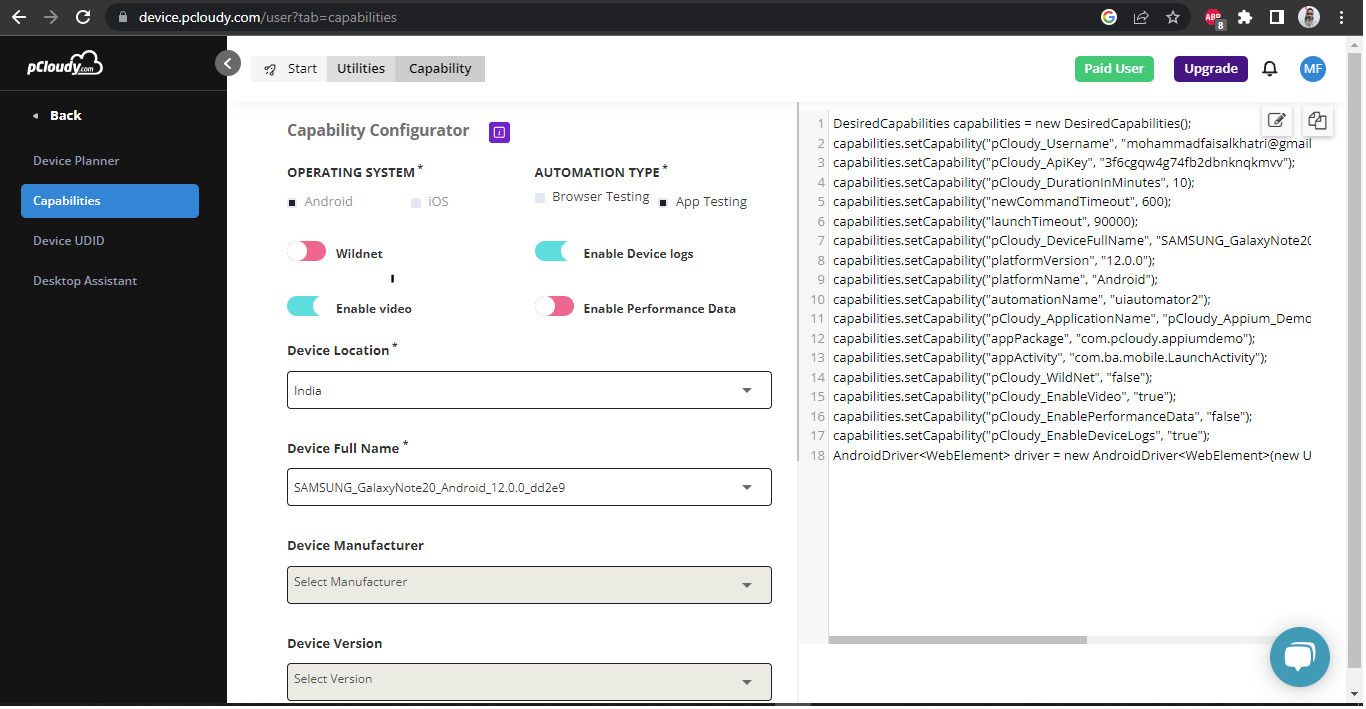
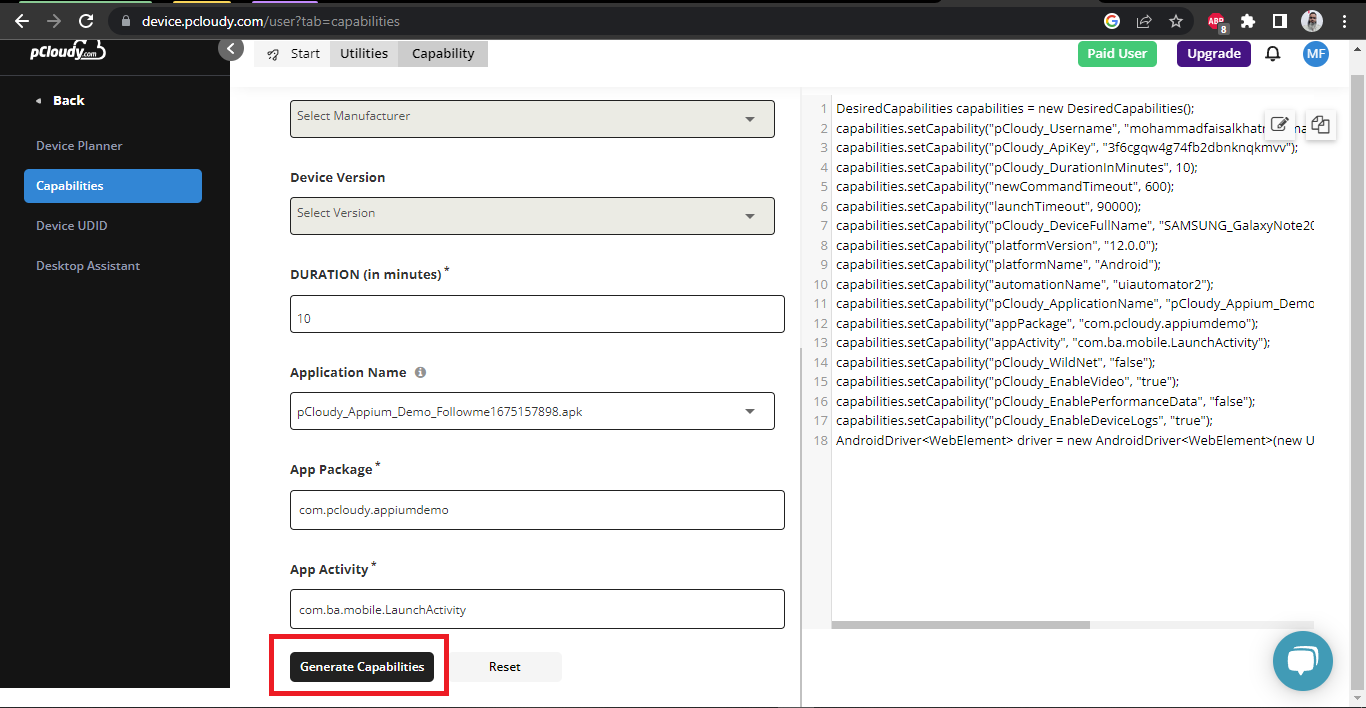
The most crucial part of the configuration is the Desired Capabilities, which help set configurations like Platform, Platform Version, Device Name, and Cloud Platform credentials like username, API key, etc. pCloudy’s Capabilities generator UI simplifies this process for Android and iOS devices. By navigating to the Capabilities generator screen, we can select the required configurations needed to run the tests and click on the Generate Capabilities button, which provides us with all the required capabilities. These can be copied and pasted directly into our tests and used further.
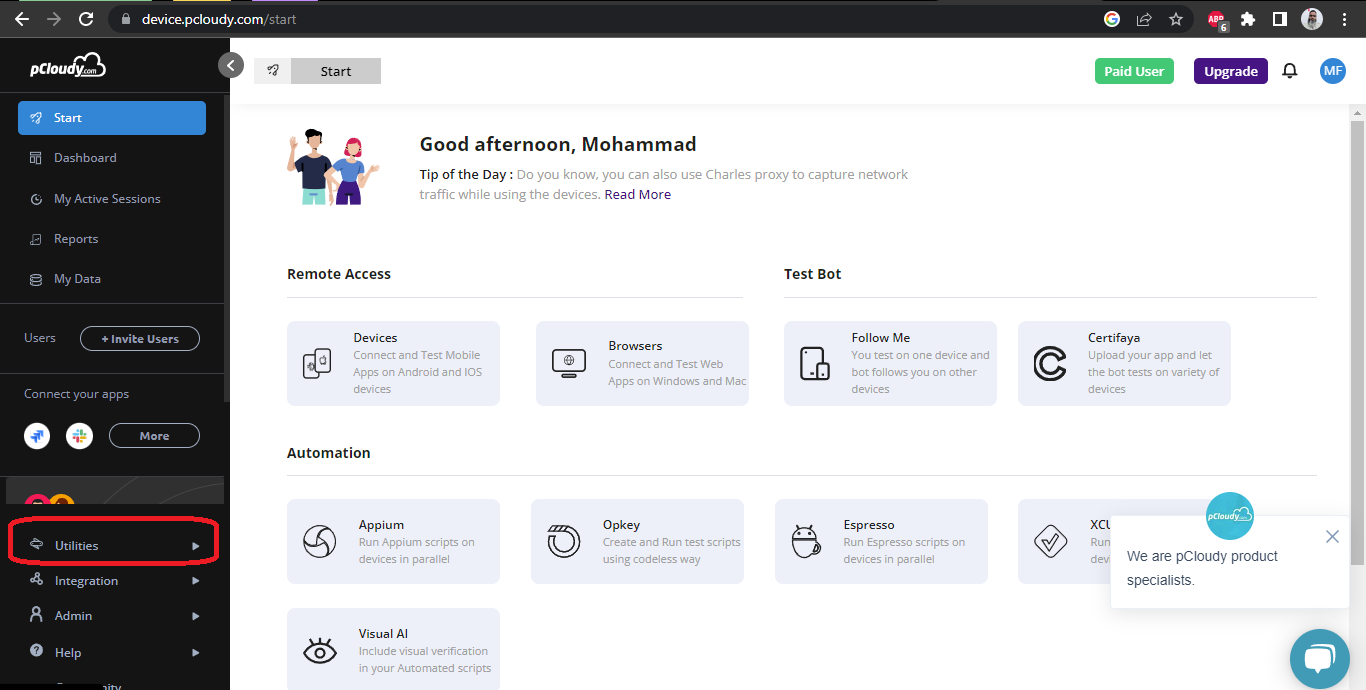
To Open the Capabilities Generator Screen, Login into pCloudy Website and navigate to Utilities >> Capabilities.
Capabilities Generator Screen
Setting the Capabilities
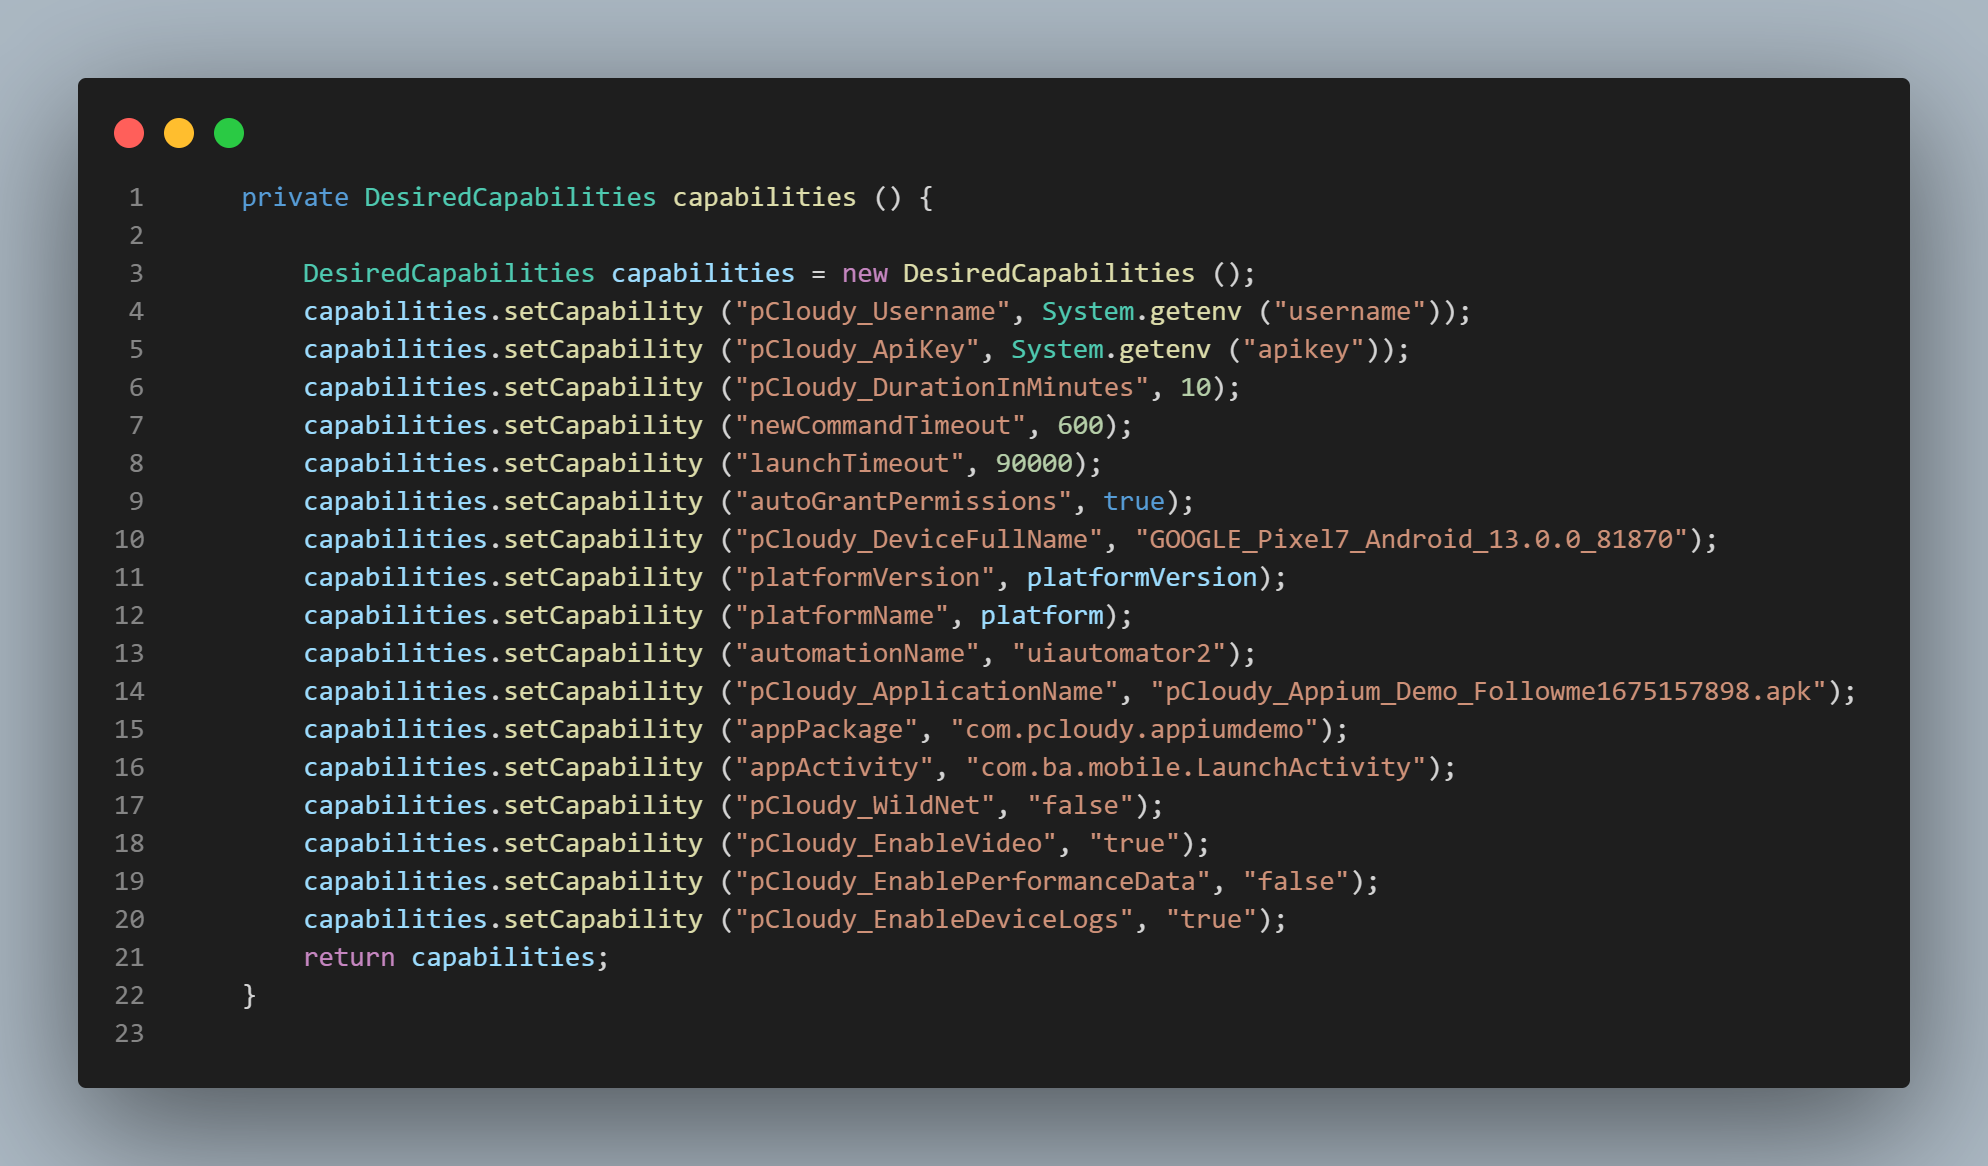
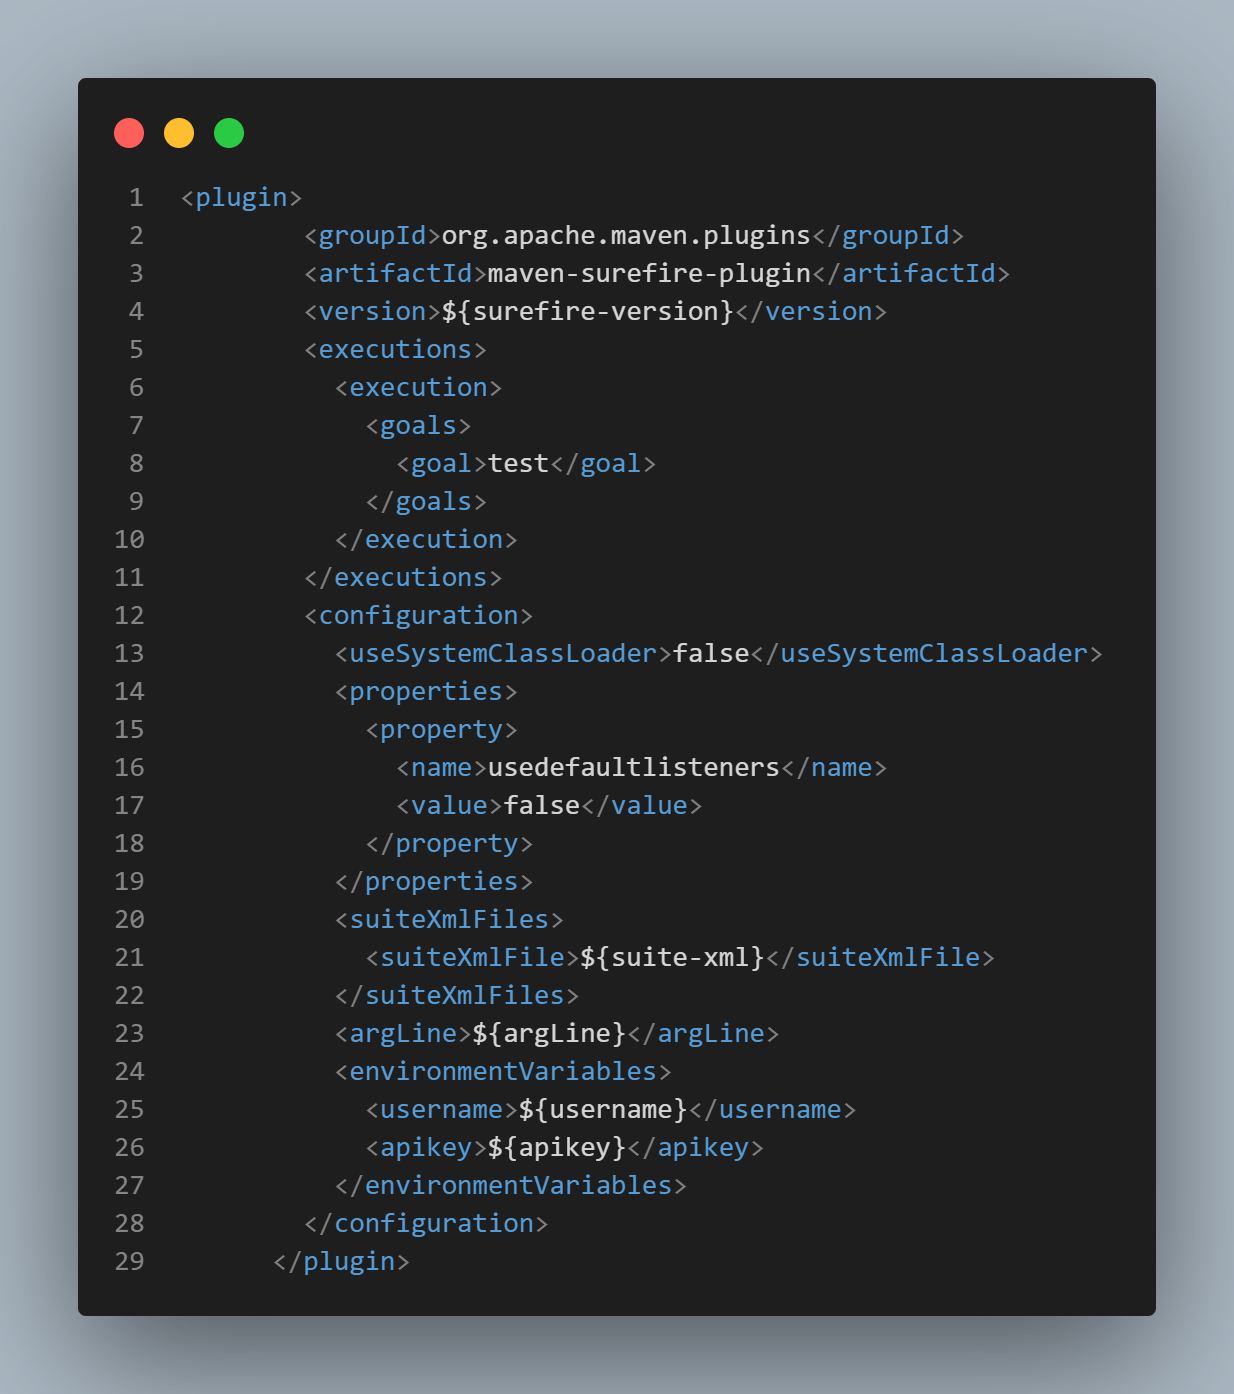
An important point to note in the capabilities() method is the System.getEnv() statement used to set the value of username and API key in the desired capabilities. This ensures that the secret values are not hardcoded inside the code and are supplied at runtime as environment variables. The following configuration needs to be set inside the pom.xml for enabling environment variables.
IOSDriver Manager
Similarly, here is the IOSDriverManager class which handles the IOS Driver.
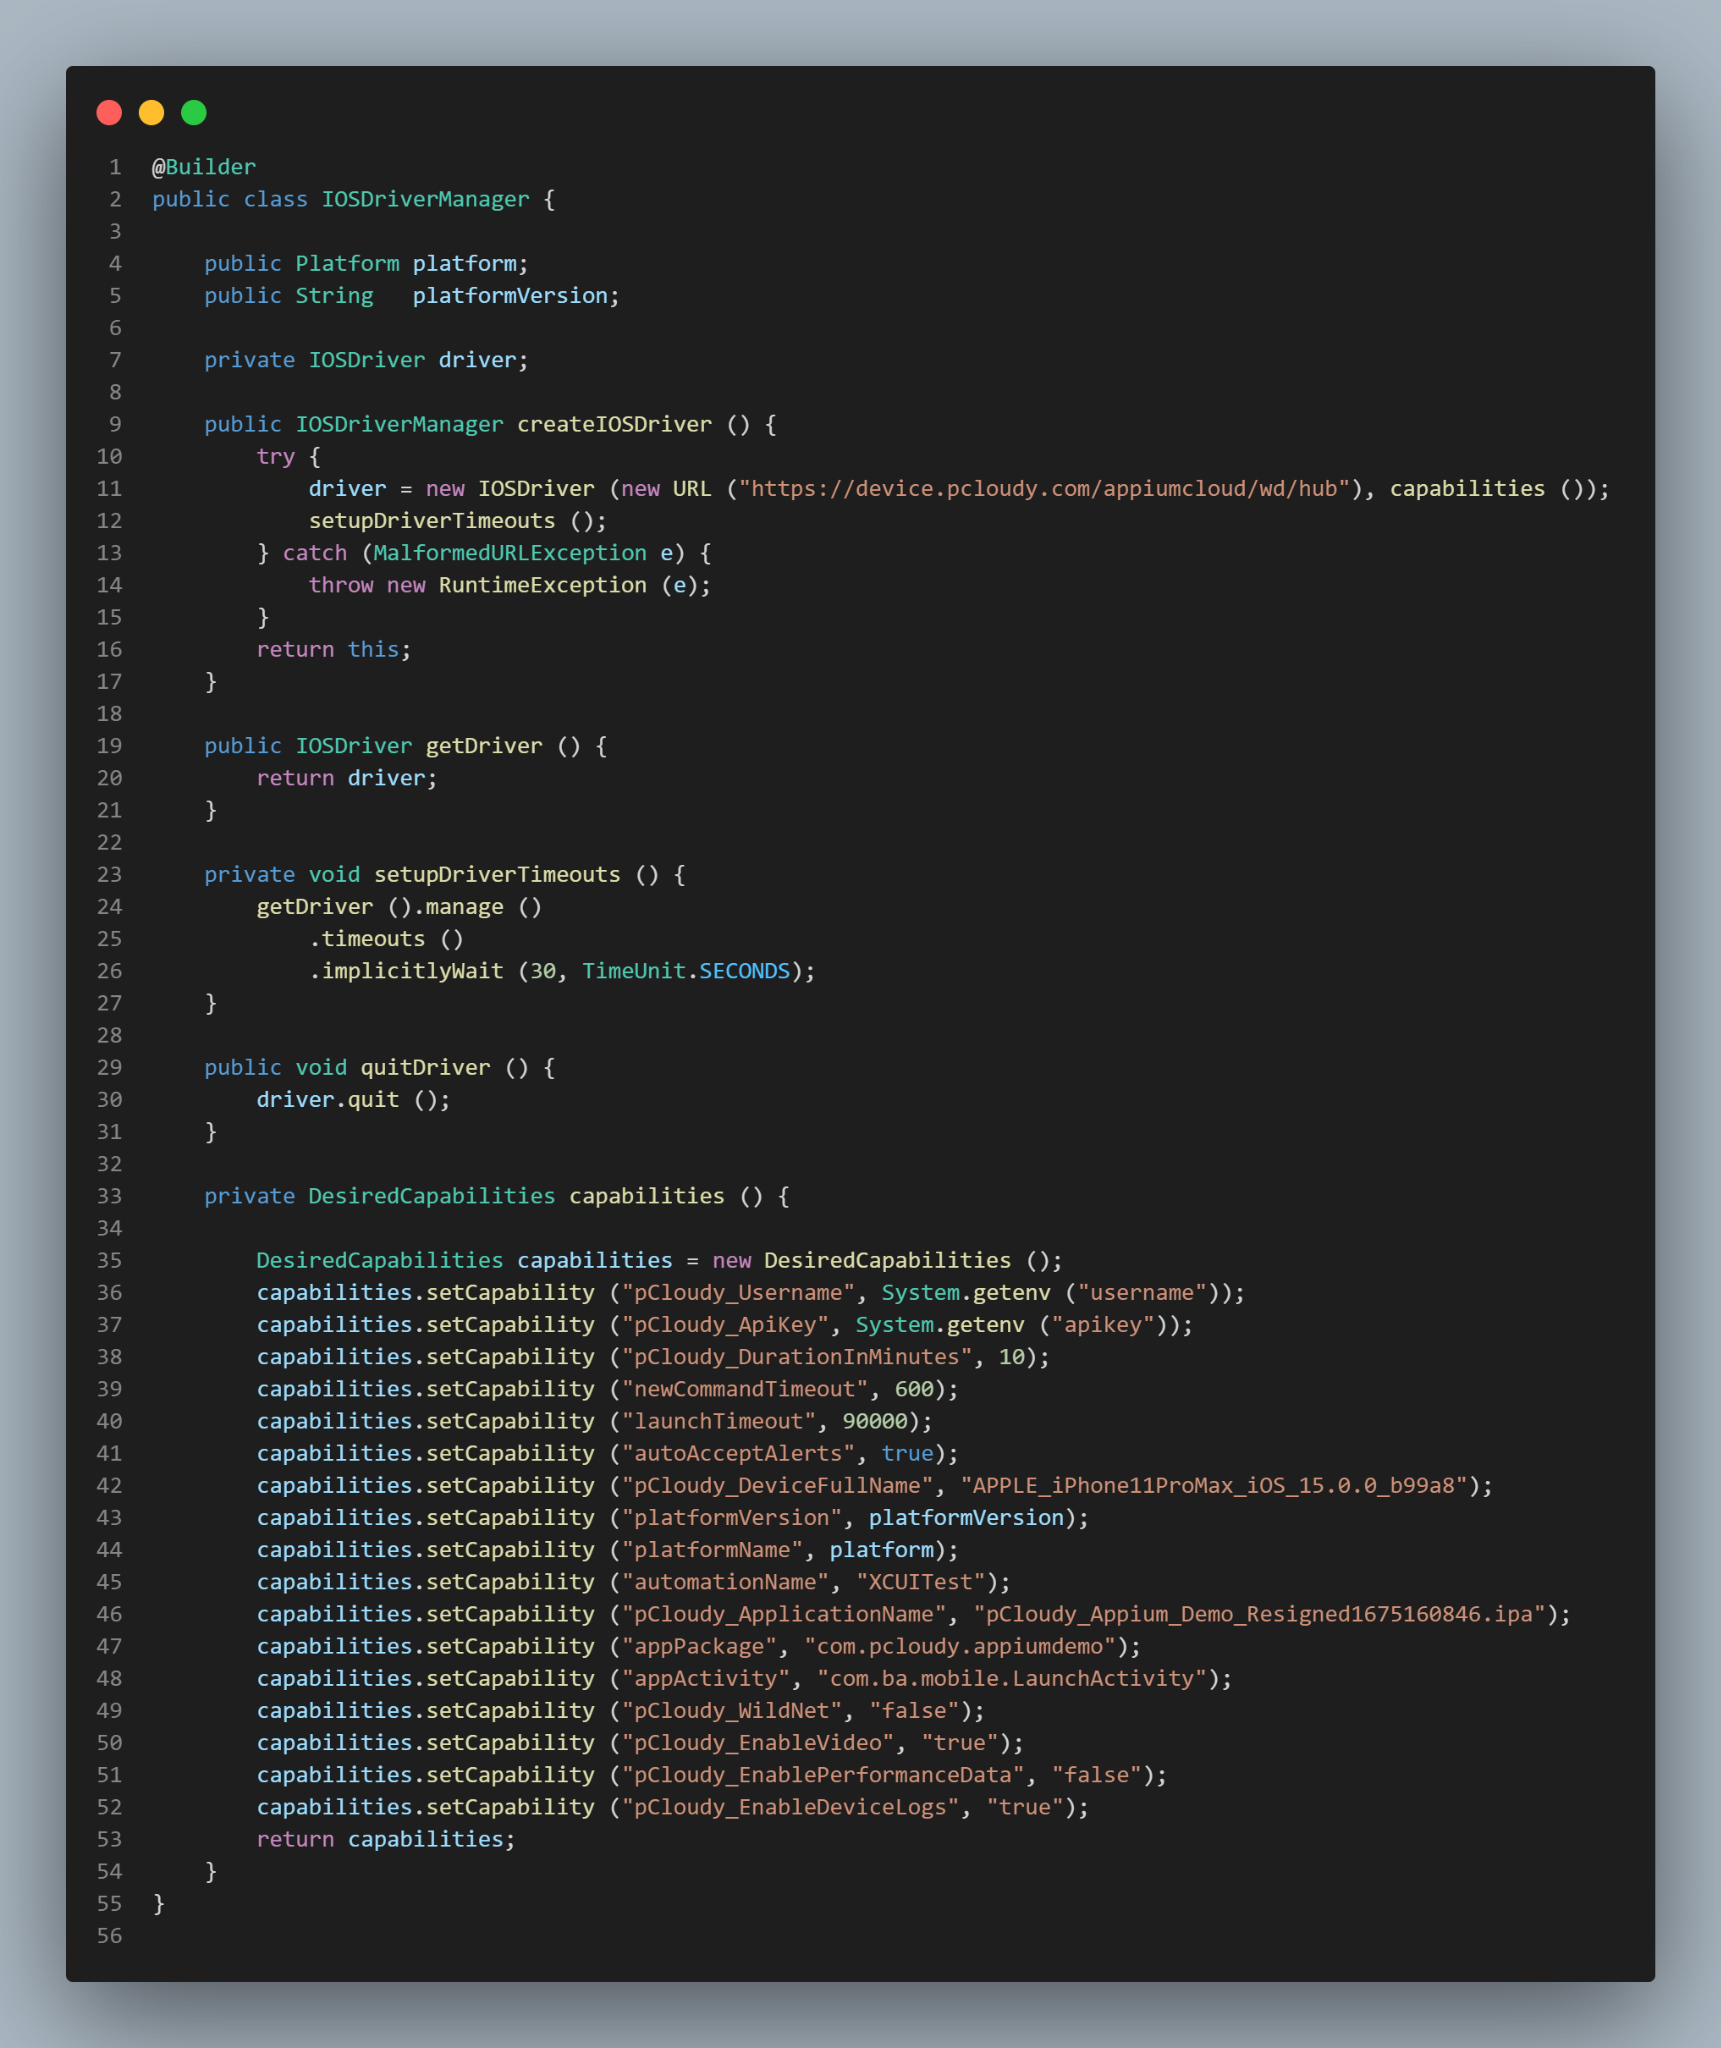
This class is written in the same way as we did for Android Driver. It returns a new driver instance of IOS Driver.
An important point to note in both Android as well as iOS Driver Manager classes is the use of Lombok’s @Builder annotation which will allow to build and take the Platform and Platform Version desired capabilities details on run time without having to pass the respective parameters in the method signature.
Base Test
Let’s define the Base Test now, which can be extended and used in Android as well as iOS application tests, so we don’t repeat ourselves in setting the same configuration repeatedly.
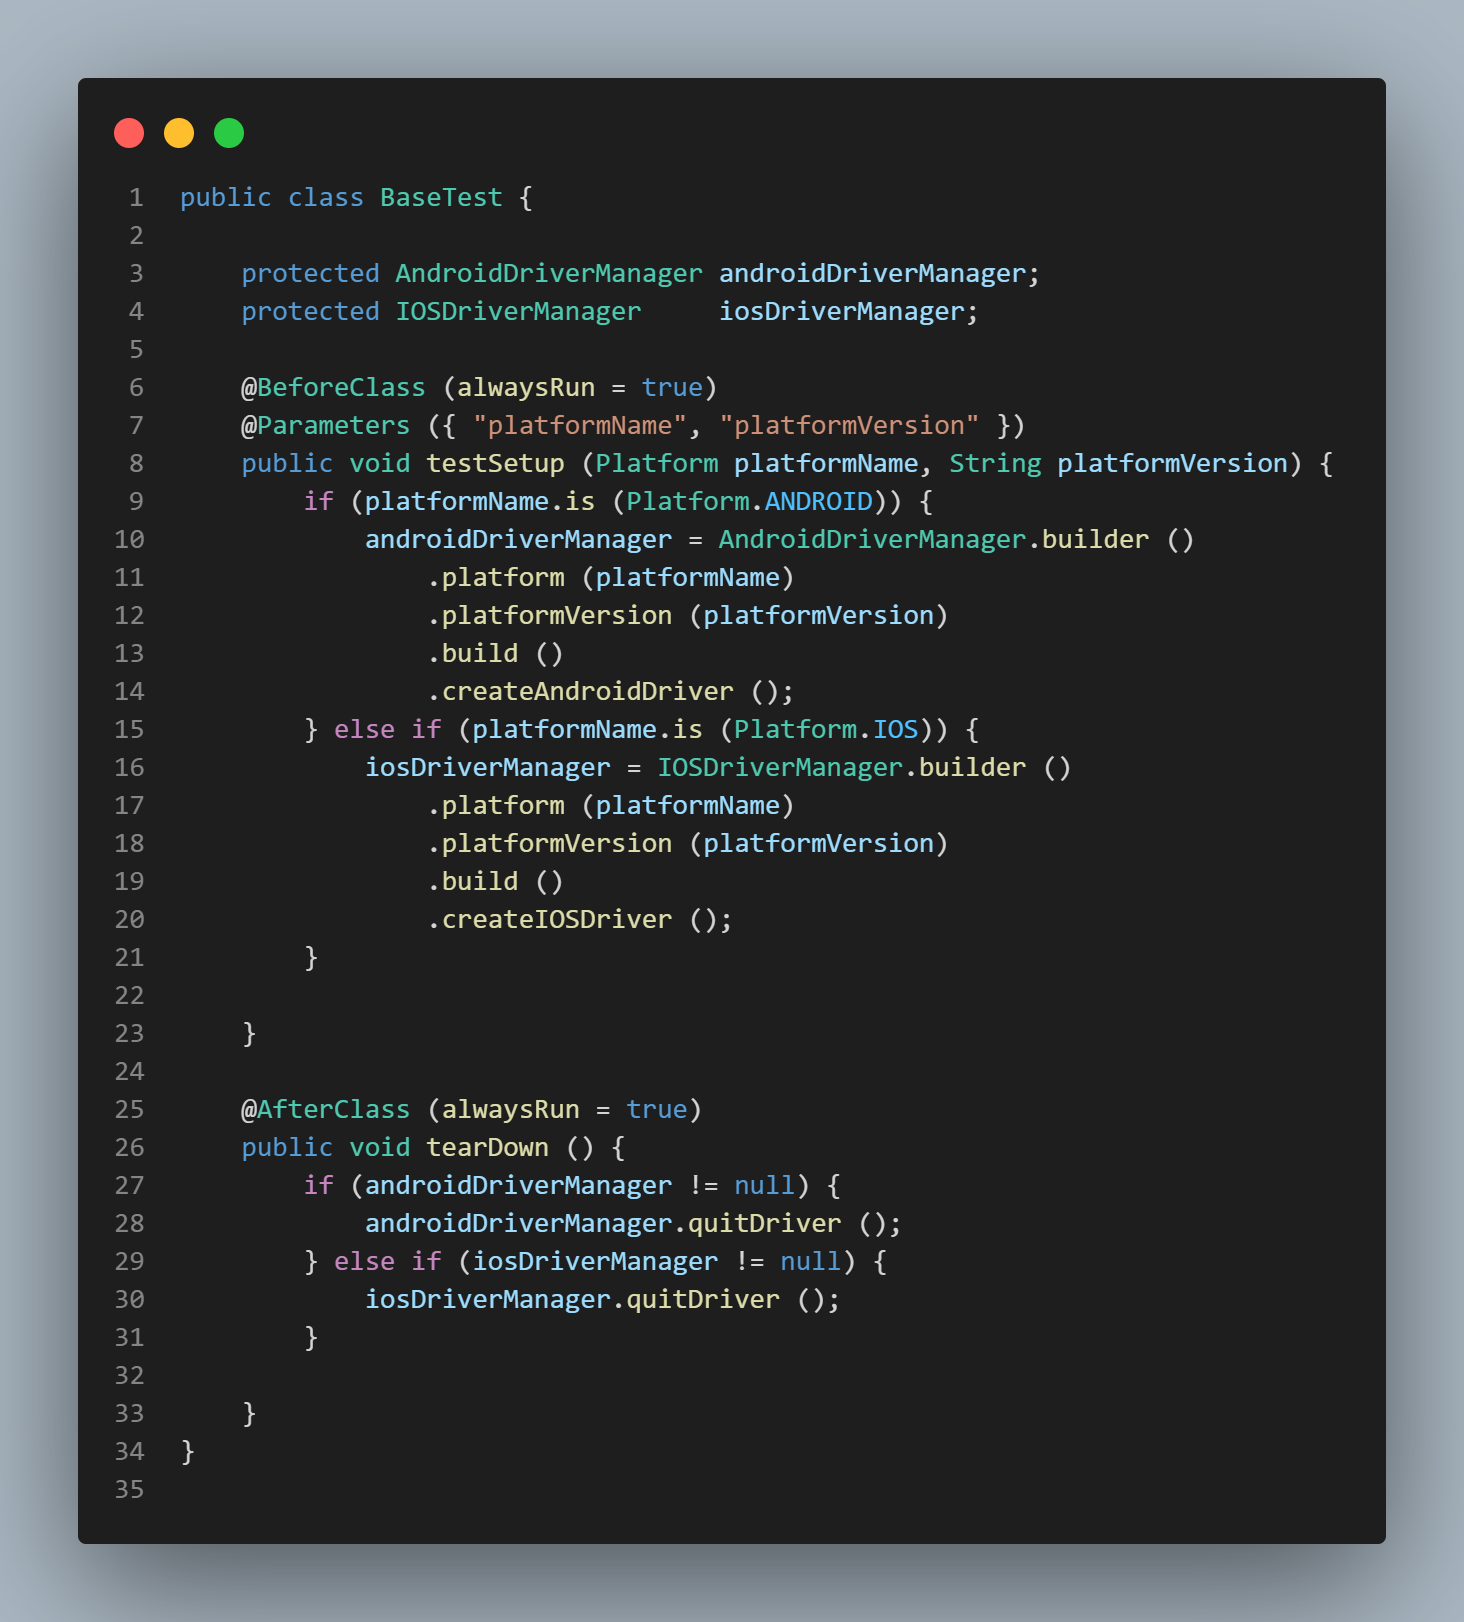
As you can see, “platformName”, “platformVersion” are captured as a part of TestNG annotation @Parameters which will be set using testng.xml file.
Next, the builder design pattern is used to build the instance for respective driverManager and accordingly pass the respective values so we can run tests on the desired configurations.
Based on the Platform that is set, the respective driver for Android or iOS will be instantiated and the related tests for Android or iOS will be run. As this configuration needs to be set before any of the tests are run hence @BeforeClass annotation of TestNG is used on the testSetup() method. @BeforeClass annotated method will be run before the first test method in the current class is invoked. Similarly, after all the tests are run the driver needs to be gracefully quit. Hence @AfterClass annotation is applied on the tearDown() method. @AfterClass annotated method will be run after all the test methods in the current class have been run.
Let’s start writing the tests using the automation test strategy we defined earlier.
Packages – Pages and Tests
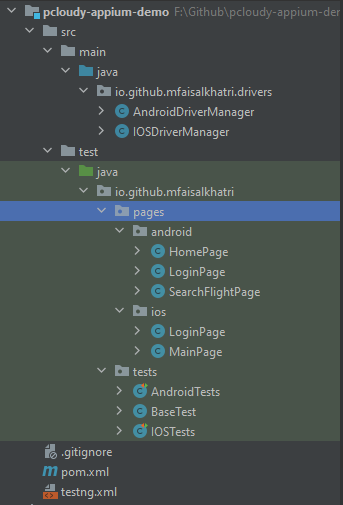
Two separate packages have been created, first for Android pages and second for iOS pages, as locators are different for both the applications. Similarly, another package for tests has been created for the Android and iOS test classes.
Page Object Classes
First, let’s locate the elements required for Android and iOS, which would help us run the tests.
Android Application Page Object Classes
HomePage class
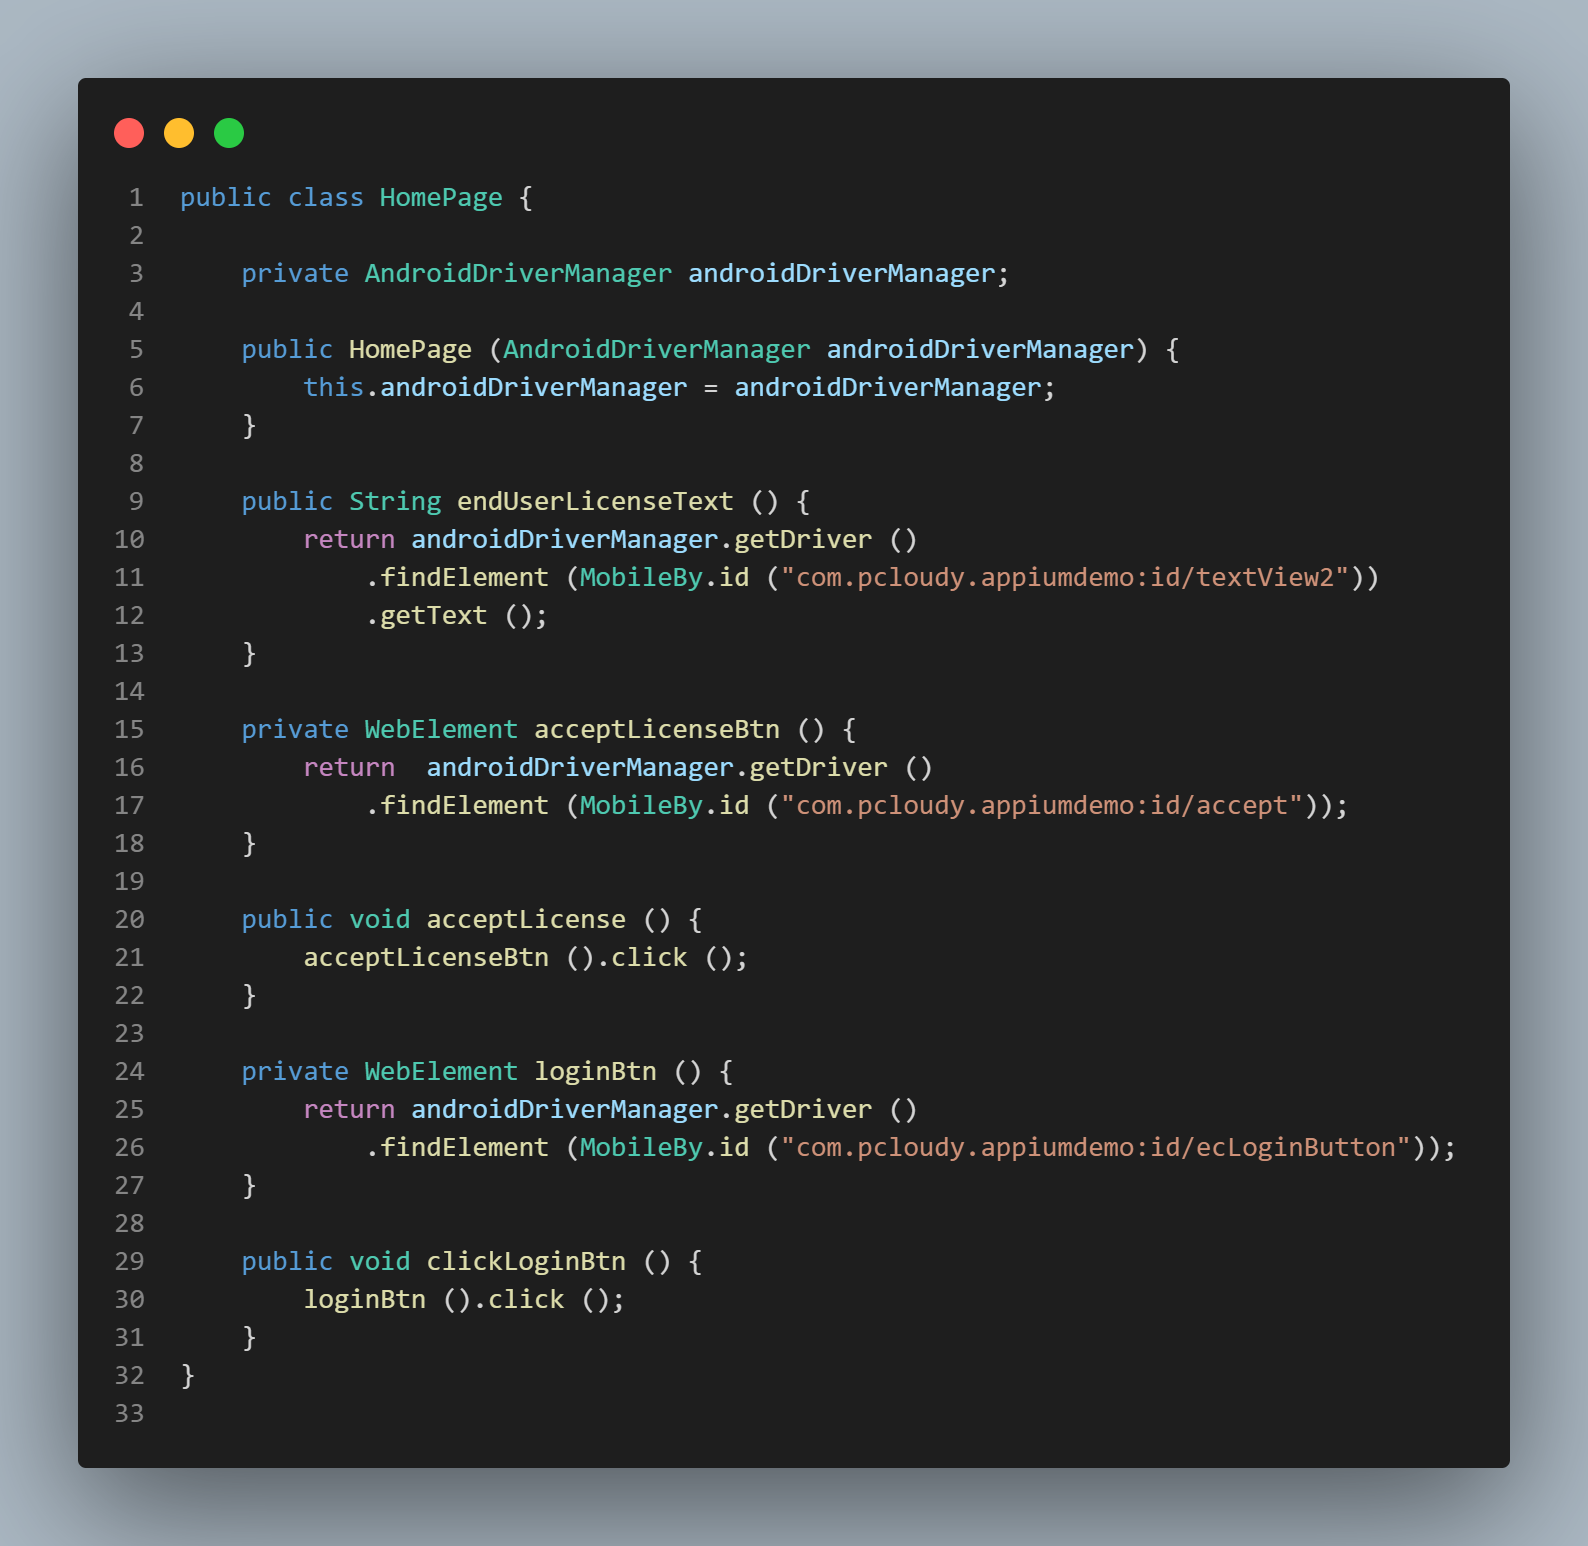
From the code it is pretty clear that the MobileBy class is used to locate elements using id. endUserLicenseText() method returns the text of the end user license, similarly acceptLicense() method will accept the license and clickLoginBtn() method will click on the login button. These methods will be called in the login tests to validate the login functionality.
LoginPage class
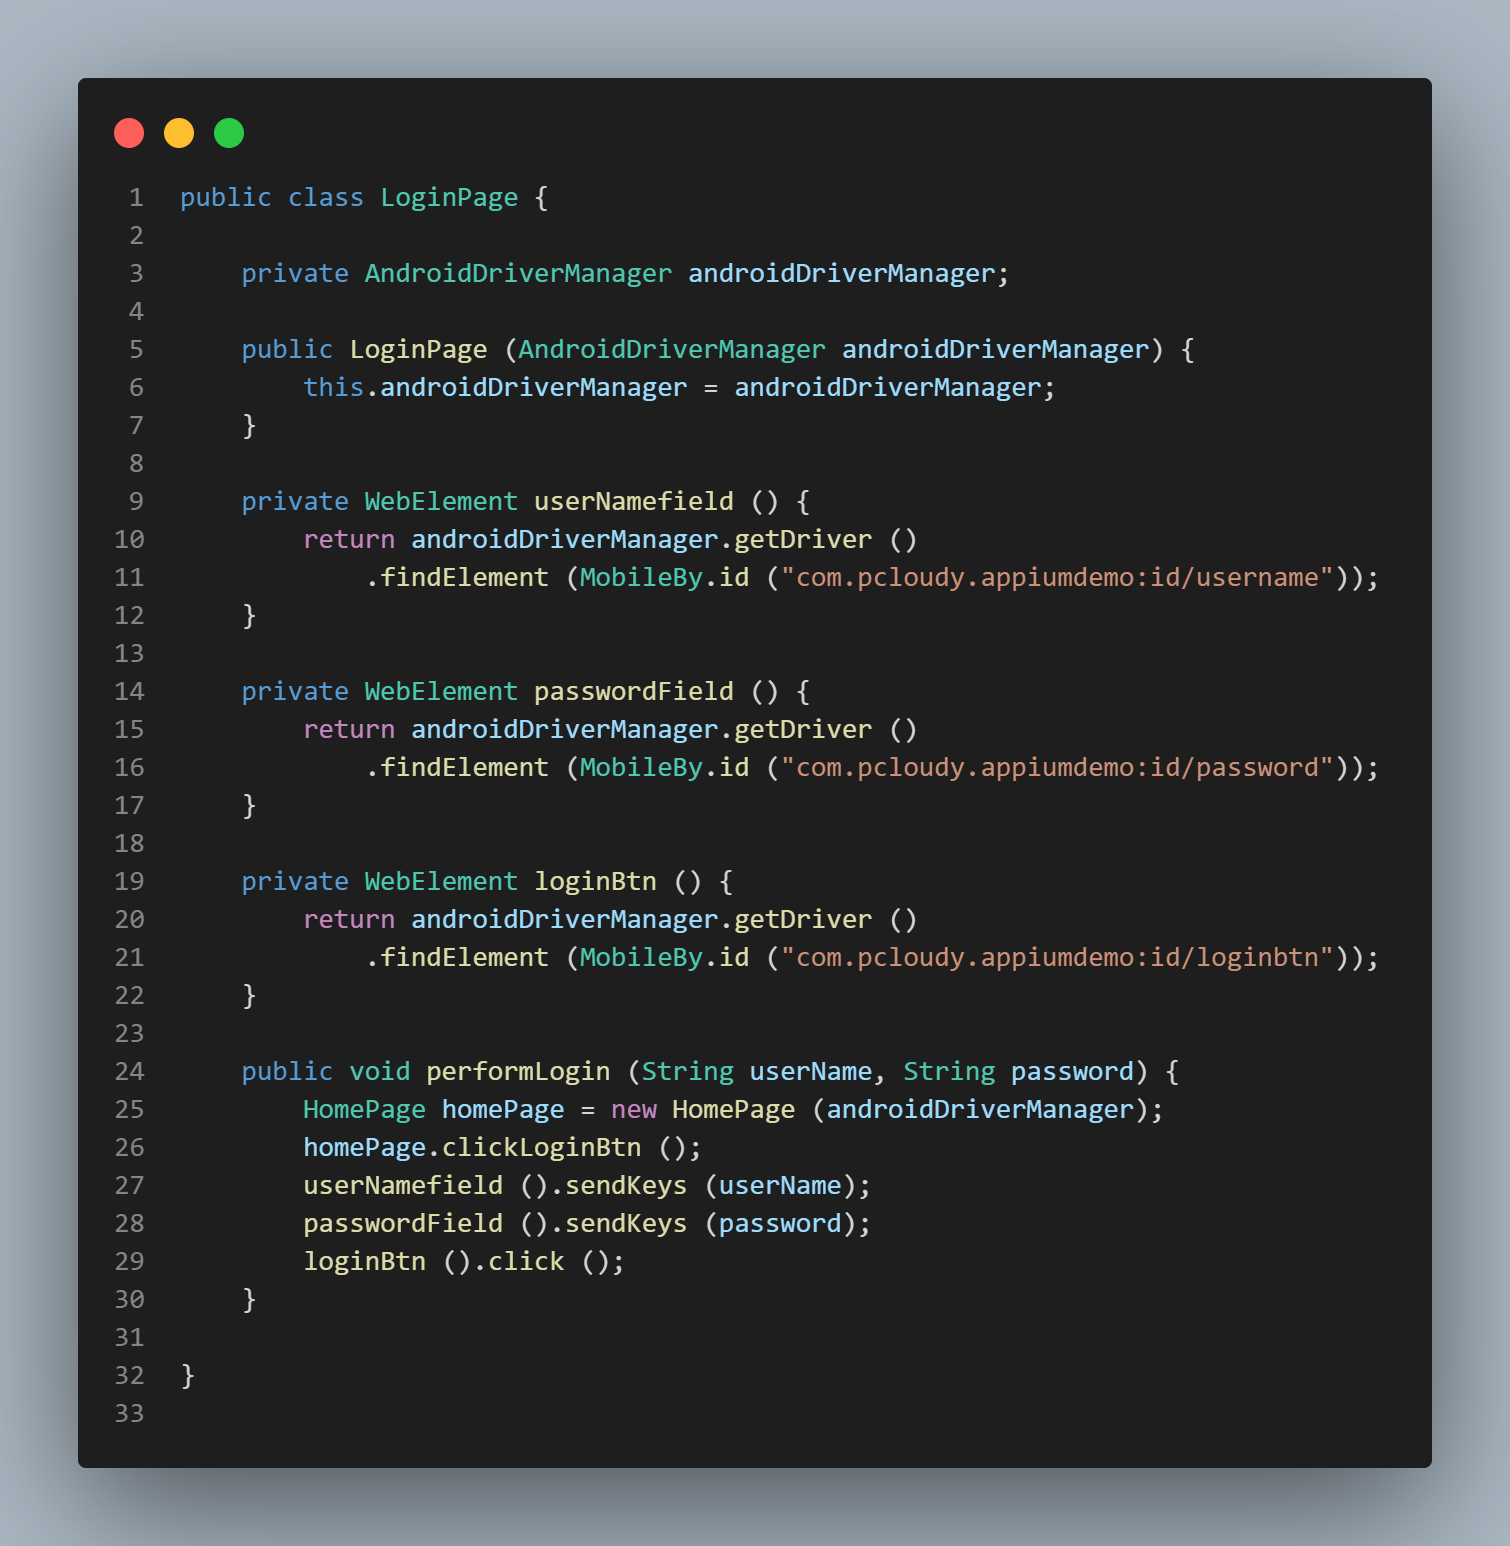
The code in the LoginPage class is also simple and Straightforward. Username and password fields are located using the id using MobileBy class which returns the WebElement for Username and Password fields respectively.
performLogin() method will perform the login action by passing the username and password values in the respective fields and click on the login button.
SearchFlightPage Class
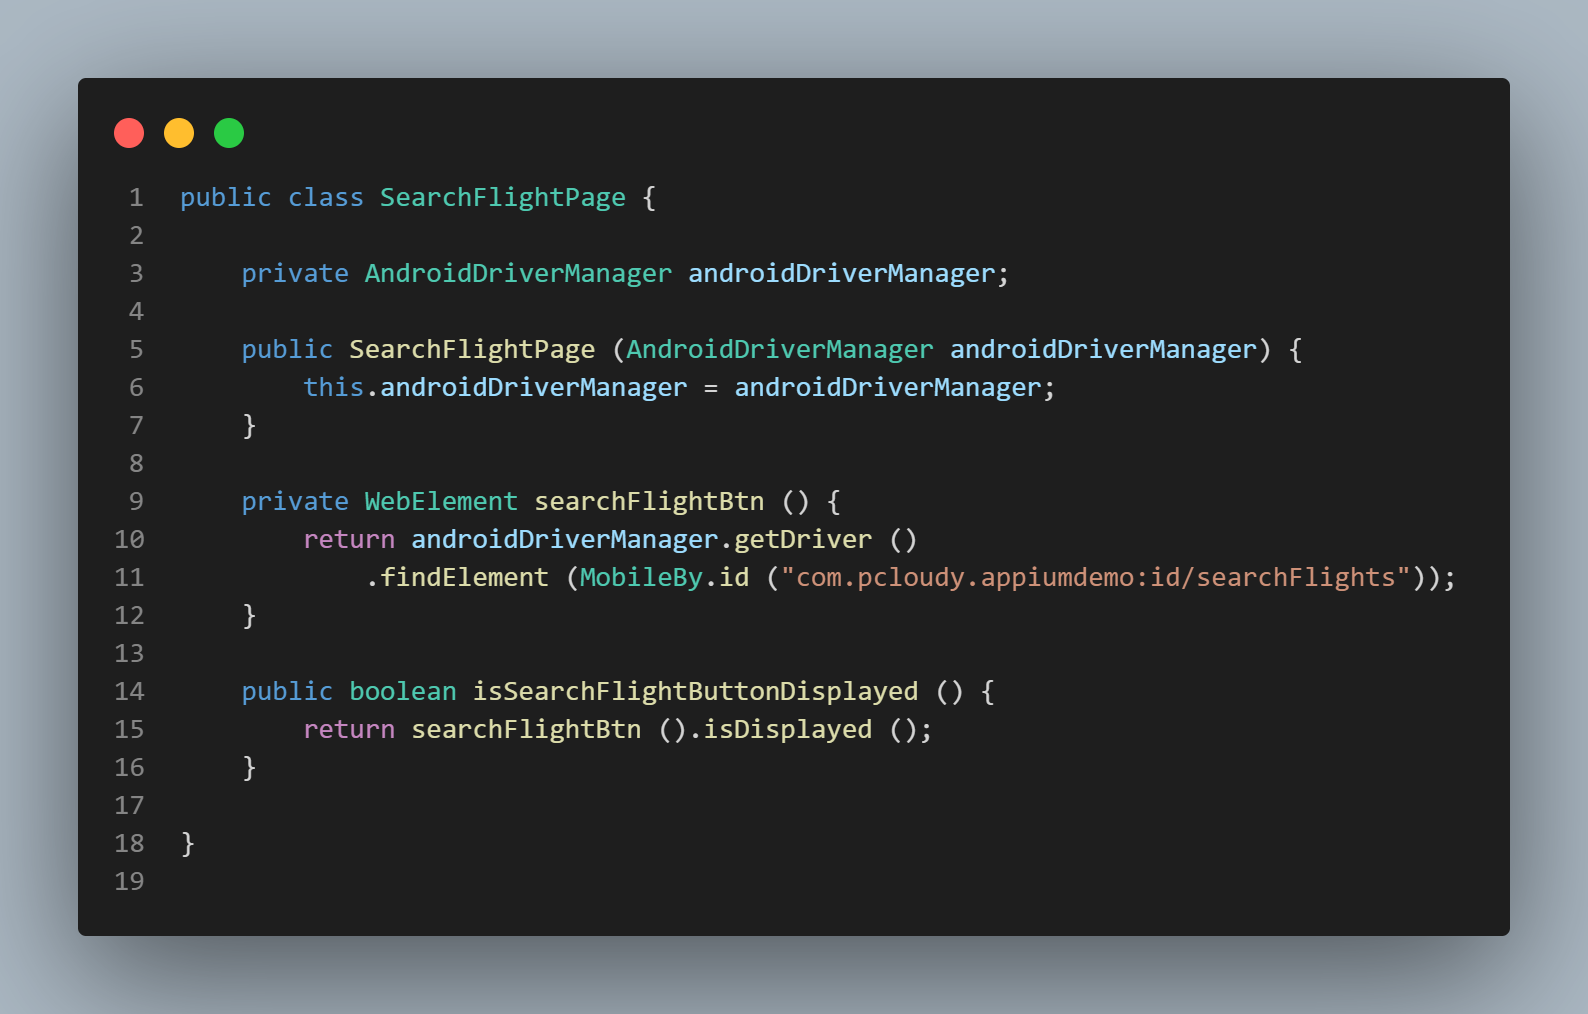
In this class, isSearchFlightButtonDisplayed() method checks if the Search Flight button is displayed and will return true or false accordingly.
iOS Application Page Object classes
Let’s create Page Object classes for iOS application as well and locate the respective elements required for running the iOS mobile application tests.
LoginPage class
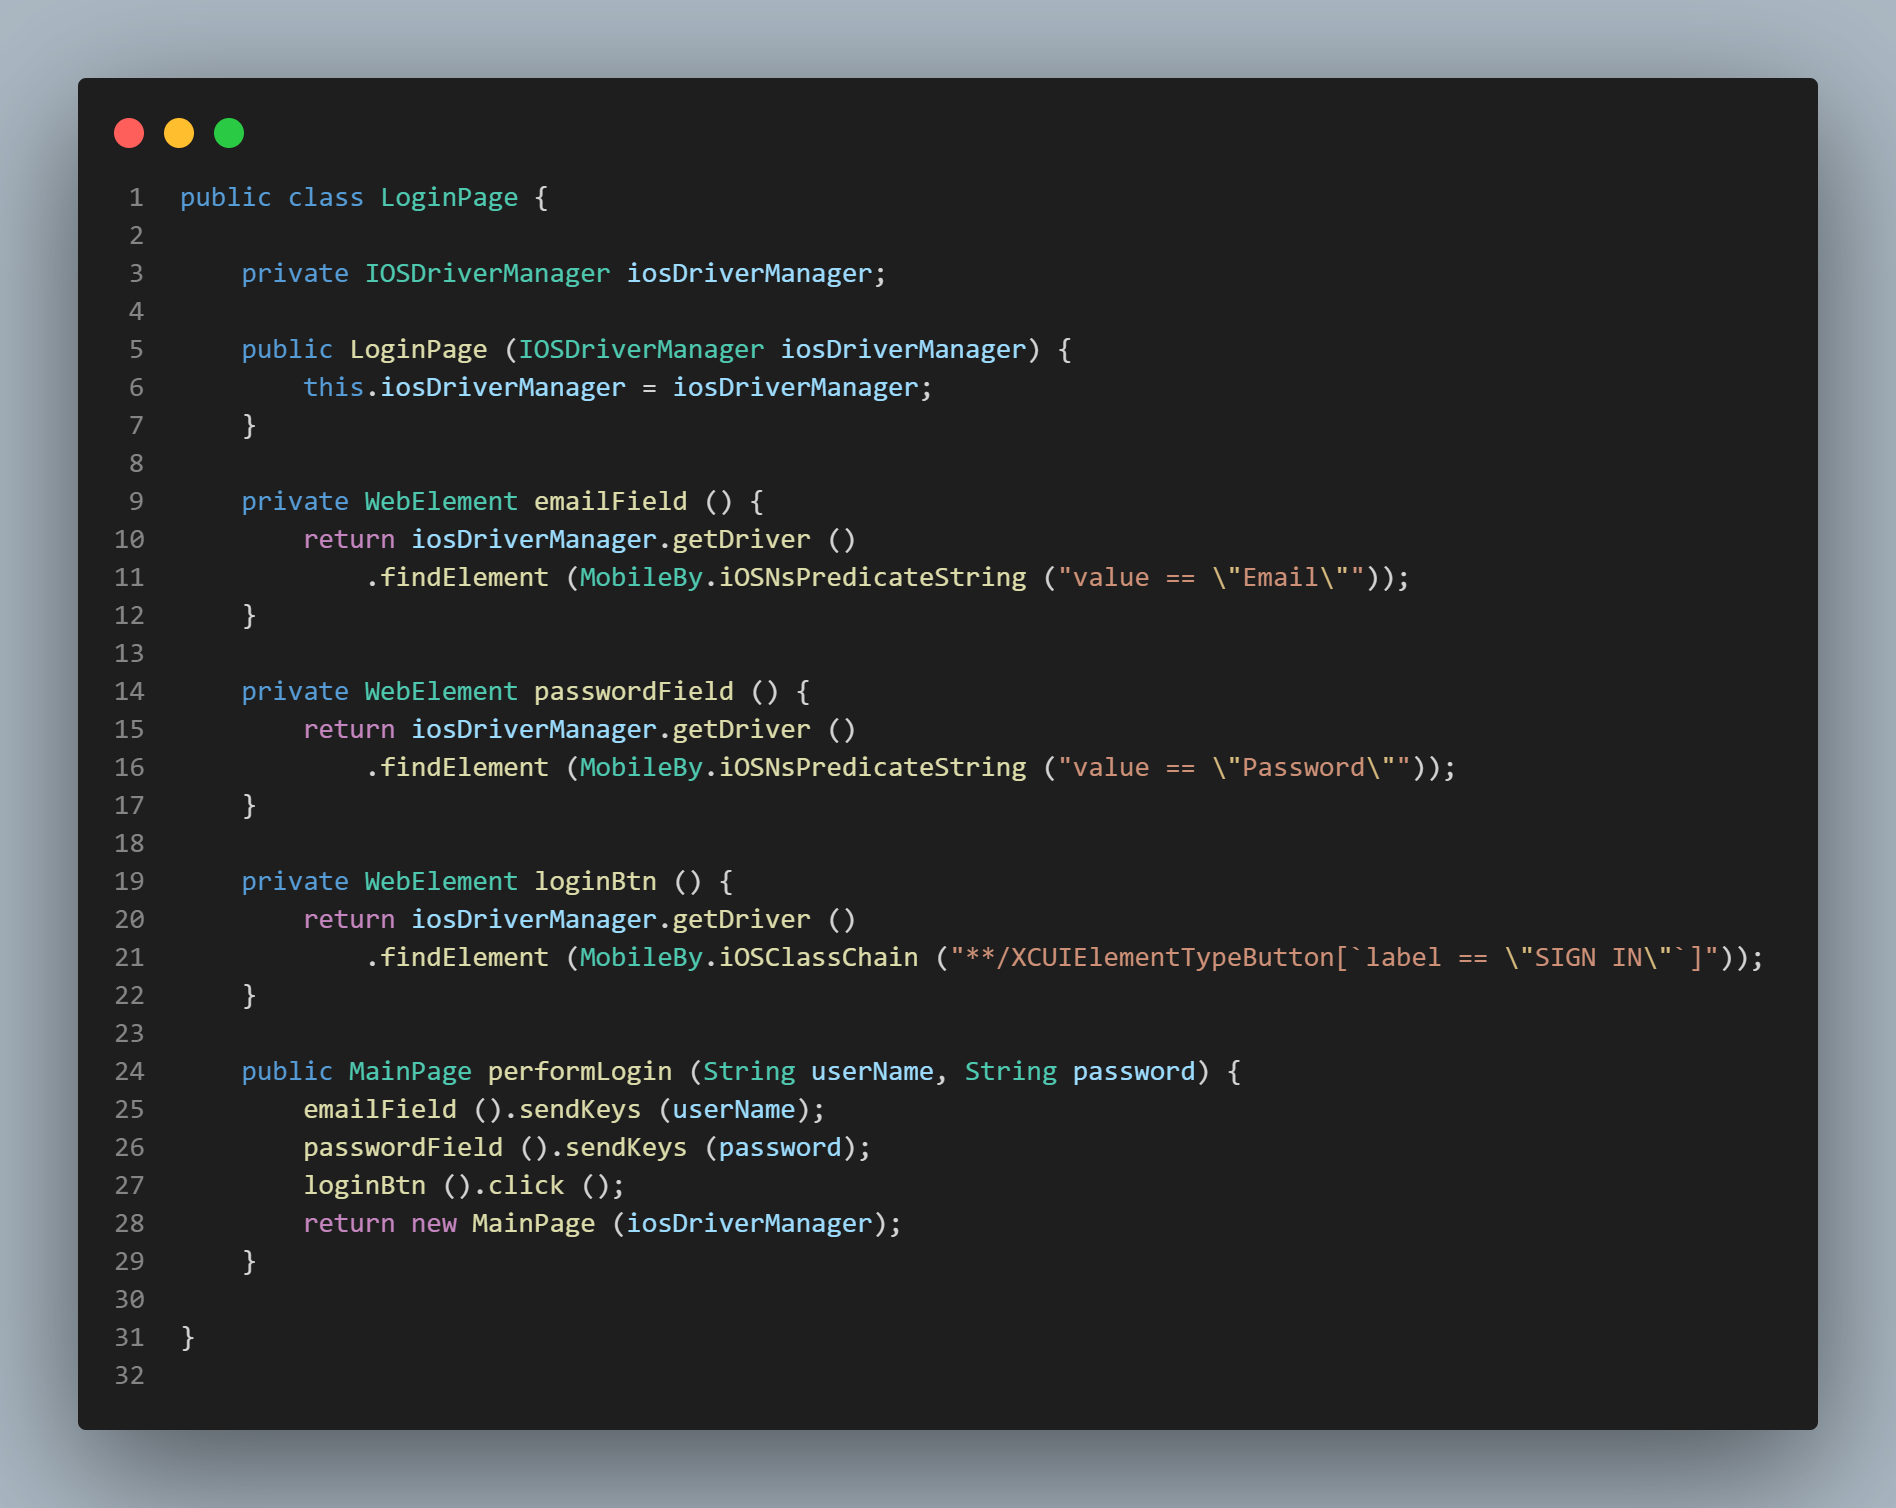
As per the test strategy we defined, in iOS application Login Page is displayed on start.
In LoginPage class, email field, password field and login button are located using the iOSNSPredicateString and iOSClassChain methods respectively. These locator methods are specific to iOS only.
performLogin() method performs the required action to login by entering email, password and clicking on the login button. Once the login is successful, this method will return a new instance of Main Page as it is the next page where focus needs to be brought to, for running the next test.
MainPage class
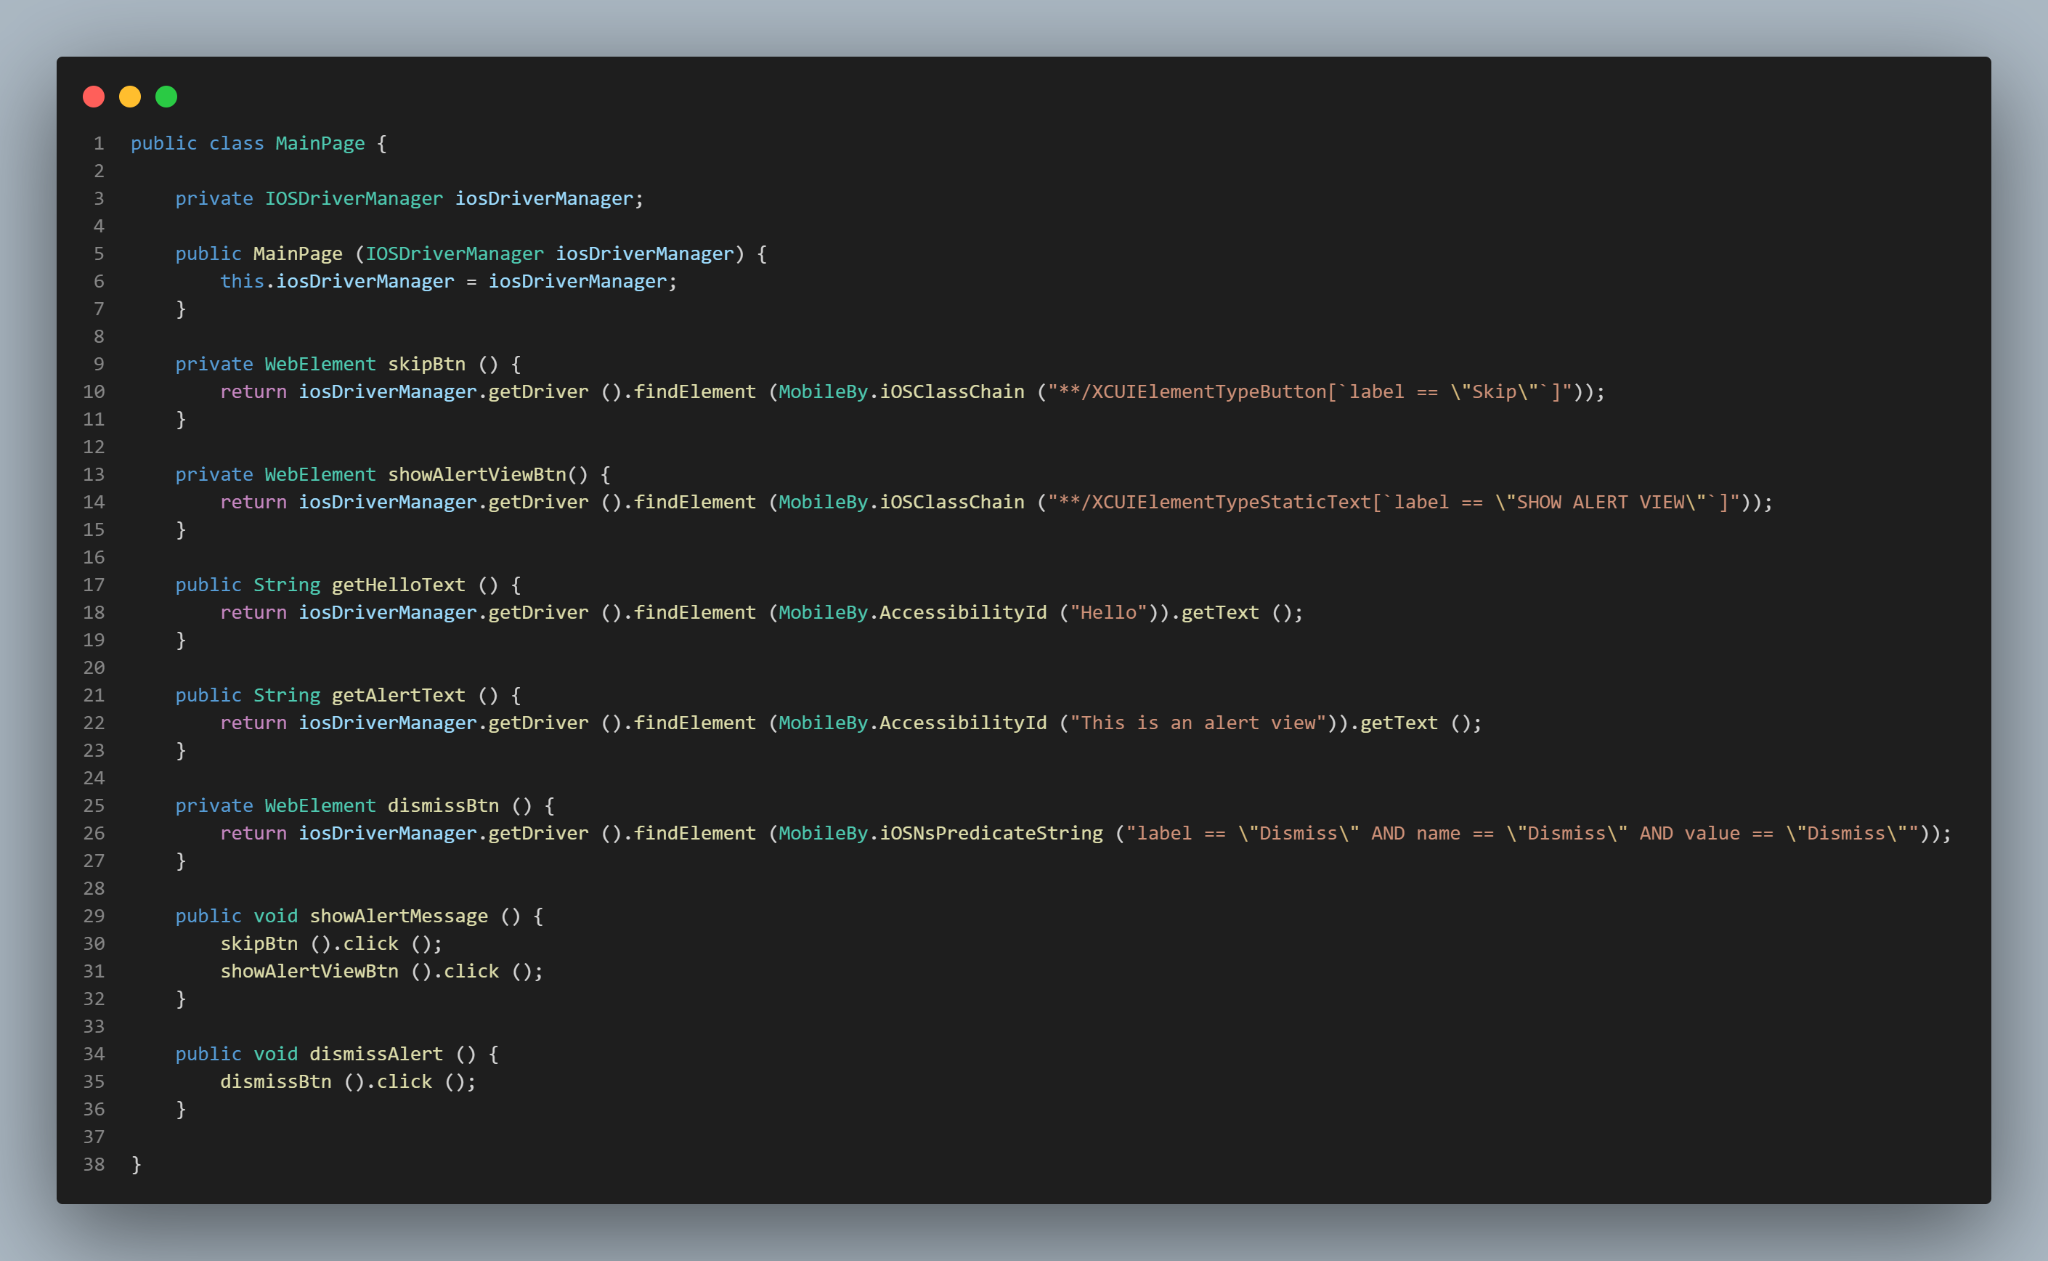
MainPage class helps in locating the fields required to run the next test. Here, showAlertButtonMessage() method will skip the Intro screen and click on Show Alert View Button on the Main Page.
To verify the alert message, getHelloText() and getAlertText() methods will help in getting the alert message texts. Finally, dismissAlert() method will be called in the test to dismiss the alert.
Automated Tests
Android Application Tests
Below is the working code used to implement the test discussed in the test strategy.
As defined in the automation test strategy, the first test will check the end user license text and accept the license terms.
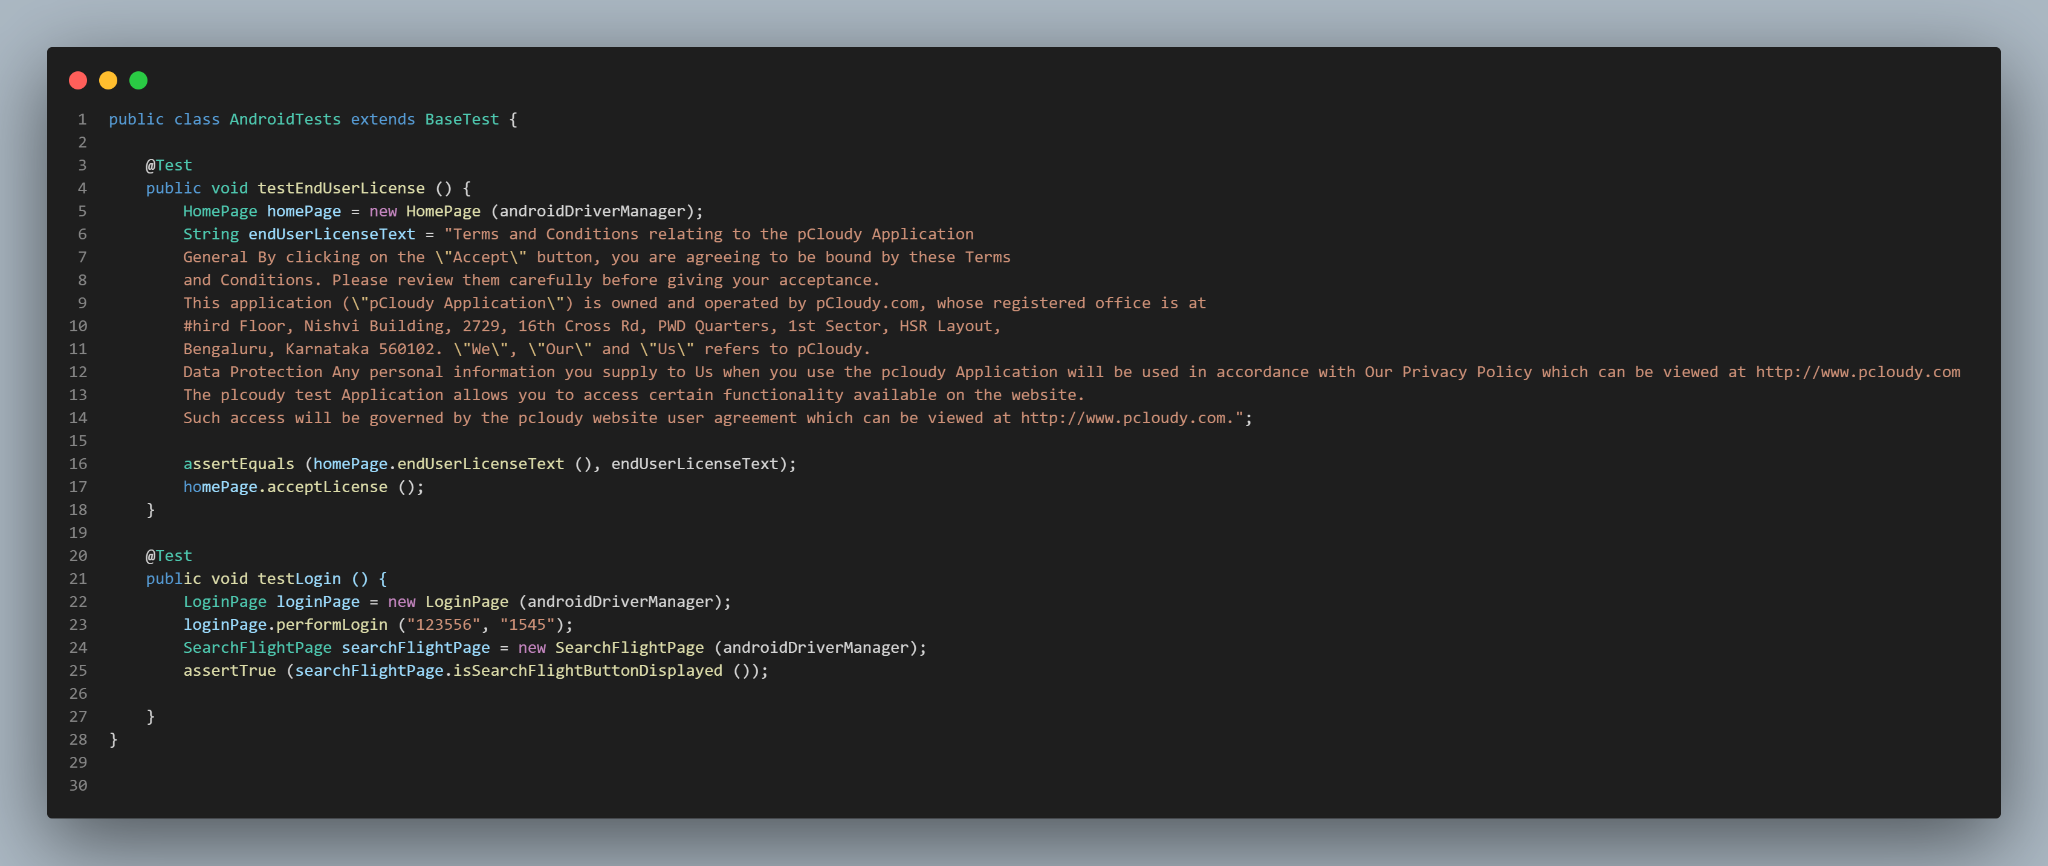
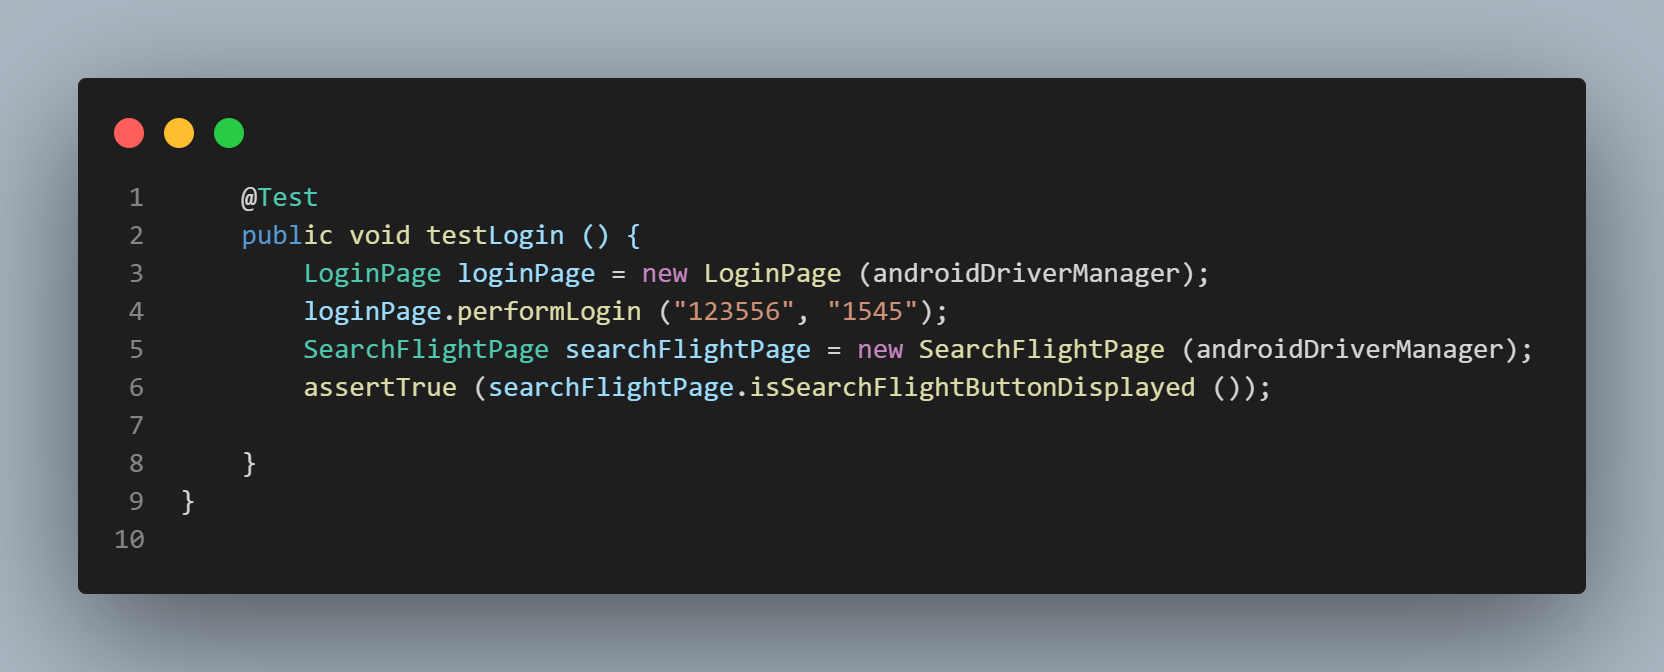
The following test will perform the login action and check that the Search Flight button is displayed after successful login.
The assertTrue() method of TestNG is used here to check that the Search Flight button is displayed as isSearchFlightButtonDisplayed() method returns a boolean value, assertTrue() method checks and marks the test pass only if the condition is true.
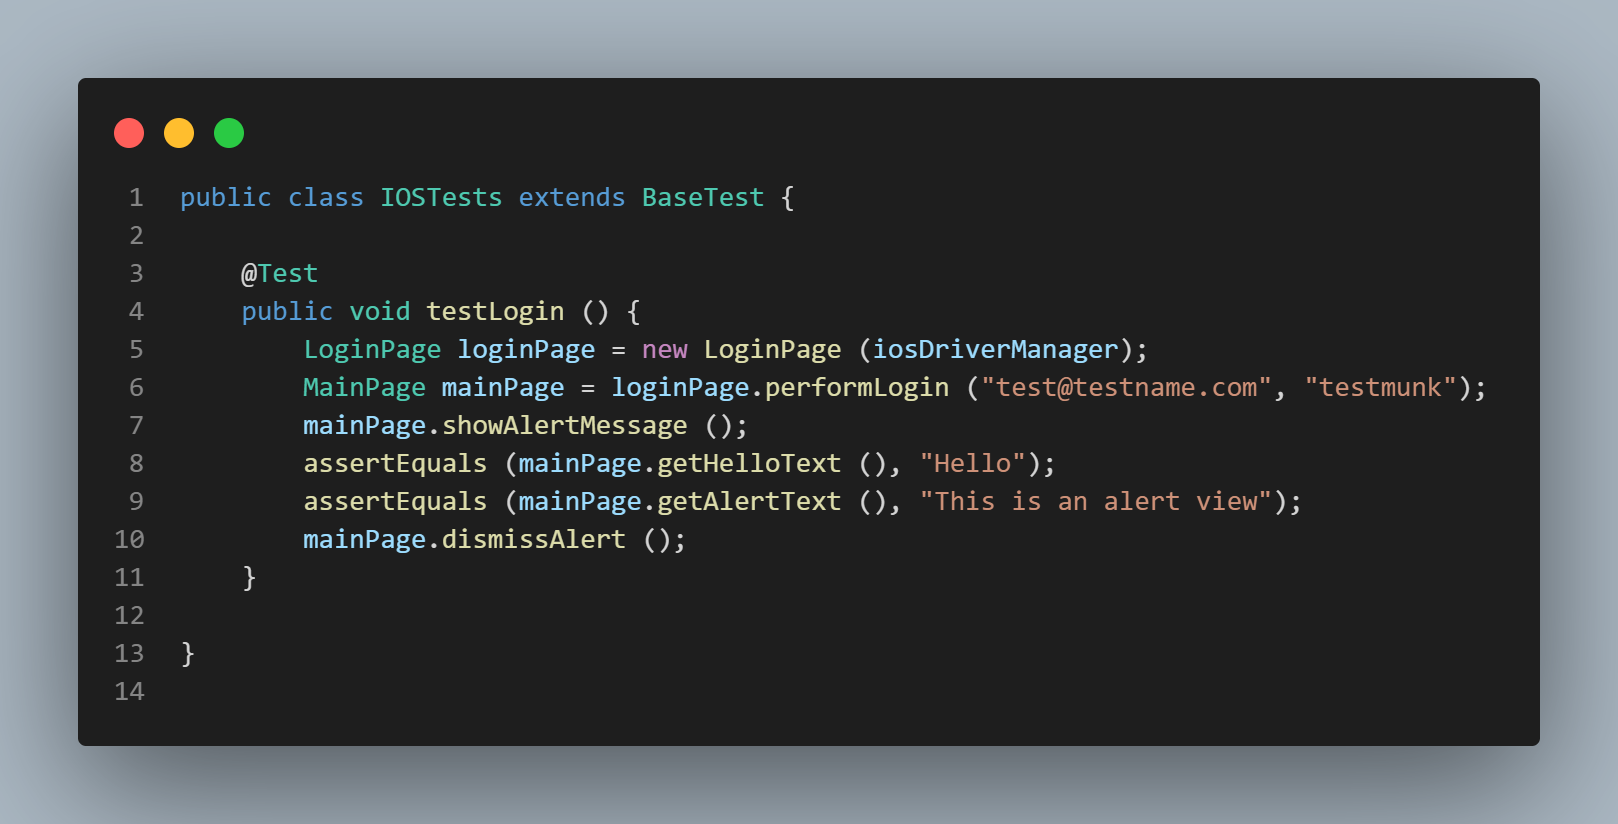
iOS Application Tests
The following test will perform the login into application by entering valid email and password.
After successful login, it will click on the Show Alert View button and verify the Alert message displayed by using the assertEquals() method of TestNG which will compare the actual and the expected text provided as the method parameters.
Running the Tests
There are two ways to run the tests.
- From the IDE using TestNG.
- From the IDE using Maven.
Using TestNG
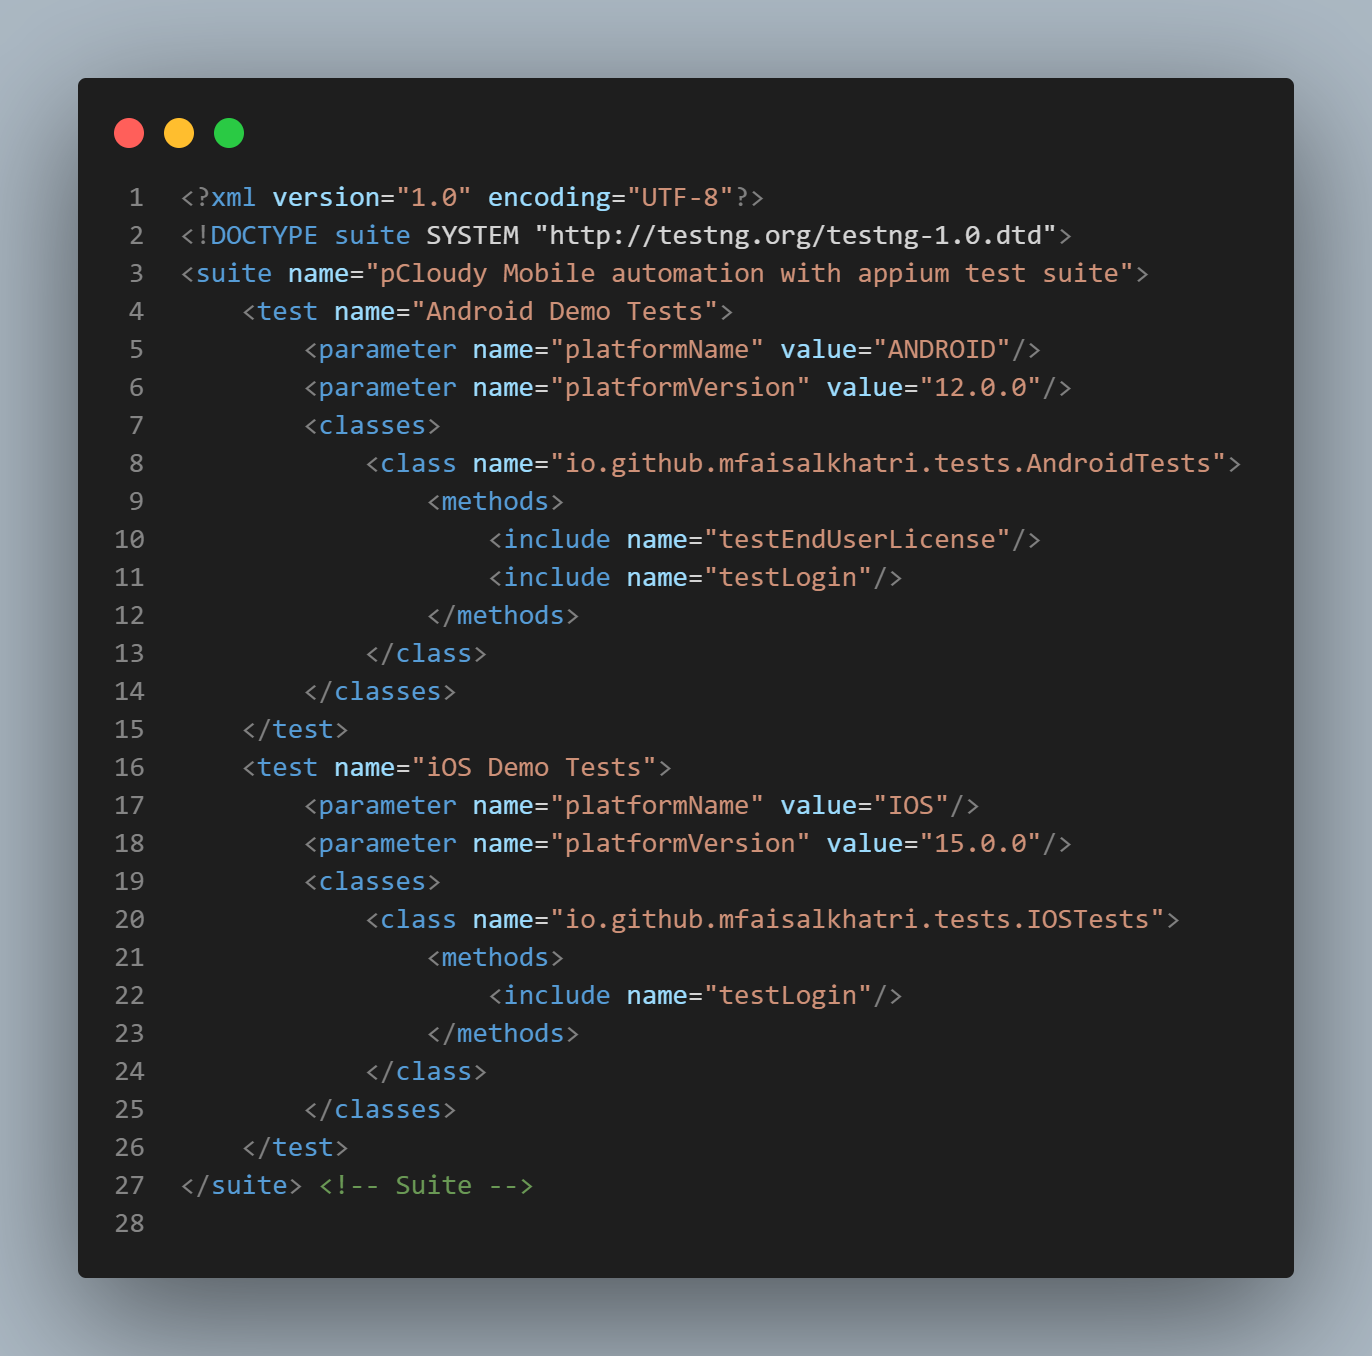
TestNG is used as a test runner, hence testng.xml has been created. Tests can be run by clicking right on the file and selecting the option Run ‘…testng.xml’.
Testng.xml
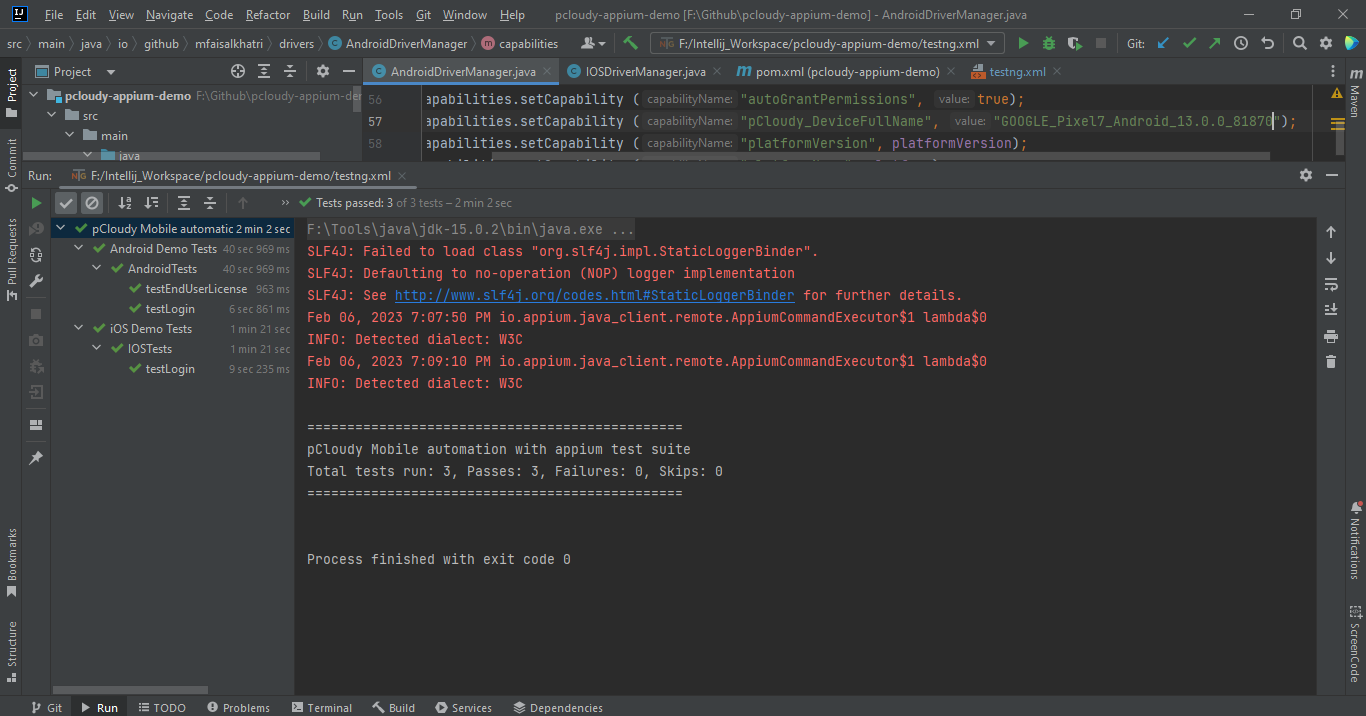
Here is the Screenshot of the test run locally using Intellij IDE.
Using Maven
To run the tests using maven, following steps needs to be run:
- Open command Prompt/Terminal.
- Navigate to the root folder of the project
- Type the command on the terminal:
mvn clean test -Dusername=<pCloudy username> -Dapikey=<pCoudy Api Key>
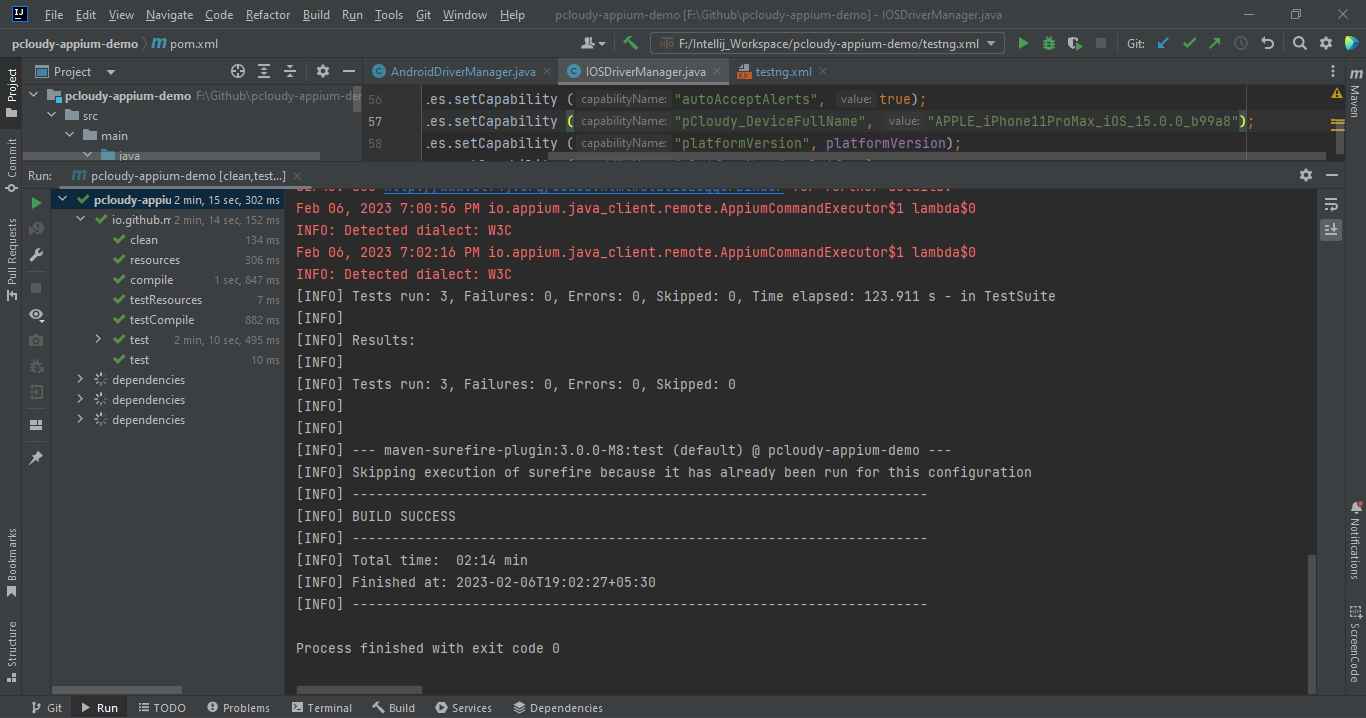
Here is the Screenshot of the test results run using Maven:
pCloudy Reports
Once the tests are run successfully, we can check out the pCloudy Reports and view all the details like session start time, end time, video recordings, etc.. and other details of the test run.
Check out the Screenshots below, which will give you a fair idea of how the reports for automated app tests look like.
Report Screen
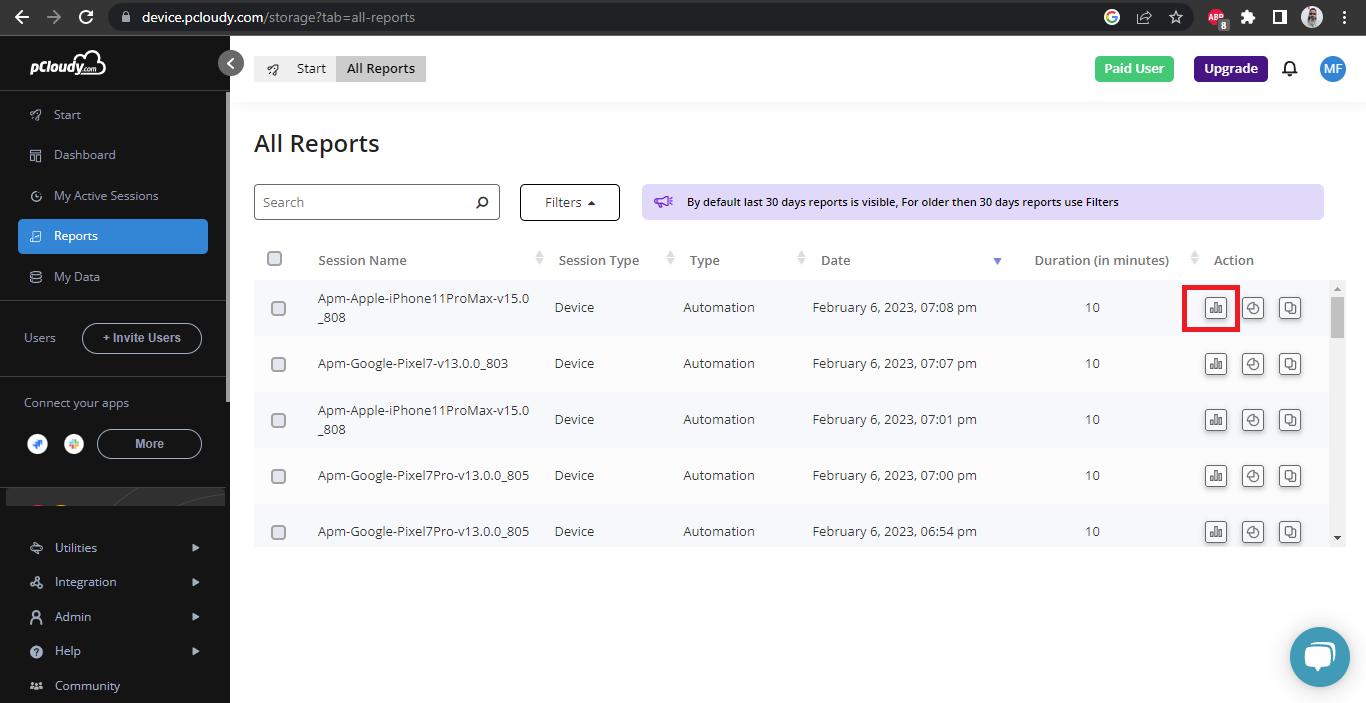
Report with Session details

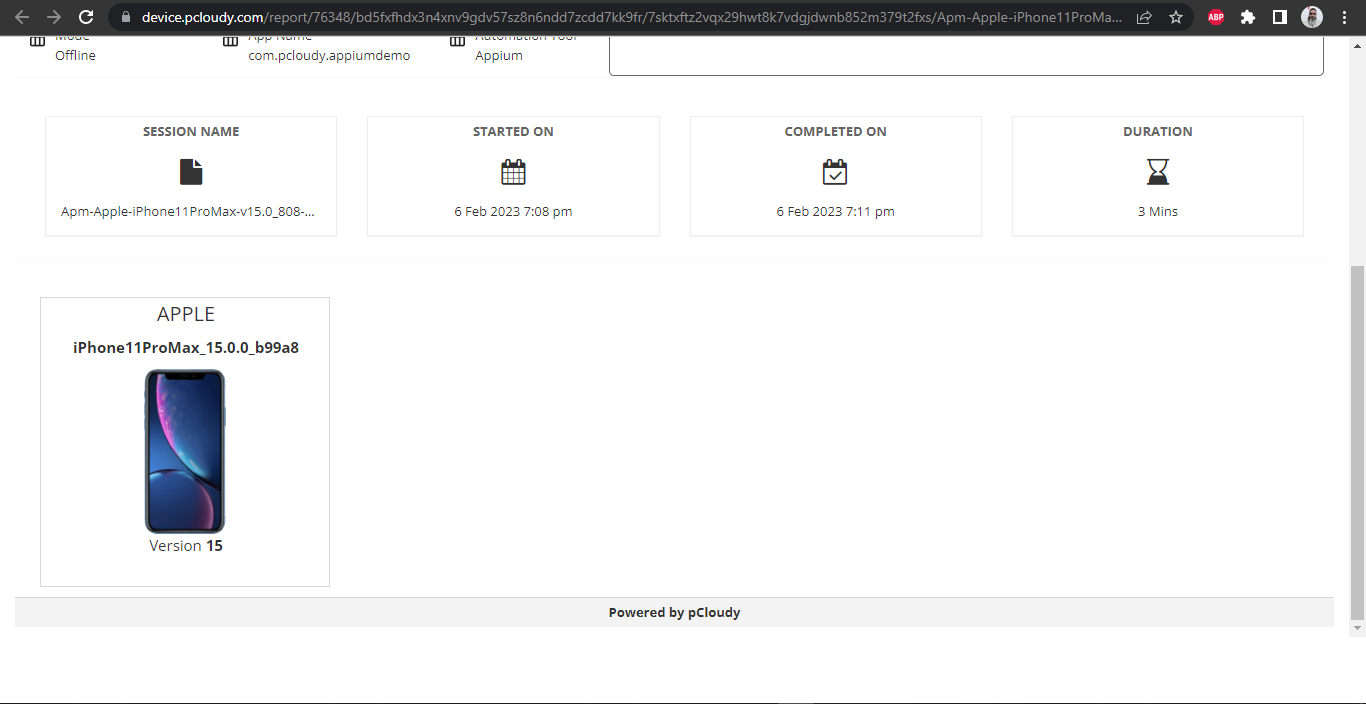
Click on the Phone icon as shown in the above screenshot to view more details like the logs, performance data, video recording etc. These details can be downloaded in a single click.
Conclusion
In this blog, we have discussed performing automated testing of Android and iOS applications on cloud platforms like pCloudy using Appium and TestNG.
pCloudy provides us good insights with details like session start time, end time, duration, video recording, and different logs about the tests that can be viewed and downloaded as reports.
Happy Testing!
Automate with Appium
Automate your mobile app testing with appium. Run your test scripts on multiple real devices and accelerate your testing.
Get a free demo


