
Today’s web applications are designed and developed with different trending technologies having complex and sophisticated frontend and backend architecture. With the growing problem of old web browsers having trouble displaying the graphics and rendering the web content as fast as the modern web browsers, there comes a need of Cross Browser Testing. It is a non-functional type of testing that allows you to validate your website performance in different environments be it different browsers, different operating systems, browser versions and different devices itself.
After Chrome, Apple’s Safari is the second most popular browser in the world, holding a market share of 18.69% in the Browser Market Share Worldwide. Since it is the default browser for most if not all Apple devices and is well recognised by its customer base, it has a significant market share. Hence, it is the primary responsibility of every tester to ensure the quality of their web application on all versions of the Safari browser.
Nowadays, the recent version of Safari comes up with in-built SafariDriver whereas the Safari versions below 10 require the installation of Safari WebDriver extension. To follow WebDriver protocol, the online Safari browser uses it’s default safaridriver that is pre-setup in Mac OS now.
Configuring SafariDriver for Test Automation
To run your automated test on a specific browser, you need to have a corresponding WebDriver. For example, ChromeDriver for Chrome, GeckoDriver for Firefox etc. However, with running the automated Safari browser tests online, we earn the advantage of not downloading any driver in Mac OS. For Safari versions 10 and above, the SafariDriver comes up by default with the Safari version pre-installed in Mac OS which means Safari now provides native support for the WebDriver API.
Also, you need to have a Mac machine to run your automated tests on Safari as Apple has discontinued the support of Safari on Windows in 2012. In case if you don’t have a Mac machine to run your selenium/appium based Safari browser online test, you can also opt for a cloud based testing platform like pCloudy where you can run your tests on Safari installed on different Mac OS and on various Apple real devices.
As discussed, safaridriver is already pre-installed in Mac OS, one can find the safaridriver at the following path: /usr/bin/safaridriver
Safari Web Driver support is initially turned off for developers. Below is the command for enabling WebDriver support in Safari for macOS High Sierra and later:
safaridriver --enable
Note: If you’re upgrading from a previous macOS release, you may need to use sudo.
Below are few steps for enabling WebDriver support in Safari for macOS Sierra and earlier:
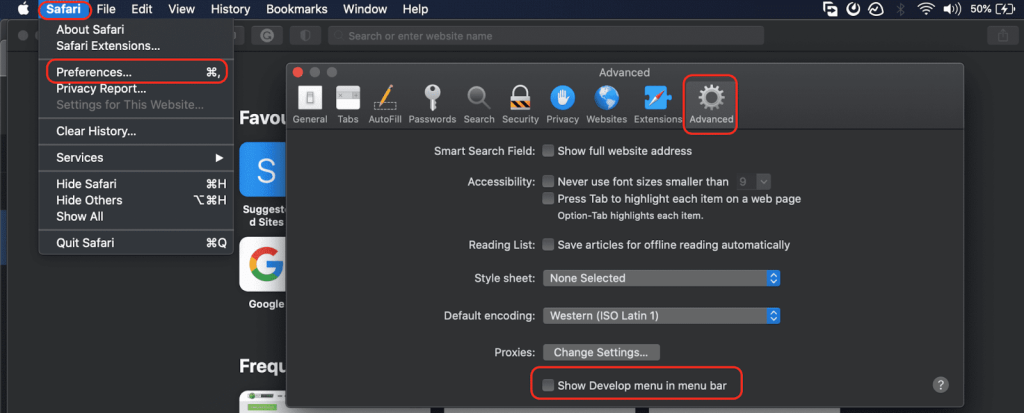
Step 1: Enable the Develop mode to get it visible in the menu bar. Choose Safari > Preferences and on the Advanced tab, select “Show Develop menu in menu bar”.
If done correctly, this is how your menu bar should look:

Step 2: Choose Develop > Allow Remote Automation.
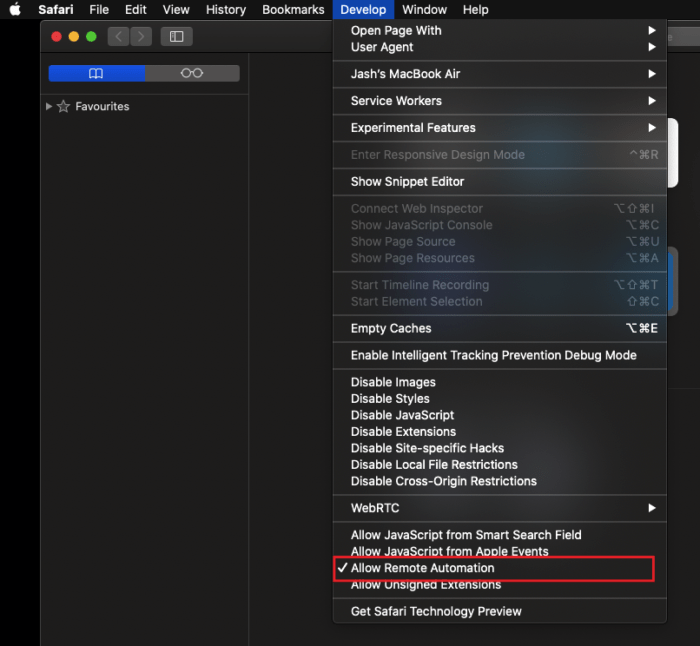
Step 3: Authorize safaridriver to launch the XPC service that hosts the local web server. To permit this, manually run /usr/bin/safaridriver once and follow the authentication prompt.
Characteristics of WebDriver for Safari
- Isolated Automation Windows: Test execution is limited to special automation windows that are separate from normal browsing windows, user settings and preferences. An automated browser always starts from a clean state like a private browsing session. It doesn’t have access to Safari’s browsing history, AutoFill data, or other sensitive information available in a normal browsing session. These isolated browser sessions ensure that current automated tests are completely unaffected by a previous test session’s persistent state.
- Glass Panes: To prevent any kind of interaction with the web window during test execution, Safari installs a transparent “glass pane” over the automation window while the browser is being used for WebDriver testing.


Any stray interactions like mouse action, keyboard action, resizing and so on that could potentially affect the automation window gets easily captured by this glass pane. If a running test gets stuck, you can interrupt it by “breaking” the glass pane and stopping the session.
- Web Inspector and WebDriver: For debugging purposes, you can use web inspector during or after execution of a webdriver test. To launch Web Inspector while a test is running, choose the Develop > Show Web Inspector menu item (shortcut: ⌥⌘I). During the running of WebDriver tests, the web inspector features such as console logging, the Elements tab and the script debugger are fully functional.
- One Session at a Time, to Mimic User Interaction: Only one WebDriver session can be attached at a time and only one Safari browser online instance can be active at any given time. This is to ensure that the simulated behaviour of mouse, keyboard and touch accurately reflects what a user can do in macOS browser environment and also prevents automated tests from competing with each other for window and keyboard focus.
Running Up First Test On Safari Using SafariDriver
Now since we have understood about the SafariDriver, we can now proceed with writing a script to run our automated tests on Safari without downloading the Safari WebDriver specifically. We need to make sure that the steps mentioned above for setting up SafariDriver have been implemented correctly to avoid any kind of failures.
We would be writing a short test script using the Java-TestNG framework. Hence, below would be prerequisites for running the test script:
- Java(JDK)
- IDE i.e. Eclipse or Intellij
- Selenium Client dependency
- TestNG dependency
For writing a test script, let’s consider a simple scenario:
- Launch Safari browser
- Direct to https://www.pcloudy.com/
- Click on Login button to open login page
- Assert the title of login page
- Close the Safari browser
Below is the Java-TestNG test class for above test scenario:
import org.openqa.selenium.By;
import org.openqa.selenium.WebDriver;
import org.openqa.selenium.WebElement;
import org.openqa.selenium.safari.SafariDriver;
import org.testng.Assert;
import org.testng.annotations.AfterClass;
import org.testng.annotations.BeforeClass;
import org.testng.annotations.Test;
public class TestScript {
private WebDriver driver;
public String expectedTitle = "Remote Mobile Web & Application
Testing on Real Android Devices - pCloudy";
@BeforeClass
public void setup()
{
driver = new SafariDriver();
}
@Test
public void verifyLoginPage()
{
driver.get("https://www.pcloudy.com/");
WebElement loginButton = driver.findElement(By.xpath("//a[text()='Login']"));
loginButton.click();
String actualTitle = driver.getTitle();
Assert.assertEquals(actualTitle, expectedTitle,
"Login Page Title didn't matched with the expected title");
}
@AfterClass
public void tearDown()
{
driver.quit();
}
}
Code Walkthrough:
In test automation, Safari browser is represented by a class named SafariDriver in the org.openqa.selenium.safari package. Like ChromeDriver and FirefoxDriver, we just have to instantiate a SafariDriver class. Since SafariDriver is pre-installed in macOS, we don’t have to specify the driver path.
In the Test annotated method, we have scripted our test case using the above defined scenario. Selenium WebDriver APIs are used for setting up our automated test case. The test case would pass if the expected title of the login page matches the actual title, else the test method would fail.
When the test execution gets completed, through the AfterClass annotated method, we have quit the online Safari browser testing.
Parallel Cross Browser Testing On pCloudy Browser Cloud
pCloudy is a continuous cloud based testing platform for desktop browser testing and mobile app testing. For desktop browser testing, it offers a Selenium Grid where we can run our tests parallely on different environments i..e different browsers, multiple browser versions and different operating systems. Along with cloud based automation testing, it also offers manual testing on different cloud based real Mac and Windows machines where the user can naturally interact with different combinations of OS and browsers to test an application with a human feel.
Running our automated tests on pCloudy Selenium Grid leverages us with web app performance statistics with detailed reporting including logs, screenshots and test video. To perform cross browser testing on different browsers and OS, we can run our test parallely on pCloudy browser cloud which would not only save the execution time but also help us compare the performance statistics of our application running on different environments.
Considering cross browser testing on Safari, let’s develop a script to run our single test case parallely on different safari versions.
import java.io.File;
import java.io.IOException;
import java.net.MalformedURLException;
import java.net.URL;
import org.apache.commons.io.FileUtils;
import org.openqa.selenium.By;
import org.openqa.selenium.OutputType;
import org.openqa.selenium.TakesScreenshot;
import org.openqa.selenium.WebElement;
import org.openqa.selenium.remote.DesiredCapabilities;
import org.openqa.selenium.remote.RemoteWebDriver;
import org.testng.Assert;
import org.testng.annotations.AfterClass;
import org.testng.annotations.BeforeClass;
import org.testng.annotations.Parameters;
import org.testng.annotations.Test;
public class Blog {
public String username = "ramit.dhamija@gmail.com";
public String accesskey = "5TfF4UcNRbN3JhucQ";
public static RemoteWebDriver driver = null;
public String gridURL = "https://prod-browsercloud-
in.pcloudy.com/seleniumcloud/wd/hub";
public String expectedTitle = "Remote Mobile Web & Application
Testing on Real Android Devices - pCloudy";
@BeforeClass
@Parameters(value = { "OS", "OSversion", "browser", "browserVersion" })
public void setUp(String OS, String OSversion, String browser,
String browserVersion) throws Exception {
DesiredCapabilities capabilities = new DesiredCapabilities();
capabilities.setCapability("pCloudy_Username", username);
capabilities.setCapability("apiKey", accesskey);
capabilities.setCapability("clientName", username);
capabilities.setCapability("email", username);
capabilities.setCapability("os", OS);
capabilities.setCapability("osVersion", OSversion);
capabilities.setCapability("browserName", browser);
capabilities.setCapability("browserVersions", browserVersion);
capabilities.setCapability("pCloudy_EnableVideo", "true");
capabilities.setCapability("pCloudy_EnablePerformanceData", "true");
capabilities.setCapability("pCloudy_EnableDeviceLogs", "true");
try {
driver = new RemoteWebDriver(new URL(gridURL), capabilities);
} catch (MalformedURLException e) {
System.out.println("Invalid grid URL");
} catch (Exception e) {
System.out.println(e.getMessage());
}
}
@Test
public void testSimple() throws Exception {
try {
driver.get("https://www.pcloudy.com/");
WebElement loginButton = driver.findElement(By.xpath("//a[text()='Login']"));
loginButton.click();
String actualTitle = driver.getTitle();
Assert.assertEquals(actualTitle, expectedTitle, "Login Page Title
didn't matched with the expected title");
System.out.println("Login Title matched");
        File screenshot = ((TakesScreenshot)
driver).getScreenshotAs(OutputType.FILE);
        try {
            FileUtils.copyFile(screenshot, new
File("https://pcloudyprod-engpgtajd7c4g9a8.a03.azurefd.net/home/ramit/Documents/loginPageScreenshot.png"));
        } catch (IOException e) {
            System.out.println(e.getMessage());
        }
} catch (Exception e) {
System.out.println(e.getMessage());
}
}
@AfterClass
public void tearDown() throws Exception {
if (driver != null) {
driver.quit();
}
}
}
TestNG.xml
<?xml version="1.0" encoding="UTF-8"?>
<!DOCTYPE suite SYSTEM "http://beust.com/testng/testng-1.0.dtd" >
<suite thread-count="2" name="cross browser test-safari"
parallel="tests">
<test name="Catalina-Safari-14">
<parameter name="OS" value="Mac" />
<parameter name="OSversion" value="Catalina" />
<parameter name="browser" value="safari" />
<parameter name="browserVersion" value="14" />
<classes>
<class name="main.java.src.Blog" />
</classes>
</test>
<test name="Catalina-Mojave-14">
<parameter name="OS" value="Mac" />
<parameter name="OSversion" value="Mojave" />
<parameter name="browser" value="safari" />
<parameter name="browserVersion" value="13" />
<classes>
<class name="main.java.src.Blog" />
</classes>
</test>
</suite>
Code Walkthrough:
With the above script, we are running our parallel cross browser tests on two different environments. In @BeforeClass annotated method, we have added username and accessKey capability for authorization. As a part of capabilities, we have further defined our testing environment, we have used @Parameter annotation that would grab the testing environment values from TestNG.xml. To capture screenshots and logs of our automated tests, we have used the screenshot and logs capabilities provided by pCloudy.
In a @Test annotated method, we have written a short test case to verify the visibility of the pCloudy login page. Once the test case gets executed, the @AfterMethod annotated method quits the online safari browser testing.
The TestNG.xml file is created to configure the execution of our test suite with different suite attributes and with a different testing environment. Since we are running 2 tests parallely, we have passed thread-count as 2 and parallel as “tests” in suite tag. In each test tag, we have defined the parameter values that would be supplied to our java test class to run our test case in the required environment.
Using TestNG.xml, we are running single test case parallely on below two environments:
- Mac-Catalina-Safari-14
- Mac-Mojave-Safari-13
pCloudy Output:
To view the current running status of your tests, direct to pCloudy device page and click on Reports-> My Active Sessions:

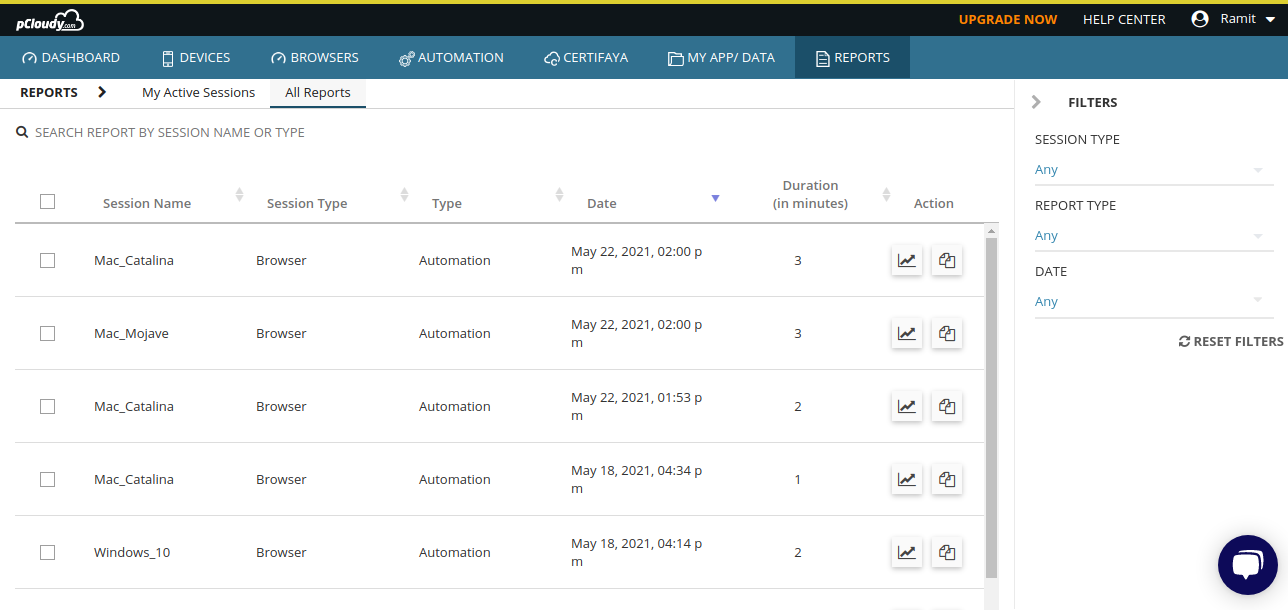
To view the all the tests executed till date, direct to pCloudy device page and click on Reports-> All Reports:
To view the logs and snapshots of a specific test, direct to pCloudy device page and click on Reports-> All Reports and take a action on particular session name for which logs and screenshots are required:


