All automation development and testing engineers are very well aware of ‘Selenium’ which is the de-facto testing framework for web applications. With the changing mobile landscape, Appium is the most used framework for testing mobile apps. But is it possible to use Selenium for mobile application testing? The direct answer is ‘Not really’ but there is a long and different approach to this answer.
Appium is the most popular mobile application test framework which can be used to test all native, hybrid, and mobile web apps for iOS and Android. It is also used for cross browser testing that involves testing on real devices and real browsers. The fact is that Appium has got its roots from Selenium and it uses JSONWireProtocol to interact with iOS and Android apps using Selenium’s webdriver.
Appium/Selenium Architecture
In a typical architecture, Appium is an HTTP server written in Node.js that produces and handles multiple WebDriver sessions. Appium starts tests on the device and gets commands from the main Appium server. The server is mainly the same as the Selenium server that gets HTTP requests from Selenium client libraries.
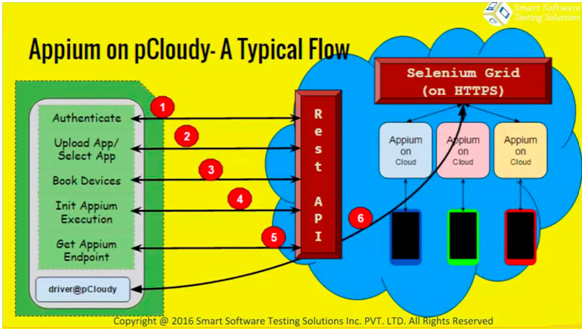
The image below is an example to show how test scripts can run on our pCloudy platform. Don’t forget to watch the video on ‘How to run Appium scripts on pCloudy‘ here.
Now that we know a bit about Selenium and Appium testing framework, let us understand the new term in Android app testing – ‘Selendroid’ which is a framework based on Selenium for automated app testing.
In other words, Selendroid is a test automation framework which can interact with multiple devices concurrently that can be tested without any modifications. It is also known as “Selenium for Android” for testing native and hybrid mobile apps and mobile web.
Let us have a look at some of the features of Selendroid:
a) It is an Open Source and is free to use
b) It supports all Android versions
c) It supports Selenium as a scripting language
d) It supports webdriver compatible languages eg: Perl, Java, C#
e) It can work on both emulators and real devices
f) It works on all native, hybrid and web-based apps
g) It is effective while executing native and cloud-based apps as it supports Selenium grid
h) It is very easy to implement.
i) With its feature called ‘Hotplugging’, it can recognize the new devices automatically.
j) It has a built-in Inspector to simplify test case development.
k) It can support various Android API versions from Android API 10 to Android API 19.
l) It can fully support parallel testing by integrating a node into Selenium grid.
Selendroid Architecture:
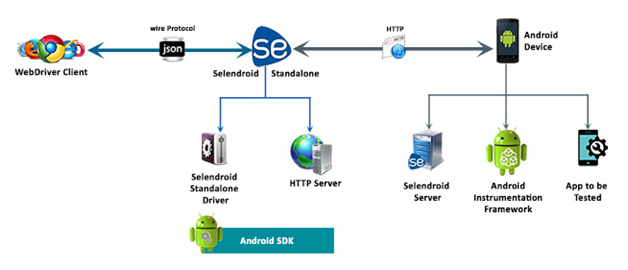
Selendroid is based on the Android Instrumentation framework where tests are written using Selenium Webdriver client API, which is also called as Selenium 2 client. Hence, it can be fully integrated with existing Selenium frameworks. It is also compatible with JSON Wire Protocol.
Let us have a look at the architecture of Selendroid:
To conclude, Selenium has paved its path as a de-facto web test automation framework and Appium is providing high-level APIs that can be speedily adopted by Selenium developers, and it helps simplify the tests.
The emergence of mobile applications for everything around us is mind boggling to say the least. All the things you would want- “There is an app for that”.
With consumers spoilt for choices, it’s a critical task to the people who are responsible for the quality of these mobile applications. Smallest of glitch and user’s are ready to click uninstall.
In order to ensure that your customers have the best of experience with your app, it needs to work on hundreds of mobile devices with various screen sizes, varying OS and different user conditions. Time consuming and exhaustive task.
Isn’t it critical to accelerate this process?
To churn out better apps faster, developers need deeper insights faster then ever.. This is where machine learning algorithms come in. They are analytics driven which makes it easier to look for patterns and monitor your app for issues, like crashes, memory spikes, high CPU, slow response time, battery drain and many other key parameters.
So, the question is, can Machines and intelligent technology become the newest buddy for you? Yes, we say. Let’s the new tech churn out data for you, and you focus on analyzing, fixing and delivering faster to the world.
Let’s see what’s up our sleeves.
A Single Click Automated App Certification with bots
pCloudy has developed a Single click App certification feature within its platform.
How pCloudy’s Certifaya makes a difference?
Simplicity is at the core of pCloudy’s Certifaya platform. All users need to do is to upload their app and ask the platform to run a test. Within minutes Certifaya spits out your report after monitoring, finding critical issues and presenting in the form of detailed blocks, screen grabs and videos of the sessions. The users also get recommendations to quickly fix the issues.
Developing apps quickly but with best of quality is mission critical. Bots make a huge difference here. Certifaya bots are designed for
Running Crash Test Scenarios: Bots run the crash test covering several installation/un-installation scenarios along with random events on the App, that too, on multiple devices. The best way to do a sanity check.
Swift and Deep Exploratory Tests: Smart bots crawl the App automatically and navigate through the App path like any human would do, collecting loads of relevant data for the App.
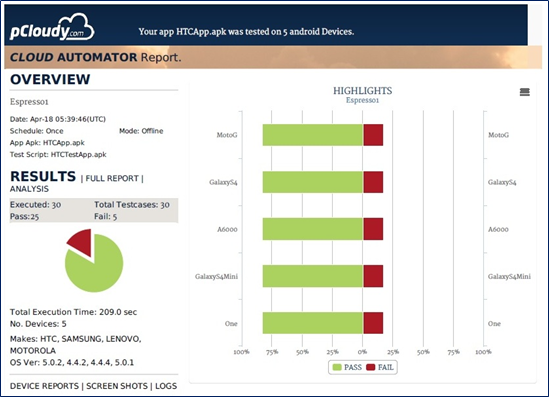
With above two tests, you get a comprehensive report on the App’s functionality and performance on multiple devices within few minutes. Have a look at a sample report. Gone are the days when you are churning out builds and waiting for hours to get a feedback.
Keep in mind that the best practices in the industry are evolving at a quick pace. Cloud adoption has accelerated quick testing practices.
Give your existing Testing practice power of Certifaya and accelerate your testing like never before.
pCloudy understands that businesses need their apps to be rolled out faster than before, without bugs, crashes, functionality issues, UI glitches, memory drainage and well, everything wrong with every app you uninstalled on your phone within minutes of using them.
We simplify testing. More importantly, this platform will equip, enable and guide you to provide single-click access solutions to the battling issues that can easily drive a developer nuts. This platform allows you to test real Android and IOS devices directly from your browser using real Mobile Devices to click-and-perform Manual and Automated Testing for maximum coverage.
Here are the most frequently used App Testing Use Cases you might be interested in.
It can be a big challenge to build a large scale Mobile Testing Lab from scratch. Look around you and you will see that with every single day, companies in adding mobile apps in their business strategy and with it the mobile app dev and testing market is becoming increasingly competitive, dynamic and fast paced. Older testing methods are becoming obsolete and the utter multiplicity of mobile platforms, devices and networks have made it important for any company to choose the right solution (Mobile Testing Lab) in order to strengthen themselves in the market.
While creating a testing program for these mobile applications can seem like a relentless chore and a massive undertaking, it doesn’t really have to be. Here are a few considerations to choose the right lab strategy for testing your mobile apps.
Key Considerations:
• Compatibility of Device OS, Screens and OEMs: The sheer number of different device variants, OS versions and screen resolutions form a large set of factors even though each of them are significant in their own rights. In 2012 there were about 4,000 Android device models on sale. 2015 saw about 24,093 distinct Android devices. Question is, can the lab I choose, cover maximum number of devices and come close to 100 percent of my end users’ device base?
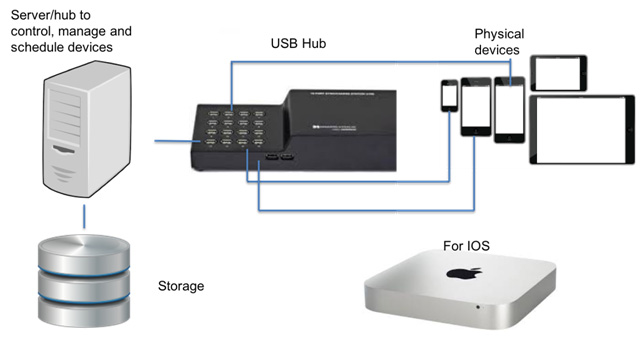
• Device Control Infrastructure: After you select your target devices, it is also key to look at the other parts of a reliable architecture of your hardware. Regardless of the technology to be used in building the device lab, one needs servers to control and take care of managing devices and execute tests. Moreover, it is crucial for these servers to collect, process and store results of the tests seamlessly and without interruption.
A snapshot of Infrastructure needed to create a Mobile Device Lab
Facebook Device Lab Infrastructure
Click Here to know about pCloudy Device Cloud Infrastructure
• Wi-Fi Infrastructure: This is another very crucial area that is often ignored when creating large-scale test lab. As the number of device in a WiFi network adds up, so do problems when all these devices transferring data at the same time. Most WiFi access points are not designed for this kind of bandwidth and you are bound to see different types of timeouts on server responses.
• Importance of Automated Testing: The very obvious benefit of automation of testing of mobile devices on the cloud is that through this one can carry out tests on a wider range of OS and devices in a much shorter time and with lesser life-cycle management investment. This not only significantly reduce QA spending, it also expands coverage and speeds up the resolution of issues. You can use a single script and apply the same on different devices and operating systems.
Integration with CI/CD pipeline:
Today, almost all organizations have mobile apps and for some, the mobile app is their only way of interacting with customers. With this increasing emphasis on mobile, the pressure to routinely update mobile apps means embracing Continuous Integration (CI) and Continuous Delivery (CD) methodologies. Any Mobile Labs has to support the CI/CD process.
1. Using Real Devices: Some Devs/testers are using emulation technology for compatibility testing. However, it has been proven beyond doubt that testing on emulators is often not reliable. Real devices help you and your team to find real bugs in your App before customers do. It is only way to have a confident App release and increase the chances of success of your test lab.
2. Tackling Multiple Devices: With thousands of different devices, it can be a bit overwhelming when building a mobile testing lab that encompasses the coverage of testing in all of them. Luckily, the major mobile operating systems use logical screen sizes which are mapped to physical screen, hence, the representative devices will get the necessary coverage. The test strategy is not to test absolutely everything, but to test the crucial elements that are most represented in the popular devices in the market, and add or subtract devices as they come in and out.
3. Using a Secure Mobile Device Testing Cloud: Using a secure cloud is vital to enterprises, especially if they aren’t located under the same roof. Testing real devices for everything can become really costly and time consuming. Using a testing cloud keeps your budget in check, reduced project cost and thus helps achieve high return on investment. Be it public cloud for small businesses, or large enterprise projects that demand a private cloud infrastructure, high performance and security are essentials to have complete control over the cloud.
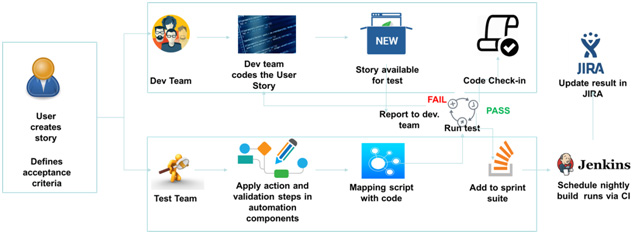
4. Automation Strategy: Creating Regression Automation suites once Application is ready is a passé. Agile methodology and CI/CD process demands automation creation in parallel to development. Automation strategy should be built keeping above aspect in mind.
Here is a depiction of what the automation process should look like.
As part of Automation Strategy, Mobile Testing Lab should provide the capability to allow automation run on multiple devices in parallel.
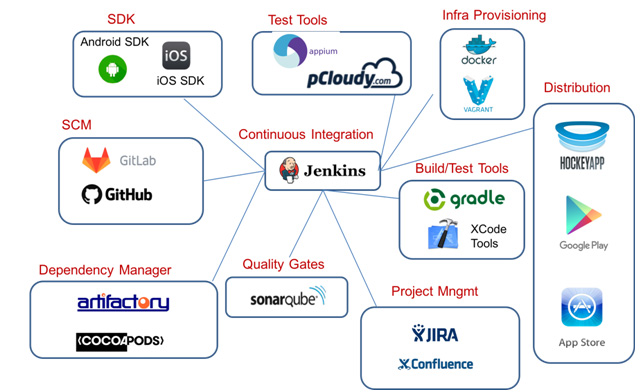
5. Increase Lab efficiency by integrating with your existing tool ecosystem: A lab is as good as how well can it be integrated within existing ecosystem. Can it integrate with your Test Management system or can it log bugs automatically after a failure? Can it integrate with your build management tool for CI process? Here is a depiction of how “Test Tools” fit in the larger ecosystem.
Conclusion: A well thought strategy for setting up of Mobile Testing Lab is a necessity for every organization undertaking Mobility projects. In current times, organizations have plethora of choice related to setting up of Mobile Testing Lab. They can choose to setup an In-house lab or use a private-hosted service or use a cost effective Public Cloud lab.
Would you like to know more about Lab options with pCloudy? Click Here
Testing of Mobile Apps in quite cumbersome because of sheer magnitude of testing required on variety of devices. Moreover, Mobile Apps require changes faster than other kind of Applications (Web or Desktop). That’s the reason, more and more organizations have started realizing the need of using automation testing over manual testing as much as possible.
Mobile App Automation Testing can be a massive undertaking, and if unaware, one can end up complicating the process by selecting a bad tool. With a major trending shift to open-source mobile test automation tools, there have been a plethora of tools available in most open-source software markets.
So how do you know which are the best software testing tool available in the market? Which tools will give you the most efficient solution to fulfill your enterprise’s need for speed and integration? Will manual testing suffice your app testing needs?
You would need a set of criteria to fulfil when assessing your selection of the right open-source automation tool. Here are a crucial few questions to ask:
Do you have the required skilled resource for automation tasks?
Is there ease of script development to support agile processes and shorter iteration cycles?
Does the tool support cross team collaboration for seamless use by QA and Dev?
Can it match app platform with test development language?
Will it have performance capabilities gaps while testing?
Will it support both real devices and emulators?
Does the app support multiple platforms — Mobile and Web?
Does it have multi device execution capability
How easily can it integrated with external Device cloud platforms?
Best Open-Source Mobile Testing Frameworks to use:
To take the final call, testers must have a strong awareness of the tool’s strong and weak aspects, what it can do and what it cannot, and find a balance between cost and benefit.
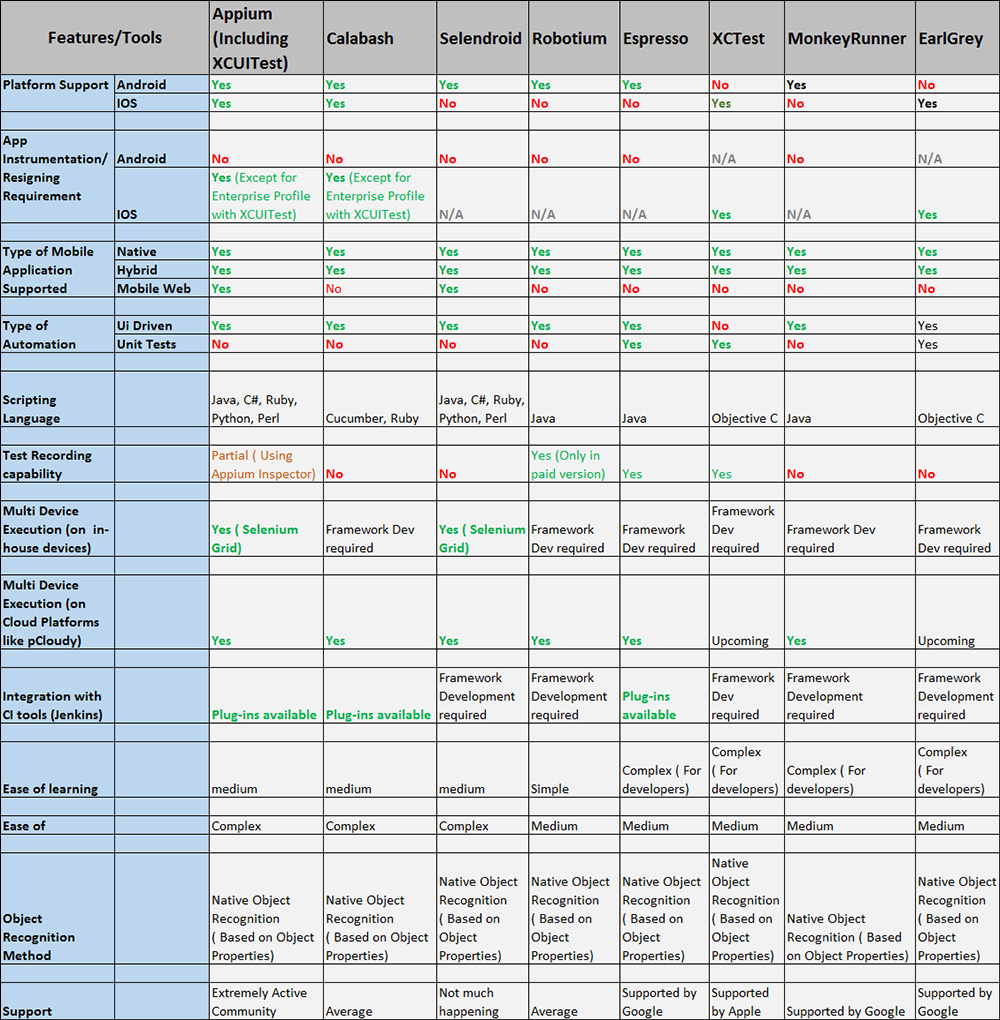
These are top highly adopted open source test automation frameworks available in the market. Each of these frameworks are backed by different communities due to their unique offerings to the target audiences and relevant platforms. The overall benefits are that they cover a wide range of devices. However, for technical clarity it’s important to know the pros and cons of the framework based on your mobile and web testing needs:
1. Appium: Widely adopted, it is the leading open-source test framework for mobile app (Android, iOS) test automation.
Pros:
Best suited for QA teams to test the functionality of mobile web, native and mobile hybrid apps across iOS and Android.
Its reports are limited from debugging and fast feedback loop.
Supports development tools using any WebDriver compatible language including Java, C#, Ruby etc.
Cross Browser Support and cross platform capabilities
Con: It is less suitable for performing and developing unit testing.
2. Calabash: It is a Behavior-driven development (BDD) test framework based on Ruby development language.
Pros:
Has a large community support
Cross platform development support (Android and iOS)
Provides solid reports and insights to QA and Dev teams
Easy path to both develop and test features in parallel
Simple and easy-to-read test statements
Con: It is not friendly to languages other than Ruby.
3. Espresso & XCTest UI: Both are very similar tools as they were designed for the target users. Espresso for Android and XCTest for iOS are fully maintained by Google and Apple, assuring the latest features for respective platforms.
Pros:
Latest feature integrations assure lead in market curve for developers and testers
Easy to develop techniques including test recorders
Support both types of unit testing and functional UI
Con: Both are app context only, which means limited ability to test for user condition scenarios
4. Selendroid: An open source automation framework which drives off the UI of android native, hybrid and mobile web application. A powerful testing tool that can be used on emulators and real devices. And because it still reuses the existing infrastructure for web, you can write tests using the Selenium 2 client APIs.
Pros:
Can interact with multiple Android devices and simulators simultaneously
Can simulate human actions like touch, swipe, drag etc. on devices
Supports development tools using any WebDriver compatible language including Java, C#, Ruby etc.
5. Robotium: Widely adopted open source Android test Automation framework.
Pros:
Easy to write powerful test scenarios
Full support for native and hybrid Android Apps
Easy to use recorder
Handles multiple Android routines automatically
6. EarlGrey: EarlGrey is a native iOS UI automation test framework that enables you to write clear, concise tests. It integrates with Xcode’s Test Navigator so you can run tests directly from Xcode or the command line.
Pros:
Works directly from XCode
Full support for native and hybrid Android Apps
Synchronization features which automatically synchronizes with the UI and network requests.
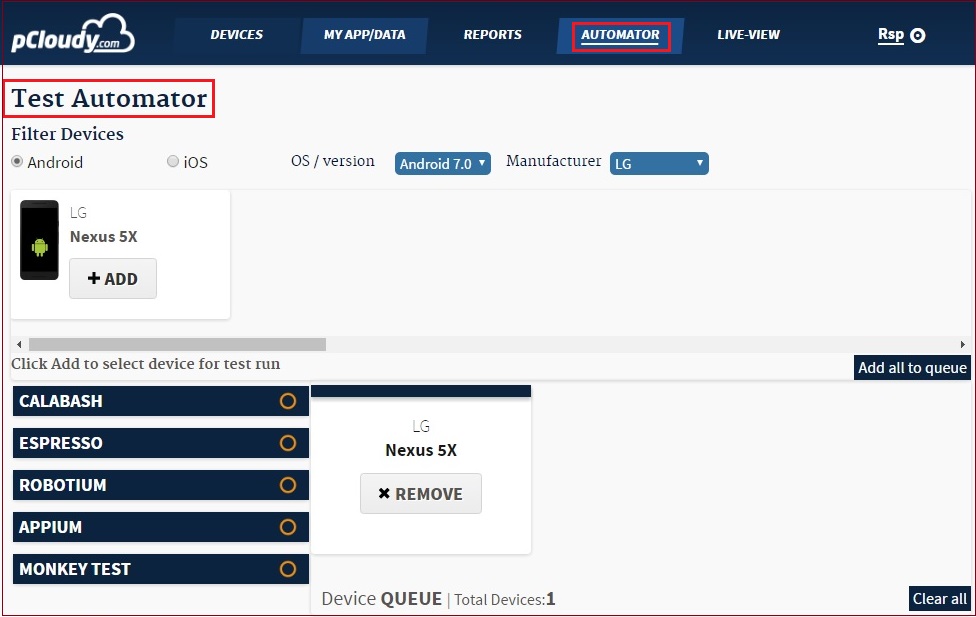
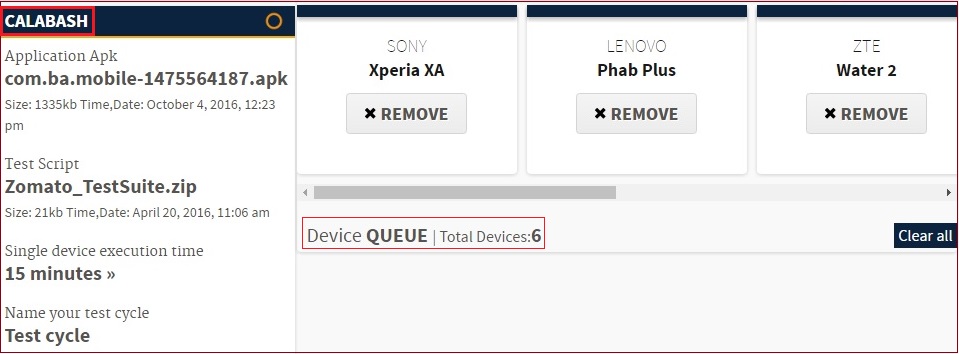
pCloudy provides you the cloud platform to perform Automated Testing on Real Mobile Devices. To schedule automated testing over pCloudy, go to the Automator page. Here, you can use filter your devices based on mobile OS (android/iOS) and test automation framework (Calabash/Robotium). Further, you need to choose application file (.apk/.ipa), zip file of test script, enter time duration (default – 15 minutes), test cycle name (default – Test cycle). Now, browse, select and add desired device(s) to schedule test automation. When test automation gets completed, you will get an email reminder for the test completion.
By using pCloudy Test Automation, you can execute your test automation Parallel Runs on Multiple Devices as well.
Navigate to Test Automator page of pCloudy.
Select the filter to choose if execution needs to be done Android or iOS.
Select the devices from the given list. User can select minimum one & maximum all the devices for the parallel run.
Choose the test framework for test automation execution.
Choose the application to be tested and test suite for the same.
If the test suite takes 25 minutes to execute completely on one device locally, then you need to add some buffer say for another 10 minutes and change the time to 35 minutes.
Finally set the test cycle name of your choice and click on the Schedule button.
Upon confirmation the same the platform will schedule the automation execution selected devices.
When test automation process gets completed on all devices, you will be informed through a mail with the link to see the test report.
Now you can run your Espresso Scripts on hundreds of Mobile devices over pCloudy.com.
Espresso is a testing framework for Android apps. The platform allows you to write concise and reliable Android UI tests. pCloudy.com provides you the platform to run these scripts on multiple mobile devices of your choice.
Here are the steps for running your Test Scripts on multiple Android Devices:
Login over www.pcloudy.com with your registered Email ID & Password.
Choose Instrumentation Type based on your Test Scripts you’ve written. pCloudy provides support for Instrumentation Type
(InstrumentationTestRunner, AndroidJUnitRunner) for Android. For more information, see Instrumentation in the Testing Fundamentals section of the Android Developer Tools documentation.
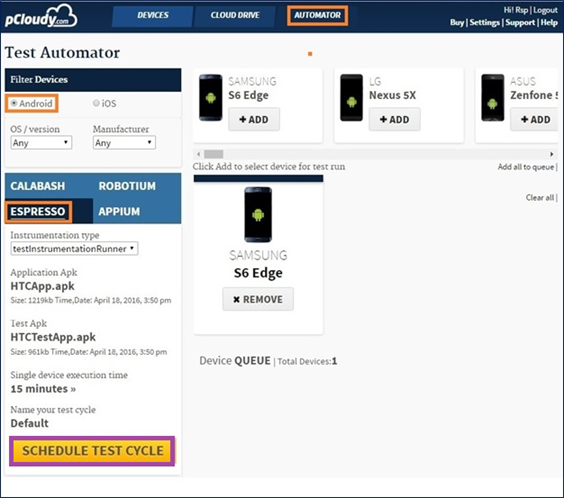
Go to the Automator Page
Select Android OS version & Manufacturer
Choose Espresso (to run Espresso Scripts)
Select Instrumentation Type (TestInstrumentationRunner/AndroidJUnitRunner).
Select Application .apk file (the App to be tested)
Select Test Script .apk file (the Test Script developed for testing)
Enter Single Device execution Time (Time required for the entire script to be executed on single device)
Enter Name of your Test Cycle (this name will represent your Test Cycle)
Click on Schedule Test Cycle
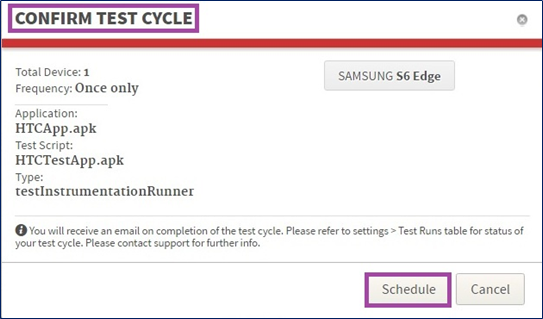
In the next step, you need to confirm schedule of test automation. Here, you can see your selected application, test script, device etc.
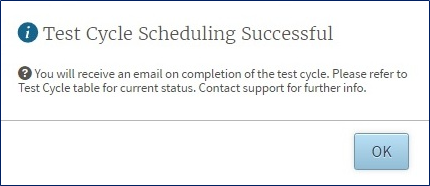
Further, you get a pop up message of test automation schedule confirmation.
Click on OK to proceed.
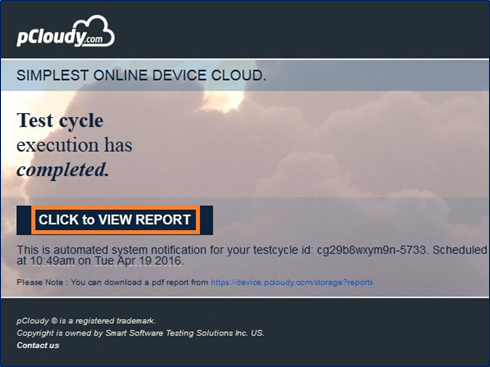
Go to your mailbox and open pCloudy Automation Alert mail.
Click on the given link “Click to view Report”.
Finally, you get result of your scheduled test automation.
We appreciate your business and welcome you to our long list of satisfied and much valued customers. Our success comes from the continuous faith in the excellence of our products and services, something we are committed to and would never sacrifice.
Our customer service, especially in the after sales phase, guarantees the satisfaction of our clients. In line with this strategy, we ask you to share with us your feedback at any time, be it positive or negative. There is always room for improvement, so if we can serve you better in anyway, please do inform us.
Introduction
This document is created to serve as a guide while you explore the pCloudy platform. It will help you understand how to use, to get quick help and whom to contact while starting off with pCloudy. Though this is not a complete help document, it will act as a quick reference to begin using the platform.
About pCloudy
pCloudy is a mobile application testing platform which will help you to test your apps on hundreds of real devices. You can remotely access real devices and carry out Manual and Automation Testing.
Quick Start
Registration
The platform has a secure login process to protect the apps you test. In order to use the platform you must setup your login credentials first.
Note: If your workstation has touch screen feature, enableTouchScreenBrowserSettings
Where do we go from here?
Once you login, you will be exposed to an array of devices and platform features. You might get overwhelmed and lost, but don’t worry, we have you covered.
A typical pCloudy user will follow these steps for testing mobile apps using the platform.
Divided into five parts –
1. How to select right device from the platform?
2. How to manage apps on the platform?
3. How to start testing your apps on the selected devices?
4. How to run automation scripts on cloud-based devices?
5. Additional Features
1. How to select right device from the platform?
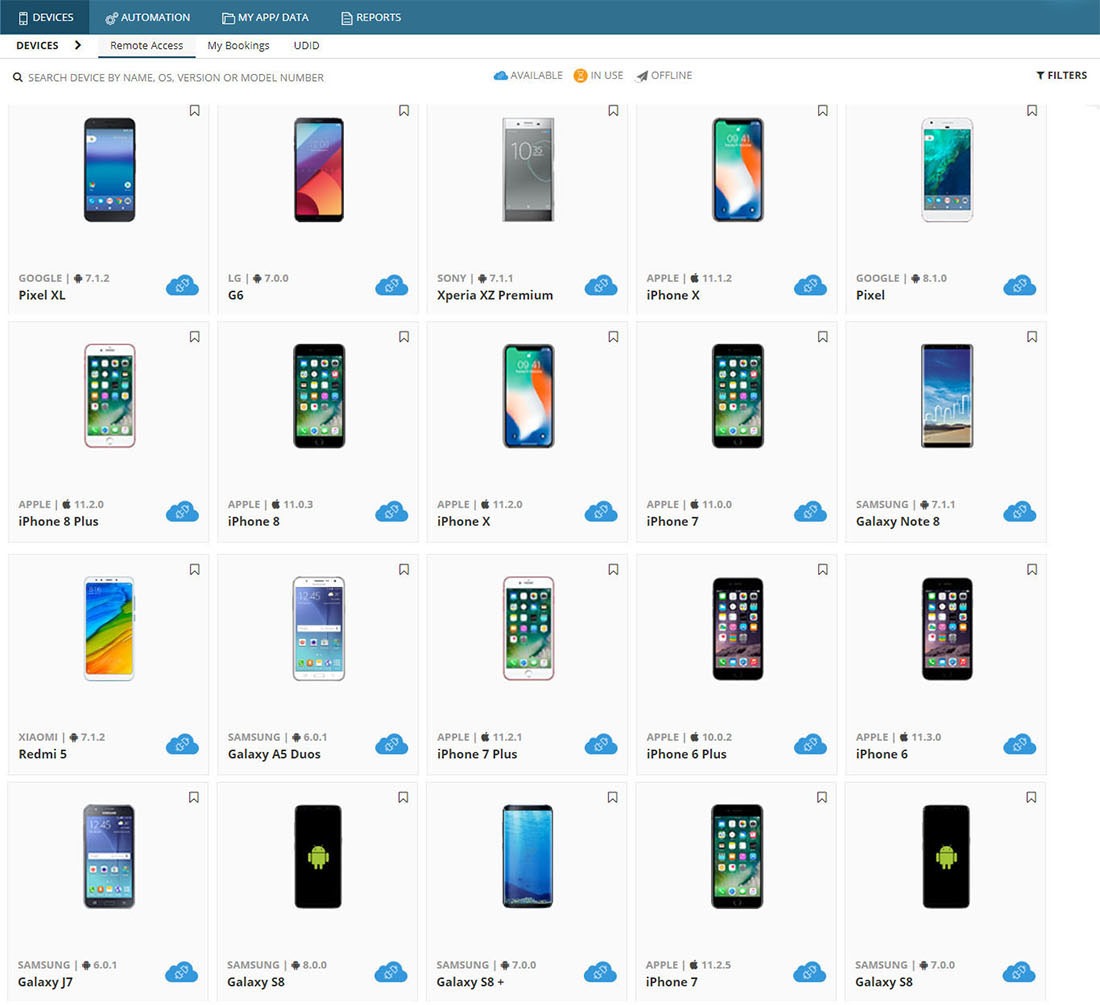
To select the right device on the cloud the platform provides various filters. These filters will help you to select devices based on the OS versions, OEMs, Screen Size, Network, or Device Location.
There are two modes to access the devices on the cloud –
1. Instant Access – This provides immediate access to the available devices at that moment. Just hit the ‘Connect’ button on any device displayed in the Instant Access page and you will be ready to use the device.
2. Book your Device – In some cases you might want to reserve a device for the future. You can book a device in advance to keep yourself prepared for testing. With careful planning, with the help of ‘Book your Device’ mode you can make sure the devices are available when you need them and save time.
The platform provides secure limited disk space to store the apps on the platform. This space can be used to store app installation files (apk or ipa) or test data (image files, zip, etc).
Refer these links to know how to upload your app files to the platform:
The dashboard provides you with quick and easy access to use the different features to test your mobile apps.
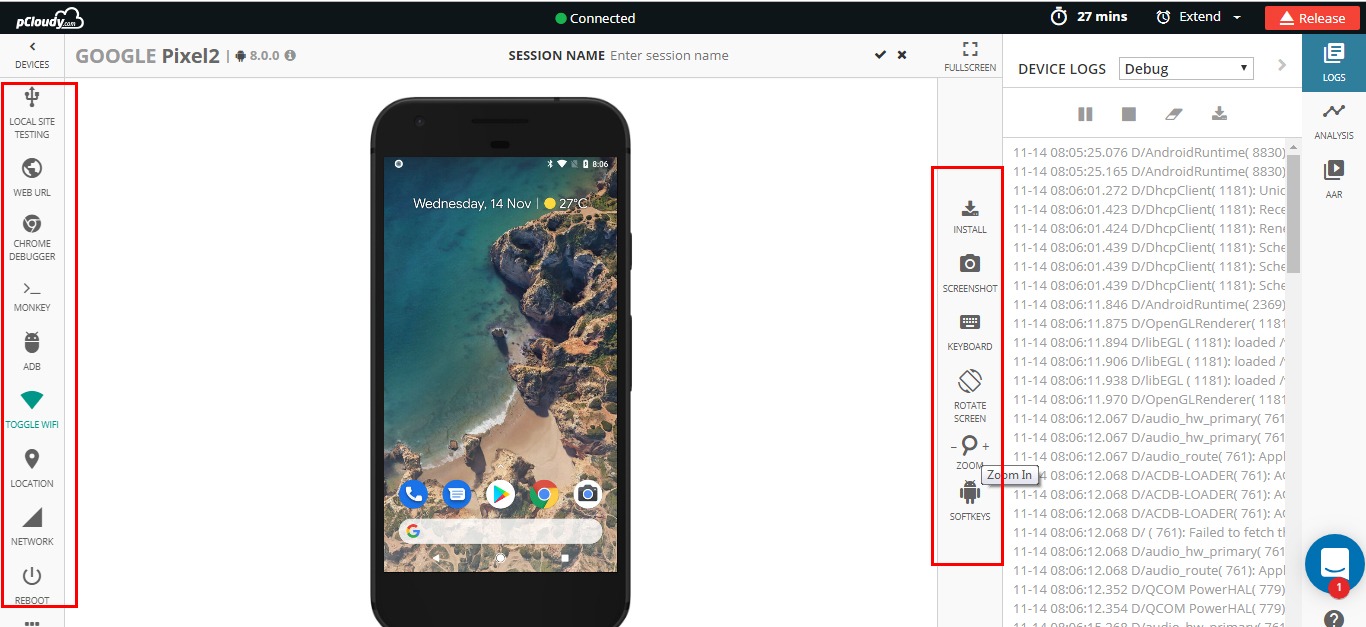
1. Device Screen: You can use the device same as how you use a device physically. You can use swipe actions, zoom-in, zoom-out and various gestures to control the device.
2. Main Panel: This panel provides options to view device info, install/uninstall apps, change device settings, tools to debug apps and run automation, and more.
3. Quick Action Bar: Frequently used controls like taking Screenshots, changing device orientation, sending text to device, and more
4. Logs and Performance: Real time device logs and app performance are displayed
Features
Here’s a list of some important features to test your apps –
1. Functional Tests
You can install/uninstall apps on the devices, you can use various gestures on cloud based devices just like how you do testing on physical device, you can mock GPS location, take screenshots, and much more. Here are some links that will help you:
Performance profiling of Android Apps – You can monitor the CPU usage, memory usage, battery consumption, frame render count of the app in real-time while testing an app.
Performance on iOS Device – You can monitor the CPU usage & memory usage of the device in real-time during testing.
3. Debugging mobile apps
You can capture bug and crash information in the form of logs, screenshots, videos, and stack trace information while testing your apps on devices.
The app you tested in your lab environment will not work the same way when you use it in an elevator, or in a basement, or while you are travelling on a highway. The Network Virtualization Tool will help you to emulate different network environments and test your apps.
You can connect and use a device with ADB just like the way you connect it physically with USB/Wireless ADB. This is used to control a device using ADB commands and debug apps.
The reports section will contain the complete details of all your testing sessions. It will hold the screenshots, logs, videos and the performance details of the testing.
You can run your automation scripts on multiple devices in parallel. The pCloudy platform supports several automation tools. Here are some links to help you –
Other than the reports generated from the automation tools, you can view additional testing reports stored on the platform as well – Automation Testing Reports. This will contain the videos, logs, and performance graphs of the devices on which Automation execution was run.
9. Integration with Continuous Integration tool – Jenkins
You can use CI tools like Jenkins in integration with the pCloudy platform. This integration will leverage your testing practices to a whole new level. You can deliver quality mobile apps continuously by automating the process of build integration using pCloudy plugin for Jenkins.
Team Admin
To effectively manage the devices, users, apps, or credits on the platform you can use Team Admin.
Refer to article – Team Admin