Prashanth M Nair | Posted on | 2 min Read

[xyz-ihs snippet=”quickLinks-scaling-up”]

Fledgling DevOps

Here I present the 4th blog in the DevOps series showcasing our learning while #scalingup. Read our previous blog to know about the lessons we learnt from our scrum.


Most DevOps patterns are exhaustive and would need some strong commitments, in terms of both time and effort which is why many a times people hesitate to introduce DevOps to their teams. Because there usually is a lot of change required in your way of working and the way your workflow flows when you try to retrofit a DevOps into your setup. More so if you did so without thinking hard about the consequences. So how did we create a continuous system of delivery? How did we make a system that is robust yet flexible enough to incorporate the needed changes?


DevOps has a unique challenge. It is difficult to retrofit DevOps into a running system and doing that is not going to directly bring revenue. So in a running startup setup we simply cannot imagine stopping everything, spend time exclusively on this and then go back to our other tasks. But it does not mean that we can’t’ have a functional DevOps, it only means we have to go from MVP (minimum viable product) to MVP on this, and the earlier MVPs might seem pretty embarrassing but it is useful to prove the concept first and then go on and build the concept. Else you might end up with a sophisticated solution that is working but may or may not be what you need.


I have already talked about our thought process where we are against blindly reinventing the wheel or retrofitting someone else’s wheel onto our vehicle. The same goes for DevOps, barring obvious things, we never did any upfront development for DevOps or DevOps processes, rather we went step by step automating bits that we could and bureaucratized bits that we couldn’t. And then went back and discarded the failed MVP, and formalized the ones that have passed. And as always kept doing it. Because above all DevOps is a result of the Agile attitude more than anything else. If you are not thinking agile when you build your DevOps, then you will end up with a random bunch of automated tools, and not a living, breathing system of delivery.


So, here are our bunch of tactics that we used at different times during our evolution to achieve a successful clockwork.


Forms

The most bureaucratic of them all. Forms are the ultimate icon of a bureaucracy. Whenever you want any service done from any bureaucracy, you have to fill a form. And it definitely looks uncool. However there is a reason why it is still going strong across the world both offline and online. The primary benefit of a form is that you get all the data you need in the correct format and it is easy to find out if any required data is missing. This helps because data being missing can be addressed at the very beginning and not later on. Where we use forms is when one group of people need a service done by another group whose work is totally different from the first. For example, when developers want the deployment team to deploy something somewhere (any of our test envs or staging or production) now a developer could do it. But the deployment team owns the passwords and access to the staging and production setups which devs do not have and they also own the best practices which the dev team may not know. One of the problems they faced was that each developer had a different idea of how to push their artifacts to production. For devs of one domain, just copying code was enough, others needed binaries to be changed, still others wanted binaries and configurations to be changed. Some needed process restarts and others did not. Some needed server restarts while others did not. For some devs running an update script was enough while for others some other thing also had to be done. It was very difficult to keep track of these. One solution would be to have the deployment automated. And that is where we eventually reached. But that was not a one day job, and till that was done, we could not have stopped deployments.


So we needed to make sure that the deployment team had the right info when the request was made and not then the team had done half the deployment. We experimented with emails, but most devs wrote what they thought was relevant and not what really was relevant. So we asked developers to mention all that was needed. But that also was not too clear a requirement. And many still missed the requirements. So we created a form. The biggest advantage, is that the developer cannot now accidentally miss any important info. It is difficult to miss info when the form explicitly asks for info. So now developers fill all the info even the ones they think are obvious or irrelevant. And the deployment team was now empowered to act like a bureaucracy and reject a form for data not filled. This worked like magic, our deployments became less buggy and there was far less cases where dev and deployment teams were arguing about what they meant when they said something. The direct result of adding deployment forms was that our deployments were now far less broken.


Checklists

It is the checklists that eventually gave us the idea that forms can also work. Checklists are the zero brainer tool of choice for a lot of people. And it has been so for almost a century now. Perhaps more. However the power of checklists are often underestimated or ignored. You need to read The Checklist Manifesto – by Atul Gawande, to understand how important and valuable checklists are and how crazy it is to ignore them. There was a huge list of things that we were many times not doing right or missing small or obvious steps. And no matter how much we tried we would many times repeat the same mistakes over and over again. And usually our bandwidth was too tight to go deep into each of those issues and find out what went wrong. The responsible person would say that they have done each step as it is supposed to be done. Obviously they did not think that they had done wrong. Because if they thought they were doing the steps, wrong they would not have done it the first time around. No one likes to do the same things repeatedly. Of course many such processes eventually got automated, but till they did, there needed to be a solution. Also not everything can be automated. So we created checklists for every repeated process. And placed them in prominent and easy to find places (physically and in our intranet) This also worked like magic. Soon the number of errors in repeated processes saw a huge fall. Once the errors reduced, the people handling those tasks got more time and bandwidth and they had time to fix their processes and also to automate them. This way the manual process need to be no longer done by a human. This brings us to the next step.


Micro Automations

While it was clear to us long time back that there needs to be a lot of automations in our day to day work, there was one thing that did not allow us that immediately. And that was that automations take time and usually features for customers had highest priority and lowest available times. So when do we spend time on automations? For some time we just postponed the automation work thinking that after the present set of issues are finished, we would have time to work on automations. However we soon realized that this is a mirage and being the startup that were, getting bandwidth for this sort of thing will not be a reality any time soon. But does that mean we abandon it and the benefits that they would bring ? No, what we did was, we took time to make sure that whatever bits we could automate, we would. And make sure that we keep using it unless it was totally unusable.

We made sure we set out to automate only small bits. I call the process Micro Automations. As the name suggests, we only automate a small bit at a time. We also ensured that each bit that we automate is SMART, (specific, measurable, achievable, realistic and time bound). And also we made each bit small enough that it can be done part time by one or two people knowing very well that the main features clearly have priority.

This ensured that over time, we automate more and more bits of processes like our build systems, deployment process, automation tests etc. Bit by Bit. Over time, however we achieved a lot. Finally after all these months, we look back and marvel how much we have actually achieved. As the old adage went, we won the race, by being slow and steady.

There are many more such things that I would like to talk about, but I would like to limit myself to the bureaucratic ones that we attempted. We wanted to make sure that our focus was on the problems pCloudy was supposed to be solving for our customers, while at the same time, we ensured that we were also becoming future ready and being more and more ready to scale further as an organization. Your comments and insights are welcome. I would like to have a conversation about that in the comments section.

Local Site Testing on pCloudy


With no access to internal or private servers, complexity in the process of VPN connections, or the problems to test a software, website or service in a production-similar environment, testing your local or a private website or url on a cloud platform has always been a challenge for testing teams.


For all the users who have been asking for a solution to test their private servers on pCloudy devices before deploying them on production, we have a good news for you.


Now, you can access your site behind a firewall, on a staging server, or locally with pCloudy before it hits production.


It’s a path breaking feature for enterprise mobility. You avoid the expense of setting up and maintaining a comprehensive and exhaustive testing setup.


Since private servers are internal to your network, they have no public access which makes it difficult to test on a device on cloud. Local Site emulation Testing provides a platform to test private or internal servers on any Android device present on pCloudy.


Let us see how to set up the connection for Local Site Testing:

1. Login to your registered account on device.pcloudy.com

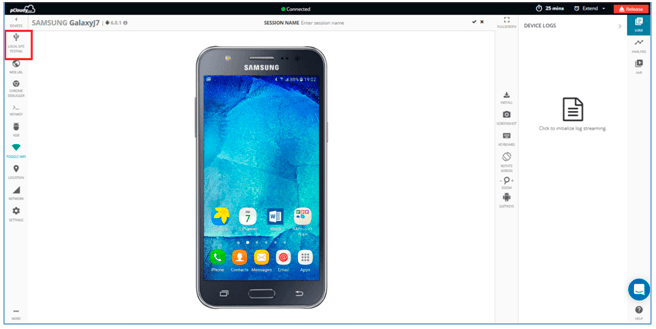
2. Select desired device from the Device page and click on “Local Site Testing” icon present at top on right hand side as shown in below screenshot.


Local Site Testing


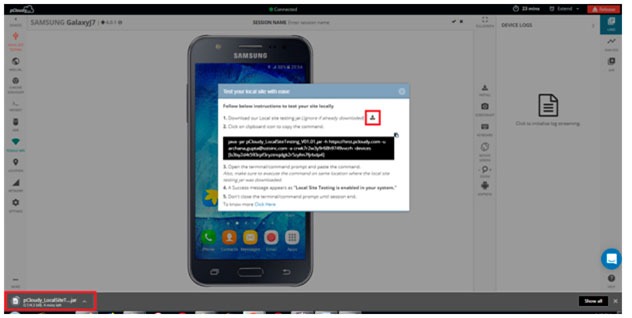
3. Download the Local Site Testing jar file as shown in snapshot below.


Local Site Testing
Note: Ignore if jar is already downloaded.


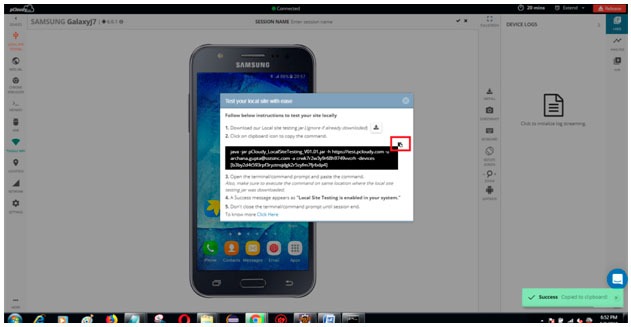
4. Copy the command by clicking on icon as shown in the snapshot.


Copy Command


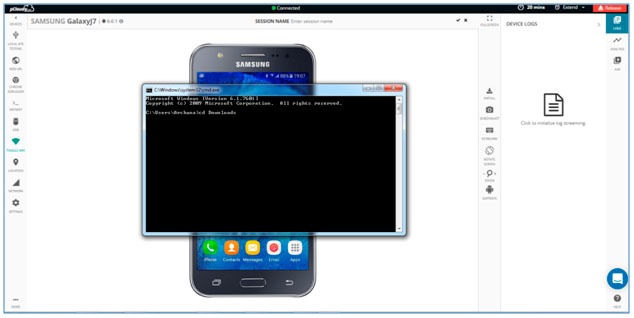
5. After the file download is complete, Open your command prompt or terminal


Open command prompt


Let us see how to open Command Prompt in different Operating system.


You can follow any of them among three mentioned ways


For Mac-OS users:


a. Open “Launch pad”: It’s the silver icon in the Dock that looks like a rocket. Type “terminal” in search bar and hit enter.

b. Hold command button and hit space bar. Pop will appear and type terminal and hit enter.

c. Open Launch pad and click the “Other” folder: It’s a square icon containing several smaller icons. Then look for terminal.


For Windows users:


a. Open Start and type in command prompt or cmd then hit enter.

b. Click the Windows logo in the bottom-left corner of the screen, or press the ⊞ Win key. You can search for Command Prompt on all supported versions of Windows.

c. Open the Run program. Hold the Win key and press the R key to open the Run window. Then enter “cmd” or “Command prompt” and press enter.


For Ubuntu users:


a. Using Keyboard Shortcuts: Press Ctrl+Alt+T This will launch the Terminal.

b. Press Alt+F2 and type gnome-terminal. This will also launch the Terminal.

c. Press Win+T (Xubuntu only). This Xubuntu-specific shortcut will also launch Terminal.


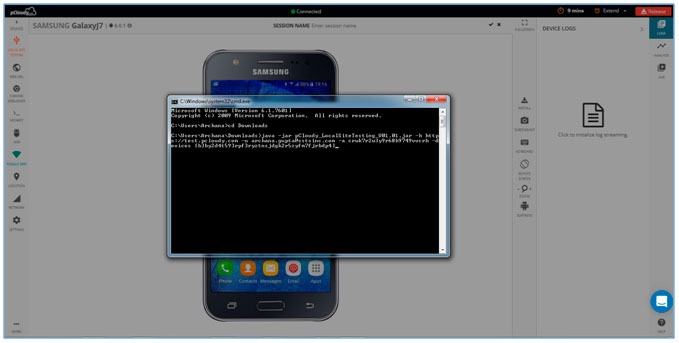
6. Execute the command on same location where the local site testing jar file was downloaded.


Command executed successfully


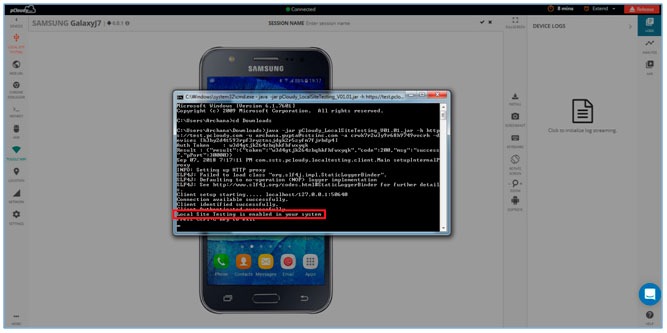
7. After the command is successfully executed you will able to see a success message appearing as “Local Site Testing is enabled in your system”. This confirms that now you are ready to test your private server on the device connected on pCloudy.


Local site testing enabled in your system
Note: Don’t close the command prompt until session ends.


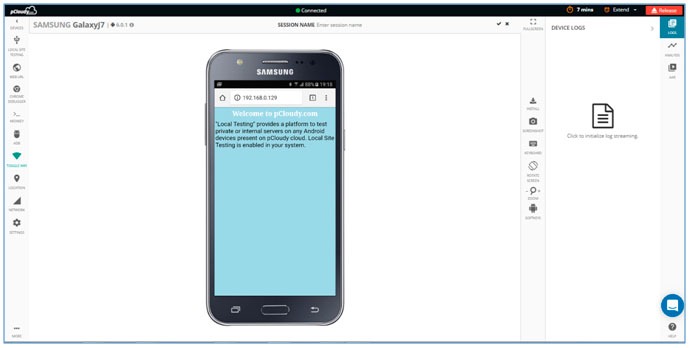
8. Go to the connected device and using the browser open any private URL to test. That’s all you are all set.


connect to the device for local site testing


You can now find more bugs and defects on your local sites before deploying it to production with this breakthrough feature.


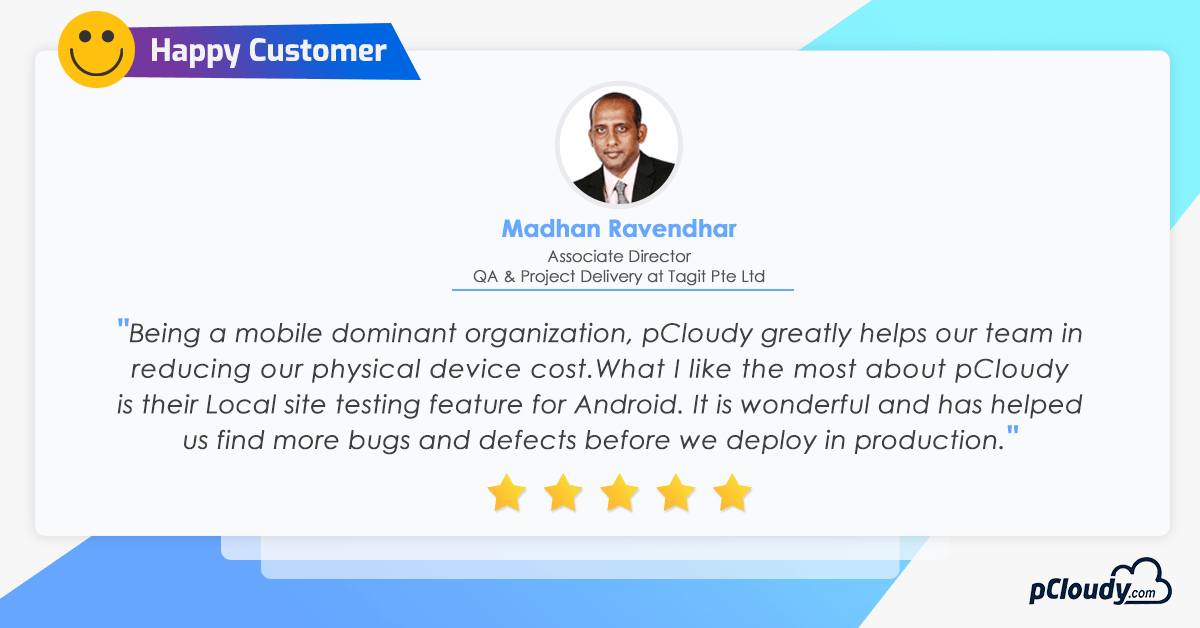
Here’s testimony to it by one of our customers from TagIT mobile.
pCloudy Testimonials Linkedin

Why don’t you try it yourself and let us know your feedback in comments about how this feature is useful to you!

Priyanka Charak | Posted on | 2 min Read

Successful 5 Tips

There are millions of mobile apps available in the market today. The statistics shows that since 2016, on an average around 6000 apps on Google play store and 1400 on the Apple store have been released every day. In order to be hassle free and to be on top of the competitors, an app needs to be stable and be properly tested.


Testing on mobile devices could be very challenging as it has to constantly be in touch with the new updates, new features and a myriad of DevOps tools that get introduced every time to ensure better performance and reliability of the mobile app.


Hence, there are many factors that have to be considered while framing the testing strategy in order to avoid all kinds of uncertainties in the app performance, just needs a right planning.


Below are five strategies every mobile testing team should keep in mind in order to reap the most benefits from their QA efforts.


1. Real Environment Testing is a must
2. Testing Automation
3. Functionality Testing
4. Performance and Load Testing
5. Choice of Mobile App Testing Tools


1. Real environment testing is a must

Emulators are the best option only at the early stage of testing, and they have a vital place in the overall QA process. But testing on emulators is not successful for all types of testing. All the tests should not run on emulators as those will not be reliable for an app to run immaculately in the real world scenario. Testing on the real devices is certainly more accurate as it can test many device functionalities like camera operations, battery life, GPS, Bluetooth, networks and more. Each device is designed differently and emulators do not solve issues specific to a particular type of device.

Procuring multiple devices and testing the app on each Operating System can be quite a daunting task and it may seem next to impossible to test the app on every OS combination. The best way would be to test apps on a cloud based platform with a hub of real devices. This way your testing results would be more precise and the procurement cost could be controlled. pCloudy has a wide variety of mobile devices available on cloud that can be considered as the preferred option.


Mobile Devices for Application Testing


2. Testing Automation

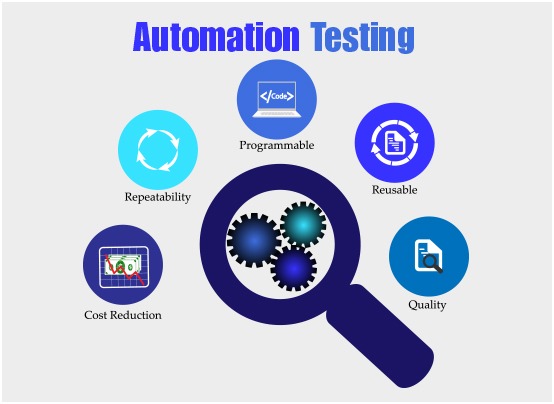
Automation testing is the key and the most vital when it comes to mobile apps. It can ease the execution of tests to run simultaneously across real devices which speeds up the entire testing process allowing the apps to float in the market quite earlier and faster. In the cases where the tests require a lot of set up and aren’t the routine tests, manual testing should be preferred over automation. Mobile Automation testing necessitates the use of right automation tools. The choicest one is Appium which is open source and supports both iOS and Android and also allows to write the tests that can run on both the platforms.


Automation Testing


3. Functionality testing

The core functionality is the main draw for any app and it has to be rock solid. People seek out apps to perform specific functions. Incomplete or inadequate functionality will result in abandonment, so make sure that the main functions are fully implemented and tested before you move on. User experience really matters and is also a key factor in an app’s success. For example, if the elements of the app are placed incorrectly on the mobile screen, the user will not use the app and uninstall it straightaway. So, the mobile app needs to be tested on each functionality in order to give the best results.


4. Performance and Load Testing

Usual tests are performed at earlier stages to identify the bugs even before they are pushed for production but the performance and load tests are performed later in the SDLC process to assess the maximum operating capacity and behavior of a mobile app in real life load scenarios. Tools like JMeter and Android’s Monkey tool are often used for performance and load testing. Also, the app performance on real devices is done in order to check the issues like network interruptions, memory leaks. Whatever the choice of tool may be, the goal is to ensure the smooth functioning of the app before and after the final release.

The Internet speed can also have a major impact on the experience of using an app. A user connected to a slow cellular network might have a hard time with apps that have rich media content. Make sure your app testing includes slow connections — and fast ones — to make sure the experience is OK at any speed.


5. Choice of Mobile app testing tools

It is very important to choose the right tool for mobile app testing. There are many favored mobile app testing tools to do the right testing.

Out of the meagre tools available in the market, Appium tops the list of the most preferred open source mobile testing tool in the market. Other than this, the tools like Robotium and Espresso which are used widely to test the Android apps by empowering the testers to write UI tests for Android Apps, easily. Google’s EarlGrey performs the similar function as Robotium for iOS framework.


Conclusion

To conclude, we must acknowledge that the decisions related to successful mobile app testing is the key role of the testing team. Testing landscapes keep changing and the testing strategies have to be aligned with the vulnerabilities of the market. It can be deduced from the above discussion that both emulators and the real devices are needed as per the testing situation. Performance and load testing are the saviors and must be performed sincerely in the production to understand the reaction of the mobile apps at different load conditions. There should be a right combination of the testing tools as per the type of operating system where the app has to be installed. To make the Mobile app testing a success, the right decision-matrix regarding the above mentioned points would prove to be the strongest pillar of the QA team of an organization. To know more about the mobile app testing success, visit www.pcloudy.com.

Prashanth M Nair | Posted on | 2 min Read

[xyz-ihs snippet=”quickLinks-scaling-up”]

This is the third blog in the #scalingup series. Read the previous blog to find out more about our DevOps journey while scaling up.


What is Scrum ?


No Really, What is scrum ? How do you define Scrum ?


A Scrum, as you can see in the image below, and as per wikipedia, is the method of restarting play in a Rugby game that involves players packing closely together with their heads down and attempting to gain possession of the ball.


Scrum


I am pretty sure that is not the definition that you wanted to see, at least not in this blog. But, bear with me for a couple of seconds. It was not a failed attempt at a bad joke. I just wanted you to see the imagery and get a feel of what is happening. Also I wanted to throw some light on the history of that name. How did a Rugby method give its name to the popular Agile methodology that we use almost throughout the software engineering world.


An oversimplified definition of scrum is that it happens to be a common Agile framework where actions are planned to be completed in timeboxed intervals known as Sprints and progress is tracked on a daily basis in short meetings known as Daily Scrums. This daily Scrum is a stand up meeting with team members standing in a rough circle and explaining their set of points. Since this arrangement looks like a civil version of the Rugby Scrum, both the daily meeting and the process take the name of this particular Rugby activity. The point of this is that the entire team meets, gets to know the statuses of all the activities being done, finds mechanisms by which anyone who is stuck gets help and any one should also be able to suggest improvements etc. Because of this nature, It also allows for course corrections and other changes needed to make sure that what was planned for in that Sprint is indeed completed within the same sprint. Everyone is present to tackle whatever situation is there at hand. Both in Rugby and in this Agile Methodology. Hence the name is shared in both the disciplines.


Scrum is probably the most popular of all the Agile Methodologies in the software engineering world now. It is popular because it gives you as a team manager and as a team member a lot of freedom and expects you to fill only the minimum amount of documentation. It also offers both stakeholders and developers opportunities to reconsider and change their minds about requirements, architecture and other stuff that is usually set in stone in an upfront manner in other older methodologies. If you need to change any of these, you only have to wait till the end of the sprint. It also has periodic feedback built into it which is facilitated by Sprint Review & Retrospectives & the availability of a dedicated Product owner gives you the ability do a lot of experimentation with your feature set before arriving at a final one.


And it is for these reasons that we chose scrum as our Agile Methodology of choice. And it made a lot of sense. After all, we had seen a lot of benefits of scrum in our previous organizations and have been able to make good use of the same here too. But the sailing was not smooth. At least not in the beginning. Here were the primary reasons.


  • Non Constant Tasks during a Sprint: pCloudy is essentially a SaaS offering and that too in a startup frame of working. So this usually meant that some issues that crop up, mid sprint which might be important for some (important) customer, and the priority therefore gets bumped up. This would mean that developers have to strategically pivot and fix those issues leading many times obviously to the issues that were originally planned getting sidelined. So the usual 2 week sprint got broken all too frequently and this meant we had unfinished tasks at the end of each sprint, which was definitely not desirable.
  •  

  • Sprint Length: The ideal sprint length is considered to be 2-3 weeks with the most popular length being 2 weeks. This is ideal because it is short enough for a feature to be completely done from end to end and yet be short enough for stakeholders to experiment with features and decide to pivot if needed. However with many customer related interruptions coming, we decided to reduce the length of a sprint to one week. The idea was that we would take in this kind of customer interruptions only in the next sprint, which never would be more than a week away, and with this whatever we planned for in the sprint would be completed. However what we say here was that a week was usually not enough time for a feature to be completely developed, let alone it being tested and deployed. This meant that at the end of the sprint, most of the features were not “done-done”. They would be in various stages of completion. Another issue we faced was the length of the review and retro meeting of one sprint and that of the planning meeting for the next one.

    So here is what we finally arrived at, which takes the best principles of Scrum but at the same time be able to be as Agile as possible. Remember, we are not here to be Agile Champions, So Agility is very highly desirable, but not indispensable. We did some modifications to our process, once small change at a time and kept doing those changes, here is what we look like now. But As our changes continue, I am pretty sure our methodology will not look like what it looks now even 6 months down the line. Here are the most salient items from our thought process.

  •  

  • Sacrosanct Backlog:
    • Backlog Storage: Every Feature that we need to pick up is stored in a backlog. We used JIRA for some time and have now migrated to Trello. But the point is that our Agile Backlog is stored in a automated tool. Tomorrow, if our team’s complexity changes, we may chose something else, but the point to note is that team members are able to access the backlog and are able to see all the items they are required to work on and report all changes in statuses. With both JIRA we had used the Kanban like board that the system provides and Trello by default comes with this board. This board was one of the most important artifacts used by the team.
    •  

    • Also we changed our methodology in such a way that while the Backlog itself is sacrosanct, but we allowed ourselves to change the backlog of a sprint to ensure that our customers are not waiting. But unless something earth shattering happens, we do not interrupt a particular task before it is finished. So strictly speaking, we are not doing Scrum, we are in fact doing something more in line with Kanban with some trappings of Scrum like Planning, Review, Retro and of course the Daily Scrum. While we continue to internally call the daily meeting a Scrum out of habit, we also do not pretend that our process is Scrum. It is now a form of what many people call the “Scrumban” where the best features of Scrum and Kanban are merged together to form a practice that looks like both. We have found that at this time, this suites our business and development needs best.
  •  

  • One Scrum / Many Scrums: We were once a smaller team and hence it made a lot of sense for the entire team to have a common scrum, but as the team became bigger, the scrums dragged longer and both heads and legs began to ache. We then divided the team based on the specific area that each of the team worked (Portal, Devices etc) and had each team have their own Scrum. Then all the Scrum Masters of each team had another “scrum of scrums” where the larger team could focus on larger goals. This made each scrum shorter and each scrum more relevant for each attendee.
  •  

  • Management View: Previously since the team was small, the management found it easy to sync with each team member and follow their pace of tasks with a single tool like JIRA or Trello. However as the team grew, the management needed something more robust and flexible to track their day to day tasks. We started with a shared Google sheet that managed the status of each work item which was always updated and visible to management. The shared Google sheet while easy seemed a bit flimsy. We then moved to something a bit more formal with Atlassian Confluence. Now broader level tasks are looked at in Confluence, which break down to smaller issues in Trello for each developer to work on. The scrum masters make sure that Confluence is updated based on the status of the tasks in Trello. Also the confluence report has links to the trello issues.


So what is next and what is the way forward ? Well I do not want to answer that question. That question takes the fun out of the journey, the fun of not knowing what you will discover at the next bend, what you will invent at the next bend. However as I have kept saying, ours will be a journey where we continue to tweak our processes so that it fits us at every phase of our growth. We are still young as a company and still growing and we need to be able to continue tweaking, at least till we are in a few hundreds in terms of headcount. But that doesn’t mean we are blind about the future, and we have no idea what to expect. In fact on the contrary, every tweak we make also comes with the question, how long will this stay and what do we need to do when we outgrow this phase. This is a constant question that we put to ourselves and make sure we have answers. Whenever we don’t, we step back and replan.


Appendix


Before I sign off, let me also throw some light on the experiences we had with some of the tools that we used to track the development. Also a small tidbit about compliance.


Plain Excel / Google Sheets: A Spreadsheet software is the simplest and most flexible mechanism to track virtually anything. In fact it is this simplicity that tempts a lot of people to Run their Software Agility through a series of shared Excel sheets. We too had the same experience, but the only problem is that if you have to manage complex calculations and deductions, then the number tasks that you have to perform to keep your sheet in control becomes difficult to manage. This is not a problem if this is the main thing you do or if you have people to do it for you, otherwise it soon becomes very cumbersome.


JIRA: Jira is a globally popular Issue Management System which is very very helpful in tracking issues. It also deals well with dependencies and broken down tasks. It does what it does very well. But it has one issue that makes it a bit difficult for a fast paced startup. And that is it is very rigid and inflexible. And maybe it was designed that way and it was intentionally not made too flexible, so that there are not too many changes done. I wanted some changes in the workflow that was specific to the work that we were doing and I could not quickly do it. Remember altering JIRA was not the only or the most important work that we were doing. I tried a lot to understand the complexity of JIRA under the hood, but I could not achieve something as simple as adding as many more columns to the JIRA kanban board as I wanted. I know it could be done as I have seen something like what I wanted working elsewhere, but I simply did not have the patience to understand the arcane JIRA workflow editor and other such entities in it. I understand, this is probably a job for a JIRA admin, but we were not so big to recruit one to do the customization for us. So for now we went to another tool from the Atlassian stable. Probably we will revisit JIRA when we grow bigger. And that brings us to the tool we are using now.


Trello: We have right now all but settled on Trello. Trello is another project tracker from Atlassian. It is built around the Kanban board and hence allows you to do a lot of changes to the Kanban Board, including custom columns(we view them as states). We liked it a lot, since I can now track the exact (and many times specific to pCloudy) state each item is in like Backlog, Requirements, Design, Test Planning, Coding, Testing, Code Review, Ready to Deploy, Post deployment Sanity and others.


Compliance: One common thing with these tools is the amount of developer (and tester and devops engineer) compliance. The success of any of these tools depend on the readiness of the developer to actually update statuses in these or any tools. I have see this for the past 15 years that many developers, including me when I was a fresher, simply do not want to do this. Somehow they are ready to spend nights and weekends in office running behind an elusive bug, but spending 5 minutes updating the tool is many times anathema. You have to make your developers see that it is imperative to do the necessary status and other updates in these tools. If your developers do not do it, then none of these tools will be useful. In the end these tools as much for the developer as much as it is for a manager, but they will work only if they are used properly.


Share with me the lessons you have learnt from your daily scrum in the comments section. Keep a watch on this space for my next blog in the #scalingup series.