
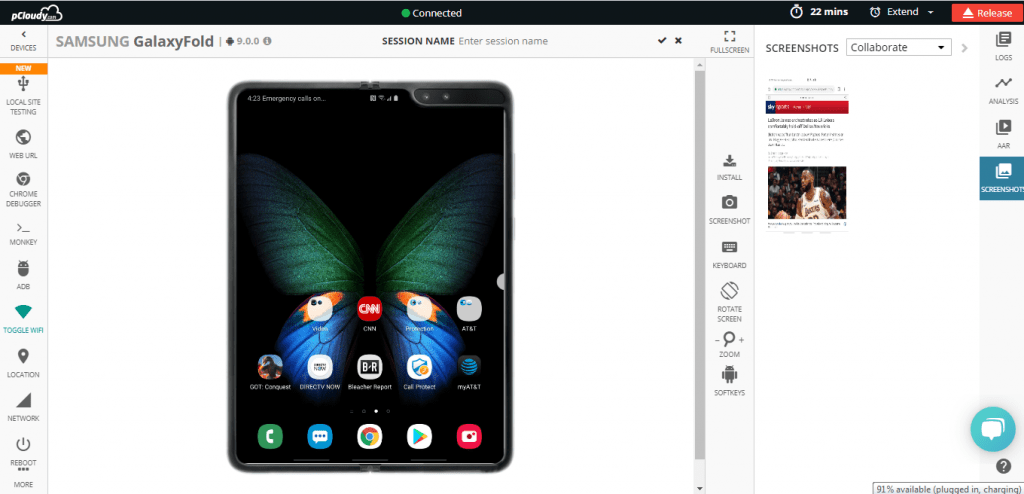
The wait is over. We are the first to have Samsung Galaxy Fold on our cloud for our users to test their apps. This phone comes with a 7.3-inch Dynamic AMOLED primary display with a resolution of 1536×2152 (QXGA+). The cover display is 4.6″ HD+ Super AMOLED with a resolution of 720×1680. You can test your apps on the primary display for now but soon you will be able to use the cover display as well for testing.
Author: Suyash Dubey
Suyash is a content strategist at pCloudy. He is a frequent contributor to the world's leading mobile technology blogs and tech forums. In his spare time, you will find him reading detective novels, watching a documentary or exploring a new destination.
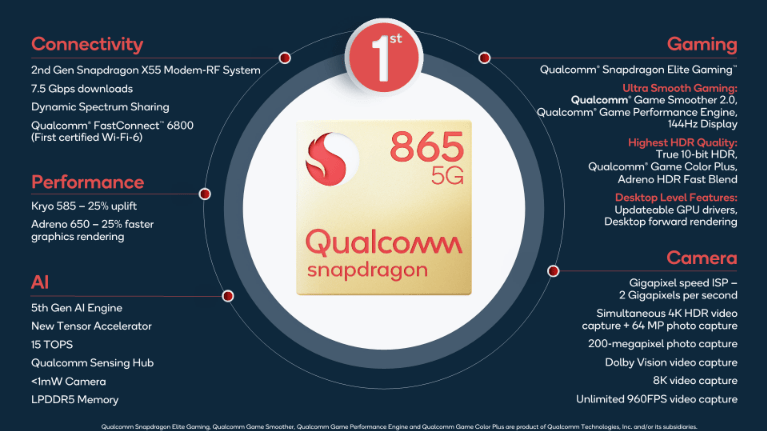
Qualcomm launched it’s flagship SoC Snapdragon 865 5G mobile platform, but without an integrated modem. The reason why Qualcomm is not selling the 865 with an integrated LTE modem, might be because OEMs are not interested in splitting their high-end products into LTE and 5G segments. With this new launch, it looks like Qualcomm is really pushing OEMs to launch 5G equipped high-end device in 2020. On the other hand, AT&T, Verizon and other carriers around the world have been spending a great deal of money on 5G deployments.
Snapdragon 865 and X55
Snapdragon 865 is a dual-chip system, but according to Qualcomm, it won’t impact power consumption. The 5G modem is not integrated into the chip due to the complexities of supporting different types of 5G networks. Although in Snapdragon 765, the X52 modem is integrated, it sports lower download and upload speed.
Some users have complained about the power consumption and heat are issues in the devices loaded with Snapdragon 765. To rectify this, further improvements to packaging, node shrinks, antenna placement, device panel power consumption, and SoC interconnects might be needed to bring device battery life back up to the consumer’s expectations.
There have been some negative speculations about the latest 5G mobile platform, but I think that the Snapdragon 865 will be an improvement for the 5G devices to be launched in 2020. OEMs are eager to sell 5G but they don’t want the user experience to be compromised for the new feature. The negatives of using an off-die modem can be balanced by improvements in other metrics.
Rapid 5G Deployment
The 5th generation of cellular technology promises to improve the coverage, speed, and responsiveness of wireless networks. Users have indicated constant speed around 1 Gbps, often touching 1.4 Gbps. That’s 10 to 100 times faster than 4G connection and even faster than a fiber-optic connection. This means you will be able to download a season of Brooklyn-nine-nine in a few seconds.
In the US, T mobile and AT&T are leading the way to deploy 5G in all the major cities. Sprint and Verizon are not far behind. But to get widespread coverage of 5G network we might have to wait till the later months of 2020.
Apple A13 Vs Snapdragon 865
The snapdragon flagship 865 has a 5th generation Qualcomm AI Engine is 2x more powerful than its predecessor and an all-new Hexagon Tensor Accelerator. The Kyro CPU provides a 25% faster performance. But is it better than Apple A13?
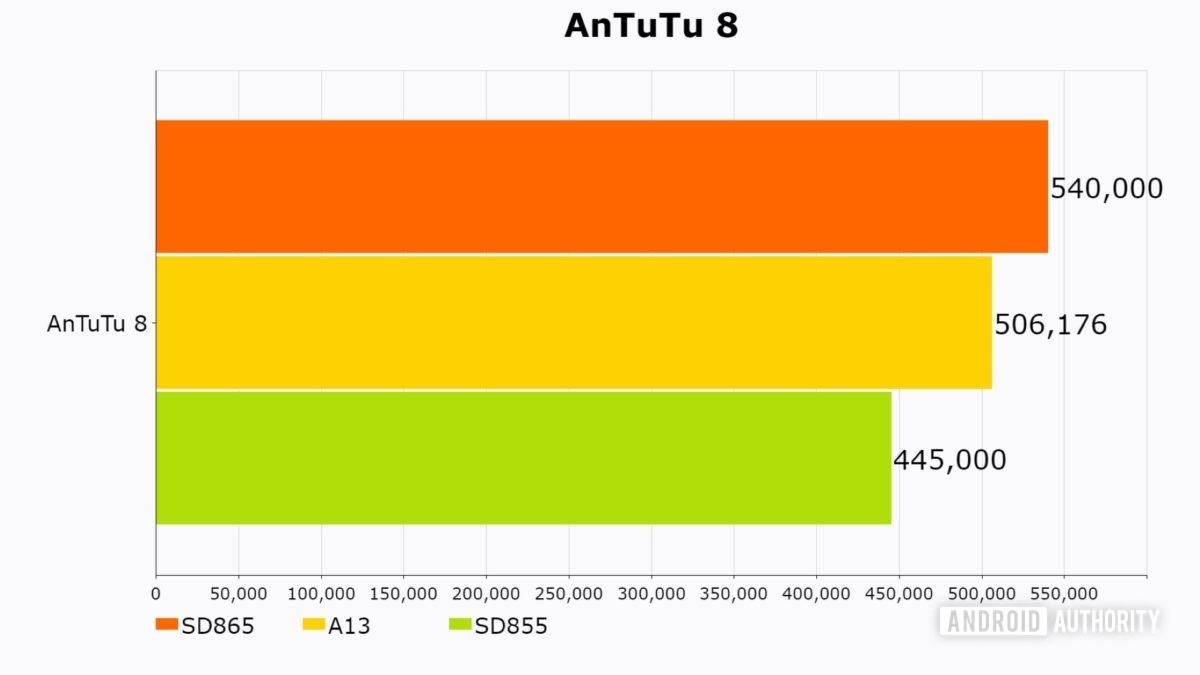
It is a common conception that Apple’s processors are two generations ahead of the Android processors. There are many processors in the 5G race like Kirin 990, Exynos 990, and Dimensity 1000 5G, but there is always a comparison between Snapdragon and Apple processors. In the speed test done by Android authority, it was found that A13 is 25% faster than SD 855 but it didn’t stand a chance in front of SD 865.
In the speed test, the Snapdragon 855-based Galaxy Note 10+ completed the CPU section of the test in 45.3 seconds, the iPhone 11 Pro Max finished it in 40.0 seconds and the 865 completes the same test in 36.6 seconds. So Snapdragon 865 is 8% faster than the iPhone 11.
Apple A13 still has the upper hand in terms of GPU performance. It took 16.9 seconds for the Qualcomm Reference Device to finish the 3D Unity test but the iPhone 11 Pro Max finished it in 14.5 seconds.
AnTuTu and Geekbench also have similar performance reviews. The scores show that A13 and 865 are neck to neck when it comes to overall performance.
The Road Ahead
In countries like the UK and South Korea, things are catching up fast. China too announced that it will roll out 5G network in all the major cities in 2020. The only thing that will hinder the deployment of 5G in the rest of the world including the developing countries is the cost.
The chipsets launched by Snapdragon and other companies are costly which adds up to the cost of the devices. So, for now, the 5G network will be made available on high-end devices like Samsung Galaxy S10, iPhone 12, Oneplus 7 Pro, etc. Looking at the speed of 5G deployment in the US, we are sure that the majority of the urban population will be able to use 5G services early in 2020. We can also expect new 5G enabled SoC launches with better specifications early next year.
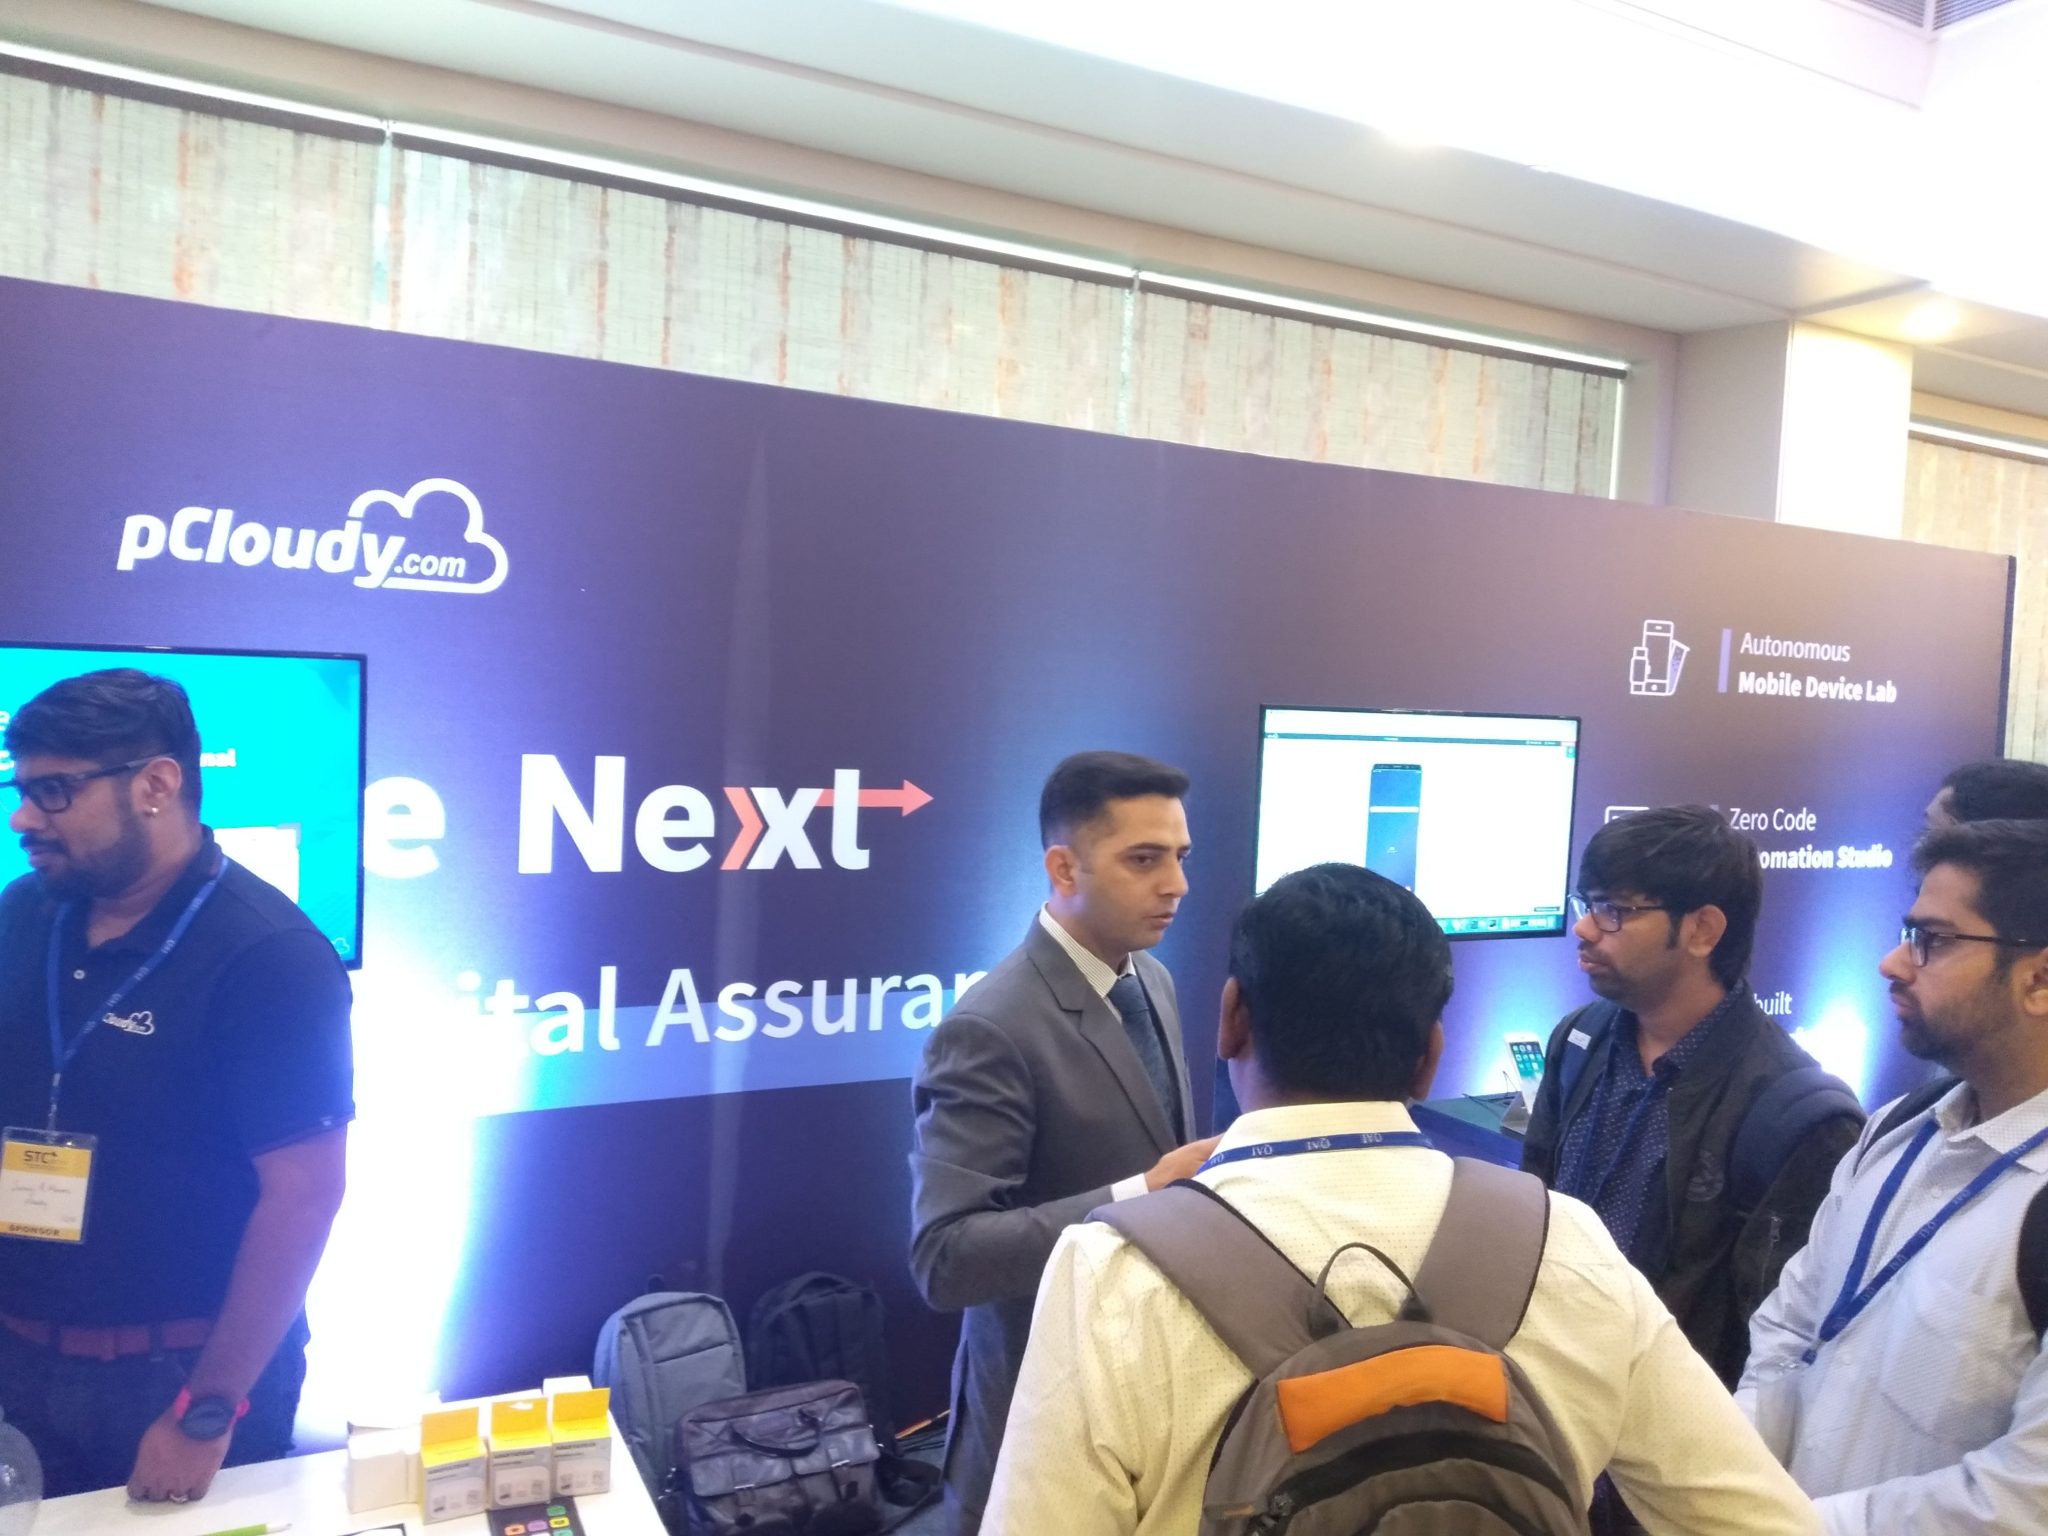
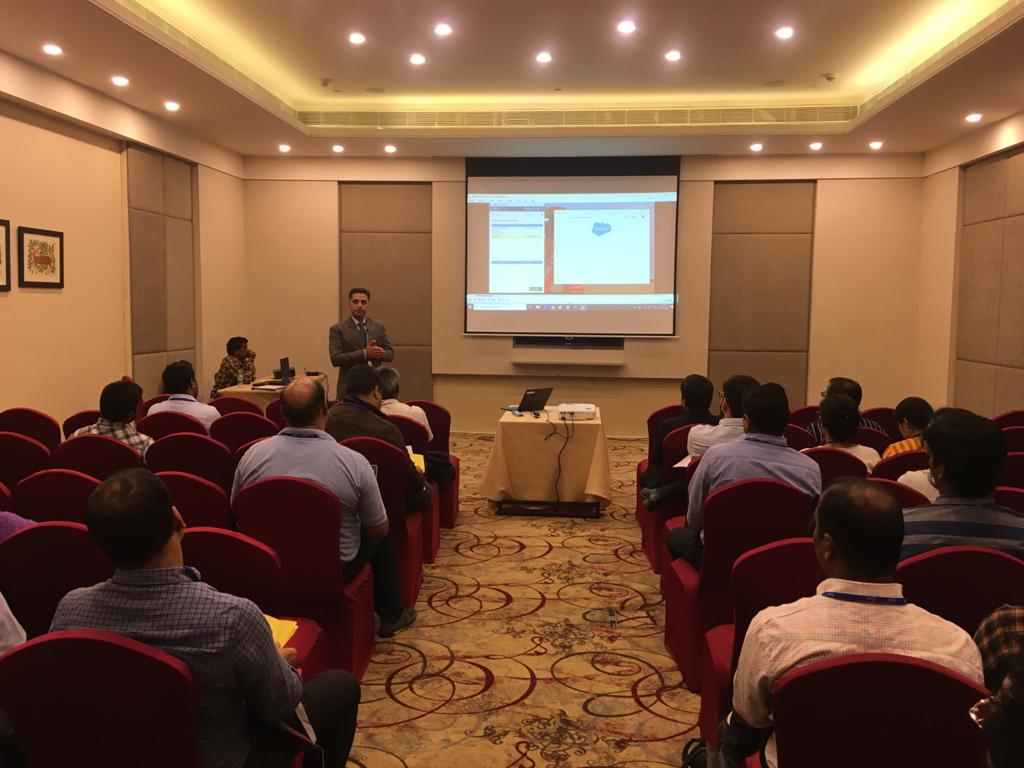
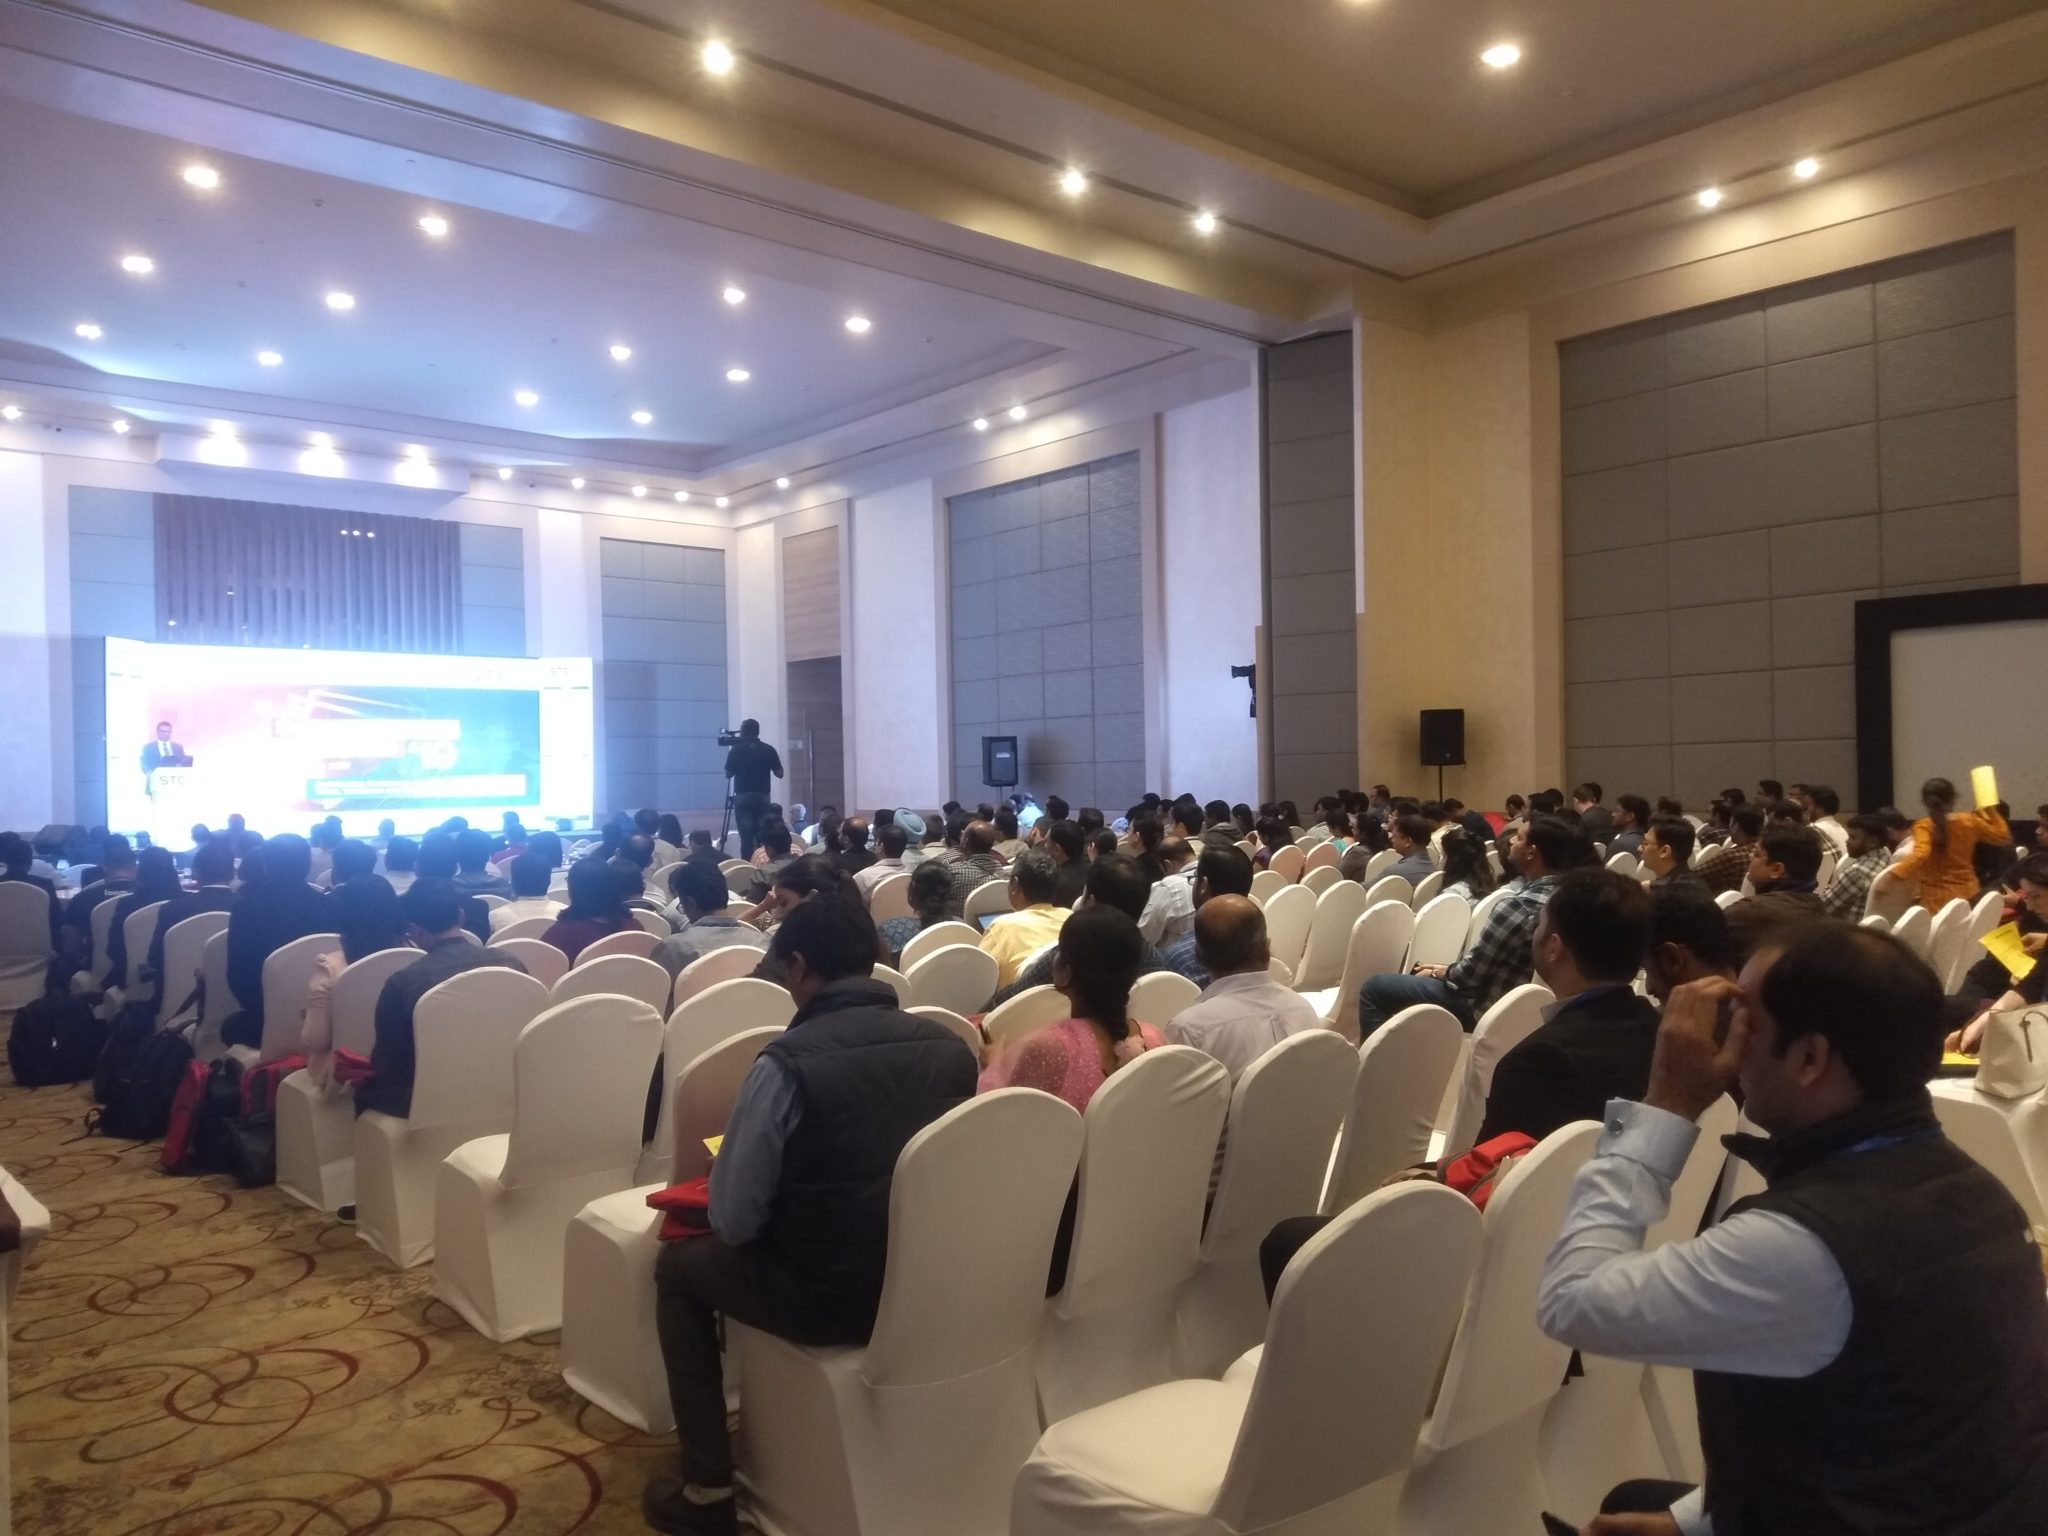
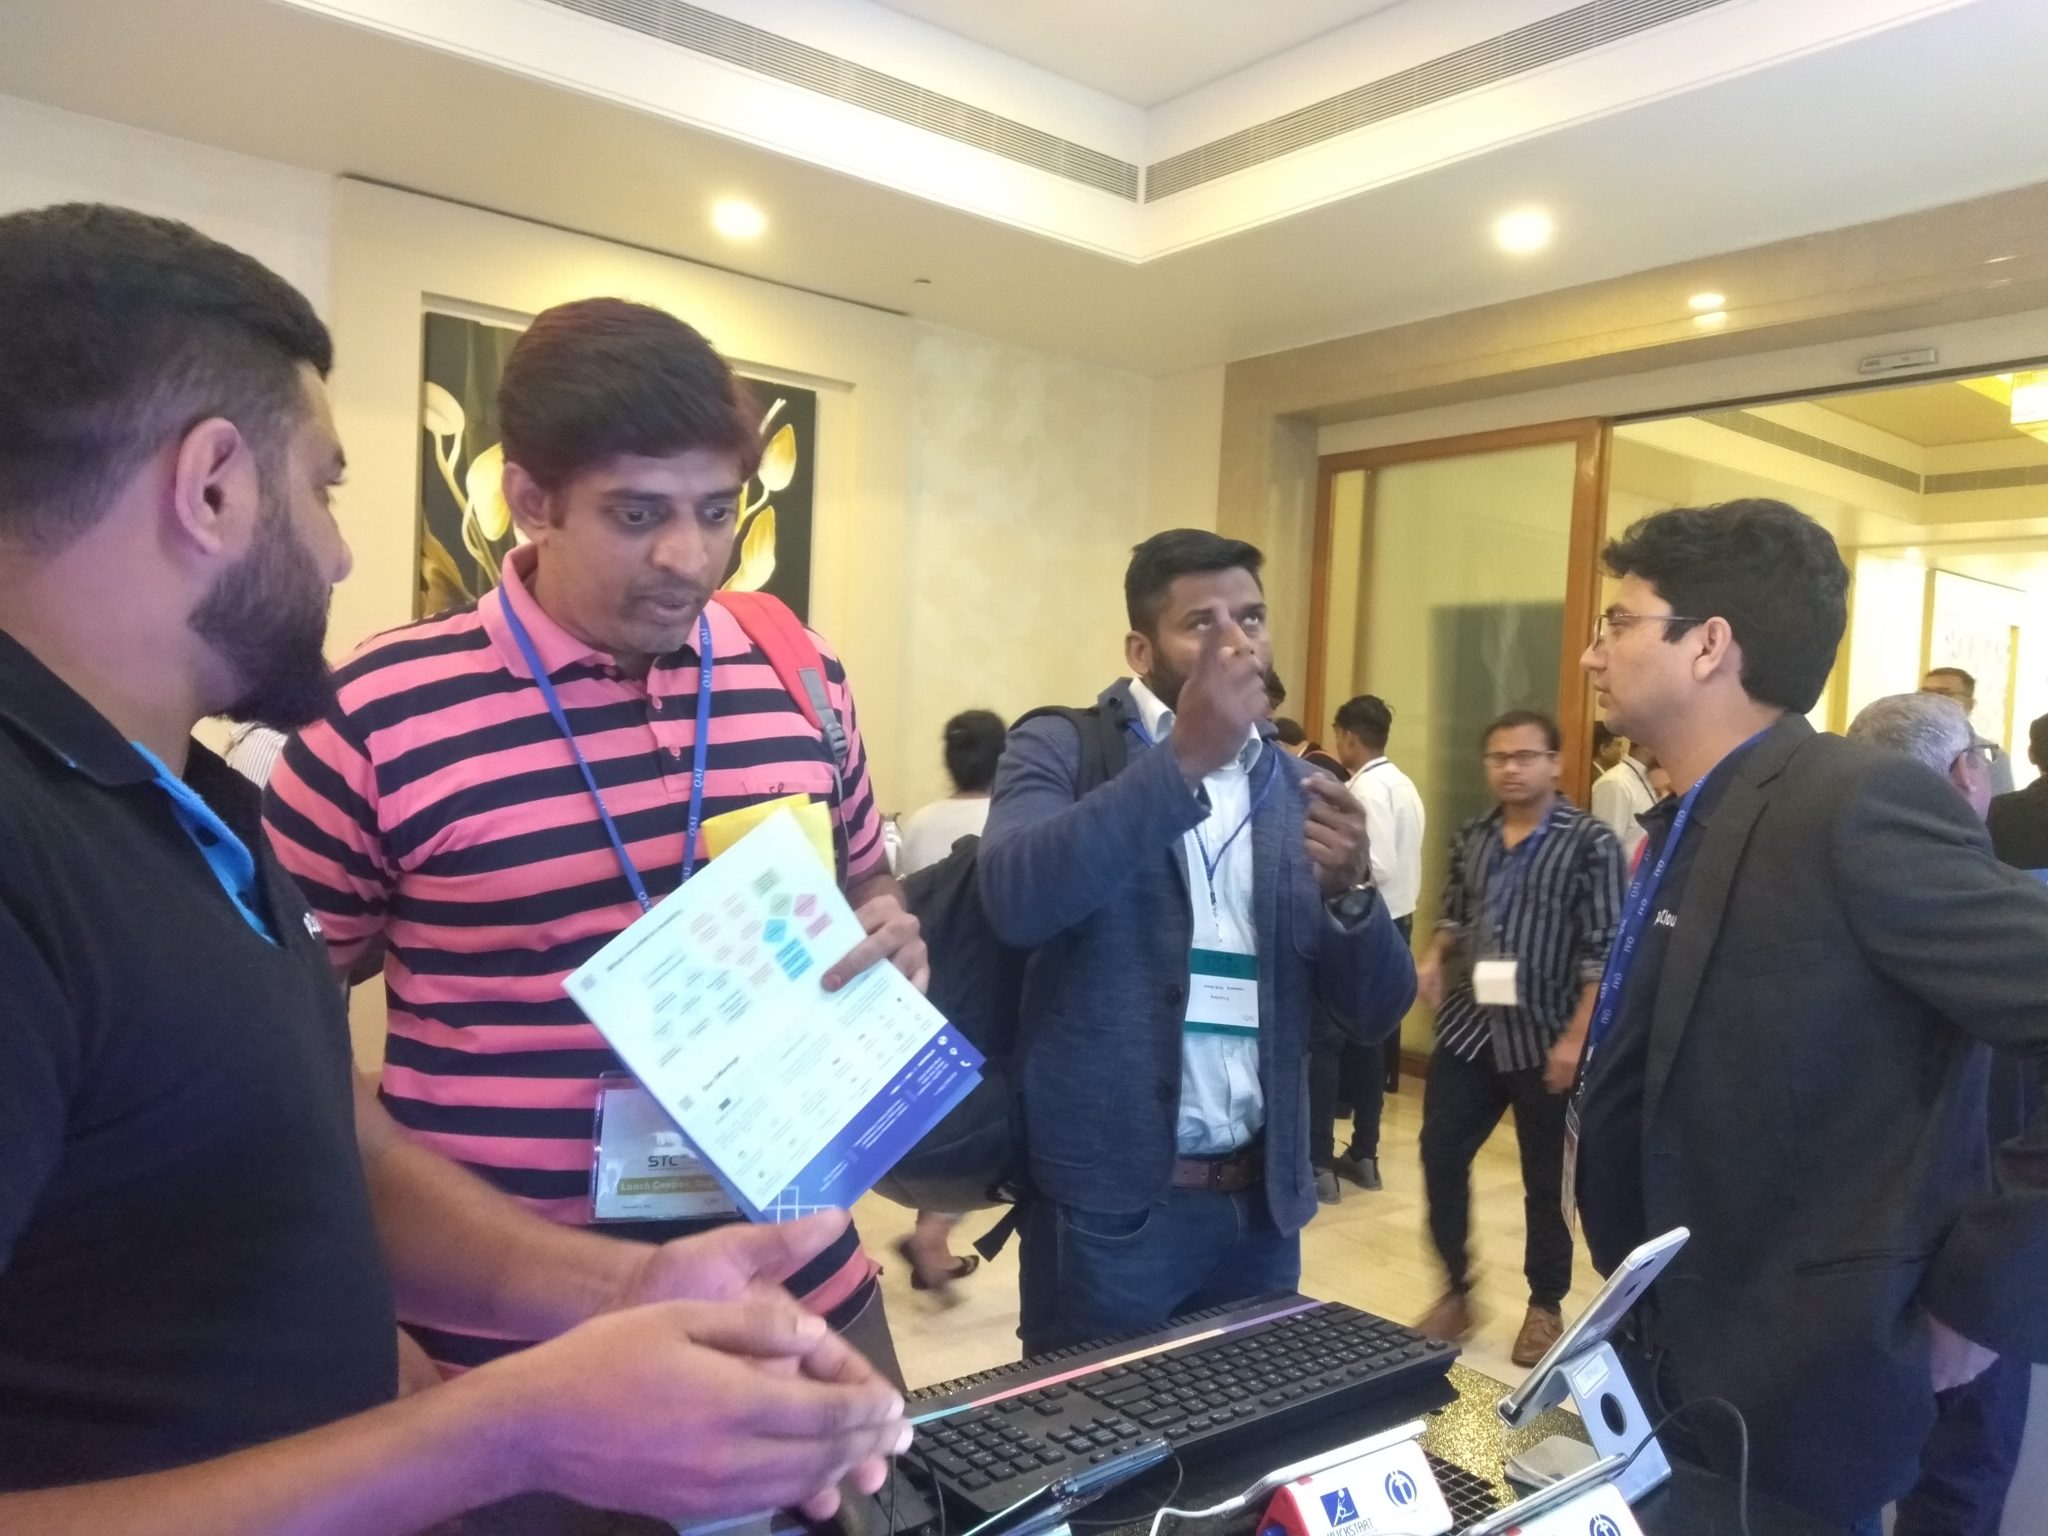
Asia’s leading software testing conference, QAI STC 2019 concluded on December 6th, 2019. The theme of this year’s STC was architecting continuous quality: think, transform, and thrive in an Intelligent future. The STC is a platform for experts to display ideas, experiments, and experiences to explore challenges and suggest techniques and innovations to overcome common problems.
Avinash’s keynote focused on the future of testing which was lauded by the top minds and became the highlight of the event.
pCloudy was the title sponsor for the event and so we got a bigger platform to showcase our contribution in shaping the future of mobile app testing.

More than 500 experts from around 130 software companies gathered to learn new trends in testing, share their ideas and grow their network. There were 14 keynotes from the industry leaders and 50 professionals got a chance to take the stage and share their views about the emerging technologies.

Let’s have a look at the major learnings from this event.
Future of Testing
The STC started with a keynote by Avinash which provided insights about the future of work, applications, and testing. How “We Working” will be the primary organizational model and algorithmic management will take over the middle management to some extent. He also talked about how people will have to constantly upskill to work with the ever-changing technology and the work-life challenges will increase in the future. A digital mesh architecture will allow enterprises to build an agile, flexible, and cloud-ready ecosystem. This will enable real-time connectivity of employees, business processes, business data, and services to help address high volumes of traffic and become cloud-native and mobile-first.
Quality Engineering and Digital Transformation
There was a great emphasis on quality engineering at the STC as most of the organizations are trying to take QE to the next level. Quality engineering focuses on the end-to-end management and the basic principle is the all the teams should bear the responsibility of maintaining the quality in the process. Software QE is the assurance of high standards in the software development life cycle while implementing DevOps and Agile.
The main role is played by testers who create, implement and maintain systems used to control the quality of production processes. These people need to have a deep understanding of all the technological activities and evaluation principles.
Quality engineering methodology is even bigger in scale than the traditional QA approach and that’s the reason that QEs cannot work in silos. In quality system engineering, people in multiple roles like IT architects, designers, test engineers, project managers, business architects, etc., must cooperate to meet customer expectations. Quality engineering is driven by emerging technologies such as AI and Big Data analytics. Automation is the driving force behind turning the traditional testing into a more effective quality support model.
The quality engineering team usually partners along with the business users and the product managers for having a better understanding of the required product details to match up the problems since the starting of the product to the last stage.
Artificial intelligence, Machine learning, and IoT
The recent development in AI, ML and, IoT were the buzz creators. Experts elaborated on how augmented analytics will be utilized for creating, developing, and consuming analytics by combining these technologies. An augmented analytics engine can identify, filter, and analyze data, and then recommend what needs to be done next without the need of an IT team. These technologies will make data-driven insights accessible to a much larger set of workers.

The conference turned out to be really productive with good insights about emerging technologies and tools. It was a great opportunity to connect with software testing experts and professionals from around the globe. To say the least, it was a remarkable event where we got a great response and positive feedback from the crowd.
By concentrating our efforts upon a few major goals, our efficiency soars, our projects are completed, we are going somewhere. This quote by Michael Korda signifies the importance of organizing our efforts to gain better efficiency at work. In mobile app testing, efficiency can be achieved by using a multifunctional tool like Jira and pCloudy. pCloudy is integrated with the Jira bug tracking tool to make it easier for testers to log bugs in Jira from pCloudy. Let’s get an overview of Jira and how it can be used for multiple purposes.
An Overview of Jira Bug Tracking
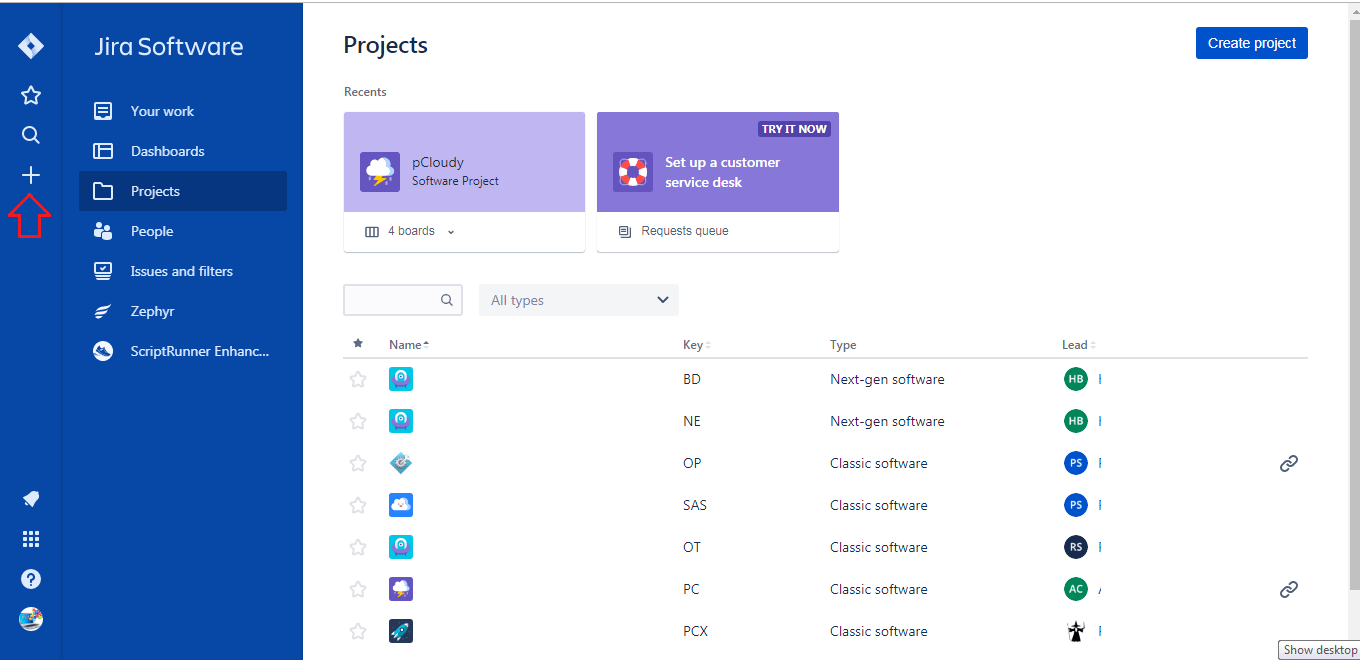
Jira is an open-source tool used for project management, bug tracking, and issue tracking. Jira has many features and functions that make issue handling easy. Customizable reporting allows you to monitor the progress of your issues with detailed graphs and charts. Jira has four major functionalities, project, issue, component, and workflow.
![]()
A Jira project is a collection of issues and it is identified by a name and a key. The project key is added to each issue associated with the project. Workflow helps in mapping your business process. So now let’s understand how to use the Jira bug tracking tool and its components.
Jira Workflow
Jira has a function called workflow which is used to make a blueprint of the procedure in any organization. The workflow can be customized to suit the project, issue or any subtask. The Jira defect workflow comprises of colored blocks that represent the status of the task and lines that represent transitions.
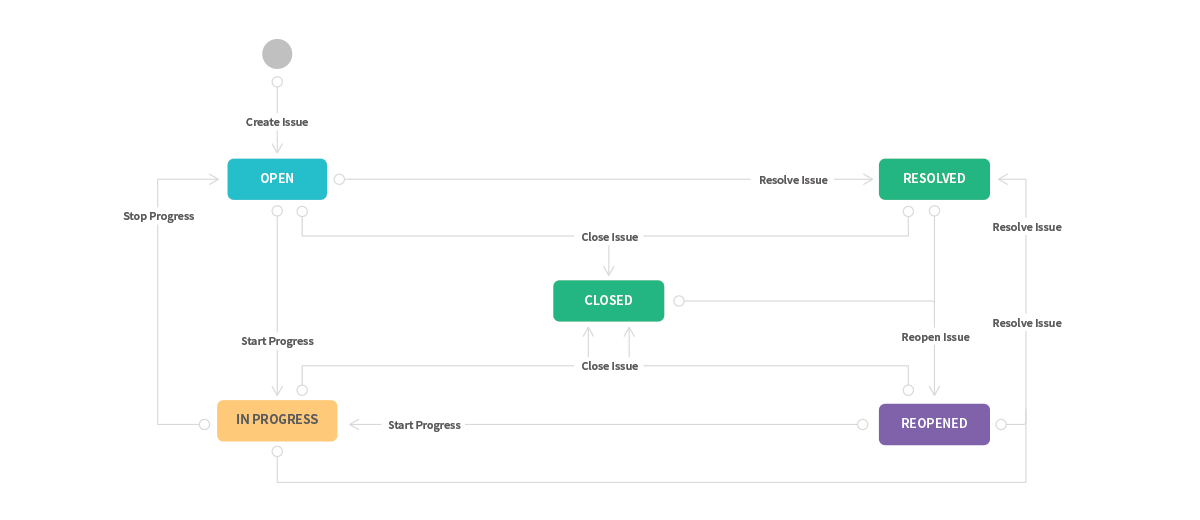
Users can build their own workflows from scratch or download the prebuilt workflows and then customize them. Approval requests can be set for users to make changes in the tasks and task status can be set to change with transitions automatically.
Status shows the position of an issue within a workflow and transitions are the bridges between the status to represent how an issue moves from one status to another. Resolution tells why an issue changed from open to close and condition control who can perform the transition. The assignee commands the responsible member for any particular issue. Validator ensures that the transition can happen given the status of the issue and Jira can recognize some properties on transitions.
Creating an Issue in Jira
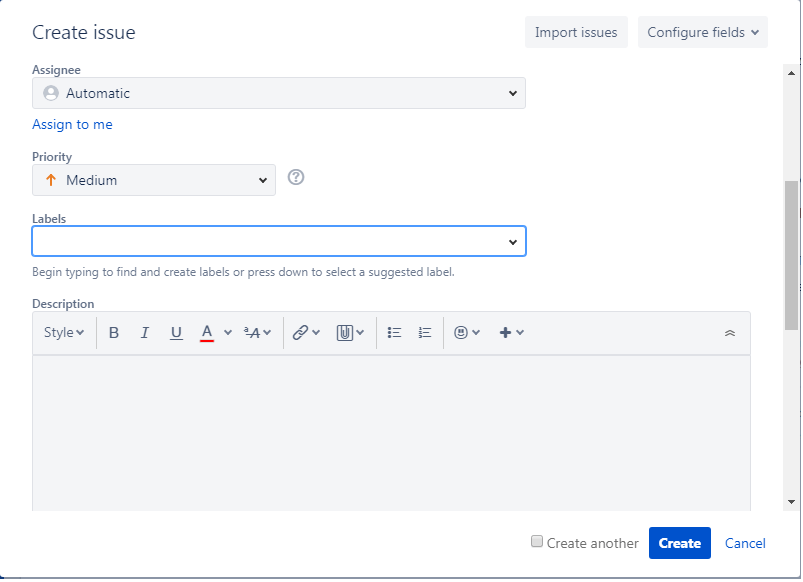
An issue is the building block of the project and components are subsections of a project used to group issues in smaller parts in a project. To create an issue you need to click on the plus sign located on the left side of the screen. A new window will pop up where you need to fill in the details about the issue that you are creating.
The first step would be to choose the project that the issue is associated with. Just below that is the issue type where you need to select if it is a task, an epic or a story.
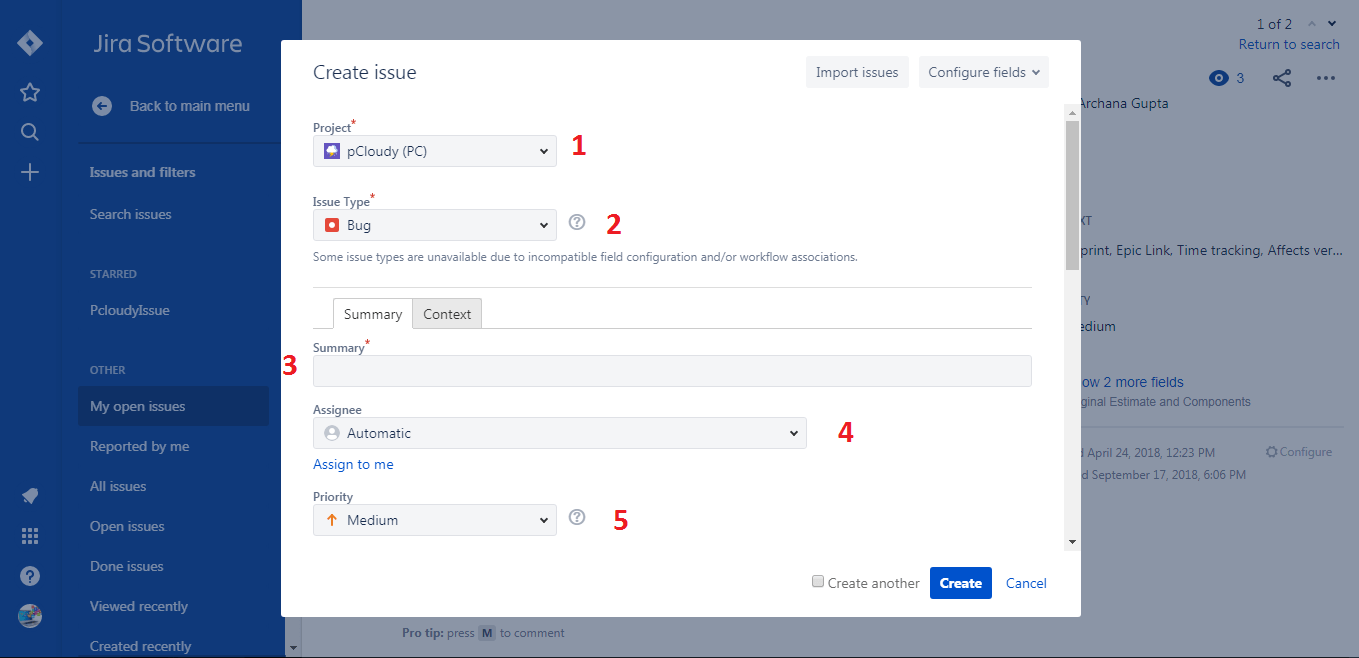
Then add a summary about the issue and assign the issue to your team members. Next, you need to choose the priority and add a label to the issue. Once that is done, You can now add a detailed description of the issue to make sure that you and your team members are on the same page.
Below the description, you will find Components dropdown and the Environment where you need to fill in the details appropriate for the issue like Hardware specifications, OS, software platform, etc.
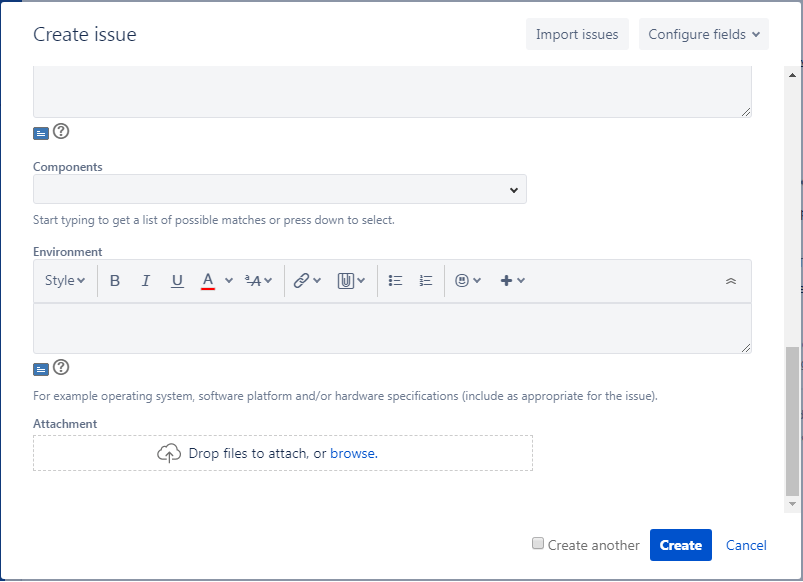
You can also attach files related to that particular issue by clicking on the attachment section and then click on Create to create the issue.
Jira Reports
Jira generates various types of reports on the basis of workflows, issues, task status, and other data fed in by the team. You can track the total work remaining in the burndown chart and manage the progress accordingly. A burnup chart will help in tracking the total scope independently from the total work done. In the sprint report, you get an idea about the tasks that are completed and pushed backed to the backlog in each sprint. Apart from this, there is a cumulative flow diagram, velocity chart, version report, etc.
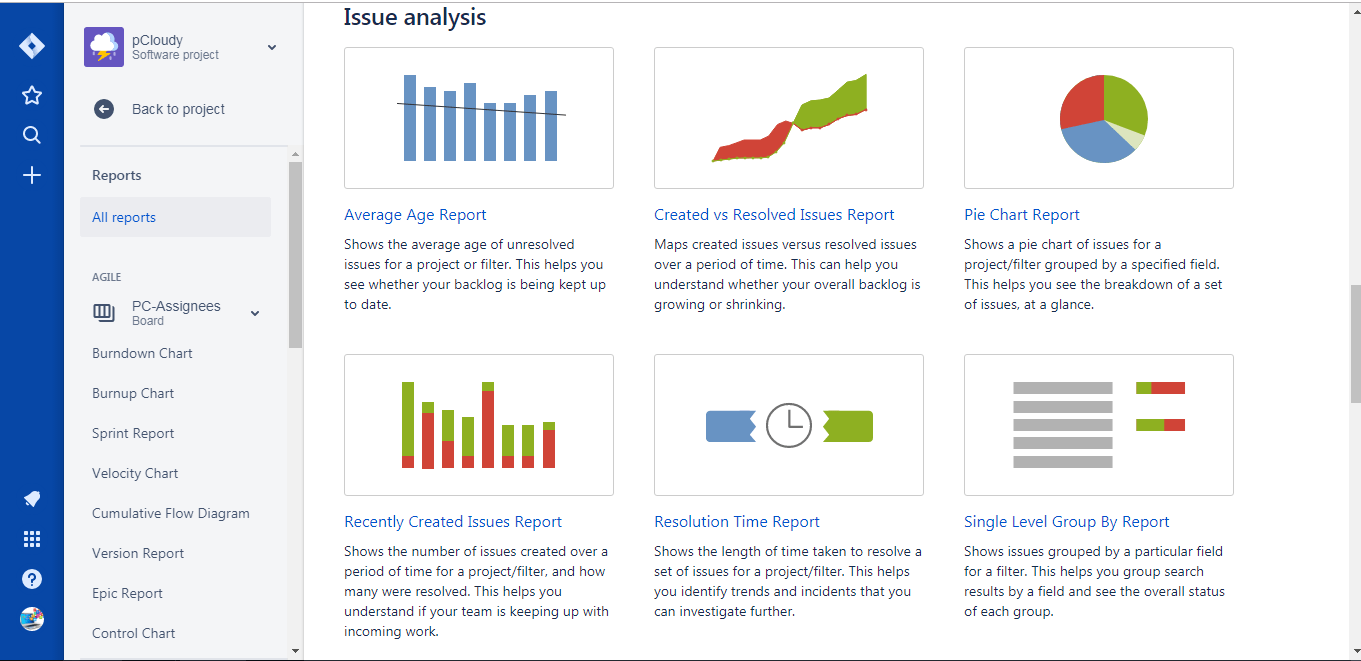
Users will also get an issue analysis report for a better understanding of the resolved and unresolved issues.
pCloudy integrated with Jira Bug Tracking
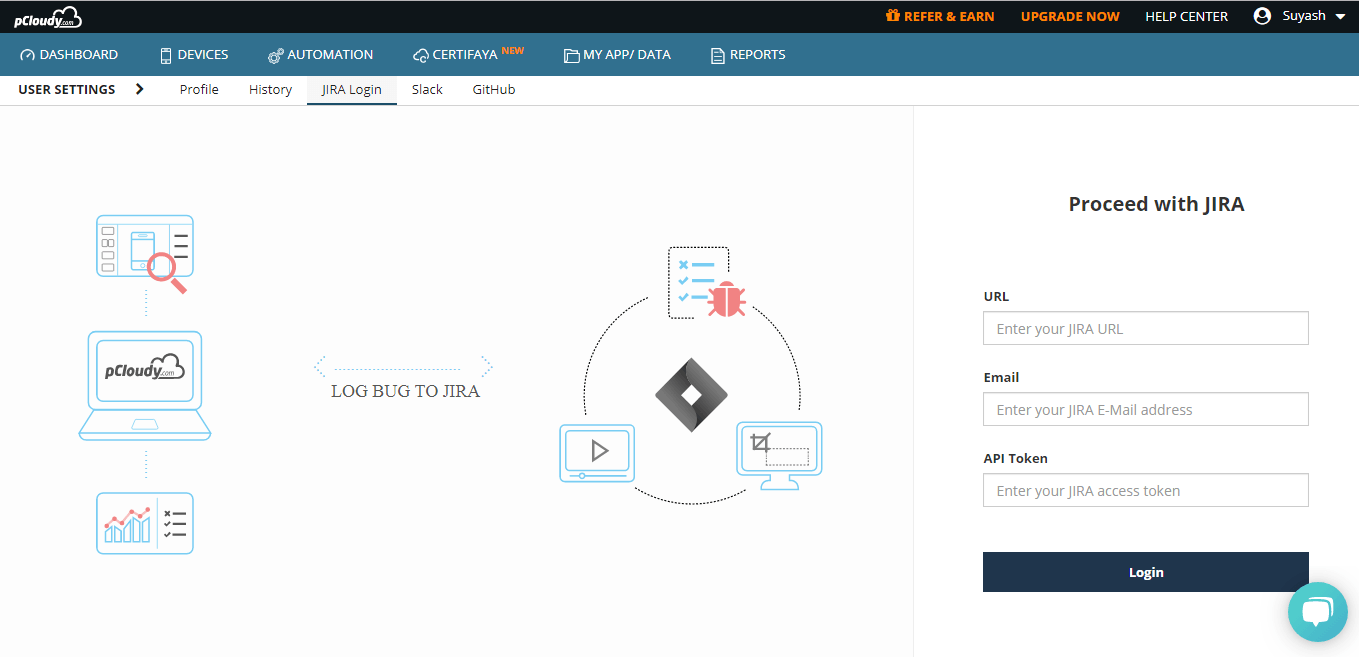
pCloudy has the option to log bugs, save screenshots and videos of the test actions. But if you want to use the Jira bug tracking system to log bugs then you can to that though pCloudy as well. Just click on the profile ID and the top right corner of the pCloudy screen and select the user setting from the dropdown list.
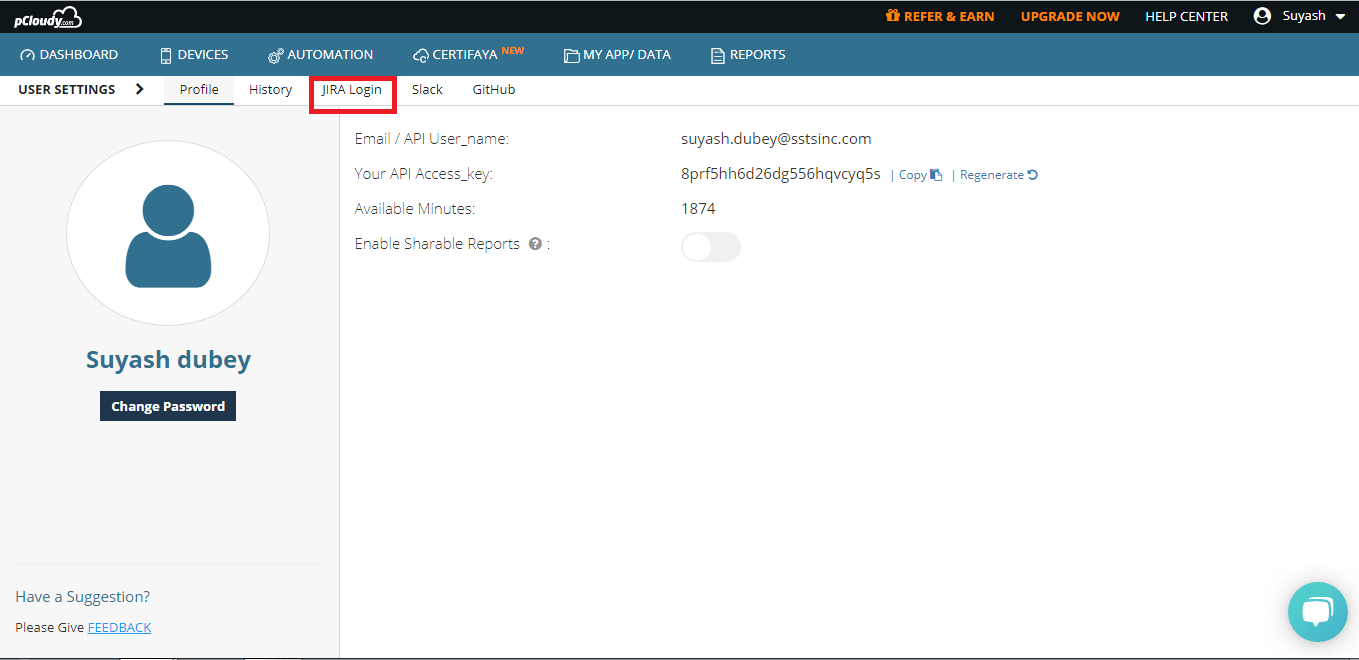
In the user setting page click on the JIRA Logs tab. Enter the URL, Email, API Token and login to log bugs in Jira.
This way you can maintain a separate bug log to share with the team apart from the one in pCloudy. pCloudy also generates reports like Jira and those reports can be shared across your team.
Jira supports both Kanban and Scrum agile methodologies. As a matter of fact, scrum is much more popular these days as it gives the project team to plan their work in detail prior to starting the project. When the scrum board is created, a list of items is added and then sprints and versions are created to move the issues from backlogs to sprints. With Kanban, users can start without having a detailed plan and in these issues can be created but that cannot be moved to sprints as we do in the scrum.
Conclusion
There are many uses of Jira in mobile app testing. It’s not just about handling issues or creating workflows, Jira project management is helping the world’s most known brands in the world. If you understand the Jira bug life cycle and follow the Jira bug tracking best practices, it becomes much easier to scale up your testing efforts. Jira bug tracking, when combined with pCloudy, can save your time and resources.
Flutter has been creating waves in the app development space since its launch. The reason is simple, it solves the problem of creating two different codebases for a single app to run on Android and iOS devices. Some experts say that Flutter which was launched by Google is to counter React Native which is used by Facebook. Nevertheless, this is a much-needed relief for enterprises as Flutter will help them save a lot of their time and resources. So let’s first understand what is Flutter.
What is Flutter
Flutter is an opensource mobile UI framework that can create Android and iOS apps from a single codebase. The Flutter framework includes the Flutter engine, Dart platform, the Foundation library, and design-specific widgets. Flutter apps are written in Dart programming language and runs on dart virtual machine.
How to Create a Flutter App
Before we start the process of app development it is important to know that there are two types of widgets, stateless and stateful. A stateless widget describes part of the UI by building a structure of other widgets that describe the UI more definitive. Stateful widgets are the widgets that can change their state multiple times and can be redrawn on to the screen any number of times while the app is in action.
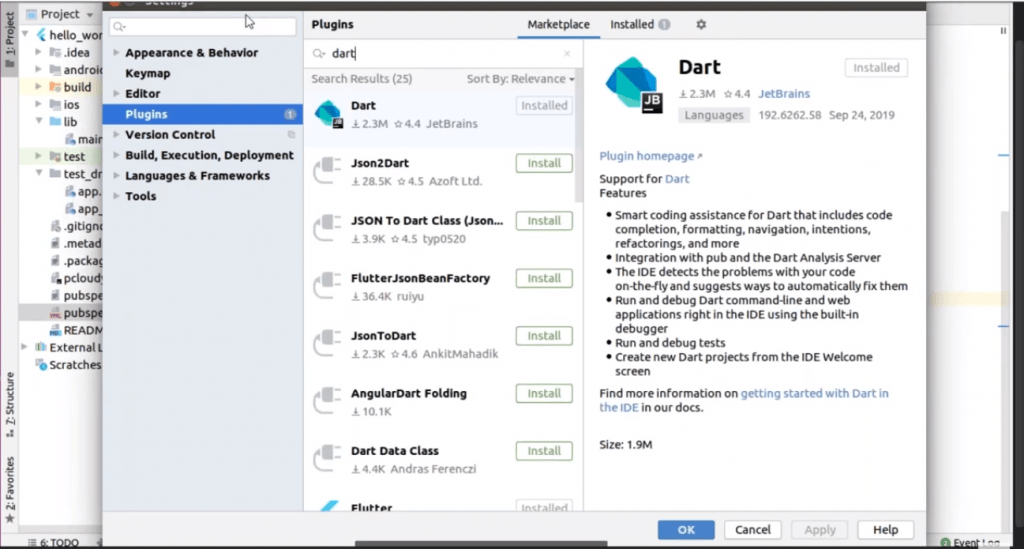
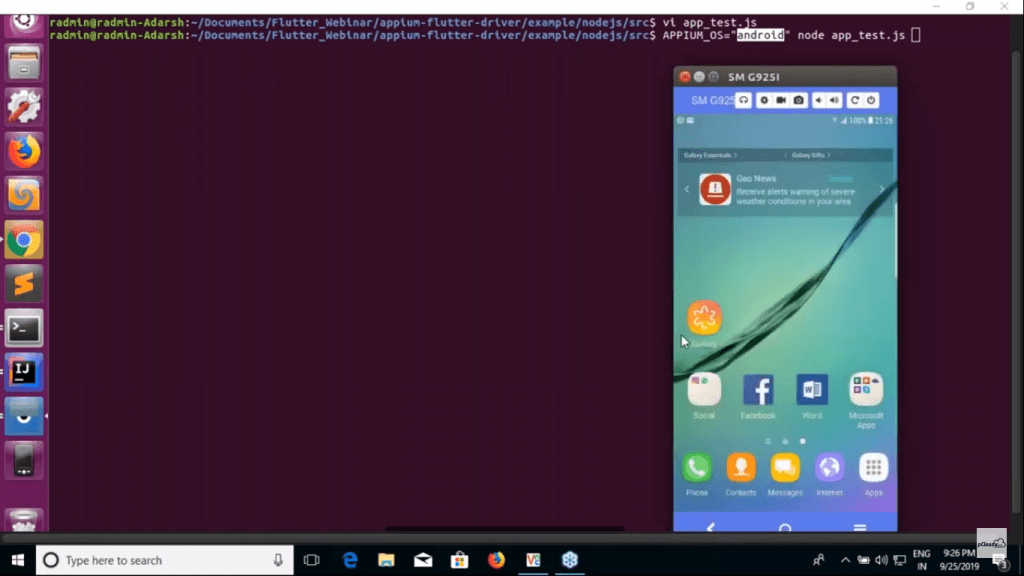
To create a Flutter app you need to install Flutter SDK and other tools required to support the framework. We will create the app in Intelli J IDE and for that, you need to install two plugins. The first one is Dart and the second plugin is Flutter. You can install the plugins by clicking on File in the menu bar of the IDE and then click on Settings.
Then you need to create a new project and you will get a basic code layout to start with your app development. In the first line, we have the main method where we will enable the flutter driver extension and there is a run app method with MyApp class instance, to run the app.
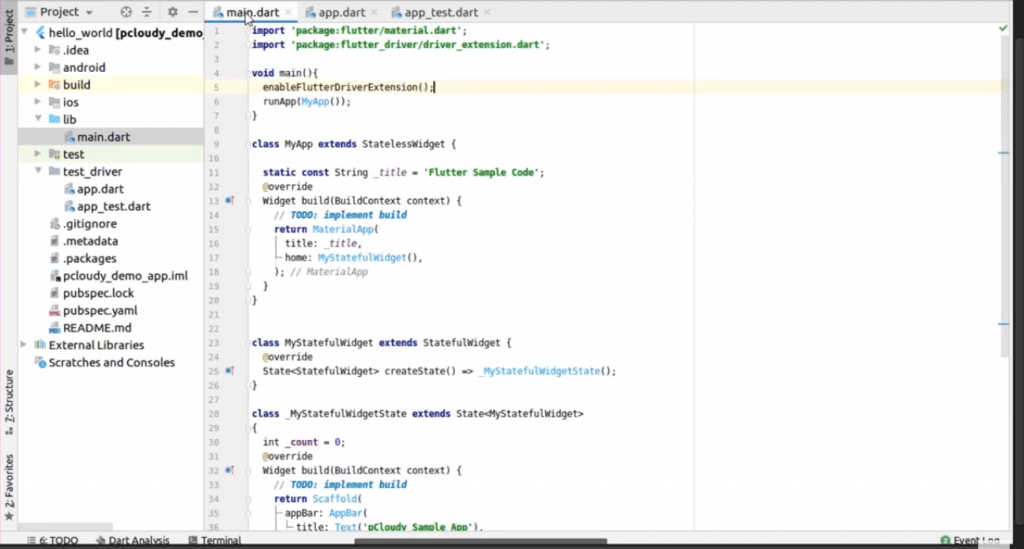
In this sample code, we have used the title as the stateless widget and we have set the title as the key and for the home screen, we are using one more instance which is MyStatefulWidget(). So in this class, we have a small piece of code, where we have set values for elements like appBar, background color, and in the body, we have placed a floating action button for a counter.

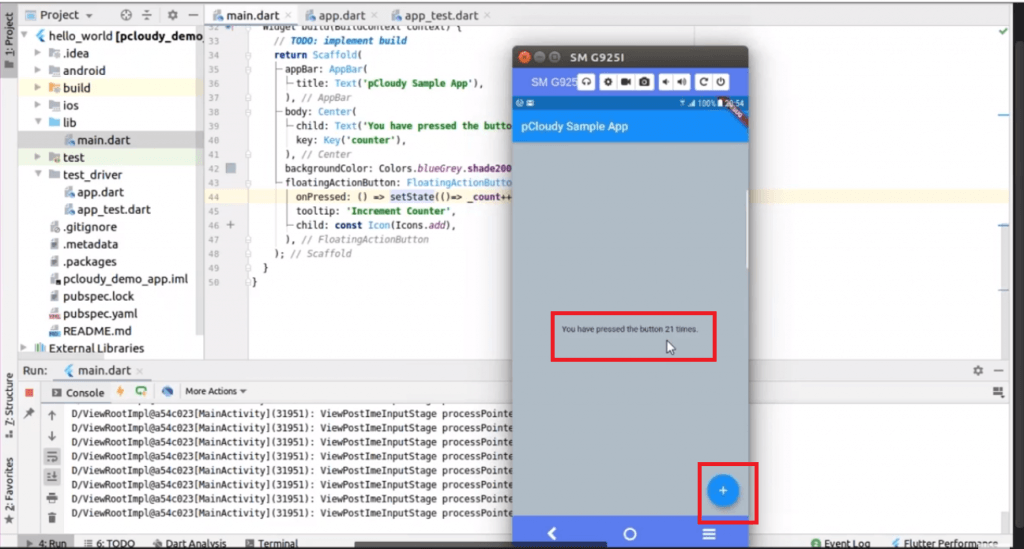
After adding the code you can run the program and you will be able to see the changed state of the counter with every click on the action button.
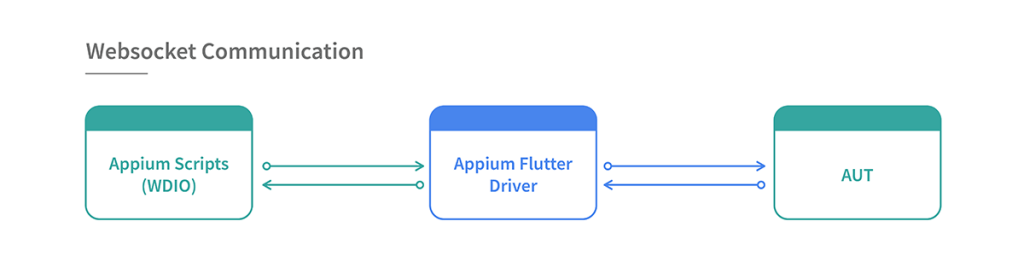
Appium Flutter Driver
Appium Flutter driver is a test automation tool for flutter apps on multiple platforms. It is a part of the Appium mobile test automation tool. But how does the Appium Flutter driver work? It uses webSocket communication to carry WDIO script to instantiate the flutter driver and the request will be sent to the particular application. Then the AUT will send the response to the script through the Appium Flutter driver.
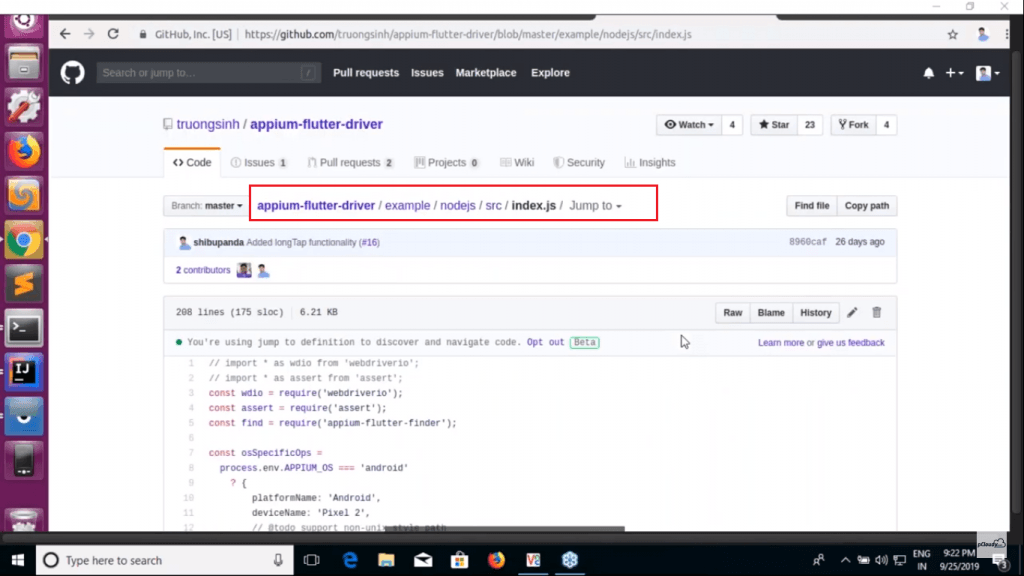
You can also build Appium in your machine through the source code. Once you have cloned the source code, run npm install then npm run built and type a command node to start the Appium server. You can download the package from GitHub. The package contains Appium Flutter Driver and Appium Flutter Finder. You can clone the sample project to get the WDIO code.
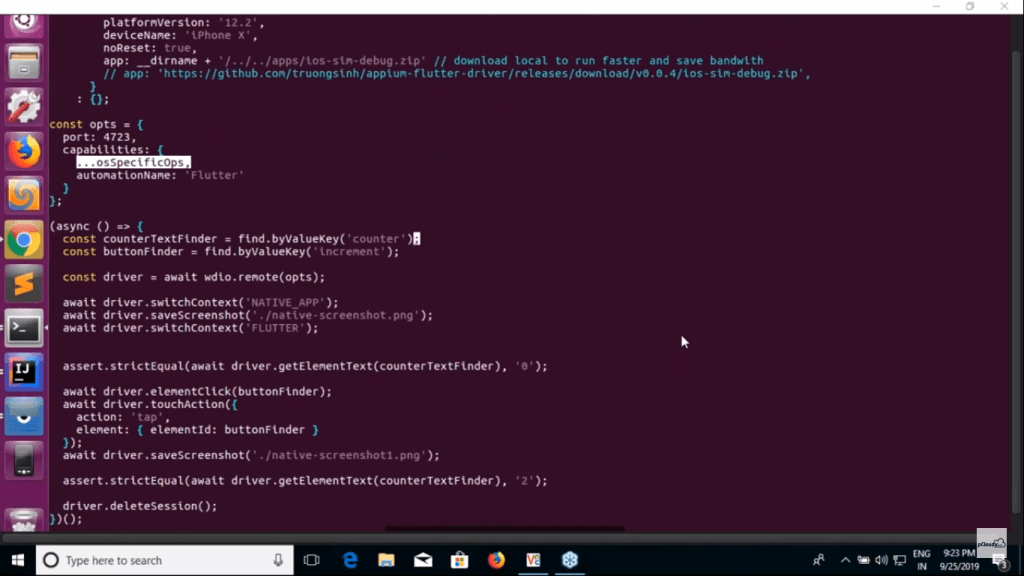
In the terminal, you can see that to automate flutter application we have used Flutter as an automation name for both Android and iOS apps. You can see that port is 4723 and in the capabilities, we have mentioned osSpecificOps, automation name: ‘Flutter’. We have mentioned the app path at the top with the device name and platform name and we created an object.
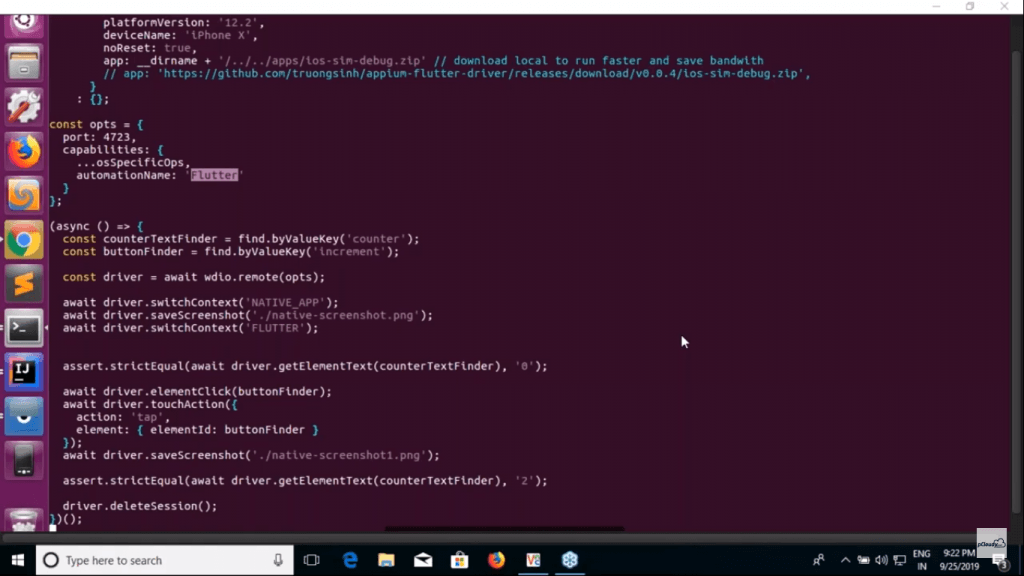
Appium==OS environment is ‘android’ which will pick all the information and specify in the capabilities and it will pass a post request to the server.
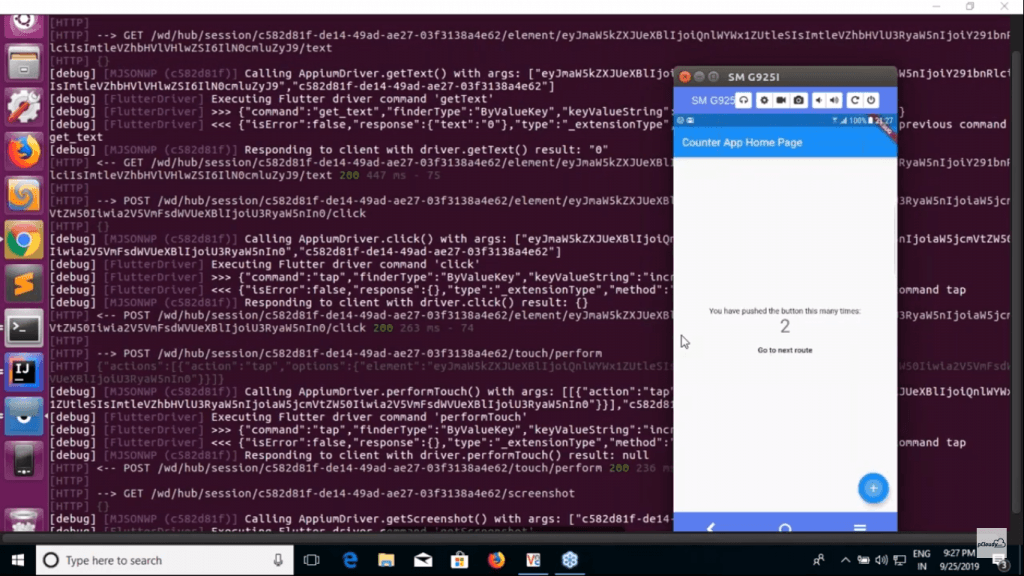
Now here we are trying to find the element using CounterTestFinder and a ButtonFinder to click on the button. In the next line, we have created a driver using a remote method.
Then we have switched the Native App context to Flutter. You can switch this if you are using the Flutter app. Once the app is launched, we are validating that the counter text finder has value as zero by calling Flutter APIs internally. So here we are using two actions, one is clicking and the other is touch.
The button is to be clicked two times and thus we have used strictEqual function. In the last line of code, we are deleting the session.
Now to run the test we need to pass the environment variable to connect the device.
Then we will check if our Appium server is running.
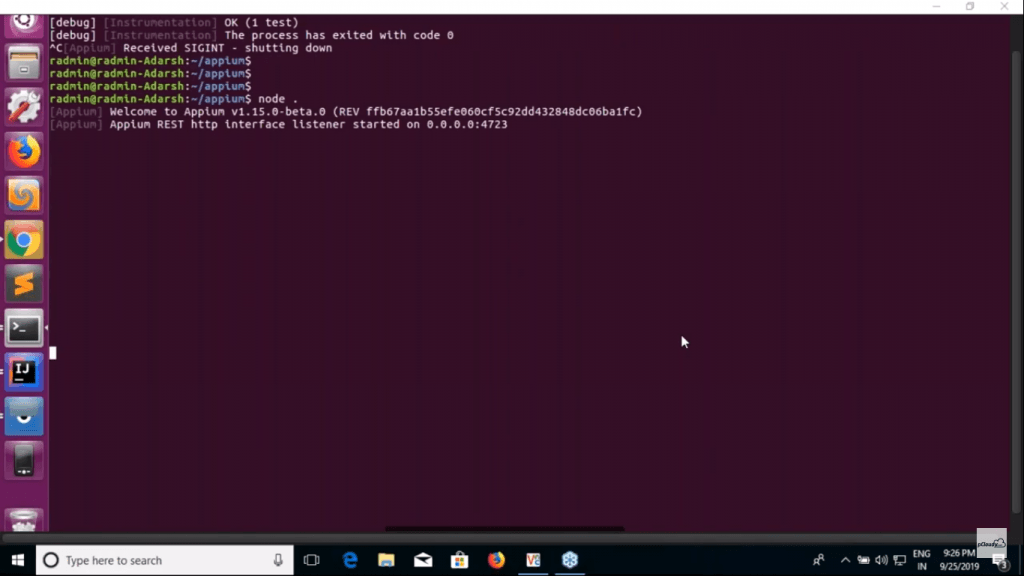
Then once you run the code you will be able to see the actions performed on the device and the counter will change to two.
This is how you can automate your Android and iOS app testing using Appium Flutter driver. Although there are many benefits of using Flutter, there are some limitations as well. The first thing is that you need to learn Dart language to develop and automate the Flutter app.
Suppose you need to run automated tests on multiple devices, then you will have to fire multiple commands in the terminal. Appium flutter driver depends on Flutter Driver APIs and as it’s still not matured enough, some actions cannot be performed.
Studies have indicated that after installing a new app, only a quarter of the users return to the app on the second day. The retention rate is eminently low and the majority of the users uninstall the app after the first use. You might have guessed the reason for this. If you think the reason is scanty testing then you are correct. A lot of times testers show little interest when testing is repetitive. Although regression testing is crucial to the success of the project, it is often overlooked to some extent. So let’s understand the concept of regression testing.
What is Regression Testing
In simple terms, regression testing can be defined as retesting a computer program after some changes are made to it to ensure that the changes do not adversely affect the existing code. Regression testing increases the chance of detecting bugs caused by changes to the application. It can help catch defects early and thus reduce the cost to resolve them.
Regression testing ensures the proper functioning of the software so that the best version of the product is released to the market. Although, creating and maintaining a near-infinite set of regression tests is not feasible at all. This is why enterprises are focusing on automating most of the regression tests to save time and effort.
Types of Regression Testing
There are different types of regression testing for different phases of testing. Let’s understand the types of regression testing.
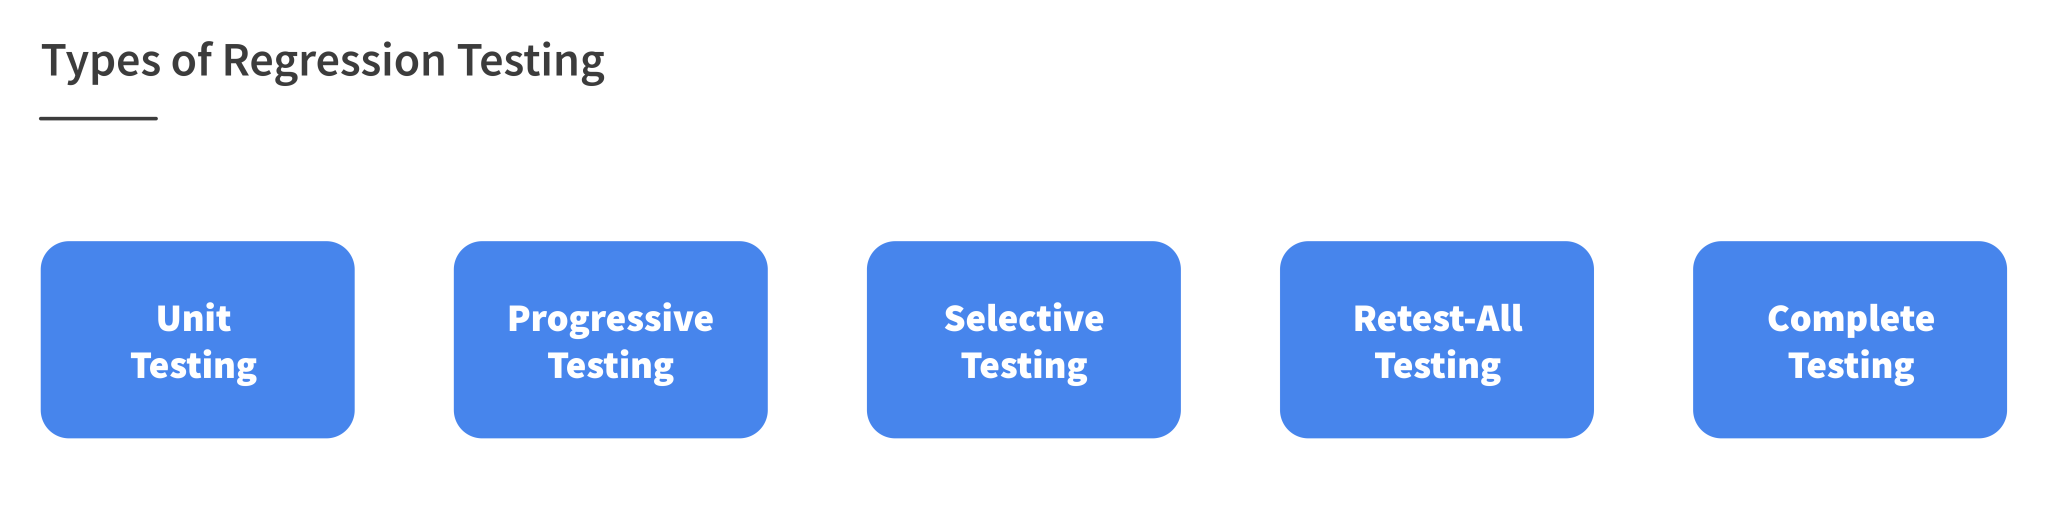
Unit Testing: It is done when coding changes are made for a single unit and a tester re-runs all previously-passed unit tests. Often automated unit tests are built into the code to make unit testing efficient.
Progressive Testing: This type of testing works effectively when there are changes done in the software/application specifications as well as new test cases are designed.
Selective Testing: In this to cut down the retesting cost and effort, testers use a subset of the current test cases. A test unit must be rerun when there are changes in the program entities it covers.
Retest-All Testing: In this, we reuse all test cases even where the changes have not been made. It shouldn’t be done where there is a small change in the application as it is very time-consuming.
Complete Testing: Complete testing is effective when multiple changes have been done in the existing code. It is done to identify unexpected bugs and the final system can be made available to the user once complete testing is done.
How to Derive a Regression Testing Plan
Whenever there is a change in the app or a new version is released the developer carries out these tests as a part of the regression testing process.
First, the developer executes unit-level regression tests to validate the code that they have modified along with any new test that is created to cover any new functionality. Then the changed code is merged and integrated to create a new build of AUT. After that smoke tests are performed to assure that the build that we have created in the previous step is good before any additional testing is performed.
These tests can be executed automatically by continuous integration services such as Jenkins. Once we get the assurance that the build is perfect then we do the sanity testing to confirm that the functionality works as expected and known defects are resolved before conducting integration testing.
Integration testing is performed to verify that the units of the apps interact with each other and with backend services such as databases. The next step is to schedule regression tests depending on the size and the scope of the code either a partial or a full regression test may take place.
Defects are reported back to the development team and many require additional runs of regression testing to confirm the resolution. So based on the test reports you can analyze and figure out what test cases can be added for the next checking process as well and you create your report on that.
Regression Testing Challenges
Automation is always a smart move but there will be some challenges that would need your attention. Let’s have a look at the challenges that you might face in automation testing.
Cost is High
In terms of business expenses, the company will have to invest a lot of time and money in repetitive testing. Also, there’s no specific return on investment that is attached to regression testing. It is a complicated process and to explain the importance of regression testing in terms of business benefits to the management is really difficult. But this has to be done to draw the budget for the testing even though it is expensive from a management point of view.
Unstructured Information
If new testers are recruited during the ongoing software testing project, either to speed up the process or to release some of the tasks. The existing testers in the organization might not have time to give complete details about the functionalities and features of the app, existing bugs, delivery time, etc. The new testers might have to initiate testing with inadequate data about the ongoing testing project. Challenges like these need an appropriate test strategy for efficient collaboration.
Time Restrictions
The focus of enterprises is on developing quality apps and delivering them faster. This is why regression testing is always time-bound. Testers always get a deadline to complete the process of regression testing. To keep pace with time, The testers might have to take chances to give more importance to the critical regression tests and skip a few tests. It is a serious challenge as it is critical to decide which tests can be skipped.
Maintenance and Optimization
A major challenge is to maintain and optimize the existing regression test suites. The existing regression test suites might need modification like adding, removing or editing the existing test cases, whenever there are new changes. All this need to be done before the deadline fixed for the regression testing. Therefore, optimization and maintenance is another challenge that needs attention.
Best Practices to Perform Regression Testing
Now that we are aware of the challenges in regression testing. Let’s have a look at the key changes we can do to enhance it.
Focus on the Frequently Used Paths
Frequently used paths also make the most frequent use cases for your app. They must include the most popular features and the basic functionality of your app. You should be aware of the core group of users and their usual interaction with the app features. The regression test cases must ensure that this core functionality is working as expected.
Update the Regression Pack Regularly
A regression pack is a collection of test cases that are performed when a new app version is released or if there are any new updates. The tests in a regression pack are created keeping in mind the app’s older version requirement specifications. Ad-hoc tests should be included in the regression pack to keep it up to date. You wouldn’t want to waste your time on tests to validate an old feature that is not included in the latest version of the app.
Create an Entry/Exit Criteria
The entry/exit criteria that we usually follow in the software development lifecycle can be implemented in regression testing as well.
As entry criteria, a fixed set of conditions need to be met like reviewing bugs and performing regression testing to fix those bugs. Exit criteria can be applied with a fixed set of conditions like making sure that all the tests are executed and no bugs remain unfixed.
Automate Regression Tests
Automating regression tests makes the process much more efficient and saves time and effort. Repetitive testing can make testers lethargic and testers might lose motivation. It also affects the quality of their work as the testing is repetitive. Automated regression testing will free up resources to work on the more complicated tests. When we use automation, the test cases along with the software can also be reused which increases the return on investment.
In a Nutshell
Change is hardest at the beginning, messiest in the middle and best at the end. This quote by Robin Sharma suits the importance of regression testing in delivering a smooth functioning app. As mentioned earlier in this blog, different types of regression testing can be performed at all stages of the testing life cycle. And there are ways to overcome the challenges in regression testing too.
One option is to use a cloud-based app testing platform which will enhance the effectiveness of regression testing by many folds. There will be hundreds of devices to perform testing in parallel and features which complement regression testing automation.
In the past couple of years, there has been a tremendous increase in voice-enabled apps in the market. This is because business is looking to make its app more user-friendly and easy to use. If the same function can be performed using just your voice then why would you waste your time entering text? Voice recognition is being used by many apps from all sectors like food delivery, eCommerce, gaming, weather, navigation, social media, etc.
The Rise of Voice-Enabled Apps and Intelligent Virtual Assistant
Voice-enabled apps are quite common these days as enterprises are trying to make it easier for users to control the app. Google was the first widely used app that utilized voice reorganization to make it simple for users to look for anything on the search engine. But when it comes to Intelligent Virtual Assistant (IVA), Apple does lead the way with Siri.
The idea of IVAs is not new and we have seen it in many Sci-Fi movies too. Take the example of Weebo from the movie Flubber. It was a flying robot assistant who recognized voice commands and helps perform daily tasks. It’s quite possible that we will see something like that soon in the market leveraging AI and drone technology.
Graphical User Interface Vs Voice User Interface
Apart from GUI, a new trend is shaping up and it’s called VUI. In the world of voice apps, the primary interaction between human and machine is done through the Voice User Interface (VUI). It is a natural form of interaction where the user can speak to the device and the device will reply or perform the task that it is asked to do. For instance, If you ask the Google assistant “How is the weather in Palo Alto?” the app will convert the analog command into binary and using AI it will reply with an audio output. Here the testers need to make sure that the app is generating the correct reply to the questions. Exploratory testing plays a key role in identifying the bugs in audio-based testing.

When it comes to GUI, it is designed in a way to make it easier for the user to navigate through the business process. The graphical interface has controls such as checkboxes, dropdown lists, radio buttons, etc, through which all the features are controlled. Therefore the tester needs to test if all the control elements are working fine in all the pages.
The fundamental difference between testing the GUI and the VUI is the input type. There is limited data input in GUI testing but in VUI testing, it can create an indefinite number of test cases. When it comes to voice apps, pairwise testing can help to get better test coverage with fewer test cases.
The Easiest way to do Audio Interaction Testing
The best way to test your app for audio functions is by using pCloudy. To perform audio testing, users need to upload their app on the platform and install it on any device of their choice. Once the device is booked and the app is installed on the device, click on the “More” option at the bottom left corner of the screen. Then you will get the audio in and audio out options in the device interaction page to do audio testing. Users can also use their voice as an input for testing using the “Audio In” feature.
This feature can be used for audio out testing as well and it is available only for devices on which audio icon is present. To perform audio output testing, just book a device on the pCloudy platform, click on the “Audio Out” icon and play any audio/video file to get the sound output on your system.
The audio testing feature is not available on any other cloud-based testing platform and this gives a big advantage to pCloudy. Testers will be able to use this feature to test their apps with voice commands. They will also be able to check if the app is responding with sound output for a particular function.
Conclusion
Looking at the popularity of voice apps, It is estimated that in the US, 111.8 million people will use a voice assistant at least once in a month in 2019. This makes up about 39.4% of internet users and 33.8% of the total population. Voice apps and assistants are gaining popularity due to its ease of use.
A lot of organizations are working on using AI and ML to make customer support automated. This means that there will be no more humans answering the phones or replying to chats. A basic version is already in practice which is the IVR. In the near future, there will be smart voice support applications that will listen to the customers and resolve their issues without human interference. This will also reduce the waiting time to talk to a support executive from the organizations. Again a great example of efficiency and speed.
For more information check out this video:
Related Articles:
[xyz-ihs snippet=”quickLinks-Appium”]
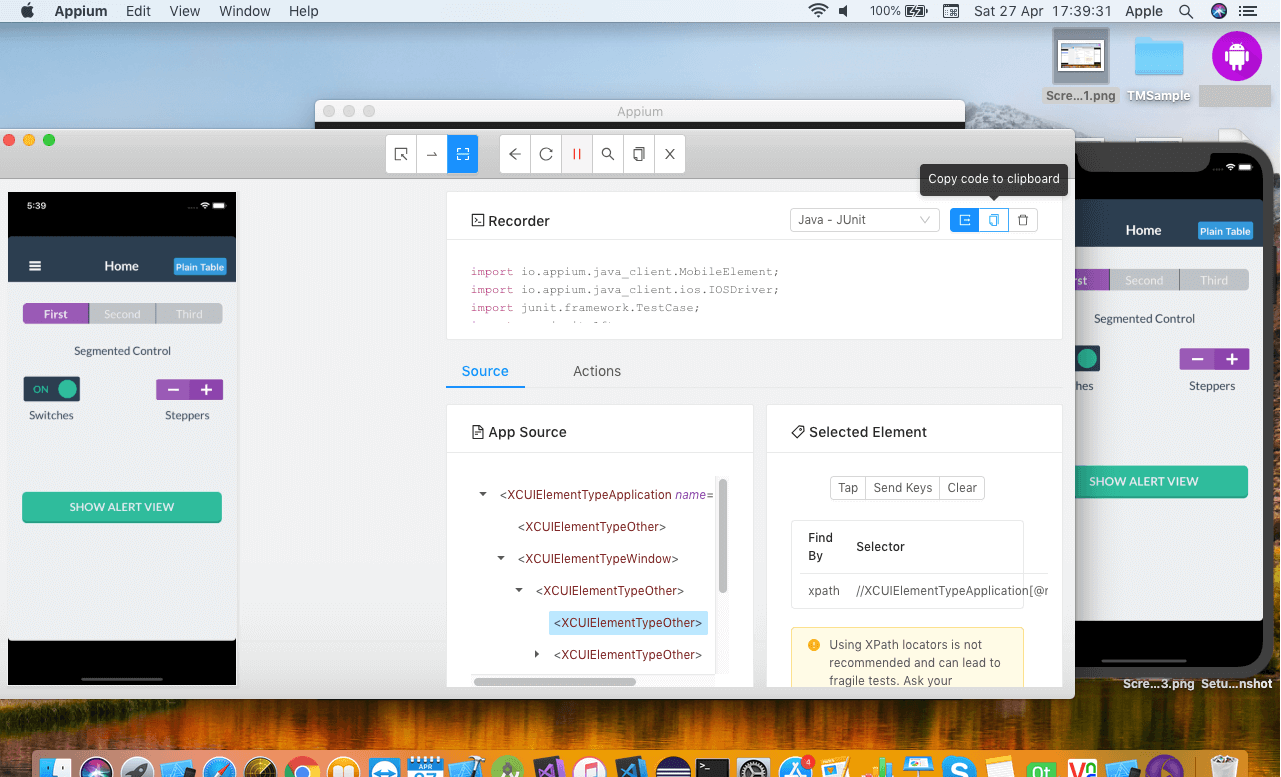
In our previous chapter on Android, we learned about UI Automator Viewer, Which is available on Android SDK, to get the properties of the application object. In the case of iOS, Appium itself provides an Inspector which helps users to locate those elements in the application.
First, open the simulator by clicking on the dock option.
Now in the Device/Simulators window, select the simulator. Open the Appium Desktop and keep the simulator side by side.
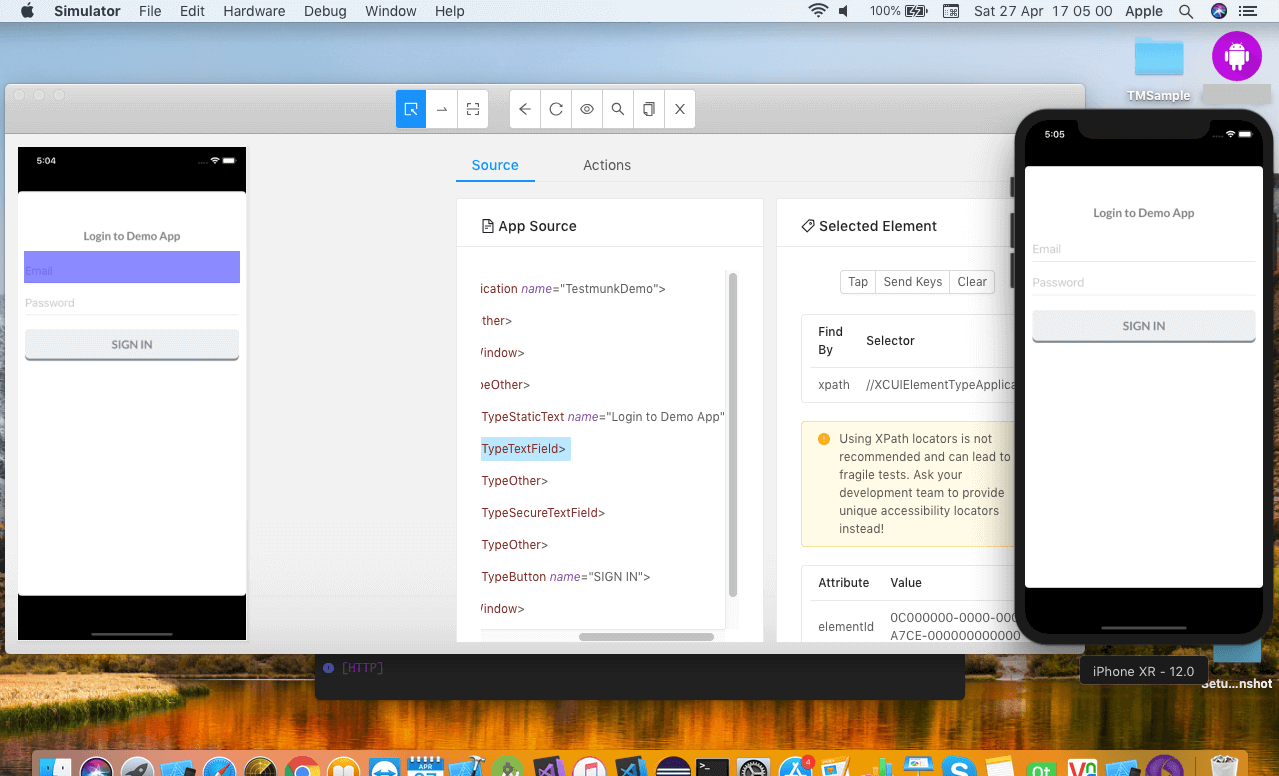
Once the inspector is started, select any of the objects on the screen. It will show you the complete hierarchy and properties of that object.
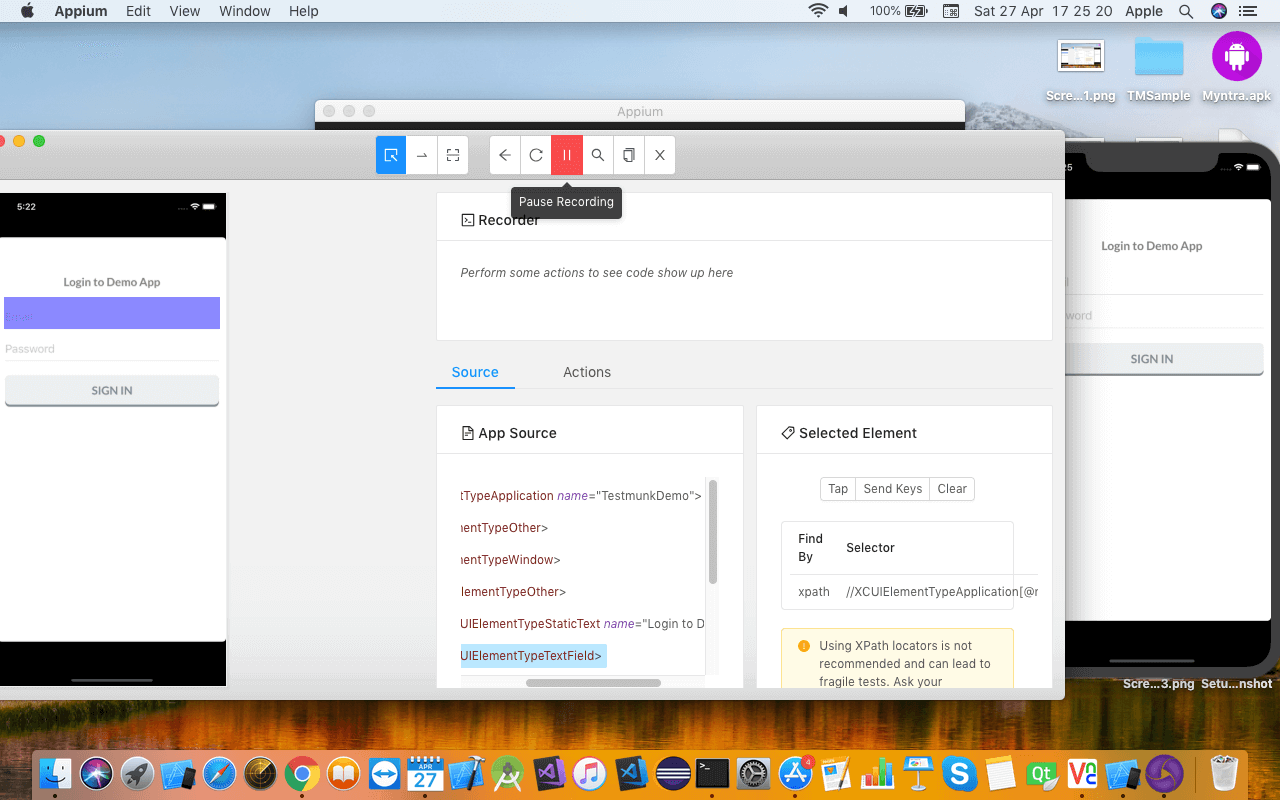
At the top of the window, you can see the Record button which is used to record all the actions taken and record the script.
To select any object, click on the Select Element button and then you can use Tap button to click on an object, Send Keys to enter text and clear to undo the action.
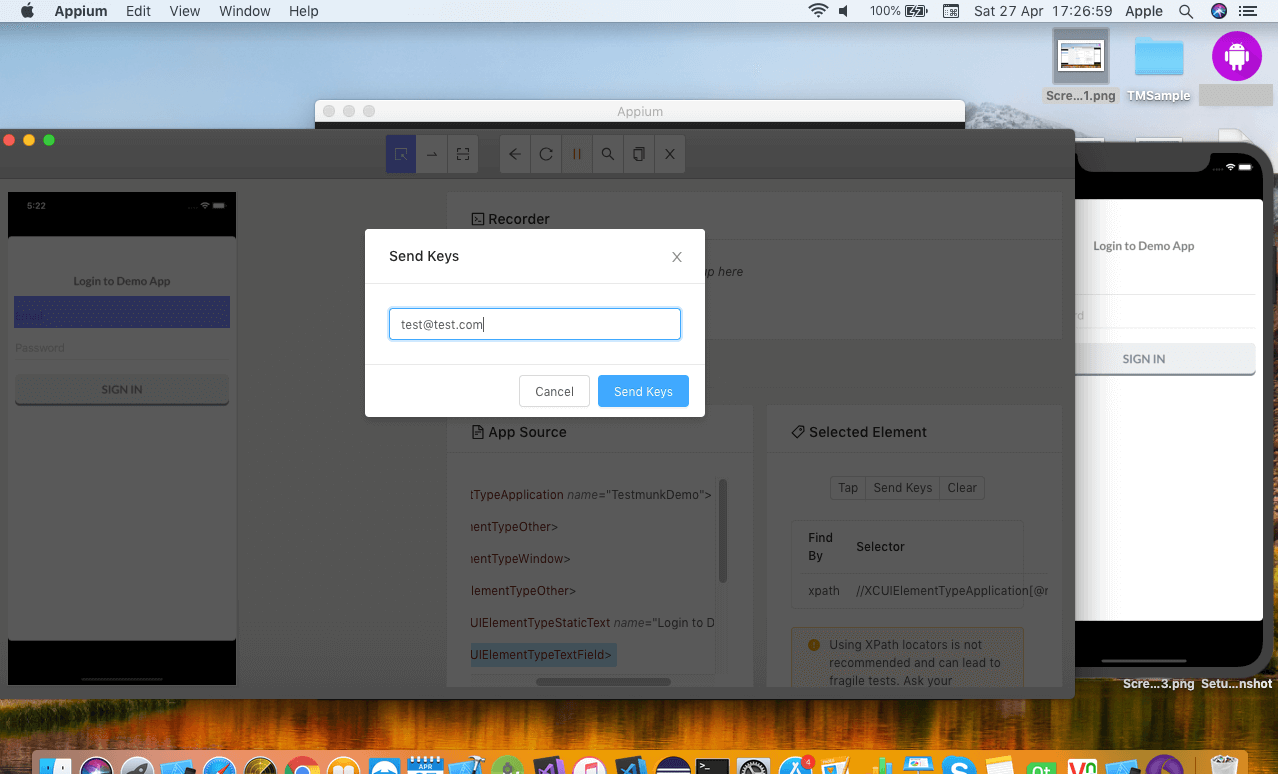
As soon as you perform an action on an object, it is recorded in the form of a script.
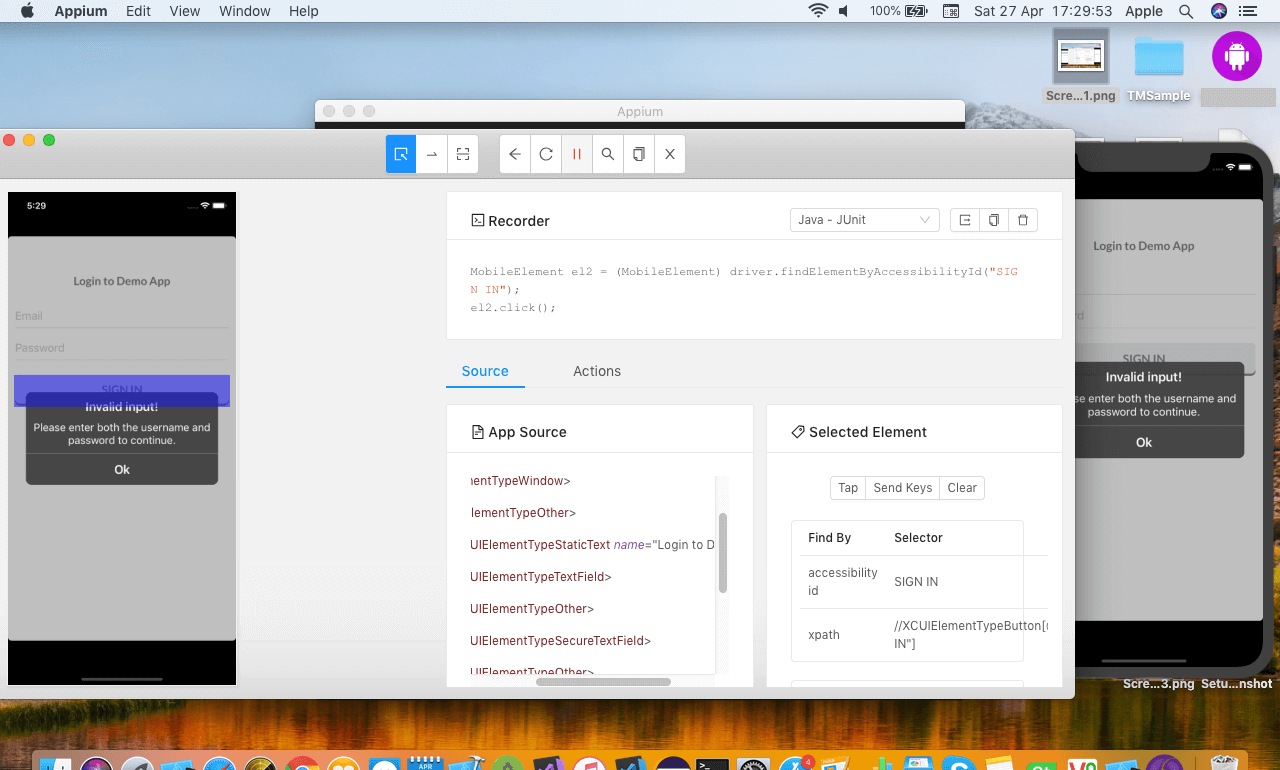
Once you are done with the recording you can copy the script and paste in eclipse editor.
In the next blog, we will learn how to write the first appium script for iOS.
Related Articles:
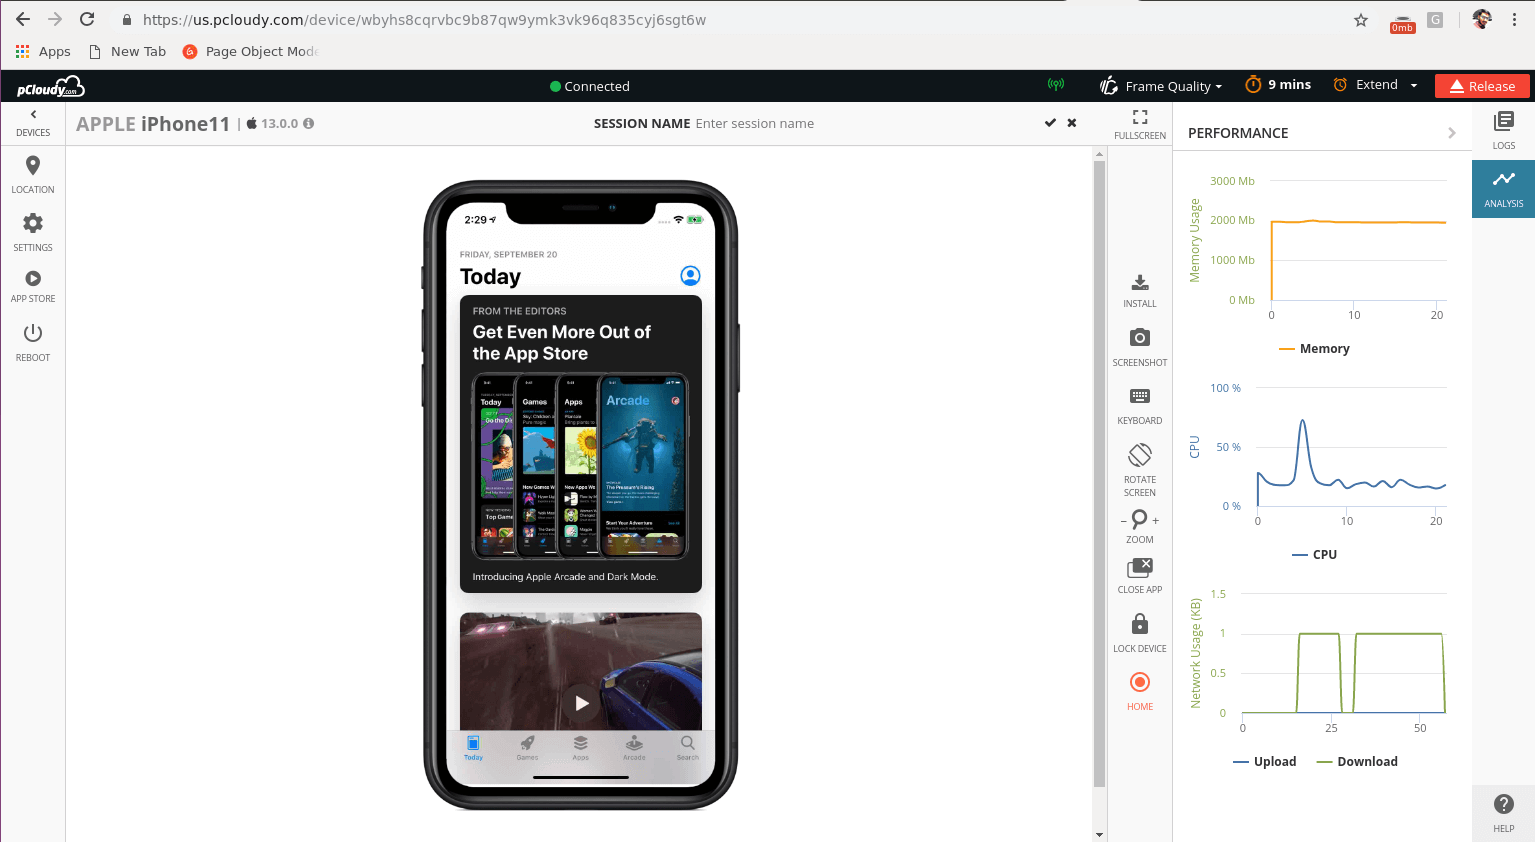
Since pCloudy is committed to providing to you with the newest, the fastest, here is another one. The newly released devices iPhone 11, iPhone 11 Pro and iPhone 11 Pro Max is now available on pCloudy for you to test your app.

Related Articles:
While there is a substantial increment in the mobile apps market share, web apps are still prevalent with a significant user base. Enterprises are focusing on the quality at speed when it comes to web apps, before deployment. This is where testing has an important role to play. UI testing is still mostly a manual process unlike some functional testing which can be automated. But it is sensible to automate testing which will save time and effort. When it comes to automation, Selenium testing is the first thing that comes to mind as it is the most popular test automation tool in the world. So let’s learn more about selenium testing.
What is Selenium Testing
Selenium testing tool is open-source and it enables users to drive interactions with the page and test the app across various platforms. It allows users to control a browser from their preferred language like Java, JavaScript, C#, PHP, Python, etc. Selenium has many tools and APIs for automating user interactions on HTML JavaScript apps on browsers like IE, Chrome, Firefox, Safari, Opera, etc.
Selenium Framework is a code structure that helps to simplify and reuse the code. Without frameworks, we will place the code as well as data in the same place which is neither re-usable nor readable. Selenium automation frameworks are beneficial for higher portability, increased code re-usage, higher code readability, reduced script maintenance cost, etc.
What is Selenium Web Driver
Selenium WebDriver accepts commands via the client API and sends them to browsers. Selenium WebDriver is a browser-specific driver which helps in accessing and launching the different browsers like Chrome, Firefox, IE, etc. The WebDriver provides an interface to create and run automation scripts and every browser has different drivers to run the tests. The different drivers are IE Driver, Firefox Driver, Safari Driver, Chrome Driver, etc.
Selenium WebDriver was introduced to negate limitations of Selenium RC, which offers enhanced support for web pages where the elements on a page change without reloading. Many browsers support selenium WebDriver and it uses each browser’s native support for automation testing. The features are supported and direct calls are made depending on the browser that is being used.
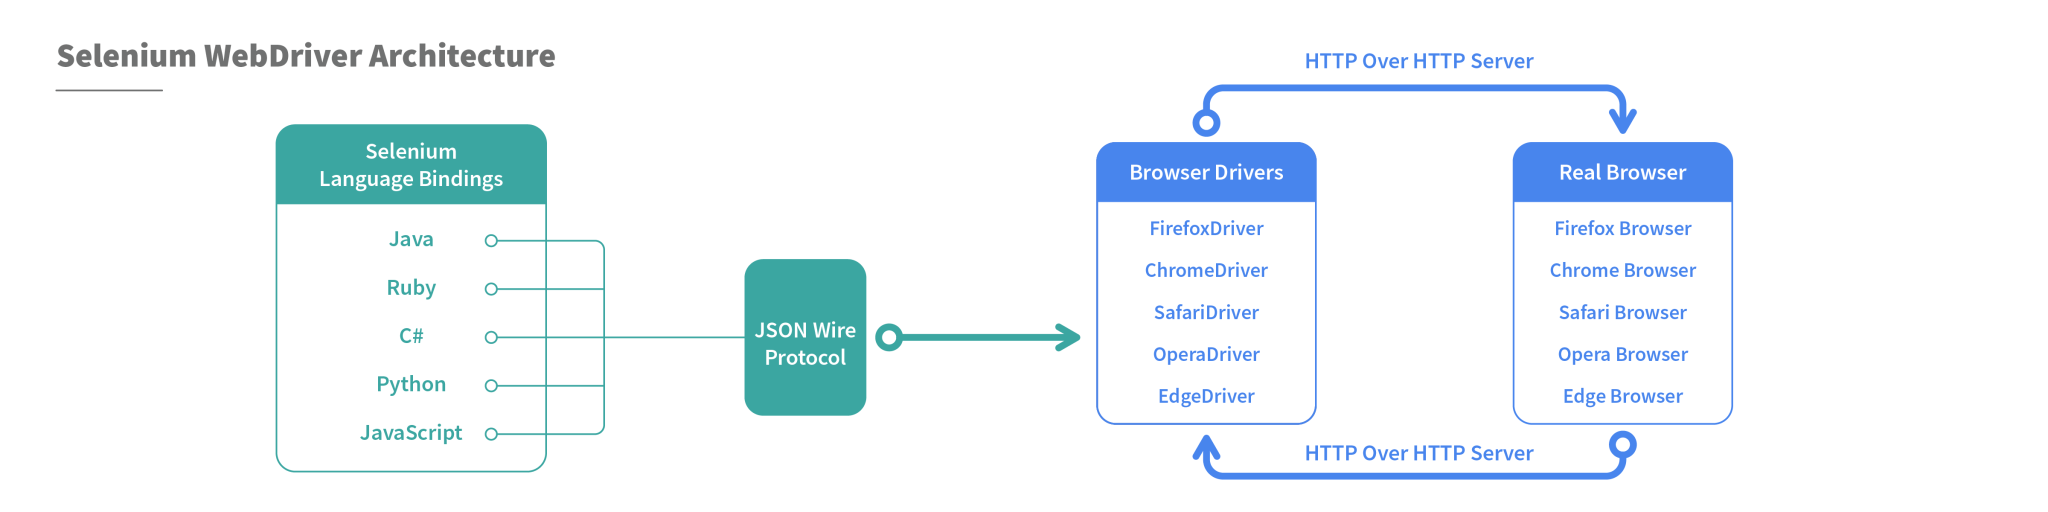
WebDriver Project depends on the programming language as well as the development environment. Selenium supports multiple languages and projects can be set up using many programming languages. Selenium provides JavaScript bindings on npm. Java projects can be setup using Maven and it will also download Java bindings and dependencies to create the project.
Run pip install selenium from the command line to add selenium in a python environment. C# bindings are there as part of a set of signed dlls and dependency dlls. You can get PHP bindings through third parties, including Chibimagic and Facebook. To add Selenium to your Ruby environment, run gem install selenium web driver from the command line.
Once you set up the environment, the selenium webdriver operates like a normal library. The selenium webdriver can self sustain as there is no need to run any installers or process before using it.
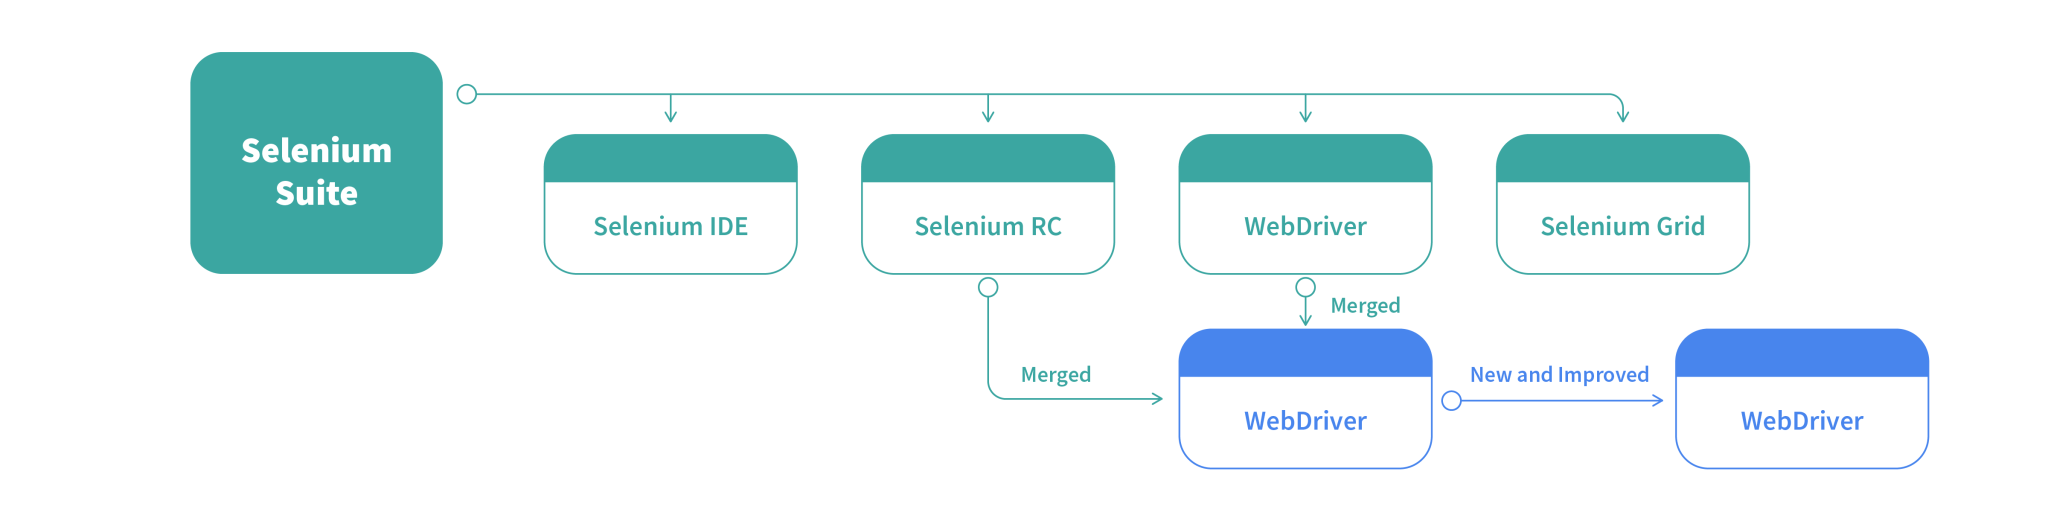
Selenium Grid
Selenium grid is a part of the Selenium Suite that allows the running of multiple test cases across different browsers, operating systems, and machines in parallel. This is called parallel testing.
In simpler words, it runs a test in parallel on multiple machines.
The test cases are triggered by a local machine. When the test cases are triggered they are automatically executed by a remote machine. So one local machine controls the triggering of test cases on multiple remote machines. For this, you need to configure a remote server so that the test cases are executed there.
Hence the architecture of the selenium grid consists of “Hub” and “Server”
Hub in Selenium Grid
Hub in selenium grid is the local machine that controls the triggering of the test cases which are executed in the multiple devices connected in parallel to it. So, the hub accepts the access request from the Webdriver client, routing the JSON test commands to the remote drives.
In short, the hub is the central machine where you will load your test and run it, but the browser will be automated in the node.
Node in Selenium Grid
A node in the selenium grid is a machine in which the browser is automated and the test cases are executed
which are triggered by the Hub. A node consists of the browser, native OS and remote web driver, in fact, all the nodes connected in parallel consists of this configuration.
How does the selenium grid work?
The selenium grid works like a regular web driver except for its two components, the Hub and Nodes (consists of remote Java Servlet which execute the test on a remote device) where the test cases are executed automatically through a remote web driver.
In your test script, you define ‘desired capabilities’ (device, platform, browser, etc.) of the node where the test will execute. The Hub receives this script, runs through the registered nodes to find one that matches the desired capabilities, and assigns the test to it for execution.
So, setting up Grid is not that difficult but scaling, configuring and maintaining its integrity may take lots of effort and resources.
Hence, Selenium Grid is mostly used for Load testing, to calculate and optimize the maximum capacity of an application to sustain the peak user load. We can use it to determine whether the current infrastructure is sufficient to run the application. To measure the number of concurrent users that an application can support and the scalability to allow more number of users to access it.
How does Selenium Boost Agile
Agile is a simple, not much organized but a continuous model that has a modular structure that promises the quality of the product.
The Agile workflow is as follows:
Once the Stakeholders agree on the simplest working design, it gets divided into smaller modules.
The module is then divided into the team of designers, software developers, and the Quality Assurance team.
The team works in a sprint to make their particular module and take a time frame called “iteration”, a window of one to four weeks to complete it. (Scrum meeting are usually carried out to gather and track work updates).
After each iteration, finished modules are put together. Multiple tests are run and the functional product is demonstrated to the stakeholder.
On receiving the product, it is evaluated by the stakeholders, add customer feedback and adapt as required, (they might ask the engineering team to add features in the product whenever required).
Where does the Selenium automation come in:
After every iteration, the finished product goes through a number of testing like System and Integration testing. After receiving the functional product the stakeholders carry out the unit and user acceptance test.
If there is any change or any feature is added then gain a series of functional test including regression testing is executed
In this way, Selenium testing is very suitable and boost Agile Methodology.
What types of testing can be automated by Selenium:
1.Compatibility Testing
Compatibility Testing is done by the QA team to assure that the web app meets the desired requirements on the browser-OS combination. Testing on various devices of different screen sizes is required to measure the responsiveness of the app. We need to test if the app is able to function properly in different types of browsers, also, for instance, to check whether the video adds are executed properly and runs on every browser and screen size. Here selenium automation will reduce the time and effort to execute the test cases.
2. Performance Testing
After the finished or functional product is handed over to the stakeholders they may run a series of performance testing to measure various parameters like loading speed, the navigation speed in case of web apps, responsiveness and stability of the product. In this case, an open-source tool like selenium which is easy to install and execute can be used to get accurate and efficient results.
3. Integration Testing
Integration testing is usually done while integrating all the modules coded separately also functions properly when assembled together. It is usually done when a new feature is added to the system. This requires a suite of lengthy test cases that requires automation to fetch efficient results. Selenium testing can make the process very easy.
4. Regression testing
A series of test cases are required to check if the new build feature is working in accordance with the existing feature. Also, you need to check if there is any adverse effect on the app due to the newly added feature. This is called regression testing. For example, if you want to add a call to action button in your blog page, you need to make sure that the button is working fine and also there is no change in the content of the blog page. Again selenium testing can help you to reduce the effort of using lengthy and test cases while giving accurate results.
Writing a Script for Selenium Automation
Let’s see how to launch a browser from the script. Make sure you have downloaded the selenium jar files and the third-party drivers. To launch a browser, the first thing you need to do is to create an object for web driver. Then use a get method to launch a new browser session and direct it to the URL specified in the parameters.
Now you need the system pointing to the location of the downloaded exe file of your browser. You can do that by using System.setProperty. Then provide the browser driver in the key and the path to the location of the browser exe file in the value. Here System is a build-in class and setProperty is a method to access the browser driver.
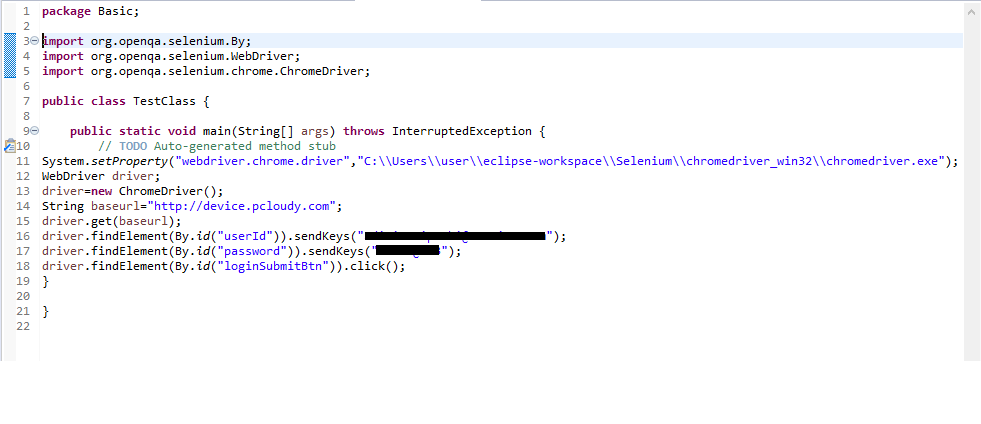
Once the path is set, you need to create an object for the WebDriver class. Hover the mouse on the highlighted value and then import it from the list as we have already added the jar files in the project.
There are two more methods, driver.close() which can be used to close the active browser window and driver.quit() is used to close the browser as well as all the associated windows.
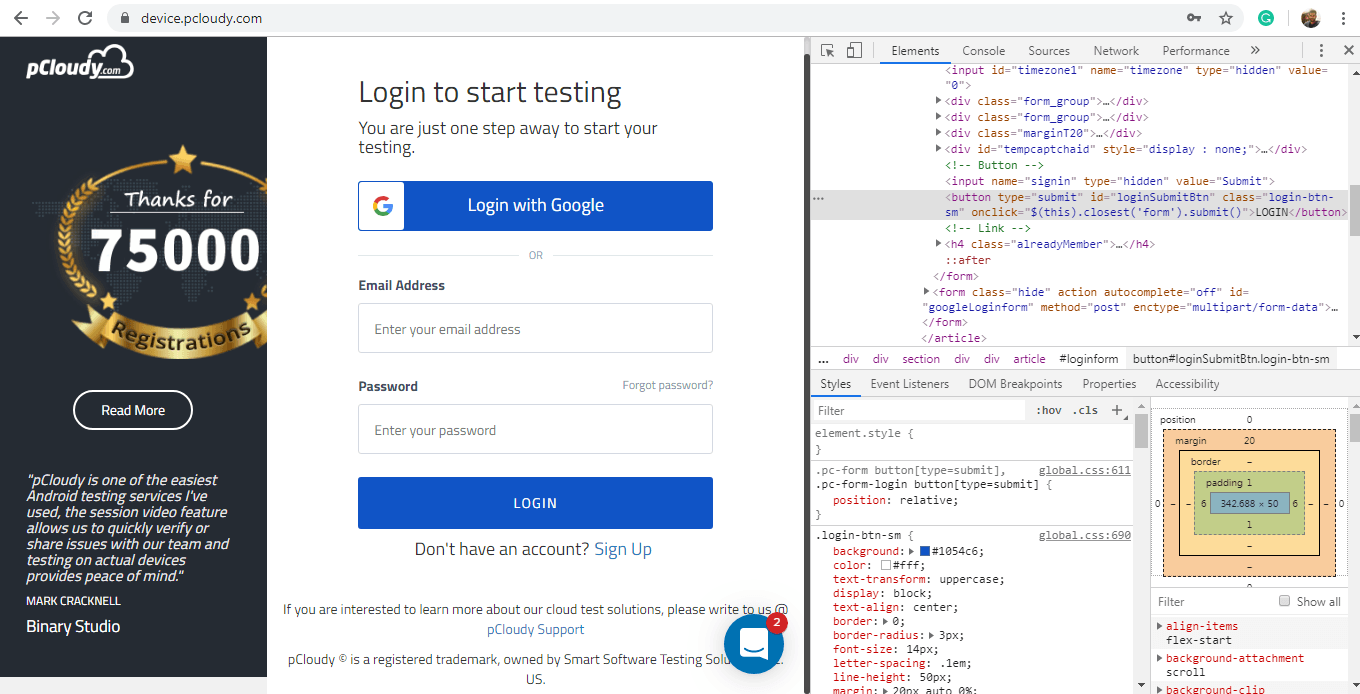
To get the ID of any element in a web page like a button, image, logo, textbox etc., Just right-click and select inspect. You will get the source code from where you can copy the ID to be used in the script. You can also use any other element locator for the script.
Now mention the driver instance and select the findElement method from the WebDriver class. Then select the ID locator and mentions the value which we copied from the source code. Use sendKeys to pass some value to a particular web element.
How to use Selenium IDE for Test Automation
Running test cases in Selenium IDE is easy. It is a Firefox plug-in which helps in recording the test and convert into code. There are multiple options for running a test case including a “Run” button to run the displayed test case.
The “Run All” button is used to run the test cases in the test suite that are currently loaded. The “Pause” button allows pausing and restarting of a running test case. There is a “Speed” button to maintain the speed of the test case runs. With the “Record” button you can record the actions taken in the web browser.
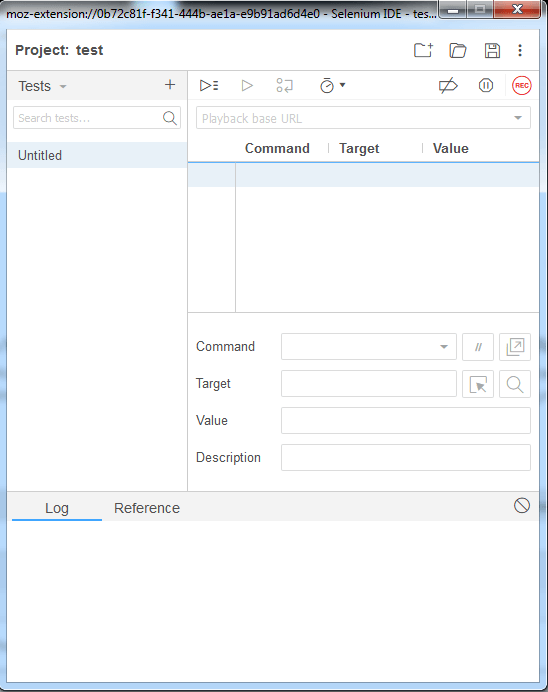
You can also use a base URL in selenium IDE to run test cases in multiple domains by mentioning a relative URL as the argument to open the test case.
The table displays the command and their parameters in a readable format. Whereas the command target and value fields display the currently selected command along with its parameters. The log will show you any kind of error messages and information messages and in the reference, you will find the documentation of the selenium command currently used.
You can use a simple HTML file and define your list of tests to define a test suite. Each row in the file should define the path to the tests you want to add in the suite. You’ll find many ways to put these tools to use to improve the development and testing processes.
To Sum Up
Enterprises are always looking to optimize the testing process and automation is one way to do it. Although it is important to use an effective tool for automation and Selenium automation testing is the best choice as it is open source and easy to use. Apart from Selenium testing, you can also opt for advanced tools like pCloudy, which has better features to make automation testing smooth as butter.
Related Articles: