In today’s fast-paced development landscape, quality assurance is no longer the sole responsibility of QA teams. Developers and testers are increasingly working together as part of a DevOps-first approach, ensuring that quality is embedded throughout the development lifecycle. Nowhere is this collaboration more critical than in mobile app testing, where continuous iterations demand faster feedback and efficient testing strategies.
To keep pace with this, developers need tools that provide real-time testing capabilities on real devices. This is where cloud-based solutions bridge the gap between development and quality, empowering teams to test and debug seamlessly.
The Importance of App Testing in DevOps
In the world of DevOps, where speed and agility define success, continuous testing is a crucial pillar. App testing in DevOps goes beyond finding bugs; it plays an integral role in ensuring seamless collaboration, faster releases, and enhanced product quality. Here’s an in-depth look at why app testing is indispensable in DevOps.
1. Enables Faster Feedback Loops
In DevOps, the objective is to deliver high-quality software quickly and continuously. Testing provides instant feedback on the quality of the code after every change, helping developers address issues early. This prevents defects from compounding and becoming costlier to fix later.
Key Benefits:
- Developers receive immediate insights after each code check-in.
- Bugs are detected and fixed in real-time, avoiding production delays.
- Faster resolution times improve overall efficiency and team productivity.
2. Ensures Continuous Integration and Delivery (CI/CD)
Continuous testing forms the backbone of CI/CD pipelines, ensuring that automated tests are executed with every build. This practice ensures that each integration of new code doesn’t break existing functionality.
Key Benefits:
- Reduces the chances of last-minute surprises before deployment.
- Ensures new features and patches are stable before they are merged.
- Automates regression tests to validate large portions of the codebase efficiently.
3. Supports Shift-Left and Shift-Right Testing Approaches
DevOps encourages a shift-left testing approach where testing is conducted early in the development lifecycle. Additionally, shift-right testing focuses on post-deployment monitoring to gather user feedback and ensure stability in production.
Key Benefits:
- Early testing (shift-left) identifies issues before they become deeply embedded.
- Post-release testing (shift-right) enhances user experience and reliability in real-world environments.
- Combines pre-release and post-release insights to drive continuous improvement.
4. Reduces Time-to-Market
App testing in DevOps accelerates the release cycles by automating repetitive test cases and integrating them into the CI/CD process. Automated tests enable teams to quickly validate code changes and release builds faster.
Key Benefits:
- Speeds up regression and performance testing.
- Allows frequent releases without compromising quality.
- Reduces bottlenecks in the testing process, helping teams meet tight timelines.
5. Enhances Collaboration and Transparency
DevOps fosters a culture of collaboration between development, QA, and operations teams. Automated test reports and dashboards improve visibility, ensuring that all stakeholders are aware of the application’s health.
Key Benefits:
- Improves cross-functional communication through shared dashboards.
- Helps developers, testers, and operations teams work in sync toward a common goal.
- Reduces miscommunication and silos by providing a single source of truth for quality metrics.
6. Increases Test Coverage and Reliability
Manual testing is often limited by time and resources, while automated testing within a DevOps framework ensures comprehensive test coverage. This includes functional, performance, security, and compatibility tests.
Key Benefits:
- Executes thousands of test cases across various environments.
- Validates edge cases, boundary conditions, and stress tests in parallel.
- Ensures that all areas of the application are consistently validated.
7. Reduces Post-Release Defects
One of the goals of DevOps is to minimize post-release issues. Automated testing detects vulnerabilities and inconsistencies in pre-production stages, reducing the risk of defects in live environments.
Key Benefits:
- Enhances customer satisfaction by reducing app crashes and bugs.
- Improves product stability, even after frequent updates.
- Reduces the costs associated with post-release hotfixes and patches.
8. Enables Scalability of Testing Across Devices and Environments
For mobile app testing, DevOps workflows require testing across different devices, operating systems, and screen sizes. Cloud-based testing platforms ensure that teams can scale their testing efforts without maintaining physical device labs.
Key Benefits:
- Provides access to hundreds of real devices for testing.
- Ensures compatibility across various OS versions and device models.
- Supports parallel testing, significantly reducing execution time.
9. Facilitates Performance and Load Testing
In a DevOps environment, testing isn’t limited to functional validation. Performance and load testing are essential to ensure that the application can handle real-world usage patterns and peak traffic.
Key Benefits:
- Identifies potential performance bottlenecks early.
- Ensures the application remains responsive under heavy user loads.
- Prevents service disruptions by validating server and API performance.
10. Promotes Continuous Improvement
DevOps is centered around the concept of continuous improvement, and testing plays a key role in gathering insights for refinement. Test results, post-deployment feedback, and analytics help teams fine-tune their processes.
Key Benefits:
- Provides actionable insights for improving the testing process.
- Helps in refining test cases based on past failures and new scenarios.
- Encourages experimentation and learning from each release cycle.
Why App Testing is Critical in DevOps
Without continuous testing, DevOps practices cannot achieve their full potential. Here’s why app testing is a critical component in DevOps:
- Prevents regression issues with each code iteration.
- Improves release confidence, ensuring builds are stable and reliable.
- Optimizes workflows, enabling teams to focus on innovation rather than firefighting.
By incorporating robust testing tools and strategies, teams can automate mundane tasks, improve coverage, and release high-quality software faster. Platforms like Pcloudy empower teams by providing cloud-based device access, real-time debugging, and seamless integration with CI/CD pipelines.
Challenges Faced by Developers
Despite advancements in DevOps, mobile app developers continue to face unique challenges when testing apps:
- Access to a Variety of Devices and OS Versions
Developers need to test their apps on different device models, screen sizes, and operating system versions to ensure compatibility and performance. However, maintaining an in-house library of physical devices is expensive and difficult to manage due to:
- Frequent OS updates and new device launches.
- The need for both legacy and latest devices to cover all user scenarios.
- Limited access to rare or region-specific device models.
This results in insufficient device coverage, leading to undetected bugs in production when users with different device configurations encounter issues.
2. Need for Robust Debugging Capabilities on Real Devices
Even when organizations provide device clouds, developers often lack the level of control they need for comprehensive debugging. Many platforms only allow basic interactions, such as installing and uninstalling apps, without:
- Access to system-level logs and detailed runtime data.
- Support for issuing custom ADB (Android Debug Bridge) commands.
- Advanced capabilities like port forwarding and shell access for running diagnostic commands.
Without robust debugging, identifying the root cause of complex issues becomes time-consuming, impacting development speed and overall productivity.
- Access to Specific Device Models for Debugging Production Issues
When an issue is reported in production, developers need access to the exact device model and OS version where the bug occurred. Unfortunately, this is not always feasible due to:
- Limited physical devices in-house that may not match the reported configuration.
- Remote or distributed teams that cannot easily share physical devices.
- High costs and logistics associated with procuring new devices for debugging one-off issues.
In such cases, developers often resort to inefficient workarounds or face delays in issue resolution, which can affect customer experience and app ratings.
- Cumbersome Physical Device Setup
In many workspaces, developers juggle multiple mobile devices connected to their computers via USB cables. This setup often leads to:
- Tangled cables and overcrowded workspaces.
- Devices frequently disconnecting during testing.
- Lost time switching between different devices for testing and debugging.
These inefficiencies slow down development cycles and create unnecessary frustration, especially when working on apps with frequent updates and tight release timelines.
Cloud-Based Solutions for Developers
To address the challenge of device access, many organizations have adopted device clouds that provide remote access to a library of real devices hosted in data centers. These platforms allow developers and testers to:
- Run tests on various device models and OS versions without managing physical devices.
- Scale their testing efforts without maintaining an expensive in-house device lab.
However, most device clouds are designed primarily for QA teams and automated testing, offering limited support for hands-on debugging by developers. Key limitations include:
- No direct integration with popular IDEs like Android Studio or Eclipse.
- Restricted access to ADB commands, making real-time debugging difficult.
- Limited file transfer options for testing specific scenarios.
Due to these gaps, developers often still rely on physical devices, undermining the benefits of cloud-based solutions.
Introducing DeviceTunnel by Pcloudy
Pcloudy’s DeviceTunnel bridges the gap between device clouds and developer needs by enabling complete control of cloud-hosted devices directly from the developer’s local environment.
How DeviceTunnel Works
- Connects to Pcloudy’s cloud servers over the internet.
- Appears to local tools like Android Studio or Eclipse as if it’s physically connected via USB.
- Developers can interact with the cloud-based device exactly as they would with a physical device.
Capabilities of DeviceTunnel
Once connected, developers can perform a wide range of actions to debug and test their apps:
- Issue ADB Commands: Execute commands for debugging, shell creation, port forwarding, and retrieving system information.
- File Transfer: Push and pull files between the local system and cloud-based devices for testing various use cases.
- App Management: Install and uninstall applications seamlessly.
- Advanced Debugging: Add breakpoints, inspect variables, and analyze runtime metrics to identify performance bottlenecks and optimize the app.
- Run Tests Directly from the IDE: Execute tests within the development environment without needing to switch to external platforms or tools.
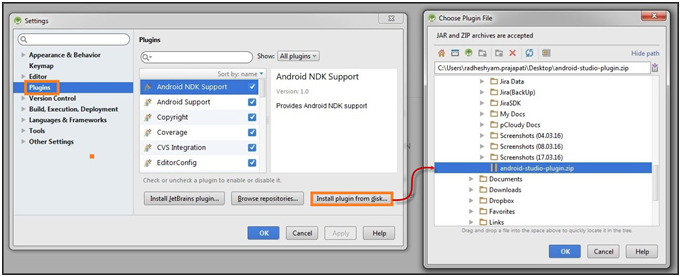
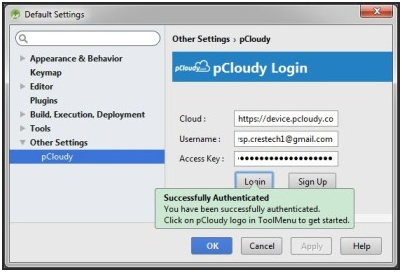
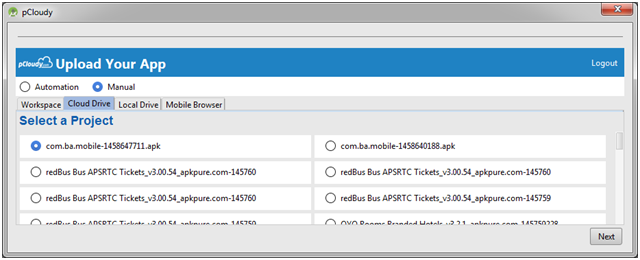
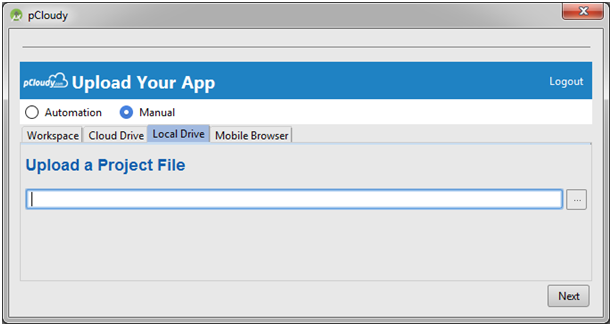
For a step-by-step guide on connecting to cloud devices using DeviceTunnel, click here.
Why DeviceTunnel is a Game-Changer
DeviceTunnel transforms cloud-based mobile app testing by providing developers with real-time, hands-on access to cloud-hosted devices.
- Eliminates Physical Device Setup
a. No need to maintain an in-house library of physical devices.
b. Reduces clutter and time spent managing physical connections.
2. Real-Time Debugging
a. Debug apps on real devices as if they were connected locally.
b. Identify and resolve issues faster with direct ADB access and advanced debugging features.
3. Seamless Integration with IDEs
a.Works seamlessly with Android Studio, Eclipse, and command-line tools.
b. Enables uninterrupted workflows for faster development cycles.
4.Improves Collaboration Across Teams
a. QA and development teams can share device logs and testing results.
b. Ensures smoother handoffs between testing and debugging stages.
In an era where speed and quality are non-negotiable, DeviceTunnel helps teams bridge the gap between local development and cloud testing. By empowering developers with real-time device access, Pcloudy enables faster debugging, fewer production defects, and accelerated release cycles—ultimately enhancing the overall app experience.


