Studies have indicated that after installing a new app, only a quarter of the users return to the app on the second day. The retention rate is eminently low and the majority of the users uninstall the app after the first use. You might have guessed the reason for this. If you think the reason is scanty testing then you are correct. A lot of times testers show little interest when testing is repetitive. Although regression testing is crucial to the success of the project, it is often overlooked to some extent. So let’s understand the concept of regression testing.
What is Regression Testing
In simple terms, regression testing can be defined as retesting a computer program after some changes are made to it to ensure that the changes do not adversely affect the existing code. Regression testing increases the chance of detecting bugs caused by changes to the application. It can help catch defects early and thus reduce the cost to resolve them.
Regression testing ensures the proper functioning of the software so that the best version of the product is released to the market. Although, creating and maintaining a near-infinite set of regression tests is not feasible at all. This is why enterprises are focusing on automating most of the regression tests to save time and effort.
Types of Regression Testing
There are different types of regression testing for different phases of testing. Let’s understand the types of regression testing.
Unit Testing: It is done when coding changes are made for a single unit and a tester re-runs all previously-passed unit tests. Often automated unit tests are built into the code to make unit testing efficient.
Progressive Testing: This type of testing works effectively when there are changes done in the software/application specifications as well as new test cases are designed.
Selective Testing: In this to cut down the retesting cost and effort, testers use a subset of the current test cases. A test unit must be rerun when there are changes in the program entities it covers.
Retest-All Testing: In this, we reuse all test cases even where the changes have not been made. It shouldn’t be done where there is a small change in the application as it is very time-consuming.
Complete Testing: Complete testing is effective when multiple changes have been done in the existing code. It is done to identify unexpected bugs and the final system can be made available to the user once complete testing is done.
How to Derive a Regression Testing Plan
Whenever there is a change in the app or a new version is released the developer carries out these tests as a part of the regression testing process.
First, the developer executes unit-level regression tests to validate the code that they have modified along with any new test that is created to cover any new functionality. Then the changed code is merged and integrated to create a new build of AUT. After that smoke tests are performed to assure that the build that we have created in the previous step is good before any additional testing is performed.
These tests can be executed automatically by continuous integration services such as Jenkins. Once we get the assurance that the build is perfect then we do the sanity testing to confirm that the functionality works as expected and known defects are resolved before conducting integration testing.
Integration testing is performed to verify that the units of the apps interact with each other and with backend services such as databases. The next step is to schedule regression tests depending on the size and the scope of the code either a partial or a full regression test may take place.
Defects are reported back to the development team and many require additional runs of regression testing to confirm the resolution. So based on the test reports you can analyze and figure out what test cases can be added for the next checking process as well and you create your report on that.
Regression Testing Challenges
Automation is always a smart move but there will be some challenges that would need your attention. Let’s have a look at the challenges that you might face in automation testing.
Cost is High
In terms of business expenses, the company will have to invest a lot of time and money in repetitive testing. Also, there’s no specific return on investment that is attached to regression testing. It is a complicated process and to explain the importance of regression testing in terms of business benefits to the management is really difficult. But this has to be done to draw the budget for the testing even though it is expensive from a management point of view.
Unstructured Information
If new testers are recruited during the ongoing software testing project, either to speed up the process or to release some of the tasks. The existing testers in the organization might not have time to give complete details about the functionalities and features of the app, existing bugs, delivery time, etc. The new testers might have to initiate testing with inadequate data about the ongoing testing project. Challenges like these need an appropriate test strategy for efficient collaboration.
Time Restrictions
The focus of enterprises is on developing quality apps and delivering them faster. This is why regression testing is always time-bound. Testers always get a deadline to complete the process of regression testing. To keep pace with time, The testers might have to take chances to give more importance to the critical regression tests and skip a few tests. It is a serious challenge as it is critical to decide which tests can be skipped.
Maintenance and Optimization
A major challenge is to maintain and optimize the existing regression test suites. The existing regression test suites might need modification like adding, removing or editing the existing test cases, whenever there are new changes. All this need to be done before the deadline fixed for the regression testing. Therefore, optimization and maintenance is another challenge that needs attention.
Best Practices to Perform Regression Testing
Now that we are aware of the challenges in regression testing. Let’s have a look at the key changes we can do to enhance it.
Focus on the Frequently Used Paths
Frequently used paths also make the most frequent use cases for your app. They must include the most popular features and the basic functionality of your app. You should be aware of the core group of users and their usual interaction with the app features. The regression test cases must ensure that this core functionality is working as expected.
Update the Regression Pack Regularly
A regression pack is a collection of test cases that are performed when a new app version is released or if there are any new updates. The tests in a regression pack are created keeping in mind the app’s older version requirement specifications. Ad-hoc tests should be included in the regression pack to keep it up to date. You wouldn’t want to waste your time on tests to validate an old feature that is not included in the latest version of the app.
Create an Entry/Exit Criteria
The entry/exit criteria that we usually follow in the software development lifecycle can be implemented in regression testing as well.
As entry criteria, a fixed set of conditions need to be met like reviewing bugs and performing regression testing to fix those bugs. Exit criteria can be applied with a fixed set of conditions like making sure that all the tests are executed and no bugs remain unfixed.
Automate Regression Tests
Automating regression tests makes the process much more efficient and saves time and effort. Repetitive testing can make testers lethargic and testers might lose motivation. It also affects the quality of their work as the testing is repetitive. Automated regression testing will free up resources to work on the more complicated tests. When we use automation, the test cases along with the software can also be reused which increases the return on investment.
In a Nutshell
Change is hardest at the beginning, messiest in the middle and best at the end. This quote by Robin Sharma suits the importance of regression testing in delivering a smooth functioning app. As mentioned earlier in this blog, different types of regression testing can be performed at all stages of the testing life cycle. And there are ways to overcome the challenges in regression testing too.
One option is to use a cloud-based app testing platform which will enhance the effectiveness of regression testing by many folds. There will be hundreds of devices to perform testing in parallel and features which complement regression testing automation.
In the past couple of years, there has been a tremendous increase in voice-enabled apps in the market. This is because business is looking to make its app more user-friendly and easy to use. If the same function can be performed using just your voice then why would you waste your time entering text? Voice recognition is being used by many apps from all sectors like food delivery, eCommerce, gaming, weather, navigation, social media, etc.
The Rise of Voice-Enabled Apps and Intelligent Virtual Assistant
Voice-enabled apps are quite common these days as enterprises are trying to make it easier for users to control the app. Google was the first widely used app that utilized voice reorganization to make it simple for users to look for anything on the search engine. But when it comes to Intelligent Virtual Assistant (IVA), Apple does lead the way with Siri.
The idea of IVAs is not new and we have seen it in many Sci-Fi movies too. Take the example of Weebo from the movie Flubber. It was a flying robot assistant who recognized voice commands and helps perform daily tasks. It’s quite possible that we will see something like that soon in the market leveraging AI and drone technology.
Graphical User Interface Vs Voice User Interface
Apart from GUI, a new trend is shaping up and it’s called VUI. In the world of voice apps, the primary interaction between human and machine is done through the Voice User Interface (VUI). It is a natural form of interaction where the user can speak to the device and the device will reply or perform the task that it is asked to do. For instance, If you ask the Google assistant “How is the weather in Palo Alto?” the app will convert the analog command into binary and using AI it will reply with an audio output. Here the testers need to make sure that the app is generating the correct reply to the questions. Exploratory testing plays a key role in identifying the bugs in audio-based testing.
When it comes to GUI, it is designed in a way to make it easier for the user to navigate through the business process. The graphical interface has controls such as checkboxes, dropdown lists, radio buttons, etc, through which all the features are controlled. Therefore the tester needs to test if all the control elements are working fine in all the pages.
The fundamental difference between testing the GUI and the VUI is the input type. There is limited data input in GUI testing but in VUI testing, it can create an indefinite number of test cases. When it comes to voice apps, pairwise testing can help to get better test coverage with fewer test cases.
The Easiest way to do Audio Interaction Testing
The best way to test your app for audio functions is by using pCloudy. To perform audio testing, users need to upload their app on the platform and install it on any device of their choice. Once the device is booked and the app is installed on the device, click on the “More” option at the bottom left corner of the screen. Then you will get the audio in and audio out options in the device interaction page to do audio testing. Users can also use their voice as an input for testing using the “Audio In” feature.
This feature can be used for audio out testing as well and it is available only for devices on which audio icon is present. To perform audio output testing, just book a device on the pCloudy platform, click on the “Audio Out” icon and play any audio/video file to get the sound output on your system.
The audio testing feature is not available on any other cloud-based testing platform and this gives a big advantage to pCloudy. Testers will be able to use this feature to test their apps with voice commands. They will also be able to check if the app is responding with sound output for a particular function.
Conclusion
Looking at the popularity of voice apps, It is estimated that in the US, 111.8 million people will use a voice assistant at least once in a month in 2019. This makes up about 39.4% of internet users and 33.8% of the total population. Voice apps and assistants are gaining popularity due to its ease of use.
A lot of organizations are working on using AI and ML to make customer support automated. This means that there will be no more humans answering the phones or replying to chats. A basic version is already in practice which is the IVR. In the near future, there will be smart voice support applications that will listen to the customers and resolve their issues without human interference. This will also reduce the waiting time to talk to a support executive from the organizations. Again a great example of efficiency and speed.
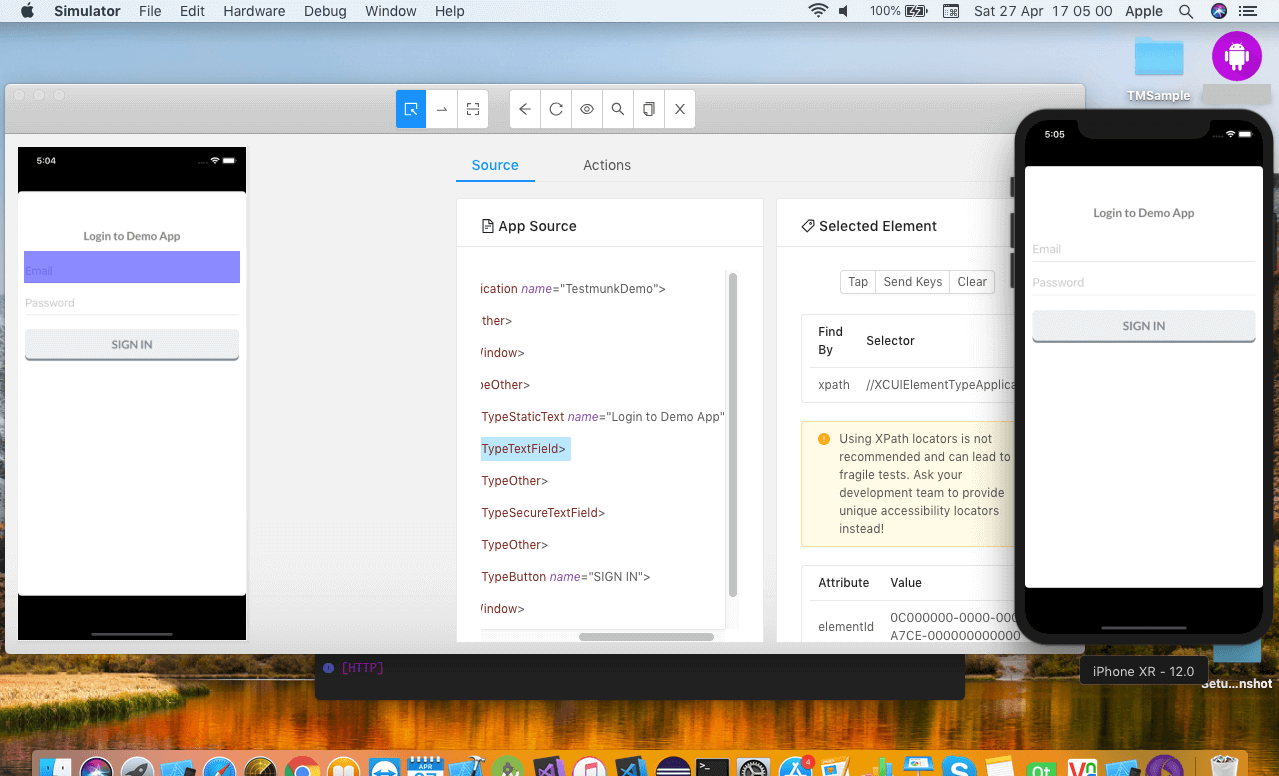
In our previous chapter on Android, we learned about UI Automator Viewer, Which is available on Android SDK, to get the properties of the application object. In the case of iOS, Appium itself provides an Inspector which helps users to locate those elements in the application.
First, open the simulator by clicking on the dock option.
Now in the Device/Simulators window, select the simulator. Open the Appium Desktop and keep the simulator side by side.
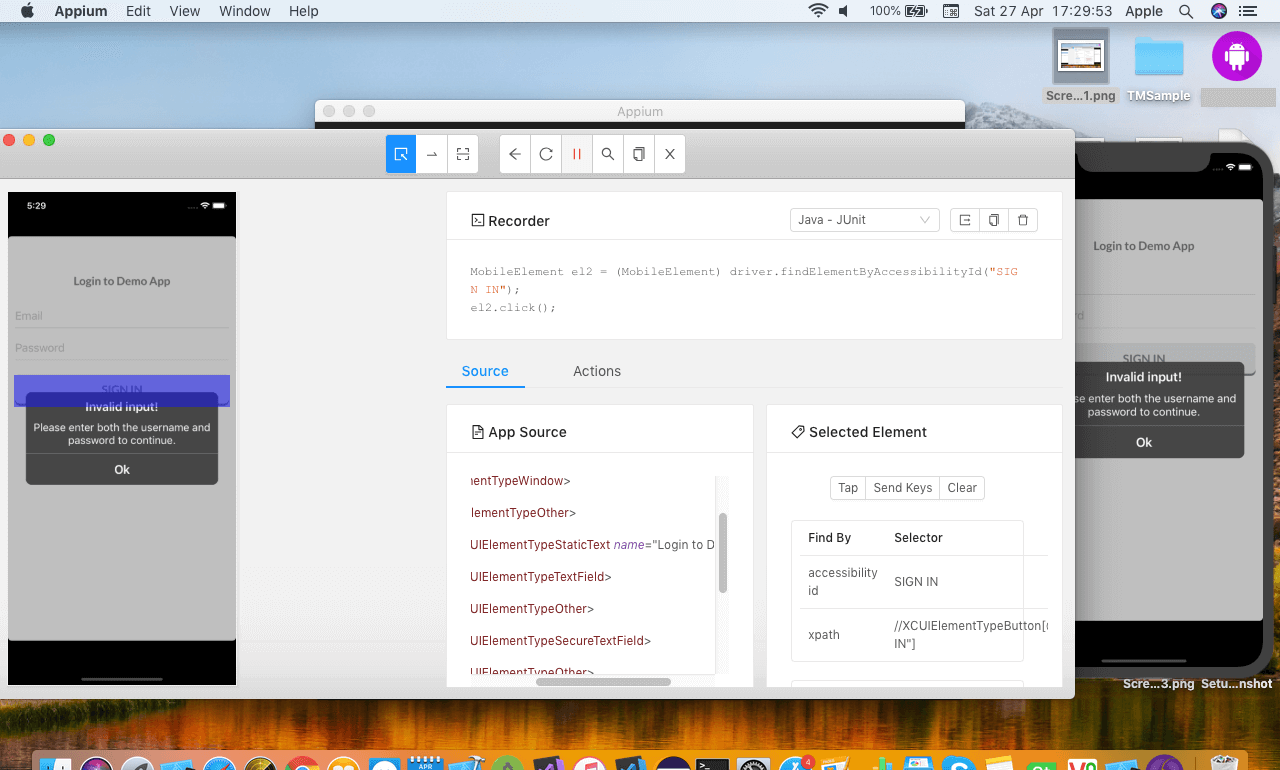
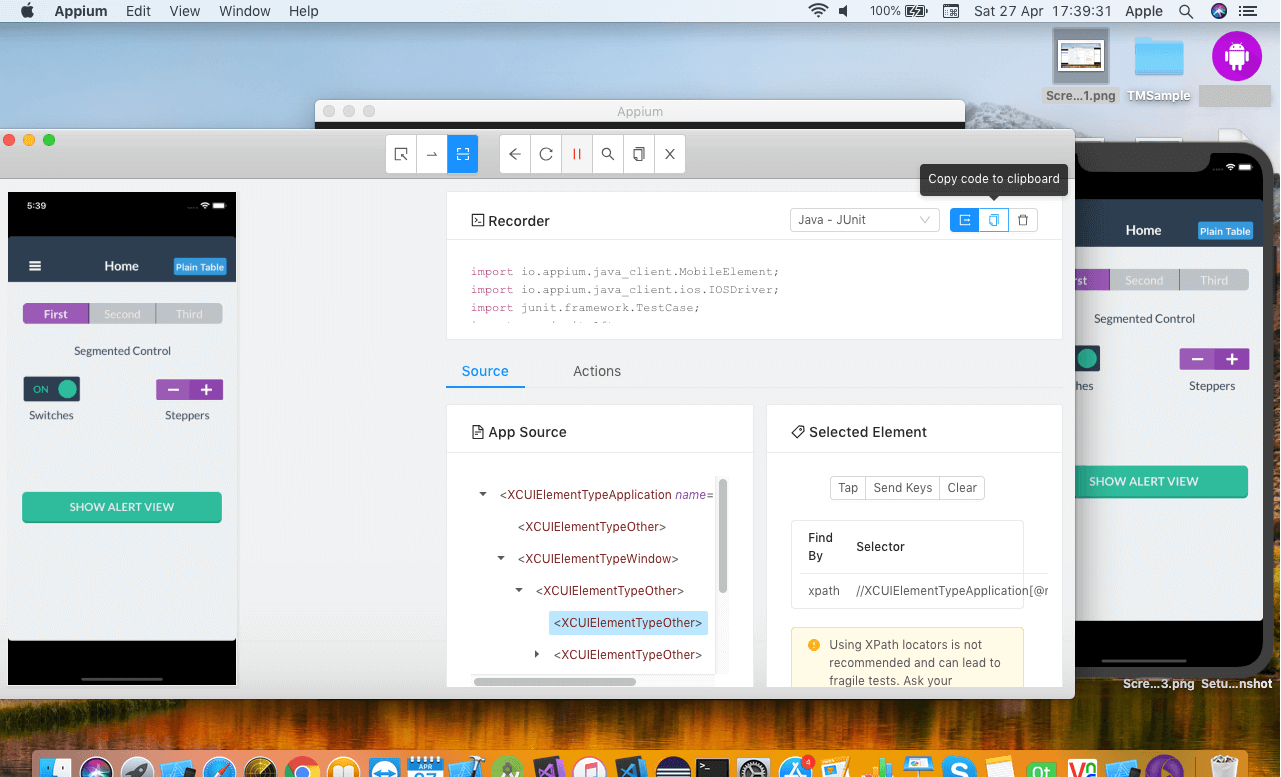
Once the inspector is started, select any of the objects on the screen. It will show you the complete hierarchy and properties of that object.
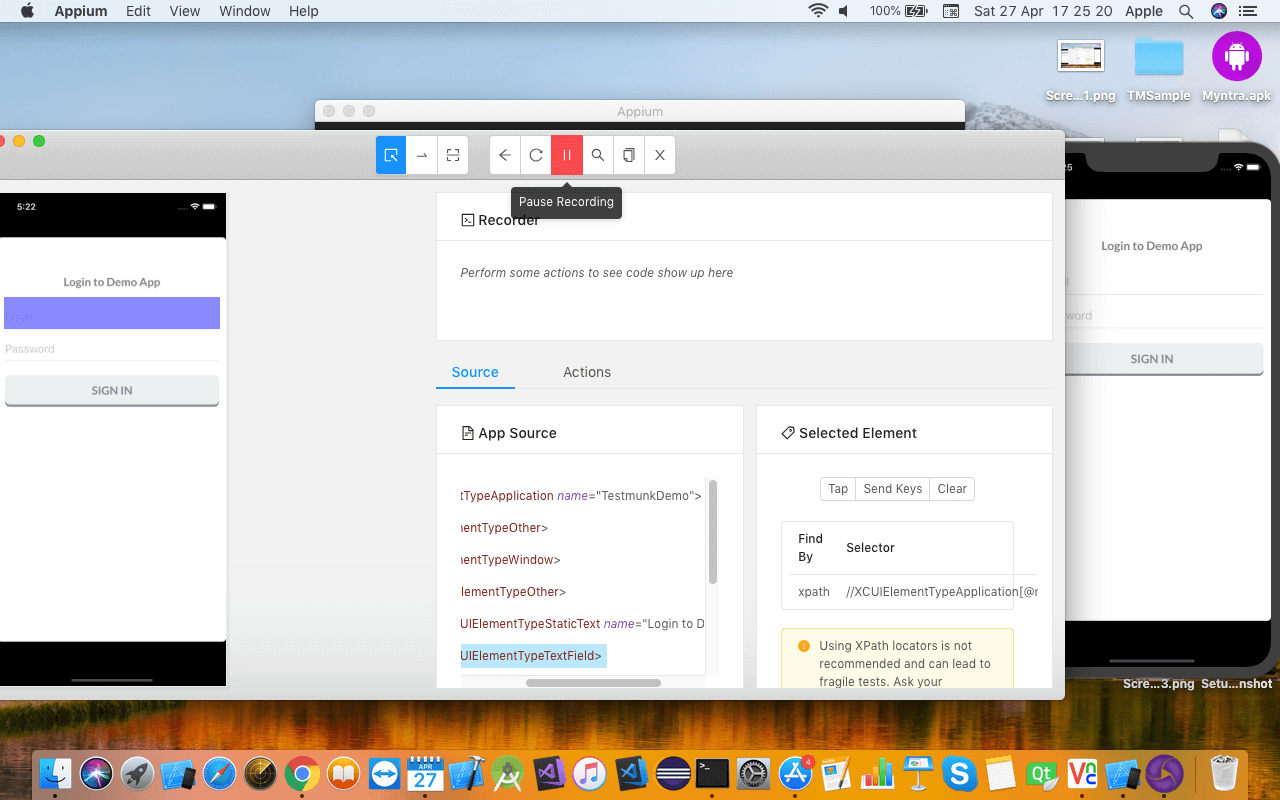
At the top of the window, you can see the Record button which is used to record all the actions taken and record the script.
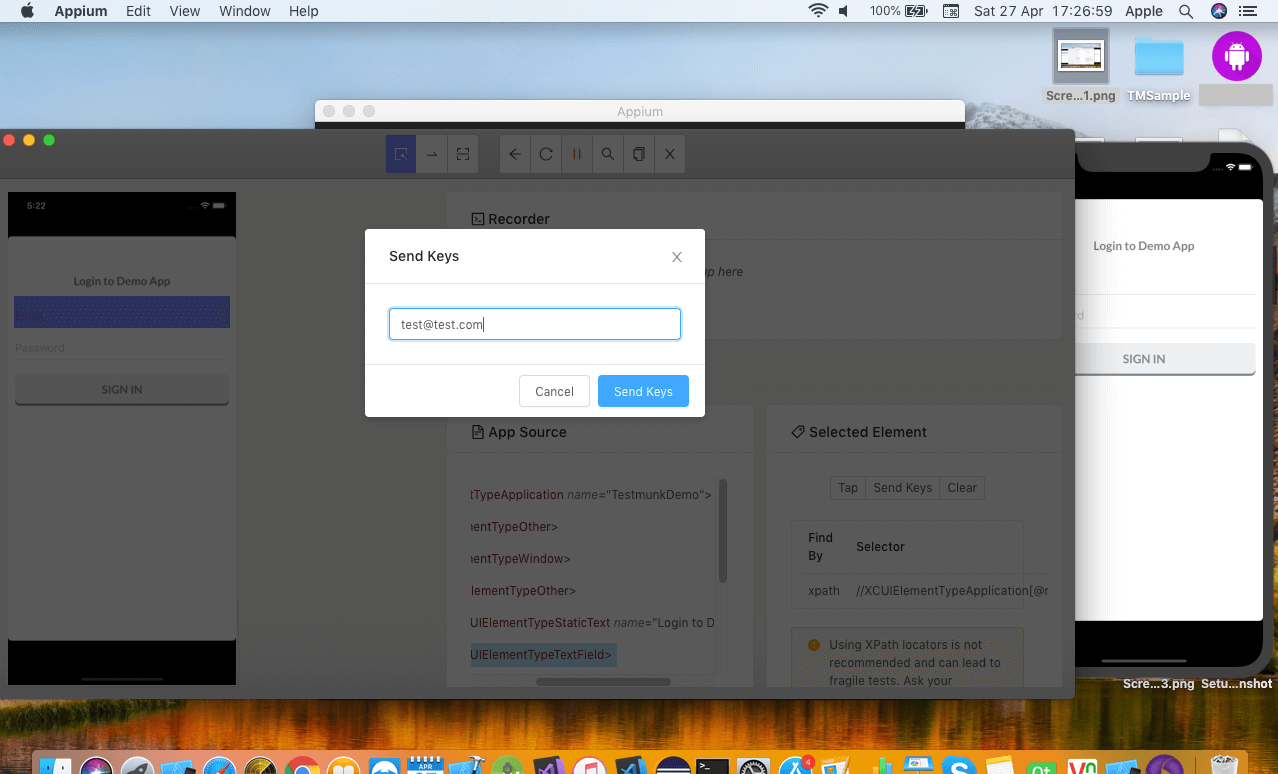
To select any object, click on the Select Element button and then you can use Tap button to click on an object, Send Keys to enter text and clear to undo the action.
As soon as you perform an action on an object, it is recorded in the form of a script.
Once you are done with the recording you can copy the script and paste in eclipse editor.
In the next blog, we will learn how to write the first appium script for iOS.
In the last blog in this series we learned how to start the Appium server and launch app from the code. In this blog we will understand how to setup Appium on a Mac machine.
Pre-requisite
• Mac Book
• Xcode
• Simulator or real device
• Appium
• Eclipse
• Java
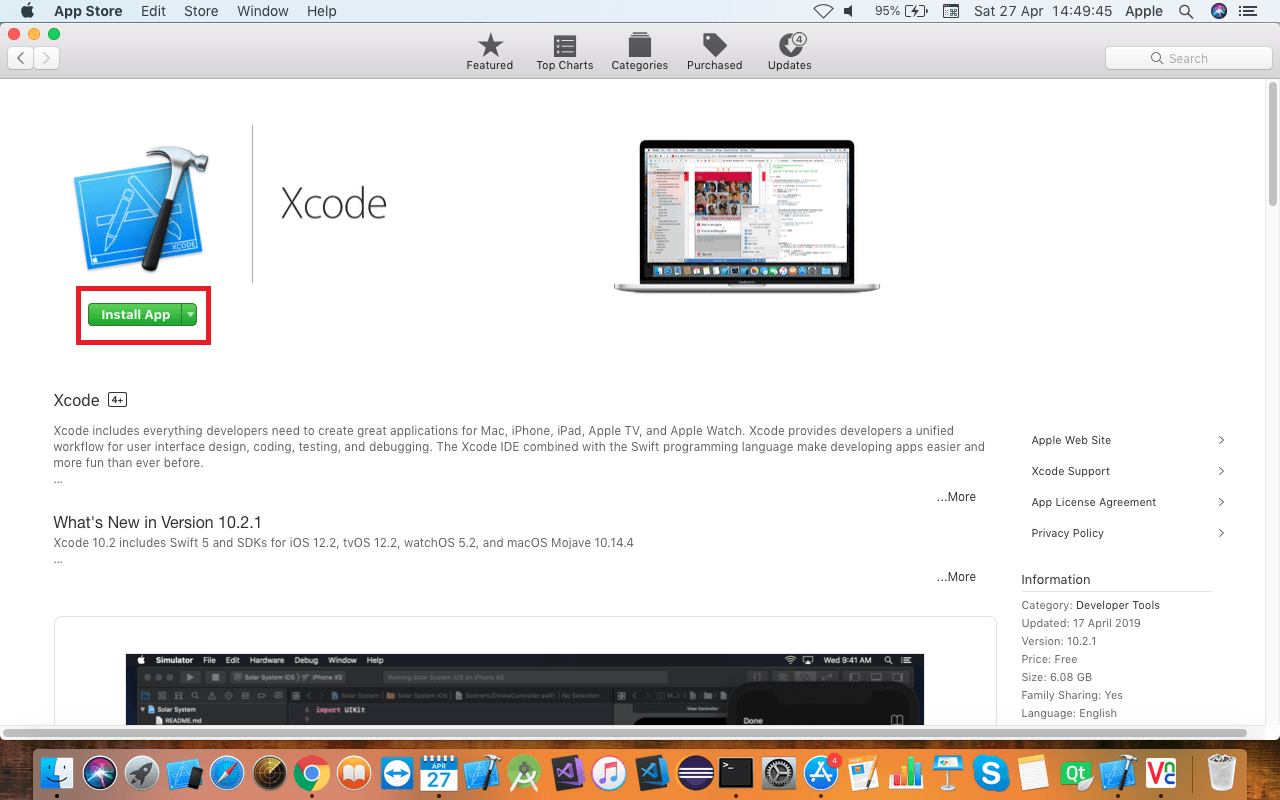
The first step is to install Xcode in the Mac Book. To do that, open app store and search for Xcode and click on the Get button to download Xcode.
Then click on the Install App option. This will install Xcode on your Mac machine. Now click on the Agree button if you agree with the terms and conditions and it will start installing components.
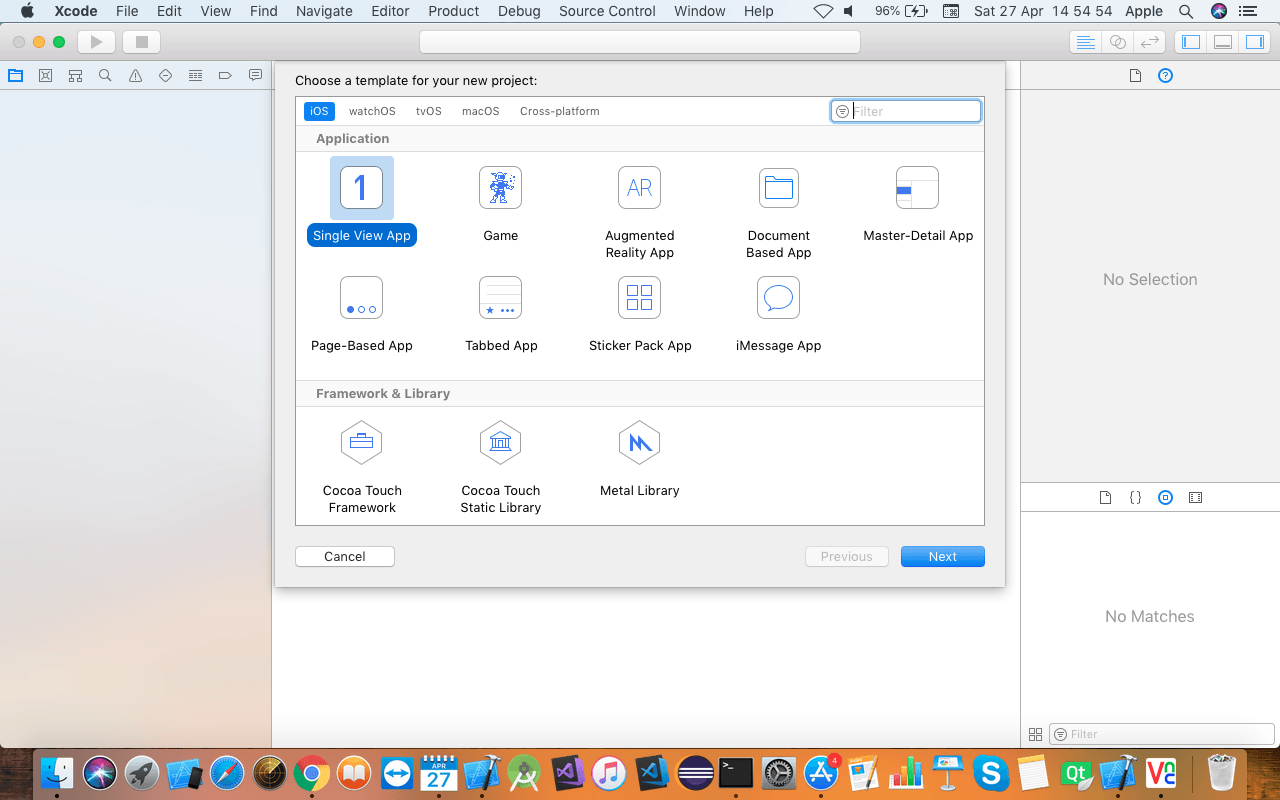
Once the Xcode is installed, you need to select “Create a new Xcode project” and you will be redirected to the template selection option.
You may select any of the templates or leave default settings as they are. Click on the next button to navigate to the next screen.
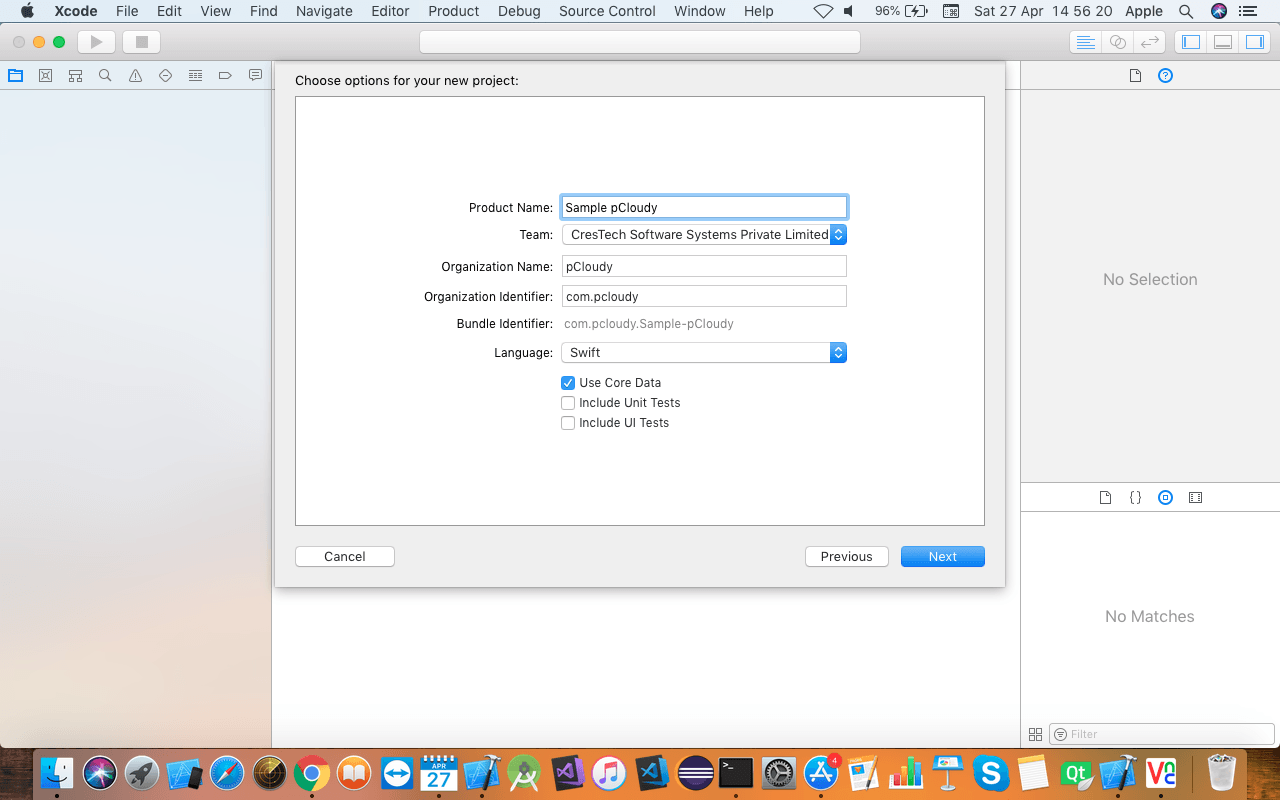
Now you will be asked to provide a product name and other product-related settings.
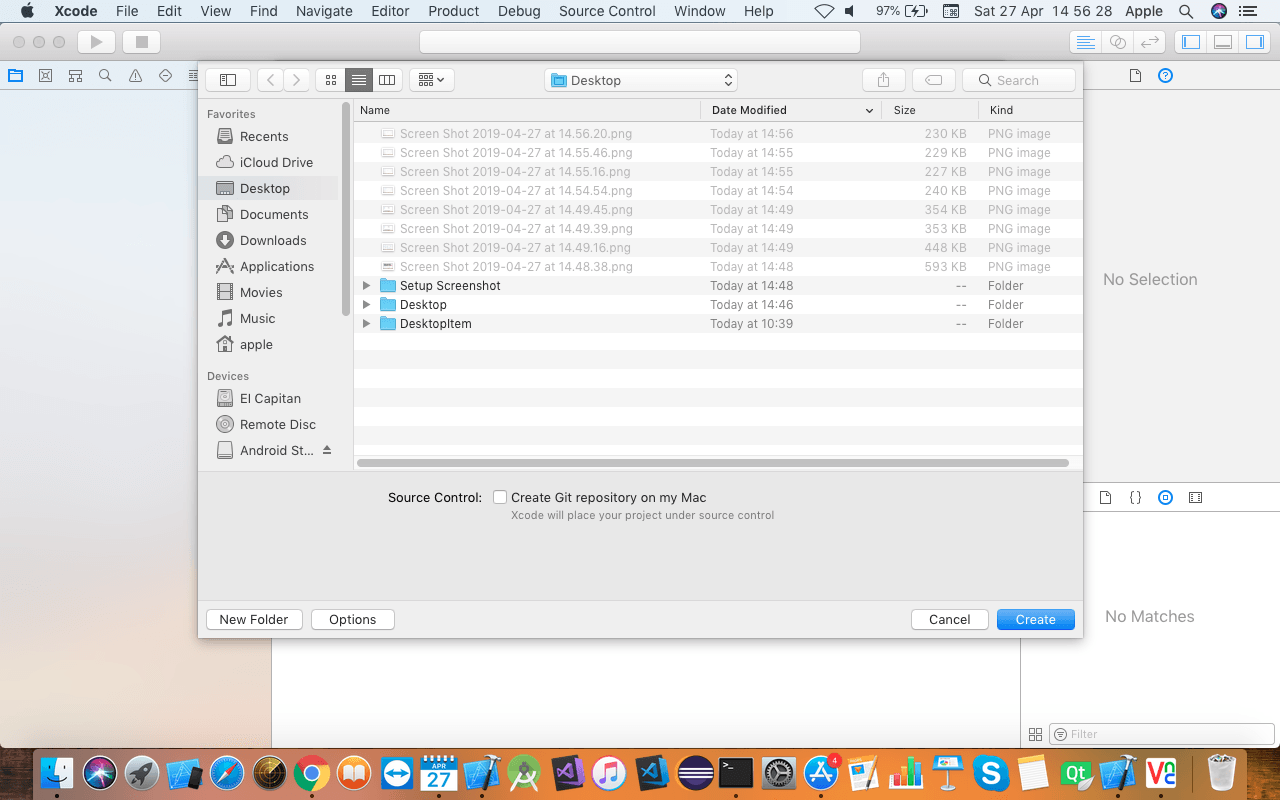
Enter the required details and click on the next button. In the last seen of product settings, you will be asked to give the location in which to save your project.
Select the location anywhere as per your requirements and click on the create button.
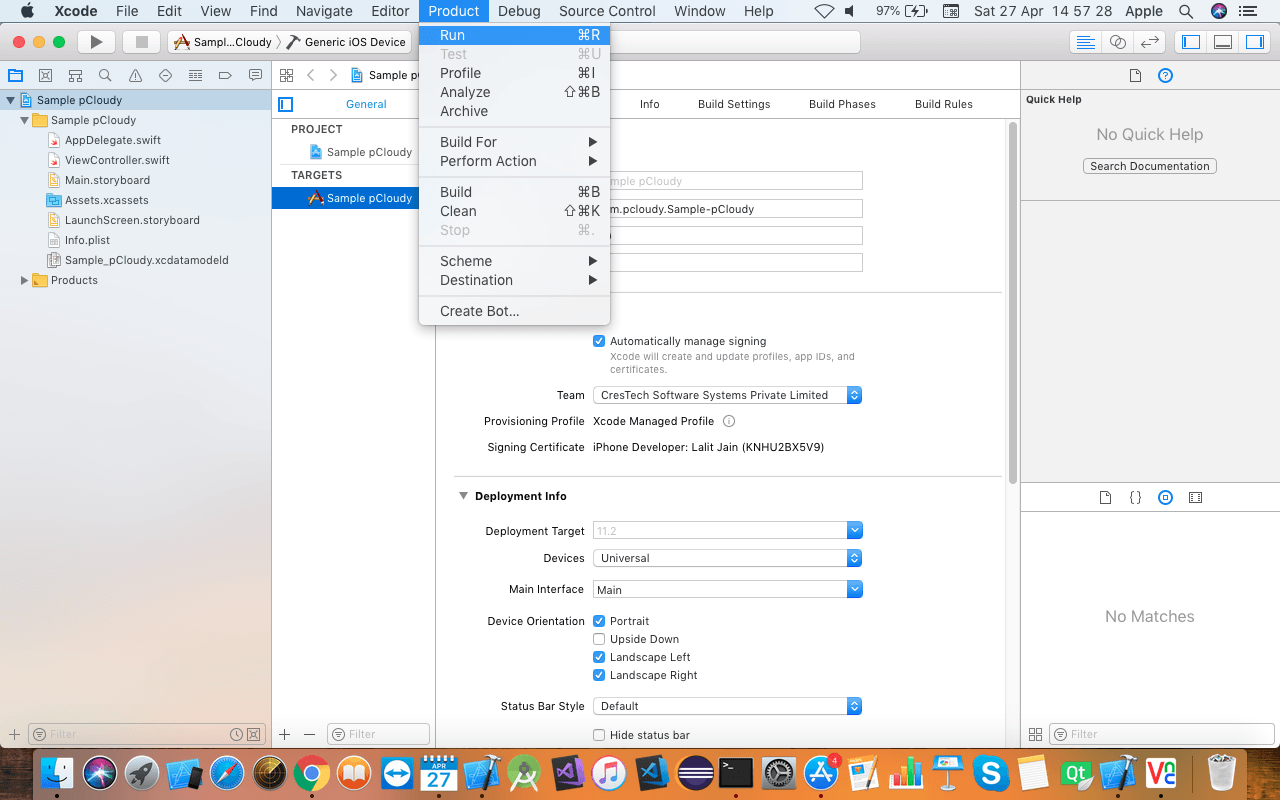
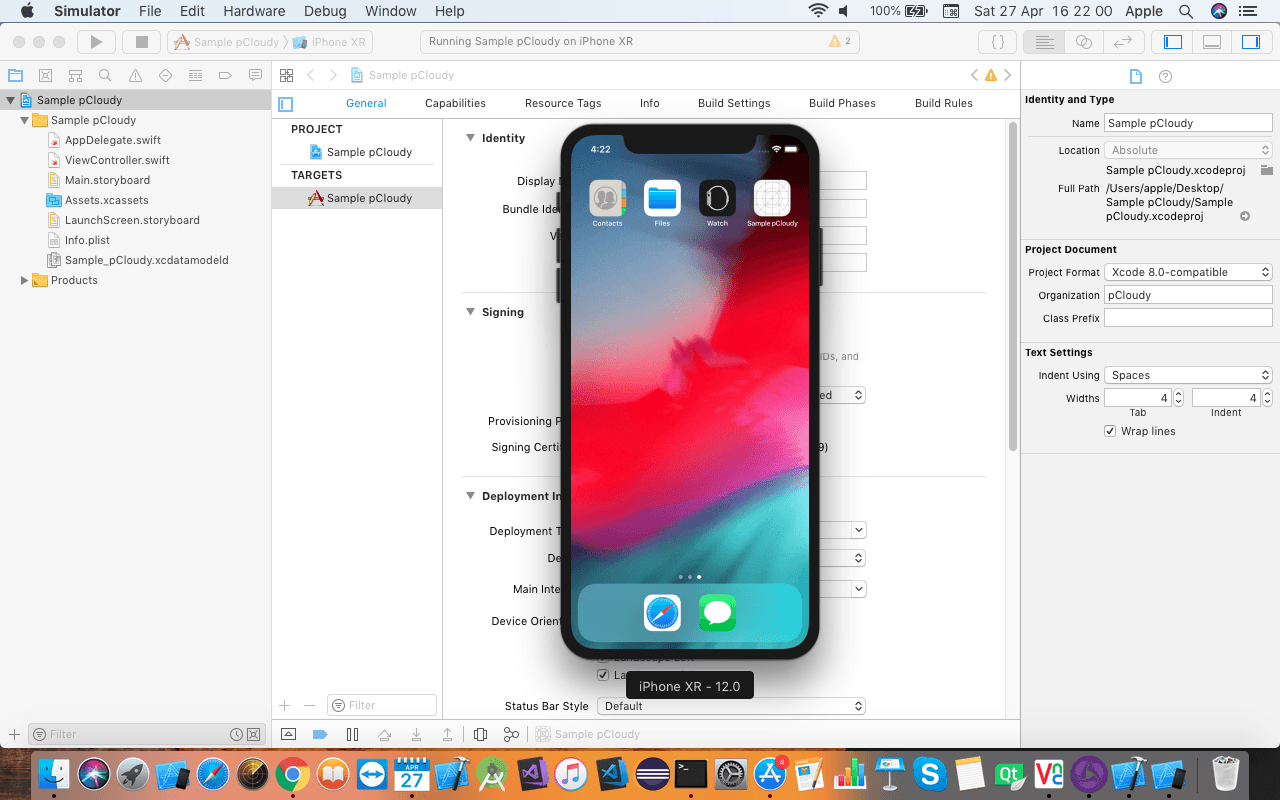
Once the project is loaded go to the Product menu option and click on the Run option.
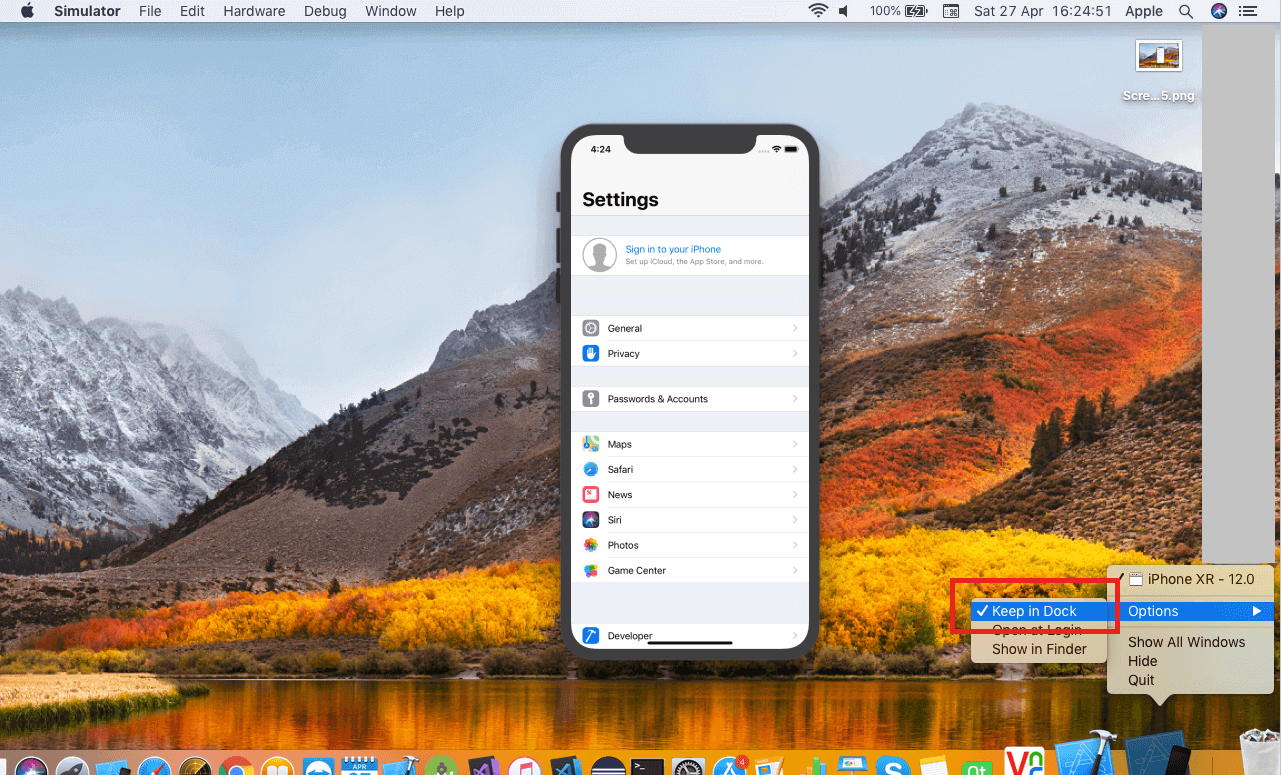
Once you click on the run option, it will launch iOS simulator.
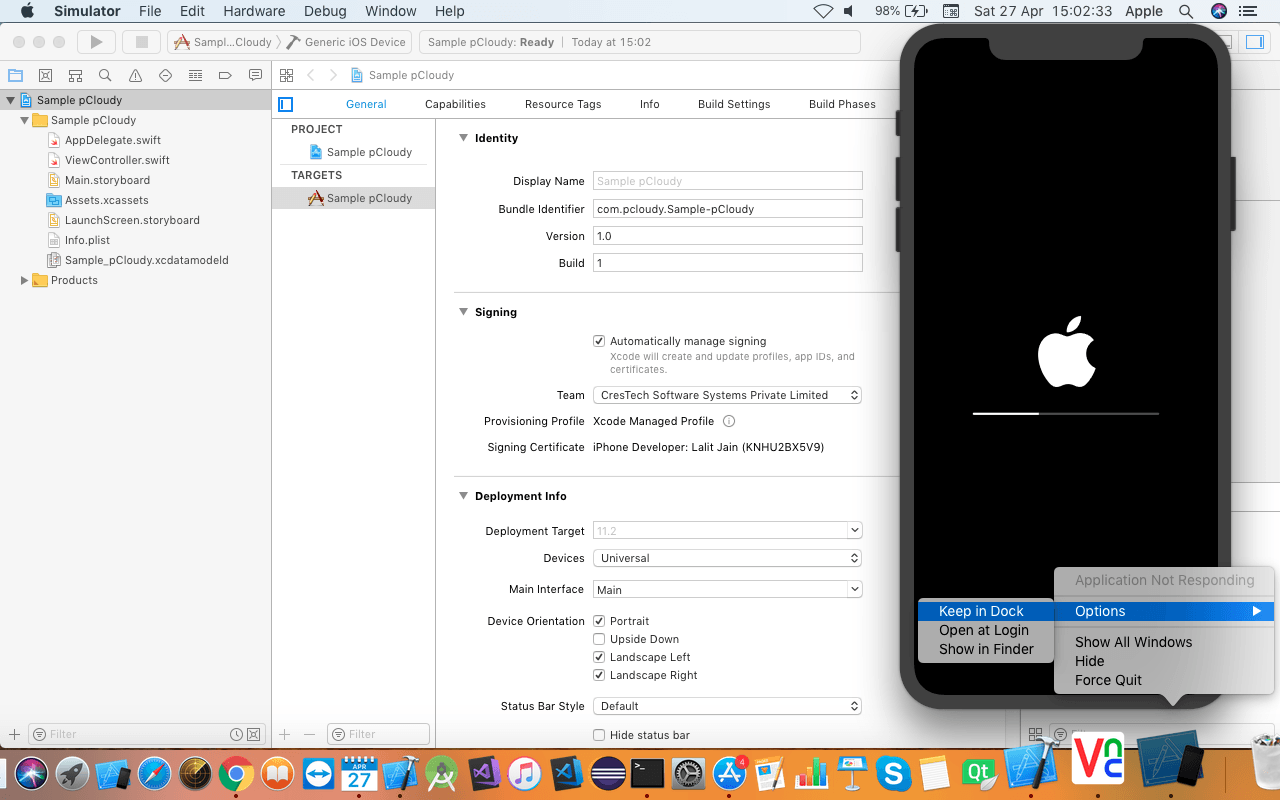
Now right click on the simulator icon on the doc panel and select the keep in doc panel. In this way, you don’t need to start Xcode to launch the simulator. Thus you don’t need to open the Xcode project each time to launch iPhone simulator. If you want to see the list of simulators, got to the Window menu and select the Devices option. You will get a list of all the simulators available with this version of Xcode.
Installing JDK and setting the path
Download JDK for Mac OS and once the file is downloaded, double click on the file and install Java.
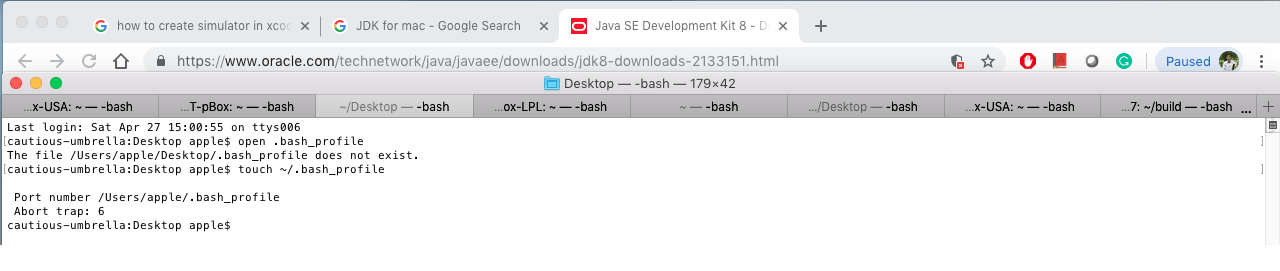
Now you need to set the Java installation path in your environment variable. Open a terminal and write “open.bash_profile”.
If “.bash_profile” does not exist then execute the command “touch~/.bash_profile”. This will create the file. So when you execute the command, it opens the “.bash_profile” file.
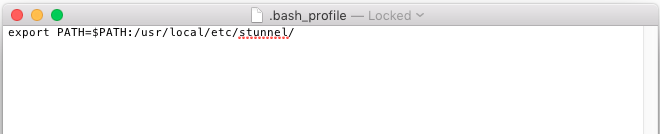
Copy the path to JDK home, write export JAVA_Home= and then save this file. Open command prompt and execute the java – version command. Open Appium.io and click on Download Appium button.
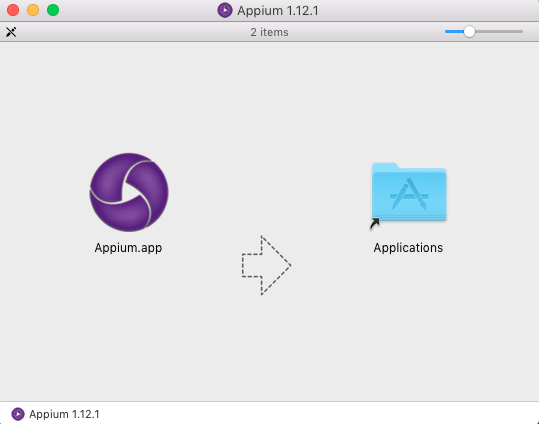
Now download the latest .dmg file and once downloaded, double click on the .dmg file.
It will open a new window where you need to drag and drop Appium into the application folder.
Search for Appium and double click on the Appium icon. This will launch the Appium server on your Mac machine.
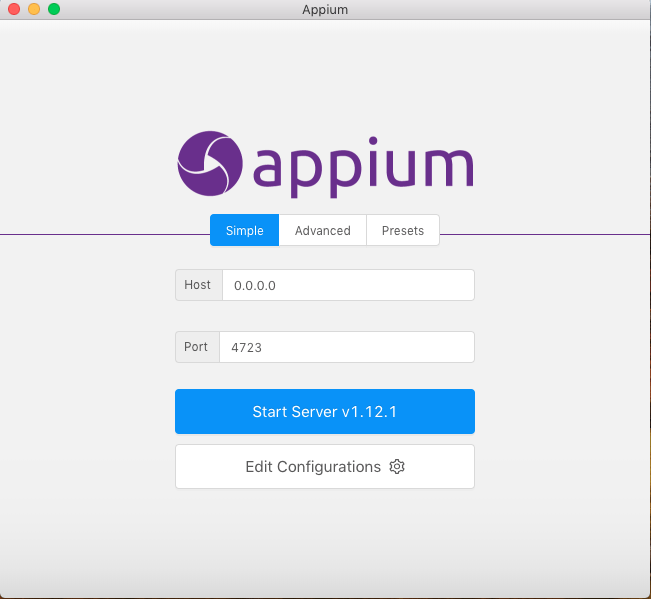
To Launch Appium on a simulator click on the Start Server button.
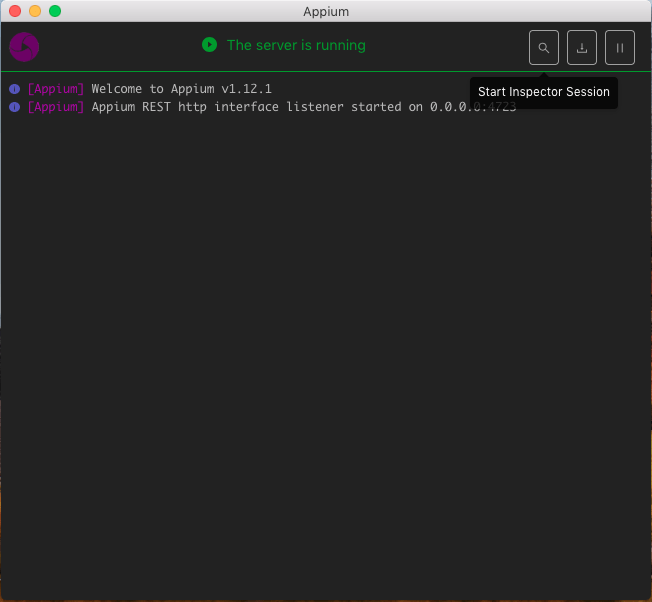
Now click on the Start Inspector Session button in the Appium server.
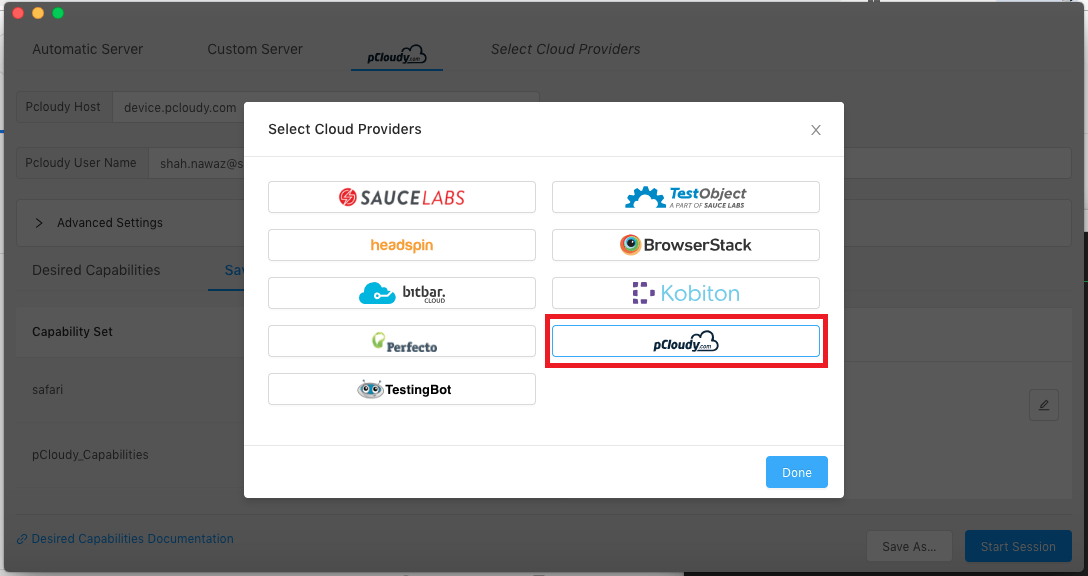
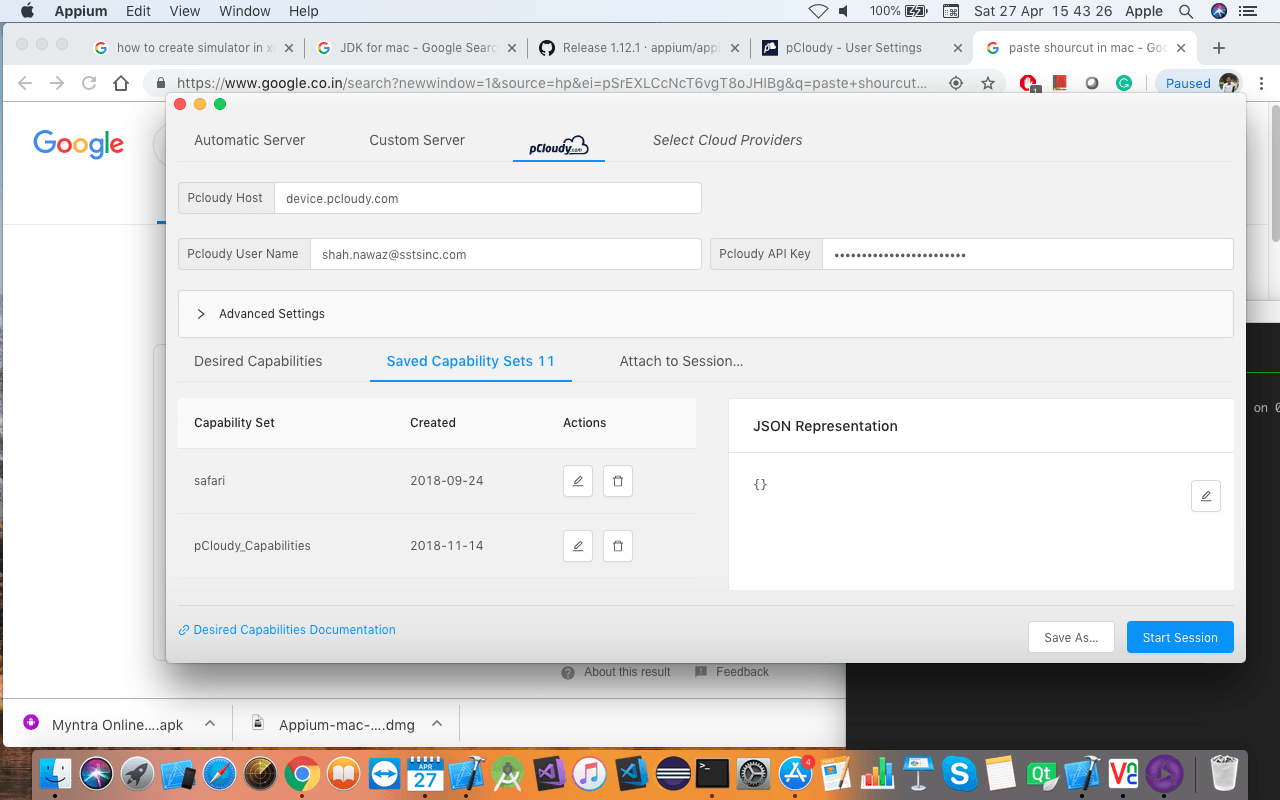
Once you select pCloudy as the cloud provider from the list you can click on Done.
Then you need to enter the Hostname, User name, API Key, Desired Capabilities and then click on Start Session.
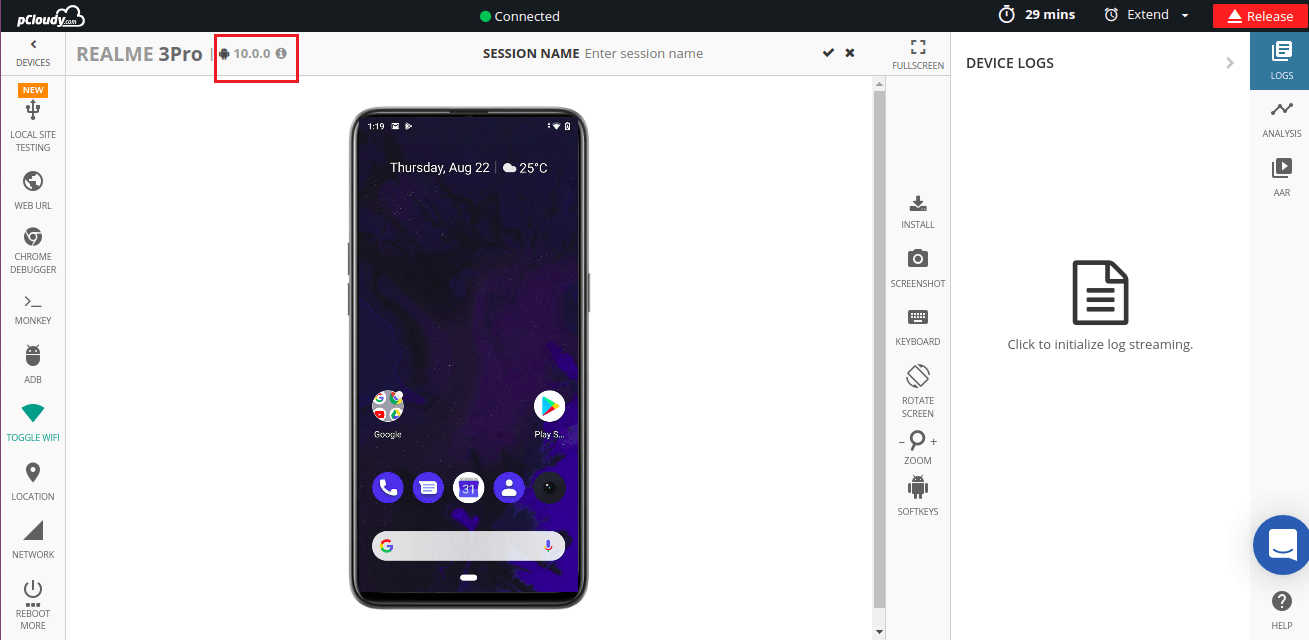
Your simulator is now connected.
Now you know how to setup Appium on Mac and in the previous blogs in this series we explained how to write the test script and start Appium server. In the next blog we will learn how to use Appium inspector to identify elements in an app.
We are committed to keeping you ahead of others. pCloudy is one of the fastest to release the support of Android Q beta devices on the cloud.
Google has launched the final Android Q beta and Android Q official release is just a few weeks away. Testers and developers can test their app against this final beta version. Android Q beta 6 includes the final API 29 SDK and updated build tools for Android Studio. It also supports all the features, developer APIs and system behaviors that will be in the final release.
Now you can test your mobile apps on devices loaded with Android Q beta version in pCloudy.
In the previous blog in this series, we learned how to write the first Appium script for Android devices. Now in this blog, we will understand how to start the Appium server.
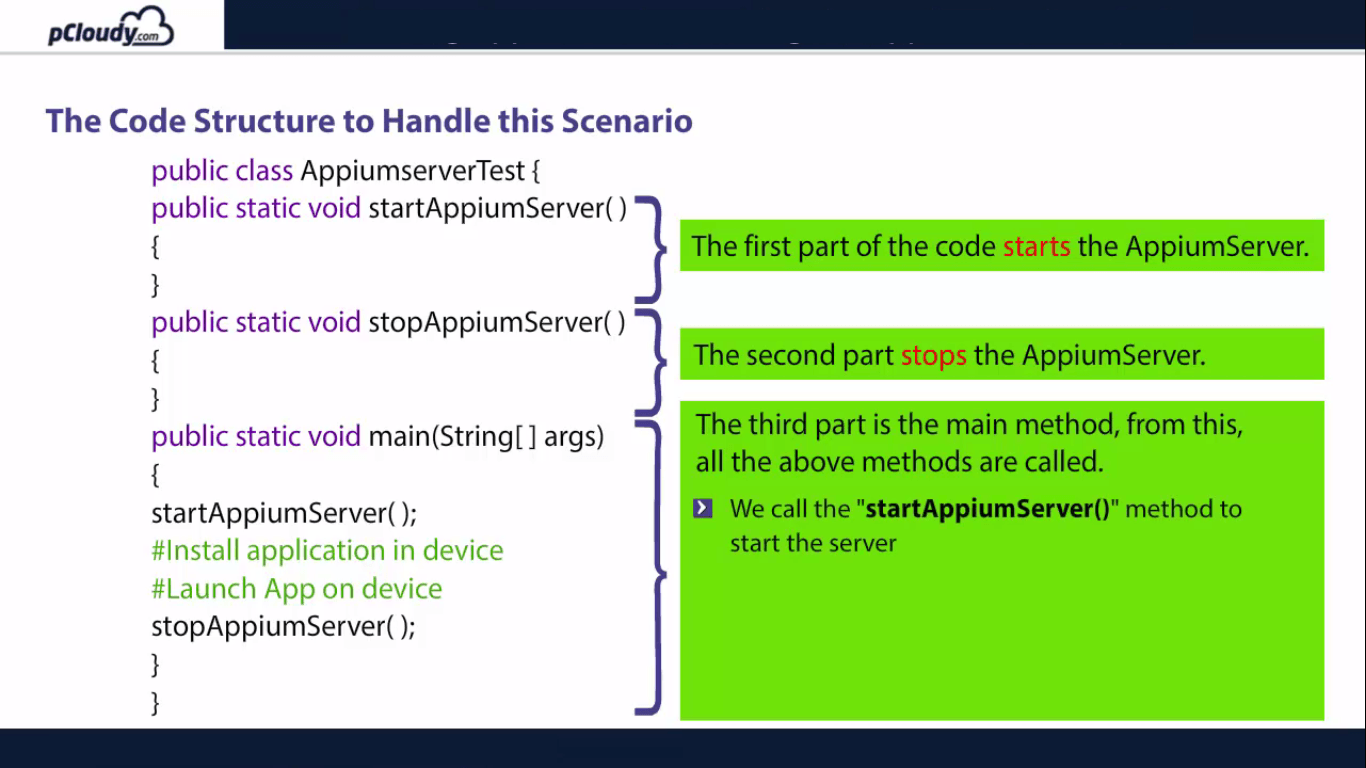
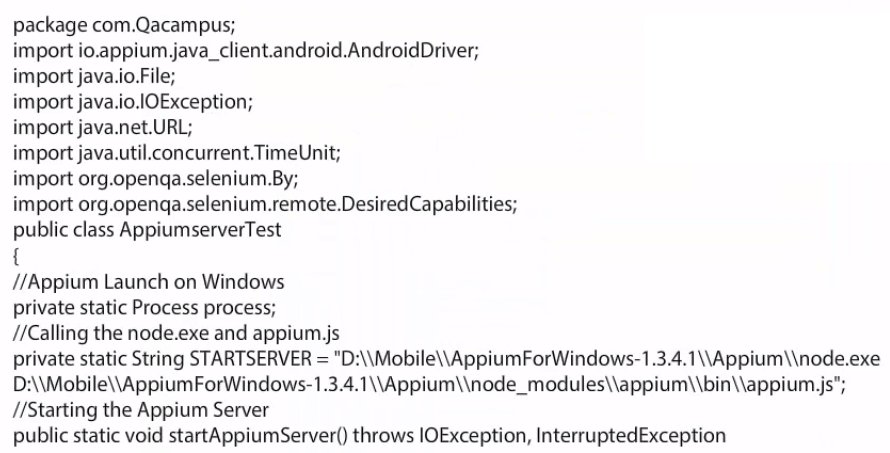
The code structure is segregated into three parts, the first part of the code starts the Appium server, the second part stops the Appium server.
The third part is the main method which is necessary to execute the class and from this main method, all the above method are called.
Starting Appium from code requires a path of two files which are kept inside the Appium folder.
node.exe
js
Starting Appium Server
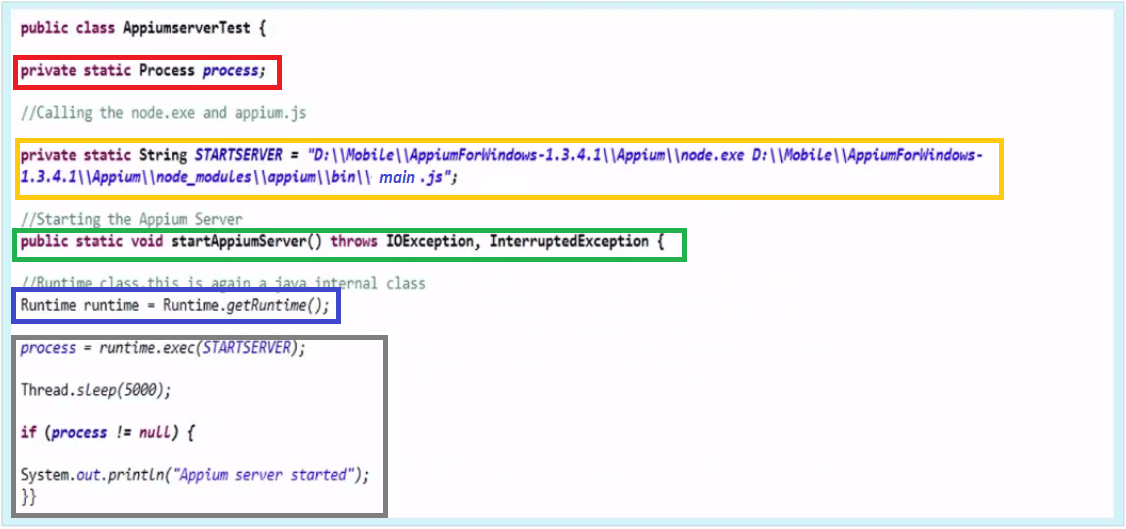
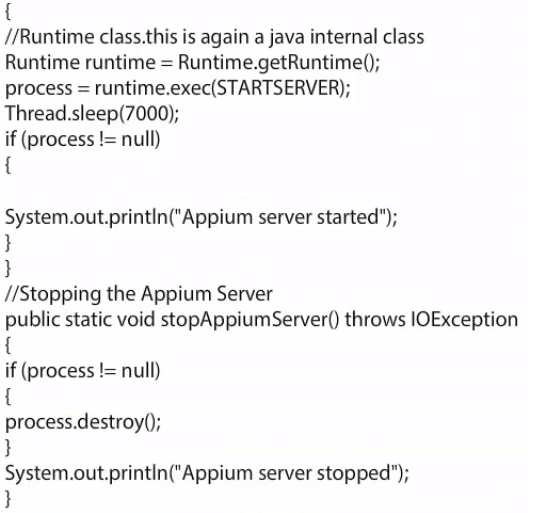
In the code highlighted in red, we have called process class which is a Java class and declared it static.
We then created a start server variable and pass the path to node.exe and main.js, highlighted in yellow. In the code highlighted in green, we added both paths into the same variable with spaces and created a method called startAppiumServer() which takes care of the Appium server startup process. Next step is to create an object of Runtime class which is again a java class and call the method getRuntime(), highlighted in blue. We will pass the variable “STARTSERVER” into runtime.exec() method. It will start the Appium Server.
Once the process is started, we have to store the current state of the process into this variable. We will give a sleep time of 5 seconds as it takes time to start the process. what we are trying to validate here is, if the process is not null; it means that the process is started as highlighted in the gray box.
Stop Appium Server
Here we need to create another method named stopAppiumServer(). We again verify the state of the process and if it is not null, call a method of process class destroy().
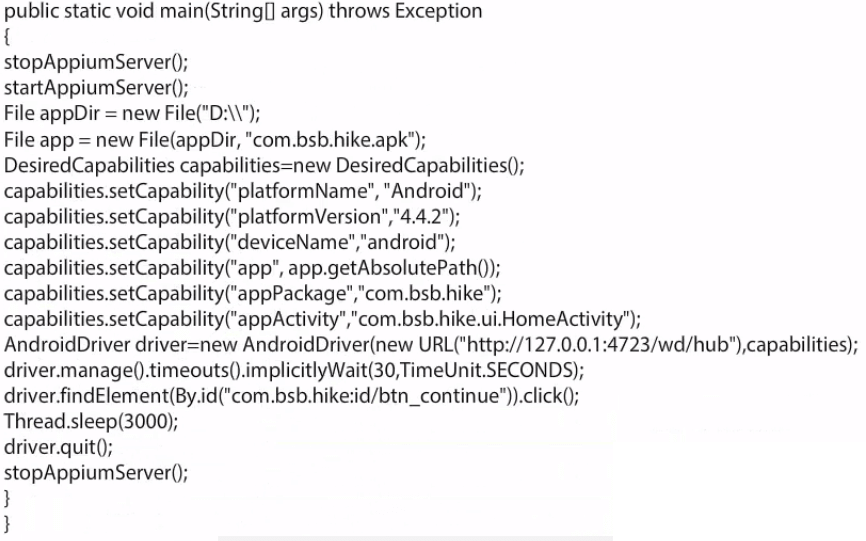
So now we know how to start and stop the Appium server from code. Let’s try to install and launch an app on a mobile device. Let’s see how we can install a .apk file on an Android device and launch it automatically without providing the path in Appium Server.
Installing and launching the application
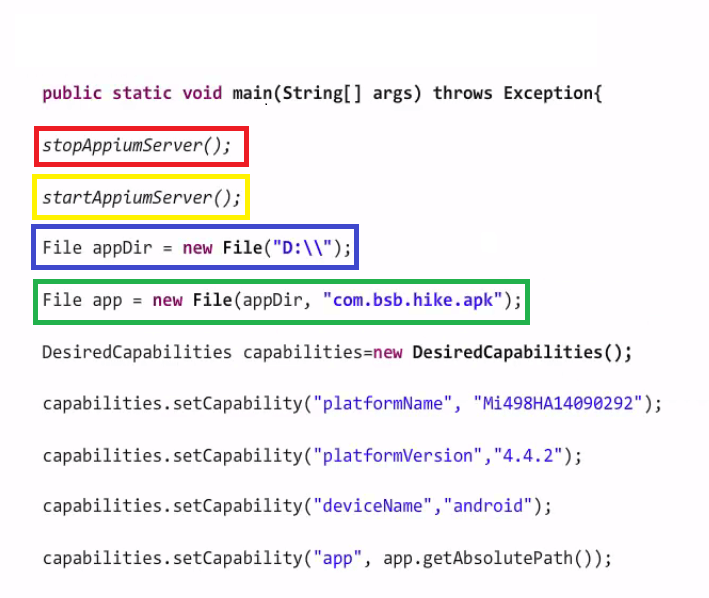
To begin with, we call the stopAppiumServer() method to verify if any instance of Appium Server is already running and if so, then it closes that instance, as highlighted in red. The method highlighted in yellow starts the Appium Server.
Then store the apk path file into a variable of File class, which is a Java class as highlighted in blue. Create another variable of File class app. It takes two parameters:
The absolute path of the apk file.
Name of the apk file.
Now the absolute path is stored into appDir variable and the name of apk file in the second part as highlighted in the green box. The rest of the things are the same as discussed in the earlier sessions.
The complete code is shown here.
Now that you have learned how to launch app from code, let’s move on to the next blog where we will learn how to set up Appium on a Mac machine.
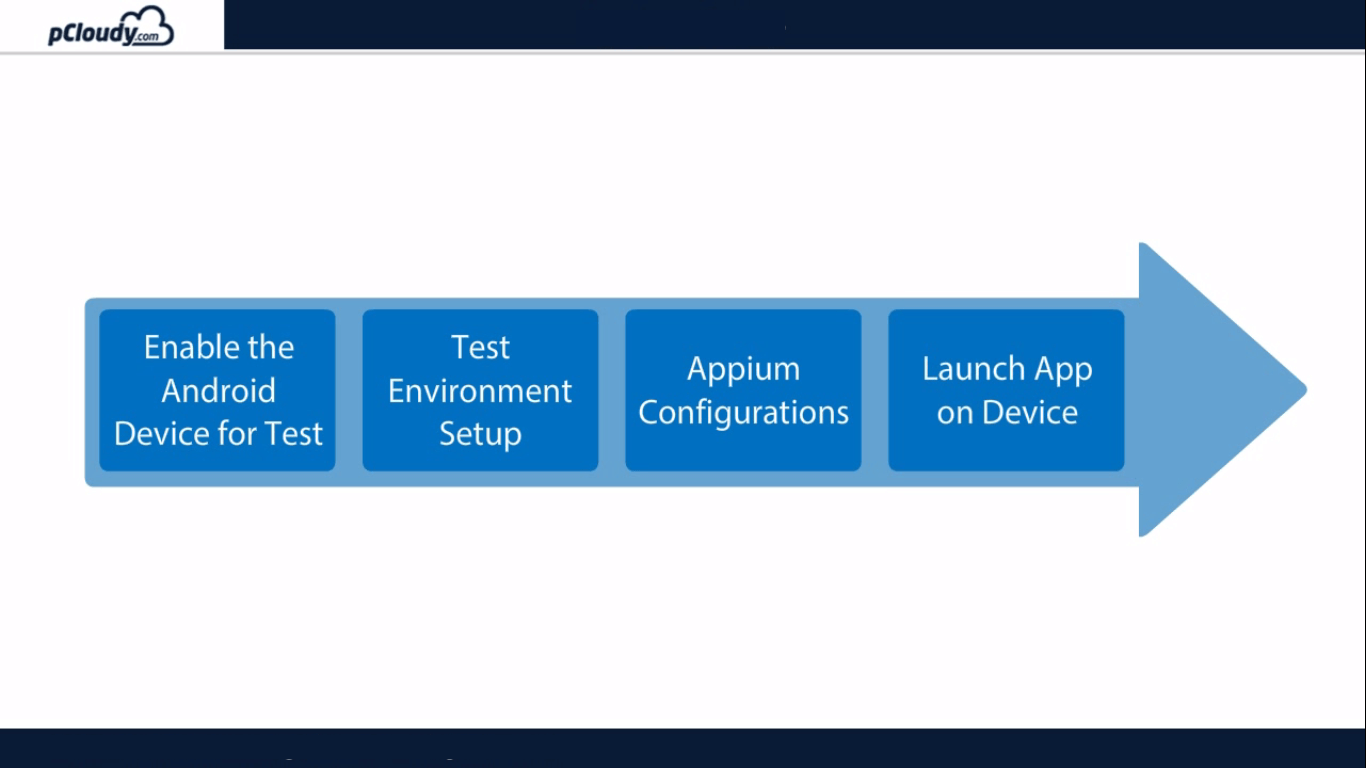
In the previous blog, we informed about the basics of Appium and its architecture. Now let’s understand how to setup Appium. There are four steps required to setup Appium, they are enabling the Android device for test, test environment setup, Appium Configurations, Launch the app on the device.
Pre-requisites for Appium Mobile Testing
1. An Android device with OS 4.2+
2. AUT(Application Under Test) file (.apk)
3. Phone USB Drivers
4. Java (JDK)
5. Android Studio (SDK)
6. Eclipse
7. Selenium Standalone JAR
8. Appium Java Client
9. Appium for Windows
10. .NET Framework 4.5
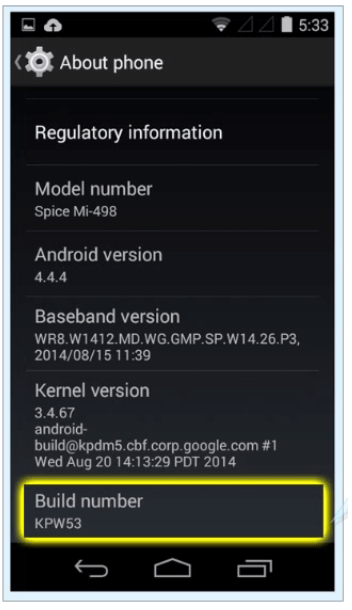
Every Android smartphone contains a secret set of Android developer options which are used by app developers who need additional functions to test their apps they are making for Android devices. It allows you to enable debugging over USB, capture bug reports on your Android device and show CPU usage on the screen to measure the impact of your software.
To enable developer option in the phones to go to the settings, click on the about phone options and click on the build number 7 times to enable the developer options.
Doing so will display a toast message for enabling the developer option. the current message appears if the developer message is already enabled on the phone.
Phone Drivers
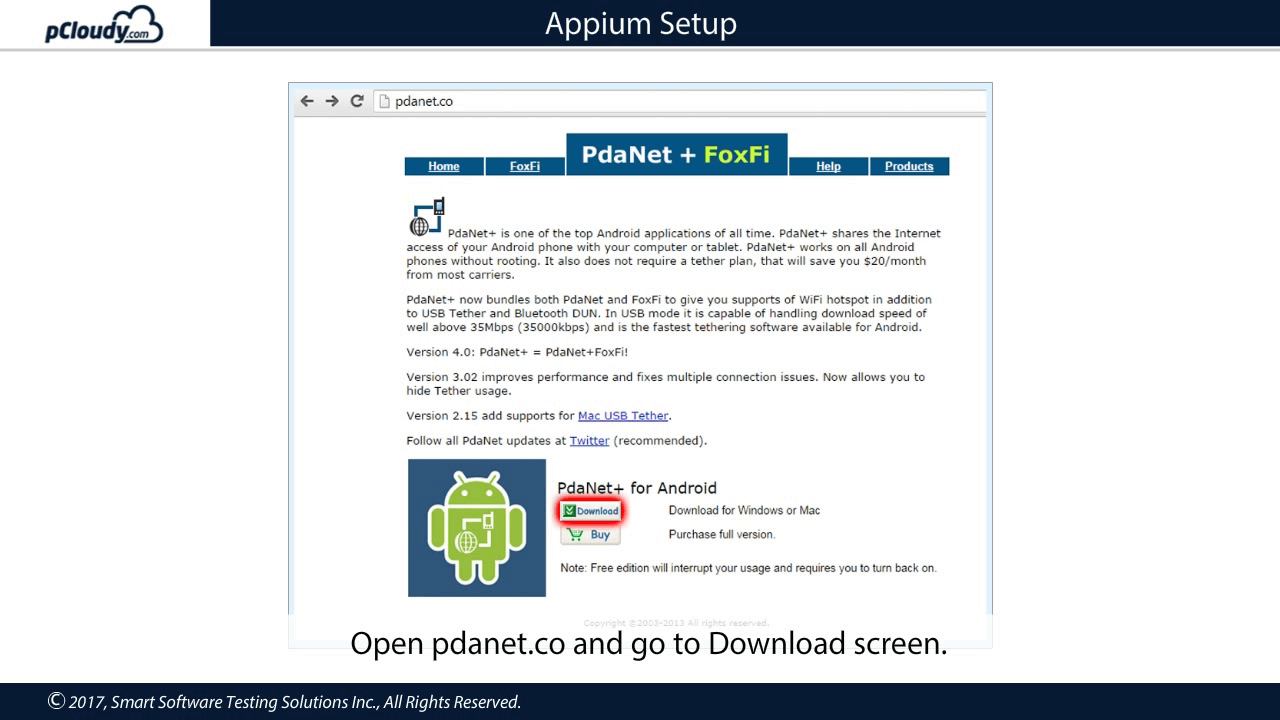
The phone can communicate with the PC only if there are proper drivers installed for the USB cable. Each phone manufacturers provides its own drivers for the phone. PDA net is a driver which works with all the Android devices. It makes sure that your phone is detected in DDMS.
Open pdanet.co and go to download screen and download the latest version to install it on your PC.
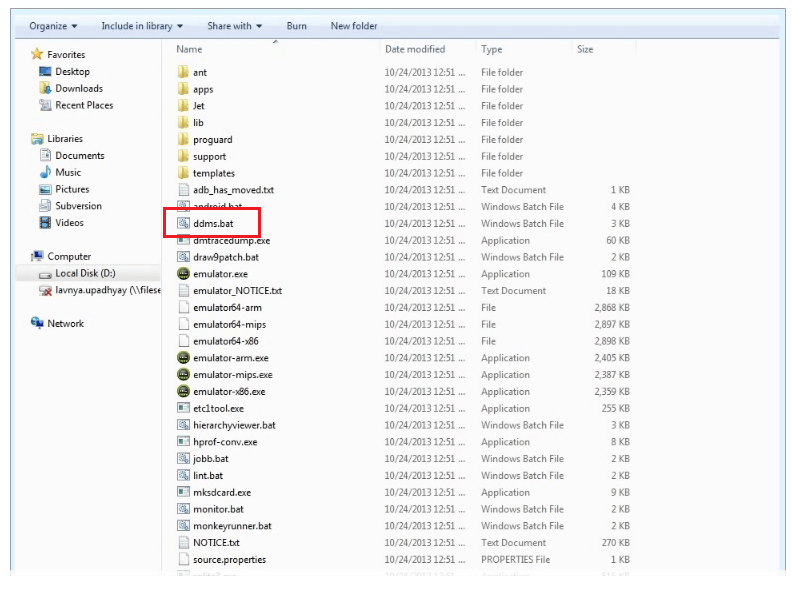
Let’s verify if the phone is prepared.
The ddms.bat file is present in the Android SDK tools folder.
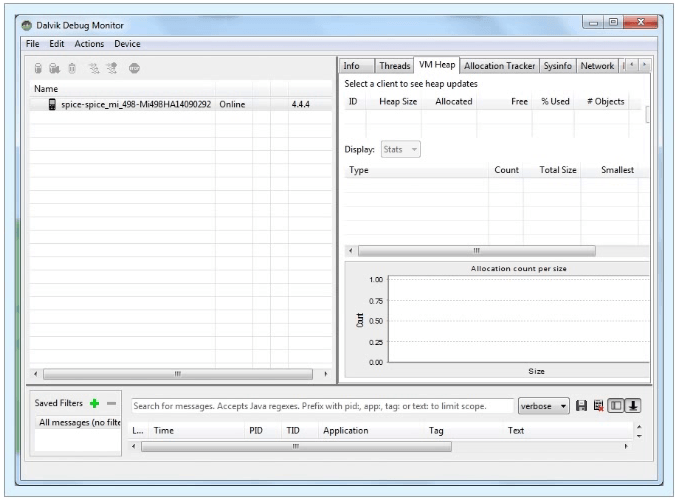
Double click on the file and you will see the Dalvic Debug Monitor window.
If your DDMS option is enabled i.e. if you have installed the PDA net software and connected the device to the machine, that device should be detected in this monitor. Now let’s move on to the second step.
Test Environment Setup
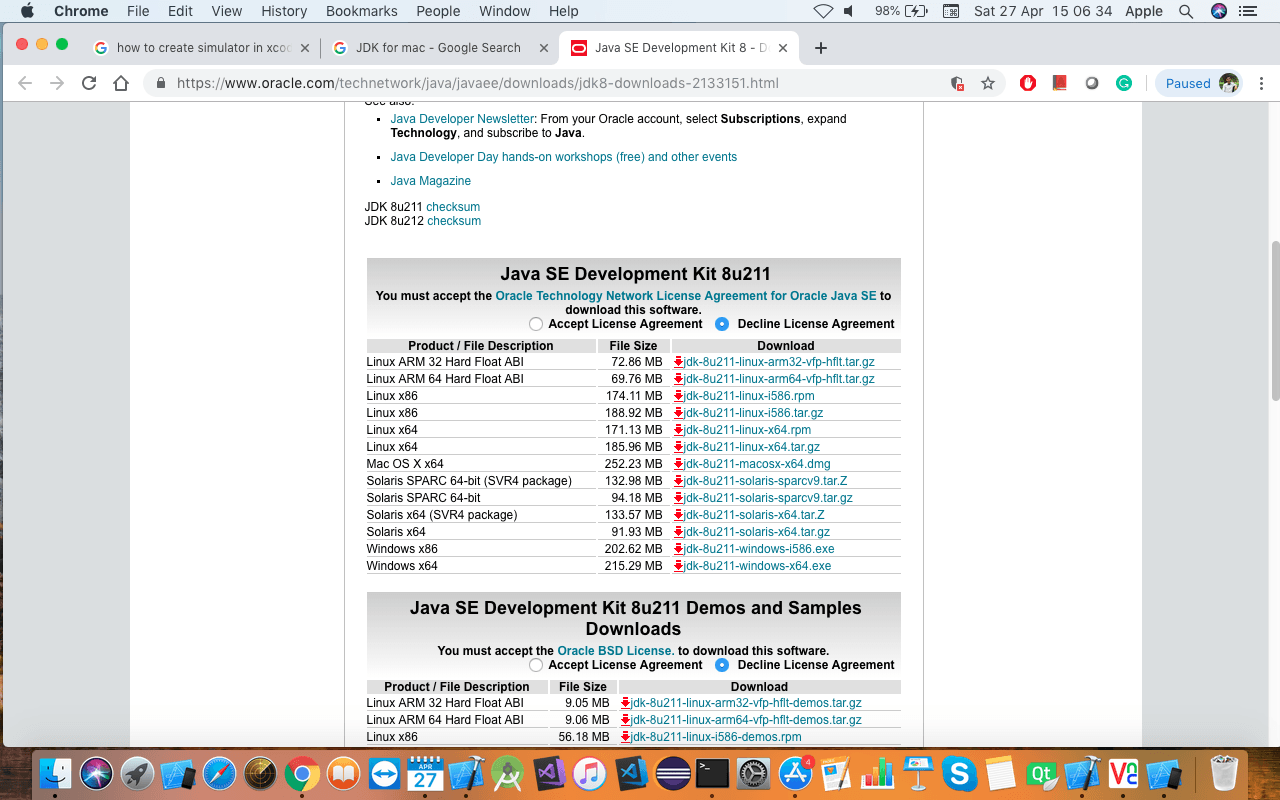
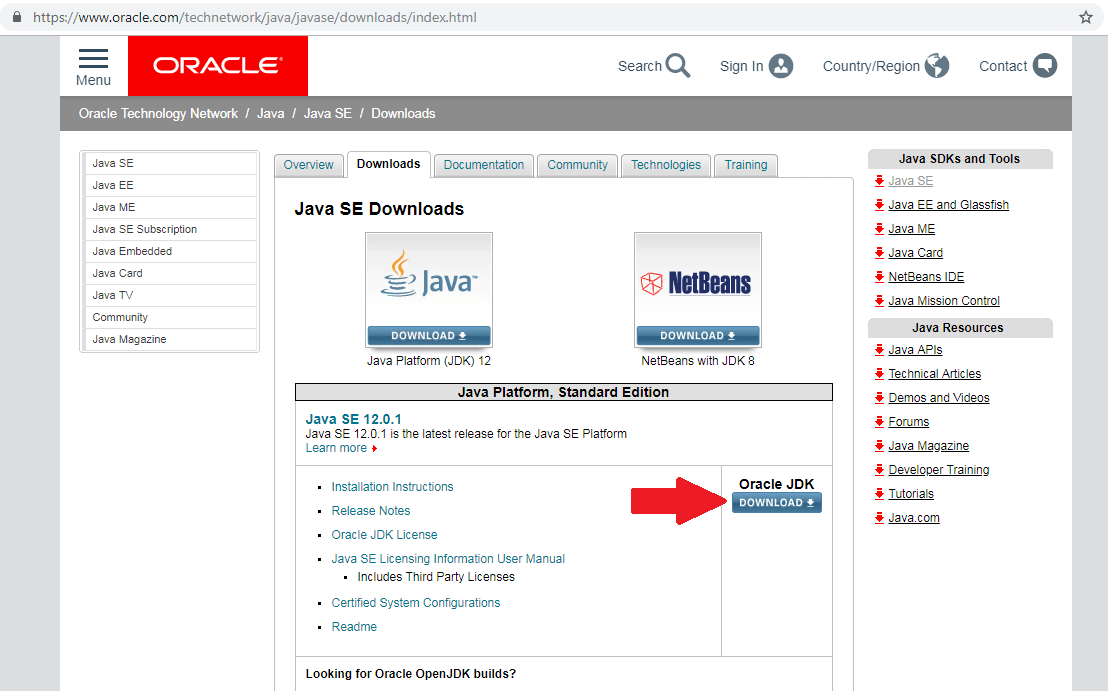
First, you need to download JDK from the Oracle website.
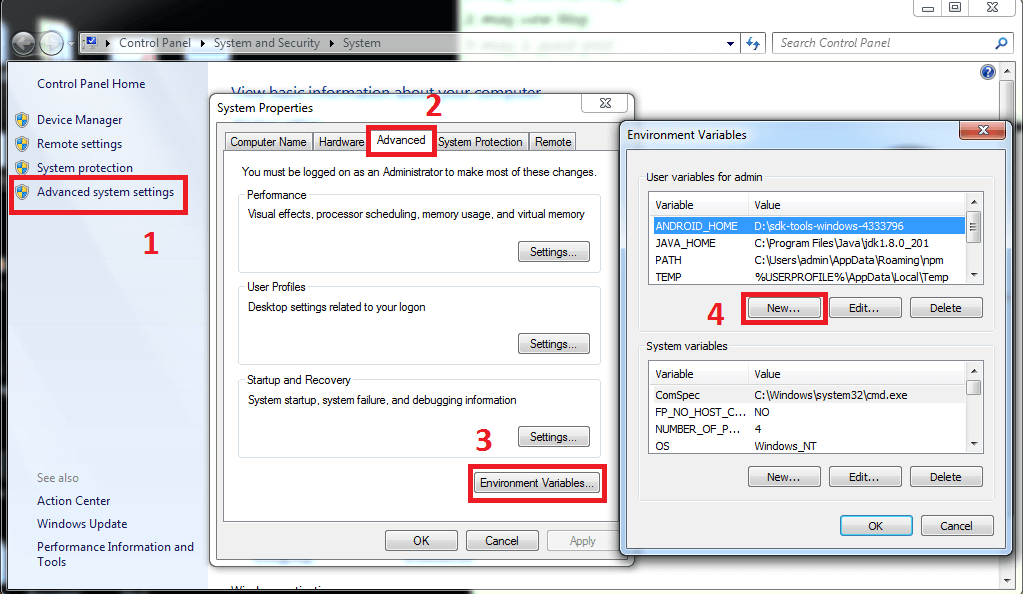
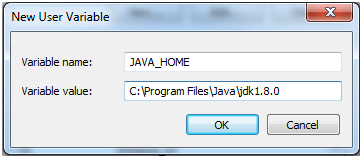
Once downloaded, install it to your machine. Now you need to set the Java installation path in your Environment variable. Right-click on Computer option in the Start menu and select the Properties option. Select Advanced system settings and then select the Environment variables option in the Advanced tab.
Then select the new option and enter the new variable name as JAVA_HOME.
Set the path of JDK to variable value and then click OK.
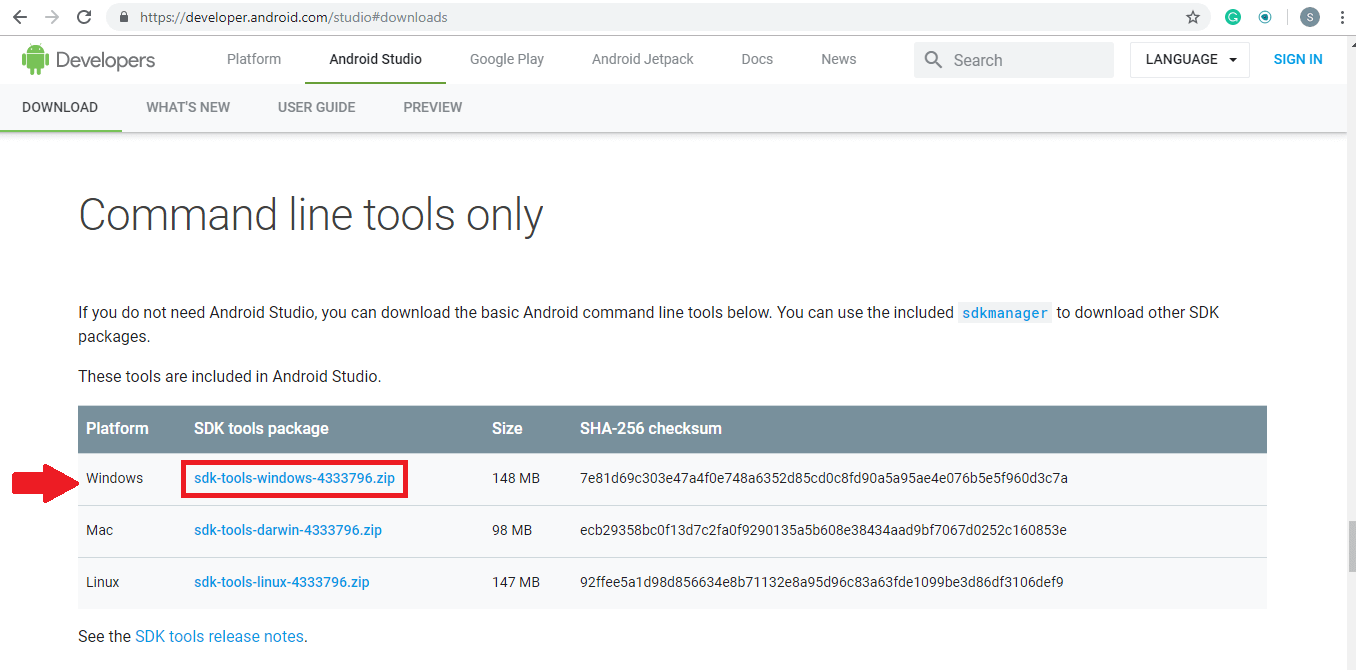
To get an Android emulator you need to go to www.developer.android.com\studio#downloads and Scroll down to Command-line tools only section to download the zip file of SDK tools package for Windows.
Don’t download the EXE file. Once the SDK file is downloaded, copy it to the C drive, make a new folder and extract the zip file in the new folder.
Now you need to search for SDK manager in the bins folder and open SDK manager. Once the SDK manager window is open, go to tools and then get into the bin folder and in the address bar type cmd and hit enter. Now in the command prompt type SDK manager “platform-tools” “platforms; Android-28 and then hit enter. So now you will be able to see Platform tools and Platform folders in now folder you created for the extracted files.
Click on platform tools and copy the address bar text and then again go to an environment variable. Then go to the path, a new window will pop up, make a new path and enter the copied text there and then click on OK.
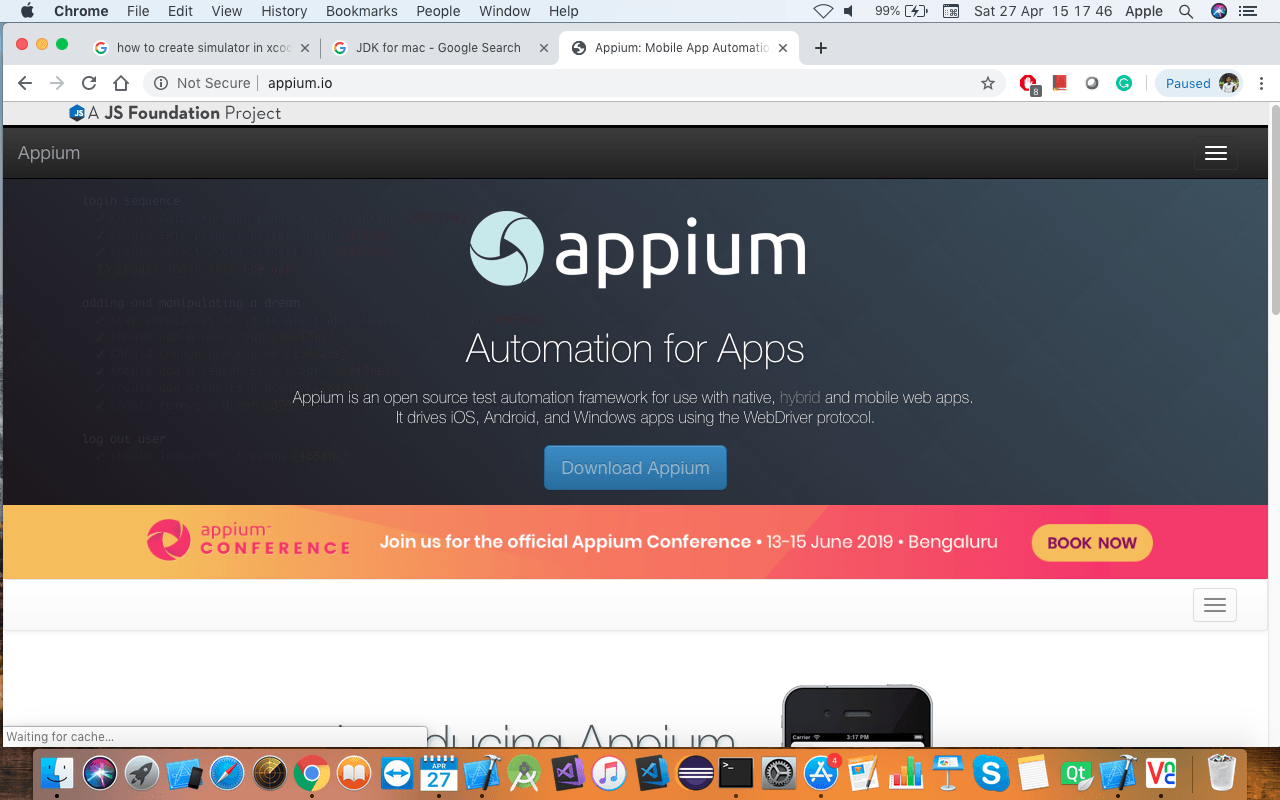
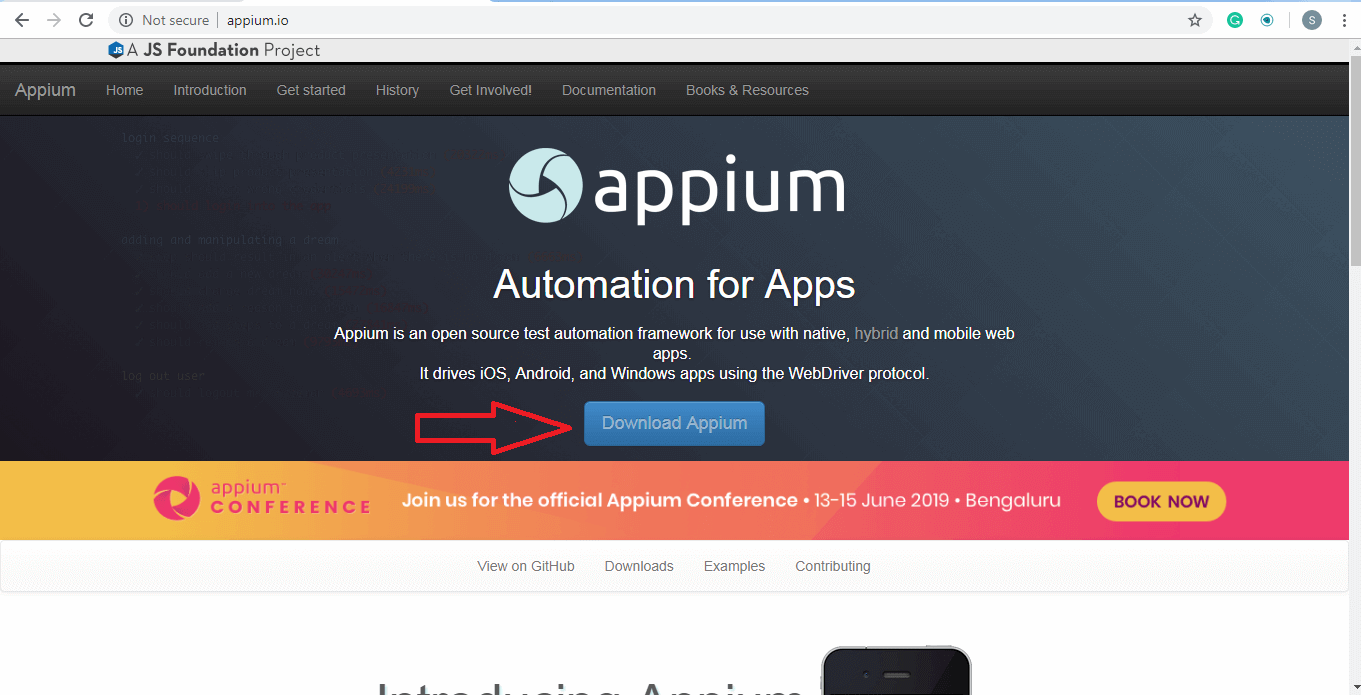
To download Appium go to www.appium.io and click on the Download button.
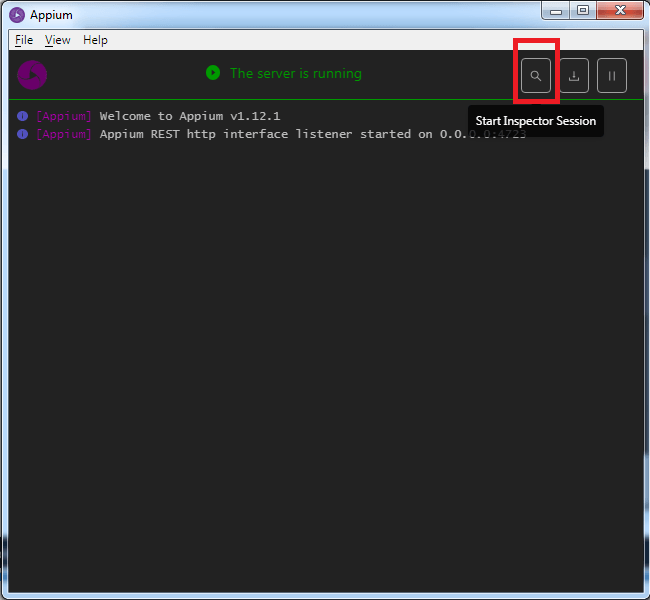
Under the latest version, click on the Appium-windows-1.12.1.exe file. Once the file is downloaded, open the appium.exe file. Click on the Start Server v1.12.1 button.
Then in the server window click on the Start inspection session icon at the top right corner.
Now you can get started with Appium automation testing. Do read our next blog to get more information about Appium mobile automation and how to inspect elements using Appium Desktop.
Appium is an open source mobile app UI testing framework. You can test all types of mobile apps and perform automation test on physical devices as well as on emulators and simulators. Appium mobile testing does not have a dependency on mobile device OS and it supports cross-platform app testing as a single API works for both Android and iOS. Appium supports many popular languages like C, PHP, Python, C#, Java, Ruby, JavaScript, etc.
What is Appium Mobile Testing?
When Appium is installed then a server is set up on your machine that exposes the REST API. It receives a command request from the client and executes that command on Android or iOS mobile devices. Then it responds back with an HTTP response. It uses mobile test automation frameworks like Apple instruments or UIAutomator2 to drive the UI of apps.
Approaches to Test Automation
There is two approaches for mobile test automation, Image-based and Object-based approach. Let’s understand both in detail.
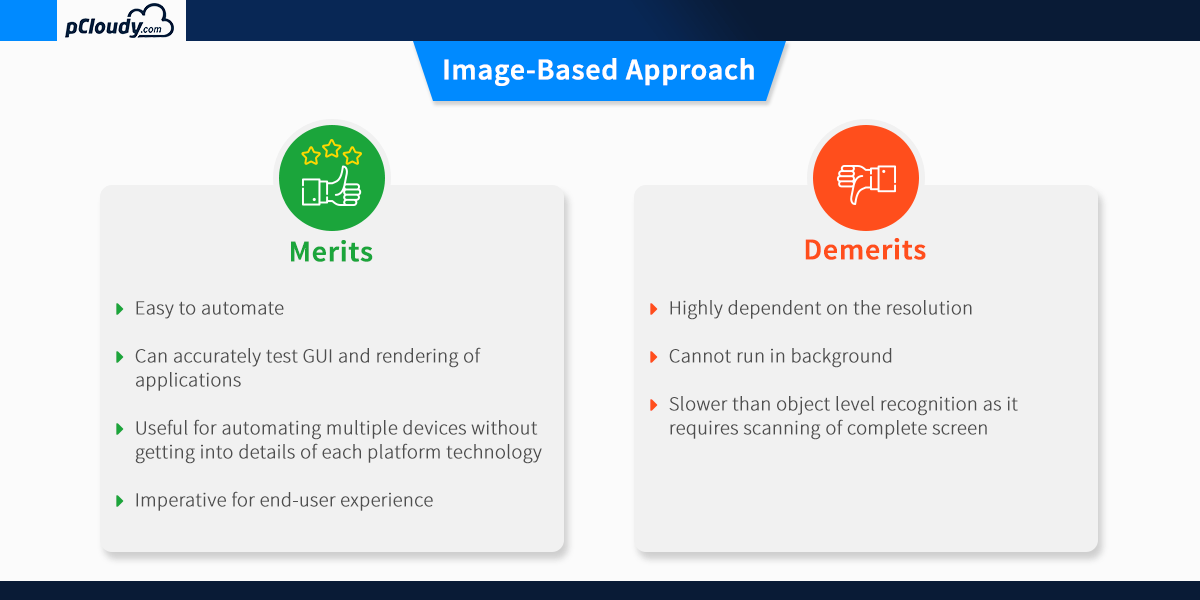
Image-Based Approach for Test Automation
This technique of object identification is based on the image processing attributes of the objects in the Application Under Test (AUT). Example: Automate user options like “click, type, drag-drop, mouse actions, etc.”
Visual verification of the expected output
• Not dependent on the platform underneath
• Can be used to automate emulators as well as a real device.
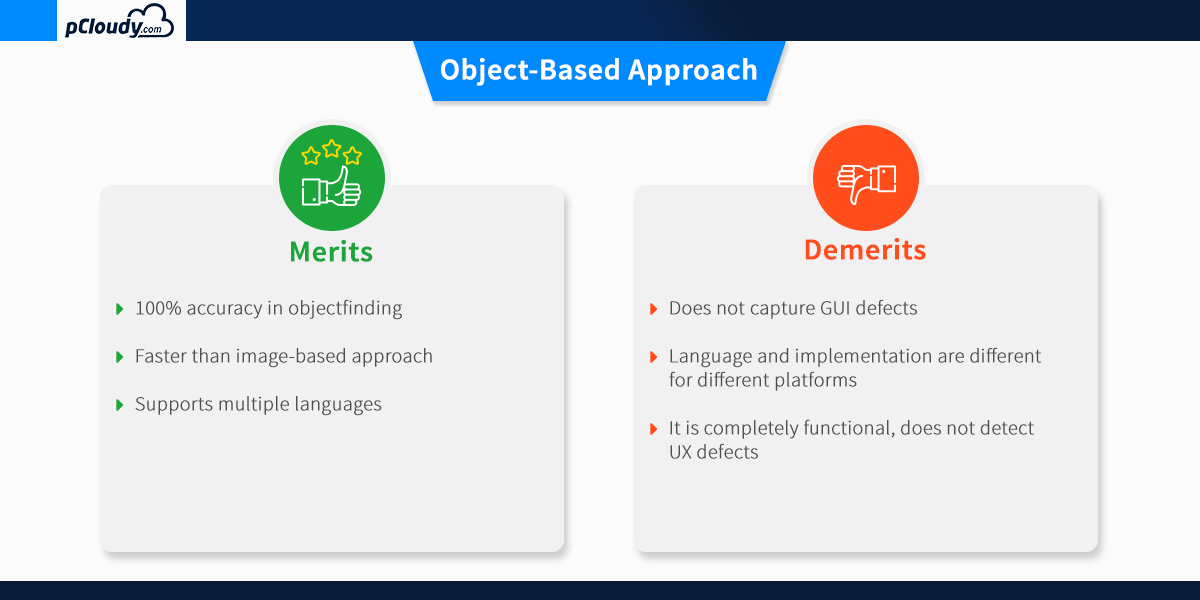
The object-based approach of test automation
This technique of test automation is based on recognizing the nativity of the objects in AUT. This nativity reorganization process for each individual object in the application is carried out using different attributes that are assigned to the object.
It is used to extract the application object identifier with its properties from the actual native operating system source code, just like the developer used. This is an accurate and fast method to recognize the buttons, lists and other objects used by the application.
One drawback of the object-based approach is that the recognition of the individual attributes of the object involved restricts these techniques ability to function in test scenarios that require third-party application access. This reduces the automation coverage of utilizing this technique.
Which approach should we choose?
As we have seen, both approaches have their pros and cons. To get better results, you can merge both approaches and think about devising a hybrid test automation solution.
The combination of OCR (image based) and native (object-based) approach allows users to build a single script that will be portable across different devices. It will make your automation robust and efficient and allows the users to confidently detect the relevant native and GUI defect within the mobile application.
Appium Overview and Architecture
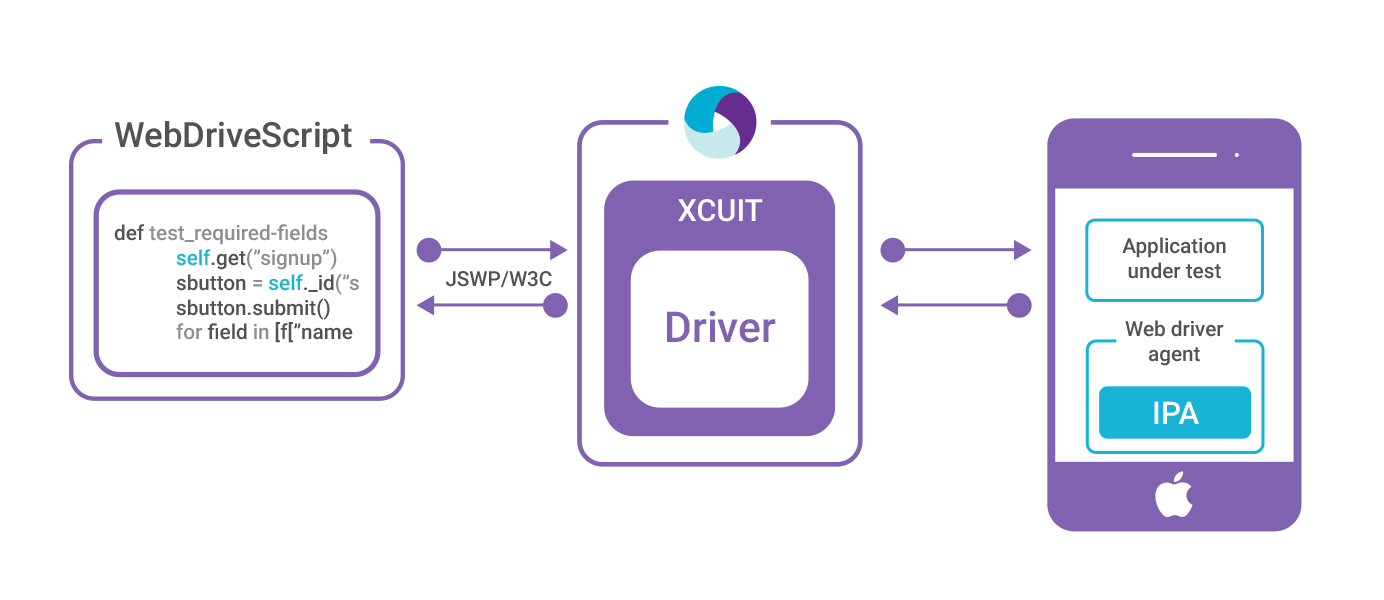
Appium is an HTTP server that manages WebDriver sessions. On iOS devices, Appium proxies command to a UI automation script running on Mac Instruments environment. Apple provides an application called instruments which are used to do a lot of activities like profiling, controlling and building iOS apps. It also provides an automation component where you can write some commands in JavaScript which uses UIAutomation APIs which interact with the app user interface. Appium mobile automation uses these same libraries to automate iOS apps.
The Webdriver Script sends a command in the form of HTTP (JSWP) to the Appium Server. Then the Appium Server will then decide as per the request which driver should be initiated. So, in this case, the Appium Server will initiate the XCUITest driver and it will pass the request to the WebdriverAgent which is an IPA (WebdriverAgent.xcproj) developed by Facebook. WebdriverAgent is responsible to send the command to the Application Under Test (AUT) to carry out the actions in the app. Then the response will be sent to the Webdriver Script through the Appium server.
Only iOS 9.3 and above version are supported by the XCUITest Driver. You can find all the capabilities for XCUITest Driver in the link mentioned below.
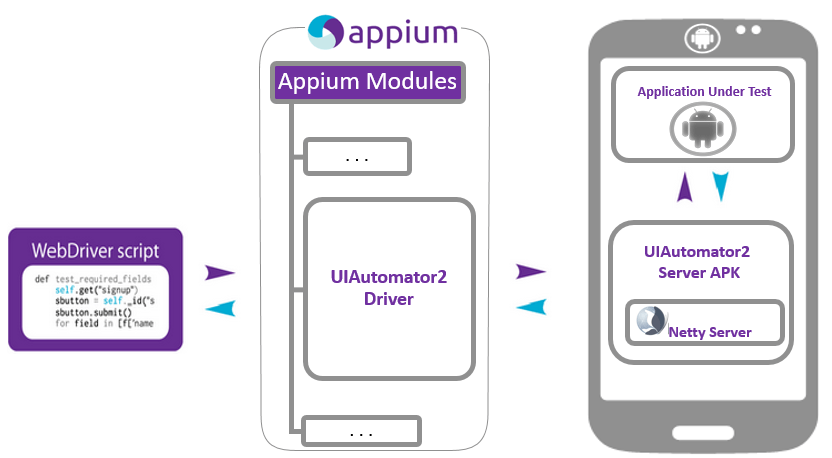
The situation is very similar in the case of Android where Appium proxies command to a UIAutomator2 test case running on the device. UIAutomator2 is Android’s UI automation framework which supports running JUnit test cases directly into the device into the command line. It uses Java as the programing language but Appium will make it run from any of the web drivers supported languages.
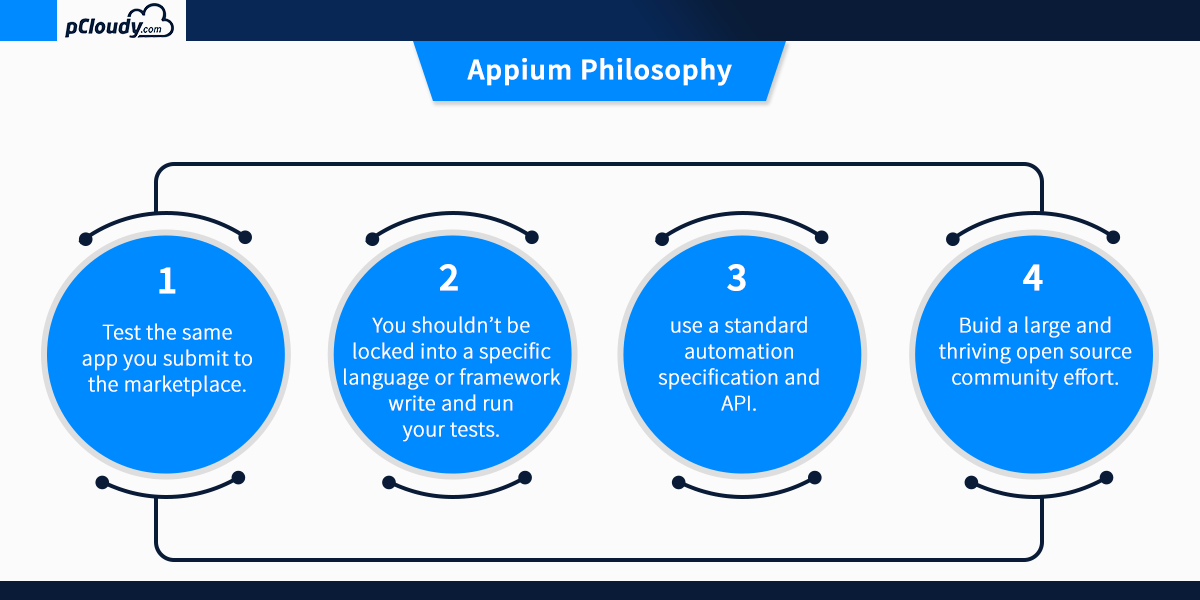
To answer the question “what is Appium automation?”, let’s have a look at the Appium philosophy.
Appium mobile testing is required for proper execution of continuous integration as it speeds up the overall testing process. Appium mobile testing helps to run the repetitive test which would take more time to perform manually. This is why appium mobile testing is the preferred choice for the developers when it comes to test automation.
In the next blog, we will learn more about Appium mobile testing and how to install/configure the Appium setup on a windows machine.
There are more than 5.5 Million apps available on Google Play and Apple App Store combined and by 2022, the number of app downloads will be around 250 Billion. The number of smartphone users in the world is more than 3 Billion and the users prefer using smartphones instead of desktop. This data shows that the mobile app market is very competitive and growing. In this age of digital transformation, the focus of enterprise mobility is to provide better user experience at great speed. The launch of 5G will further complicate the app development and testing process initially. But apart from this, there are three main challenges to overcome and pCloudy is leading the path to bring positive change. Let’s look at these challenges and their solutions.
Challenges Faced by Enterprise Mobility
There is a growing demand for quality at speed in the mobile app industry. The current market dynamics are such that it is necessary to provide the best quality product in less time to remain in the competition. When we talk about mobile app testing, quality can be maintained only when the enterprise can achieve scale. There is a myriad of devices in the market with different OS versions, browsers, Custom ROM, etc. and the app should be compatible with all the devices. How can ensure this and most importantly, how can we speed up the testing process on multiple devices? pCloudy can help you overcome this challenge with its best in the class features. Let’s have a look at them one by one.
Parallel Testing to Achieve Scalability
If we are talking about scalability then testing your app on 5,10 or even 20 devices are not enough for the enterprises to ensure a bug-free app. pCloudy enables to testers to run your test scripts concurrently on 50, 100 or maybe more devices. Enterprises have the option to perform parallel testing in our public cloud or in our plug & play on-premise infrastructure solution. With more than five thousand device browser combinations, enterprises can ensure that the application is working properly in all the devices.
Parallel testing on 50 devices
You can see in the picture above, we have set up a device infrastructure for 50 devices for demonstration. Similar device setup can be provided for our on-premise solution and public cloud users can just log into the pCloudy platform and book the devices to perform testing. These real devices can be accessed remotely on the cloud which makes it more convenient for the users as there are no location constraints.
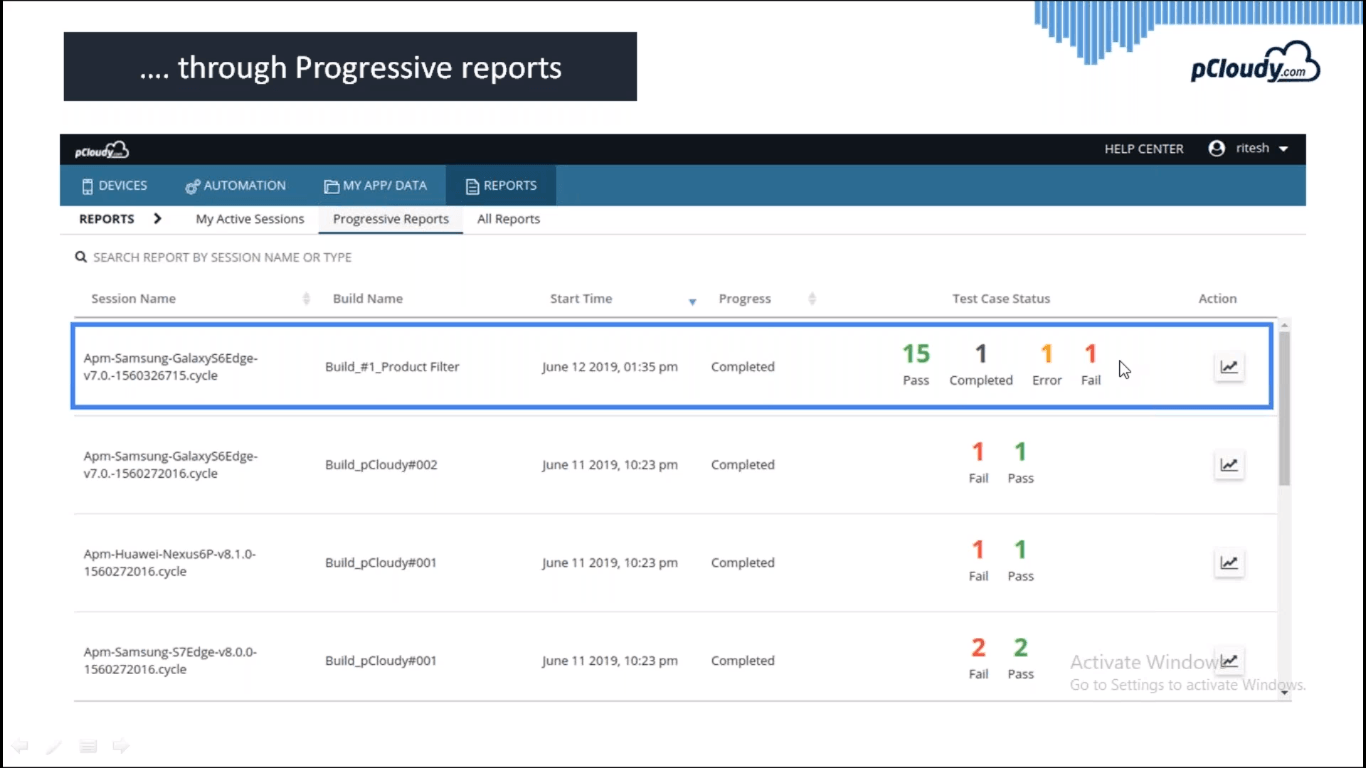
Progressive Reports to Improve Quality
It won’t be efficient to go through each and every report to analyze the data for every device. Instead of that, you get intelligent results where you can do a quick analysis of the errors and then debug quickly. In the pic below you can see the list of results for different builds with their start time, progress, status, and Action.
In the status, you will be able to see how many tests pass, fail, and errors. This way you can concentrate on the tests which failed and you will save time as you don’t have to manually go through all the cases.
You can integrate any reporting framework with your existing Appium setup. The same way you have to configure with pCloudy by adding a one-line code while creating an asset.
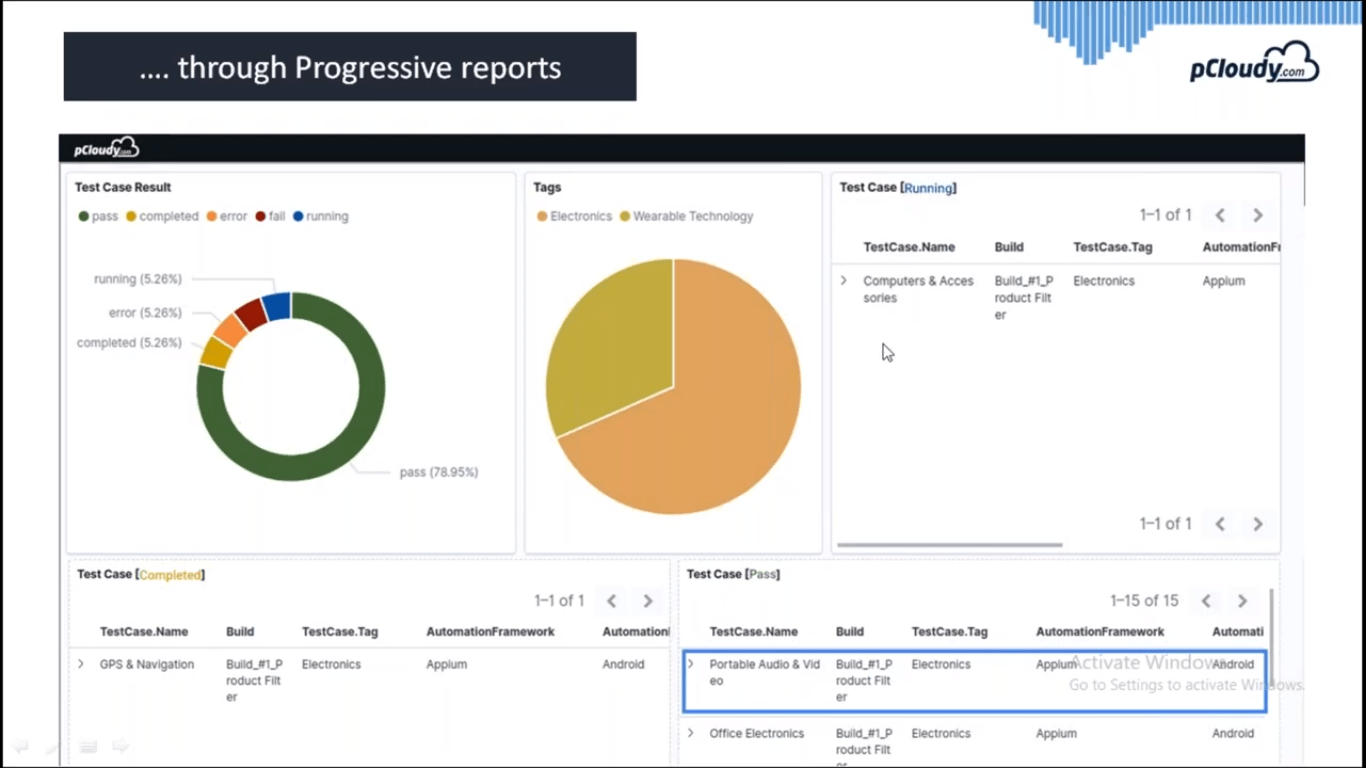
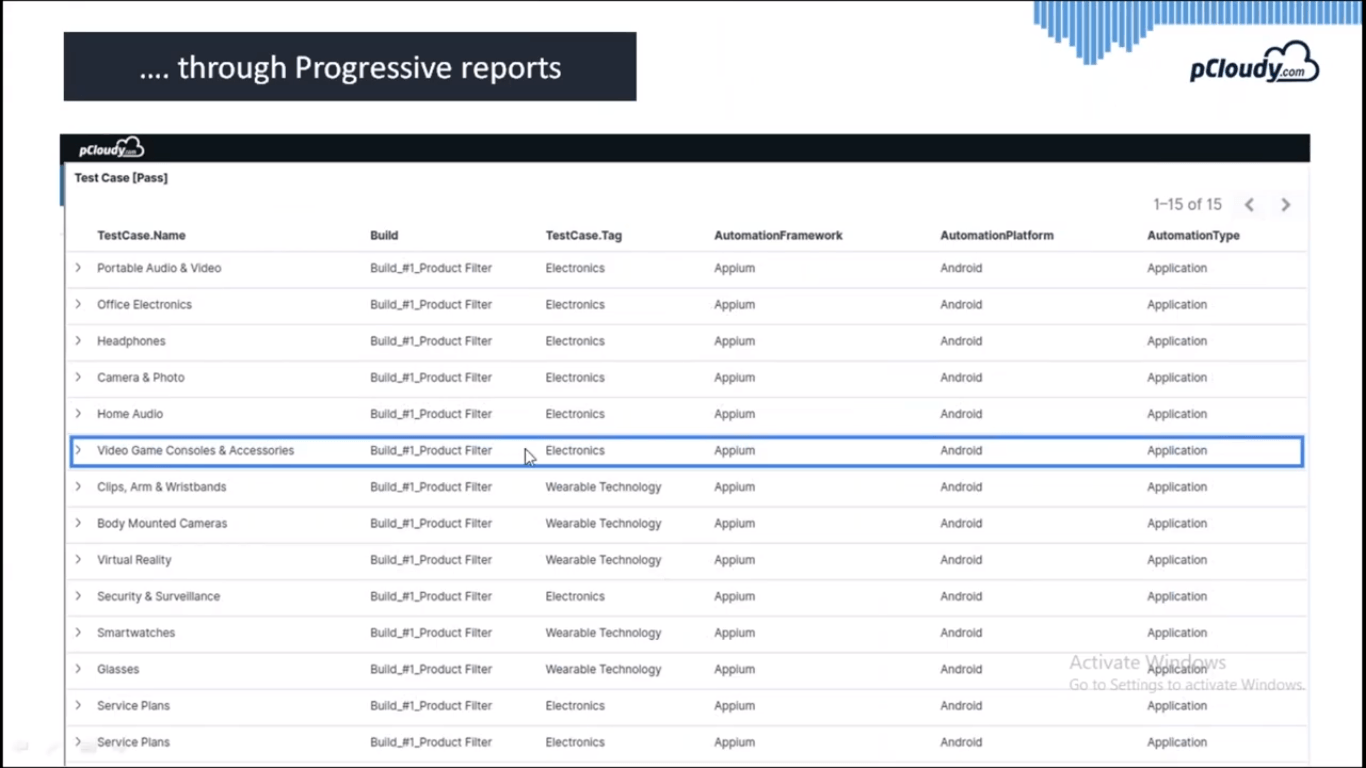
In the pic above you can see the test case result in detail. You can see the tags, test case name, build, Automation, and the live status of errors.
Once you expand the test case you can see the logs, Jason format, screenshots, video for that particular session. This information can be used to expedite the test execution.
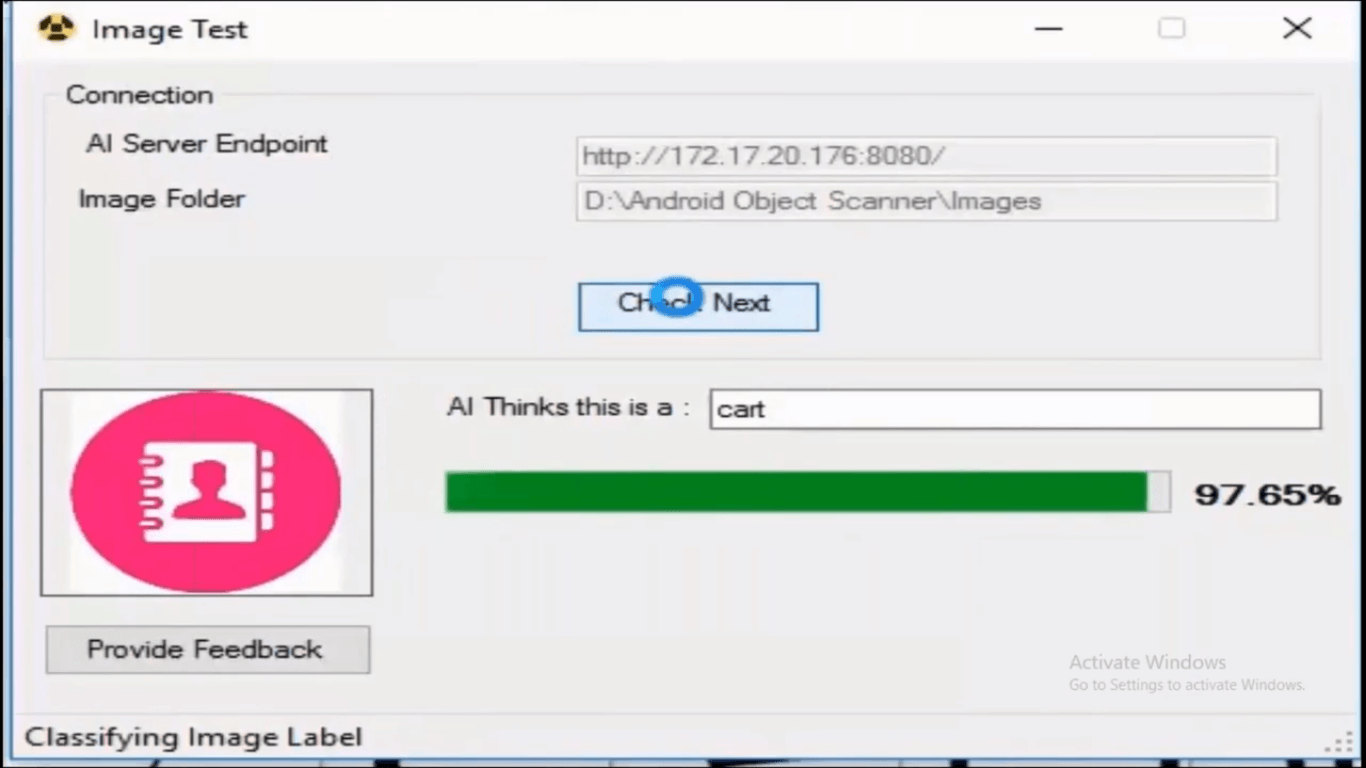
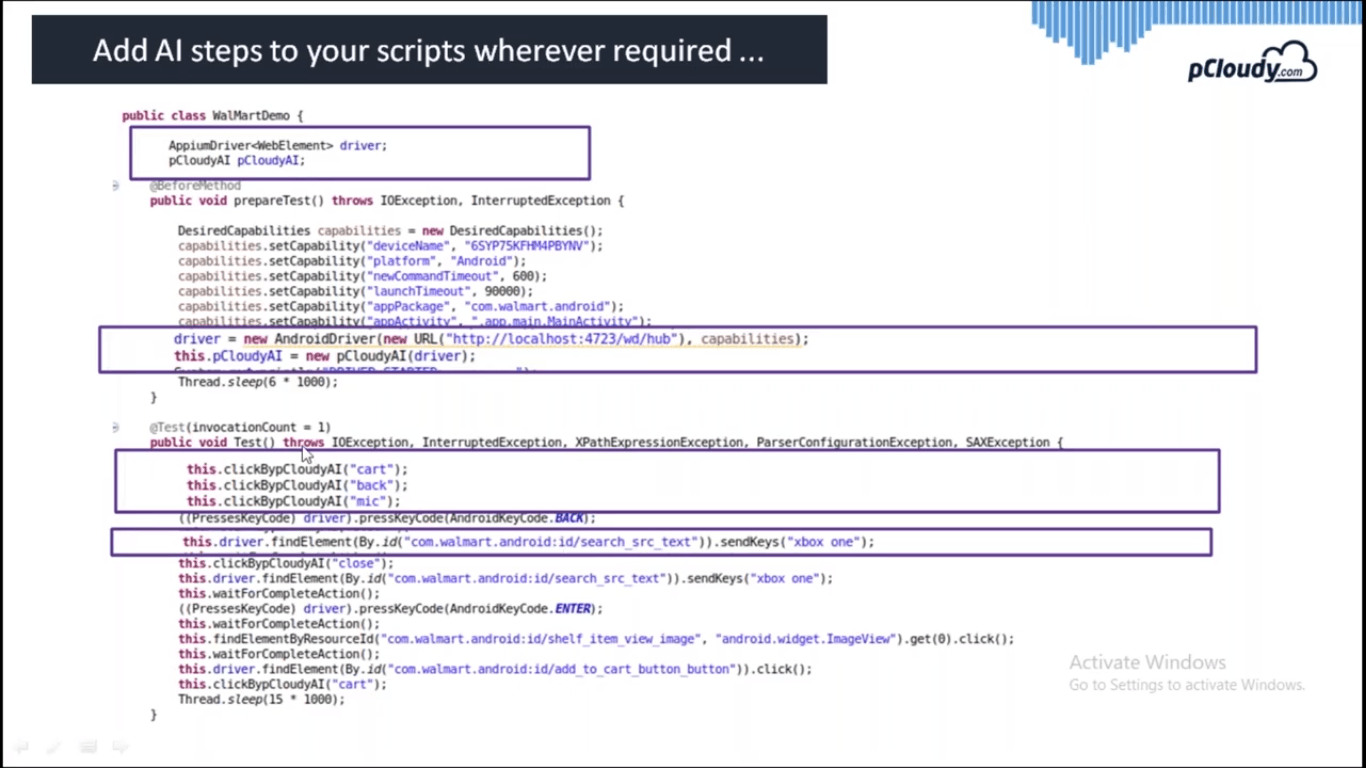
Integration with AI to Speed up Mobile App Testing
The next challenge is to speed up and simplify the test script creation process. Usually, the procedure is to connect the device to the system and use an automation framework like Appium to use object repositories. If you are using images then the XPath may change depending on the devices.
This AI based utility will help you to get the object repository for the entire page. So if there is an icon for contacts then this utility will automatically recognize the element.
In the code, you just need to declare the driver for Appium and for pCloudy as well. Then you need to initialize the drivers and start using the code generated using the AI utility. This is how the script creation is expedited using AI.
Conclusion
To sum up, pCloudy has come forward with solutions for the enterprise mobility to deliver quality at speed with scale. Whether it’s parallel testing, progressive reports or creating a script using AI-based utility, all these features fix the problems that were mentioned earlier. The proverb “change is the only constant” fits well as pCloudy comes up with updates on a regular basis to resolve the issues and make mobile app testing better.
These days software firms are putting in a lot of effort to attain quality at speed. Whether it’s continuous testing, agile or bringing AI into automation, it is required to refine the software development process to keep up with the rapid technological changes. The best way to do that is to adopt practices like parallel testing which will save time and effort. So let’s get into the details of parallel testing and understand the benefits and challenges faced to implement it into the software development life cycle.
What is Parallel testing?
Parallel testing is defined as a type of software testing where multiple apps or features are tested simultaneously which reduces time consumption.
Mostly it is done when a new version is released for an app. There is a need to check the compatibility of the latest version of different device, browsers and OS combination.
For example, if there is a new version of the OS being launched, then there is a need for testing the app to check if all the features are working fine with the new OS version.
So parallel testing can be used when the app is to be tested on the different version of the operating system or when there is a new version of the app to be launched.
To perform parallel testing you can simply create slave projects for the different functionalities of the app and a master project that will run these projects.
Why and When to Perform Parallel Testing
Parallel testing is done to make sure if the new version of the app works fine or to check the consistency between the old and the new version. It can also be done to check the integrity of the new app and the data format between the versions. When a company is moving from the old system to new system and synchronization is performed, it becomes necessary to check the legacy data is imported from one system to another and all the outcomes are defined more accurately especially in the financial domain.
Benefits of Parallel testing
Parallel testing has become a need for the QA teams as the benefits cannot be neglected. Let’s have a look at some of the benefits of performing parallel testing.
Better Development Flow: Better reporting and quick feedback with parallel testing enable testers to share the results with the development team. This practice also boosts the Continuous Integration efforts which lead to the timely delivery of the product. Parallel testing also helps build better communication between the QA team and the developers as the testing and reporting are done in a timely manner.
Less Effort: Needless to say manual testing is very important but doing regression testing again and again on different devices combinations will be time-consuming. Performing parallel testing will reduce the amount of work that you have to put in as you will have to work on one script only. That script will be replicated on multiple devices.
Time-Saving: Parallel testing saves your time by a lot and that time can be invested in exploratory testing. Even if you are testing your app on two devices, your testing speed increases by two times. Human error can give you incorrect data so it’s better to use parallel testing for such repetitive testing which can also be boring.
Better Test Coverage: The test coverage increases when you test your app on various device browser-OS combinations. The more devices you test your app on the better. This will ensure that the end user gets the best experience irrespective of the device used. In this way, parallel testing ensures better user experience which means better ROI.
Less script: You can just write the script once and rerun the test on multiple devices. The older and newer version of your app can be installed on different devices to check compatibility and consistency. The goal is to make sure that the newer version of the app works fine on the latest and the legacy devices similar to the older version with some updates.
Challenges of Parallel testing
Parallel testing has its own sets of challenges and It is always better to get familiar with the issues before making a decision. Although there are solutions to these challenges which are also mentioned below.
Infrastructure Limitations: The cost to set up the test environment can take a toll on the company’s finance as the infrastructure and maintenance will cost a lot. Mobile and networking devices will add to the cost. Also, the company will have to hire highly skilled professionals just to maintain the setup. Instead of this companies can opt for cloud-based services like pCloudy where they will get all the desired devices to test on which can be accessed from anywhere anytime.
Data Dependencies: It might be difficult to make a strategy for parallel testing if the test cases are dependent on some specific data. So if we take a case of sign up page. There can be test scripts running for a user login but if not done in a sequential manner then any other script might run first which would delete the user credentials form the database. Another script might also run which will require a user to enter the data. In this case, it will be difficult to integrate the scripts into parallel testing due to data dependencies. This is why it is required to write the test scripts which are truly data independent. Therefore the test scripts should have the configured data which is required for the test run and then the scripts can be modified to run in parallel.
Conclusion
To sum up, parallel testing reduces the effort and time spent on testing the app by multiples. It also increases your test coverage and helps provide a better user experience. The best way to do parallel testing is by using the cloud platform as you will not have to invest in the infrastructure and you will be able to access the devices from anywhere anytime. So if your testing team is distributed across the globe, this will be your best option and all that extra money saved in the maintenance can be put to good use for some other feature development process.