Good news for Android users!!! The wait for the new version of the Android is over as it is likely to be released in the first week of September. Yes, you read it right.


Finally, Google has ditched its sweet flavours that started with Android 1.5 naming as “Cupcake”. After that, the trend followed as — Donut, Eclair, Froyo, Gingerbread, Honeycomb, Ice Cream, Jellybean, KitKat, Lollipop, Marshmallow, Nougat, Oreo, and Pie. 


For the first time in its history, Android released its OS without a dessert name. It has discontinued the tradition permanently. It is simply called Android Q or Android 10


However, the previous version Android 9 or Pie was most focused to introduce the best of intelligence, simplicity, digital wellbeing and ultimate navigation.

 
The new version Android Q is filled with functions like Android Q desktop mode offering more control to apps and features to its users. Fans and tech junkies had lots of expectations from Android 10 as it comes with lots of interesting and innovative features. 


Android Q Features

Let us look at major changes in the Android 10.


Fully Gesture-based Navigation


Putting forward the gesture-based navigation added to the Android Pie, the new version will have fully-gesture based navigation. The traditional back button of the Android OS will not be available. It’s one of the remarkable changes that users will find in the Android OS navigation. 


Some of the gestures are:  

  • Swipe up to access home;
  • Swipe up and hold to show the multitasking menu, 
  • Swipe from the left or right edge of your screen to go back.
  • First, swipe to open a side menu and a double swipe to go back. 


However, user can anytime switch between various system navigation options that include: Gesture navigation, 2-button navigation, and the traditional 3-button navigation. 


System-Wide Dark Mode

 
The feature which every Android user was waiting for- the Dark mode. Google’s Android 10 will have a system-wide dark theme that can be turned on and off at any time via a Quick Settings toggle. 


Adding to that, Google has also created APIs that third-party app developers can use to activate the dark theme mode within their apps. 


Live caption transcription


Live Caption will provide real-time captions for just about anything on your phone where someone is talking or reading. The best part is that it happens locally on-device. In other words, no internet connection of any kind is required. Anyone can turn Live Caption on through Android 10’s accessibility settings. 


This will be a godsent gift for users who have difficulty in hearing or partially deaf. They generally face difficulty to understand the media contents like video, games, podcasts and so on, they can turn on the “Live caption” feature to better understand the media being displayed. 

 
Privacy


Privacy is the biggest concern for our generation. New steps have been taken by the Android 10 developers to give us a better understanding and more control over what exactly apps on your phone have access to like calendar, location, camera, contacts, and microphone.


Now the apps that ask for your location will now show a new pop-up asking you if you want to grant location access all the time, only when the app’s being used, or not at all. This is a major step where the user has more command over third-party apps.


Permission Usage

 
The Permissions Usage page in settings has been completely modified to show which permissions are being used by how many of your apps, the ability to filter by permissions to see which apps are using certain ones, and a new User Interface for the App info page.

 
Sharing Shortcut


The direct share is replaced by sharing shortcut. It allows apps to return lists of direct targets for sharing for use within share menus. Unlike its previous versions, apps publish their targets in advance and do not have to be polled at runtime, improving performance. 


Wi-Fi QR Code


Using a password to connect to a Wi-Fi will no longer be required. Android 10 has a built-in feature called “Easy connect”, where the system lets us make a QR code that others can access to use your Wi-Fi.


Bubbles


Bubbles are just like you see chat heads in facebook messenger. It will be a circular floating head that shows the latest notification on the screen. The new notification bubbles will now pop up on your screens while using other applications. The bubble is created for multitasking purposes; however, the user has an option to disable it. 


Audio Features

 
Android 10 lets us record or listen to audio on two different apps. Previously, if an app started to capture audio, all other apps had no way to access the audio input until the capturing app was stopped. But now, you will be able to get two applications to listen to audio input at the same time. 


Settings Panel


User need not jump through multiple pages to get to the phone settings you want. Settings Panel on the screen let you access phone settings that are contextual and correlated to the app that users currently have open.


Foldable Devices


There is a high possibility that foldable smartphones will be introduced in the market by the end of the year. Android 10 will offer support for application developers to develop apps specifically for such devices, even with different folding patterns. The support addresses the app’s resizing, screen ratios, multi-window functions and aspect ratios.

 
Undo App Removal
 

This feature can be saviour for users, as it happens to most of us, we accidentally remove any app and then we realize, we shouldn’t do that. 


Google has understand this issue and has given to undo the removal. After you have removed any app, you have a few seconds to undo it by pressing the “undo” button that you can find within the bottom of the screen. 


Smart Battery Indicator

 
The new indicator will reveal the remaining battery capacity. Currently, we see a certain percentage showing on the screen. Now the OS will show a text like “Until 10 PM” instead of a percentage. This text will only appear when the battery decreases to a certain level. 


Android 10 will give extra privacy to the smartphone users and with the help of innovative technologies, the Android OS users will be able to function more efficiently. All these features will surely make things easier and navigable. 

 
When to Expect the Release
 

Google had released the first Android Q Beta version in early March this year for the Pixel phones and multiple Beta versions were released including Android Q Beta 6 which appeared on August 7. As of now the announcement of the Q3 has been made on August 22, so we can expect the final release of the Android 10 at any point of time when Q3 is over. 


These Android Q features of the Beta versions are live on 20 different phones across multiple manufacturers. People can sign up and enroll to get the new updates on Android 10. 


The current compatible Phone after launch with Android 10 is – Pixel 3, Pixel 3XL, Pixel 2, Pixel 2 XL, Pixel, Pixel XL, OnePlus 6T, Sony Xperia Z3, and LG G8, Nokia 7.1, Nokia 8.1.

 
Related Articles:

  • Android Q Beta Devices Available On pCloudy
  • Migrating to AndroidX
  • Testing The Battery Drain For Android App
  • What’s in Store For Dev and Testers With Android O Release?
  • pCloudy Plugin for Android Studio
  • Suyash Dubey | Posted on | 2 min Read

    We are committed to keeping you ahead of others. pCloudy is one of the fastest to release the support of Android Q beta devices on the cloud.
     
    Google has launched the final Android Q beta and Android Q official release is just a few weeks away. Testers and developers can test their app against this final beta version. Android Q beta 6 includes the final API 29 SDK and updated build tools for Android Studio. It also supports all the features, developer APIs and system behaviors that will be in the final release.
     
    Now you can test your mobile apps on devices loaded with Android Q beta version in pCloudy.
     
    Google-Pixel-2 Android Q Beta Device


    Google-Pixel-2 Android Q Beta Device


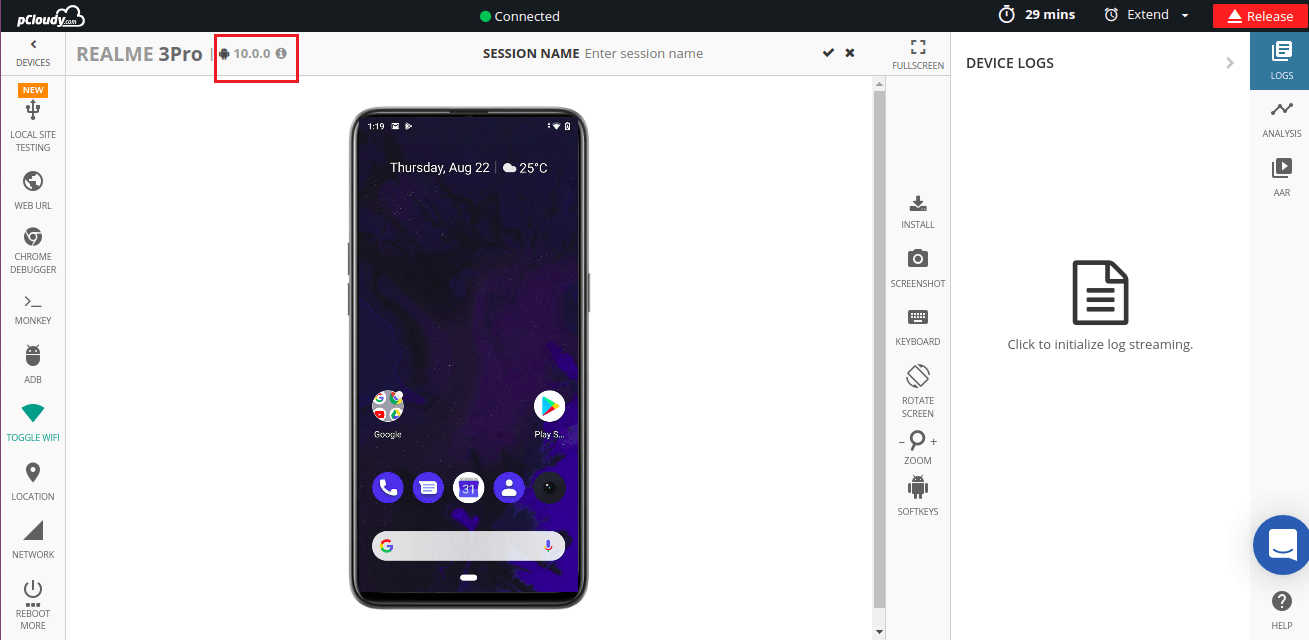
    Realme 3Pro Android Q Beta Device

     
    Related Articles:

  • Android Q: All You Need To Know
  • Writing The First Appium Test Automation Script (Android)
  • Problems With Online Android Emulators and How to Solve it?
  • pCloudy Announces Availability of iOS 11 (beta) Devices on Cloud
  • pCloudy Announces Availability Of iOS 13 (beta) and iPadOS Devices On Cloud
  • Suyash Dubey | Posted on | 2 min Read

    In the previous blog in this series, we learned how to write the first Appium script for Android devices. Now in this blog, we will understand how to start the Appium server.

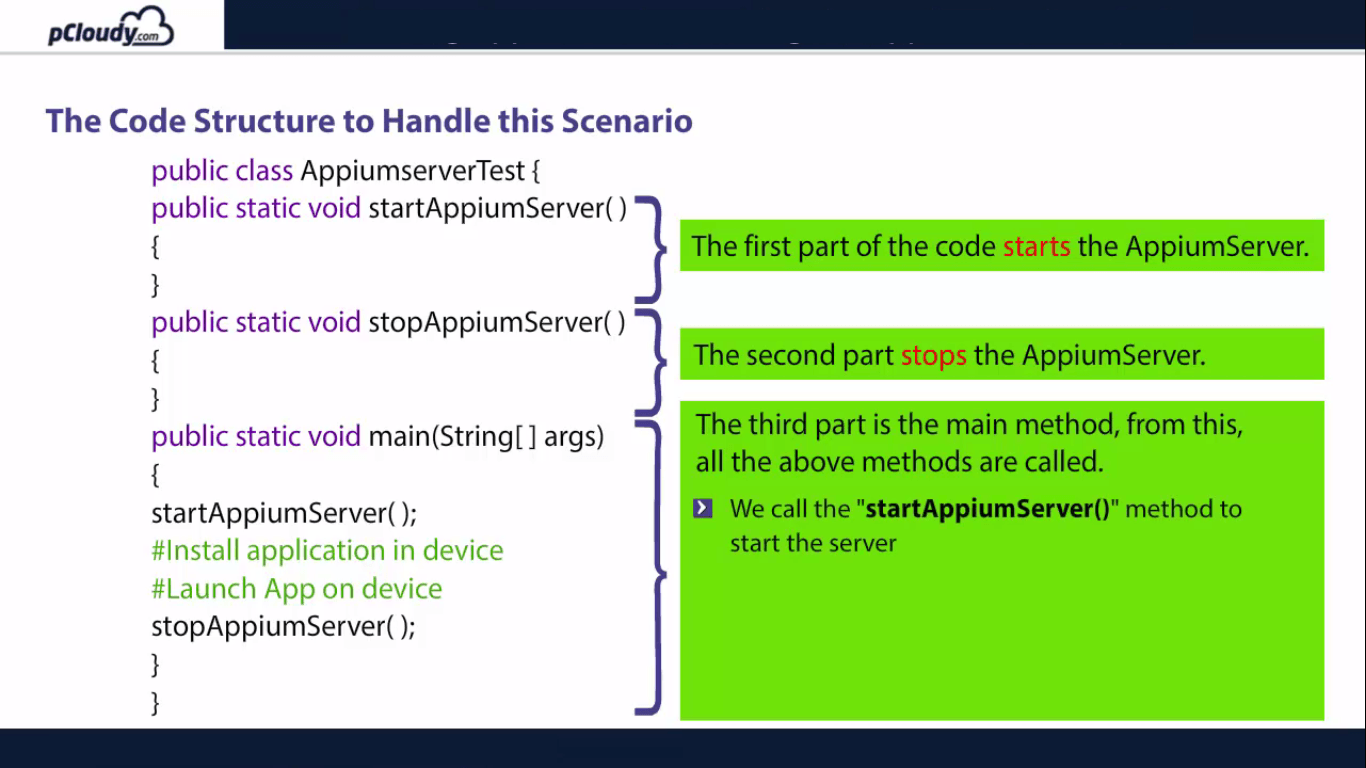
    The code structure is segregated into three parts, the first part of the code starts the Appium server, the second part stops the Appium server.

    The Code Structure

    The third part is the main method which is necessary to execute the class and from this main method, all the above method are called.

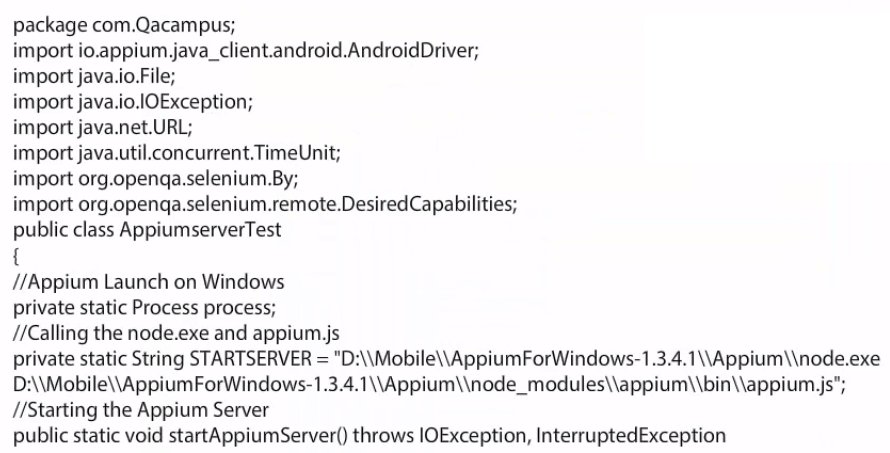
    Starting Appium from code requires a path of two files which are kept inside the Appium folder.

    • node.exe
    • js


    Starting Appium Server

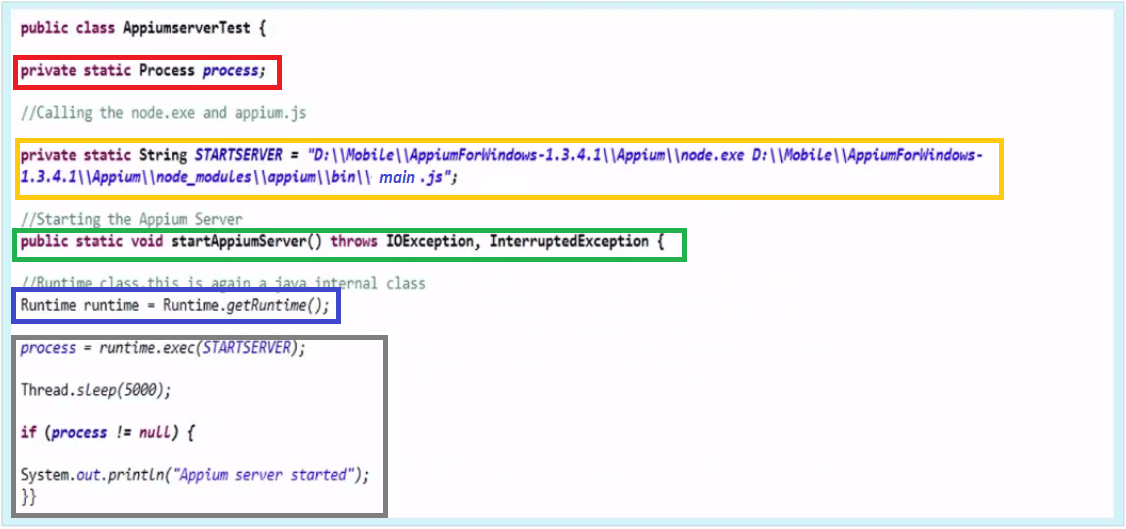
    In the code highlighted in red, we have called process class which is a Java class and declared it static.

    Starting Appium Server

    We then created a start server variable and pass the path to node.exe and main.js, highlighted in yellow. In the code highlighted in green, we added both paths into the same variable with spaces and created a method called startAppiumServer() which takes care of the Appium server startup process. Next step is to create an object of Runtime class which is again a java class and call the method getRuntime(), highlighted in blue. We will pass the variable “STARTSERVER” into runtime.exec() method. It will start the Appium Server.

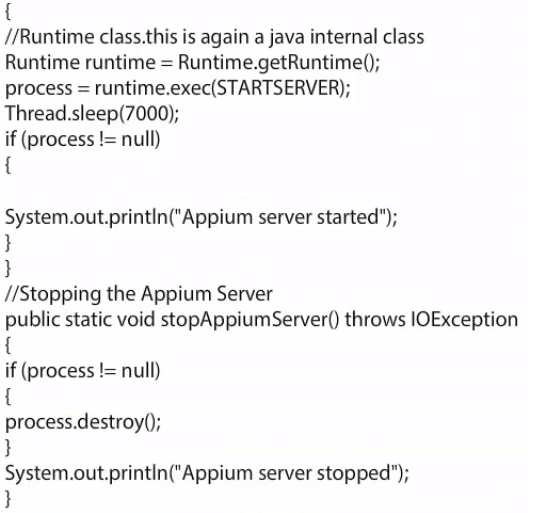
    Once the process is started, we have to store the current state of the process into this variable. We will give a sleep time of 5 seconds as it takes time to start the process. what we are trying to validate here is, if the process is not null; it means that the process is started as highlighted in the gray box.

    Stop Appium Server

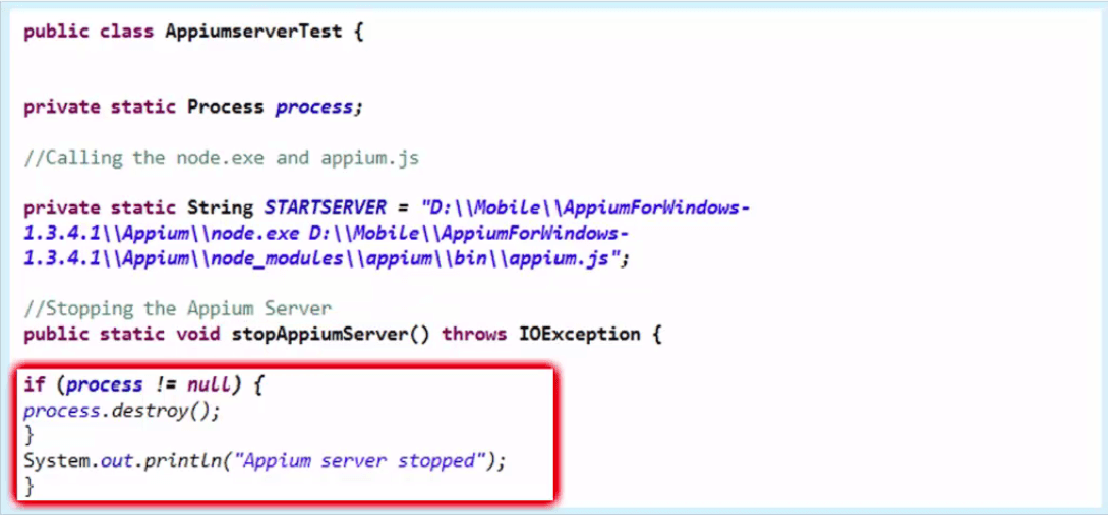
    Here we need to create another method named stopAppiumServer(). We again verify the state of the process and if it is not null, call a method of process class destroy().

    Stop Appium Server

    So now we know how to start and stop the Appium server from code. Let’s try to install and launch an app on a mobile device. Let’s see how we can install a .apk file on an Android device and launch it automatically without providing the path in Appium Server.

    Installing and launching the application

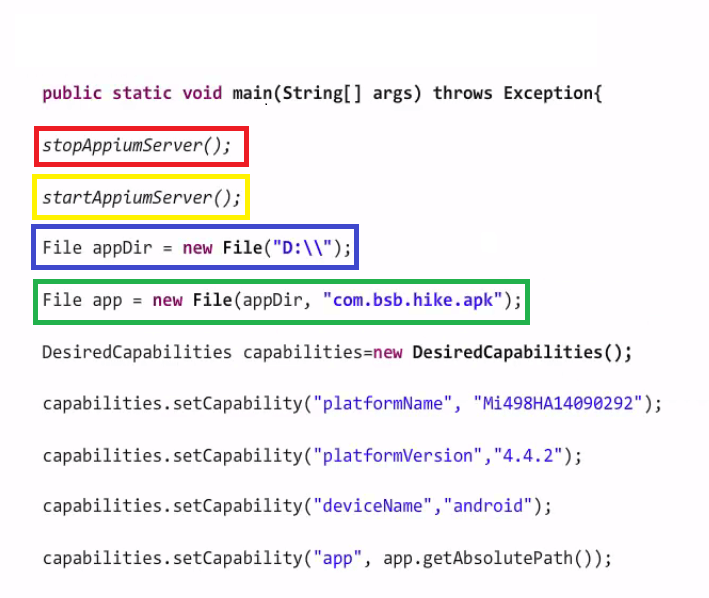
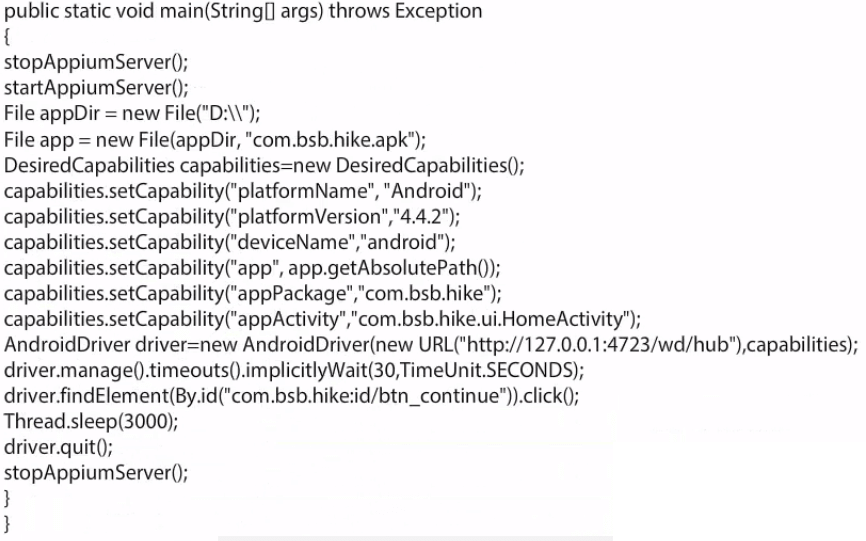
    To begin with, we call the stopAppiumServer() method to verify if any instance of Appium Server is already running and if so, then it closes that instance, as highlighted in red. The method highlighted in yellow starts the Appium Server.

    Installing and launching the application

    Then store the apk path file into a variable of File class, which is a Java class as highlighted in blue. Create another variable of File class app. It takes two parameters:

    • The absolute path of the apk file.
    • Name of the apk file.

    Now the absolute path is stored into appDir variable and the name of apk file in the second part as highlighted in the green box. The rest of the things are the same as discussed in the earlier sessions.

    The complete code is shown here.

    Package QA campus

    Appium server installation

    Appium server installation

    Now that you have learned how to launch app from code, let’s move on to the next blog where we will learn how to set up Appium on a Mac machine.

    Suyash Dubey | Posted on | 2 min Read

    In the last blog in this series, we learned how to set up Appium for test automation on a Windows machine. Now we will handle the application by writing the Java code. We will require the following software:

    Eclipse

    Selenium standalone Jar

    Appium Java Client
     

    This process consists of five steps as depicted in the picture below.

    Test Automation

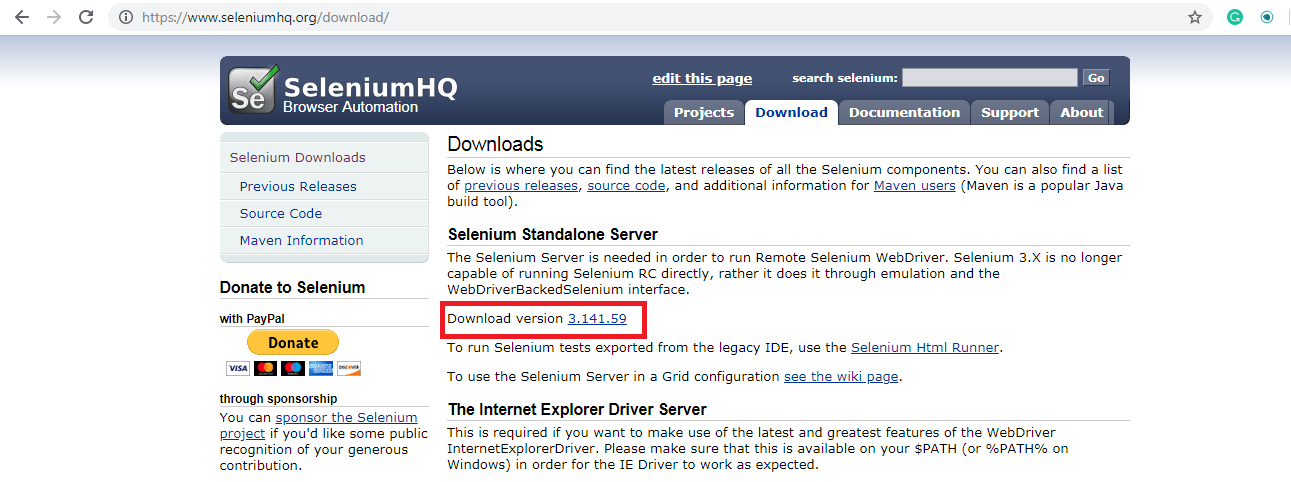
    First, we need to collect the Selenium Standalone JAR and Appium Java Client Libraries. To download the Selenium standalone JAR file, go to seleniumhq.org/download then click on the Download version.

    Test Automation SeleniumHQ

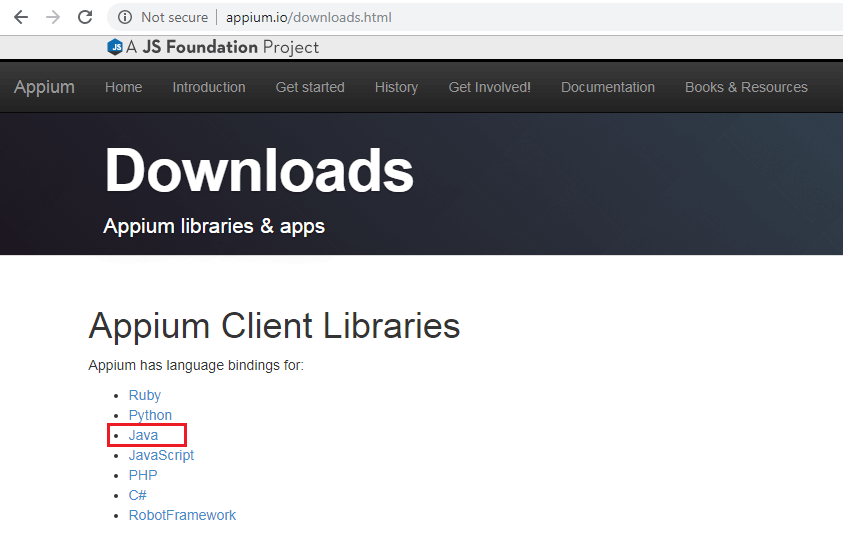
    For Appium Java client you need to go to appium.io/downloads and download the libraries for the selected language.

    Test Automation Downloads

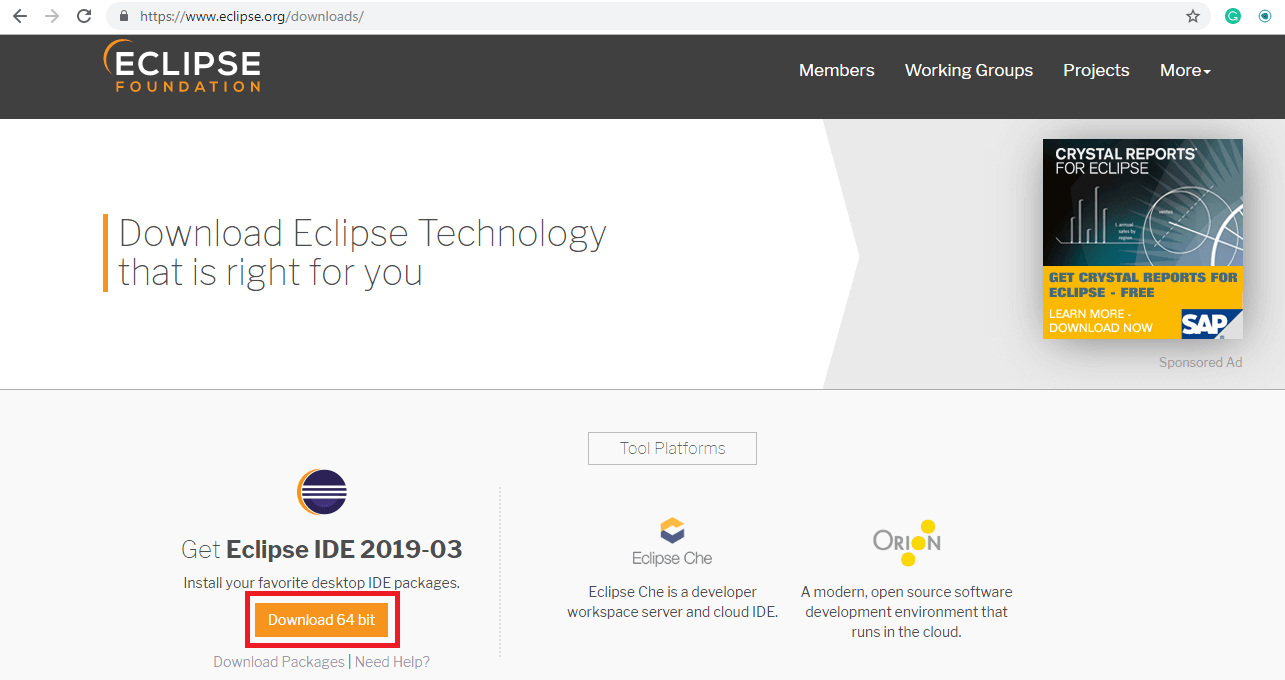
    Now to create a java project download Eclipse from eclipse.org/downloads. Launch Eclipse and select the workspace location.

    Test Automation Eclipse

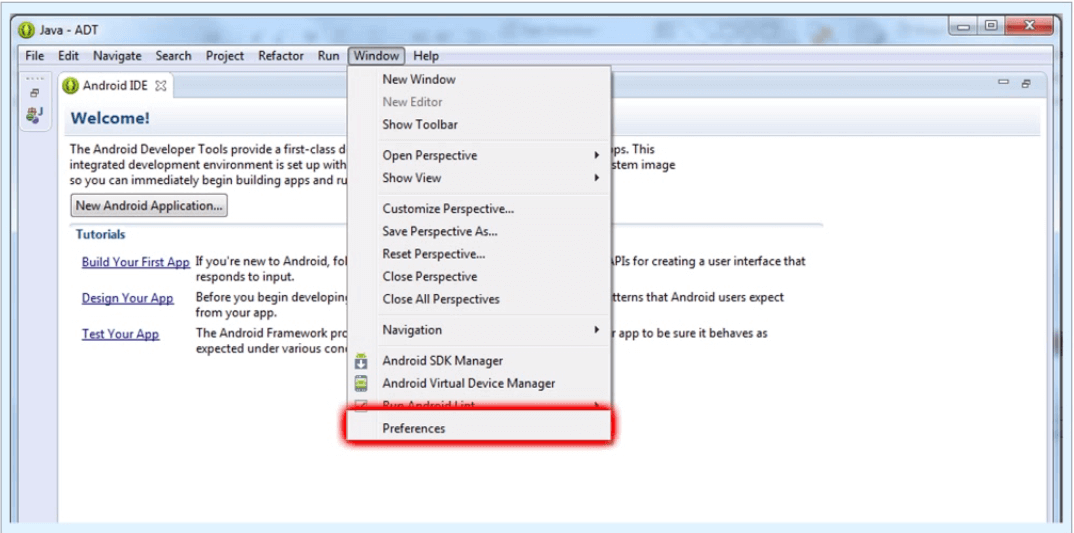
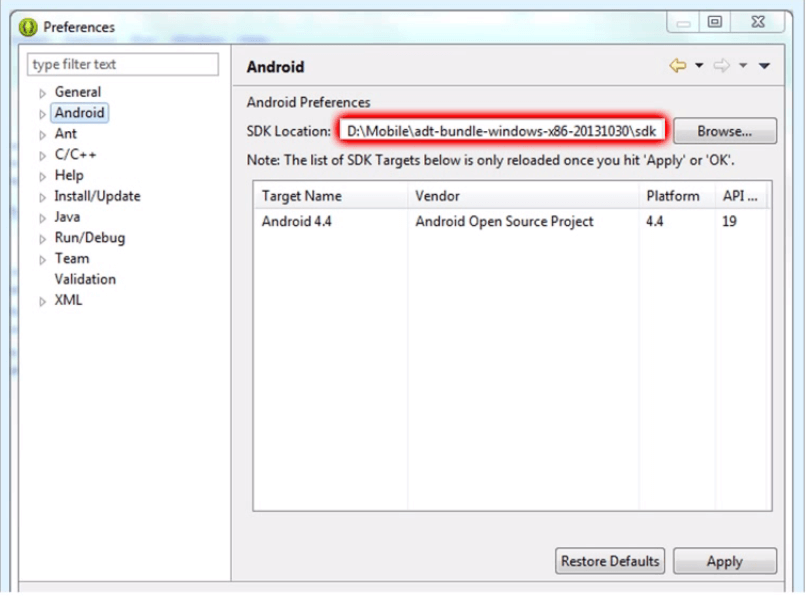
    To set the Android SDK path into Eclipse, click on the Windows tab in the menu bar and select Preferences in the drop-down list.

    Test Automation

    Then select the Android option and browse your Android SDK location and click on Apply.

    Test Automation Preference

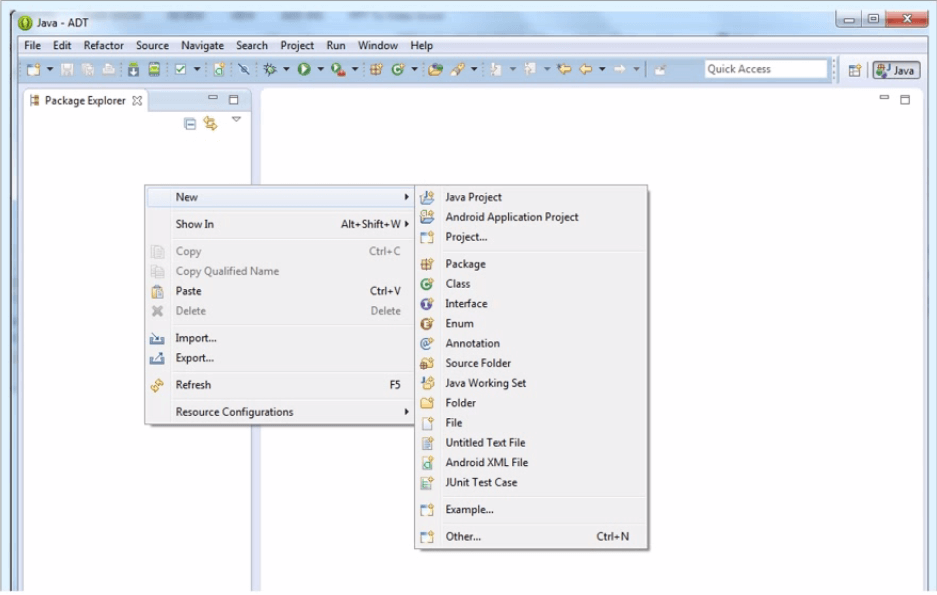
    Launch Eclipse and right-click on Package Explorer. Then select a new Java Project.

    Test Automation Java ADT

    Enter a project name and click finish.

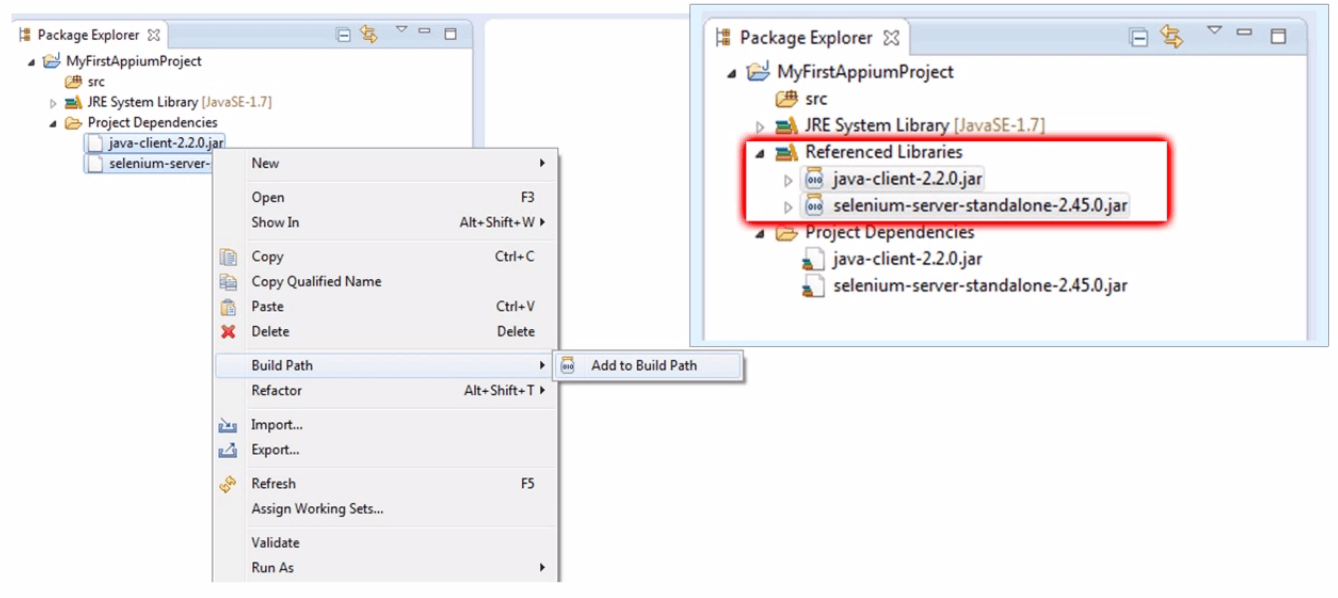
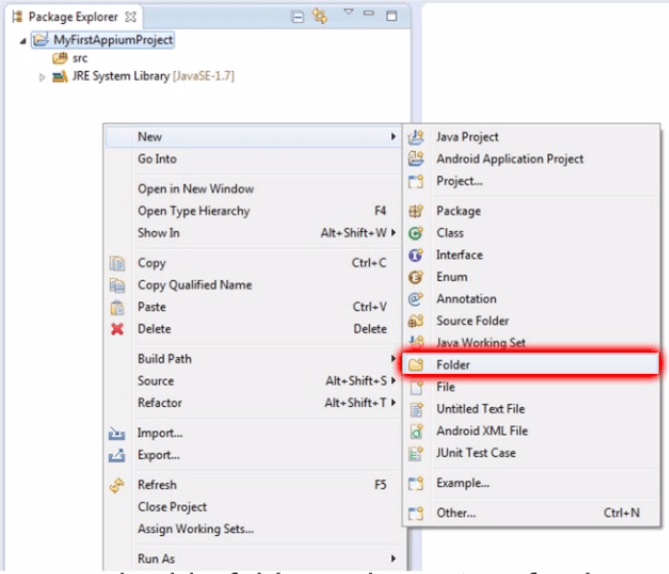
    Once the project is created, add a folder to the project, for the project dependency files [Selenium Standalone] and [Appium Client Library] which you have downloaded.

    Test Automation Package Explorer

    Copy the downloaded file into the newly created project dependencies folder. Select both files and right-click. Then select the add to Build path option and then Add to Build Path. Thus both classes have been added to your project reference libraries.

    Test Automation Package Exp

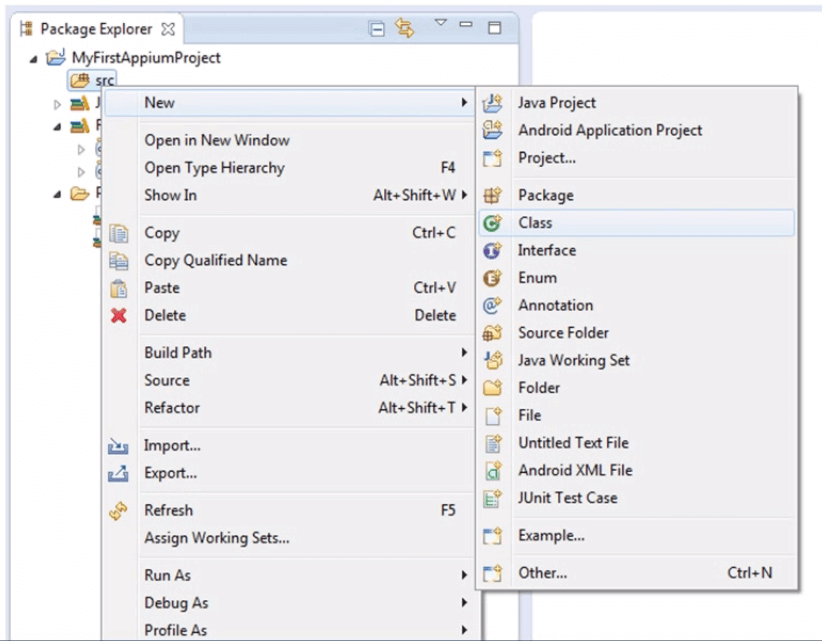
    Create a class and import the required packages. Now right click on the src folder, hover the mouse over the new option and select the Class option.

    Test Automation Class

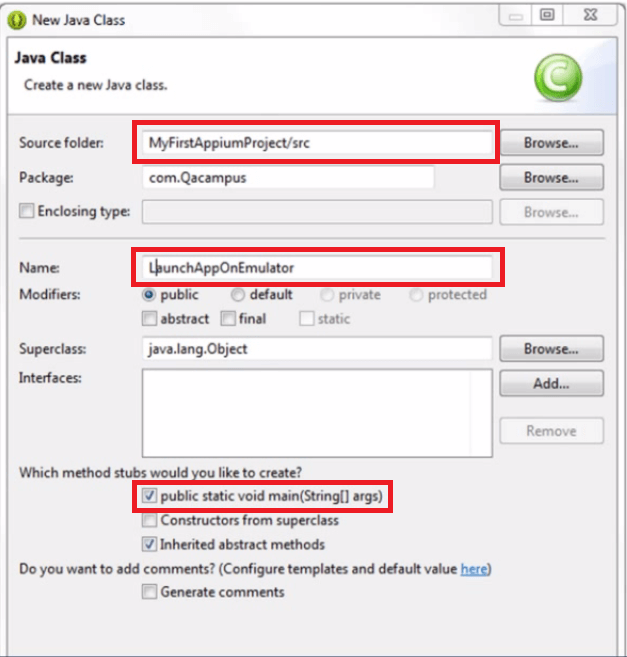
    Provide a package name, the name of class then select the main method checkbox.

    Test Automation Java Class

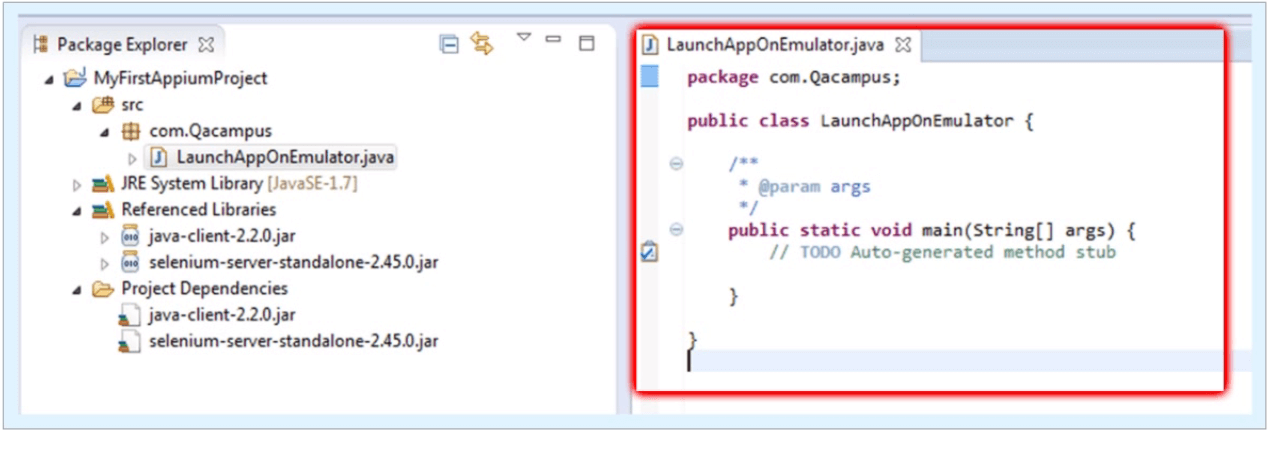
    A .java file within the package is created in Package Explorer panel. An auto-generated the main method is generated on the right panel.

    Test Automation Lauchapp

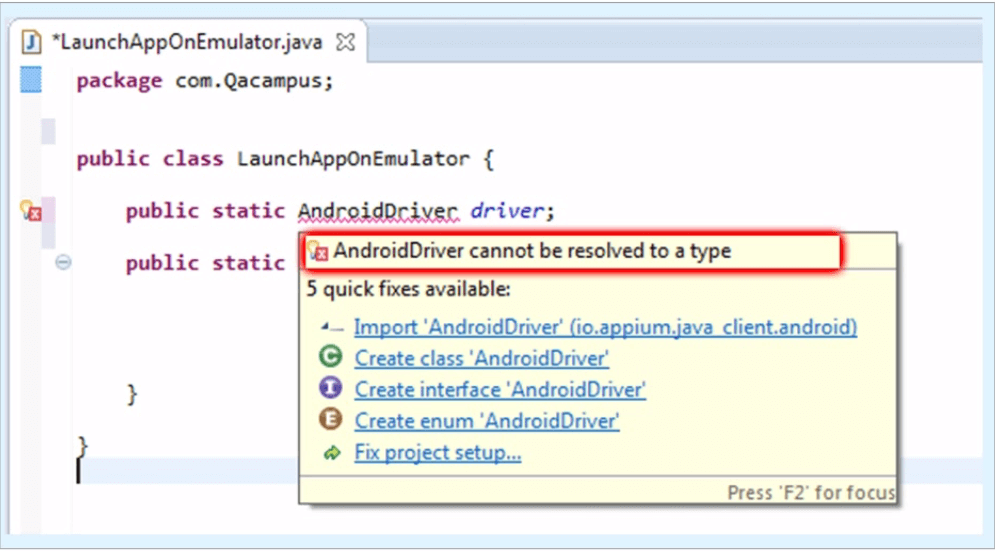
    You need to define a public class variable of AndroidDriver as your first line of code. You will now see an error for an android driver. Now hover your mouse over the error, you will get a list of quick fixes. Select Import ‘AndroidDriver’. Once you select the import package option, the android driver package will be imported and the error will be removed.Test Automation Android Driver

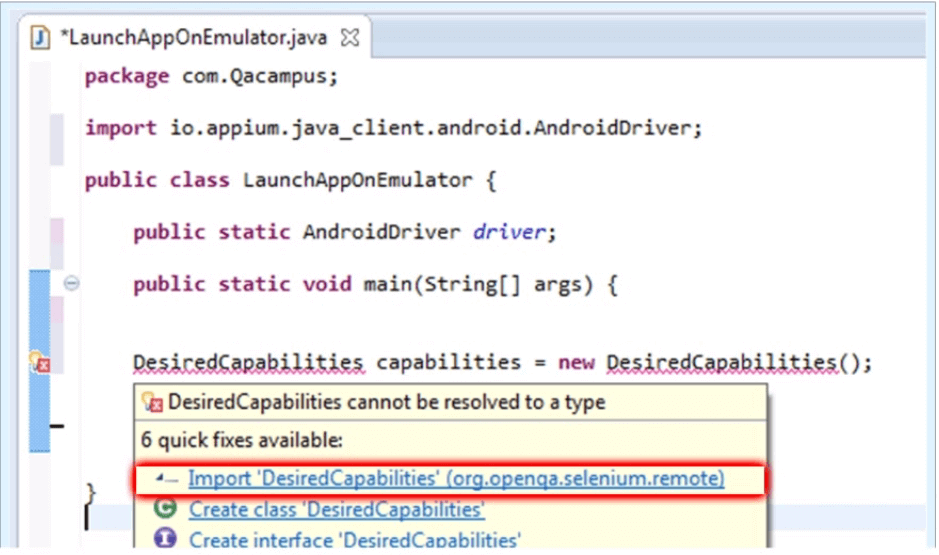
    Create an object of DesiredCapabilities. Again you will get an error for DesiredCapabilities. Hover the mouse over DesiredCapabilities and then select Import ‘DesiredCapabilities’ from the quick fix list.

    Test Automation Emulator

    Once you select the import package option, the DesiredCapabilities package will be imported and the error will be removed.

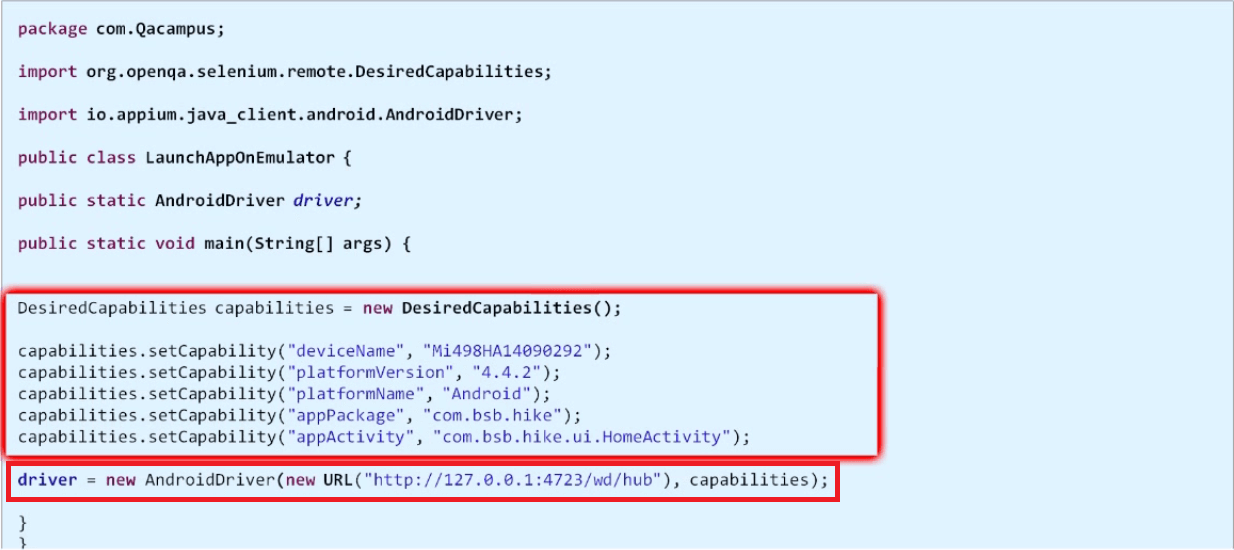
    Now set the DesiredCapabilities and also provide the package of an application and the name of application launcher activity.

    Now you need to instantiate the Android driver.

    To do this we need to have two parameters, the first is the Appium server address with the port number which it is running and the Capabilities.

    Test Automation capabilities

    Hover mouse on URL and import URL from Java.net. You will get an error for complete new URL section, hover mouse on the error and select Add throws declaration. By doing so exception has been added into your main method.

    Test Automation Driver

    Now start the Appium server and connect a device to the system. Now return to Eclipse and execute the code. This will launch the app in the device.

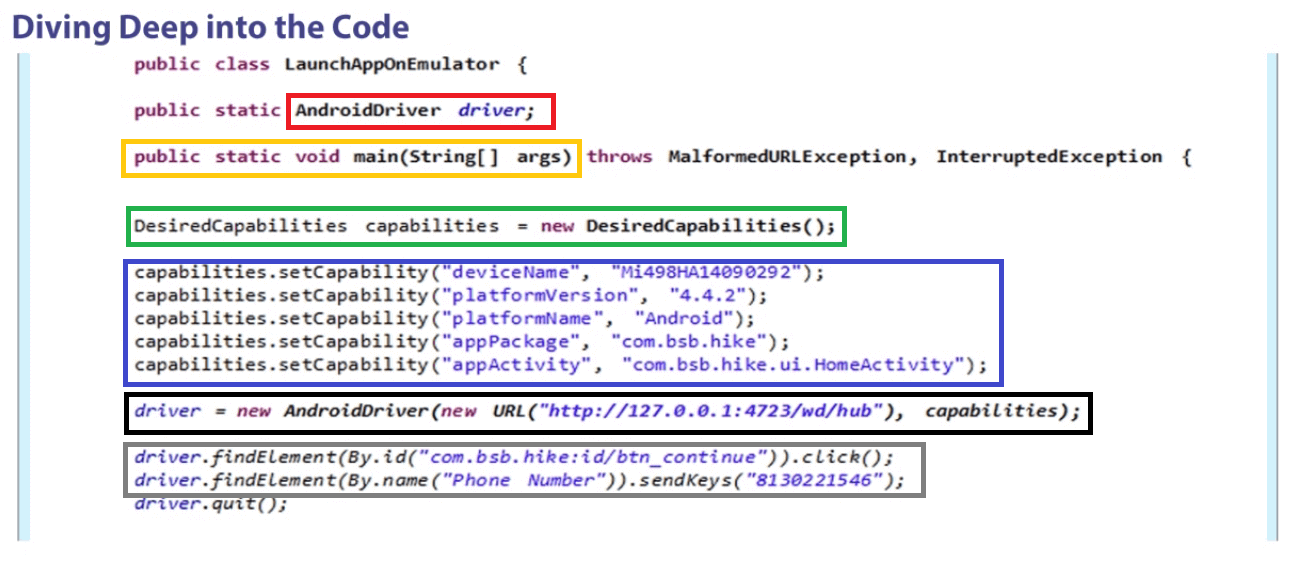
    In the code, we have declared the class as public so that we can access it anywhere inside out test.

    Test Automation Diving Deep

    The java main method is highlighted in yellow. We created an object of desired capabilities class which you can see in the green box. In method setCapability, there are two parameters. First is the capability name and second is the capability value as highlighted in blue. Then we created an object of AndroidDriver class highlighted in the black box. The code highlighted in gray is the findElement(By) method which can locate an element on the screen.

    Now that you have learned how to write a mobile test automation script using Appium test automation framework, we can move on to the next blog where we will learn how to start the Appium server and launch the app from code.

     
    Related Articles:
  • How to use Appium Inspector for Test Automation
  • Basics of Appium Mobile Testing
  • Inspecting Element on pCloudy Devices Using Appium Desktop
  • Help Guide for pCloudy-java-Connector for Appium
  • Appium vs Espresso: The Most Popular Automation Testing Framework in 2019