Nowadays, it has been a dominant trend to deploy big releases on an infrequent basis without sacrificing the quality of the product. With every new deployment that introduces new features, bug fixes need in-depth end to end testing to ensure the success rate of deployment. The small product or projects can be covered up with manual testing but the products or applications that are huge in amount of features definitely require automation testing to provide maximum test coverage in minimum time. Such use cases can be achieved with the use of Selenium with any robust programming language, in this post we will be using Selenium with Python.
Selenium WebDriver is a web framework that permits automation of web based applications on various supported browsers like Chrome, Firefox, Safari, etc. The selenium test automation framework enables you to define step by step interactions with a web application and adding assertions to uncover maximum bugs.
The Selenium web test automation framework can be used with different programming language like Java, Python, Javascript, Ruby, C#, etc. As per the GitHub survey, Python is the developers most demanded programming language. Python language has a smooth learning curve with easy syntax and concise code. Hence, selenium can easily be integrated with Python to automate the web testing process.
Quick Overview Of Selenium WebDriver Architecture
Moving forward, it is important to understand how exactly the Selenium WebDriver works. Selenium WebDriver is not a standalone testing tool, it comprises various components to fulfill the need of web test automation. Below is the diagram that depicts the architecture of Selenium WebDriver.
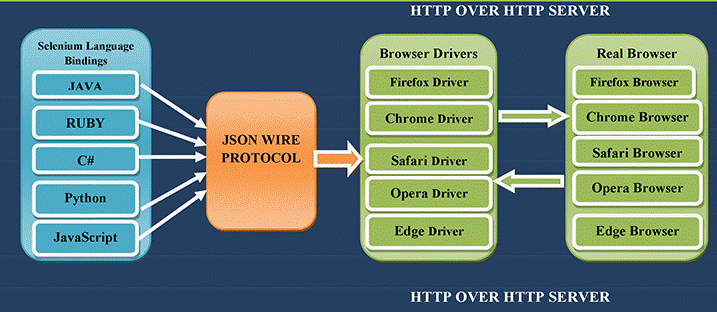
This image gives us a brief of the backend working of Selenium WebDriver along with the other components involved. Let’s quickly have a theoretical overview of these components:
- Selenium WebDriver Client Libraries / Language Bindings: As mentioned above, Selenium can be integrated with any preferred language like Java, Python, JavaScript, C#, etc. Selenium Client & WebDriver Language Bindings are available on the Selenium downloads page to create scripts in any preferred language that can interact with the Selenium server.
- JSON Wire Protocol: This protocol is said to be the heart of Selenium. JSON Wire Protocol facilitates communication between the code and browser by providing a medium for data transferring with REST API’s. These APIs are used to transfer data between client and server. Each Browser Driver uses it’s own HTTP server for data transfer.
- Browser Drivers: Each browser has its own implementation of browser driver. The browser driver receives the command from the selenium based script that we write, executes it on the respective browser and a response is returned in the form of HTTP response. This is only possible with the help of JSON Wire protocol that establishes a connection between the browser binaries and the client libraries.
- Browsers: Each automated test triggered gets executed on the browser installed in a local or remote machine. Selenium supports multiple browsers such as Firefox, Chrome, Microsoft Edge, Safari, etc.
Top Four Python Test Automation Frameworks
With the increase in demand for Python, the popularity of Python test automation frameworks has correspondingly increased. The frameworks play an important role in organising automation projects in terms of managing the order of script execution, storing results, presenting logs and adding assertions. Initially, it might be difficult to select one framework out of the multiple frameworks available but eventually it would benefit a lot in developing a robust test framework. Here we will look closely at the top four test automation frameworks demanded in Python:
Robot Framework:
Robot framework is an open source automation test framework majorly used for robotic process automation(RPA) and acceptance test driven development(ATDD). It is supported with Python version 2.7.14 or higher.
Pros:
- It is suitable for all types of applications like web application, mobile app, desktop app.
- It is a Keyword Driven Approach(KDA) that allows us to create test cases in human readable keywords where no coding experience is required.
- It supports native IF/ELSE syntax from RF v4.0
- It provides a dedicated community support and multiple resources.
Cons:
- Customization of reporting is complex.
- Scope of parallel testing is limited with this framework but it can be achieved with Pabot(a parallel executor for robot framework).
Pytest:
Pytest is the most used Python automation framework for testing. It is majorly used for unit, functional and API testing. It is supported with Python version 3.5 or higher.
Pros:
- Provides fixtures that help in covering all the parameter combinations without re-writing the code.
- Supports multiple range of plugins such as: pytest-randomly, pytest-cov, pytest-django, pytest-bdd.
- Supports pytest html plugin that generates html report for the automated test suite. With just a single command the report can be generated.
- Supports parallel execution of test cases using pytest-xdist
Cons:
- Since pytest has a unique routine for writing test cases, it cannot be easily compatible with other testing frameworks
PyUnit:
It is the default Python testing framework that comes with the Python package and is thus preferred by many developers. It is a unit testing framework that was inspired from JUnit, the most popular java testing framework.
Pros:
- Since it is a part of the default Python package, no other additional installations are required to set up PyUnit.
- Generates both test reports in a very quick manner i.e. XML reports and unittest-sml-reporting
Cons:
- Sometimes, there is a huge amount of boilerplate code involved.
- Since it is based on JUnit, camelCase naming method is used instead of Python snake_case naming convention
Behave:
Behave is one of the most popular Python BDD(behavior-driven development) test automation framework. It’s functions are very similar to the Cucumber framework.
Pros:
- It has a full support of Gherkin language for writing test cases in readable languages which further leads to the participation of other non-technical teams as well.
- It has Django and Flask integrations.
Cons:
- It is only preferred for black box testing.
- And doesn’t support parallel testing.
Setting up Python with Selenium and Pytest framework
Now that we have understood about the architecture of Selenium WebDriver and a few testing frameworks of Python, let’s start with the installation of stuff required to run selenium based automated tests on Windows machines.
Step 1: Download Python for Windows and install the program. You can skip this step in case Python is already installed in your local machine.
Step 2: To install and manage any package in Python, PIP has to be installed in your local machine with Python. PIP is the package management system that can be downloaded from Python official site. Once downloaded, you can install the same by using the below
command:
python get-pip.py
Below is the command to confirm whether PIP is properly installed or not:
pip –version
Step 3: Since we are using the Pytest framework to build our automation test suite, it is important to install Pytest libraries as well. Execute the below command to install pytest:
pip install -U pytest
Below is the command to confirm whether pytest is properly installed or not:
pytest –version
Step 4: For installing Selenium framework with PIP, execute the below command:
pip install -U selenium
To verify the selenium version installed, use the command:
|
python -c “import selenium; print(selenium.__version__)” |
Step 5: To invoke our automated browser, we will not be downloading any browser driver specifically. Instead, we will be using WebDriver-Manager, which is an open source library to automatically manage different browser drivers.We can install the webdriver-manager by running the below command:
pip install webdriver-manager
You can verify if Selenium and Webdriver-manager are installed by running the command below:
|
pip list |
With this, we come to the end of the installation of all the prerequisites to run selenium based automated tests using python. Now let’s quickly create a short test scenario to write a script upon:
- Direct to pCloudy home page
- Click on Login
- Get the page title
- Assert the login page title
To implement the above test scenario, here is the selenium-python script using pytest framework:
import pytest
from selenium
import webdriver
from webdriver_manager.chrome
import ChromeDriverManager
import sys
from selenium.webdriver.chrome.options
import Options
from selenium.webdriver.common.keys
import Keys
from time
import sleep
def pcloudy_sample_test():
driver = webdriver.Chrome(ChromeDriverManager().install())
driver.get(‘https://www.pcloudy.com/’)
driver.maximize_window()
driver.find_element(By.XPATH, ‘//*[text()=”Login”]’).click()
sleep(2)
title = “”
Remote Mobile Web & Application Testing on Real Android Devices – pCloudy “”
assert title == driver.title
driver.close()
Code Walkthrough:
Initially, we have imported the libraries required to run our automation test. By creating a function, we have first used WebDriverManager to invoke our chrome browser. Basically, WebDriverManager checks for the latest version of the WebDriver binary, downloads it if it’s not present on your system and then exports the required WebDriver environment variables needed by Selenium. After launching the browser, we have passed the pCloudy homepage URL to the browser and have maximized the browser for better resolution.
Once the pCloudy homepage is loaded with the use of XPATH locator, we are looking for the Login button to redirect to the login page. Finally, we are asserting the actual title with the expected retrieved title of the home page.
If the assertion passes, the test case would get marked as passed, else it would be marked as failed. At the end of the execution, the running session would get closed.
Running Pytest Framework Test on pCloudy Browser Cloud for Cross Browser Testing
pCloudy is a continuous testing cloud that provides cross browser testing capabilities offering a wide range of browsers supported by real Windows and Mac machines. The platform named Browser Cloud allows us to access remote machines that are hosted on cloud which leverages us to use RemoteWebDriver in the Selenium automation framework. We leverage this to run our automated tests on cloud on different environments such as different browsers, multiple browser versions and different operating systems.
With the Browser Cloud test automation platform, it also offers manual testing of web applications on these cloud hosted machines. In case, if your automated tests fails on a particular environment, you can manually run that test on the same environment on pCloudy by just selecting the same environment from UI.
Let’s have a quick look at the Pytest framework based Selenium script below that would run on pCloudy Browser Cloud to perform cross browser testing:
import pytest
from os
import environ
from selenium
import webdriver
from selenium.common.exceptions
import WebDriverException
from selenium.webdriver.remote.remote_connection
import RemoteConnection
@pytest.fixture(scope = ‘function’)
def driver():
desired_caps = {}
browser = {
“pCloudy_Username”: “ramit.dhamija@gmail.com”,
“apiKey”: “5TfF4UcNRbN3JhucQ”,
“clientName”: “ramit.dhamija@gmail.com”,
“email”: “ramit.dhamija@gmail.com”,
“os”: “Mac”,
“osVersion”: “Catalina”,
“browserName”: “safari”,
“browserVersions”: “14”,
“pCloudy_EnableVideo”: “true”,
“pCloudy_EnablePerformanceData”: “true”,
“pCloudy_EnableDeviceLogs”: “true”
}
desired_caps.update(browser)
selenium_endpoint = “https://prod-browsercloud-in.pcloudy.com/seleniumcloud/wd/hub”
executor = RemoteConnection(selenium_endpoint, resolve_ip = False)
browser = webdriver.Remote(
command_executor = executor,
desired_capabilities = desired_caps
)
yield browser
sample_login_test.py
import pytest
import sys
@pytest.mark.usefixtures(‘driver’)
class TestLink:
def test_title(self, driver):
“”
“
Verify click and title of login page: return :None “”
“
driver.get(‘https://www.pcloudy.com/’)
driver.maximize_window()
driver.find_element(By.XPATH, ‘//*[text()=”Login”]’).click()
sleep(2)
title = “”
Remote Mobile Web & Application Testing on Real Android Devices – pCloudy “”
assert title == driver.title
driver.quit()
Command to execute pytest test script:
|
pytest -n=2 testssample_login_test.py |
Note: In the above command, -n is used to specify the number of parallel test executions.
Code Walkthrough:
In our first script, we have used pytest fixtures which are basically functions that run before each test function to which it is applied on. The scope defined in fixtures – ‘function’ is the default value of fixture scope which means fixture will be executed once per test session.
To run our test on pCloudy browser cloud, we have defined our desired capabilities which include pCloudy authentication in the form of username and API key. In desired capabilities, further we have defined our desired environment where we want our tests to run on the operating system as Mac, OS version as Catalina, browser as Safari and browser version as 14.
There are few in-built capabilities of pCloudy that we have used to capture test video recording, performance data and logs.
To run our tests on pCloudy Selenium grid, we have defined the selenium grid URL as selenium_endpoint. The node machines connected to this hub will get auto assigned according to the test environment being used. In the end of the script, we are yielding the browser that stores and updates the desired capabilities of our automated tests.
In the next script, we have used the same selenium script that we have used earlier to assert the title of the pCloudy login page. This automated test would run on the pCloudy browser cloud on the environment : Mac-Catalina, Safari-14.
pCloudy Output:
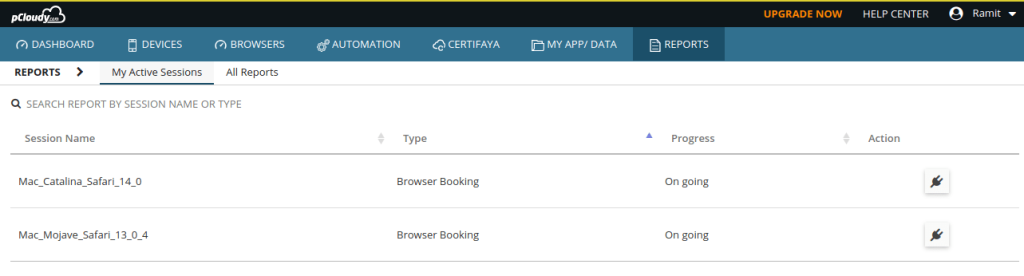
To view the current running status of your tests, you will need to redirect to pCloudy device page and click on Reports -> My Active Sessions:
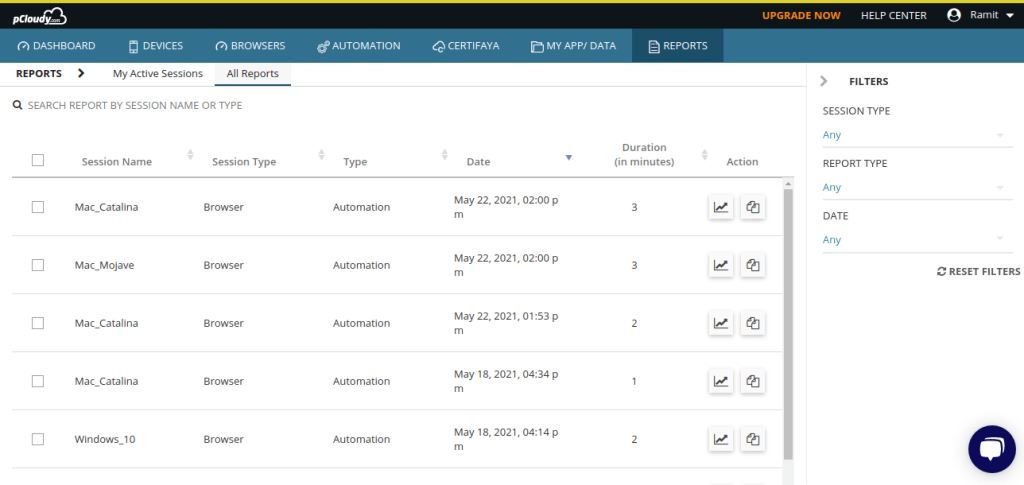
To view all the tests executed till date, direct to pCloudy device page and click on Reports-> All Reports:
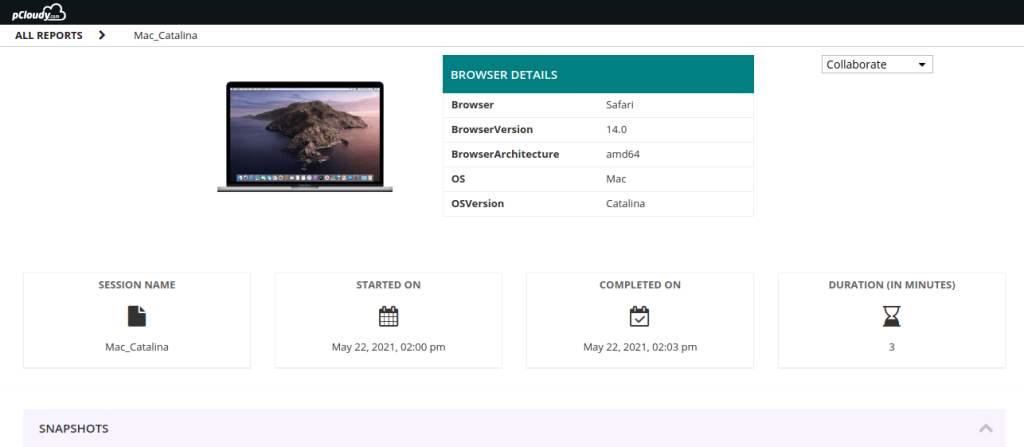
To view the logs and snapshots of a specific test, direct to pCloudy device page and click on Reports-> All Reports and take a action on particular session name for which logs and screenshots are required: