
Testing is an important phase of the Software Development Life Cycle(SDLC) where the primary agenda is to uncover maximum bugs and dig out the missing requirements for successful product release. To increase the product test coverage and ship a bug free product in the fastest way possible, it is important to bring functional automation testing into the picture to ensure that the product functions as expected and delivers a flawless experience to the end users.
Nowadays, we have a lot of automation testing tools and frameworks to automate web actions. However, Selenium is one of the most popular and feasible framework for web automation.
Selenium is an open source testing framework used to automate end to end test processes via the front end of an application. It is further categorized as :
- Selenium IDE: Selenium Integrated Development Environment(IDE) is primarily a record and playback tool that one can use to automate the web actions. It is easy to use and can just be configured by adding an extension to a browser. It is a GUI based application for recording interactions with the website and creating a test suite within IDE.
- Selenium WebDriver: is a remote control interface that provides control of user agents. Selenium WebDriver is a browser automation framework that accepts commands from language bindings and forwards them to a browser. It controls the browser by directly communicating with it and is implemented through a browser specific driver.
- Selenium Grid: is a trending tool used to run multiple automated tests parallely against different environments created by different browsers, browser versions and different OS. Selenium Grid is basically a combination of the hub and nodes where the hub is the Selenium standalone hub and nodes are different browsers connected to a single hub.
Selenium supports a number of scripting languages like Java, Ruby, C#, Python, JavaScript etc. JavaScript is a high level, multi-paradigm programming language used both on the client side and the server side, allowing you to transform static web pages into interactive ones. We will be looking at how Selenium Webdriver can be used with Javascript for automated testing of web applications.
Why Choose JavaScript For Selenium Based UI automation?
JavaScript is primarily used for development of web applications as a lot of web applications are based on either MEAN stack (MongoDB, Express.js, AngularJS, and Node.js) or MERN stack (MongoDB, ExpressJS, ReactJS, Node.js). As per the Stack Overflow survey, JavaScript is the most used programming language in the world.
Since it is preferred by many of the audiences of web development, hence, integrating it to enhance the test automation with Selenium can be a prime idea. Below are the few points that highlight why to choose JavaScript with Selenium:
- JavaScript is a well developed and structured pattern language that makes automation scripts more compact and easy to understand.
- Selenium based UI automation with Javascript can be a good combination for many organisations as they can stick to one technology for web development and test automation.
- These technologies are open source and free to use and are gradually being enhanced for better development.
- It is wrapped with advanced security and is relatively safe to use.
- JavaScript is a scripting language that provides a huge advantage as it can directly control both server or client side scripting.
Top Four JavaScript Testing Frameworks
1. JEST
JEST is an automation testing framework developed by Facebook to test JavaScript codes for the applications developed using React JS. It has been considered as a very well documented and fast performing JavaScript testing framework. The primary advantage of using JEST is that the test cases can be written using the behavior-driven development approach and the framework can also be used to perform visual regression testing by capturing screenshots.
2. Nightwatch
Nightwatch is a node.js powered automation testing framework. It facilitates end to end testing of a web application by utilizing W3C Selenium WebDriver API. It can be used for both uniting testing and integration testing. It has an inbuilt command line test runner for test execution with retries and implicit wait. The syntax of the Nightwatch framework is very clean and easy to understand and helps the tester to write more effective test cases.
Download a Free Poster of the Top Four JavaScript Testing Frameworks
3. Protractor
As we have studied above, JEST is mainly used for React JS based applications, similarly, for Angular JS based web applications, we have Protractor. It is commonly used for end to end testing of Angular applications and supports additional locators comparable to Selenium locators like: repeater, model, binding and many more. Setting up parallel execution of test cases against different environments is very easy. Also, automated screenshot capturing and comparing is much easier with Protractor.
4. Mocha
Since 2011, Mocha JS has been a popular automation testing framework. It is an open-source testing framework used majorly by JavaScript developers for unit testing. It operates on Node.js and provides compatibility for both frontend and backend testing. It is widely used for third party assertions, mocking and spying. It supports the node.js debugger that makes error identification easier. Mocha JS framework is also famous for its accurate reporting and for easy mapping of exceptions with relevant test cases.
Prerequisites Of Setting Up Selenium with JavaScript
There are few prerequisites that need to be checked to proceed with the execution of test automation with Selenium and JavaScript. Let’s have a look:
Step 1: Install Node.js npm
Node.js comes bundled with npm i.e. Node Package Manager. You can download the same from Node.js official site. Run below commands to verify the installations of npm and node.js:
- npm -v
- node -v
Step 2: Install Selenium WebDriver
Npm is the built-in package manager which will be further used to install Selenium for JS.
Below is the command to install Selenium WebDriver (-save is being used to create a new package which would be saved to projects package.json file):
- npm install –save selenium-webdriver
You will also need to download drivers for Chrome, Firefox or any other specific browser on which you want to execute your automated tests, the same can be downloaded from npm js site. It is highly recommended to add the browser driver’s path to system PATH so that Selenium can directly launch the browser with those executables.
Step 3: Install IDE
For implementation, you can install any IDE of your choice for JS from below:
Writing Our First Web Automation Test With Selenium and JavaScript
Once all the steps mentioned above have been implemented and the configuration setup is successfully complete, we are good to start writing our first Selenium automation test with JavaScript.
Our test scenario would be as follows:
- Navigate to pCloudy official site
- Get the title of the homepage
- Verify the homepage title to validate the landing on the pcloudy website
- Print the logs as per the test case pass or fail
first_test.js
var webdriver = require('selenium-webdriver');
const driver = new webdriver.Builder()
    .forBrowser('chrome')
    .build();
driver.get('http:/www.pCloudy.com').then(function(){
    driver.getTitle().then(title=>{
        if(title.localeCompare("Mobile App Testing, Continuous Testing Cloud, Mobile Testing Tools | pCloudy")){
            console.log("Test Passed!")
        }else{
            console.log("Test Failed!")
        }
    })
 });
driver.quit();
Code Walkthrough:
Initially, we imported the selenium-webdriver library and then we created an instance of the chromedriver using the Builder method from the library we imported.
Next, we navigated to the web application URL using driver.get(). We then fetched out the title of our application homepage using driver.getTitle() and verified if the actual title matches the expected title. Further the logs will be printed on the console to display the status of the test case. At the end of the script, we have quit the running browser session.
To run the test, execute the command:
| node first_test.js |
Running Selenium Automation Test with JavaScript on pCloudy Browser Cloud
pCloudy is a Continuous cloud testing platform that offers a huge combination of browsers supported by real Windows and Mac machines. The browser platform is named as Browser Cloud where all the remote machines are hosted on cloud for us to leverage and run our automated tests on different environments i.e. different browsers, multiple browser versions and different operating systems.
The Browser Cloud also offers manual testing of web applications on these cloud hosted machines. In case your automated tests fail on a particular environment, you can manually run that test on the same environment on pCloudy by just selecting the same environment from the pCloudy UI.
Now, let’s have a quick look at the JavaScript based Selenium script below that would be used to perform cross browser testing on the pCloudy Browser Cloud:
const webdriver = require('selenium-webdriver');
var id = 'ramit.dhamija@gmail.com';
var accessKey = '5TfF4UcNRbN3JhucQ';
function verifyHomePageTitle() {
    const capabilities = {
	pCloudy_Username: id,
	apiKey: accessKey,
	clientName: id,
	email: id,
      os: 'Mac',
	osVersion: 'Catalina',
      browserName: 'safari',
      browserVersions: '14',
      pCloudy_EnableVideo: true,
      pCloudy_EnablePerformanceData: true,
      pCloudy_EnableDeviceLogs: true
    }
    const gridUrl =        'https://prod-browsercloud-in.pcloudy.com/seleniumcloud/wd/hub';
    const driver = new webdriver.Builder()
        .usingServer(gridUrl)
        .withCapabilities(capabilities)
        .build();
    driver.get('http:/www.pCloudy.com').then(function(){
    driver.getTitle().then(title=>{
        if(title.localeCompare("Mobile App Testing, Continuous Testing  Cloud, Mobile Testing
        Tools | pCloudy")){
            console.log("Test Passed!")
        }else{
            console.log("Test Failed!")
        }
     })
  });
}
verifyHomePageTitle();
Code Walkthrough:
Since we are now running our automated test on Selenium Grid i.e pCloudy Browser Cloud, it is important to add the desired capabilities to set up the testing environment. As a part of the desired capabilities, we have passed our pCloudy credentials (username and api key) along with the capabilities of real test machine such as ‘Mac’ as an operating system, ‘Catalina’ as an operating system version, ‘safari’ as browser and ‘14’ as safari browser version. Also, there are a few in-built capabilities of pCloudy that we have used to capture test video recording, performance data and logs.
To run our tests on the pCloudy Selenium grid, we have defined the selenium grid URL. Further, we have scripted the same test scenario as mentioned above for the previous script.
pCloudy Output:
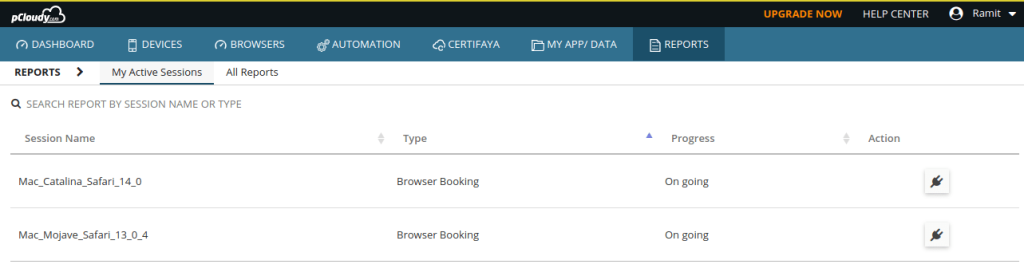
To view the current running status of your tests, you will need to direct to pCloudy device page and click on Reports-> My Active Sessions:
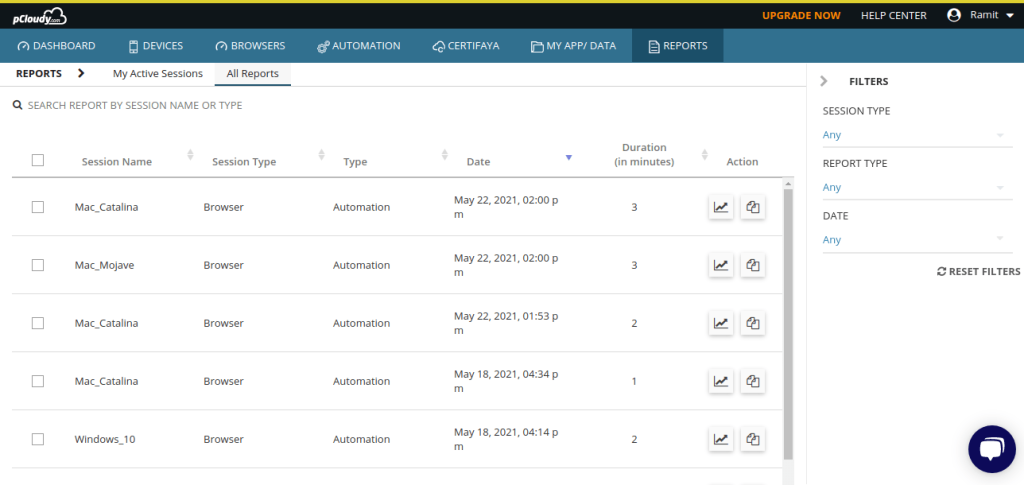
To view the all the tests executed till date, direct to pCloudy device page and click on Reports-> All Reports:
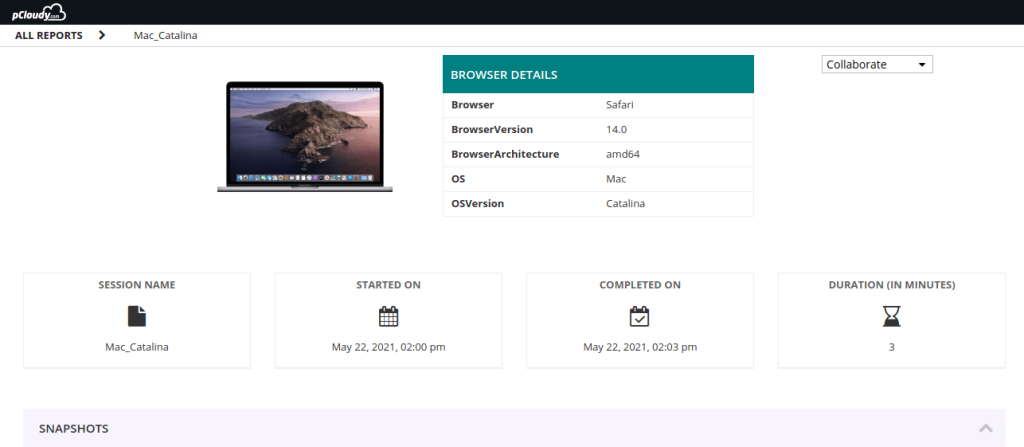
To view the logs and snapshots of a specific test, direct to pCloudy device page and click on Reports-> All Reports and take a action on particular session name for which logs and screenshots as required:
When automating tests, it’s essential to follow best practices to ensure that the tests are maintainable, reliable, and effective. Here are some best practices that should be followed:
Writing Reusable Code
Creating reusable code is a fundamental practice in test automation. The idea is to write a function or method once and reuse it across multiple test cases.
Modularization: Break your code into smaller, logical modules or functions that perform specific tasks.
Parameterization: Make your functions accept parameters so they can be more flexible and used in a variety of scenarios.
Use Descriptive Names: Name your functions and variables clearly to indicate their purpose.
Create Helper Functions: For common tasks that are used frequently, create helper functions. For example, a function to login can be reused in several test cases that require user authentication.
b. Keeping Test Data Separate
Keeping test data separate from test scripts is crucial for maintainability and scalability.
External Files: Store test data in external files like CSV, XML, or JSON. Reading data from these files can help in data-driven testing.
Configurable Environment: Store environment configurations such as URLs or credentials in configuration files. This way, you can easily switch between different environments like staging, QA, or production.
c. Implementing Proper Wait Strategies
Proper synchronization is critical in automation testing to handle the unpredictability of web elements loading time.
Explicit Waits: Use explicit waits to wait for certain conditions to be met before proceeding. For example, waiting for an element to be clickable.
Fluent Waits: Use fluent waits to repeatedly check for a condition until it’s met or a timeout occurs. Fluent waits are useful for AJAX-based applications.
Avoid Thread.sleep(): Using sleep should be avoided because it’s not an efficient use of resources and can lead to flakiness in tests.
d. Running Tests in Parallel
Executing tests in parallel can significantly reduce the test execution time and provide faster feedback.
TestNG or JUnit: Use testing frameworks like TestNG or JUnit, which support parallel test execution.
Selenium Grid: Utilize Selenium Grid for running tests on different browsers and operating systems concurrently.
CI/CD Integration: Integrate parallel test execution in your CI/CD pipeline for quicker feedback loops.
e. Regularly Reviewing and Refactoring the Test Code
Continually reviewing and refactoring your code is essential to ensure your test scripts remain reliable and maintainable.
Code Review: Regularly conduct code reviews to ensure the code adheres to best practices and coding standards.
Remove Redundancy: If you find redundant or duplicate code, consider combining them into a single reusable function.
Update Test Cases: As the application evolves, make sure to update test cases and remove obsolete tests.
Simplify Complex Logic: If some part of the code is too complex, try to break it down or simplify it to make it more understandable and maintainable.
By following these best practices, you’ll be able to create robust, maintainable, and efficient test automation scripts that can effectively support your testing objectives.
Conclusion
Leveraging Cloud based testing platforms like pCloudy is key to automate your testing efforts. And since both Selenium and JavaScript are a few of the most popular automation testing systems, using them to run your app testing scripts across devices becomes all the more important to release quality apps faster. Automation has always been a key driver for business to develop and test apps faster. We hope this guide will help you start off your app’s automation journeys soon. Happy Testing!


