Improve the quality of your iOS and Android apps by running your Calabash Test Scripts (Calabash Automation Testing) against real phones and tablets on pCloudy.com.
Along with Appium, Robotium and Espresso, you can use Calabash as well on pCloudy.com.
Calabash is a free open source framework for mobile automation testing. It is cross platform, supporting both iOS and Android. It consists of two libraries – calabash android and calabash iOS, which helps in writing tests in domain specific languages. Calabash consists of libraries that enable the test code to interact with apps. Each of these interactions consists of a number of end user actions like gestures, assertions or screenshots. The Tests can be written in simple, self-explanatory language that can be easily followed by even non-technical people.
Further, to increase the efficiency of testing and to improve the quality of your iOS and Android Apps and you can automate your Calabash Test Scripts against a wide range of real mobile devices on pCloudy.com.
Here’s how you can use Calabash on pCloudy devices:
Using Eclipse or Android Studio to code your app? Now with just a few simple mouse clicks test apps directly and in parallel on multiple real mobile devices.
Eclipse and Android Studio are two popular IDEs for mobile app development. The reason behind their popularity is, these are open source tools and have a great community of developers whom you can turn to for any support. Anyway, if you are one of those mobile app developers using these popular IDEs then there’s good news for you!
What if you could extend the capability of your IDEs to improve the quality of your apps? What if you could test your app on hundreds of mobile devices right from your IDE? What if you could with the help of simple plugins take your mobile app development process to a whole new level?
Well, you can – with a simple yet salient solution from pCloudy.com. With a cloud based device lab, pCloudy is contributing to the cause of redefining mobile app testing by providing remarkably useful platform and plugins to test your apps on real mobile devices. As mentioned in our previous articles, it is not enough if mobile apps are tested on Emulators alone. We need to ensure that the apps are tested on Real Devicesas well. It is also important to test your mobile apps on different devicesbased on a carefully analysed device matrix to hit maximum downloads. To continuously develop, integrate and release mobile apps in your DevOps environment such solutions are crucial.
Here’s how can our plugins benefit you
Description:
Our Plugins act as a wizard that allows you to:
extend the ability of Eclipse to use real devices over a cloud platform
select and install an app from a Cloud Driveor from local
If you have already created Test Scripts ready for Test execution, then all you need to do is to select some real devices over the cloud platform and run the execution to test your app. To help you out with this, the Plugin generates a pseudo-code that can simply be copied into your existing test scripts using Android Studio or Eclipse. With simple changes in the test script, the app will get installed and test execution is performed on the selected mobile devices. In the end, a detailed automation report will also be generated through our platform.
With these plugins app developers and testers can:
choose from hundreds of mobile devices to test your App
effortlessly test their apps directly on real mobile devices
can view or perform an activity on mobile screen from directly within on your IDE
perform automation runs in parallel on multiple mobile devices
The future of app testing in IoT lies in integrating app interaction with external hardware triggers. While devices such as phones, tablets and wearables may already seem ubiquitous, a networked array of entrenched systems and sensors commonly called the Internet of Things, could eventually race past all of them in its worldwide reach and number of applications and services.
Connectivity through the IoT is reliant on many different wireless standards. For example, to do anything at all, an IoT-enabled device might have to interface with Wi-Fi, Bluetooth, amongst others channels. For software makers, these potential issues with connectivity and infrastructure will inevitably shape the design of their applications.
Speaking of wireless connectivity technologies, NFC applications can now be tested with pCloudy’s new testing solution- pBot. Before explaining pBot, let’s talk about what Near Field Communication is all about.
NFC is a set of short-range wireless connectivity technologies that are perfect for transmitting small amounts of data with minimal setup time and power consumption. NFC applications include contactless transactions, data exchange and simplified setup of more complex technologies. NFC-enabled devices typically support three operating modes which are Reader/Writer, Peer to Peer and Card Emulation. This fuels contactless payments, exchange of business cards or digital pictures.
As the number of available NFC-enabled mobile phones and tablets increases, the market will see a growth in applications such as mobile payments, ticketing, smart posters, as well as access control, data sharing and additional services.
pCloudy’s pBot has made NFC testing flawless with its advanced functionalities. For instance, NFC tagged visiting card. The card data i.e., the contact information is being read by an app on mobile device. Here, pCloudy mobile app interface integrates robotic actions which triggers the robot to perform NFC action.
Smart Payment Terminal Testing with pCloudy pBot
With pBot, smart payments are now made realistic through testing payment terminal for EMV certification. For instance, when a credit card swipe device needs to be tested with real credit cards, the pCloudy mobile app interface integrates robotic actions which triggers the robot to action on payment terminal.
Thus, app testing with pCloudy’s pBot is now made futuristic with distinctive robotic functions. App testing should include IoT specific test strategies, support SDLC under context, and have access to on-demand test teams with requisite specializations. Success depends on the ability to influence a dedicated infrastructure, cloud capabilities and a wide array of test tools.
As enterprises leverage smart systems that ‘sense’ the environment and execute programmed actions, IoT driven testing is crucial to strengthen IT initiatives with security, intelligence and flexibility.
We have recently done a series of tests to help you find the compatibility of your app on various Android devices
It’s not an obvious matter of fact that there would be a particular device that suits your app. Especially, when there are end number of mobile manufacturers are foraying into the Indian market lately. However, careful selection of devices can ensure wide coverage.
‘’Mobile phone manufacturing in the country may reach 500 million units in coming two years’’
The success of your app depends on the compatibility of your app on various devices and platforms. Before you launch your App in the market, it’s extremely important to ensure that Apps runs on a wide range of devices your customers will possibly be using. Considering the number and variety of devices available in the market, it’s not possible to test the App on all the devices. However, careful selection of devices can ensure wide coverage.
In this context, we have done a through research to help you select the right device for testing. We have analyzed a wide range of data from the public domain, industry reports and our platform generated data to create this report for you.
Below are some key findings,
Top Android versions in Indian Market
Jellybean (versions 4.1 to 4.3) is the most widely used Android versions (~50%) among Indian Smartphone users. A close second is kitKat(4.4) (~42%). Looking at the growth trend, soon it would acquire the no. 1 spot.3rd is Ice cream Sandwich (4.0) (~ 4%)
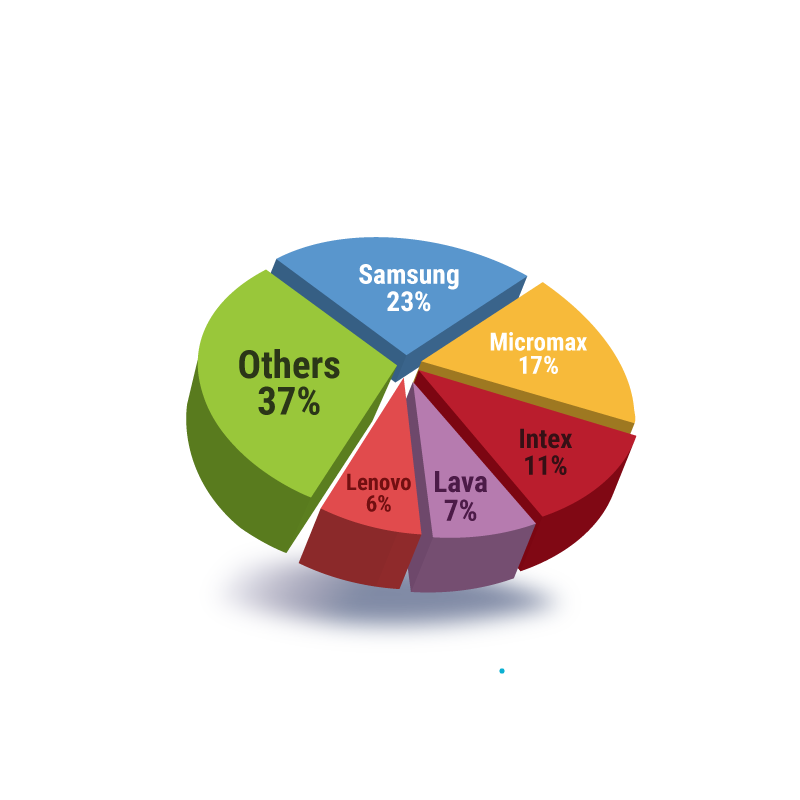
2.Market share of Manufacturers in Indian Market
No one can beat the popularity of Samsung when it comes to Android phones, followed by the Indian manufacturers Micromax because of their low-cost phones. There are other companies like Intex and Lava who competes against each other in the same space. With most of the Chinese giants joining the race, this is going to be interesting
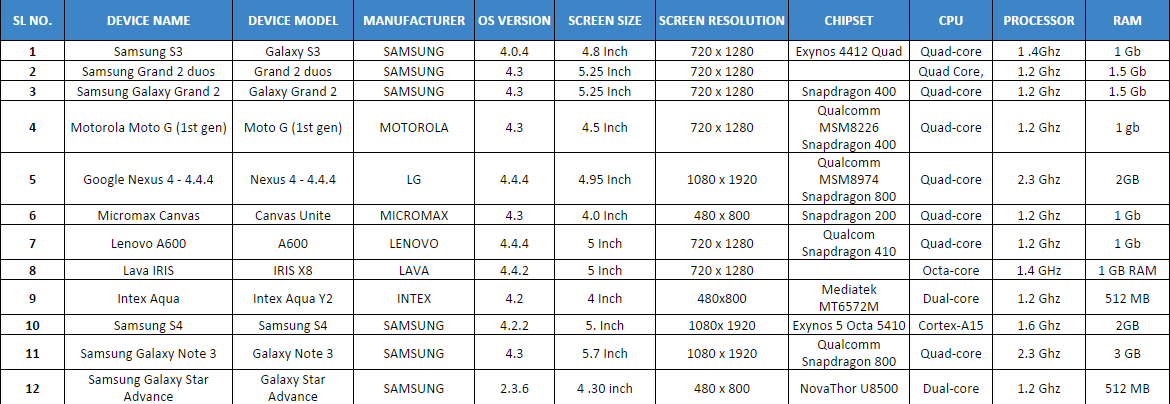
3.Top Android devices in Indian market (usage wise)
We have been tracking device usage data on our platform since last year. Moreover, based on the feedbacks from various customers, we are able to give you the following data.
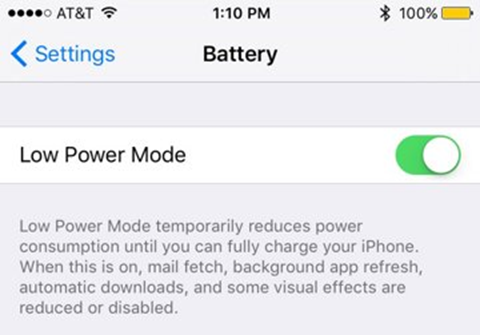
“Users who wish to prolong their iPhone’s battery life can enable Low Power Mode under Settings > Battery.
Once enabled, Low Power Mode changes the battery indicator in the top right corner to yellow, reminding users that their device is running in a more efficient state.
In Low Power Mode, iOS conserves battery life by enacting certain energy-saving measures. For example, the system may:
Reduce CPU and GPU performance
Pause discretionary and background activities, including networking
Reduce screen brightness
Reduce the timeout for auto-locking the device
Disable Mail fetch
Disable motion effects
Disable animated wallpapers
The mode automatically disables when the battery level rises to a sufficient level again.
Impact on Apps
Your app should take additional steps to help the system save energy when Low Power Mode is active. For example, your app could reduce the use of animations, lower frame rates, stop location updates, disable syncs and backups, and so on.
What if your App is resource intensive, and user is trying to use the App when iPhone is in the low power mode? You App might crash. Regardless of the scenario, You need to make sure your app works and the best way to do that is to conduct mobile app testing on real devices. You need to put your App through rigorous testing on low power scenario on real devices.
Appium is an open source test automation framework which is used with wide range of mobile apps that supports only android/ios or both. pCloudy is a popular mobile testing platform integrated with Appium script which enables you to automate test of mobile apps as well. If you have your Appium Scripts (or you plan to build them) in Java then you can use the pCloudy-java-connector.jar to integrate with the pCloudy platform. In case, you don’t have your Appium script then, you will need to use the rest web services APIs which are given in the end of this document.
1.2 Objective of this document
This user help guide has been developed for pCloudy end users. This help guide will help you to understand the APIs that pCloudy platform provides to integrate your existing Appium Scripts with pCloudy. After the integration, you will be able to execute your Appium scripts from your PC directly to the pCloudy real device cloud.
1.3 System Requirements
Java based Appium Script
Eclipse or Netbeans
>APK or IPA file
pCloudy Account
pCloudy-java-connector jar
Note : The APIs are evolving and we will come back with a better set of APIs & the jar soon. You might need a little tweaking in the code.
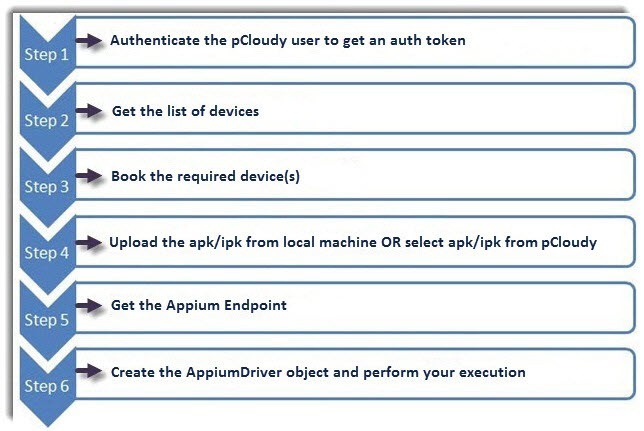
1.4 Stepwise Workflow of the APIs for getting an Appium Driver
The basic steps to get APIs for Appium Driver are given below:
1.5 How to get my API Key for using the services
If you are a registered user then you just need to follow few simple steps to get API key for using our services.
Login to pcloudy.com –
After successful login, Instant Access page opens. Now, you finds different devices which can be filtered from the above given dropdown list of devices. From this page, you can book your device by clicking on Book your Device link. Furthermore, you can connect with any given device to perform mobile testing but you will be given 10 minutes only. While performing testing operation on selected device, you cannot perform testing on other device simultaneously. For this, you need to release previously connected device.
When you click on settings option, support page opens by default which helps you to drop support ticket. It also includes various options like support, History, Test Runs, UDID, Profile, Credits, Unsubscribe, and API.
1.6 How to integrate my existing Appium Scripts on Java with pCloudy
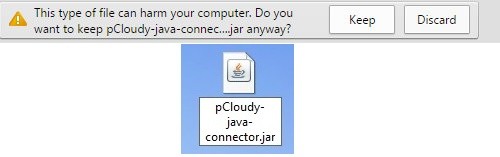
You need pCloudy java connector jar file and corresponding APIs for Appium based mobile testing platform, pCloudy. You should add the pCloudy-java-connector.jar in its build path as a reference within the your java project containing appium scripts. See this link to learn how to add reference in eclipse.You can download pCloudy-java-connector.jar from this link –
While downloading such file, you may come across message as given below which alerts you regarding safety of your computer.
Now, you can reference the JAR file in Eclipse or Android studio. Please refer the link.
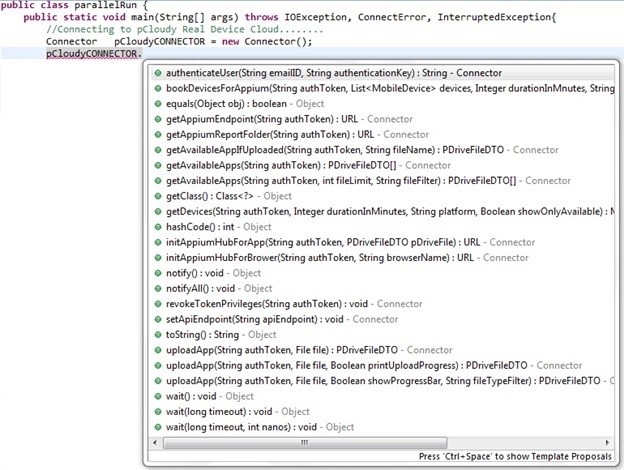
The pCloudy-java-connector.jar comprises the following methods which gives you a wrapper code over the web services. Furthermore, you will not need to call the Rest APIs if you are working on JAVA:
1.7 Useful Codes to get Web-Driver Object
A. Run on Android Native
public void runExecutionOnPCloudy() {
Connector pCloudyCONNECTOR = new Connector();
// User Authentication over pCloudy String authToken = pCloudyCONNECTOR.authenticateUser(“abc@gmail.com”, “asd53sd3fa4asd5fsasda”);
ArrayList selectedDevices = new ArrayList<>();
// Populate the selected Devices here selectedDevices.add(MobileDevice.getNew(“Gionee_Ctrl-V6L_Android_4.4.2”, 73, “Ctrl-V6L”, “Ctrl V6L”, “android”, “4.4.2”, “Gionee”));
// Upload apk in pCloudy PDriveFileDTO pDriveFile = pCloudyCONNECTOR.uploadApp(authToken, new File(appPath));
System.out.println(“ipa file uploaded successfully”);
pCloudyCONNECTOR.initAppiumHubForApp(authToken, pDriveFile);
// Get the endpoint from pCloudy URL endpoint = pCloudyCONNECTOR.getAppiumEndpoint(authToken);
System.out.println(“Appium Endpoint:” + endpoint);
// Create multiple driver objects in multiple threads for (int i = 0; i < bookedDevicesIDs.length; i++) {
Thread.sleep(5000); new Thread(getTestCaseClass(endpoint, bookedDevicesIDs[i])).start();
}
}
private Runnable getTestCaseClass(final URL endpoint, final BookingDtoDevice dto) {
// this will give a Thread Safe TestScript class.
// You may also like to have this as a named class in a separate file
// Get the endpoint from pCloudy URL endpoint = pCloudyCONNECTOR.getAppiumEndpoint(authToken);
System.out.println(“Appium Endpoint:” + endpoint);
// Create multiple driver objects in multiple threads for (int i = 0; i < bookedDevicesIDs.length; i++) {
Thread.sleep(5000); new Thread(getTestCaseClass(endpoint, bookedDevicesIDs[i])).start();
}
}
private Runnable getTestCaseClass(final URL endpoint, final BookingDtoDevice dto) {
// this will give a Thread Safe TestScript class.
// You may also like to have this as a named class in a separate file returnnew Runnable() {
@Override
public void run() {
DesiredCapabilities capabilities = new DesiredCapabilities();
capabilities.setBrowserName(“chrome”);
capabilities.setCapability(“newCommandTimeout”, 600);
capabilities.setCapability(“deviceName”, dto.capabilities.deviceName);
capabilities.setCapability(“platformName”, dto.capabilities.platformName);
AppiumDriver driver = new AndroidDriver(endpoint, capabilities); // Your Test Script Goes Here… }
};
}
C. Run on IOS
public void runExecutionOnPCloudy() {
Connector pCloudyCONNECTOR = new Connector();
// User Authentication over pCloudy String authToken = pCloudyCONNECTOR.authenticateUser(“uttam.kumar@sstsinc.com”, “sadf5sd5fds5sfd5a5fdas1”);
ArrayList selectedDevices = new ArrayList<>();
// Populate the selected Devices here
selectedDevices.add(MobileDevice.getNew(“Apple_iPad2_Ios_7.1.2”, 70, “iPad2”, “iPad 2”, “ios”, “7.1.2”, “Apple”));
// Book the selected devices in pCloudy BookingDtoDevice[] bookedDevicesIDs = pCloudyCONNECTOR.bookDevicesForAppium(authToken, selectedDevices, 5, “friendlySessionName”);
System.out.println(“Devices booked successfully”);
// Upload apk in pCloudy
PDriveFileDTO pDriveFile = pCloudyCONNECTOR.uploadApp(authToken, new File(appPath));
System.out.println(“ipa file uploaded successfully”);
pCloudyCONNECTOR.initAppiumHubForApp(authToken, pDriveFile);
// Create multiple driver objects in multiple threads for (int i = 0; i < bookedDevicesIDs.length; i++) {
Thread.sleep(5000); new Thread(getTestCaseClass(endpoint, bookedDevicesIDs[i])).start();
}
}
private Runnable getTestCaseClass(final URL endpoint, final BookingDtoDevice dto) { // this will give a Thread Safe TestScript class. // You may also like to have this as a named class in a separate file
returnnew Runnable() {
@Override public void run() {
DesiredCapabilities capabilities = new DesiredCapabilities();
capabilities.setCapability(“newCommandTimeout”, 600);
capabilities.setCapability(“launchTimeout”, 90000);
capabilities.setCapability(“deviceName”, dto.capabilities.deviceName);
capabilities.setCapability(“browserName”, dto.capabilities.deviceName);
capabilities.setCapability(“platformName”, “ios”);
capabilities.setCapability(“bundleId”, bundleId);
IOSDriver driver = new IOSDriver(endpoint, capabilities); // Your Test Script Goes Here…
}
};
}
2. Rest APIs if needed to be used in platforms other than Java
We have been continuously working towards a mission to create a world class yet affordable platform for testing of apps in connected world.
In this journey we are committed to bring you best of features to make your App testing quicker, easier and cost effective.
I would like to introduce PCloudy 3.0, our latest release. So, what’s new here?
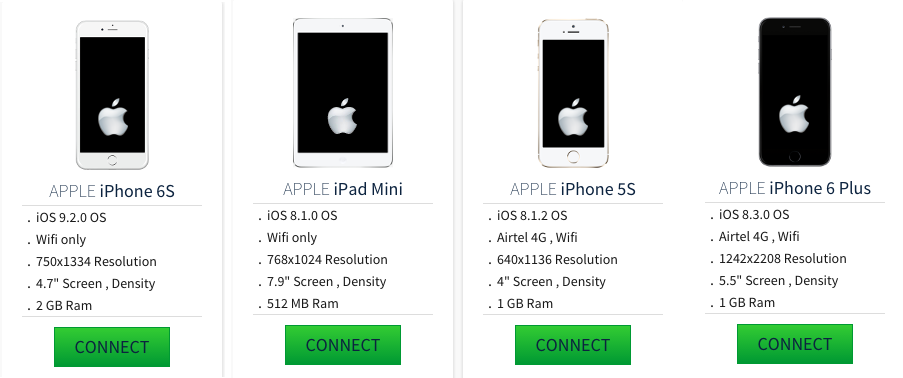
IOS support
We have added latest IOS devices on our platform which means you can test your IOS apps on real devices exactly the same way you tested your Android apps. You can find latest devices like IPhone 6S, IPhone 6 plus and IPad Air 2. Moreover, you can find IOS devices with older versions as well.
Appium support
Running your Mobile App automation was never so easy. Now you can focus on building your scripts. Leave the execution to us. Just create your Appium scripts in Eclipse or using your own framework. Insert a small piece of code within your script and you are ready to run your scripts on multiple devices in parallel.
Test your Apps on real Network
We have enabled real network on many of our devices. Now, you can test your Apps across 2G, 3G, 4G and wifi across various network providers.
You can switch between networks while executing your test cases.
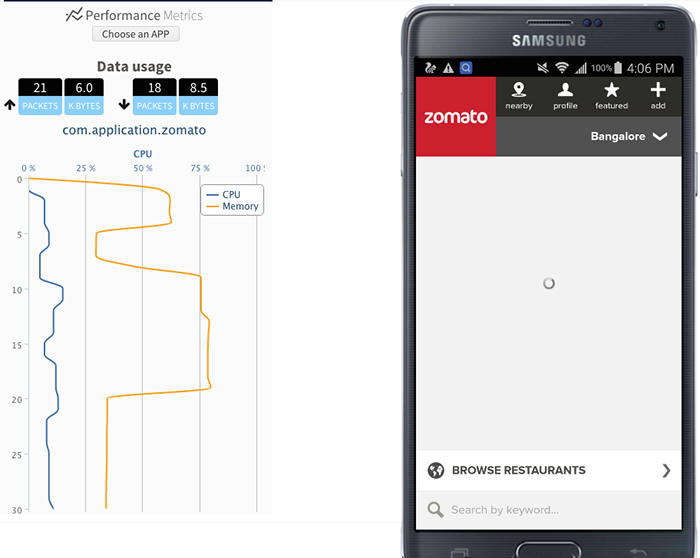
On-device performance Metrics:
This has been a big pain area of testers and developers. How to measure and analyze resource consumption (CPU, Memory and Network consumption) for App on a real device. Well, it’s a click away on our platform.
Latest Devices:
We are constantly updating our device matrix to provide our customers latest and greatest devices available in the market.
Improved Performance:
Our commitment is to provide you a working experience as close as possible to a real device. We have done many perf improvements on our platform. Moreover, we moved to a new Data center. It’s an ISO 27001 certified Data center with 99.99% uptime commitment.
How Long will it Take to Fix This Bug ? This is the first question asked
Well, i need to understand the story. Need to find the bug from the story. Now , i need to reproduce it! . may be some ping-pong between teams or tester. Then finally when i give-up, i will take Debug Logs, Stack trace, Performance data and what not.
Damn, it will be fixed when it is fixed 🙂
This is the usual Life cycle of a bug, they live too long, more than they deserve to. basically they live through the time we waste on re doing things, developer re doing things which a tester gone through already.
How can we fix this bug quick, And make the cycle efficient.
I will demonstrate some tools provided by pCloudy to collaborate effortlessly between developer and tester, To fix a bug so quick, with out wasting time or re doing things.
Some of the data pcloudy record’s from device session, which a developer can use to fix the bug Complete video is recorded, which is the steps to understand and reproduce the bug. A Video Is Worth 1.8 Million Words
Screen shots can be taken at any point
Debug Logs are recorded
Crash log/Stack trace are recorded
This is fully automatic, that’s what i meant by effortlessly.
As i said, A Video Is Worth 1.8 Million Words, I have recorded a short video explaining these tools.
Now when you share this bundle with the developer, What more a developer expect ? This is possibly everything he needs to start fixing the bug. No re-doing things or ping-pong.
Collaborate effortlessly using pCloudy
Lets build better apps together
We appreciate your business and welcome you to our long list of satisfied and much valued customers. Our success comes from the continuous faith in the excellence of our products and services, something we are committed to and would never sacrifice.
Our customer service, especially in the after sales phase, guarantees the satisfaction of our clients. In line with this strategy, we ask you to share with us your feedback at any time, be it positive or negative. There is always room for improvement, so if we can serve you better in anyway, please do inform us.
Introduction
This document is created to serve as a guide while you explore the pCloudy platform. It will help you understand how to use, to get quick help and whom to contact while starting off with pCloudy. Though this is not a complete help document, it will act as a quick reference to begin using the platform.
About pCloudy
pCloudy is a mobile application testing platform which will help you to test your apps on hundreds of real devices. You can remotely access real devices and carry out Manual and Automation Testing.
Quick Start
Registration
The platform has a secure login process to protect the apps you test. In order to use the platform you must setup your login credentials first.
Note: If your workstation has touch screen feature, enableTouchScreenBrowserSettings
Where do we go from here?
Once you login, you will be exposed to an array of devices and platform features. You might get overwhelmed and lost, but don’t worry, we have you covered.
A typical pCloudy user will follow these steps for testing mobile apps using the platform.
Divided into five parts –
1. How to select right device from the platform?
2. How to manage apps on the platform?
3. How to start testing your apps on the selected devices?
4. How to run automation scripts on cloud-based devices?
5. Additional Features
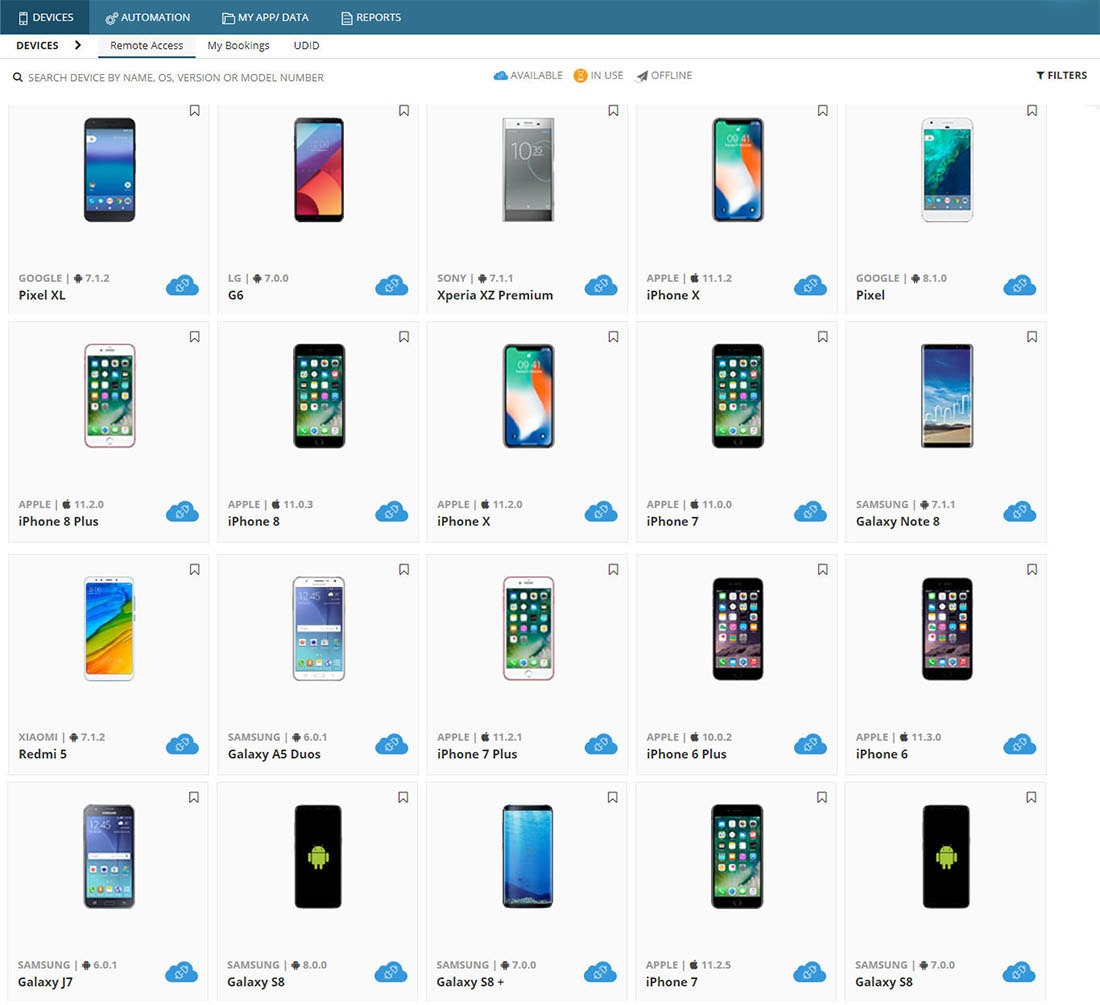
1. How to select right device from the platform?
To select the right device on the cloud the platform provides various filters. These filters will help you to select devices based on the OS versions, OEMs, Screen Size, Network, or Device Location.
There are two modes to access the devices on the cloud –
1. Instant Access – This provides immediate access to the available devices at that moment. Just hit the ‘Connect’ button on any device displayed in the Instant Access page and you will be ready to use the device.
2. Book your Device – In some cases you might want to reserve a device for the future. You can book a device in advance to keep yourself prepared for testing. With careful planning, with the help of ‘Book your Device’ mode you can make sure the devices are available when you need them and save time.
The platform provides secure limited disk space to store the apps on the platform. This space can be used to store app installation files (apk or ipa) or test data (image files, zip, etc).
Refer these links to know how to upload your app files to the platform:
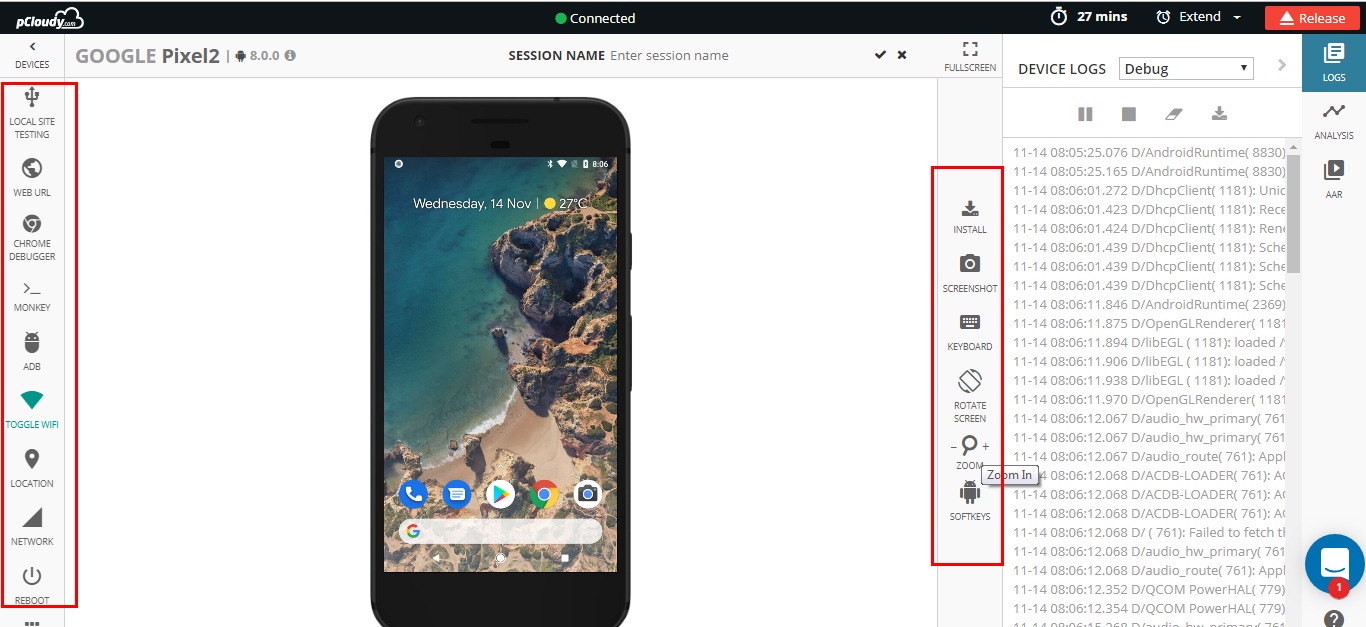
The dashboard provides you with quick and easy access to use the different features to test your mobile apps.
1. Device Screen: You can use the device same as how you use a device physically. You can use swipe actions, zoom-in, zoom-out and various gestures to control the device.
2. Main Panel: This panel provides options to view device info, install/uninstall apps, change device settings, tools to debug apps and run automation, and more.
3. Quick Action Bar: Frequently used controls like taking Screenshots, changing device orientation, sending text to device, and more
4. Logs and Performance: Real time device logs and app performance are displayed
Features
Here’s a list of some important features to test your apps –
1. Functional Tests
You can install/uninstall apps on the devices, you can use various gestures on cloud based devices just like how you do testing on physical device, you can mock GPS location, take screenshots, and much more. Here are some links that will help you:
Performance profiling of Android Apps – You can monitor the CPU usage, memory usage, battery consumption, frame render count of the app in real-time while testing an app.
Performance on iOS Device – You can monitor the CPU usage & memory usage of the device in real-time during testing.
3. Debugging mobile apps
You can capture bug and crash information in the form of logs, screenshots, videos, and stack trace information while testing your apps on devices.
The app you tested in your lab environment will not work the same way when you use it in an elevator, or in a basement, or while you are travelling on a highway. The Network Virtualization Tool will help you to emulate different network environments and test your apps.
You can connect and use a device with ADB just like the way you connect it physically with USB/Wireless ADB. This is used to control a device using ADB commands and debug apps.
The reports section will contain the complete details of all your testing sessions. It will hold the screenshots, logs, videos and the performance details of the testing.
You can run your automation scripts on multiple devices in parallel. The pCloudy platform supports several automation tools. Here are some links to help you –
Other than the reports generated from the automation tools, you can view additional testing reports stored on the platform as well – Automation Testing Reports. This will contain the videos, logs, and performance graphs of the devices on which Automation execution was run.
9. Integration with Continuous Integration tool – Jenkins
You can use CI tools like Jenkins in integration with the pCloudy platform. This integration will leverage your testing practices to a whole new level. You can deliver quality mobile apps continuously by automating the process of build integration using pCloudy plugin for Jenkins.
Team Admin
To effectively manage the devices, users, apps, or credits on the platform you can use Team Admin.
Refer to article – Team Admin
How many devices you have tested your applications on? How are you making sure your application is indeed working on all the devices available in the market?
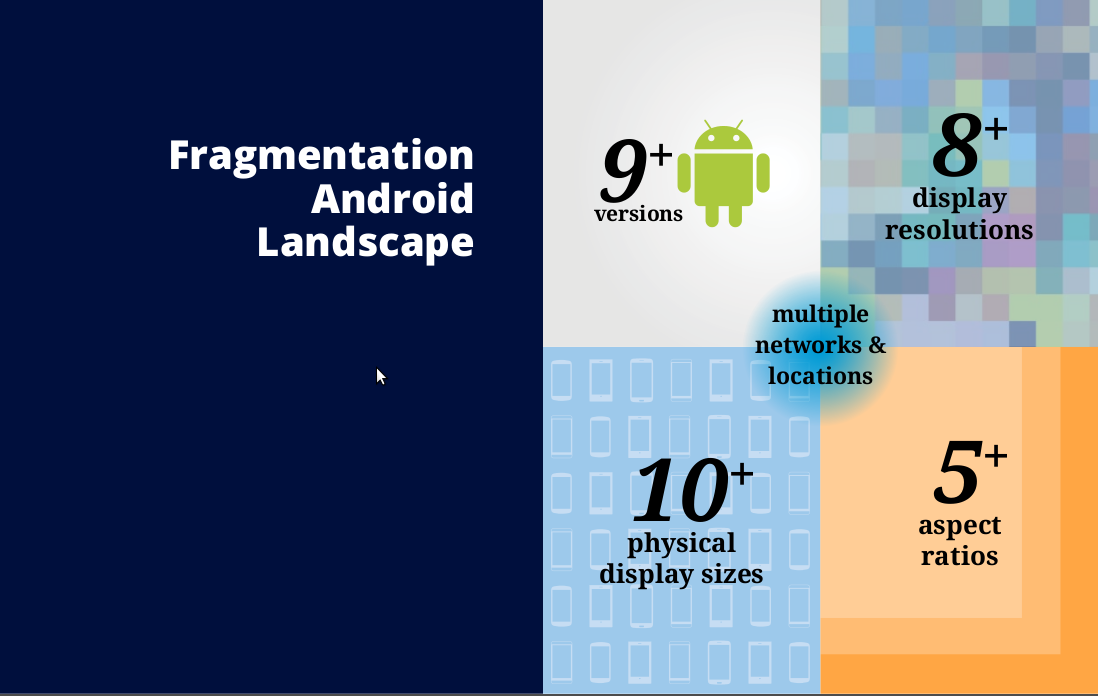
Yes one must test the application on Real devices, rather quite a lot of devices available in the market and must not rely only on emulators or one or two devices available with the developers. If so, you know that it’s difficult, primarily because of fragmentation in Android space. There are 9+ os versions, 8+ display resolutions, 5+ aspect ratios , 10+ physical device sizes & OEM customizations. All these factors are getting wider and wider day by day. So testing your application on all the devices is impractical because it consumes whole lot of time and buying so many devices is too expensive.
Now what? First you should bring out an optimal set of devices which is derived by considering all the above factors in fragmentation. It turns out that its still too expensive to buy these devices. To avoid investing in buying a moving target of devices, you should try to lease the devices. You can save your efforts of buying & managing the moving target and of-course lot of money.
This is exactly pcloudy is trying to solve, Real Android Devices on cloud for you to lease the devices only for the duration you need to finish your task. You will get access to Real Android Devices through any modern browser to finish your manual testing anddebugging. This tool is being used by lot of testing and development communities across the world today.
Below are few feature from this wonderful tool.
Lets make better apps, better experience together….