There are more than 5.5 Million apps available on Google Play and Apple App Store combined and by 2022, the number of app downloads will be around 250 Billion. The number of smartphone users in the world is more than 3 Billion and the users prefer using smartphones instead of desktop. This data shows that the mobile app market is very competitive and growing. In this age of digital transformation, the focus of enterprise mobility is to provide better user experience at great speed. The launch of 5G will further complicate the app development and testing process initially. But apart from this, there are three main challenges to overcome and pCloudy is leading the path to bring positive change. Let’s look at these challenges and their solutions.
Challenges Faced by Enterprise Mobility
There is a growing demand for quality at speed in the mobile app industry. The current market dynamics are such that it is necessary to provide the best quality product in less time to remain in the competition. When we talk about mobile app testing, quality can be maintained only when the enterprise can achieve scale. There is a myriad of devices in the market with different OS versions, browsers, Custom ROM, etc. and the app should be compatible with all the devices. How can ensure this and most importantly, how can we speed up the testing process on multiple devices? pCloudy can help you overcome this challenge with its best in the class features. Let’s have a look at them one by one.
Parallel Testing to Achieve Scalability
If we are talking about scalability then testing your app on 5,10 or even 20 devices are not enough for the enterprises to ensure a bug-free app. pCloudy enables to testers to run your test scripts concurrently on 50, 100 or maybe more devices. Enterprises have the option to perform parallel testing in our public cloud or in our plug & play on-premise infrastructure solution. With more than five thousand device browser combinations, enterprises can ensure that the application is working properly in all the devices.
Parallel testing on 50 devices
You can see in the picture above, we have set up a device infrastructure for 50 devices for demonstration. Similar device setup can be provided for our on-premise solution and public cloud users can just log into the pCloudy platform and book the devices to perform testing. These real devices can be accessed remotely on the cloud which makes it more convenient for the users as there are no location constraints.
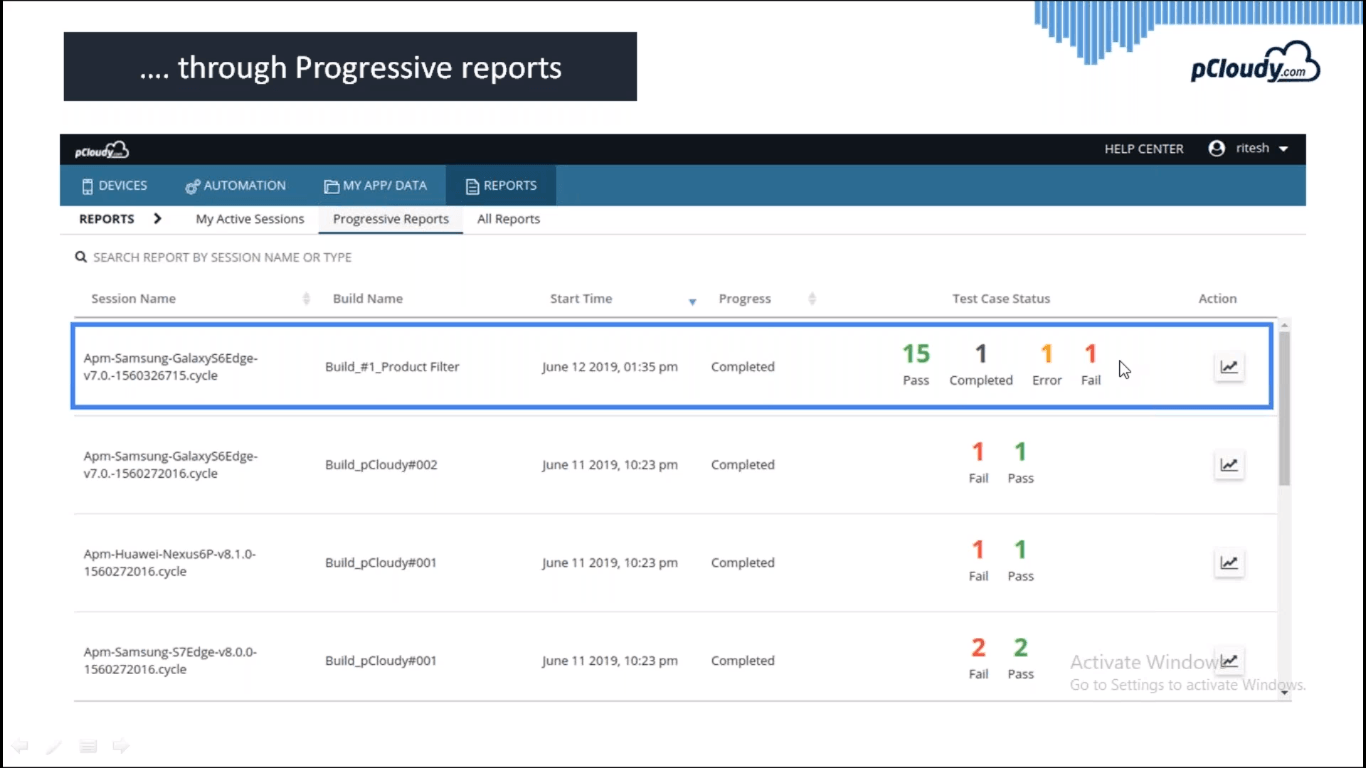
Progressive Reports to Improve Quality
It won’t be efficient to go through each and every report to analyze the data for every device. Instead of that, you get intelligent results where you can do a quick analysis of the errors and then debug quickly. In the pic below you can see the list of results for different builds with their start time, progress, status, and Action.
In the status, you will be able to see how many tests pass, fail, and errors. This way you can concentrate on the tests which failed and you will save time as you don’t have to manually go through all the cases.
You can integrate any reporting framework with your existing Appium setup. The same way you have to configure with pCloudy by adding a one-line code while creating an asset.
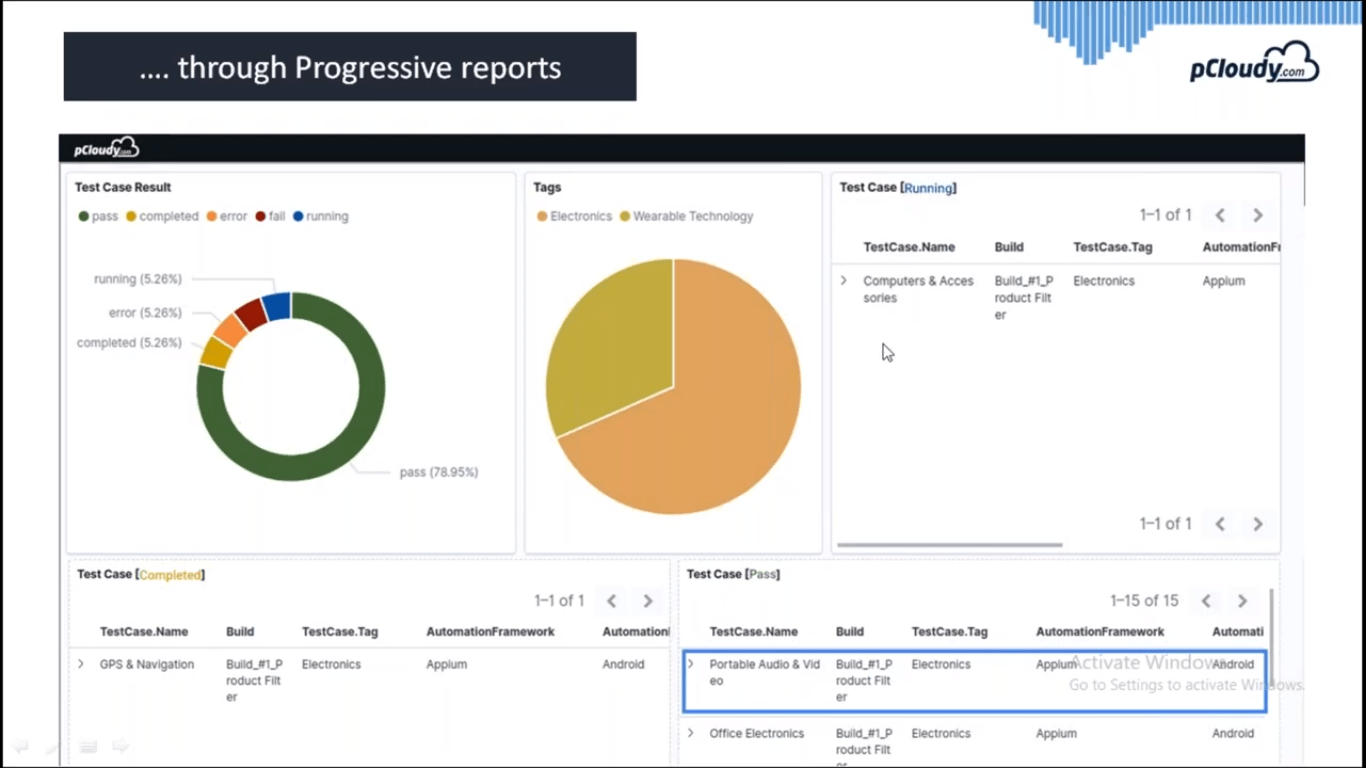
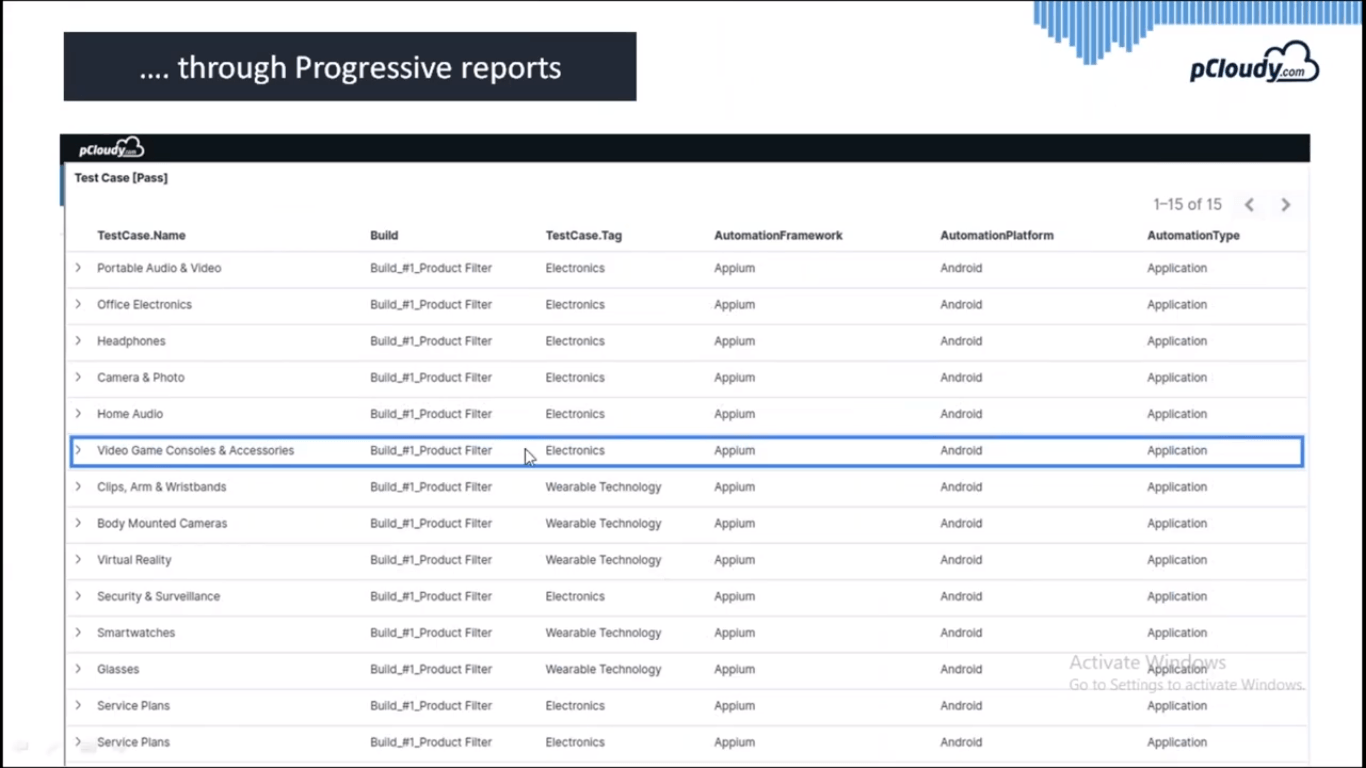
In the pic above you can see the test case result in detail. You can see the tags, test case name, build, Automation, and the live status of errors.
Once you expand the test case you can see the logs, Jason format, screenshots, video for that particular session. This information can be used to expedite the test execution.
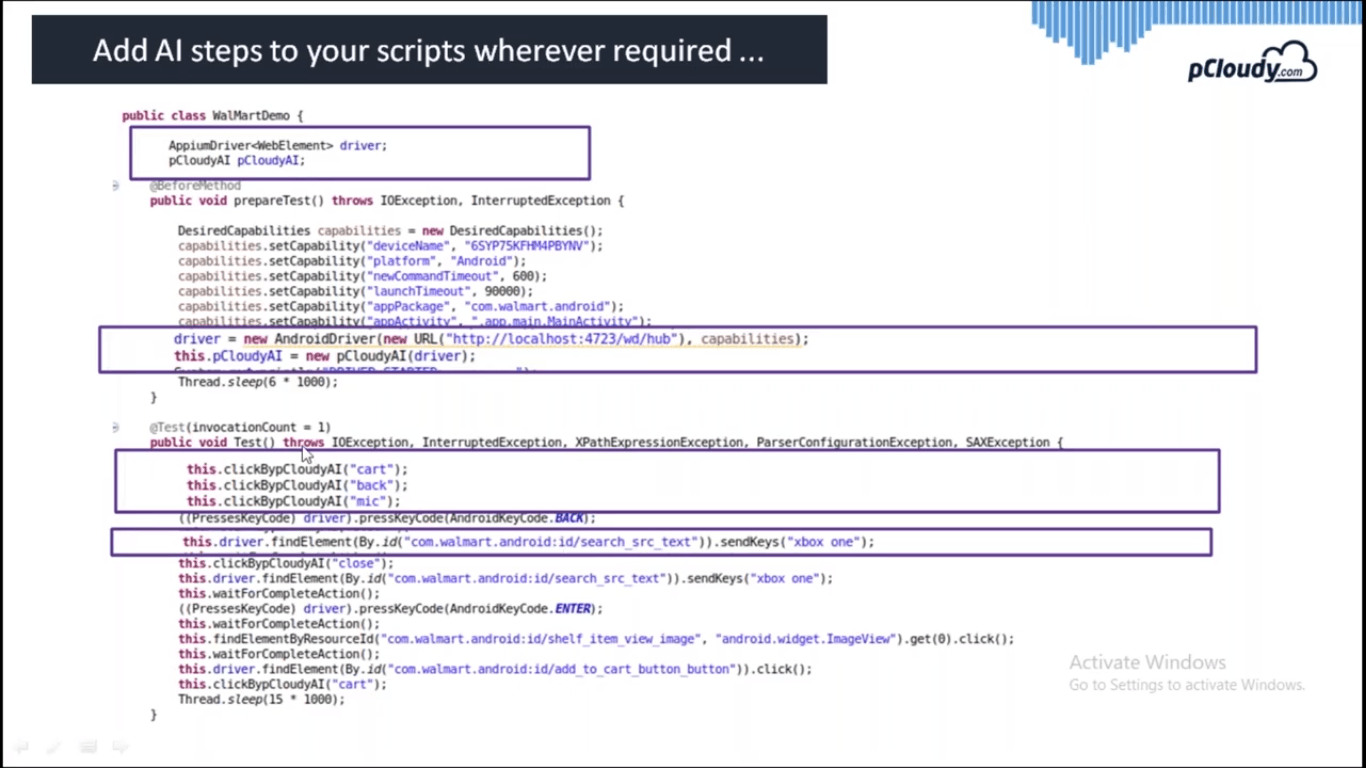
Integration with AI to Speed up Mobile App Testing
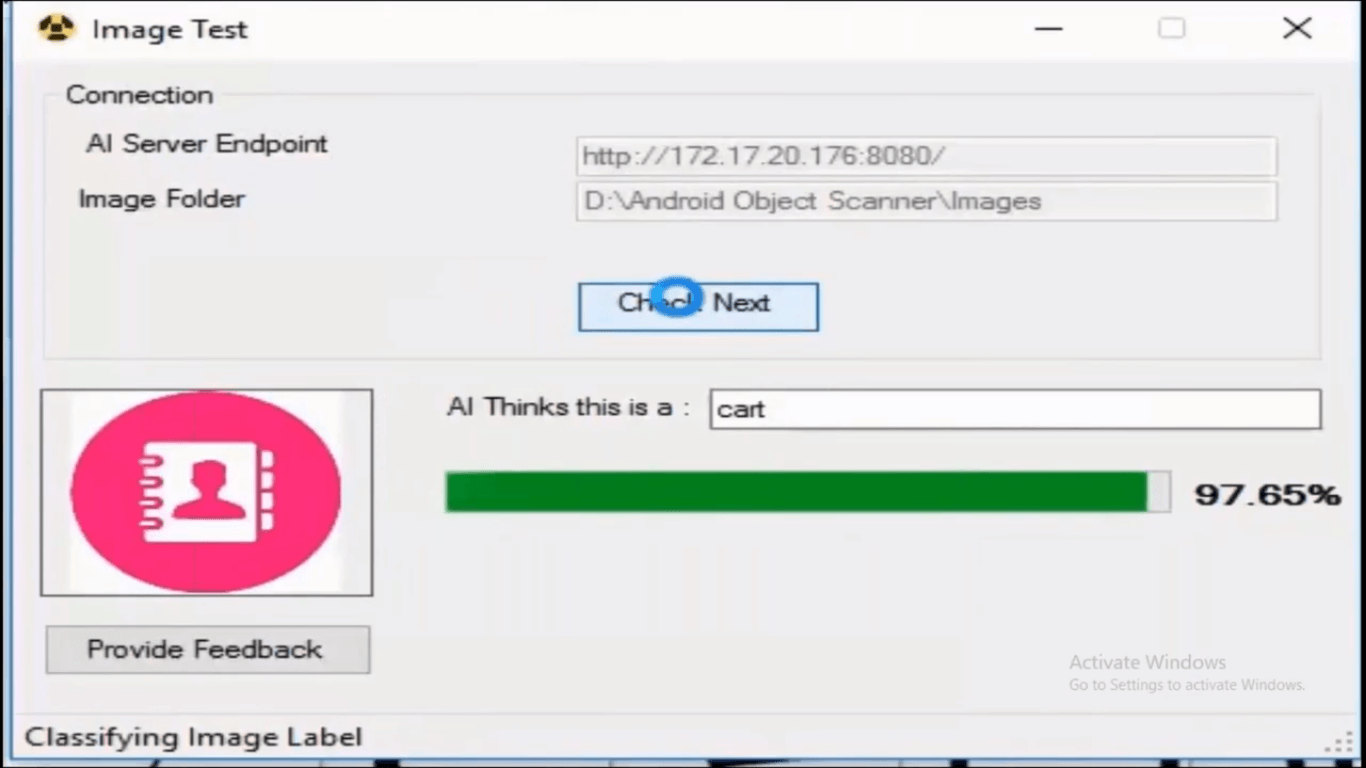
The next challenge is to speed up and simplify the test script creation process. Usually, the procedure is to connect the device to the system and use an automation framework like Appium to use object repositories. If you are using images then the XPath may change depending on the devices.
This AI based utility will help you to get the object repository for the entire page. So if there is an icon for contacts then this utility will automatically recognize the element.
In the code, you just need to declare the driver for Appium and for pCloudy as well. Then you need to initialize the drivers and start using the code generated using the AI utility. This is how the script creation is expedited using AI.
Conclusion
To sum up, pCloudy has come forward with solutions for the enterprise mobility to deliver quality at speed with scale. Whether it’s parallel testing, progressive reports or creating a script using AI-based utility, all these features fix the problems that were mentioned earlier. The proverb “change is the only constant” fits well as pCloudy comes up with updates on a regular basis to resolve the issues and make mobile app testing better.
End to end testing is done to make sure that the application behaves as expected and the flow of actions from starting to end is complete without any issue. To explain with an example, suppose you are the end user and you are using the app to book a flight. So first you will launch the app and click on the flight’s icon on the home page. Then you will enter the destination, date and other required details. Now you will choose your preferred flight, book the seat, enter the passenger details and make the payment. Once this is done, you will get the ticket and a follow-up email on your registered email ID.
Now in this scenario, if the screen takes a lot of time to load the next page or if the book button does not work then this will be an unpleasant experience for the user. So we can figure out if there are any issues from starting to the end of the process. It’s not just about the UI functioning but also the data encryption and security, information flow between other internally used platforms integrated to the app, proper functioning of the firewall and more. This is where end to end testing comes into the picture to make sure that everything works well under any circumstances.
How to Perform End to End Testing
While performing end to end testing the first thing to do is to analyze the requirements and set up the test environment. Then you need to evaluate the main system with the connected subsystems and define the responsibilities of all systems involved. Make a list of the testing methods and the description of the standards to be followed. Once that is done you can create the test cases and track the requirement matrix. Finally, you need to save the output and input data before testing each system.
Measuring the success of the end to end testing
To perform end to end testing efficiently and save time and effort, a matrix should be created. Some parameters should be defined to gauge the success of the testing performed. These measurements will help you define the testing matrix:
Test case status: A proper visualization of the test cases prepared can be observed through graphs and compared with the number of tests that were initially planned. Tracking Test progress: This measurement will help you to get the details of the tests completed on a weekly basis. It will be easy to keep a track of the test that failed and those that passed. Defect details: Tracking of the bugs occurred and the issues surfaced should be done one a weekly basis and keeping a track of the defects that were opened and closed on the basis of priority. Environment availability: Here we need to take a note of the amount of time allotted for running a test in an environment and the time actually spent on performing end to end testing.
Best Practices to Perform End to End Testing
End to end testing can be very time consuming and we can save some time and effort by following some steps. It is always better to plan in advance before initiating the testing process.
Prioritize: Chances of defect increases as the test cases become complex with more components and it becomes difficult to debug them. Therefore it is better to perform unit testing and integration testing to resolve issues that are easier to detect. After initiating the End to end testing you can also start doing smoke and sanity testing to keep an eye on the high-risk scenarios. Manage the Environment: The requirements need to be documented and the system administrator needs to be informed about it to meet the requirements before starting the testing. The system setup should be proficient enough to run the test cases and keep your staging environment close to the production. Optimize: After test completion, you need to clear the test data so that the environment is restored and can be used for testing again. This will make the environment ready to start at any moment. Risk Analysis: Focus on the features that are crucial and on failure can cause a high risk. Prepare a risk assessment matrix which will come in handy in these situations. Limit Exception testing: Use low-level unit testing and integration testing for exception scenarios and use end to end testing to deal with typical user scenarios.
Conclusion
With the rapid enhancements in the app technology and the increasing use of technologies like IOT, the development teams have to make sure that the app has a smooth functionality. The end users can be very choosy in this competitive market and so it’s necessary to perform end to end testing of applications to provide a good user experience.
Since there are many players in the mobile app market, the competition is endless. To beat the heat and to keep providing an enhanced mobile app experience to the users, the app needs to be constantly updated with the changes happening and for doing this, there are different types of testing techniques. Let us have an insight into the types of testing methods.
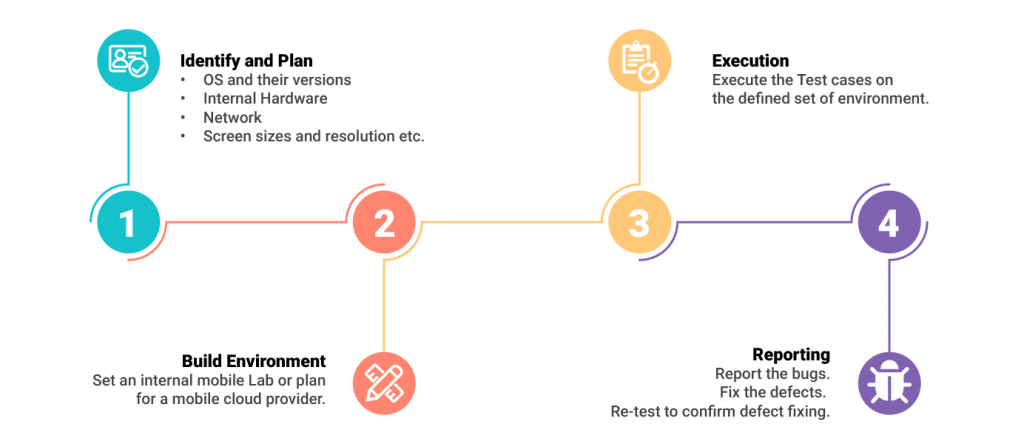
1. Compatibility Testing
Compatibility testing is a critical QA task. It assures that a given application works as intended with selected operating systems, selected devices with different screen sizes resolutions, and internal hardware (memory size, processor speed, and button/input differences). It defines the feasible compatibility combinations of devices and interfaces for a specific testing assignment, in concurrence with the customer’s requirement.
Want to test your Mobile App?
Join pCloudy Platform!
Signup for Free
Compatibility Factors:
There are different factors that play a very significant role in mobile compatibility testing strategy. Mobile operating systems and their supported versions, mobile devices developed by different manufacturers, different device screen sizes with different resolutions and internal hardware including different input types, processor speeds and memory size of devices.
Let’s develop a test strategy for compatibility testing. The first step is to identify the Operating systems and devices based on key factors described in the previous slide. Once you identified the devices based on different compatibility factors you need to set up your environment for testing. You can either set up your internal test lab or you can go for external cloud providers like pCloudy. Now, the next step is to execute your test cases on a defined set of environment. Report the defects to appear while testing and report these defects to your development team.
The main purpose of compatibility testing is to ensure whether different software is compatible with different configurations and whether the application is compatible with the client’s environment.
2. Installation Testing
Mobile phones come with different types of mobile apps like Native and Web and Hybrid. Installation testing is a type of testing that is done at the initial stage of mobile app life span or maybe it is the first impression on the users, in other words. Installation testing checks whether the mobile app installs, uninstalls and updates properly without any interruption.
Want to test your Mobile App?
Join pCloudy Platform!
Signup for Free
Installation Testing Factors:
There are some of the factors that play a significant role in installation testing of an application. Factors like which platforms and operating systems supported by the application and how they will be distributed whether it is directly available in the app store or are going to get the installable files on mail itself or is it available on an app distribution platform and can be accessed through public URL. The user behavior regarding installation changes from person to person. For eg: the developer may install the app (By using ADB install command) and a different user might directly install it from the app store or public URL.
Important points to be noted in Installation Testing:
Some of the common checkpoints which can be converted to standard test cases are:
Installing the app in phone memory.
Installing the app in phone memory is full.
Installing the app on an external SD card.
Installing the app on an external SD card is full.
Check the memory space after installing. It should not occupy more than promised.
Check if it is releasing the space after removing
Another part of the installation and uninstallation testing is the testing of patches/updates
These are the common situation when we need to test app after updates.
Check for updates:
Can I download an update?
Can I update the app when there are multiple updates available?
What happens if I don’t update?
When App is upgraded:
Check that the user is still logged in
Check that data is still the same
Backward compatibility:-Check that database changes will not affect the current data.
Test the update from an older version to the current version
When OS is upgraded:
Check the app compatibility.
App updated gracefully without a crash.
3. Interruption Testing
Interrupt testing is a process to replicate abrupt (Unexpected) interrupt to the application. It is done to understand how the app behaves under certain interruptions before resuming to its original state. This can be achieved in various ways and techniques depending on the application under test.
Following are some Common Interrupts:
1. A phone call when the application is running or is in background
2. Battery removal when the application is running or is in the background, battery high, battery low, incoming call or SMS
3. Plugged in or out of charging
4. Device shut down
5. OS upgrade
6. Network loss and restoration, etc.
Some specific scenarios for an application using a network:
1. Connect to the network but remove LAN connection from the router so the device can sense wifi state on the device but cannot connect to the internet
2. Connection via VPN and VPN disconnected
Scenario for Application using services:
1. Kill service by clicking on the recent button and swiping the application right to kill app and services
2. Kill app using third-party App killer
3. Kill specific services from Settings->Manage Applications
4. Scenarios for Application Linked to account Manager
Remove account from Settings->Account Manager
Incoming and Outgoing SMS and MMS:
An application is running in your mobile and you send an SMS/MMS from another mobile to your mobile. In this situation, SMS/MMS notification should display for a while and then close and the application should continue to run.
Incoming and Outgoing calls:
You are in a login page trying to log in and you have just pressed the submit button that will take you to the application home page. This is a transition period because loading is happening.If we receive a call during this time then the application should not end abruptly or crash.
Battery Removal:
If the application is running, remove the battery of your mobile and it will shut down. After rebooting the mobile, run the application again, it should run smoothly and without a crash.
Data Cable Insertion and Removal:
When the application is running, connect the USB Cable, the system should display “USB Connection Screen” and if the user returns to the application then the application should not crash or end abruptly
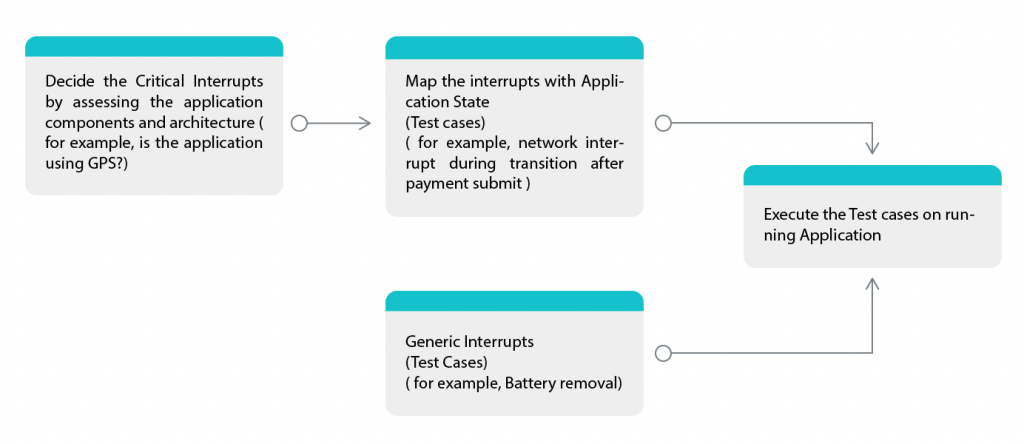
Interruption Testing Strategy
Let’s prepare a test strategy to test interruption testing:
The first step in this process is to decide the critical interrupts based on your application components and architecture. For example, if your application is using GPS include common interrupts related to GPS. Let’s Include two type of interrupts:
Application specific interrupts:
Prepare your test cases and try to fit theses interruption test cases with state of the application. For example, interrupt your Network while performing payment.
Interrupt testing process:
List of common Interrupts:
Phone calls, Text messages, App notifications, Battery Warning, Forced updates, Voicemail, Shaking the Phone, Different Gestures, Switching between apps, Locking and unlocking the screen, Changing the orientation, Music playing while using the app, Out of memory (general performance interruptions), Data app interruptions (What Sapp, Viber, Tango), Audio interrupts from multiple sources (iPod, Media player, Other audio apps), phone in standby mode, switch the network to plane mode.
Tools to test interruption Testing:
Use tools like Joule Unit (Android), On iOS use the Energy Usage Function of Instruments, Monkey for Android to stress test your app and see the handling of the interrupts, UI Auto Monkey for iOS
Scenario
A) Once the user connects the mobile earphone jack with Nokia Lumia and starts music Player.
B) Now when the user resumes the application the cart gets empty.
4. Localization Testing
This type of testing is a technique in which we check whether the mobile app adheres to the local cultural settings, customizing the apps according to target country and language and also according to the linguistic aspects. Localization is also known as “L10N” as there are 10 characters between L & N. For eg: Chinese language-search engine offered by Baidu beats Google in China. Baidu does better than Google because it looks and feels fully native to the Chinese speaking audience.
Also, regional language speakers can’t get many games in their own language, so they turn to race games, which are easy to understand. We must have noticed in these examples, language is the common issue. Apart from Translation there are different other elements in the localization, like Usage of proper Time zone, local formats of dates, addresses and phone numbers, Design and layout to fit translated text, Converting to local requirements (such as currencies and units of measure), Adapting graphics to target markets, Modifying content to suit the tastes and consumption habits of other markets, Addressing local regulations and legal requirements.
Why should we localize?
Localization is important in order to understand the cultural and linguistic aspects of a particular region. While testing, testers keep repeating the tests to check typographical, linguistic errors, cultural appropriateness of the UI, etc. Research says:
1. 56.2 percent of consumers say that the ability to obtain information in their own language is more important than price. (Common Sense Advisory, Can’t Read, Won’t Buy: Why Language Matters on Global Websites, 2006)
2. 74 percent of multinational enterprises believe it is either important or most important to achieve increased revenues from global operations. (California State University at Chico, 2007.
3. 95 percent of Chinese online consumers indicate a greater comfort level with websites in their language. (Forrester Research, Translation and Localization of Retail Web Sites, 2009)
4. A critical success factor for cross-border merger and acquisition deals is the ability to communicate information clearly and accurately in multiple languages. (Merrill Corporation, How to do Better Multinational M&A Deals, 2008)
Types of Localization Testing:
In the localization testing, validating whether a mobile app is capable of performing given a geographical location, in particular, is found out. It includes four major types of testing like linguistic, culture, cosmetic, and functional tests. 1. Linguistic testing– ensures that the UI text appears in the congregation with the language and is not mistranslated or misapplied. This requires language skill and knowledge of the product. Mistranslation, irrelevant usage of the language are few of the errors in this.
2. Cultural Testing– Few words may imply different meanings in different cultures. So, this has to be translated properly in relation to the target culture.
3. Cosmetic Testing– For easy understanding, let us use this scenario. For eg. In the apps used in Afghanistan, the text will be in Arabic and will start from right to left unlike other languages like English, French that are read from Left to right.
4. Functional Testing– In this testing, testers follow prescribed test scripts to run through all aspects of the product to make sure it functions as designed in a localized environment. Often functional testing includes verification that the localized product is compatible with various operating systems and third-party products. Functional testing generally requires a good knowledge of the target language and total familiarity with the product. Some of the major Functional testing problems may include– Incorrect or missing UI elements, graphics, and windows, Incorrect error messages, Localization bugs that may cause software crashes, Errors generated by installing the localized software on a localized OS.
5. Performance Testing
Performance testing is to test the performance of the mobile application in expected workload scenarios and to eliminate the performance hurdles. It checks whether the response of the app is quick, the ability of the app to tale load, and app stability in those load situations. Performance is very critical because if the app is malfunctioning, it is more possible that the user might uninstall the app and might shift to a competitor’s app which is better.
App start-up time is the most critical performance parameter from the user’s point of view. It shouldn’t take more than 2 seconds for the app’s first screen to pop up after the user taps on the app’s icon. Battery time is the second most important issue. Some apps consume a high amount of battery life. Excessive resource usage creates a burden on the processor and the phone heats up. In some cases, it is observed that the new app installed uses the same amount of battery as the OS. If more features are added in the app its memory consumption also increases. This is why memory consumption should be checked while testing the app.
Network Performance
The app needs to be tested on different mobile networks and network properties. If there is packet loss then the app should generate alerts or resend the request for the information. Jitters or delay in receiving information
Server/API Performance
Performance is directly proportional to the response time from the Server. In this, tests are run to check how efficient the app is to handle data transfers from the server and how quickly and in what format the data is transported by the app. The number of API calls generated by apps should be lesser and how and where the data is saved in the ‘server down’ case is all that is tested here.
Mobile app testing tools make it easier for the testers to identify and rectify any error that comes up. For different OS there are a different set of Mobile app tools. For Android, we can use Robotium and Monkey Runner and for IOS we can use Automator.
6. Usability Testing
Usability testing is a type of testing which is performed to check how user-friendly the mobile application is in terms of the navigation, ease to use the app, flexible app controls, etc. It is also known as user experience testing.
What matters in Usability Testing?
Workflow: To understand, below image represents the workflow of how the user reaches its goal while navigating through the app controls.
We must understand what the user needs to do in order to use the app’s functionality. If the workflow was overlong and included repetitive actions It may annoy the user while performing the task. Design and Layout: Good layout and design allow a user to easily complete tasks. An app need not offer so many features or content that the app is difficult to navigate. A friendly app has a design that allows less user text entry, helps differentiation between the selected items, finger-sized targets, should provide intuitive hints to texts, etc.
The response time of the application: It is one of the key factors. This means how long the user takes to complete a task. Often long delays while the app interacts with the server hinders the user experience standards.
The emotional state of users: Emotional state of user measures the user’s motivation to use the app. The apps should be smart enough to understand what the users want and how to engage them, this can be achieved by usability testing.
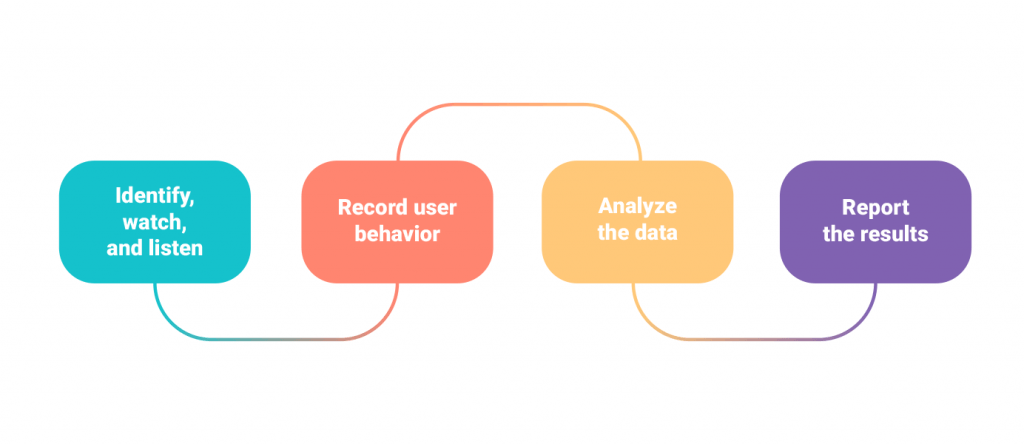
Usability Testing Strategy:
The first step is to identify users who match your expected audience. Watch and listen to them as they use your products. You can use video and audio recording equipment for archiving test sessions, in case later review is needed. However, our primary tool is taking notes with paper and pencil! This is still the fastest way we have found to get information quickly to developers and designers. You have your data. You now need to organize and analyze it. How the results are absorbed as a report in order to be useful for product changes.
Tools and techniques for usability testing
1. Mr. Tappy: It is a tool set up to capture how users interact with the apps naturally. The user data so generated could be used for better user experience.
2. Paper Prototyping: It is a technique that consists of creating hand drawings of user interfaces in order to enable them to be rapidly designed, simulated and tested. As simple as this technique may look like, it has been effectively used since the 1980s and is likely to continue to be used with a guaranteed degree of success for many more years to come.
3. Magitest: It allows you to perform mobile user testing of native apps and websites. Captures the participant’s voice and facial expressions during the session. Here the users complete the tasks you specify and allows to listen to them speak their thoughts aloud as they interact with your mobile app.
4. Reflector: This app allows us to see the iPad, iPod, iPhone screens on MAC or PC. The devices connect wirelessly to proceed with further functions.
7. Conformance Testing
Conformance/compliance testing is a type of testing which is performed to validate if the application is meeting the Market place and Enterprise policy guidelines. It is like an audit done to check whether certain standards are being met or not. Conformance Testing is focused on two main areas- App store guidelines and Enterprise policy compliance. Each Market place has their own guidelines. We need to validate if the application is following the guidelines of each of these app stores.
1. App store Guidelines pertaining to User Interface, Media Content, Privacy, Spyware and Phishing, nudity, religion, culture, violence, etc.
2. Enterprise Policy Compliance pertaining to a different set of industrial standards. For eg: For the pharmaceutical industry, the Food and Drug Administration (FDA) passed rule comes into the picture, For the pharmaceutical industry, the Food and Drug Administration (FDA) passed rule comes into the picture, In healthcare, the Health Insurance Portability and Accountability Act (HIPAA) includes an administrative simplification section, which mandates protecting the information assets of patients. So, it is a dire need for the testing organizations to follow the necessary guidelines and compliances to limit the risk that non-compliance might follow.
Reap the benefits of different types of testing
In this day and age, mobile app quality matters the most as the market is very competitive. We need to focus on user experience as well as the performance of the app. If the app contains bugs the app ratings will go down and so will the number of app downloads. If we can make our app bug free than the chances of app gaining popularity will increase. This can be achieved by performing different types of testing on the mobile application. In the next blog in this series, we will talk about mobile app testing strategies.
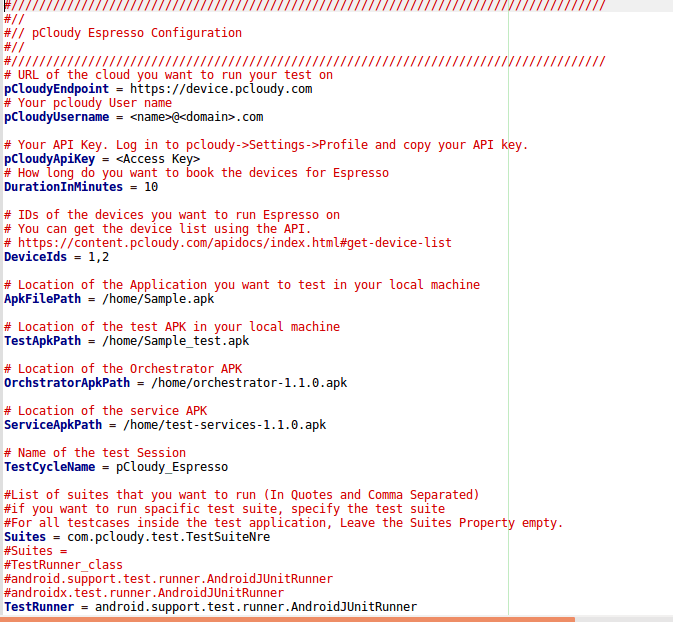
Do you know why Google has selected Gradle as the build system for Android Studio? Many Android developers work in a heterogeneous environment with different technology stacks. Gradle solves some of the hardest problems faced by the developers like how to automate the testing of apps and how to manage dependencies and variations that allow professional developers to develop variations of their app with one click. This is why pCloudy came up with a new update where you can now run Espresso with Gradle on pCloudy devices. Let’s get a brief introduction about Espresso and Gradle before we learn how to run Espresso with Gradle on pCloudy devices.
Espresso is a testing framework for Android which automatically synchronizes your test actions with the UI of your app. It also let the test wait until all the background activities have finished.
Gradle is an open source advanced build tool that allows seamless execution of tasks. It uses domain specific language and it is based on Groovy and Kotlin. It is a plugin based system so if you want to automate the task of building some package from sources then you can write the complete plugging in Java and share it with the world.
Gradle allows efficient and repeatable use of espresso and Test Orchestrator which allows automated yet fine-tuned control of the way you run your test. You can decide which specific test suites to be run to distribute the test cases across different devices. It is preferred by developers as it allows deep unit and functional testing rigs.
Power up your DevOps with Espresso and Gradle on pCloudy
You would be running Espresso on your machine using Android Studio and Gradle. However, the test would be running on pCloudy device. There is a pCloudy Espresso script that is provided by us and you need to put that espresso script in the workspace of the project. Along with the Gradle script, you will also get a config file. The gradle script will read input parameters from this config file.
Then you run Gradle to invoke the script which will upload your Application APK, test APK and other APK files to pCloudy. It would acquire a device to run your test on, it would execute those tests it will report back the status of what is happening into the Android Studio. After the test cases are run you can see the detailed reports and after that gradle script will release the device for other users to use.
There is a one-time setup that you need to do to place the gradle script in the workspace and you need to fill in the configuration file. So when you run the gradle script it will complete all the task for you and generate the report.
Steps to run Espresso with Gradle on pcloudy
1. Download the espresso starter pack from here and Unzip it
2. You will find three files,
a. pCloudy_Espresso.jar
b. Config.properties
c. build.gradle.SAMPLE
(This is a sample build.gradle that shows how to change your build.gradle to add the pCloudy Espresso jar.)
3. Copy the contents of the file build.gradle.Sample to the build.gradle file of your Android Application to register the new Gradle task and update as appropriate (see the image below)
4. Place the config.properties file in your android workspace in the same directory as your build.gradle file.
5. Update the config.properties file as guided in the comments in the file.
6. In your Android workspace run the command by typing the name of the gradle task as below.
7. Once the test execution is complete you will get a URL of the test execution report. Some fields in the report are empty right now. We will fix them in subsequent phases.
The use of gradle has made it easier to run Espresso test on pCloudy devices. We can just use the configuration file and easily run the test scripts on pCloudy devices. This will save time and effort as it further simplifies the app testing process in pCloudy.
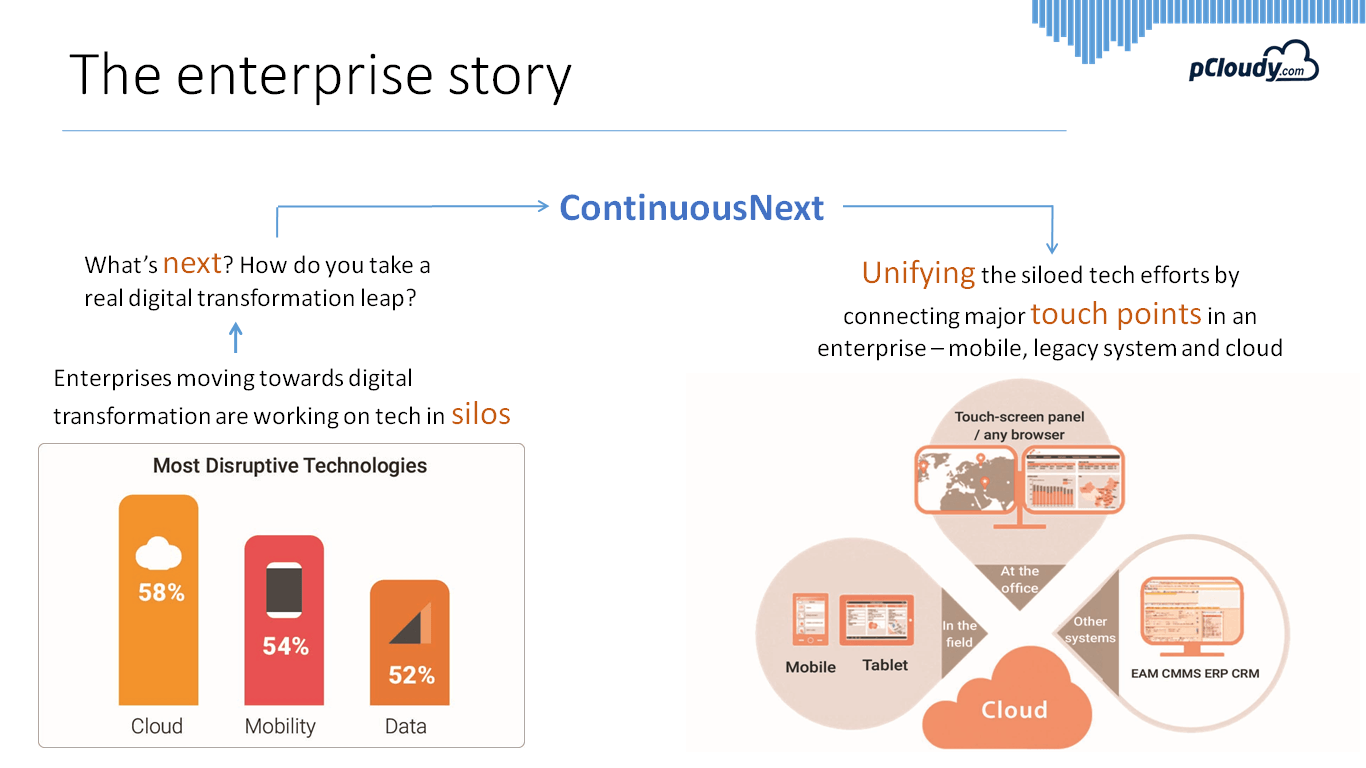
We are thriving in a 'Digital First' world. In this digital era, quality assurance remains the major gear behind a digital success and for that it has to work in tandem with the other. As per Gartner majority of organizations have taken up digital transformation projects. These are in the areas of Mobility, Cloud or Data analytics.
Today digital transformation is at its peak because after decades of development it has become incredibly useful. Still, if you look closely, trough is what is waiting after a crest. And it's true for digital transformation as well as you can already see the contours of its inevitable descent into the mundane.
So what's next?
It's Continuous Next.
We have seen that digital transformation projects taken up by organizations are siloed in nature. To take the next leap which Gartner has termed as Continuous Next there is a need to unify the siloed tech effort by connecting the major touchpoints like mobility, cloud, data etc.
With a mission to propel success of largest digital transformation projects through the power of Futuristic Testing, pCloudy saw this trend early.
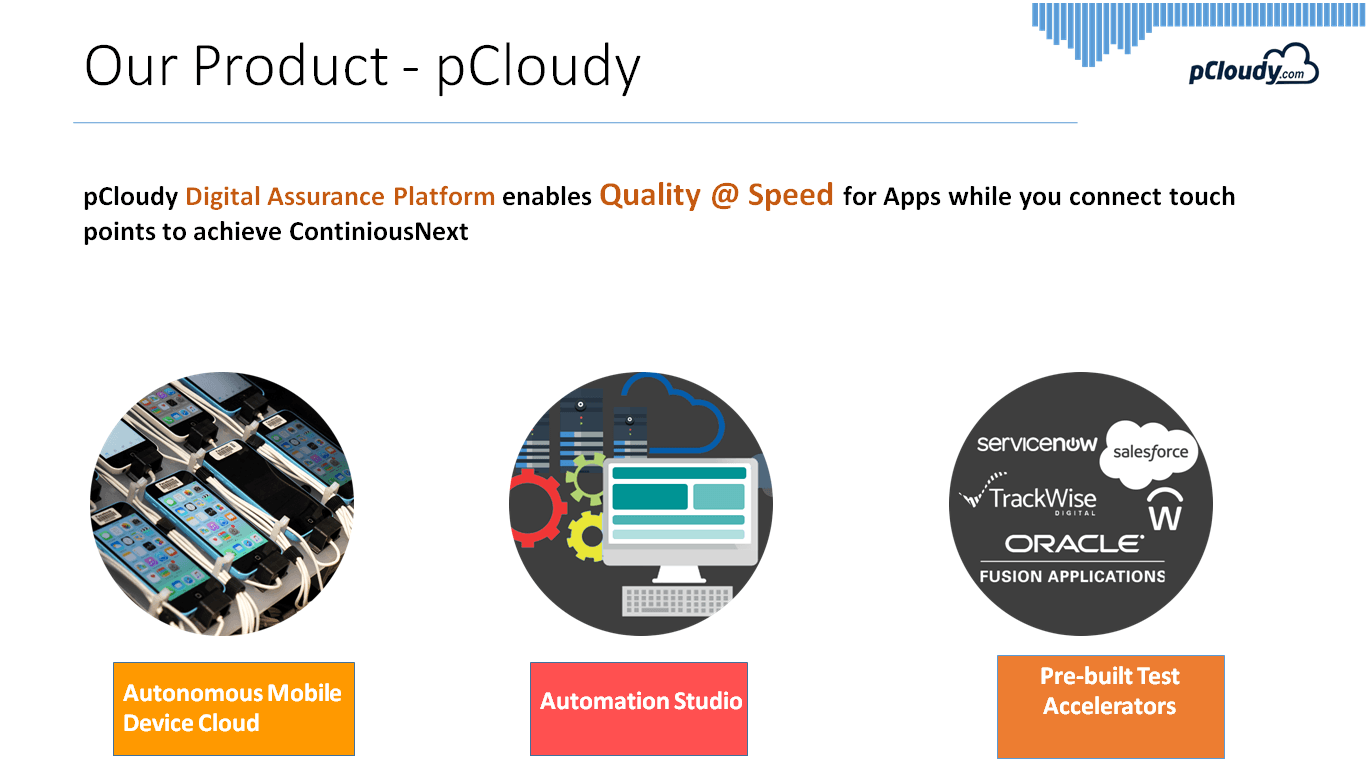
This led us to unify our 2 different products – Opkey and pCloudy and go ahead with this product enhancement merger. Opkey is now officially pCloudy Automation Studio.
This product enhancement merger gives way to a complete Digital Assurance platform which enables Quality @ Speed for apps while you connect touch points to achieve Continuous Next.
We do it through portfolio of tools which connect seamlessly in one single platform.
Platform is comprised of three suites of tools: 1) Autonomous Mobile Device Cloud – reliable Test infrastructure for Mobile App Testing 2) Zero code factory Automation Studio allowing rapid Automation for Mobile, Web, and APIs 3) Pre-built Test Accelerators for Enterprise Apps like Salesforce, Oracle Fusion, Workday etc..
This is yet another step to ensure to help you propel success and take a big leap in your digital transformation journey.
We assure the smooth merger of these 2 products which will make organizations take leap in their digital transformation journey. If you have any questions regarding this merger feel free to write back to us.
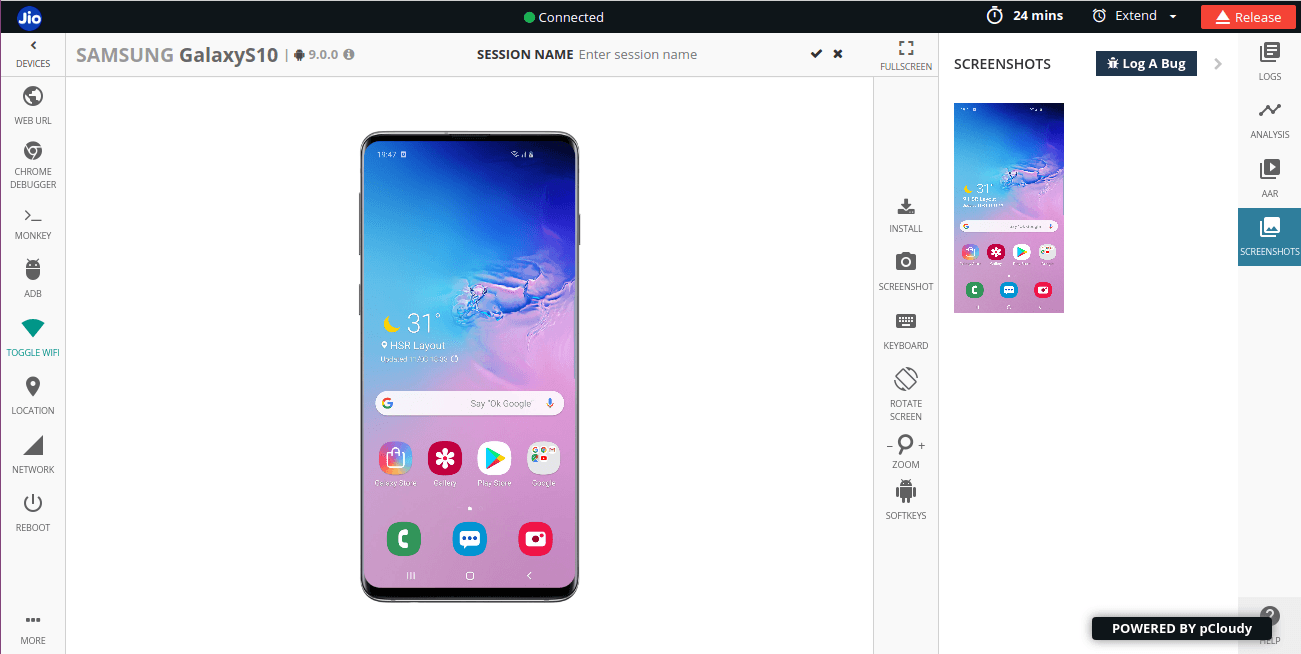
Since pCloudy is committed to provide to you with the newest the fastest, here is another one. The newly released device Samsung s10 is now available on pCloudy for you to test your app.
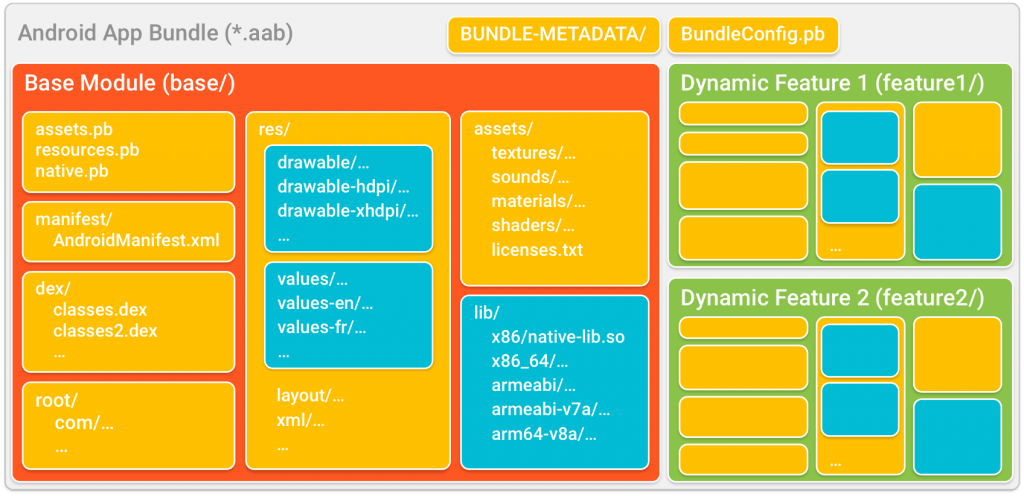
It is a new publishing format by Google which is a more efficient way to develop and release app. App bundle helps to reduce your app size and deliver features on demand. Earlier, android operating system used android packaging kit (APK) to distribute and install applications on a device. These applications are downloaded by users across the world on various devices. These devices have different configurations and language inputs. To meet all the users demands, the application becomes bulky as all the features are to be downloaded.
Android App Bundle is a zip archive with .aab extension. It contains codes and resources for all the devices that the app supports. Google Play handles signing and generation, once it is uploaded for publishing. In app bundle, dynamic delivery is used to generate an optimized APK for users, based on their device configuration.
Benefits of .aab
The key benefit of android app bundle is that it the developers need to write less code to push the app in Play store. The users save space in their device by saving a small size APK. App bundles can use uncompressed native libraries in android 6.0 and up, that are stored in the APK instead of the users device. This lowers the download size and the size on disk. It serves users with functions they need on demand, instead of installing all the functions at one go. We don’t need to build and publish multiple APKs, therefore, app bundle also simplify the built and release management.
How Android App Bundle works
Android delivers APKs with the required resources using split APK mechanism. Google Play uses this mechanism to split large apps into smaller APKs, as per the device requirements.
According the Google, there are 3 types of APKs:
a) Base APK: This is the first mandatory APK to be installed. It contains the basic requirements for the application. This APK contains codes and resources that other split APKs can provide. Only the base APK’s contains full declaration of your app’s services, permissions, platform version providers and dependencies of system features. It is important that all codes and resources included in this module are included in the base APK.
b) Configuration APK: It contains specific data, based on the device requirements. Configuration APK is generated by Google Play from the app bundle that is uploaded to the store. Each of these APKs includes native libraries and resources for a specific screen density, CPU architecture or language. When a user downloads the app, their device downloads only the specific APKs for that device. You don’t create separate module for configuration APKs. If you use standard practices to organize alternative, configuration specific resources for your base and dynamic modules, Google Play automatically generates configuration APKs for you.
c) Dynamic Feature APK: These are the optional features installed required by the user. Each of these APKs contains code and resources for a feature of your app that is not needed when your app is first installed. Using the play core library, dynamic APKs may be installed on demand after the base APK is installed on the device to provide additional functionality.
Android Application Bundle Format
An Android App Bundle is a file with .aab extension which you can upload to Google Play to support dynamic delivery. App bundles are signed binaries that organize your apps resources into modules. Each of these modules may be generated as separate APKs. Google Play uses the app bundles to generate various APKs that are served to users.
App Bundle’s files and directories: Base/, feature 1/ and feature 2/: Top level folders that contain different modules of your app. The base directory contains base module of the app. The directory for dynamic feature module is given the name specified by the split attribute in the module’s manifest.
Bundle-Metadata: Metadata files include complete list of the app’s DEX files and Proguard Mappings. Files in this directory are not packed into the app’s APKs.
Module Protocol Buffer files (*.pb): Provides metadata that describe the content of each module to the play store. For example, native.pb and resource.pb describe the code and resources in each module, which is used when Google Play optimizes APKs for different device configurations.
Manifest/,DEX/: Unlike APKs, app bundles stores the androidmanifest.xml and DEX files for each module in a separate directory.
res/, libs/and assets/: These directories are used in the same ways as APK, except that for an app bundle, they are used by Google Play to package only the files that satisfy the target device configuration.
root/: This directory stores files that are later relocated to the root of any APK including corresponding module.
How to deploy App Bundle
Unlike APKs, App Bundles cannot be installed on a device. It is an uploaded format which contains compiled code and resources in a single build framework. Once we upload out signed app bundle, Google Play builds and signs the apps APKs and serve them to users through dynamic delivery.
Testing your app bundle with Google Play Internal Test Track
You need to generate signed in app bundle before you can upload your app bundle to the play console. Proceed with these steps to generate a signed app bundle.
Select Build then select Generate Signed Bundle/APK from the menu bar. In the Generate Signed Bundle/APK dialogue, select Android app bundle and click on Next.
In the Module dropdown menu, select the base module for the app you want to generate app bundle for.
Provide information for an existing key and keystore, or create a new. This is the same type of key and keystore information you provide when building a signed APK.
I you want Android Studio to also save your signing key as an encrypted file, check the box next to Export encrypted key. To be able to upload your app bundle and take advantage of dynamic delivery, you need to upload this encrypted file to the play console and enrol in app signing by Google Play.
Click Next and provide a Destination Folder for your app bundle. Select the Build Type and flavours that you want to generate app bundles for.
Click Finish.
Now you have generated a signed bundle, you can upload your app bundle to the play console.
Testing your .aab file on pCloudy pCloudy supports .aab format and the user can upload the App Bundle instead of “.apk” to test their app on the device cloud.
Conclusion
Android Application Bundles is a big step forward in the area of application publishing and uploading. It has reduced the size of APK of your application which leads to more download of the application.
‘Metrics’. This term has become one of the widely used terms today in enterprise mobility especially for measuring mobile app performance.
Let us first understand why are the metrics are so important to analyze the performance of an app.
Generally, app developers consider mobile app performance testing as an afterthought. Mobility teams have to meet stringent deadlines and for them, testing the performance of an app has the least priority. To them, passing the functional tests meet all critical criteria for launching an app. Well, let us find out why is performance such an important criterion for mobile app testing.
Reasons why measuring Mobile App performance is such an important criterion:
1. Speed wins: As per the Compuware report, users expect their apps to load in about two seconds. This can even be proven right by the SEO reports from Google, which considers the site speed as an important parameter for Page ranking.
It is important for mobility teams to understand that your users want their apps to respond in about two seconds or less. Anything beyond two seconds, and you might lose your business.
Once the app starts taking anywhere close to five or 10 seconds, users start shifting to your competitors.
2. Mobile App Error Rates are probably much higher than it seems: You must have struggled with issues like images not loading, network errors, content feeds leaving blank holes in the app, timeouts, crashes, freezing, upload failure etc. Most of these issues are not errors of apps but caused by unreliable networks.
The error rates are highly variable and depend on network conditions. In the United States, we’ll typically see 3% error rates, whereas in India, China, and on challenging networks in Europe and Asia, we see error rates up to a frustrating 12%. Not measuring and then getting a handle on mobile app errors will quickly result in frustrated customers, uninstalls and 1-star reviews in the app stores. And no one wants that.
3. 5 star app rating: Reviews and ratings have become important aspects of judgment for any user before downloading your app. And the app should be perfect in all the ways to ensure a 5 star rating.
If you focus on functional tests and miss out on the mobile app performance not knowing, if too much battery is drained on a particular device, or is consuming too much data, then your Playstore might be full of negative reviews even before you market it well.
In this post, you’ll know how app monitoring performance works so that you can get the best out of your Smartphone software.
What is application performance management? 10 APM features that we can tick right off our fingers are:
Troubleshooting of disruption of frequent speed and uptime
Monitoring of the speed at which transactions are performed by end-users and systems
Use of a single integrated suite of software tools
Load-testing
Synthetic monitoring
Real-use monitoring
Root-cause analysis
Web-performance monitoring, to gauge app speed and uptime
An end-to-end overview of bottlenecks
Review of service interruptions
APM is integrated through the lifecycle of an application including the pre-deployment and post-deployment stages. It is therefore important for developers, testers, and business teams. A slow load can be prevalent due to a host of issues related to APIs, servers, or browsers. APM techniques are what help pinpoint the actual problem.
Basic availability monitoring involves testing IP protocols and network services, but a user needs to establish some optimal performance thresholds and real-time alerts to monitor and manage both speed and reliability.
Tips for monitoring app performance
Performance monitoring must take into account certain things in order to optimize user experience. These include measuring from the user’s point of view, i.e. performance, stability, and resource utilization in real time the way the user perceives them.
The context is crucial too. It’s important to determine how many users were affected by a slowdown, and what action on a specific operating device prompted the disruption. To truly experience a ‘mobile moment,’ you should follow these tips for monitoring your app performance:
a) Measure Frame rendering time
Only measuring network time doesn’t cut it out for users, who are interested in when the network resumes as well as when it responds.
Measuring response time by the device or operating system allows the product manager to focus on one platform at a time, respond to performance issues, and deploy resources accordingly.
b) Measure battery usage
It’s crucial to measure the battery consumption of your mobile app, along with data plan impact and memory usage. If the app is responsible for draining your battery, you should bring it in line with best practices.
Frequent updates can also be minimized so that user satisfaction can be increased.
c) Measure cell data consumption
Recent studies by Dimensional Research have shown that 20% of respondents stopped using apps that were heavy on data usage. This indicates that you should measure the consumption by app version, the total number of users, KBs of data consumed per minute, the amount of data being transferred per hit, and the percentage of data being consumed per hit.
d) Measure errors
HTTP errors from certain URLs need to be captured. This will help track the number of users who received an error, the actions that resulted in it, number of users with errors on app launch, the percentage of actions that led to at least one error, and the app version.
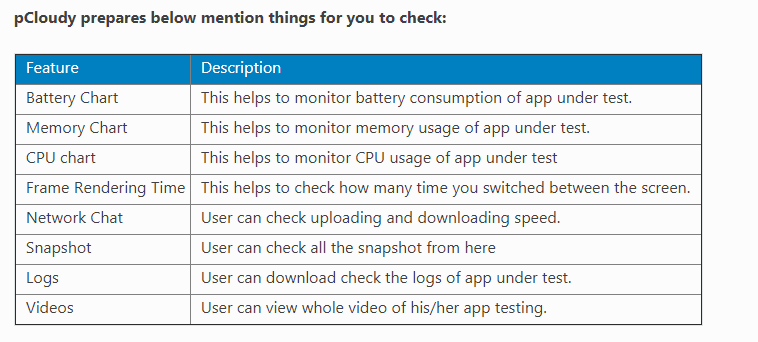
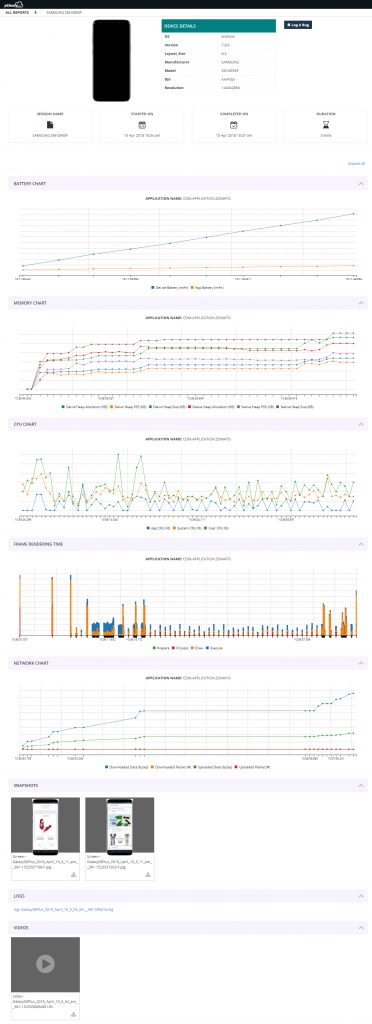
pCloudy helps you with performance profiling of your mobile apps. You can view the CPU usage, Memory usage, Data usage and Battery consumption while performing a series of actions on the app. The Real time mobile app performance monitoring feature helps you to keep track of the app’s performance while conducting manual tests. You can even check the performance consistency of the app by running automation test suites in parallel on multiple devices and by also simulating different network environments.
App Performance while conducting Manual Tests
The performance of an app can be viewed real-time while conducting functional tests. You can simply select the application installed on the device from the Tools section to view a graph of Memory and CPU usage, with the packets/bytes consumed in the Data Usage.
All information captured during a testing session is gathered by the platform and stored in a secure location to be used later. When a tester completes his testing session using a device, the performance related information can be found in the Cloud Drive.
Battery Consumption
The Battery Consumption graph indicates Battery consumption by Device, Battery consumption by Application and Battery consumption in %.
CPU Consumption
The CPU consumption of an App is plotted as CPU consumption in percentage against Time Duration in seconds.
Memory Consumption
The CPU consumption of an App is plotted as Memory consumption in ‘Mb’ against Time Duration in seconds.
You can listen to this webinar on Performance testing to find out how a cloud based solution can help your app perform well in all situations.
There has been tremendous growth in the usage of the web in the past years. Internet users rose from 3.5 billion in 2017 to 4.1 billion in the year 2018 as per internet world stats. Also, according to internet live stats, there are around 1.5 billion websites in the World Wide Web network today. The development team puts in a lot of effort in building a website so it is important that the website should work hassle-free on all the browsers, equally. Moreover, almost everyone is dependent on the content that exists on the internet. On top of that, the content is available in more than 3000 different internet-enabled devices which is what is to be focused here. More devices, more ways to view the websites. So, here the real concern is-are all the users using different devices, able to view the website the way it is intended?
What is Cross-Browser Testing?
As the web grows, new technologies, tools to build the websites are also introduced simultaneously. But not all are browser compatible technologies. So, for browser compatibility testing, a developer needs to perform cross browser testing. It is nothing but to perform multiple browser testing for web applications and checking its compatibility with different operating systems, screen resolutions and devices to find out if it meets the developer’s expectations. When it is about web applications, it is an important task to ensure they are fully functional across multi-browser settings and it provides a good experience to the users, irrespective of the device and the browser they use. Browser test is a ‘must-have’ because there are chances that the users might not come back once they face any problem or do not get good site experience.
Let us understand more deeply as in why Cross Browser Testing is important and what purpose it serves. 1. Every Browser interprets differently:
Every browser is different and carries a unique ability to interpret things differently i.e not all the codes are understood by different browsers in the same way. So, a coder must ensure that all the browsers interpret the commands in a similar way to give the intended user experience through the website. Also, since there are multiple browsers with different versions, it becomes challenging to know if the website works well on all versions. Cross browser testing tools help in testing multiple browser and its different versions.
2. Different Mobile Platforms:
One of the main reasons why Cross browsing Test has become important is because of different mobile platforms available today. Multiple mobile devices are launched every year so it is imperative for a mobile website to open properly on each device correctly. There are different sets of browser combinations preferred by the users so the organizations can focus on those combinations of proper functioning on mobile devices. Testing teams need to test on different mobile browser versions because it becomes challenging to understand which version the user is using. Even the CSS runs differently on each version so cross-browser testing tools can check the same easily.
3. Fewer Bugs:
Cross-Browser testing is one of the rigorous tasks that the QA team has to perform but at the same time, it is a great move to introduce this practice because this would reduce time in testing across different browsers, simultaneously. To make every minute component and feature function properly and to avoid any last-minute complications and bugs, cross-browser testing should be performed to make sure all browsers and its versions are functioning correctly on all platforms. Web traffic data can be helpful to understand what browsers our users use frequently which can be used as information to focus only on important parts of testing.
4.Re-usable tests :
With Cross Browser testing, there’s no need for creating and maintain separate browser tests for each browser platform. The tests can be reused in different supported browsers with the help of different test automation technologies. The cross-browser tests can be created by custom scripts apart from the cases where the custom solution fails.
5. Free tools available:
There are many free tools available to perform web and mobile automation such as Selenium WebDriver and Appium. Most of the cross-browser test automation tools are based on open source automation tool i.e. Selenium which has a great User Interface making it easier to perform cross browser testing on multiple browsers.
There are many widely used web browsers, but not all browsers, and versions of those browsers work the same. A website may not look or function identically on each one, which can lead to lost revenue for an enterprise. We at pCloudy addressed the issue of choosing from the fixed set of browsers previously available. Heeding to the growing demands of our users, we have introduced the Launch and Upload browser feature for our Android users which will give him the freedom to choose the version of the browser that he wants to use. This is going to save their testing time and efforts to a great extent and also give better results for their cross browser test. For more information, visit pCloudy