Suyash Dubey | Posted on | 2 min Read

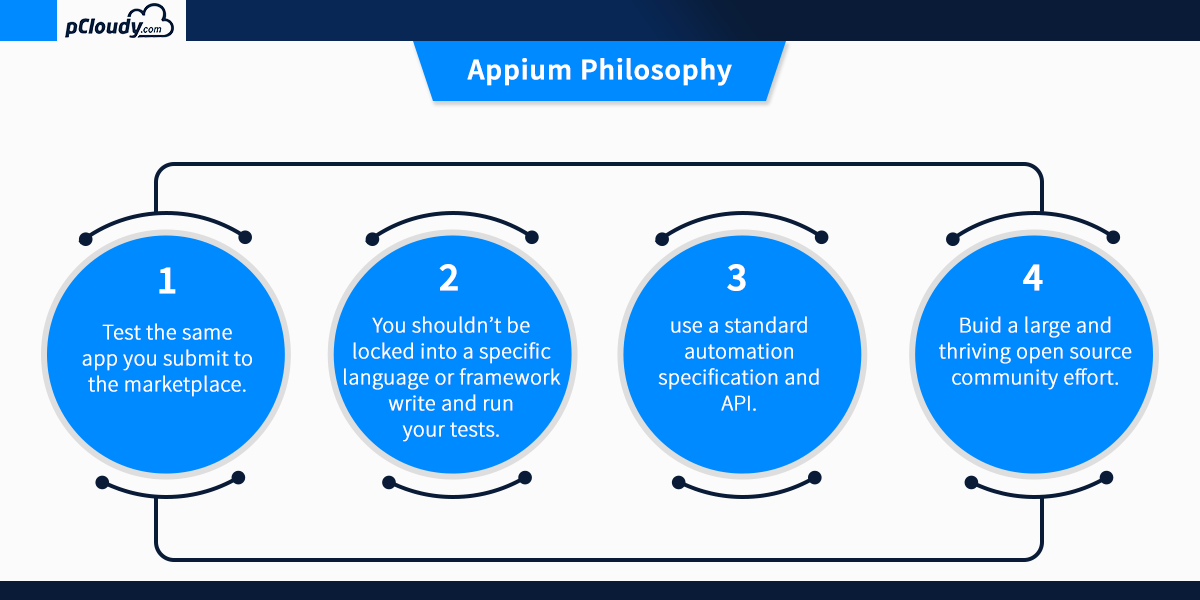
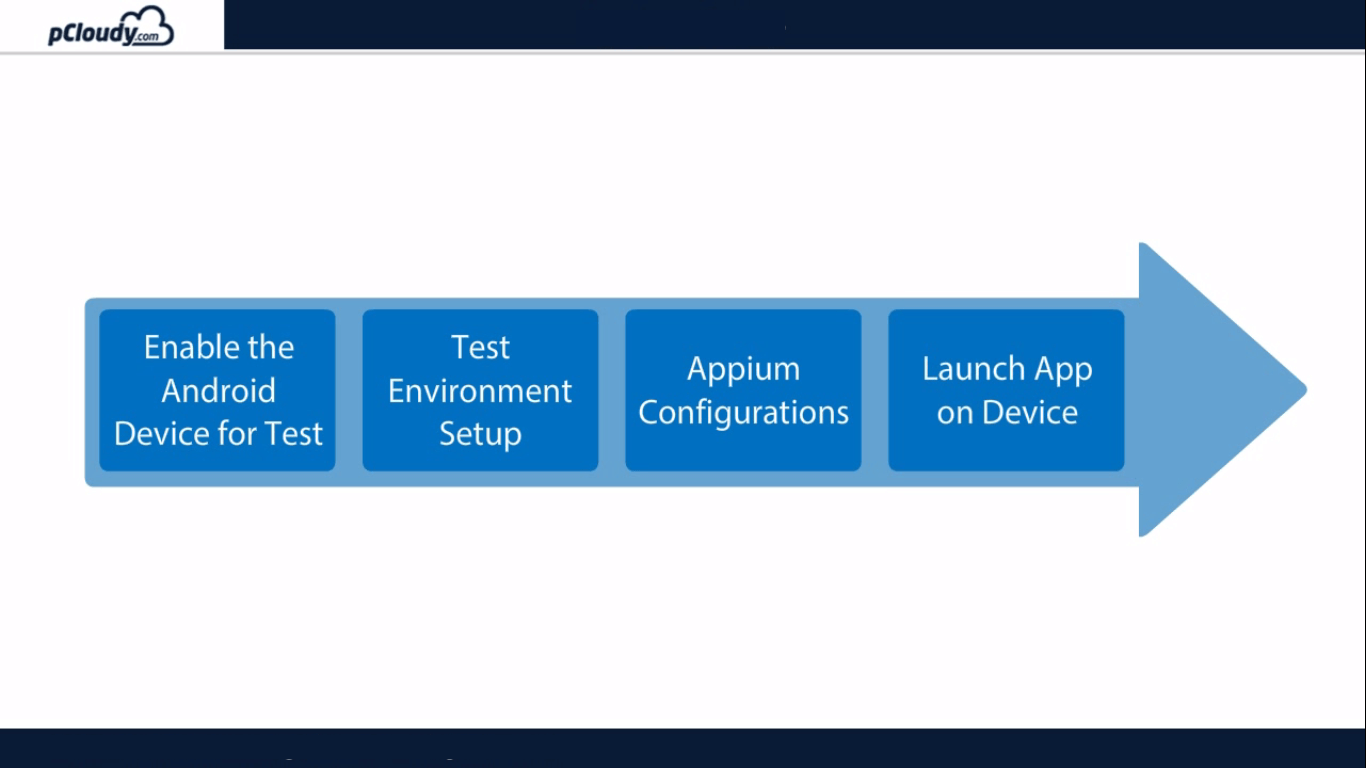
In the previous blog, we informed about the basics of Appium and its architecture. Now let’s understand how to setup Appium. There are four steps required to setup Appium, they are enabling the Android device for test, test environment setup, Appium Configurations, Launch the app on the device.
 
Appium Mobile Testing

Pre-requisites for Appium Mobile Testing

 
1. An Android device with OS 4.2+
2. AUT(Application Under Test) file (.apk)
3. Phone USB Drivers
4. Java (JDK)
5. Android Studio (SDK)
6. Eclipse
7. Selenium Standalone JAR
8. Appium Java Client
9. Appium for Windows
10. .NET Framework 4.5
 

Want to test your Mobile App?

Join pCloudy Platform!

Android Developer Options in device

 
Every Android smartphone contains a secret set of Android developer options which are used by app developers who need additional functions to test their apps they are making for Android devices. It allows you to enable debugging over USB, capture bug reports on your Android device and show CPU usage on the screen to measure the impact of your software.
 
To enable developer option in the phones to go to the settings, click on the about phone options and click on the build number 7 times to enable the developer options.
 
About Phone

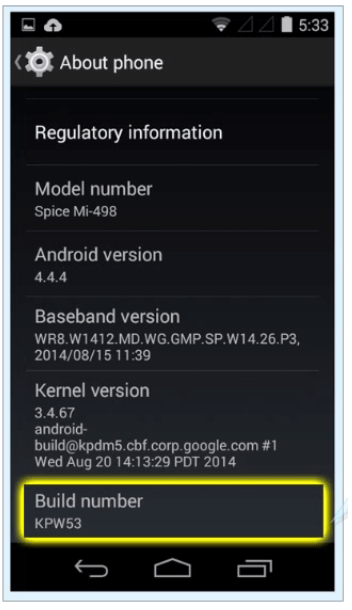
Doing so will display a toast message for enabling the developer option. the current message appears if the developer message is already enabled on the phone.
 

Phone Drivers

 
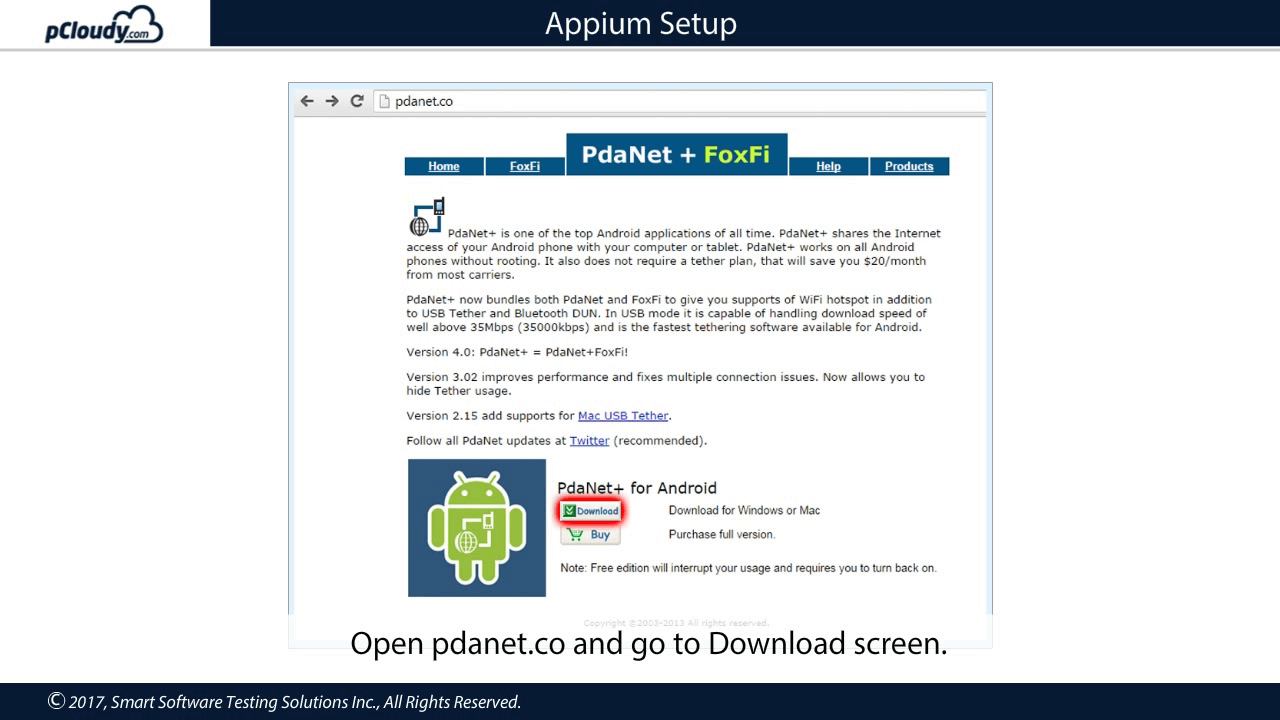
The phone can communicate with the PC only if there are proper drivers installed for the USB cable. Each phone manufacturers provides its own drivers for the phone. PDA net is a driver which works with all the Android devices. It makes sure that your phone is detected in DDMS.
 
Open pdanet.co and go to download screen and download the latest version to install it on your PC.
 
Appium Setup

Let’s verify if the phone is prepared.
 
The ddms.bat file is present in the Android SDK tools folder.
 
Dalvic Debug Monitor

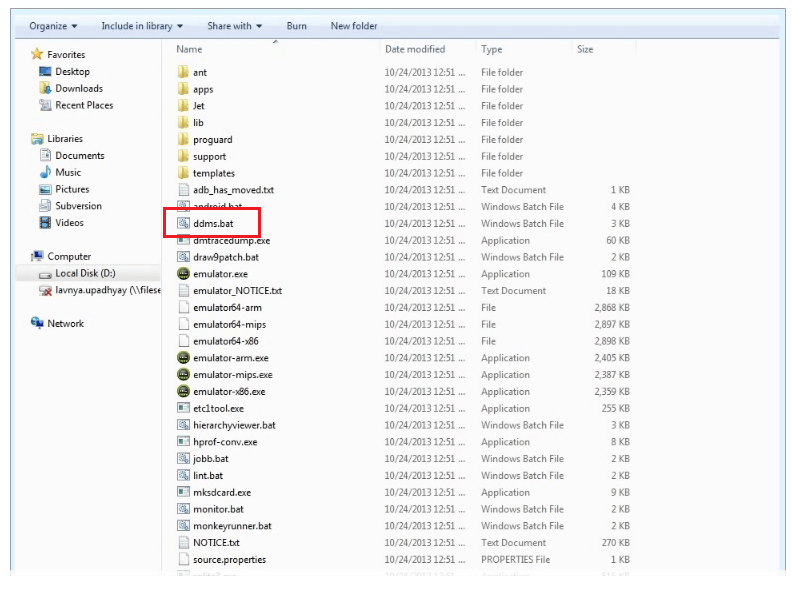
Double click on the file and you will see the Dalvic Debug Monitor window.
 
DDMS

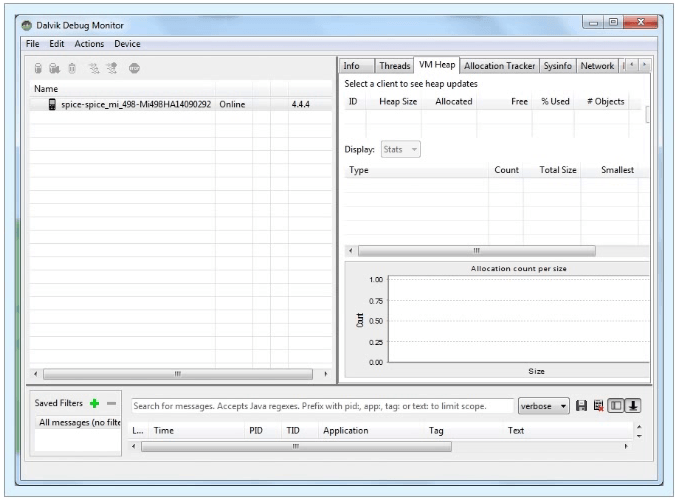
If your DDMS option is enabled i.e. if you have installed the PDA net software and connected the device to the machine, that device should be detected in this monitor. Now let’s move on to the second step.
 

Test Environment Setup

 
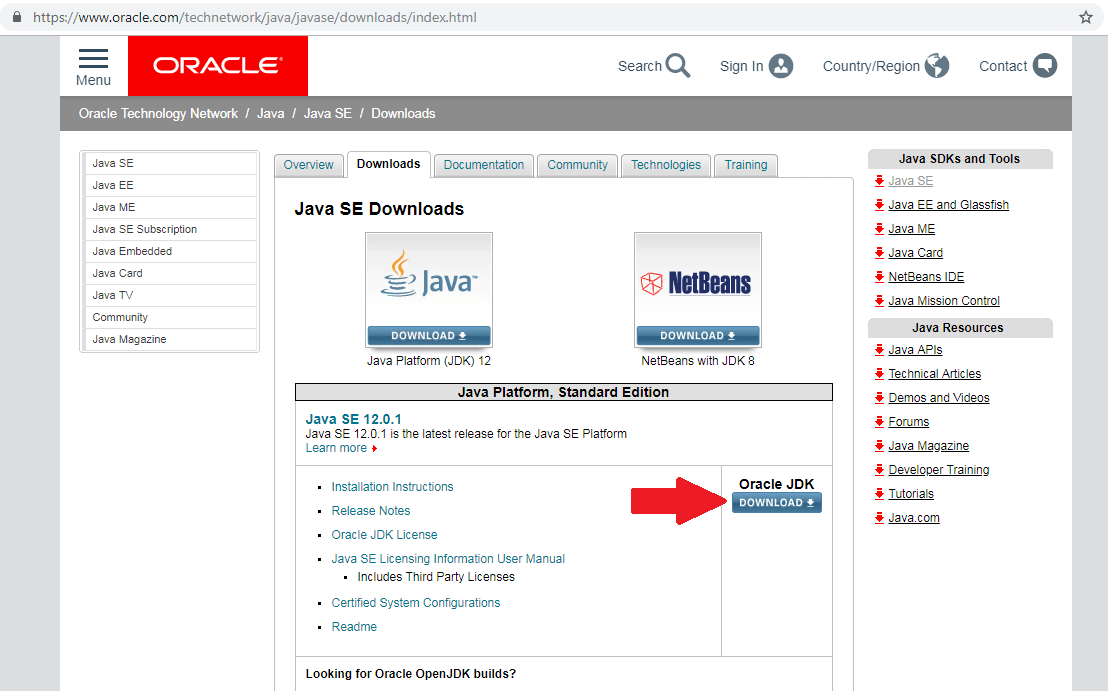
First, you need to download JDK from the Oracle website.
Oracle download

Once downloaded, install it to your machine. Now you need to set the Java installation path in your Environment variable. Right-click on Computer option in the Start menu and select the Properties option. Select Advanced system settings and then select the Environment variables option in the Advanced tab.
 
Advanced system setting

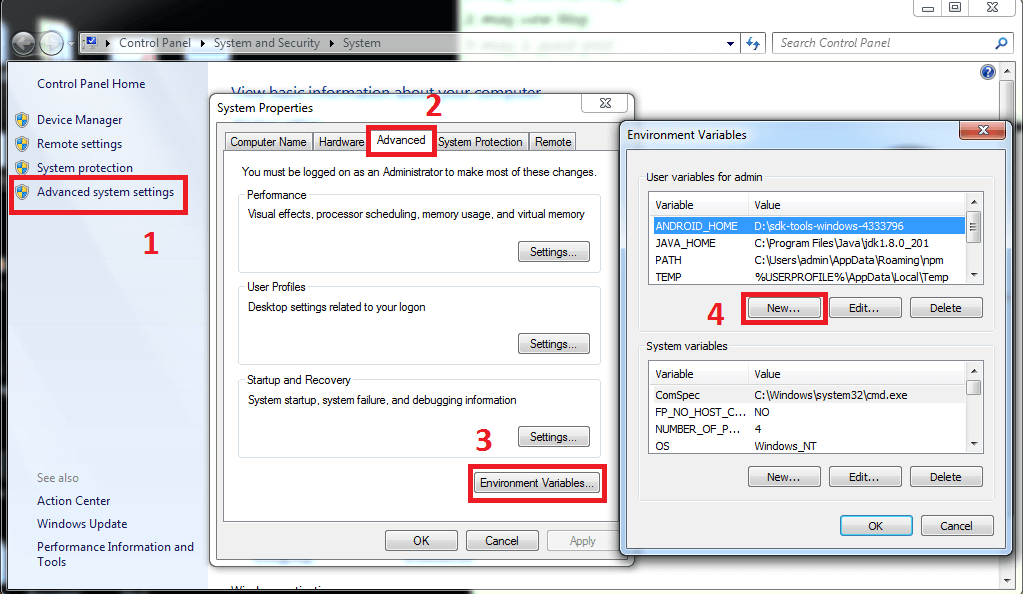
Then select the new option and enter the new variable name as JAVA_HOME.
 
Java Home

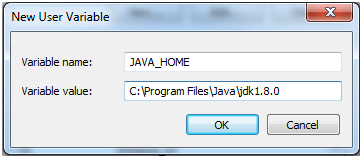
Set the path of JDK to variable value and then click OK.
 
To get an Android emulator you need to go to www.developer.android.com\studio#downloads and Scroll down to Command-line tools only section to download the zip file of SDK tools package for Windows.
 
Command line tools only

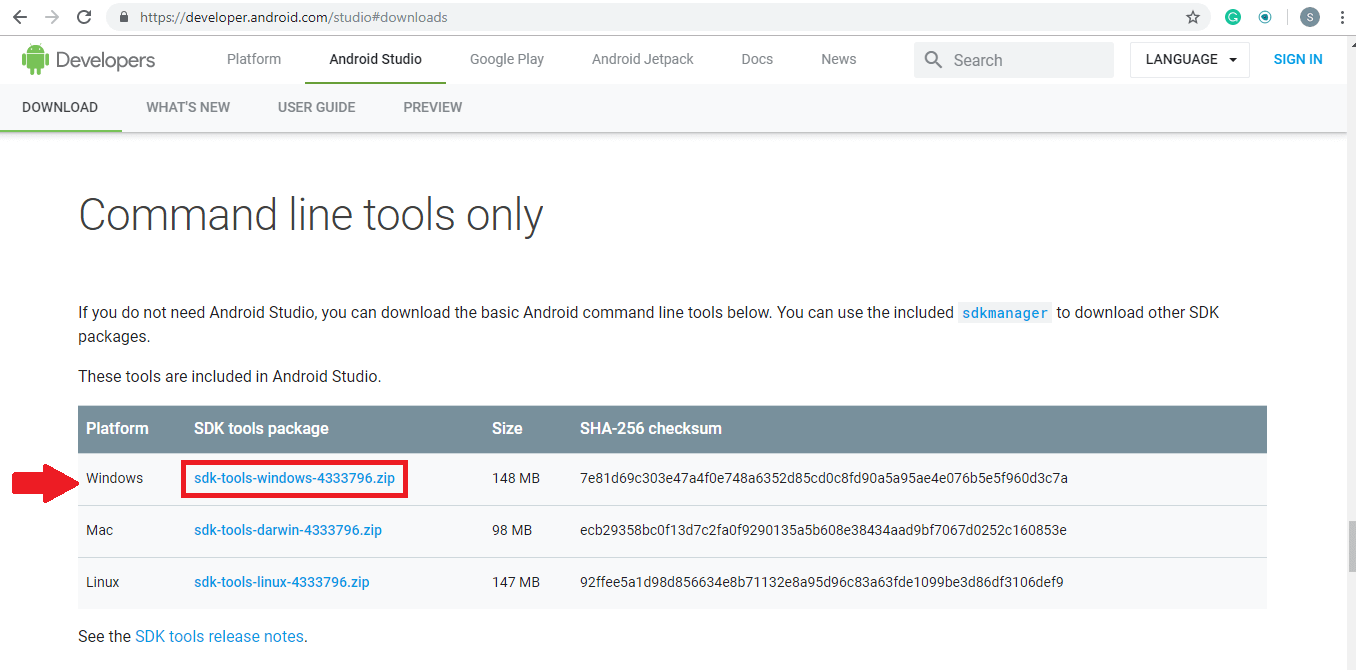
Don’t download the EXE file. Once the SDK file is downloaded, copy it to the C drive, make a new folder and extract the zip file in the new folder.
 
Now you need to search for SDK manager in the bins folder and open SDK manager. Once the SDK manager window is open, go to tools and then get into the bin folder and in the address bar type cmd and hit enter. Now in the command prompt type SDK manager “platform-tools” “platforms; Android-28 and then hit enter. So now you will be able to see Platform tools and Platform folders in now folder you created for the extracted files.
Click on platform tools and copy the address bar text and then again go to an environment variable. Then go to the path, a new window will pop up, make a new path and enter the copied text there and then click on OK.
 
To download Appium go to www.appium.io and click on the Download button.
 
Download Appium
 
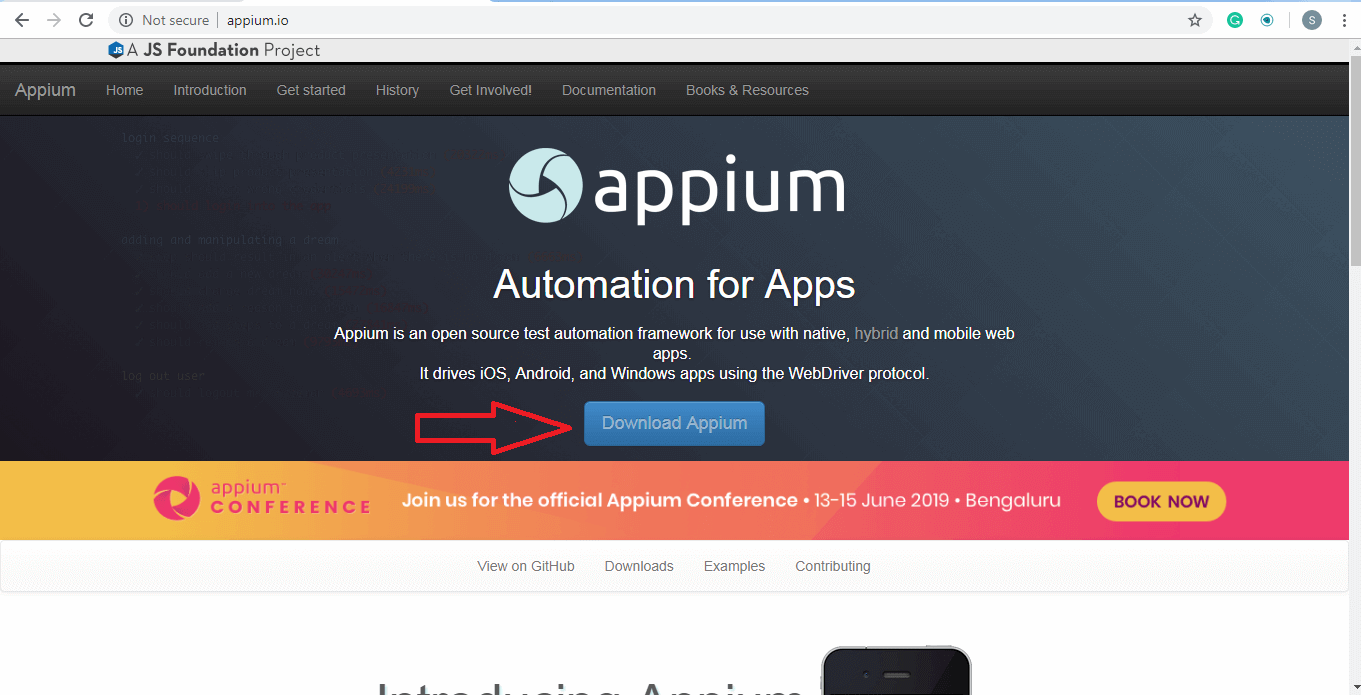
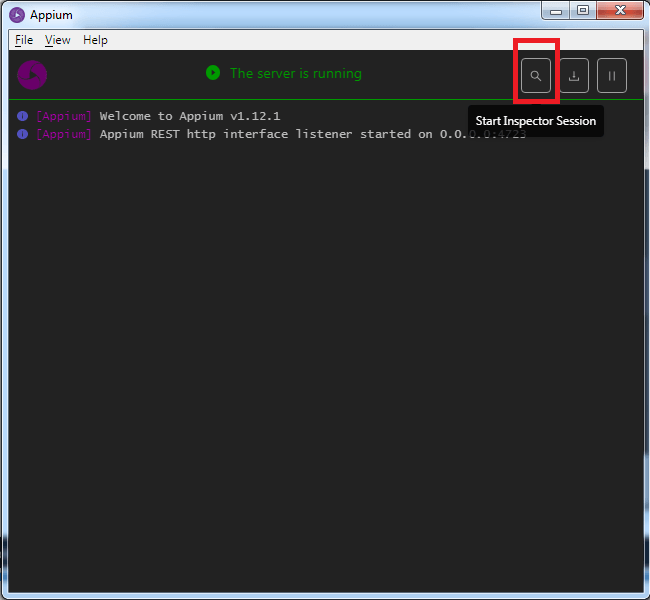
Under the latest version, click on the Appium-windows-1.12.1.exe file. Once the file is downloaded, open the appium.exe file. Click on the Start Server v1.12.1 button.
 
ApAppium Start Server v1.12.1

Then in the server window click on the Start inspection session icon at the top right corner.
 
Appium server

Now you can get started with Appium automation testing. Do read our next blog to get more information about Appium mobile automation and how to inspect elements using Appium Desktop.

Want to test your Mobile App?

Join pCloudy Platform!

 
Related Articles:

  • Writing The First Appium Test Automation Script (Android)
  • How To Install Appium On A Mac Machine
  • Basics of Appium Mobile Testing
  • Inspecting Element on pCloudy Devices Using Appium Desktop
  • Cross Platform Mobile Test Automation Using Appium
  • Suyash Dubey | Posted on | 2 min Read

    [xyz-ihs snippet=”quickLinks-Appium”]
     
    Appium is an open source mobile app UI testing framework. You can test all types of mobile apps and perform automation test on physical devices as well as on emulators and simulators. Appium mobile testing does not have a dependency on mobile device OS and it supports cross-platform app testing as a single API works for both Android and iOS. Appium supports many popular languages like C, PHP, Python, C#, Java, Ruby, JavaScript, etc.
     

    What is Appium Mobile Testing?

     
    When Appium is installed then a server is set up on your machine that exposes the REST API. It receives a command request from the client and executes that command on Android or iOS mobile devices. Then it responds back with an HTTP response. It uses mobile test automation frameworks like Apple instruments or UIAutomator2 to drive the UI of apps.
     

    Approaches to Test Automation

     
    There is two approaches for mobile test automation, Image-based and Object-based approach. Let’s understand both in detail.
     

    Image-Based Approach for Test Automation

     
    This technique of object identification is based on the image processing attributes of the objects in the Application Under Test (AUT). Example: Automate user options like “click, type, drag-drop, mouse actions, etc.”
     

    Visual verification of the expected output

     
    • Not dependent on the platform underneath
    • Can be used to automate emulators as well as a real device.
     
    Image based approach

    The object-based approach of test automation

     
    This technique of test automation is based on recognizing the nativity of the objects in AUT. This nativity reorganization process for each individual object in the application is carried out using different attributes that are assigned to the object.
     
    It is used to extract the application object identifier with its properties from the actual native operating system source code, just like the developer used. This is an accurate and fast method to recognize the buttons, lists and other objects used by the application.
     
    One drawback of the object-based approach is that the recognition of the individual attributes of the object involved restricts these techniques ability to function in test scenarios that require third-party application access. This reduces the automation coverage of utilizing this technique.
     
    Object based approach

    Which approach should we choose?

     
    As we have seen, both approaches have their pros and cons. To get better results, you can merge both approaches and think about devising a hybrid test automation solution.
     
    The combination of OCR (image based) and native (object-based) approach allows users to build a single script that will be portable across different devices. It will make your automation robust and efficient and allows the users to confidently detect the relevant native and GUI defect within the mobile application.
     

    Appium Overview and Architecture

     
    Appium is an HTTP server that manages WebDriver sessions. On iOS devices, Appium proxies command to a UI automation script running on Mac Instruments environment. Apple provides an application called instruments which are used to do a lot of activities like profiling, controlling and building iOS apps. It also provides an automation component where you can write some commands in JavaScript which uses UIAutomation APIs which interact with the app user interface. Appium mobile automation uses these same libraries to automate iOS apps.

    Appium Overview and Architecture

    The Webdriver Script sends a command in the form of HTTP (JSWP) to the Appium Server. Then the Appium Server will then decide as per the request which driver should be initiated. So, in this case, the Appium Server will initiate the XCUITest driver and it will pass the request to the WebdriverAgent which is an IPA (WebdriverAgent.xcproj) developed by Facebook. WebdriverAgent is responsible to send the command to the Application Under Test (AUT) to carry out the actions in the app. Then the response will be sent to the Webdriver Script through the Appium server.
     
    Only iOS 9.3 and above version are supported by the XCUITest Driver. You can find all the capabilities for XCUITest Driver in the link mentioned below.

    https://github.com/appium/appium-xcuitest-driver

    UI Automation Server flow diagram

    The situation is very similar in the case of Android where Appium proxies command to a UIAutomator2 test case running on the device. UIAutomator2 is Android’s UI automation framework which supports running JUnit test cases directly into the device into the command line. It uses Java as the programing language but Appium will make it run from any of the web drivers supported languages.
     
    To answer the question “what is Appium automation?”, let’s have a look at the Appium philosophy.
     
    Appium philosophy
    Appium mobile testing is required for proper execution of continuous integration as it speeds up the overall testing process. Appium mobile testing helps to run the repetitive test which would take more time to perform manually. This is why appium mobile testing is the preferred choice for the developers when it comes to test automation.
     
    In the next blog, we will learn more about Appium mobile testing and how to install/configure the Appium setup on a windows machine.

     
    Related Articles:

  • How to use Appium Inspector for Test Automation
  • Appium Setup for Windows
  • Starting Appium Server and launching the app from code
  • How To Install Appium On A Mac Machine
  • Appium vs Espresso: The Most Popular Automation Testing Framework in 2019
  • Suyash Dubey | Posted on | 2 min Read

    There are more than 5.5 Million apps available on Google Play and Apple App Store combined and by 2022, the number of app downloads will be around 250 Billion. The number of smartphone users in the world is more than 3 Billion and the users prefer using smartphones instead of desktop. This data shows that the mobile app market is very competitive and growing. In this age of digital transformation, the focus of enterprise mobility is to provide better user experience at great speed. The launch of 5G will further complicate the app development and testing process initially. But apart from this, there are three main challenges to overcome and pCloudy is leading the path to bring positive change. Let’s look at these challenges and their solutions.
     

    Challenges Faced by Enterprise Mobility

     
    There is a growing demand for quality at speed in the mobile app industry. The current market dynamics are such that it is necessary to provide the best quality product in less time to remain in the competition. When we talk about mobile app testing, quality can be maintained only when the enterprise can achieve scale. There is a myriad of devices in the market with different OS versions, browsers, Custom ROM, etc. and the app should be compatible with all the devices. How can ensure this and most importantly, how can we speed up the testing process on multiple devices? pCloudy can help you overcome this challenge with its best in the class features. Let’s have a look at them one by one.
     

    Parallel Testing to Achieve Scalability

     
    If we are talking about scalability then testing your app on 5,10 or even 20 devices are not enough for the enterprises to ensure a bug-free app. pCloudy enables to testers to run your test scripts concurrently on 50, 100 or maybe more devices. Enterprises have the option to perform parallel testing in our public cloud or in our plug & play on-premise infrastructure solution. With more than five thousand device browser combinations, enterprises can ensure that the application is working properly in all the devices.
     
    Parallel Testing
     

    Parallel testing on 50 devices

     
    You can see in the picture above, we have set up a device infrastructure for 50 devices for demonstration. Similar device setup can be provided for our on-premise solution and public cloud users can just log into the pCloudy platform and book the devices to perform testing. These real devices can be accessed remotely on the cloud which makes it more convenient for the users as there are no location constraints.
     

    Progressive Reports to Improve Quality

     
    It won’t be efficient to go through each and every report to analyze the data for every device. Instead of that, you get intelligent results where you can do a quick analysis of the errors and then debug quickly. In the pic below you can see the list of results for different builds with their start time, progress, status, and Action.
    In the status, you will be able to see how many tests pass, fail, and errors. This way you can concentrate on the tests which failed and you will save time as you don’t have to manually go through all the cases.
     
    Progressive Reports
     
    You can integrate any reporting framework with your existing Appium setup. The same way you have to configure with pCloudy by adding a one-line code while creating an asset.
     
    Test Case Report
     
    In the pic above you can see the test case result in detail. You can see the tags, test case name, build, Automation, and the live status of errors.
     
    Progressive report
     
    Once you expand the test case you can see the logs, Jason format, screenshots, video for that particular session. This information can be used to expedite the test execution.
     

    Integration with AI to Speed up Mobile App Testing

     
    The next challenge is to speed up and simplify the test script creation process. Usually, the procedure is to connect the device to the system and use an automation framework like Appium to use object repositories. If you are using images then the XPath may change depending on the devices.
     
    AI
     
    This AI based utility will help you to get the object repository for the entire page. So if there is an icon for contacts then this utility will automatically recognize the element.
     
    AI Code
     
    In the code, you just need to declare the driver for Appium and for pCloudy as well. Then you need to initialize the drivers and start using the code generated using the AI utility. This is how the script creation is expedited using AI.
     

    Conclusion

     
    To sum up, pCloudy has come forward with solutions for the enterprise mobility to deliver quality at speed with scale. Whether it’s parallel testing, progressive reports or creating a script using AI-based utility, all these features fix the problems that were mentioned earlier. The proverb “change is the only constant” fits well as pCloudy comes up with updates on a regular basis to resolve the issues and make mobile app testing better.

     
    Related Articles:

  • Basics of Appium Mobile Testing
  • Python + Appium + Robot Framework
  • Inspecting Element on pCloudy Devices Using Appium Desktop
  • 5 Reasons Why Appium is The Best Mobile Automation Testing Tool on Device Cloud
  • Help Guide for pCloudy-java-Connector for Appium