Suyash is a content strategist at pCloudy. He is a frequent contributor to the world's leading mobile technology blogs and tech forums. In his spare time, you will find him reading detective novels, watching a documentary or exploring a new destination.
End to end testing is done to make sure that the application behaves as expected and the flow of actions from starting to end is complete without any issue. To explain with an example, suppose you are the end user and you are using the app to book a flight. So first you will launch the app and click on the flight’s icon on the home page. Then you will enter the destination, date and other required details. Now you will choose your preferred flight, book the seat, enter the passenger details and make the payment. Once this is done, you will get the ticket and a follow-up email on your registered email ID.
Now in this scenario, if the screen takes a lot of time to load the next page or if the book button does not work then this will be an unpleasant experience for the user. So we can figure out if there are any issues from starting to the end of the process. It’s not just about the UI functioning but also the data encryption and security, information flow between other internally used platforms integrated to the app, proper functioning of the firewall and more. This is where end to end testing comes into the picture to make sure that everything works well under any circumstances.
How to Perform End to End Testing
While performing end to end testing the first thing to do is to analyze the requirements and set up the test environment. Then you need to evaluate the main system with the connected subsystems and define the responsibilities of all systems involved. Make a list of the testing methods and the description of the standards to be followed. Once that is done you can create the test cases and track the requirement matrix. Finally, you need to save the output and input data before testing each system.
Measuring the success of the end to end testing
To perform end to end testing efficiently and save time and effort, a matrix should be created. Some parameters should be defined to gauge the success of the testing performed. These measurements will help you define the testing matrix:
Test case status: A proper visualization of the test cases prepared can be observed through graphs and compared with the number of tests that were initially planned. Tracking Test progress: This measurement will help you to get the details of the tests completed on a weekly basis. It will be easy to keep a track of the test that failed and those that passed. Defect details: Tracking of the bugs occurred and the issues surfaced should be done one a weekly basis and keeping a track of the defects that were opened and closed on the basis of priority. Environment availability: Here we need to take a note of the amount of time allotted for running a test in an environment and the time actually spent on performing end to end testing.
Best Practices to Perform End to End Testing
End to end testing can be very time consuming and we can save some time and effort by following some steps. It is always better to plan in advance before initiating the testing process.
Prioritize: Chances of defect increases as the test cases become complex with more components and it becomes difficult to debug them. Therefore it is better to perform unit testing and integration testing to resolve issues that are easier to detect. After initiating the End to end testing you can also start doing smoke and sanity testing to keep an eye on the high-risk scenarios. Manage the Environment: The requirements need to be documented and the system administrator needs to be informed about it to meet the requirements before starting the testing. The system setup should be proficient enough to run the test cases and keep your staging environment close to the production. Optimize: After test completion, you need to clear the test data so that the environment is restored and can be used for testing again. This will make the environment ready to start at any moment. Risk Analysis: Focus on the features that are crucial and on failure can cause a high risk. Prepare a risk assessment matrix which will come in handy in these situations. Limit Exception testing: Use low-level unit testing and integration testing for exception scenarios and use end to end testing to deal with typical user scenarios.
Conclusion
With the rapid enhancements in the app technology and the increasing use of technologies like IOT, the development teams have to make sure that the app has a smooth functionality. The end users can be very choosy in this competitive market and so it’s necessary to perform end to end testing of applications to provide a good user experience.
We are glad to announce the release of pCloudy 5.4 with exciting new features to make app testing simpler than ever. There is a possibility that you might be familiar with pCloudy, but for those who are new, pCloudy is a cloud-based mobile app testing platform. We have achieved many milestones in a short period of time because we resolve issues immediately and bring in new features on a regular basis. Case in point: This new version of pCloudy, where we have addressed the concerns of our users and added new features to optimize testing. Let’s have a look at all the features added in pCloudy 5.4.
CTRL + V
To test your app on a pCloudy device you need to login to device.pcloudy.com and then book a device by clicking on the devices tab. Just click on the available button next to the chosen device which will take you to the device interaction page. Earlier in the device window, you would have to use the virtual extended keyboard to enter text in the device. Although now you can just copy any text from your system and paste it in the device directly. So now instead of using an extended keyboard just use two buttons to enter the string in the device. This will save time and effort when working with multiple devices where you need to enter long text many times.
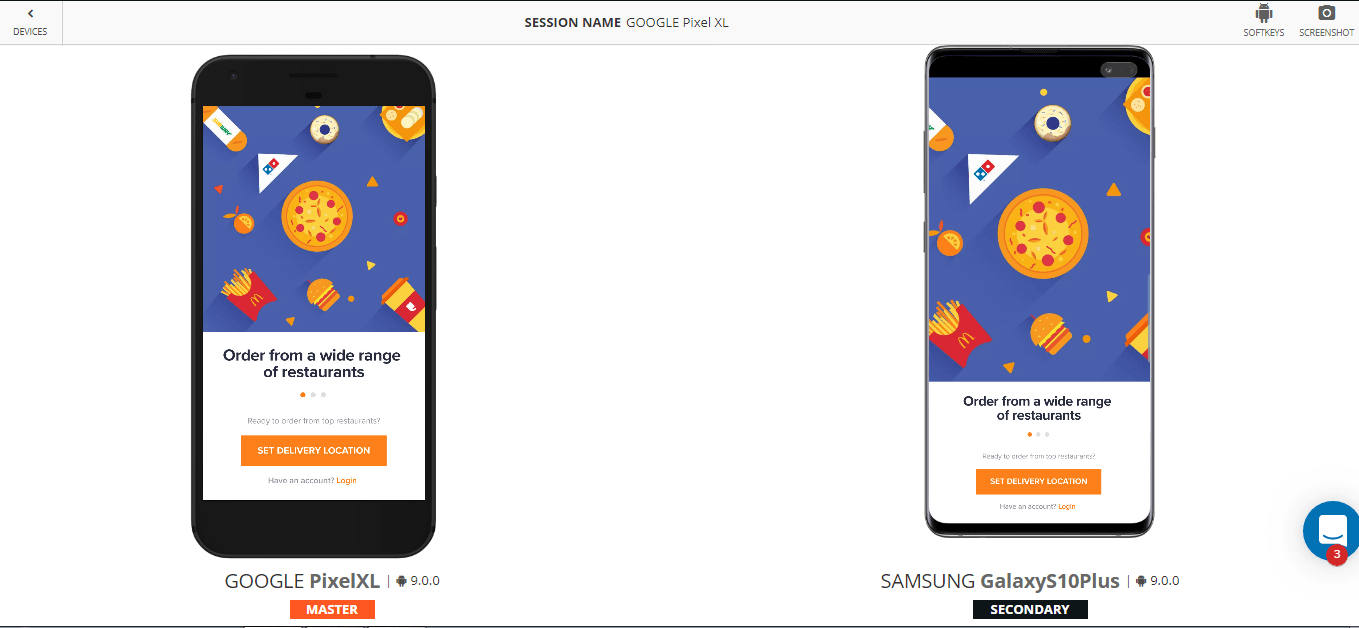
FollowMe new UI
To use the FollowMe feature you will have to instrument the app you want to perform the test on. Under devices section, click on the FollowMe tab then in the next screen choose the app, select the duration and devices on which you will perform the test. In the next screen, you will see the devices which you selected and two options (Softkeys and Screenshots) at the top right corner of the window. Now when you perform any action in the master device, that action gets replicated on the secondary device too. If you enter text, tap on a button, swipe, etc. in the master device then that will happen simultaneously in the secondary device.
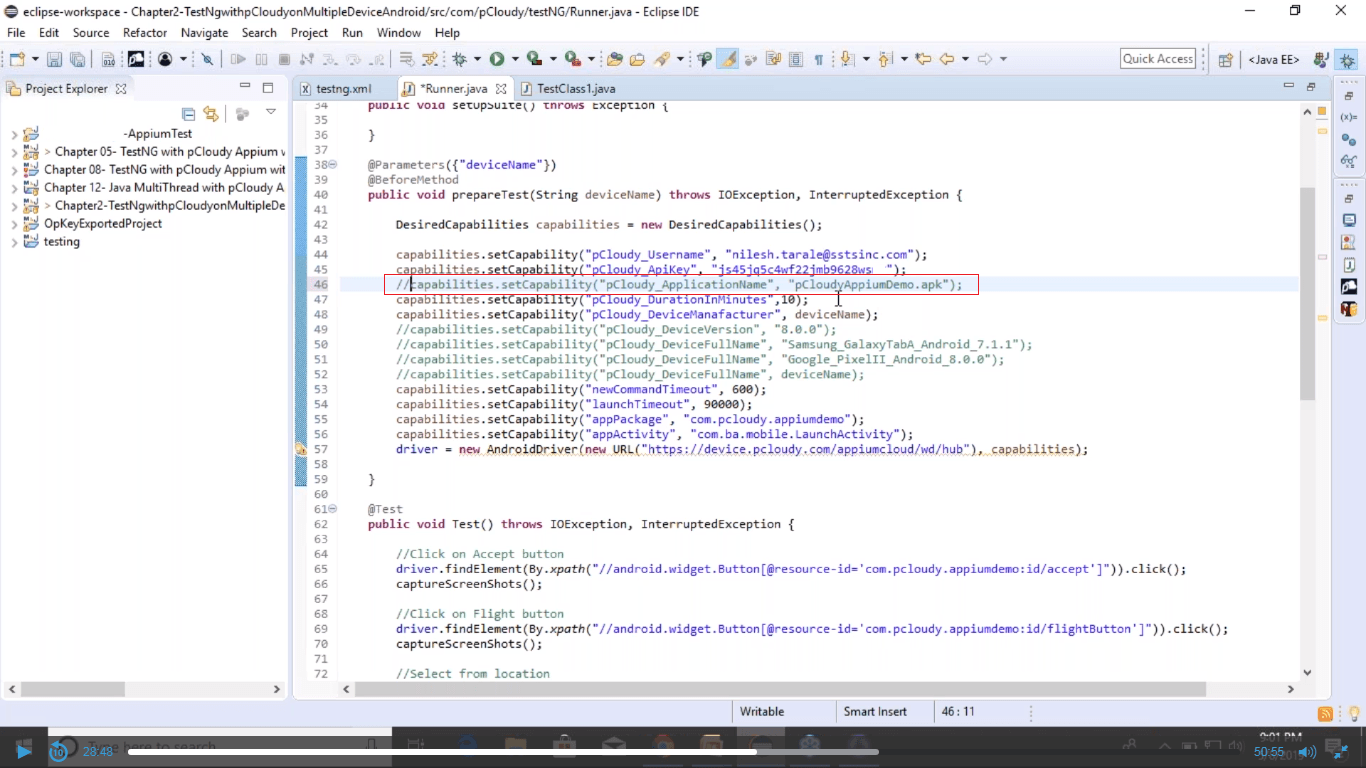
In pCloudy, you can run Appium tests on multiple devices in parallel. To perform a test using Appium, you need to feed in the capabilities. Some users want to test their apps more than once to perform different types of tests on the same app. To do that earlier the users had to install the app again and again. But now we have released an update through which you can perform different types of testing using Appium on the preinstalled apps. This will save you time and make the process easier.
So if you have already installed the app in the device and you want to perform a test on the same app then you don’t need to pass the Application Name capability.
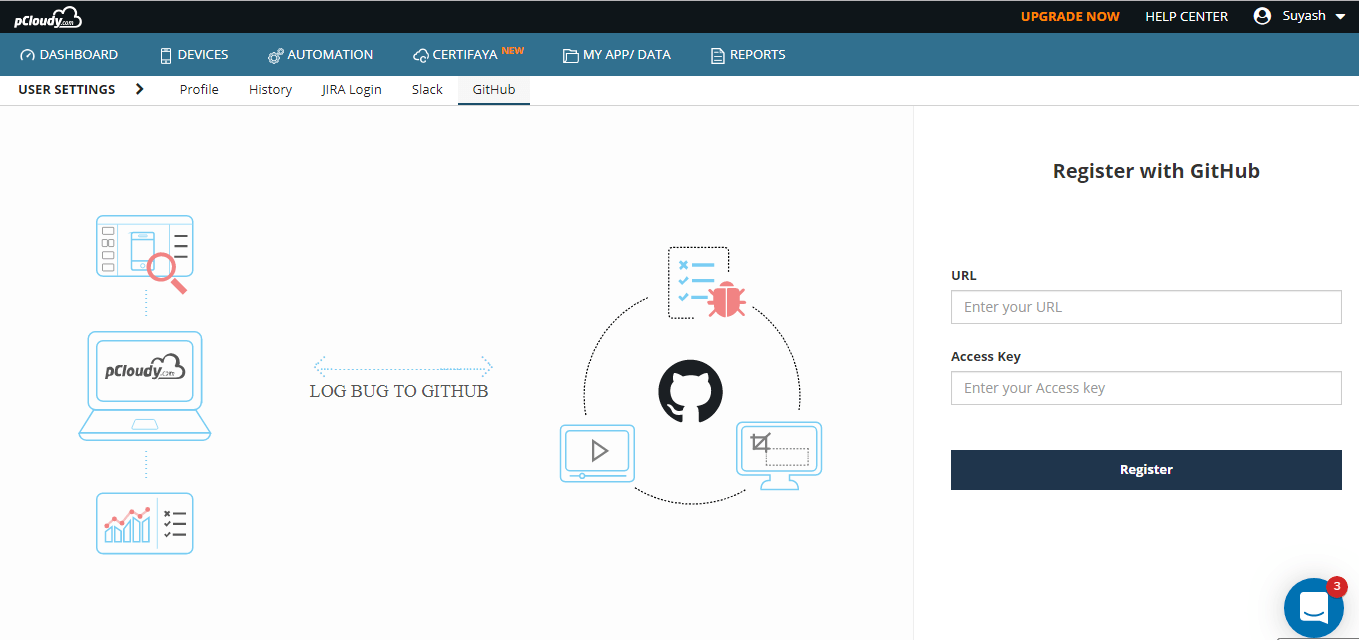
pCloudy is integrated with the most popular tools and frameworks to make testing convenient. A lot of users also requested to integrate Github repository and so we did it. Now you can directly upload your tasks and raise defects in the GitHub repository from pCloudy. Again this feature is added to make it convenient for our users to test and manage the tasks through pCloudy.
To make use of GitHub just login to device.pcloudy.com and click on the user name at the top right corner of the window. In the dropdown list click on settings and in the settings window click on GitHub tab and enter the URL and access key to register. Now in the device session screen, you can click on Collaborate and then select Log a bug in GitHub. A new window will open where you will be able to see the list of repositories, enter the issue type, enter the title, add the description and then click on the click on the Log A Bug In GitHub button. Then you can go to the GitHub to check all the issues raised whenever you want.
Summary
We are working on some more new features and very soon we will come up with the new version of pCloudy. This is a constant process and we always try to address the users issues and provide them updates on a regular basis. This is why we are achieving new heights and we will keep on working hard to provide the best service.
DevOps helps enterprises to build software at a fast pace and with minimal issues. The time to market is accelerated and the bugs are fixed faster in continuous deployment with the help of automated tools. AI is much in line with DevOps as the main focus is on automating the process and with AI the system can identify patterns, anticipate issues and provide solutions. The proactive approach improves the overall efficiency of the software development life cycle. So let’s have a look at how AI is transforming DevOps.
Feedback Loop and Correlate Data
The main role of DevOps is to take continuous feedback at every stage of the process. often people use performance monitoring tools to get feedback on running applications. These tools gather much information in the form of log files, data sheets, performance matrix, and other types. The monitoring tools use machine learning to identify the issues early and make suggestions. The DevOps teams use these suggestions to make the necessary improvements to the application. Many times teams use two or more tools to monitor the health of the app and the data from all the platforms can be correlated by the help of machine learning to get a more deep understanding of the app functioning.
Software Testing
AI is changing DevOps for good by enhancing the software development process and making testing more efficient. Whether it is regression testing, user acceptance testing or functional testing, these all produce a large amount of data. AI can figure out patterns in the data collected in the form of results and identify poor coding practices which produce a lot of errors. This information can be used by the DevOps teams to increase their efficiency.
Anomaly Detection
DevSecOps is one of the essential aspects of software development as security is the key to any successful software implementation. Distribution denial of service attacks are increasing and the business needs to prepare themselves to protect their security systems from hackers. DevSecOps can be augmented using artificial intelligence to enhance security by central logging architecture to record threats and running machine learning based anomaly detection. This will help businesses proactively attenuate the attack from hackers and DDOS.
Alerts
DevOps approach might create scenarios where the team receive an overwhelming amount of alerts without any priority tag. This will create ruckus in the teams as it will be very difficult to handle all the alerts in the continuous development environment. AI can help in this scenario by tagging the alerts and prioritizing them so that the urgent ones can be worked upon immediately.
Root Cause Analysis
To fix an issue permanently, a root cause analysis is necessary. Although it might take time to do it compared to fixing the issue with a patch which will provide the instant solution. In order to find the root cause of an issue, the developers will have to spend time which will delay the release of the product. AI can speed up the process by finding patterns in the data collected and implement to fix the root cause.
The collected data can be used by implementing AI to find a pattern and speeding up the development process. The organized data is more useful and makes prediction possible. The best practice is to use machine learning to automate the tasks which are time-consuming which will ensure the smooth and effective functioning of the DevOps teams.
Software testing has evolved a lot since the time when the waterfall model was used. All the work was done in a sequential manner and only after the development phase was complete the testers used to test the product. Testers used to find bugs but a lot of time and energy was wasted in the process to rebuild and code again.
Now companies are using an Agile model where the main goal is to find the bugs in continuous development, fix them quickly and release the app faster. There is a need to improve the automated testing process to complement the manual testing. More emphasis has been given to CI, CD, and DevOps to make the software development effective.
There has been a considerable change in the functioning of testing tools and test automation frameworks. The most important change is the introduction of AI in a test automation strategy.
According to G2Crowd, AI-powered bots are expected to cut business cost by $8 billion by 2022. Testing bots are already empowering automation testing and will play a major role in reducing the time and effort spent in mobile app testing.
Let’s have a look at how AI is breaking new ground for test automation.
1. Running automated tests that matter
It’s not a good strategy to run your entire test suite due to a very small change in your app that you couldn’t trace. You are probably already generating a lot of data from your test runs if you are doing continuous integration. But it will take a lot of time to go through the data and search for common patterns. So you need to know if you make a small change in code then what is the minimum number of test you need to run to figure out if the change is needed or not.
2. Reducing maintenance and eliminating flaky test
We can run several automated tests on a daily basis to ensure the functionalities of the app are still stable. Although, if we find out that half of this test failed. In that case, we would need to spend a lot of time to troubleshoot the failures and investigate the cause. Then there is a need to find ways to fix the failures and then work on the changes.
Using AI we can avoid issues and start detecting issues in the test before they even occur. So instead of reacting to it, we can proactively fix tests. AI can figure out which tests are stable or flaky based on the number of test runs and it can tell us what test needs to be modified to ensure test runs are stable. AI can also handle test running on different resolutions and can optimize the wait time used in the test to wait for the page to load.
3. Dependencies on other modules
Writing a test for systems having dependencies on other modules is also a challenge. AI can help us to mock responses from a database or server. The AI can start recording server responses once we have written the test and have run them for a period of time. So the next time we run the test it will access the stored responses and will continue to run without any obstacles. This will speed up the process as the delay in response is eliminated and the server or physical database is no more needed.
4. Learning from production data
Real user data can be used to create an automated test and with the help of AI, we can observe and learn how the customer is using our product. We can identify common actions such as search option, using filters, login/logout, etc and compile them into reusable components. These components can be used for our test as well. Therefore, we have an actual test written by AI based on the real data along with the reusable components.
5. Easy execution of tests and speeding up the release
In automation testing, the time and effort it takes to write and execute a test is a major challenge due to the complexity of the test automation tools, app, and programing language used. To mitigate these problems AI-based tools are being used. The use of dynamic locators and reusable components has made it possible to write and execute a test in hours which earlier used to take a week.
Conclusion
The DevOps theory says test early, test often, but this puts a lot of responsibility on the testing team. Also, it’s not feasible for testing teams to spend time to do exploratory testing manually for each new release. AI-based tools can perform codeless automation testing which will save us time and resources and give the testers some space to breathe.
Do you know why Google has selected Gradle as the build system for Android Studio? Many Android developers work in a heterogeneous environment with different technology stacks. Gradle solves some of the hardest problems faced by the developers like how to automate the testing of apps and how to manage dependencies and variations that allow professional developers to develop variations of their app with one click. This is why pCloudy came up with a new update where you can now run Espresso with Gradle on pCloudy devices. Let’s get a brief introduction about Espresso and Gradle before we learn how to run Espresso with Gradle on pCloudy devices.
Espresso is a testing framework for Android which automatically synchronizes your test actions with the UI of your app. It also let the test wait until all the background activities have finished.
Gradle is an open source advanced build tool that allows seamless execution of tasks. It uses domain specific language and it is based on Groovy and Kotlin. It is a plugin based system so if you want to automate the task of building some package from sources then you can write the complete plugging in Java and share it with the world.
Gradle allows efficient and repeatable use of espresso and Test Orchestrator which allows automated yet fine-tuned control of the way you run your test. You can decide which specific test suites to be run to distribute the test cases across different devices. It is preferred by developers as it allows deep unit and functional testing rigs.
Power up your DevOps with Espresso and Gradle on pCloudy
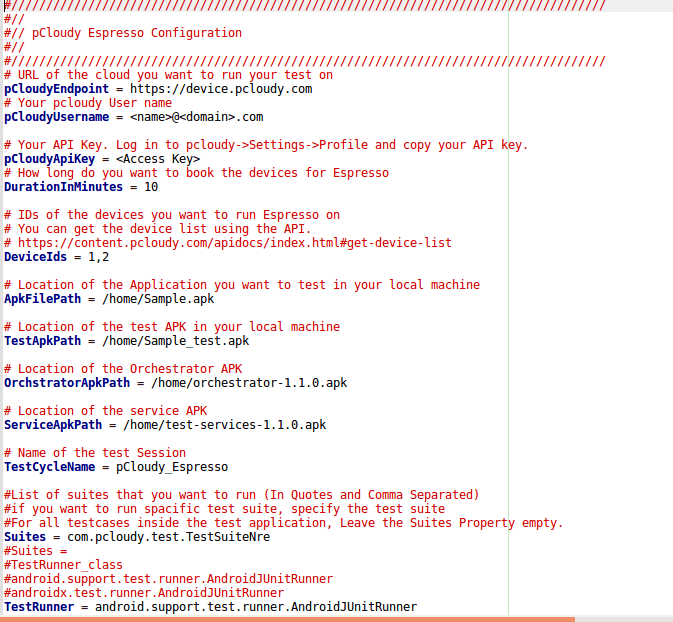
You would be running Espresso on your machine using Android Studio and Gradle. However, the test would be running on pCloudy device. There is a pCloudy Espresso script that is provided by us and you need to put that espresso script in the workspace of the project. Along with the Gradle script, you will also get a config file. The gradle script will read input parameters from this config file.
Then you run Gradle to invoke the script which will upload your Application APK, test APK and other APK files to pCloudy. It would acquire a device to run your test on, it would execute those tests it will report back the status of what is happening into the Android Studio. After the test cases are run you can see the detailed reports and after that gradle script will release the device for other users to use.
There is a one-time setup that you need to do to place the gradle script in the workspace and you need to fill in the configuration file. So when you run the gradle script it will complete all the task for you and generate the report.
Steps to run Espresso with Gradle on pcloudy
1. Download the espresso starter pack from here and Unzip it
2. You will find three files,
a. pCloudy_Espresso.jar
b. Config.properties
c. build.gradle.SAMPLE
(This is a sample build.gradle that shows how to change your build.gradle to add the pCloudy Espresso jar.)
3. Copy the contents of the file build.gradle.Sample to the build.gradle file of your Android Application to register the new Gradle task and update as appropriate (see the image below)
4. Place the config.properties file in your android workspace in the same directory as your build.gradle file.
5. Update the config.properties file as guided in the comments in the file.
6. In your Android workspace run the command by typing the name of the gradle task as below.
7. Once the test execution is complete you will get a URL of the test execution report. Some fields in the report are empty right now. We will fix them in subsequent phases.
The use of gradle has made it easier to run Espresso test on pCloudy devices. We can just use the configuration file and easily run the test scripts on pCloudy devices. This will save time and effort as it further simplifies the app testing process in pCloudy.
Espresso is a testing framework used to write UI test cases. It automatically tests your actions with the UI of your application. The framework also ensures that your activity is started before the test run. It can be used to test across multiple applications. If used for testing outside application, you can perform only black box testing. as you cannot the classes inside the application.
Espresso has three components:
ViewMatchers: Allows to find the view in the current view library. ViewActions: Allows to perform actions on the view ViewAssertions: Allows to assert state of the view
Why Espresso?
It's fast: It is really important to run test cases at a fast pace as there can be many tests. UI test takes time and is costly and it is possible that you might not be able to run all the tests.
It's easy to setup: Setup process on local machines is easy and Android developers feel comfortable in the mobile SDK language which they use every day.
It's less flaky: Automated DevOps process required fast and reliable feedback. Test written in native tools is much less flaky. It gives more control over the application: It is white box testing, Espresso is inside the application, it has access to and knows how to use the code that actually runs the application for more thorough testing of each element.
You can use Espresso cheat sheet for quick reference as it contains most available instances of Matcher, ViewAction, and ViewAssertion.
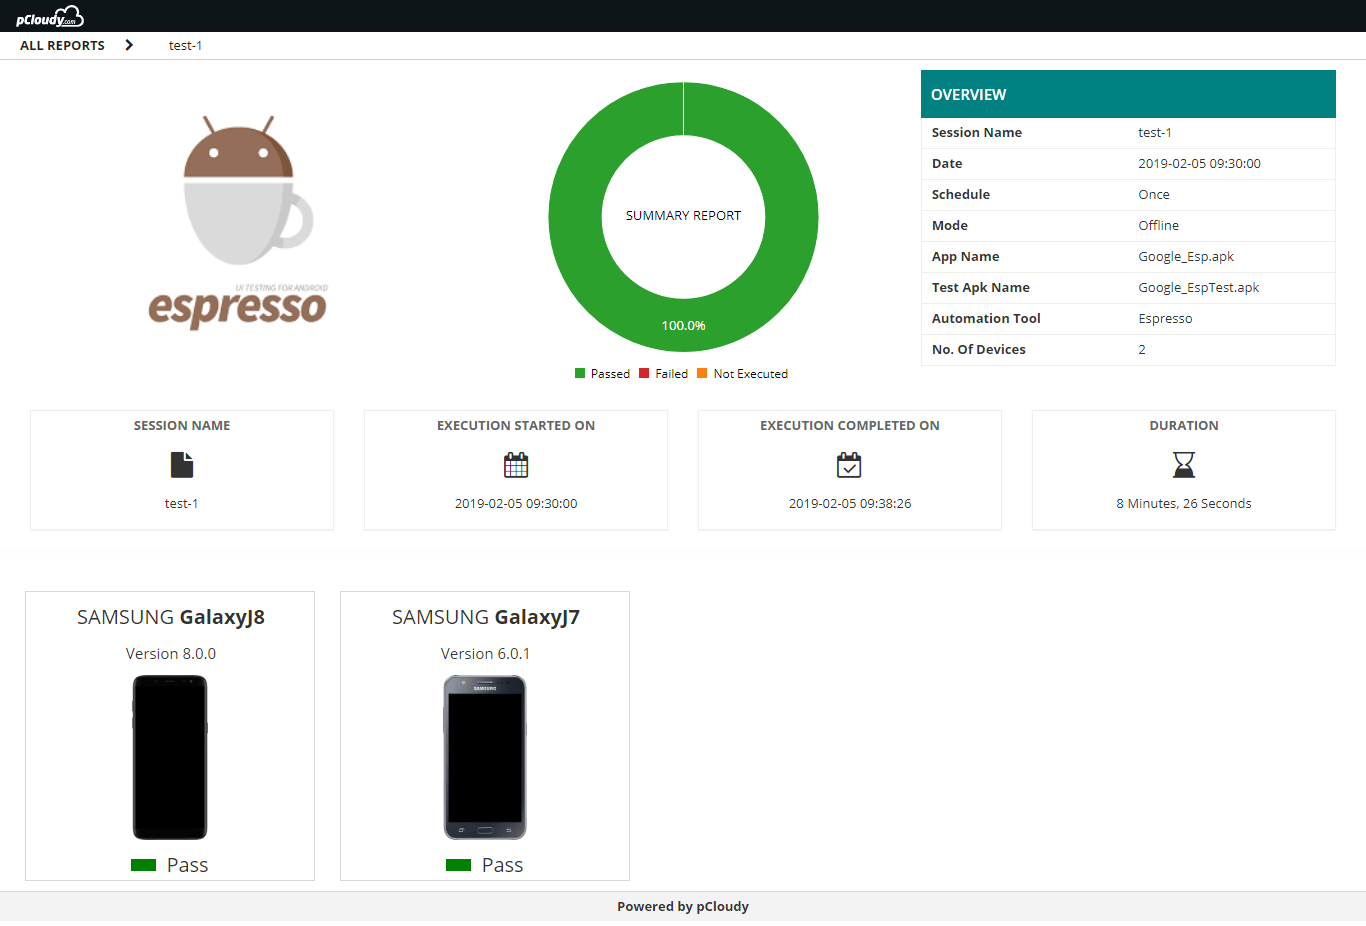
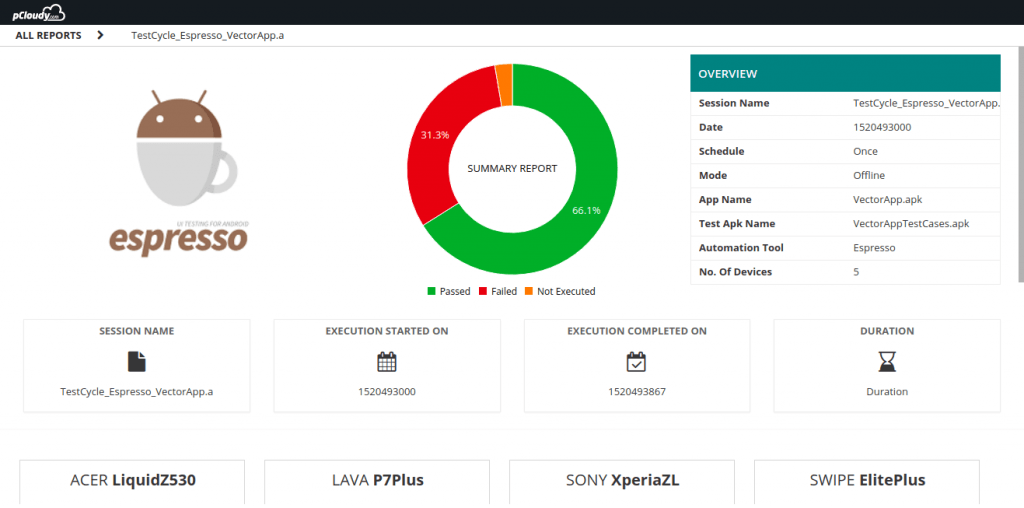
Steps for running your Test scripts in Espresso using pCloudy:
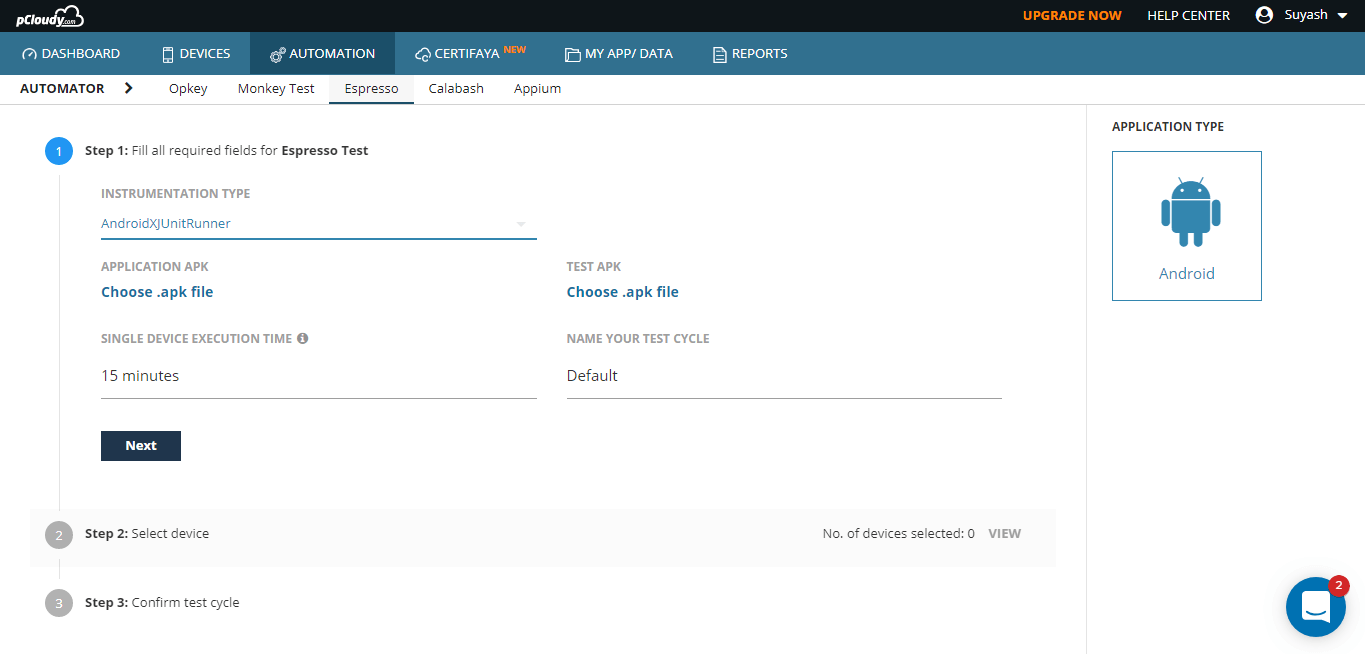
Login over https://device.pcloudy.com with your registered Email ID & Password.
To schedule "Espresso" over pCloudy, follow the following steps-
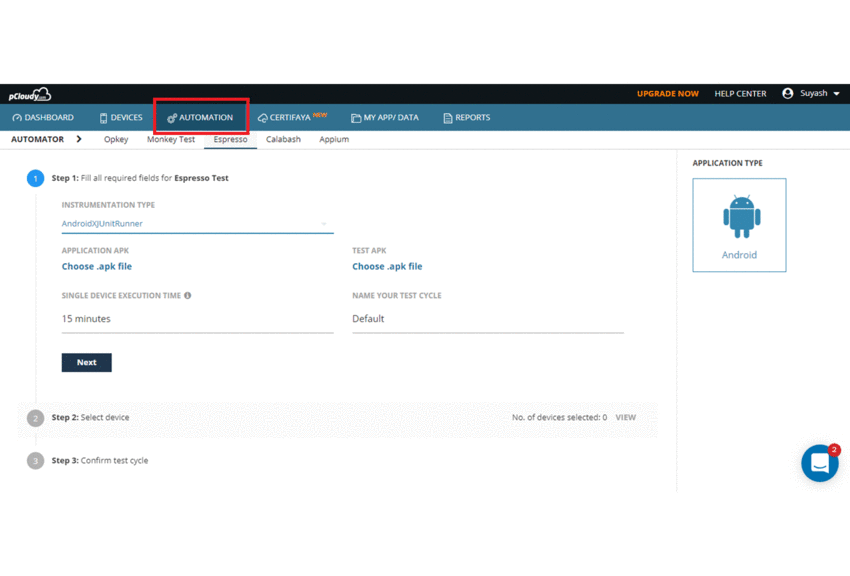
Go to the "Automation" page.
Select the Automation tool as "Espresso".
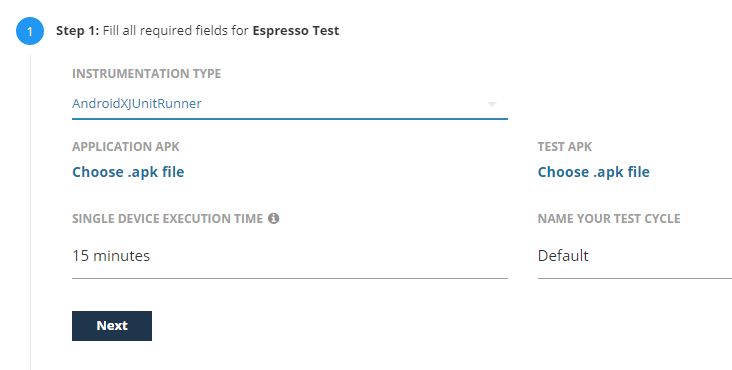
Select "Instrumentation Type" based on the Test Scripts you've written.
Note: pCloudy provides support for Instrumentation Type(InstrumentationTestRunner, AndroidJUnitRunner, and AndroidXJUnitRunner) for Android.
Select the Application APK and Test APK that you must have uploaded in the MY APP/DATA section.
Select the single device execution time and assign a name to your test cycle.
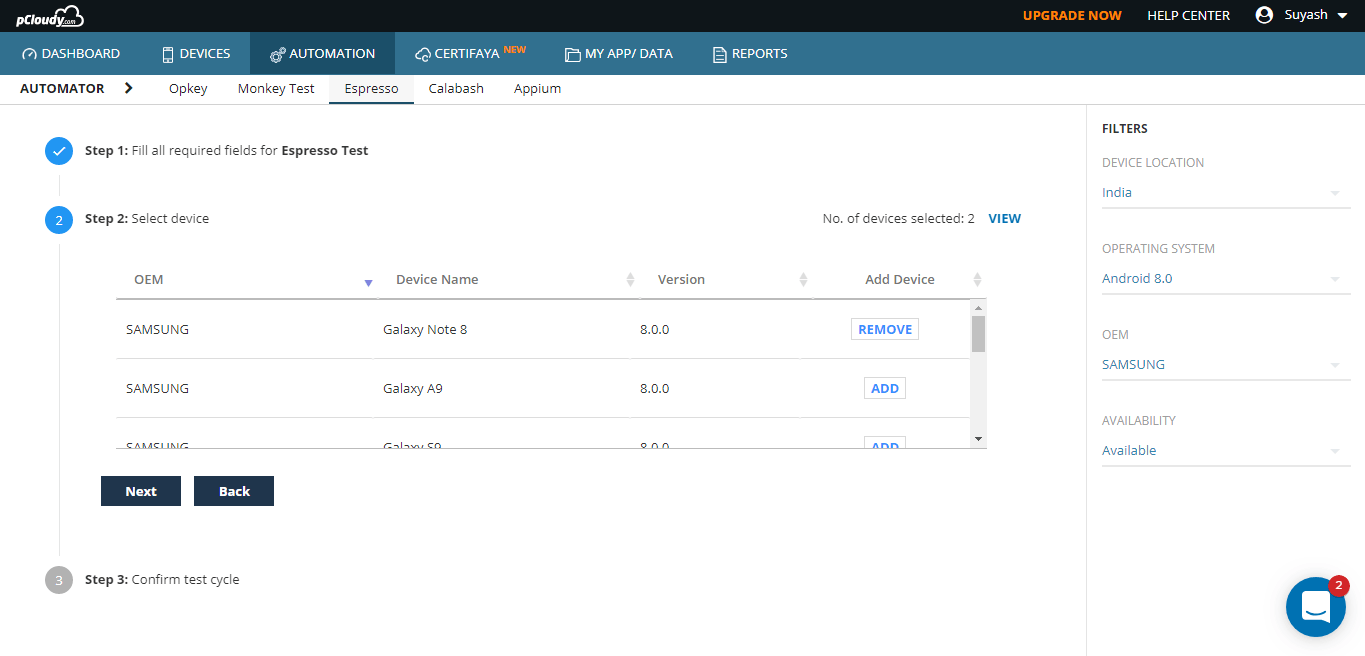
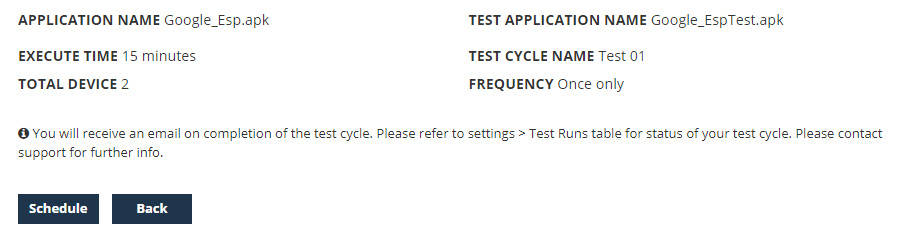
In the next step, Click on "ADD" to add the device for testing and click on " Next".
Now you can select the devices by clicking on the "ADD" button. You can also use the device filter to make it easier to search for a device. Click on next once the devices are selected.
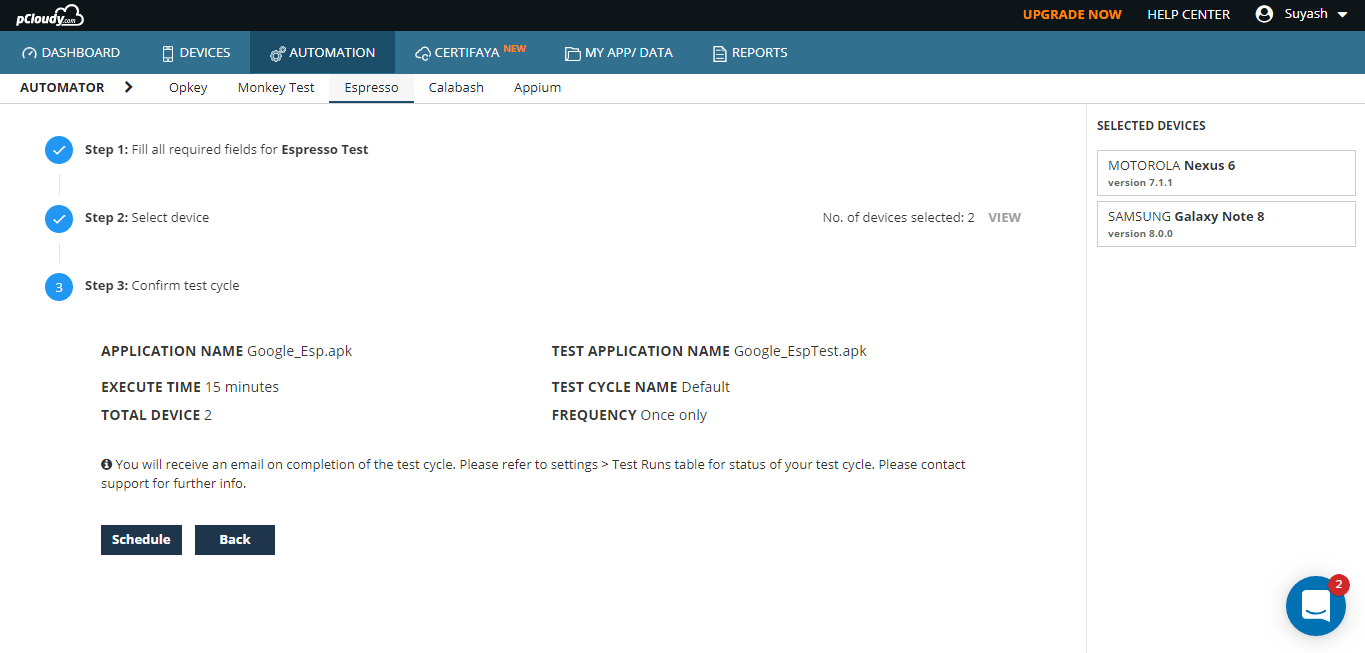
Click on "Schedule" to start the test.
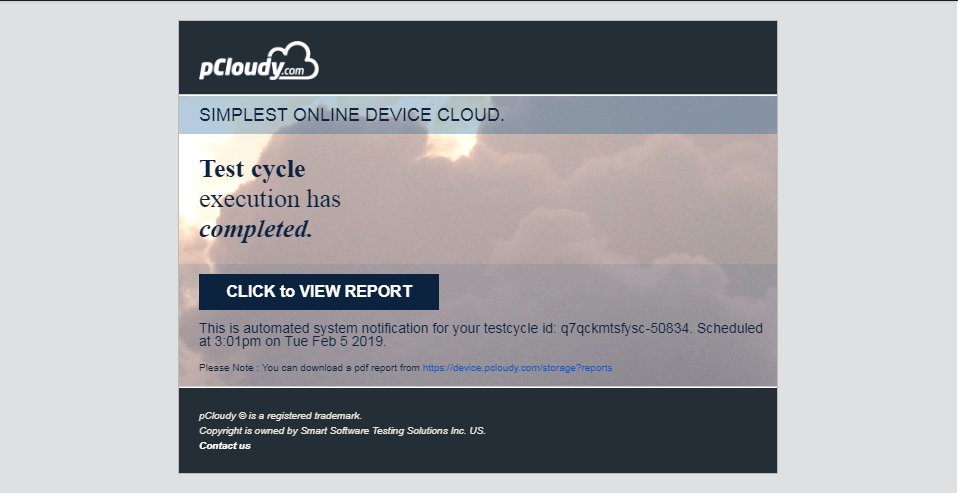
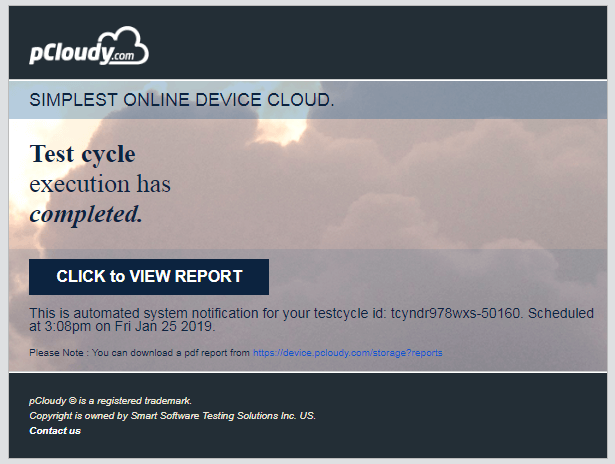
Go to your email inbox and open pCloudy Automation Alert mail. Click on the given link “Click to view Report”.
Now you have the result of your scheduled test automation.
Take a look at this GIF to understand the flow of actions taken to run the test cycle.
Software developers tend to make mistakes as app development is a very complex process. This means that the app will contain bugs. Espresso helps us detect errors that may have been made in the development, ensuring the reliability of the client and his satisfaction with the application.
Since pCloudy is committed to provide to you with the newest the fastest, here is another one. The newly released device Samsung s10 is now available on pCloudy for you to test your app.
The second blog in the series “Start to end guide for mobile app testing”
Basics and Comparison
In the previous blog in this series, we talked about the evolution of mobile technology. In this blog, you will know more about the two most popular mobile operating systems, Android and iOS. Here you can also learn about the Android architecture, concepts of Android SDK, emulators and iOS architecture and mobile cloud. Let’s start by getting familiar with Android versions.
What is Android?
Android is a software bunch comprising not just the operating system but also middleware and key applications. It is developed by Google and later by the Open Handset Alliance but it is not limited to only mobiles. In other words, it is a complete set of software required for the development of smart devices such as smartphones, tablets, notebooks, set-top boxes, TVs, smart watches, etc. Android is a Linux based open source software platform. The application development in Android is done in the Java language.
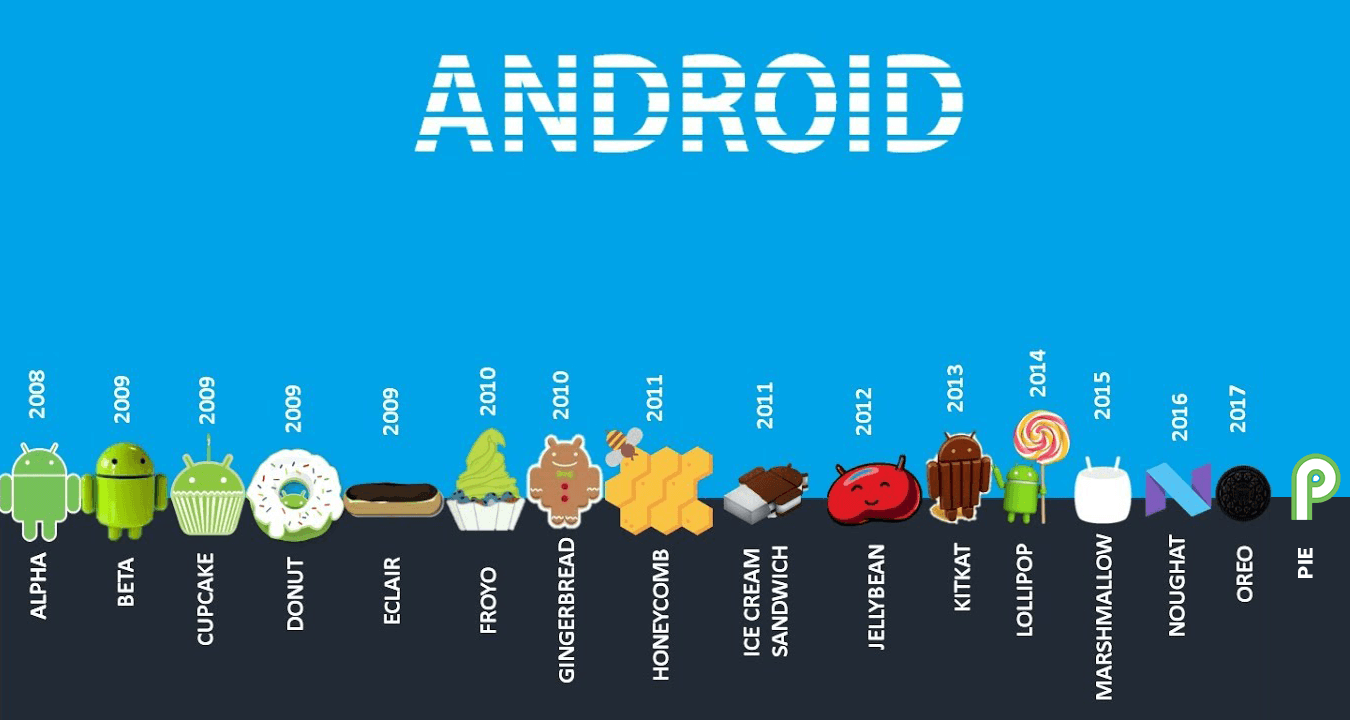
Versions of Android
The first version of Android was launched on the HTC Dream mobile in the year 2008. Since then Android has been evolving constantly and now it has the largest user base of around 88% global market share. Android OS versions are released with a name following the alphabetical order, such as Android 1.1, 1.5-Cupcake, 1.6-Donut, 2.0/2.1-Eclair,2.2-Froyo,2.3-Gingerbread,3.X-Honeycomb,4.0-Ice Cream Sandwich, 4.1/4.2/4.3-Jelly Bean, 4.4-KitKat, 5.0-Lollipop, 6.0-Marshmallow, 7.0-Nougat, 8.0-Oreo and 9.0- Pie being the latest of all the versions.
Why so buzz about Android?
Whenever we hear the word Android, we usually think about the ‘smart phones’. This is how Android is placed in our minds. It is one of the most successful mobile operating systems in the market today. Android apps are the most downloaded apps in the app stores. It runs on millions of mobile devices in more than 190 countries in the world. Around 1.5 billion apps and games are downloaded from Google play store in a month. It does not fail to impress its users by consistently introducing new features. It is open source, so any android variant can be developed using the source code. It supports wireless communication including 3G, 4G, WiFi, and Bluetooth. Android keeps introducing its new and upgraded versions, often. Due to its popularity, around 1million new Android devices are activated worldwide in a day. Google play is an open marketplace for developers to sell and distribute their mobile apps. It has already entered the field of Artificial Intelligence enabling the apps to be more intuitive and user-friendly.
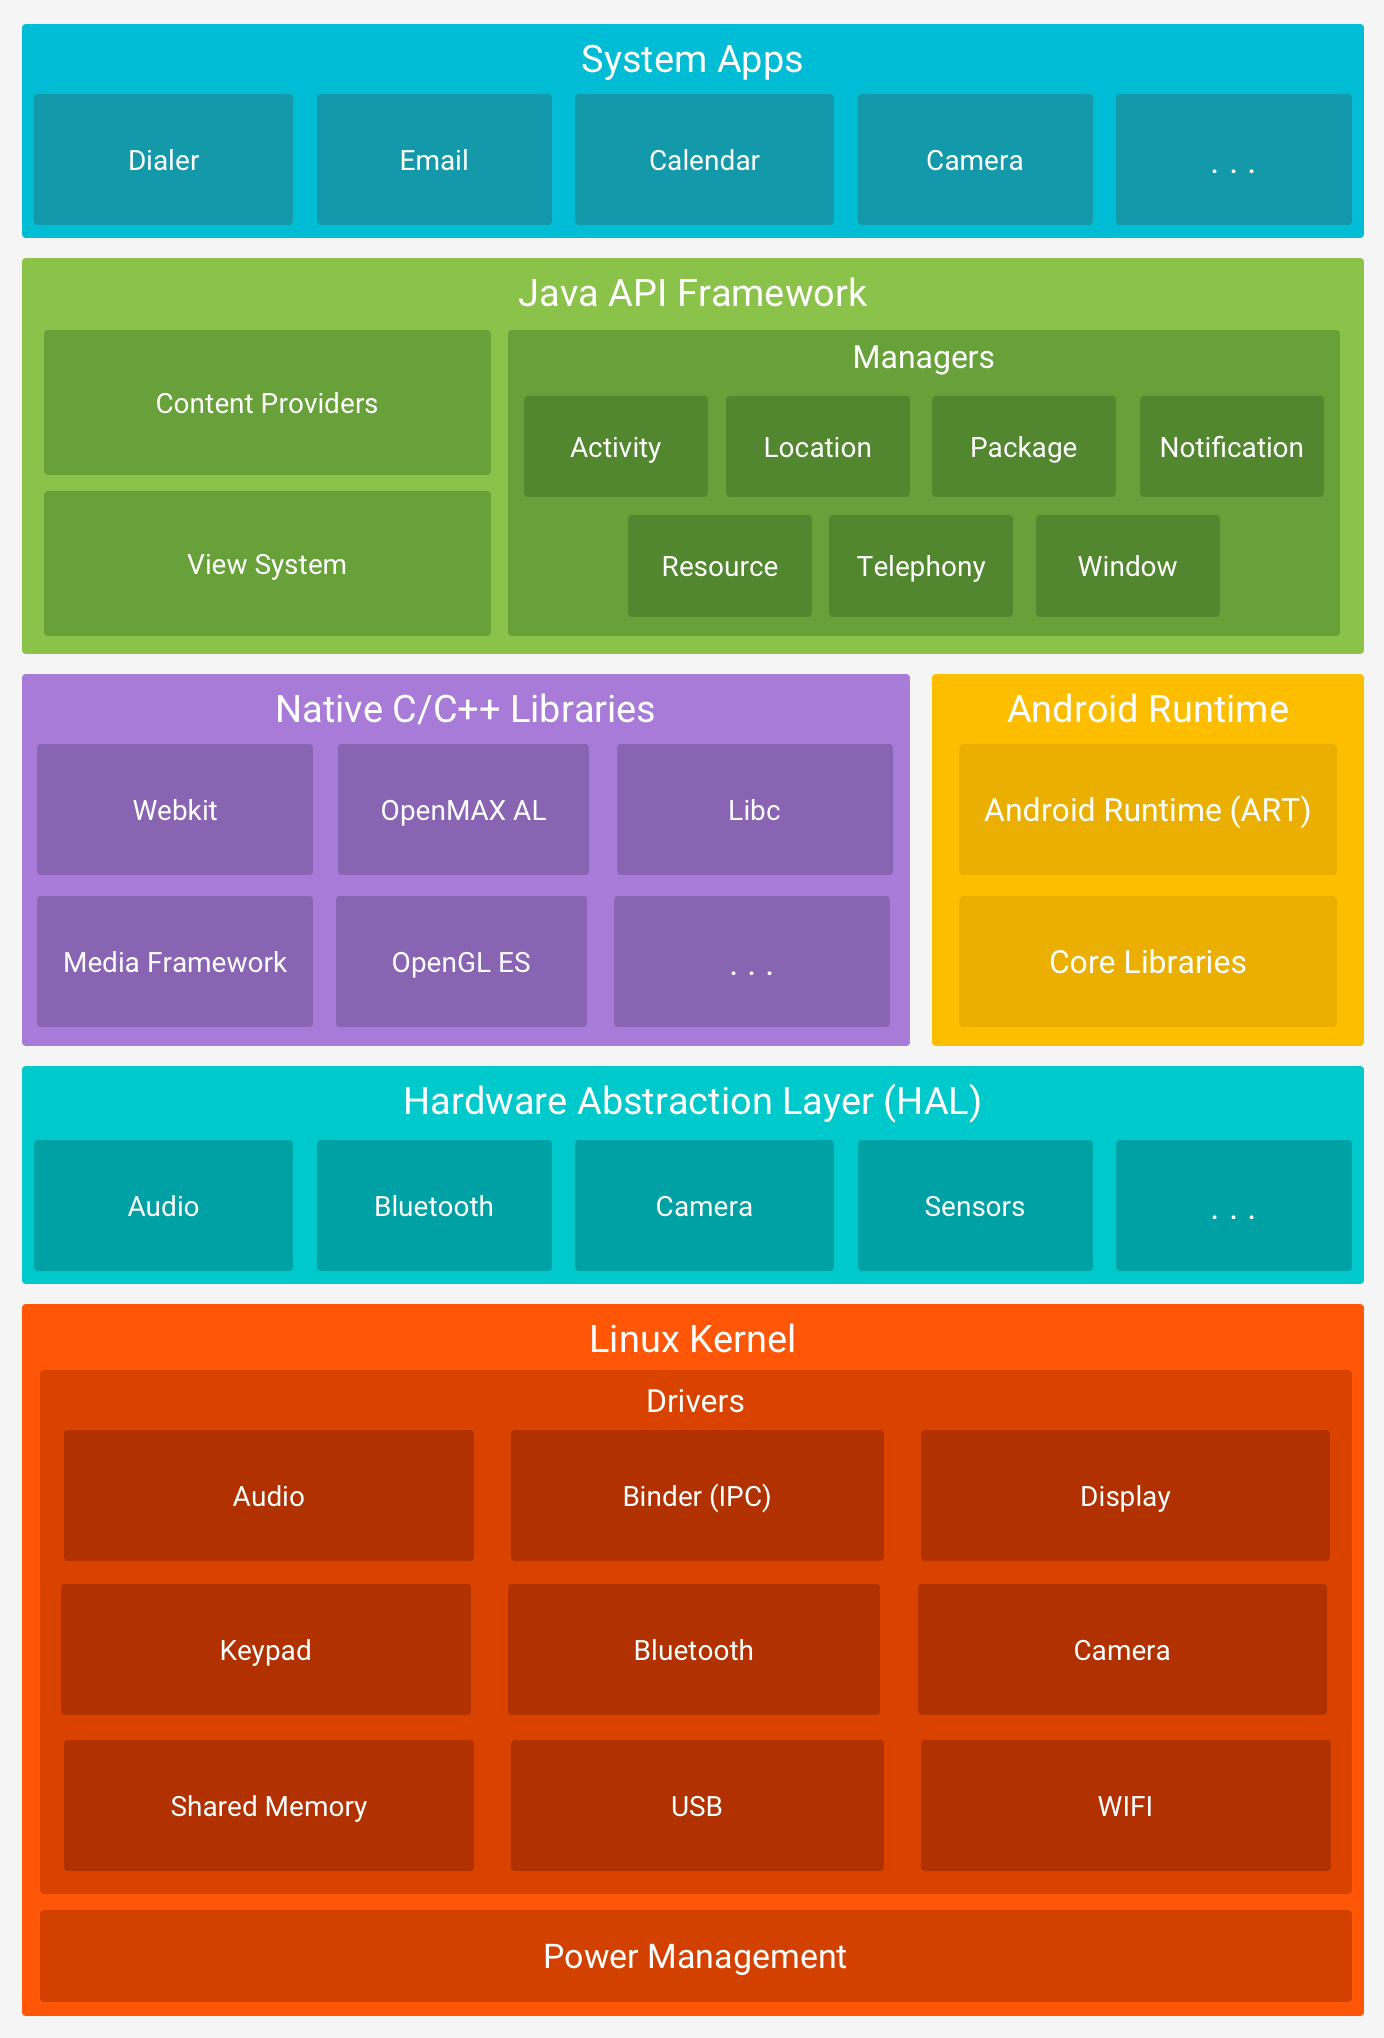
Android Architecture
Android is architected in the form of a software stack comprising applications, an operating system, run-time environment, middleware, services, and libraries. The following figure is the visual outline of the elements integrated layer by layer. These all elements are the prerequisites of the mobile app development and to make the app environment ready. Android Architecture is categorized as Linux kernel, native libraries(middleware), Android runtime, Application framework, and applications.
Linux Kernel- It exists at the root of the Android architecture. It contains all drivers for hardware components, battery and memory management, resource access and device management. Android only uses the Linux Kernel.
Libraries – It is the layer above the Linux Kernel, including native libraries such as WebKit, OpenGL, FreeType, SQLite, Media framework, C runtime library(Libc), etc. Webkit library supports the web browsing engine, SQLite is used for sharing and storing application data, Media to play record audio/video, etc. FreeType is for processing fonts, SSL libraries are for internet security, OpenGL and SGL are responsible for rendering 3D,2D graphics, respectively, the Surface manager is responsible for rendering windows and drawing surfaces of apps on the screen. Libraries also contain C++ libraries used by android system components.
Android Runtime (ART)- these have the core libraries also known as Dalvik Libraries (DVM) which are responsible for running an android application. Android Runtime is built to run apps in a restricted environment where there is limiter power in terms of battery, processing, and memory. ART uses DEX files, a type of byte code designed for Android to manage memory more efficiently.
Android Framework- On the top of Android runtime is Android Framework. It includes a collection of Android APIs written in Java. Enables and simplifies the reuse of core components and services such as Window, view, Activity, telephony, resources, locations, Content Providers (data) and package managers. It provides access to Android feature set fir developers to build a mobile app for Android OS.
Applications- Over the Android Framework lies the application layer covering system and other apps that the users can download from the Google Play Store. The core apps like email, SMS, calendar, maps, browser, contacts, etc are pre-packed in the mobile device. This layer uses all other layers for enhancing the performance of these mobile apps.
Concepts of Android SDK and .apk file and emulators
Android SDK is a Software Development Kit which allows the developers to develop an application for the Android platform. The Android SDK comprises of software programs with the sample source codes, developer tools, documentation, tutorials, an emulator and essential libraries to build, test and debug mobile apps for Android. Apps are written in Java language and are run on Dalvik(DVM) that runs on Linux Kernel.
APK stands for Android Application Package. It is a package file format used by Android OS for distribution and installation of mobile apps and middleware. For installing any mobile app/games, we require APK files with an extension .apk. These can be downloaded from the play store. Apk files are just like .exe files for windows. Apk file is in zip format and contains all necessary files required for app installation. The Apk archive usually contains META-INF directory:
MANIFEST.MF: the Manifest file
CERT.RSA: The certificate of the application.
CERT.SF
Android Emulators-
Android emulator or Android Virtual Device (AVD) is a device that is a functional replica of an Android device that can be used to run and test the Android applications on the PC even before they are published in the market for final use. Android emulator comes as part of the Android SDK. It is a virtual device that lets the developer develop the apps without using a physical device. Android emulator requires JRE –Java Runtime Environment and Android SDK to function. The applications can be either downloaded or installed directly on the device from the Google play store or if the application is available in ‘.apk’ format, it can be installed using the “add” command.
iOS and its versions
iOS is a mobile operating system developed by Apple Inc. It was originated in 2007 for iPhone and later extended its support to other Apple devices like iPad and iPod touch. It is the second most popular mobile device in the world after Android. The iOS mobile apps can be downloaded from Apple’s App Store. The App store contains more than 2 million iOS apps today. The iOS apps are programmed in Objective C, C, and C++ languages. Version updates for iOS are released through iTunes software until the introduction of iOS 5 in 2011. Now, the software updates and data sync can happen wirelessly through Apple iCloud service. iOS has expanded its market by introducing new products powered by Apple like iWatch and AppleTV.
It was formerly known as iPhone OS and the name was used for its other 3 subsequent versions until 2010 when Apple released iOS4. In 2011, iOS5 was released providing access to around 500000 iOS apps and some additional features. iOS 6, 7, 9 were released in the succeeding years with more advanced features and performance. The latest versions iOS 10,11 and 12 are released in 2017 and 2018 respectively.
iOS Architecture
iOS Architecture is also a layered one. Each layer is built with a variety of frameworks which can be assimilated in the iOS apps. The layers communicate with the hardware with the help of clearly described system interfaces that make it easy for the developer to build the app that is ready for different devices. Let us discuss each layer below:
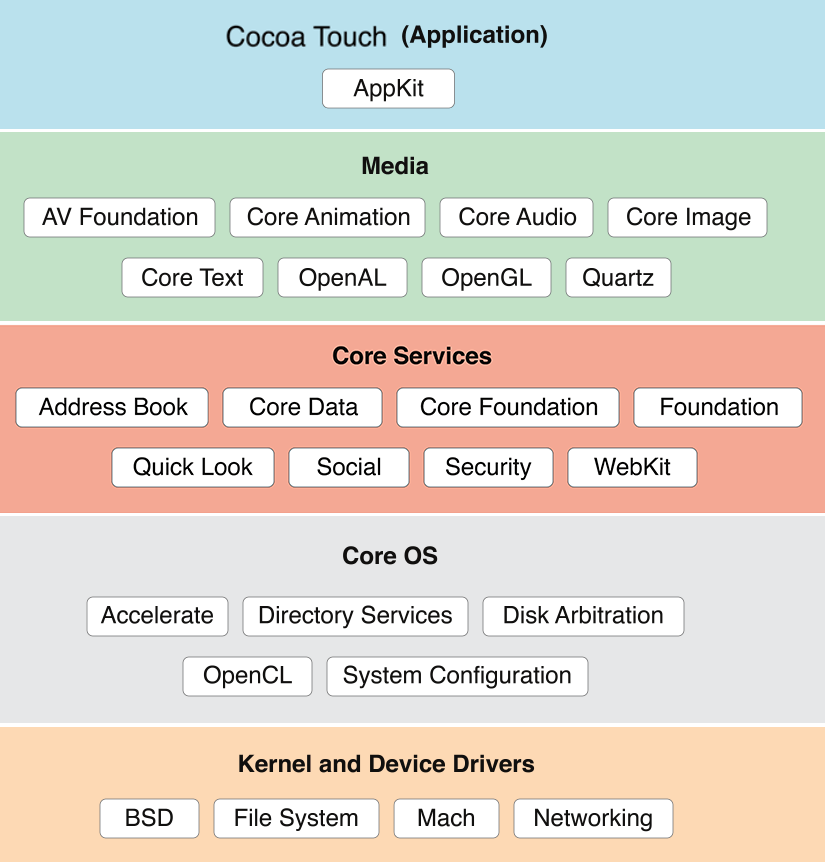
Core OS- This layer is the foundation layer of the OS on which other layers are dependent. This layer is responsible for managing memory, system and OS tasks, networking and also interacts directly with the hardware. This layer comprises of frameworks like accelerate, external accessory, core Bluetooth, security and local authentication.
Core Services Layer- It consists of technologies that provide certain services to the app but are not directly related to the UI of the app. It contains high-level features like iCloud storage. The core services include address book framework(provides access to contacts and user database), CloudKit (medium of transferring the data between app and cloud), Core Data (to manage the data model of a model view controller app), Core Foundation( Technologies to provide Data management services to IOS), Core Location(gives location info to apps),Core Motion(ton access motion-based info on the device),Foundation(Using Objective C), Healthkit (handles health-related info of the user),Homekit(controlling connected devices of the user at home),Social( to access user’s social media accounts) and Storekit Framework( supports in making in-app purchases from iOS apps).
Media Layer- Media layer in iOS architecture enables the Graphics, Audio, Video technologies. Graphic Technologies like UIKit Graphics, Core Graphics framework, Core Animation, Core Images, OpenGl ES which handles 2D vector and animating views and 2D and 3D figures, GLKit and Metal. Audio Framework supports rich Audio experience and includes- Media Player Framework, AV Foundation, OpenAL.
Video Framework includes AV Kit, AV Foundation, Core Media, Also the iOS support
for the playback of movie files with the .mov, .mp4, .m4v. and .3gp filename
extensions.
Cocoa Touch Layer – The layer defines the basic application and support for key technologies such as multitasking, touch-based input, push notifications, and many high-level system services. It includes EventKit, GameKit, iAd, MapKit, PushKit, Twitter and UIKit frameworks.
IPA stands for iOS App Store Package. Any file with .ipa extension is an iOS application. It is an archive like ZIP that contains software sets used to develop the iOS app. Each .ipk file can be opened with Apple’s iTunes program. An IPA file has a binary for ARM architecture and can only be installed on an iOS device. IPA files cannot be installed on the iPhone Simulator. To run applications on the simulator, original project files which can be opened using the Xcode SDK are required.
iOS Simulators – These are again programs to test and run the iOS applications without having any physical or the ‘real’ device. The iOS Simulator allows you to rapidly prototype and test builds of your app during the development process. Installed as part of the Xcode tools along with the iOS SDK, iOS Simulator runs on Mac and behaves like a standard Mac app while simulating an iPhone or the iPad environment. iOS simulators require MAC Environment and Xcode to function. To start the iOS simulator, firstly launch the Xcode and then do one of the following:
1. Choose Xcode > Open Developer Tool > iOS Simulator.
2. Control-click the Xcode icon in the Dock, and choose Open Developer Tool > iOS
Conclusion
Operating systems are being revamped using AI and connectivity to the Internet of Things. These technologies are still evolving and both Android community and Apple are trying to lead the way by enhancing the user experience. Android had an upper hand in the past as it has a very active open community to support the development. Although, Apple in the recent past has taken a new approach in getting ahead with technology for e.g. Air Pods and their own coding language Swift. We can be sure that both Android and iOS will be more convenient and interactive as both Google and Apple are the torch bearers of the future.
In the next blog, we will talk about the types of mobile applications.
AndroidX is an improved version of the android support libraries that the android team uses to develop, test, package, version and release libraries within the jetpack. AndroidX fully replaces the support library by providing feature parity and new libraries. In addition, AndroidX includes the following features:
All packages in AndroidX are in consistent namespace starting with the string AndroidX. The support library packages have been mapped into androidx.* packages. For a full mapping of all the old classes and built artifacts to the new ones.
Unlike the support libraries, AndroidX packages are separately maintained and updated. The AndroidX uses strict semantic versioning.
All new android development will occur in the AndroidX library. This includes maintenance of the original support library artifacts and introduction of new jetpack components.
Android Jetpack
Android jetpack is a set of components and tools along with architecture guidance designed to help you accelerate your android development. It gives a template to write production ready android code. Jetpack is made up of components in four categories, foundation architecture behaviour and UI. Each component is individually adaptable and build to maintain backwards compatibility. Android architecture components are very modular, so we are allowed to choose what feature sets we want that are compatible to our app.
Espresso is now a part of the AndroidX family
Espresso is a testing framework designed to provide a fluent API for writing concise and reliable UI test. Writing reliable UI test is difficult as user interfaces are asynchronous driven by events, transitions and data loaded from background threats. Coding around that without any help from UI testing framework would require a lot of boilerplate. Espresso takes care of any UI events, so that in most cases you don’t have to worry about any view state transition and implementation details. The basic UI test flow when using Espresso includes:
View Matchers: To find view in the current view hierarchy for e.g. to find UI elements like buttons, textbox etc.
View Action: To perform action on the view, e.g. to click on a button, double click, scrolling etc.
View Assertions: Allows to assert state of a view.
Application of Espresso test recorder
Allows us to create effective UI test cases with user interactions.
We can capture assertions and interactions without accessing app structure directly which increases execution speed and optimizes test case.
Saves time searching for locators and then writing the test cases.
It supports multiple assertions making more reliable test cases.
Pcloudy supports androidX instrumentation with Espresso
Now you can write test cases in espresso and test the APIs in pCloudy using androidX Junit instrumentation. Here are the steps for running your Test scripts on multiple android devices:
Login over https://device.pcloudy.com with your registered Email ID & Password.
To schedule “Espresso” over pCloudy, follow the below mentioned steps-
Go to the “Automation” page.
Select the Automation tool as “Espresso”.
Select “Instrumentation Type” based on your Test Scripts you’ve written.
Note: pCloudy provides support for Instrumentation Type (InstrumentationTestRunner, AndroidJUnitRunner and AndroidXJUnitRunner) for Android.
Select the Application APK and Test APK that you must have uploaded in the MY APP/DATA section.
Select the single device execution time and assign a name to your test cycle.
In the next step, Click on “ADD” to add the device for testing and click on ”
Next”.
Click on “Schedule” to start the test.
Go to your mailbox and open pCloudy Automation Alert mail.
Click on the given link “Click to view Report”.
Now you have the result of your scheduled test automation.
How to migrate to AndroidX?
To migrate from support libraries to AndroidX the Google has provided a refractor tool in Android Studio. Projects can be migrated to AndroidX by clicking on ‘Refractor’ in the menu bar and then clicking on ‘Refactor to AndroidX’. Then it will search for the usage and show the result. To refactor click ‘Do Refactor’.
pCloudy is leading the way in the field of automated mobile testing solutions.
Single sign on is a process of authentication where user can access multiple applications and portals with one set of credentials. With SSO a user logs in with a single ID and password to gain access to a connected system. Single sign on must internally store the credentials for initial authentication and then translate them to the credential required for the different mechanisms.
SAML 2.0
SSO services uses security assertion mark-up language (SAML 2.0) which is an XML standard that facilitates the exchange of user authentication and authorization of data across secure domains. SAML simplifies the authentication and authorization process for the user, an identity provider and a service provider. When the user attempts to access an application, the service provider will send a request to identity provider for authentication.
Benefits of single sign on
SSO reduces risk for access to third party sites (user passwords not stored externally). It also alleviate password fatigue from different user name and password combinations. Reduces IT cost due to lower number of IT help desk calls about password. Reduces time spent re-entering password for the same identity.
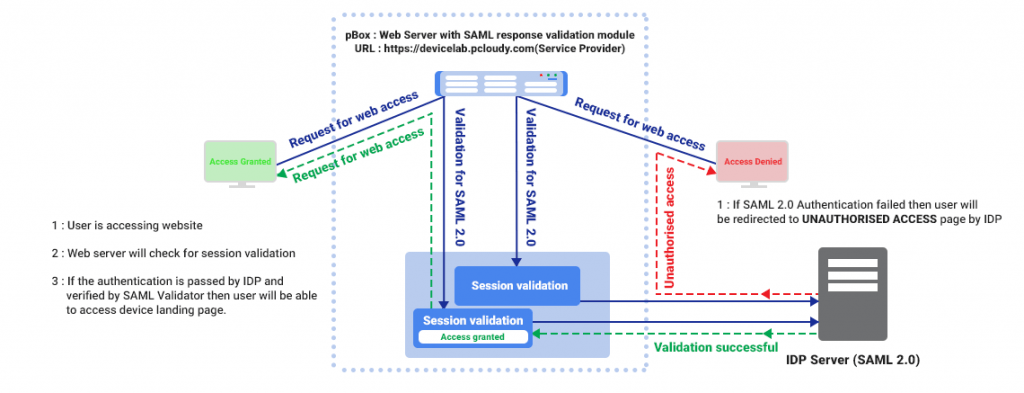
pCloudy SSO integration architecture
Sequence of events for integration of SAML 2.0 Authentication
The user attempts to reach a web application at a service provider (SP i.e pCloudy Set Up).
The service provider generates a SAML request and redirects the user to the IdP’s SSO URL with the generated request.
The IdP authenticates the user and generates a SAML response.
The user is redirected back to the SP with the SAML response.
The SP verifies the SAML response.
The user is successfully logged-in to the SP’s web application.
Note: pCloudy has included this feature in Enterprise set up Private Cloud and On-Premise Cloud.
SAML assertion
SAML assertion is the XML document that the identity provider sends to the service provider, that contains user authorization. There are Three types of SAML assertion:
Authentication assertion – It proves identification of the user and provide the time the user logged in and what method of authentication they used.
Attribute assertion – It passes the SAML attributes to the service provider. SAML attributes are specific pieces of data that provide information about the user.
Authorization decision assertion – It says if the user is authorized to use the services or if the identity provider denied the request due to password failure or lack of rights of the service.
SSO solves the problem of managing the increasing number of users across an ecosystem of application and services. It is a step forward in the optimization of pCloudy integrated architecture.